

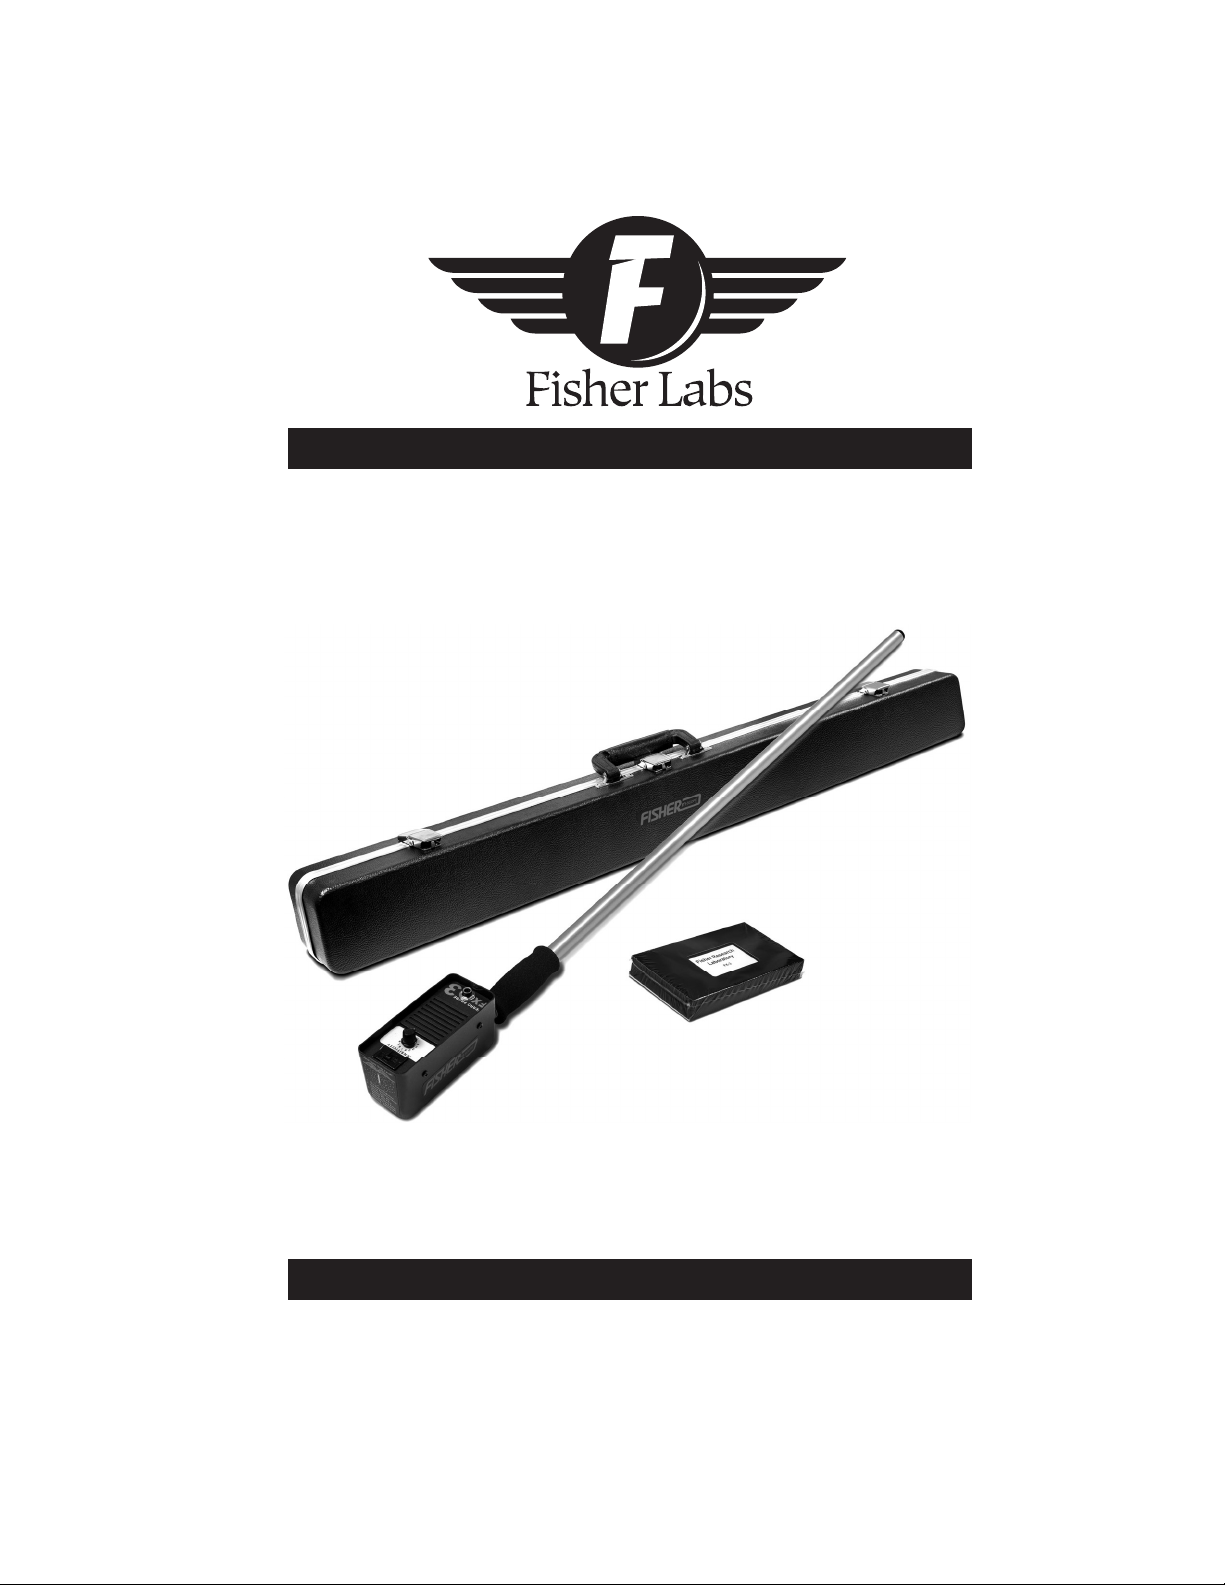
FX-3
Ferro Magnetic Probe
Operating Manual
F I S H E R R E S E A R C H L A B O R A T O R Y
Find Quality Products Online at: sales@GlobalTestSupply.com
www.GlobalTestSupply.com

CONTENTS
Introduction.............................................................................. pg. 1
Description ............................................................................... pg. 2
Turn On and Battery Test ......................................................... pg. 3
Pretest ....................................................................................... pg. 3
Searching ................................................................................. pg. 6
Normal Sensitivity................................................................. pg. 6
High Sensitivity...................................................................... pg. 6
Searching Tips ...................................................................... pg. 6
Pinpointing ............................................................................... pg. 8
Quick Pinpointing................................................................. pg. 8
Precise Pinpointing .............................................................. pg. 8
Pinpointing Tips..................................................................... pg. 9
Battery Replacemen ............................................................... pg. 10
.......................................................................... pg. 11
Headphones (not included)................................................... pg. 12
Find Quality Products Online at: sales@GlobalTestSupply.com
www.GlobalTestSupply.com

INTRODUCTION
induction magnetometer designed to locate survey markers, pipes,
valves, well casings, septic tanks and a variety of other ferromagnetic
objects. It is also used by relic and treasure hunters to seek out
buried objects far beyond the reach of ordinary metal detectors
also use it.
objects, ignoring all other materials (copper, aluminum, brass, etc.).
1.
it (or the target) is in motion.
2.
the output tone increases in volume and pitch
then momentarily disappears as it passes over the
target.
3.
purchase and less to use. Advanced solid state
techology combined with Fisher engineering has
made possible a one knob, one battery locator so
reliable that it’s backed by a 2 year warranty.
engineering has made possible a reliable one knob, one battery
locator.
Fisher Research Laboratory has been producing rugged, high
quality metal detectors longer than any company in the world. The
carefully and spend sometime practicing. Treat it as you would any
locating needs for years to come. If you have any questions, problems
or suggestions, please feel free to phone or write.
1
Find Quality Products Online at: sales@GlobalTestSupply.com
www.GlobalTestSupply.com
DESCRIPTION
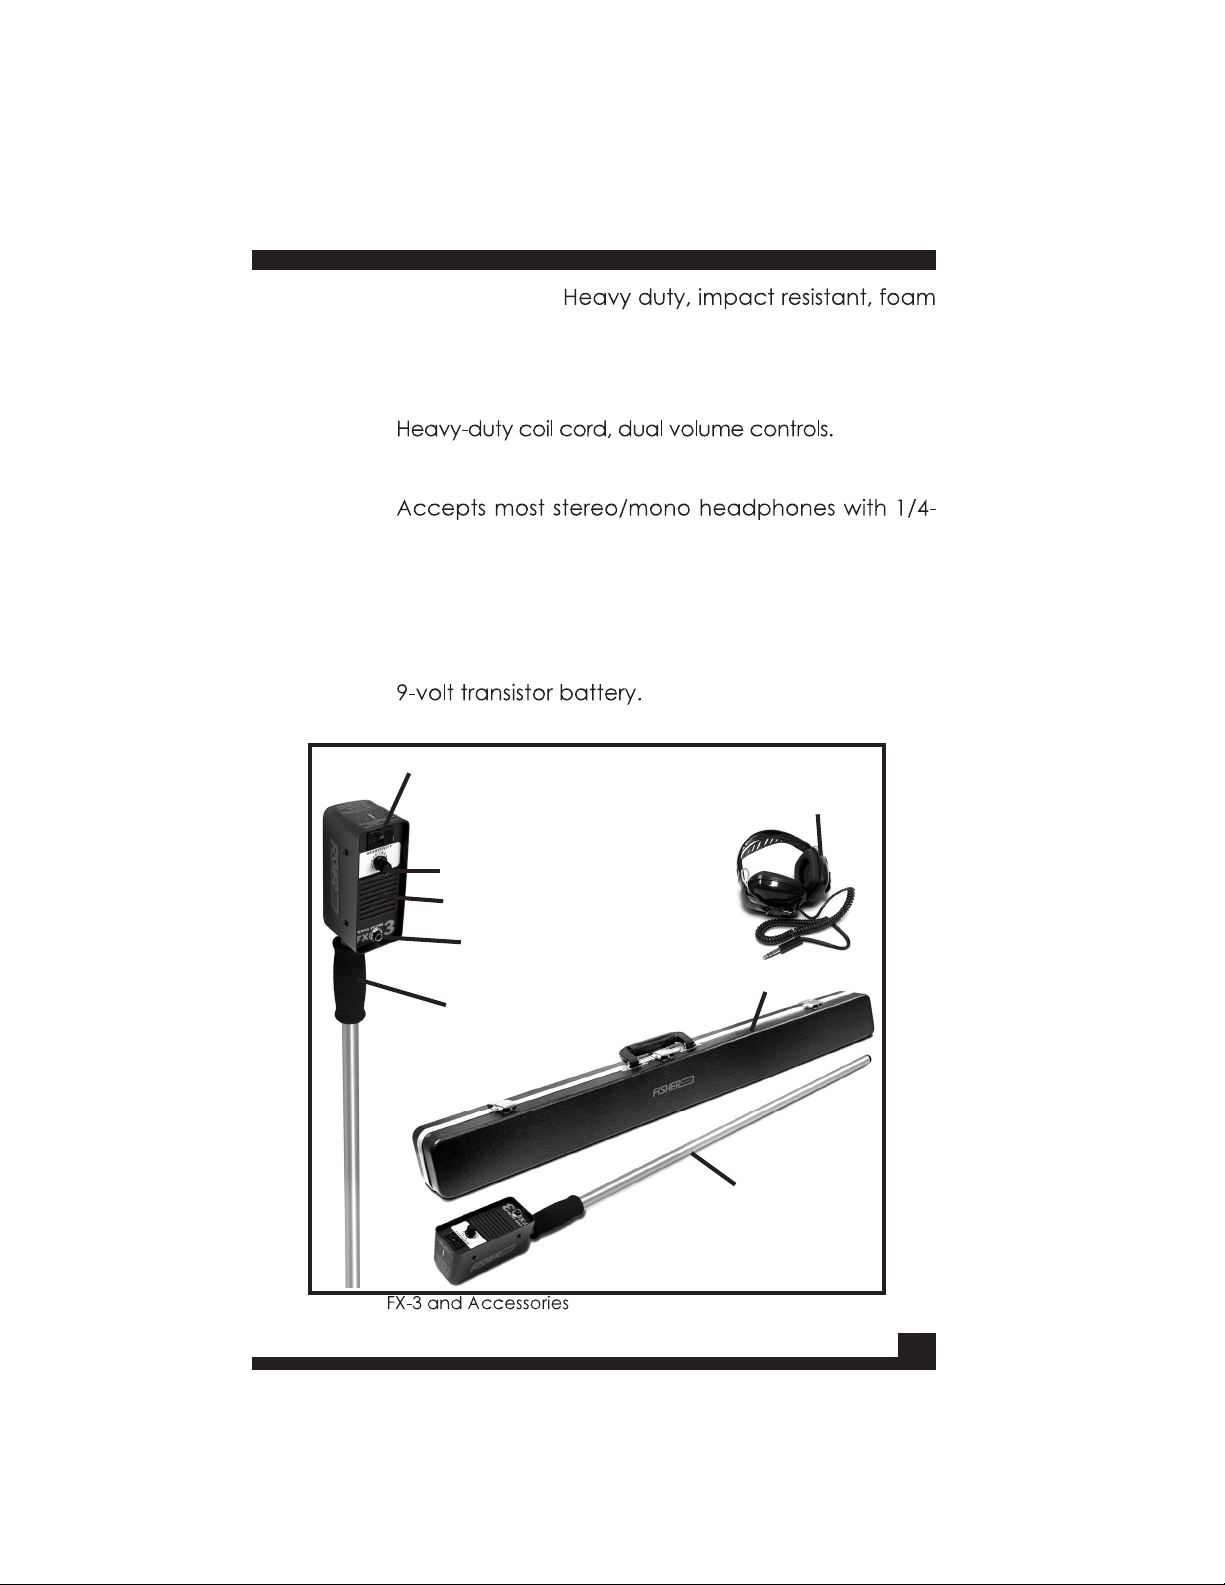
1. Carrying Case:
lined.
2. Sensor Probe: Waterproof to control housing.
3. Stereo Headphones (Optional): For use in noisy areas
or areas where you don’t want to attract attention.
4. Handle Grip
5. Headphone Jack: For optional stereo headphones.
inch plug. Speaker is automatically disconnected
when headphones are plugged in.
6. Speaker
7. On-Off/Sensitivity Control: Controls power and
sensitivity level.
8. Battery Access Panel: Remove this door to replace
Battery Access Panel
On-Off/Sensitivity Switch
Speaker
Handle Grip
Figure 1.
Stereo
Headphones
(Optional)
Headphone Jack
Carrying Case
Sensor Probe
2
Find Quality Products Online at: sales@GlobalTestSupply.com
www.GlobalTestSupply.com

TURN ON AND BATTERY TEST
1.
motionless and point it upward away from any metal
objects.
2.
3.
slow ticking indicates a dead or weak battery.
PRETEST
1. Scatter a few sample targets on the ground at least
two feet apart such as a nail, a piece of rebar and
a length of iron pipe.
2.
the handle grip with the control panel facing
downward.
3.
ground and move it slowly over the samples. As you
a solid tone increasing in volume and pitch. As the
probe tip passes directly over the target, the tone
will suddenly disappear and then return as it leaves
the target.
Figure 2.
position and search
pattern
3
Find Quality Products Online at: sales@GlobalTestSupply.com
www.GlobalTestSupply.com
PRETEST
4.
motion detector and responds only when it (or the
target) is moving.
5. Recheck the targets at different sensitivity settings
a. Sensitivity level
b. Sweep speed
c.
d. Distance between the probe tip and the target
e . A n g l e fr o m wh i c h so m e ta r g e t s a r e
approached
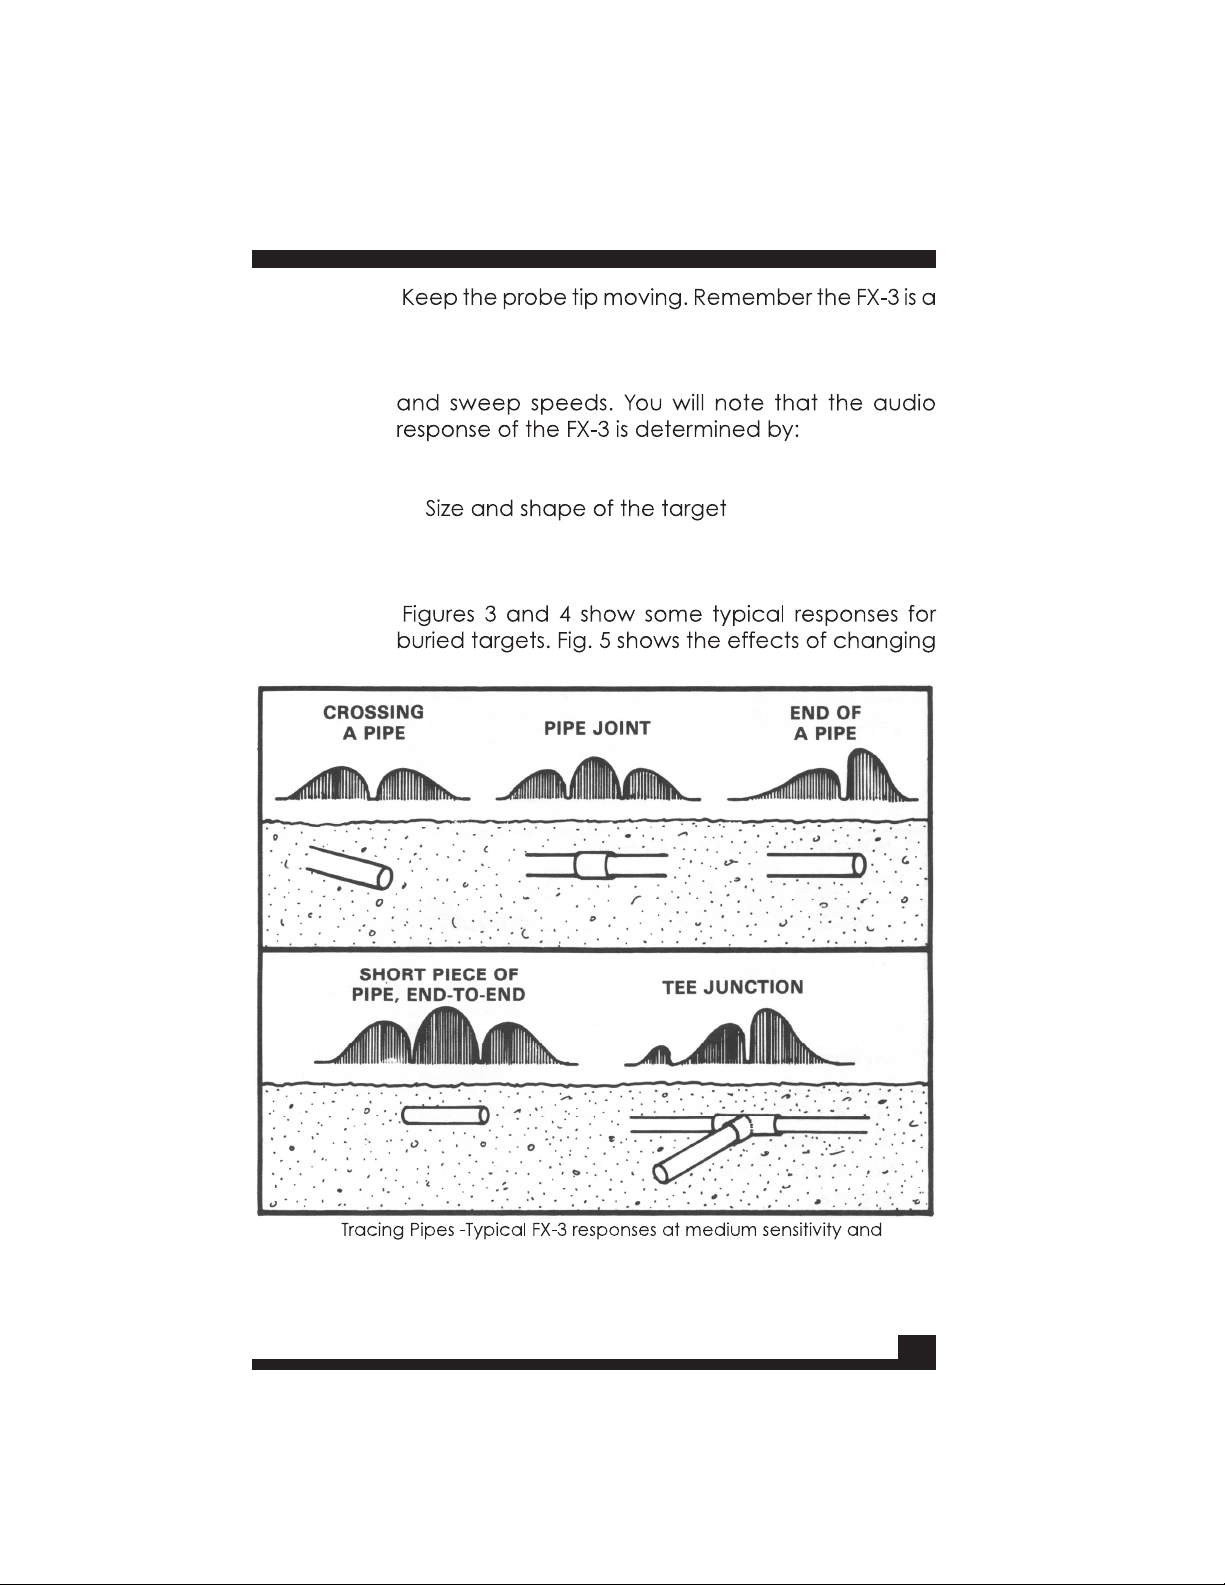
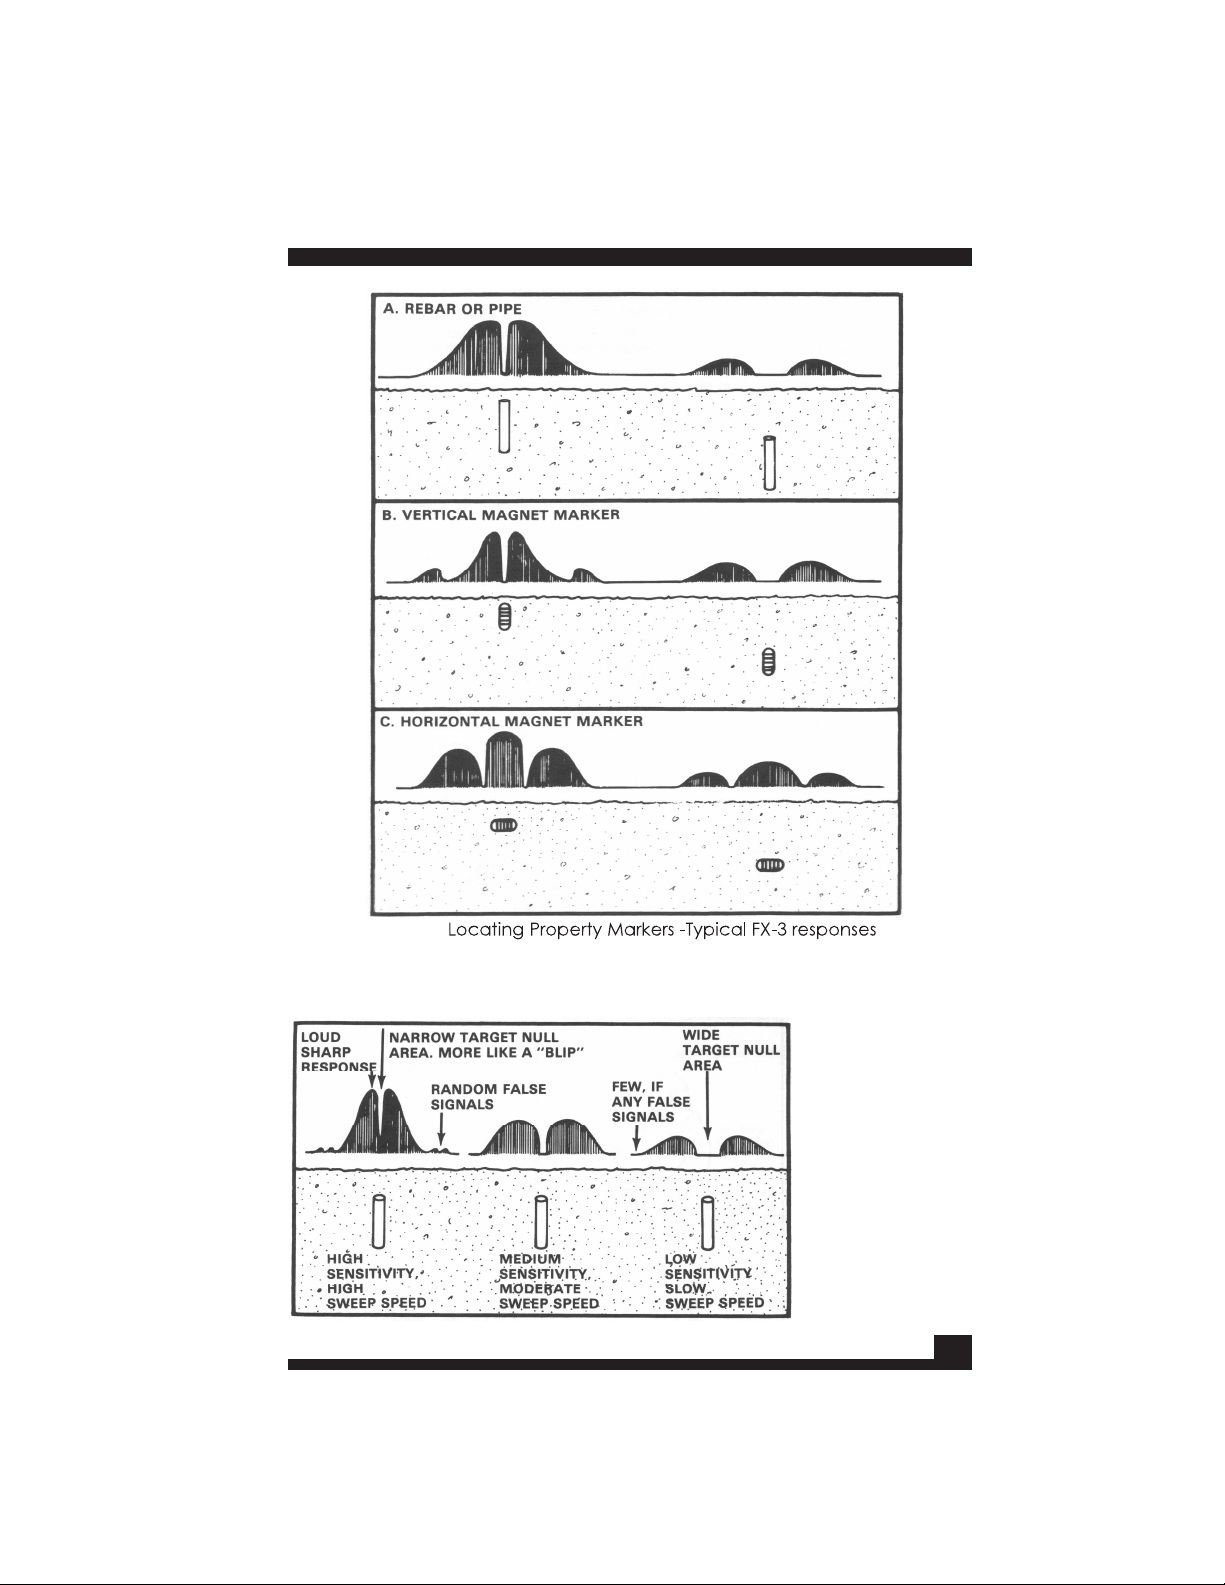
6.
Figure 3.
moderate sweep speed.
4
Find Quality Products Online at: sales@GlobalTestSupply.com
www.GlobalTestSupply.com
PRETEST
Figure 4.
at medium sensitivity and moderate sweep speed for
shallow and deep targets.
Figure 5. Reducing
sensitivity and/or
slowing down
sweep speed.
5
Find Quality Products Online at: sales@GlobalTestSupply.com
www.GlobalTestSupply.com

SEARCHING
Normal Sensitivity Search Method
1.
lower when searching for very shallow or large
objects.
2. Sweep the probe tip from side to side, holding the
3. Keep the probe tip close to the ground and keep
it moving.
4. Search in a methodical manner. Pay attention to
where you’re going and where you’ve been.
5. If you don’t locate the target, increase the sensitivity
level and repeat your search using the following
method.
High Sensitivity Search Method
This method of searching is used for very deep or small
targets.
1.
2.
on the next page) and move it slowly from side to
side. The vertical position and slower sweep speed
will reduce the number of false signals caused by
nearby ferrous objects and buried trash.
3. Keep the probe tip moving and make sure you cover
the entire search area.
Searching Tips
1.
set the sensitivity control any higher than necessary.
The higher the sensitivity level, the more false signals
you’ll receive from buried trash, nearby objects and
2. If there are large ferrous objects (autos, steel
buildings, steel fences, etc.) near the search area,
you may obtain better results by turning down the
sensitivity control, keeping the probe tip close to the
6
Find Quality Products Online at: sales@GlobalTestSupply.com
www.GlobalTestSupply.com

SEARCHING
ground, walking parallel to the object and holding
3.
is at the probe tip. To prevent false signals in the grip
a.
from ferrous belt buckles, key rings, etc.
b. Remove your watch or at least put it on your
other wrist.
c. Remove any large ferrous objects from your
person (hunting knife, tools, etc.).
4.
is extremely sensitive to the headphone speakers
Figure 6. Vertical Position
high sensitivity levels and
precise pinpointing.
7
Find Quality Products Online at: sales@GlobalTestSupply.com
www.GlobalTestSupply.com

PINPOINTING
both of the following methods.
Quick Pinpointing
1. Once the presence of a target has been indicated
by increased audio response, continue moving the
probe tip back and forth across the target area at
a slow to moderate sweep rate.
2. As the probe tip passes directly over the target (or
the point closest to the target) the audio response will
you will notice nulls over both ends.
3. Gradually narrow your search pattern around the
strongest audio response and the most pronounced
null area.
4. When you have narrowed your sweep width to
mark the spot directly below the probe tip as the
probable target location.
Precise Pinpointing
1. Once the presence of the target has been
indicated by increased audio response, hold the
2. Move the probe tip slower and slower across the
target area in a narrower and narrower search
pattern.
3. The target has been pinpointed when the search
which becomes wider as the probe tip slows down
while moving the probe tip left to right or front to back
in this area, but will sound off with a sharp increase in
tone as it moves away from the target.
8
Find Quality Products Online at: sales@GlobalTestSupply.com
www.GlobalTestSupply.com

PINPOINTING
Pinpointing Tips
1. For large or shallow targets producing a very sharp
audio response, lower the sensitivity level and/or
raise the probe tip.
2. For small or deep targets producing a faint audio
response, increase the sensitivity level, lower the
probe tip closer to the ground and/or increase your
sweep speed.
3. Practice over known buried targets.
A. Quick Pinpointing:
Keep the probe moving
at a moderate rate until
you have cen tered
the null and strongest
wide sweep pattern.
Figure 7. Pinpointing.
B. Precise Pinpointing:
and re duce s w eep
speed and/or sensitivity
until you can move the
probe t ip back and
forth and from side to
side within the target
null area.
9
Find Quality Products Online at: sales@GlobalTestSupply.com
www.GlobalTestSupply.com

BATTERY REPLACEMENT
As the battery weakens, the ticking will become slower. When the
1. Remove the hinged battery access door at the top
of the control panel.
2.
batteries.
Figure 8.
10
Find Quality Products Online at: sales@GlobalTestSupply.com
www.GlobalTestSupply.com
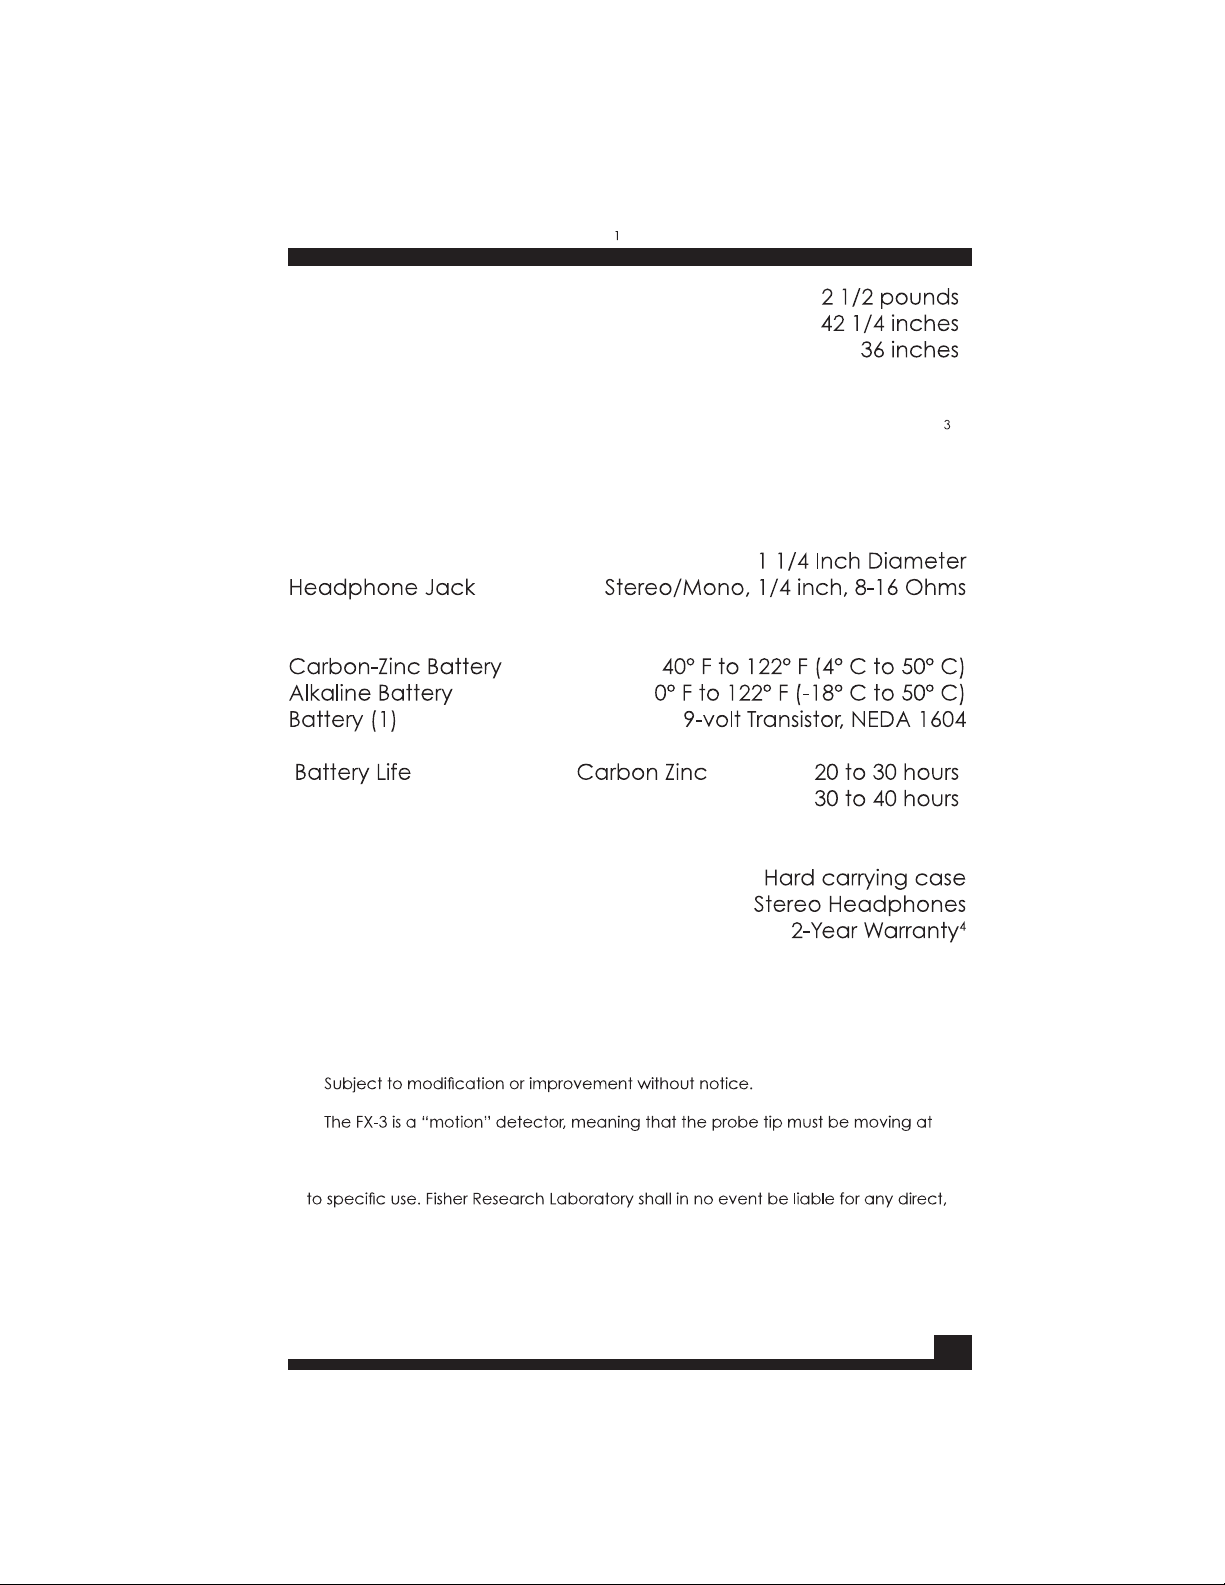
SPECIFICATIONS
Weight .........................................................................
Length .........................................................................
Waterproof Length ...........................................................
Types of Operation .........................................Differential induction
Magnetometer, VCO output, Motion Search Mode
Metals Detected ...................Ferromagnetic only (Iron and steel)
Audio ...................................................................................... Output
Target Response .....................Increasing Frequency and Volume
Speaker ............................................................
...................
Single Control ....................................................... On/Off Sensitivity
........................
................................
.............................................
.......................... ................
...............................................Alkaline ........................
Accessories
Standard Equipment .........................................
Optional Equipment ........................................
Warranty..................................................................
2
2
2
2
2
NOTES:
1.
2. Approximate.
3.
least slightly to detect a target.
4. The length and terms of the warranty will vary outside the U.S. Check with
your distributor for details. Fisher Research Laboratory does not warrant suitability
incidental, consequential or indirect damages.
11
Find Quality Products Online at: sales@GlobalTestSupply.com
www.GlobalTestSupply.com

USING HEADPHONES
Using headphones (not supplied) improves battery life, and
prevents the sounds from annoying bystanders.
It also allows you to hear subtle changes in the sound more
clearly, particularly if searching in a noisy location. For safety
other dangers are present. This device is to be used with
interconnecting cables/headphone cables shorter than three
meters.
12
Find Quality Products Online at: sales@GlobalTestSupply.com
www.GlobalTestSupply.com

Q U A L I T Y
Fisher detectors are renowned for their quality.
Each detector is hand crafted in the USA with pride
P E R F O R M A N C E
The worldwide underground utility industry relys on Fisher.
Our instruments are durable, dependable, and locate deeper.
R E P U T A T I O N
over 70 years, the Fisher logo has been a mark of excellence.
2 - YEAR LIMITE D WARRANTY
Fisher believes in the products we produce and backs this belief
with a 2 year limited warranty.
Proof of purchase is required to make a claim under this warranty.
NOTE TO CUSTOMERS OUTSIDE THE U.S.A.
This warranty may vary in other countries, check with your distributor for details.
Factory warranty follows the channel of distribution.
Warranty does not cover shipping costs.
not expressly approved by the party responsible for compliance could void
the users authority to operate this equipment.
S E R V I C E
Fisher is committed to providing you, our valued customer, with
superior service. Each and every instrument is rigidly tested
and carefully inspected during assembly and before shipment.
Should you have any questions or problems, contact:
FISHER RESEARCH LABORATORY
Find Quality Products Online at: sales@GlobalTestSupply.com
www.GlobalTestSupply.com
 Loading...