

Page 1

Instructions Instructions
C
o
m
ma
nd
Com
mand
Co
m
m
a
n
d
C
o
Comm
a
nd
C
o
m
mand
C
om
m
C
o
m
m
a
n
d
C
o
mm
and
Comm
and
Comman
d
d
an
d
Co
mma
nd
Comma
nd
Co
m
m
a
n
d
Co
Comm
a
nd
C
o
m
mand
C
om
m
C
o
m
man
d
Comm
and
C
om
m
and
C
omman
d
d
an
d
30.5 cm
12"
Watch a video of these instructions at
TM
www.pollypocket.com/wallparty
NOTE: Video in English only.
Keep these instructions for future reference as they contain important information.
Please read all instructions before beginning assembly and set-up.
You will need:
Contents:
Approximately
1’
1 foot of open
wall space
15 minutes
WARNING:
CHOKING HAZARD
– Small parts.
Not for children under 3 years.
Hangs with
®
Before applying Command® Strips:
· CAUTION: NEVER use with wallpaper. May not adhere well to vinyl surfaces.
· CAUTION: NEVER hang items over beds.
· Make sure the wall surface is clean and dry. If cleaning is necessary 3M recommends using
isopropyl rubbing alcohol. DO NOT use household cleaners.
· Apply strips to surfaces above 50°F (10°C). Adhesive could lose adhesion above 105°F (40°C).
When removing bracket from wall:
· NEVER pull strip towards you.
· NEVER press bracket against wall.
· ALWAYS hold bracket gently in place to prevent
it from hitting fingers.
· ALWAYS pull tab on Command
AND STRAIGHT DOWN WALL. Stretch at least 12
inches (30.5 cm) until bracket and strip release.
Purchase medium Command® Refill Strips to reapply to your wall.
®
Strip SLOWLY
Page 2
1
C
o
m
ma
nd
Com
mand
Co
m
m
a
n
d
C
o
Comm
a
nd
C
o
m
mand
C
om
m
C
o
m
m
a
n
d
C
o
mm
and
Comm
and
Comman
d
d
an
d
Co
mma
nd
Comma
nd
Co
m
m
a
n
d
Co
Comm
a
nd
C
o
m
mand
C
om
m
C
o
m
man
d
Comm
and
C
om
m
and
C
omman
d
d
an
d
l
a PARED
d
e
la
do d
e
l
a
P
ARE
WALL
side
WAL
Coté MUR
Coté MU
de la
P
ARED
lado
WALL side WALL
Coté M
U
R
C
oté MU
R
é
MUR
lado de la PA
W
A
LL s
id
e WALL si
Comma
S
Command
Strip
Com
Command
Strips
Command
Strips
Command
Strips
Command
St
ri
ps
i
ps
omm
t
Comma
S
Command
Strip
Com
Command
Strips
Command
Strips
Command
Strips
Command
St
ri
ps
i
ps
omm
t
Comma
S
Command
Strip
Com
Command
Strips
Command
Strips
Command
Strips
Command
St
ri
ps
i
ps
omm
t
l
a PARED
lado de l
d
e
WALLside
U
R
lado de la PARE
side
WAL
C
oté M
UR
Coté
M
U
Co
t
é MUR
lado de la PARED
lado
WALL side WALL
Coté MUR
Coté M
U
RCo
t
é
MUR
lado de la PA
WALL side WALL si
30.5 cm
12"
30.5 cm
12"
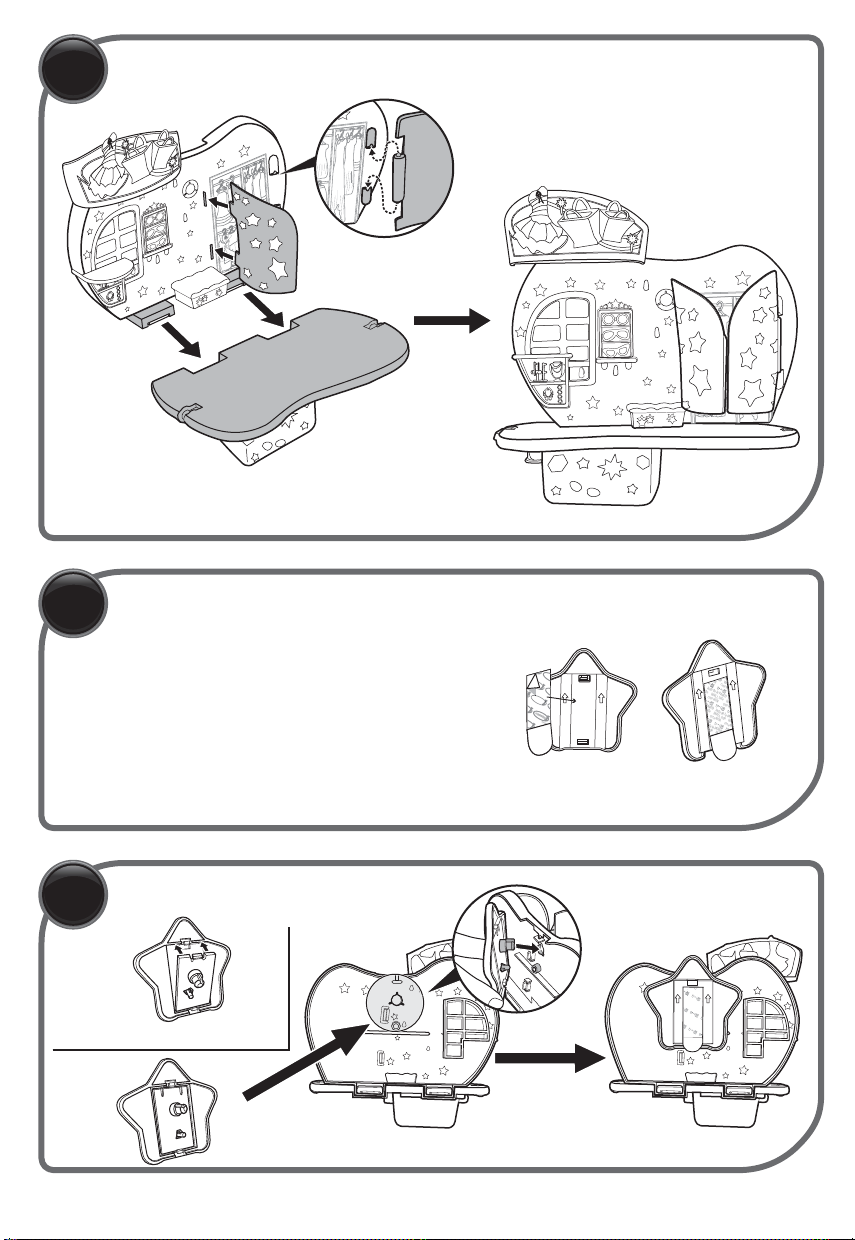
Assemble the Playset
2
Apply Command® Strips
Separate strips. Remove red-printed liner
from one Command
of bracket as shown. Make sure the strip tab
is accessible for future removal.
NOTE: DO NOT PULL BRACKET OFF WALL without reading
removal instructions.
3
Attach Bracket
Reattach in case of detaching.Reattach in case of detaching.
Red Printing = On Bracket
®
Strip and apply to back
Black Printing = On Wall
Rear View Rear View
Page 3

4
C
o
m
ma
nd
Com
mand
Co
m
m
a
n
d
C
o
Comm
a
nd
C
o
m
mand
C
om
m
C
o
m
m
a
n
d
C
o
mm
and
Comm
and
Comman
d
d
an
d
Co
mma
nd
Comma
nd
Co
m
m
a
n
d
Co
Comm
a
nd
C
o
m
mand
C
om
m
C
o
m
man
d
Comm
and
C
om
m
and
C
omman
d
d
an
d
30.5 cm
12"
Hang Playset on Wall
1. Remove black-printed liner from Command® Strip.
2. Position playset level against the wall at a suitable height for your child.
3. Press bracket firmly onto wall and hold for 30 seconds.
NOTE: For optimal adhesion performance, 3M recommends waiting 1 hour before adding weight
to Command
®
Strips.
Press
firmly for
30
seconds
5
Connect with other Wall Party
™
Playsets (sold separately)
1. Attach zip line to playset on wall.
2. Follow Steps 1-3 on the other Wall Party
3. Attach zip line to other Wall Party
™
playset.
™
playset instructions.
4. Position other playset to desired location, level against the wall.
5. Press playset firmly onto wall and hold for 30 seconds.
6. Connect all playsets together to create your own Wall Party
™
!
Connects to
ALL
Wall Party
playsets!
™
Page 4

6
C
o
m
ma
nd
Com
mand
Co
m
m
a
n
d
C
o
Comm
a
nd
C
o
m
mand
C
om
m
C
o
m
m
a
n
d
C
o
mm
and
Comm
and
Comman
d
d
an
d
Co
mma
nd
Comma
nd
Co
m
m
a
n
d
Co
Comm
a
nd
C
o
m
mand
C
om
m
C
o
m
man
d
Comm
and
C
om
m
and
C
omman
d
d
an
d
30.5 cm
12"
30.5 cm
12"
How to Play
Open
for
storage!
NOTE: For best results, apply suction cups on smooth area and clean suction cups with water periodically.
7
Reattaching & Removal
1. Mounting plates are designed to break
away from the set without causing surface damage.
2. To remove bracket from the wall entirely:
a. NEVER pull strip towards you.
b. Hold bracket gently to prevent it from
snapping fingers. DO NOT press against wall.
c. Grab tab on Command
®
Strip and
SLOWLY STRETCH STRAIGHT DOWN ALONG
WALL AT LEAST 12 INCHES until bracket and
strip release.
3. Purchase medium Command
®
Refill Strips to
reapply to your wall.
Command® Strips are a product of 3M. For further information visit command.com
®
NOTE: Apply strips to surfaces above 50°F (10°C).
Adhesive could lose adhesion above 105°F (40°C).
CAUTION:
DO NOT use with wallpaper. May not adhere well to vinyl surfaces.
DO NOT hang items over beds.
3M and Command are trademarks of 3M.
© 3M 2012. All Rights Reserved.
©2012 Mattel and/or Origin Products Ltd. All Rights Reserved. Mattel, Inc., 636 Girard Avenue, East
Aurora, NY 14052, U.S.A. 1-800-524-8697. Mattel Australia Pty. Ltd., Richmond, Victoria. 3121.
Consumer Advisory Service - 1300 135 312. Mattel East Asia Ltd., Room 1106, South Tower, World
Finance Centre, Harbour City, Tsimshatsui, HK, China. Diimport & Diedarkan Oleh: Mattel SEA Ptd Ltd.
(993532-P) Lot 13.5, Menara Lien Hoe, Persiaran Tropicana Golf Country Resort, 47410 PJ. Tel:
03-78803817, Fax: 03-78803867.
service.mattel.com
Y6435-0920
 Loading...