

Page 1
ON
OFF
BATTERY SAVE MODE
If Cranky is not played with for more than
20 minutes, he will automatically shut-off
to preserve battery life.
To resume play, set the ON/OFF switch on
Cranky’s cab to OFF and then ON again to
resume play.
BATTERY INSTALLATION
Unscrew and lift cover away from products.
Install battery as indicated inside the
battery compartment.
For longer life use only alkaline batteries.
Requires 6 “AA” (LR6), 1”C” (LR14) and
5 “AAA” (LR03) batteries.
If this toy begins to operate erratically,
you may need to reset the electronics.
Remove the batteries from the toy and
replace it.
Do not connect to more than the
recommended number of power supplies.
Required tool:
Phillips screwdriver (not included)
BATTERY SAFETY INFORMATION
In exceptional circumstances batteries may leak fluids
that can cause a chemical burn injury or ruin your toy
(product). To avoid battery leakage:
• Non-rechargeable batteries are not to be recharged.
• Rechargeable batteries are to be removed from the
product before being charged (if designed to be
removable).
• Rechargeable batteries are only to be charged under
adult supervision (if designed to be removable).
• Do not mix alkaline, standard (carbon-zinc), or
rechargeable (nickel-cadmium) batteries.
• Do not mix old and new batteries.
• Only batteries of the same or equivalent type as
recommended are to be used.
• Batteries are to be inserted with the correct polarity.
• Exhausted batteries are to be removed from the
product.
• The supply terminals are not to be short-circuited.
• Dispose of battery(ies) safely.
• Do not dispose of this product in a fire.
The batteries inside may explode or leak.
This equipment has been tested and found to comply with the limits for a Class B digital device, pursuant to part
15 of the FCC rules. These limits are designed to provide reasonable protection against harmful interference in a
residential installation. This equipment generates, uses and can radiate radio frequency energy and, if not installed
and used in accordance with the instructions, may cause harmful interference to radio communications. However,
there is no guarantee that interference will not occur in a particular installation. If this equipment does cause
harmful interference to radio or television reception, which can be determined by turning the equipment off and
on, the user is encouraged to try to correct the interference by one or more of the following measures:
Reorient or relocate the receiving antenna. Increase the separation between the equipment and receiver.
Connect the equipment into an outlet on a circuit different from that to which the receiver is connected.
Consult the dealer or an experienced radio/TV technician for help.
NOTE: Changes or modifications not expressively approved by the manufacturer responsible for compliance
could void the user’s authority to operate the equipment.
This device complies with part 15 of the FCC Rules. Operation is subject to the following two conditions:
(1) This device may not cause harmful interference, and
(2) this device must accept any interference received, including interference that may cause undesired operation.
• This Category II radio communication device complies with Industry Canada Standard RSS-310.
• Ce dispositif de radiocommunication de catégorie II respecte la norme CNR-310 d’Industrie Canada.
• Operation is subject to the following two conditions: (1) this device may not cause interference, and (2) this
device must accept any interference, including interference that may cause undesired operation of the device.
• L’utilisation de ce produit est sujette aux conditions suivantes : (1) il ne doit pas produire de brouillage et
(2) il doit pouvoir tolérer tout brouillage reçu, même si ce brouillage est susceptible de compromettre
son fonctionnement.
TM
INSTRUCTIONS
Please keep these instructions for future reference as they contain important information.
Flynn Cranky
1,5V x 1
“AA” (LR6)
ON OFF
Thomas
1,5V x 1
“AA” (LR6)
Diesel
1,5V x 1
“C” (LR14)
OFF
ON
OFF
ON
1,5V x 4
“AA” (LR6)
Remote
Control
1,5V x 3
“AAA” (LR03)
Searchlight
1,5V x 2
“AAA” (LR03)
CAUTION:
To prevent entanglement,
keep hair away from wheels.
OFF
ON
ID.V7026-0920
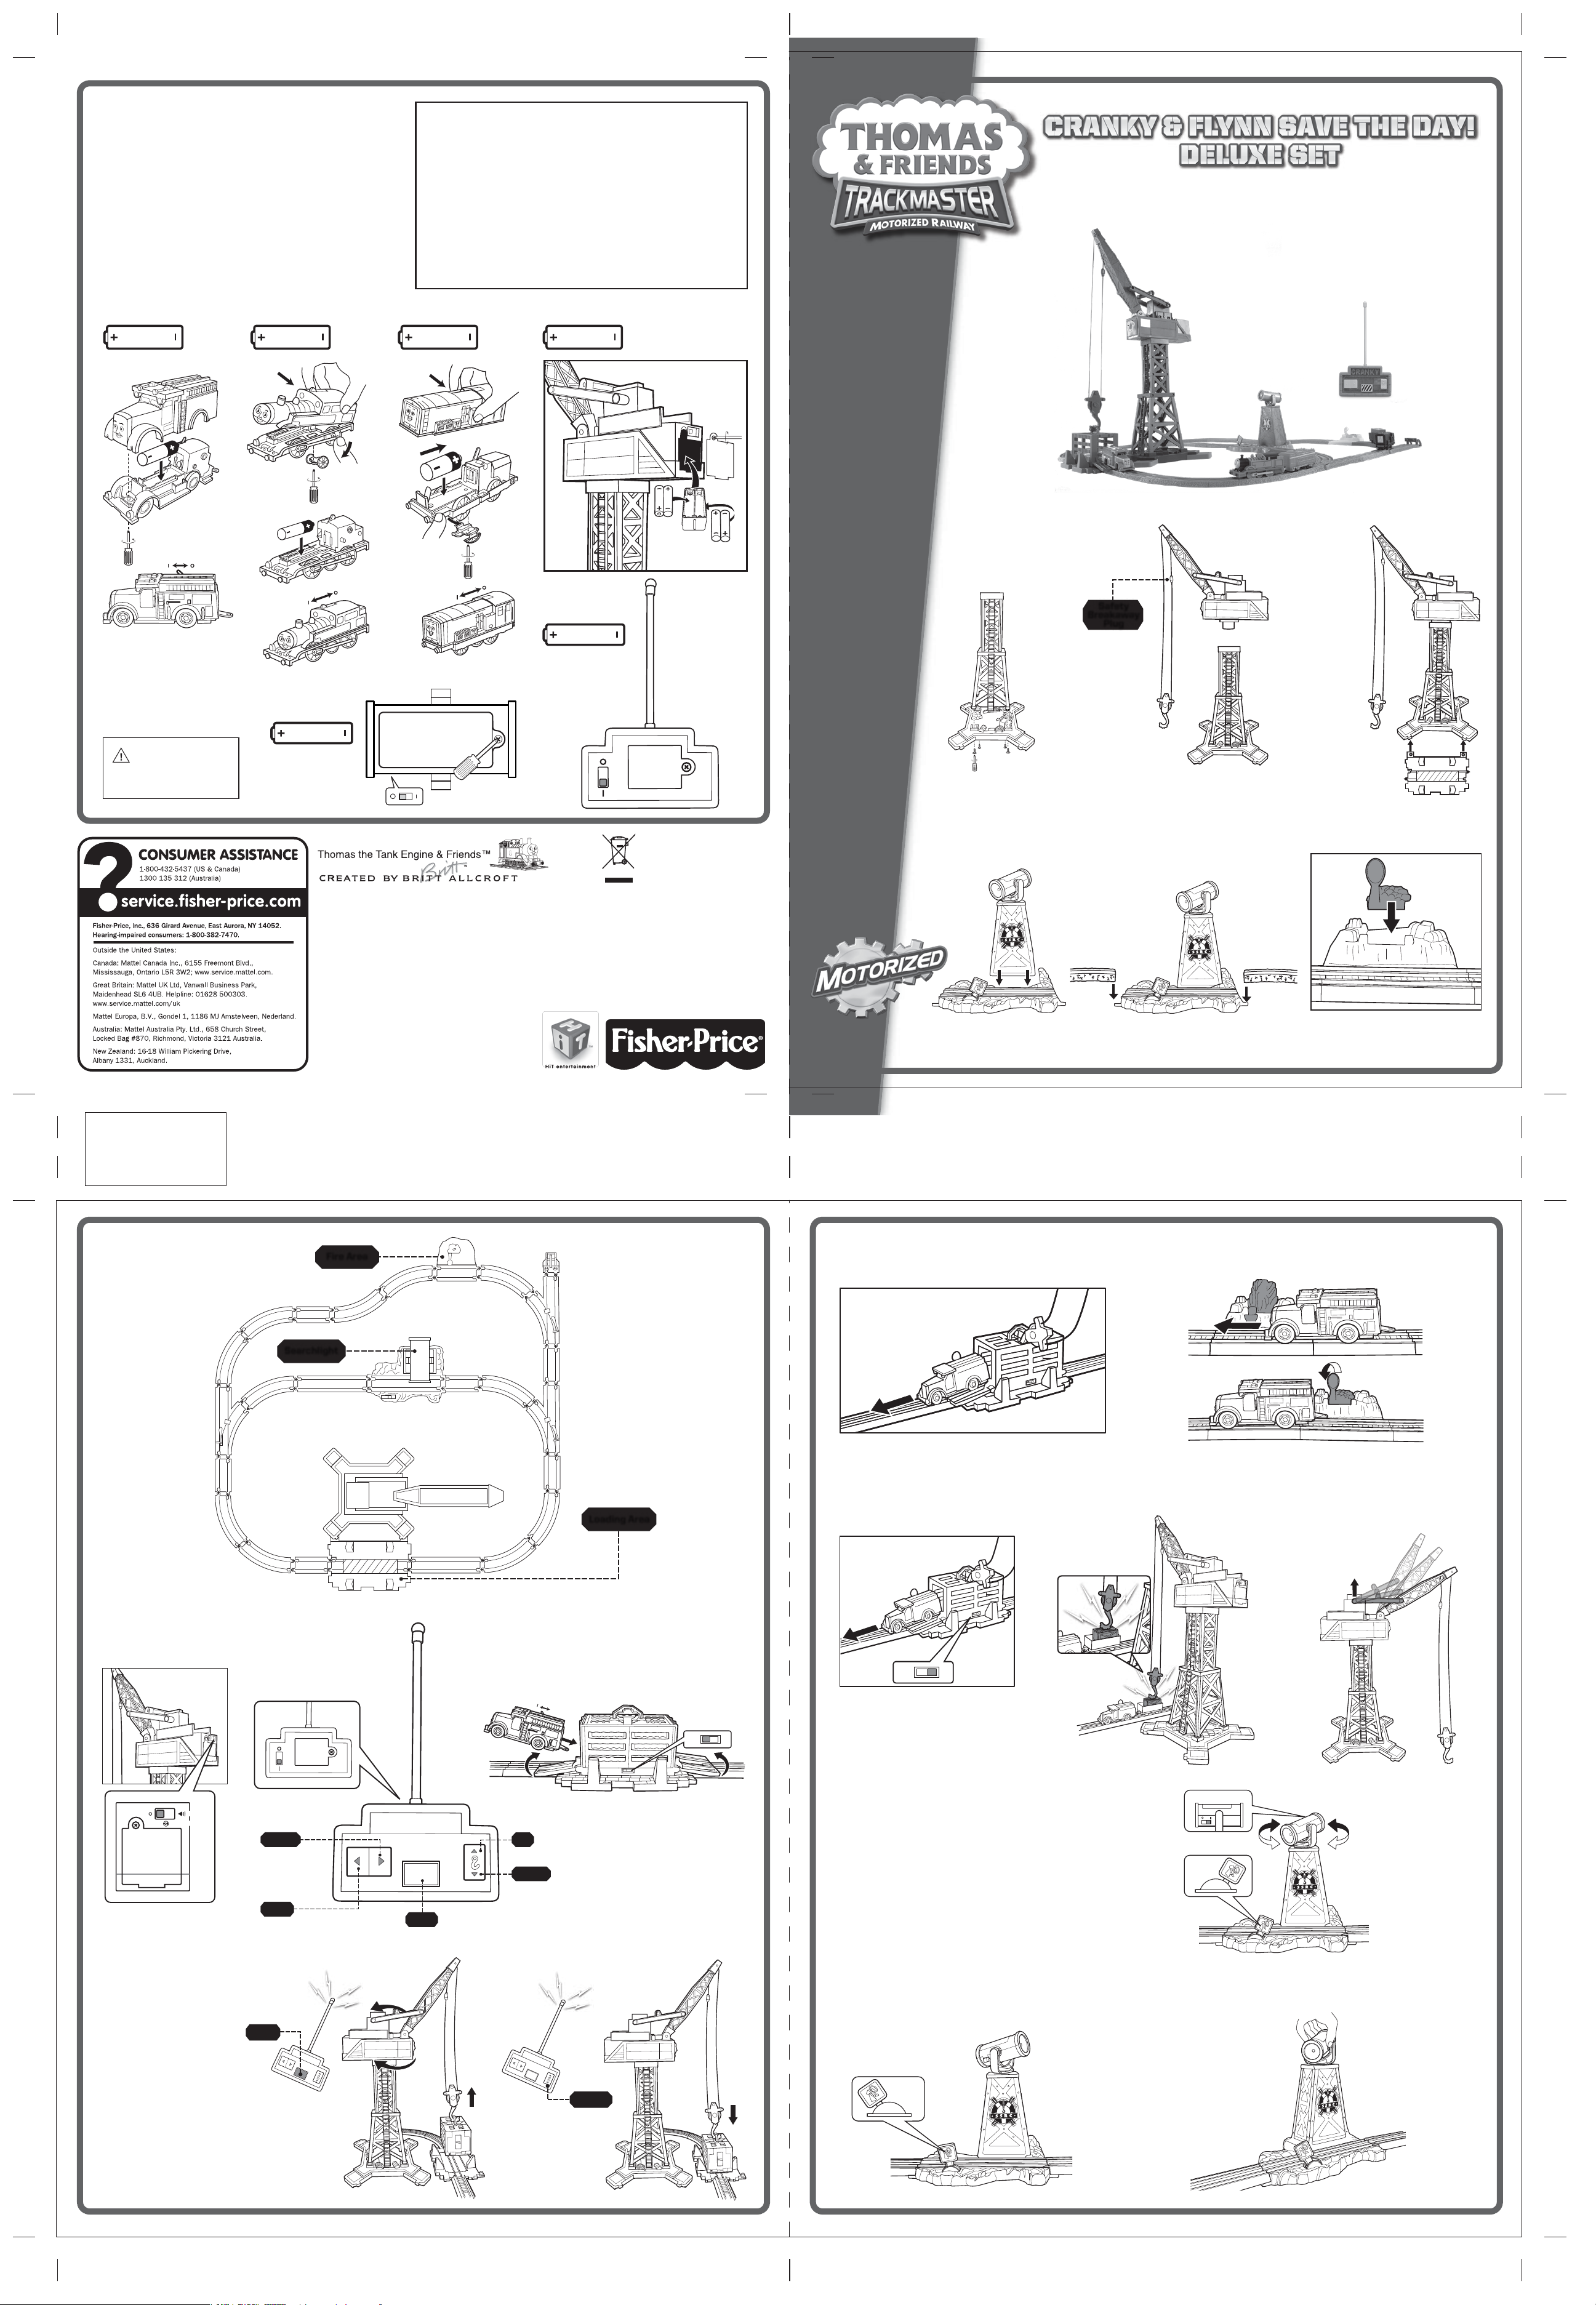
Assembly
Cranky
1. Assemble the
tower to the base
using the (4)
screws (included).
Searchlight
1. Attach the searchlight to
the base, as shown.
Once these pieces are
snapped together, they
cannot be taken apart.
2. Snap the cab
onto the tower.
Safety
Breakaway
Plug
NOTE:
This is a one
time snap.
Once the cab
is assembled
to the tower,
it cannot be
taken apart.
2. Attach the base to the
track, as shown in the
track layout.
3. Assemble the
base to the
Loading Area,
aligning the two
plugs found on
the track to the
pegs found on
the base.
Fire Area
Item No : V7026-9020
Version : EL
Size : 16.54" x 11.69" (A3)
Paper : Woodfree paper 80 gsm
Color : Black
Date : April 11, 2011 (Ivy)
Track Layout
Based on the Railway Series by The Reverend W Awdry.
© 2011 Gullane (Thomas) Limited.
Thomas the Tank Engine & Friends and
Thomas & Friends are trademarks of Gullane (Thomas) Limited
© HIT Entertainment Limited.
HIT and the HIT logo are trademarks of HIT Entertainment Limited.
Fisher-Price, Inc., a subsidiary of Mattel, Inc.,
East Aurora, NY 14052 U.S.A.
PRINTED IN CHINA. Manufactured for Fisher-Price.
© 2011 Mattel, Inc. All Rights Reserved.
® and ™ designate U.S. trademarks of Mattel, Inc.,
unless otherwise indicated.
Mattel East Asia Ltd., Room 1106,
South Tower,World Finance Centre,
Harbour City, Tsimshatsui, HK, China.
Fire Area
Protect the environment by not
disposing of this product with
household waste (2002/96/EC).
Check your local authority for
recycling advice and facilities.
V7026
ADULT ASSEMBLY REQUIRED.
5. When the crate is lowered onto the base, the doors
will open and Flynn will drive out of the crate and
onto the tracks.
Phillips screwdriver required (not included).
6. As Flynn races by the fire he will knock over the flame tab
and “put out the fire”!
How To Play
Cranky
1. Be sure the ON/OFF
switch on the crane is in
the ON position.
Searchlight
2. Be sure the ON/OFF switch
on the remote is in the ON
position. Now you control
Cranky with the remote!
NOTE: Adults should remove
& discard rubber bands
holding tracks together.
Loading Area
3. Place the crate on the Loading Area with the cargo
doors OPEN. Set the switch on the crate to the
STOP position. Place “Flynn” on the track and set
his switch to the ON position. Flynn drives into the
rear end of the crate, stopping inside the crate.
ON
7. As Flynn continues on the track he
can either drive through the crate if
the switch is set to GO or re-load into
the crate if the switch is set to STOP.
STOP GO
8. You can also load and unload the
small cargo crate using the magnet
found at the end of Cranky’s hook.
9. Manually raise and lower the angle
of the crane arm using the tabs on
the side of Cranky’s cab. For your
safety, always remove the crate from
the hook before adjusting the crane
arm angle.
NORMAL
OFF
NOTE: If you wish to play
with Cranky without sound,
set the switch to NO SOUND.
NORMAL
NO SOUND
NO SOUND
RIGHT
- rotates Cranky's
cab counter
clockwise
LEFT
- rotates Cranky's
cab clockwise
4. Close the crate doors and use the remote
to pick up the crate with Cranky's hook.
Once the crate is
raised, use the remote
control to turn Cranky
Left and Right.
When you want to
LOAD
load Flynn onto the
tracks, line the crate
up with the loading
area and lower it onto
the loading surface.
LOAD
- aligns Cranky with
the Loading Area
STOP
UP
- raises the crane hook
DOWN
- lowers the crane hook
NOTE: For best results, make sure the
remote is no further than 5 feet (1.5 m) away
from Cranky while playing. Be sure to point
the remote directly at Cranky with nothing in
between Cranky and the remote.
DOWN
GO
Searchlight
1. Set the switch on top of the searchlight to the
ON
ON position to turn on the light.
2. Set the brake lever to the STOP position. As the
engine approaches, the brake switch will cause
it to stop in front of the searchlight.
STOP
3. While the engine is stopped in front of the
searchlight, the wheels of the engine will power
the searchlight to spin around.
4. Set the brake lever to the GO position to send
the engine on its way around the track.
5. You can point and shine the searchlight manually when the engine is
not powering it. Set the switch to the GO position. Do not touch the
spinning searchlight while the engine is powering it.
GO
NOTE: At any time
you can press the
LOAD button on the
remote to utomatically
align Cranky with the
Loading Area.
Lower the crate to
the Loading Area
using the remote
to control Cranky.
 Loading...