

Page 1
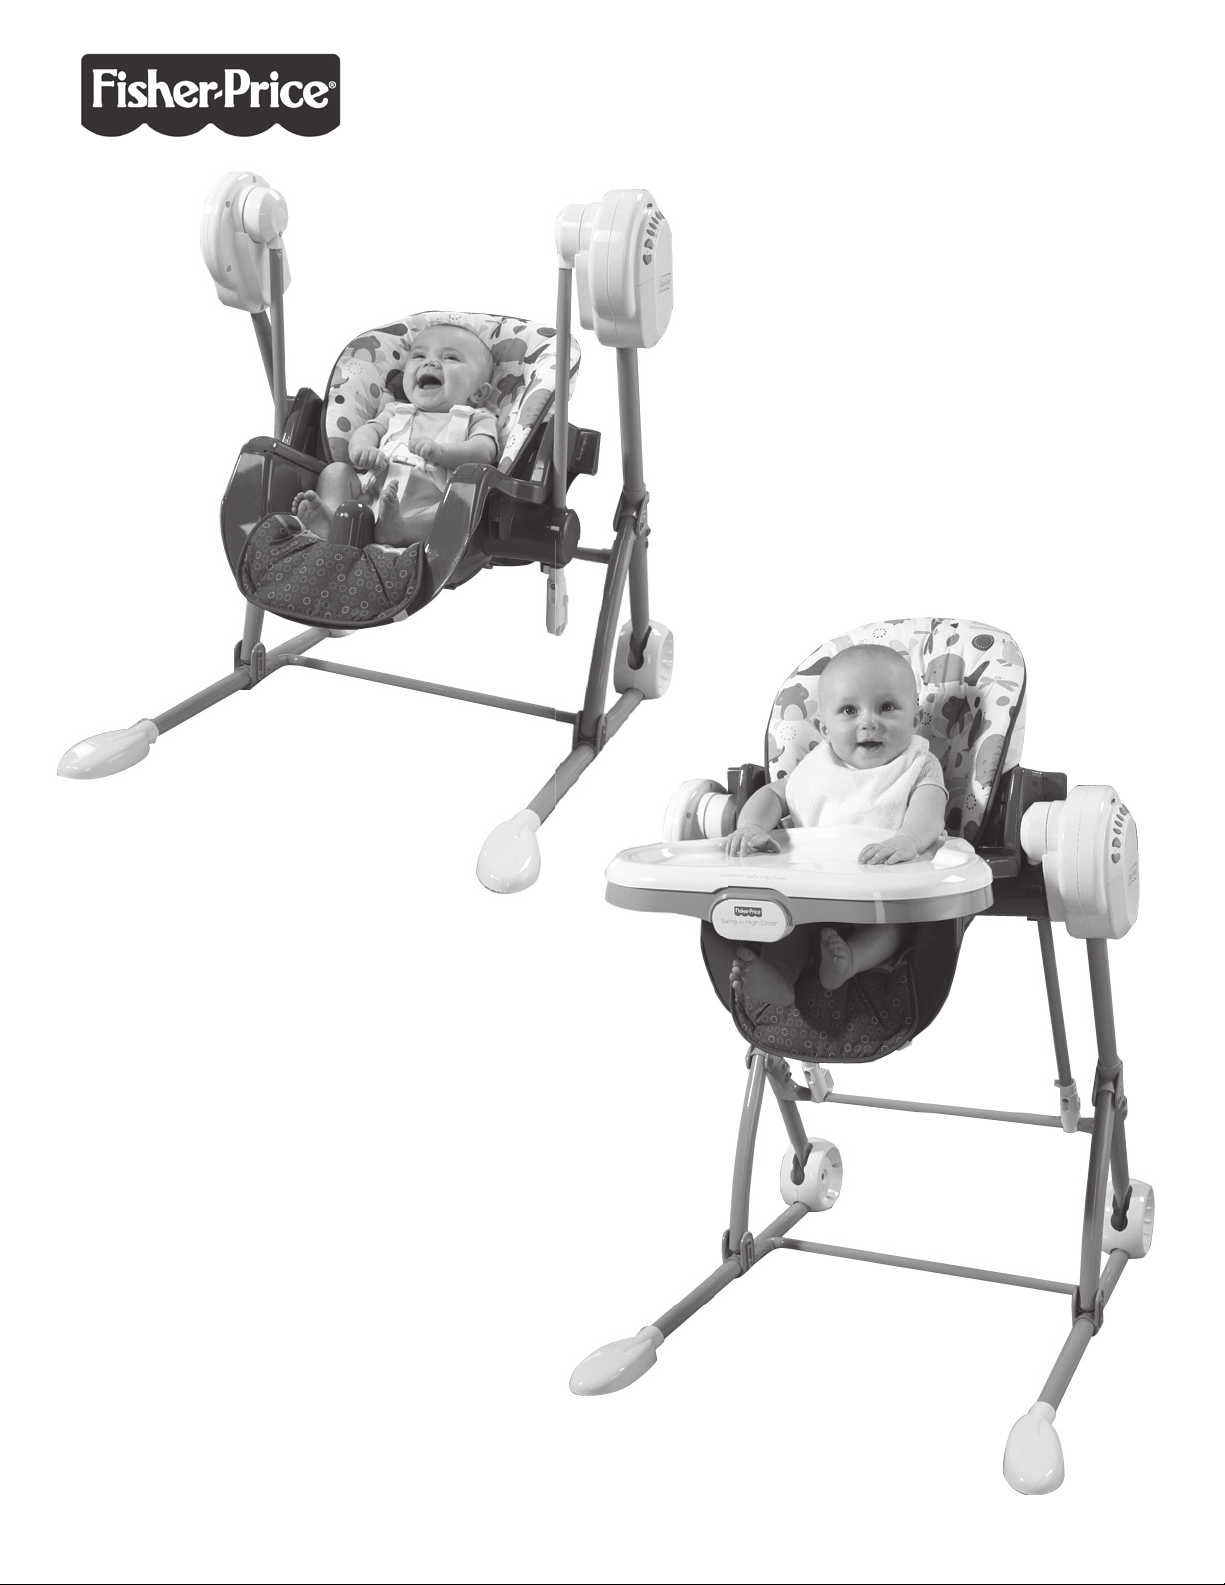
T2684
Swing
High Chair
www.fi sher-price.com
Page 2
Consumer Information
Swing
• Weight limit: 25 lbs (11,3 kg).
• If your child weighs less than 25 lbs (11,3 kg), but is really active and appears to be able to climb out
of the swing, immediately discontinue its use.
WARNING
To prevent injury or death from falls and being strangled in the restraint system:
• Always use the restraint system. Never use the tray to restrain child.
• Never use with an active child who may be able to climb out of the swing.
• Never leave child unattended.
• Never convert to high chair with child in product.
High Chair
• Weight limit: 50 lbs (22,6 kg).
WARNING
Prevent serious injury or death from falls or sliding out.
• The child should be secured in the high chair at all times by the restraint system,
either in the reclining or upright position. The restraint belts must be adjusted to t
your child snugly. The tray is not designed to hold the child in the chair.
• Only use as a high chair when child is capable of sitting up unassisted.
• Never leave child unattended.
• Never convert to swing with child in product.
2
Page 3

Consumer Information
CAUTION
This package contains small parts
in its unassembled state. For adult
assembly only.
• IMPORTANT! Please keep these instructions for future reference.
• Please read these instructions before assembly and use of
this product.
• Adult assembly is required.
• Tools required for assembly: Phillips screwdriver (not included)
and Allen wrench (included).
• Requires four “D” (LR20) alkaline batteries for swing operation,
sounds and music. Batteries not included.
• Product features and decoration may vary from photographs.
FCC Statement (United States Only)
This equipment has been tested and found to comply with the limits
for a Class B digital device, pursuant to Part 15 of the FCC Rules.
These limits are designed to provide reasonable protection against
harmful interference in a residential installation. This equipment
generates, uses and can radiate radio frequency energy and, if not
installed and used in accordance with the instructions, may cause
harmful interference to radio communications. However, there is no
guarantee that interference will not occur in a particular installation. If
this equipment does cause harmful interference to radio or television
reception, which can be determined by turning the equipment off and
on, the user is encouraged to try to correct the interference by one or
more of the following measures:
• Reorient or relocate the receiving antenna.
• Increase the separation between the equipment and receiver.
• Consult the dealer or an experienced radio/TV technician for help.
Note: Changes or modifications not expressly approved by the manu-
facturer responsible for compliance could void the user’s authority to
operate the equipment.
This device complies with Part 15 of the FCC Rules. Operation is
subject to the following two conditions: (1) this device may not cause
harmful interference and (2) this device must accept any interference
received, including interference that may cause undesired operation.
ICES-003
This Class B digital apparatus complies with Canadian ICES-003.
Operation is subject to the following two conditions: (1) this device
may not cause harmful interference and (2) this device must accept
any interference received, including interference that may cause
undesired operation.
NMB-003
Cet appareil numérique de la classe B est conforme à la norme
NMB-003 du Canada.L’utilisation de ce dispositif est autorisée seulement aux conditions suivantes : (1) il ne doit pas produire de brouillage
et (2) l’utilisateur du dispositif doit être prêt à accepter tout brouillage
radioélectrique reçu, même si ce brouillage est susceptible de
compromettre le fonctionnement du dispositif.
3
Page 4
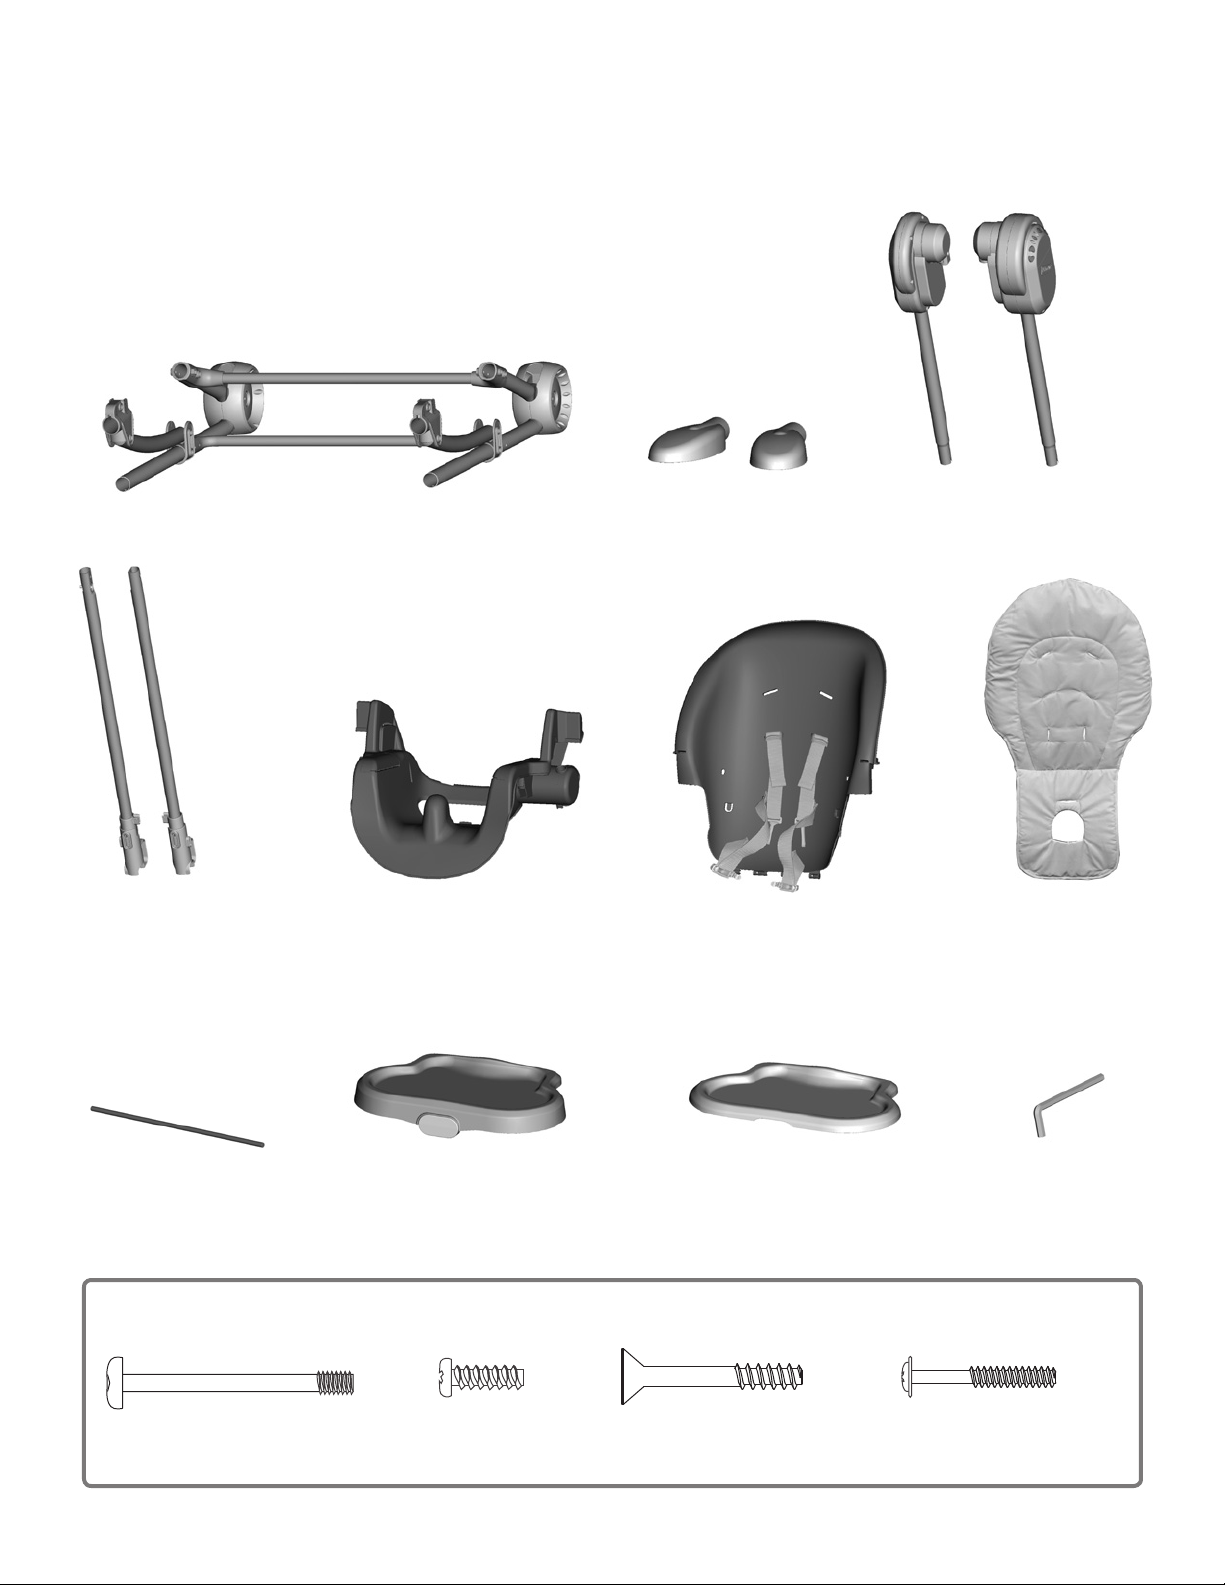
Parts
IMPORTANT! Please remove all parts from the package and identify them before assembly. Some parts may be packed in the pad.
2 Seat Tubes
(Left and Right)
Frame
Seat Bottom
2 Feet
(Left and Right)
Seat Back
2 Upper Frame Tubes
(Left and Right)
Pad
Hinge Rod
Note: Tighten or loosen all screws with the Allen wrench or a Phillips screwdriver. Do not over-tighten.
M5 x 38.5 mm Screw - 2
Tray
M4.5 x 12 mm Screw - 3
All Shown Actual Size
M5 x 32 mm Screw - 2
4
Tray Insert
Allen Wrench
M3.5 x 25 mm Washer Head Screw - 2
Page 5
Assembly
IMPORTANT! Before assembly and each use, inspect this product for
damaged hardware, loose joints, missing parts or sharp edges. DO
NOT use if any parts are missing or broken. Contact Fisher-Price® for
replacement parts and instructions if needed. Never substitute parts.
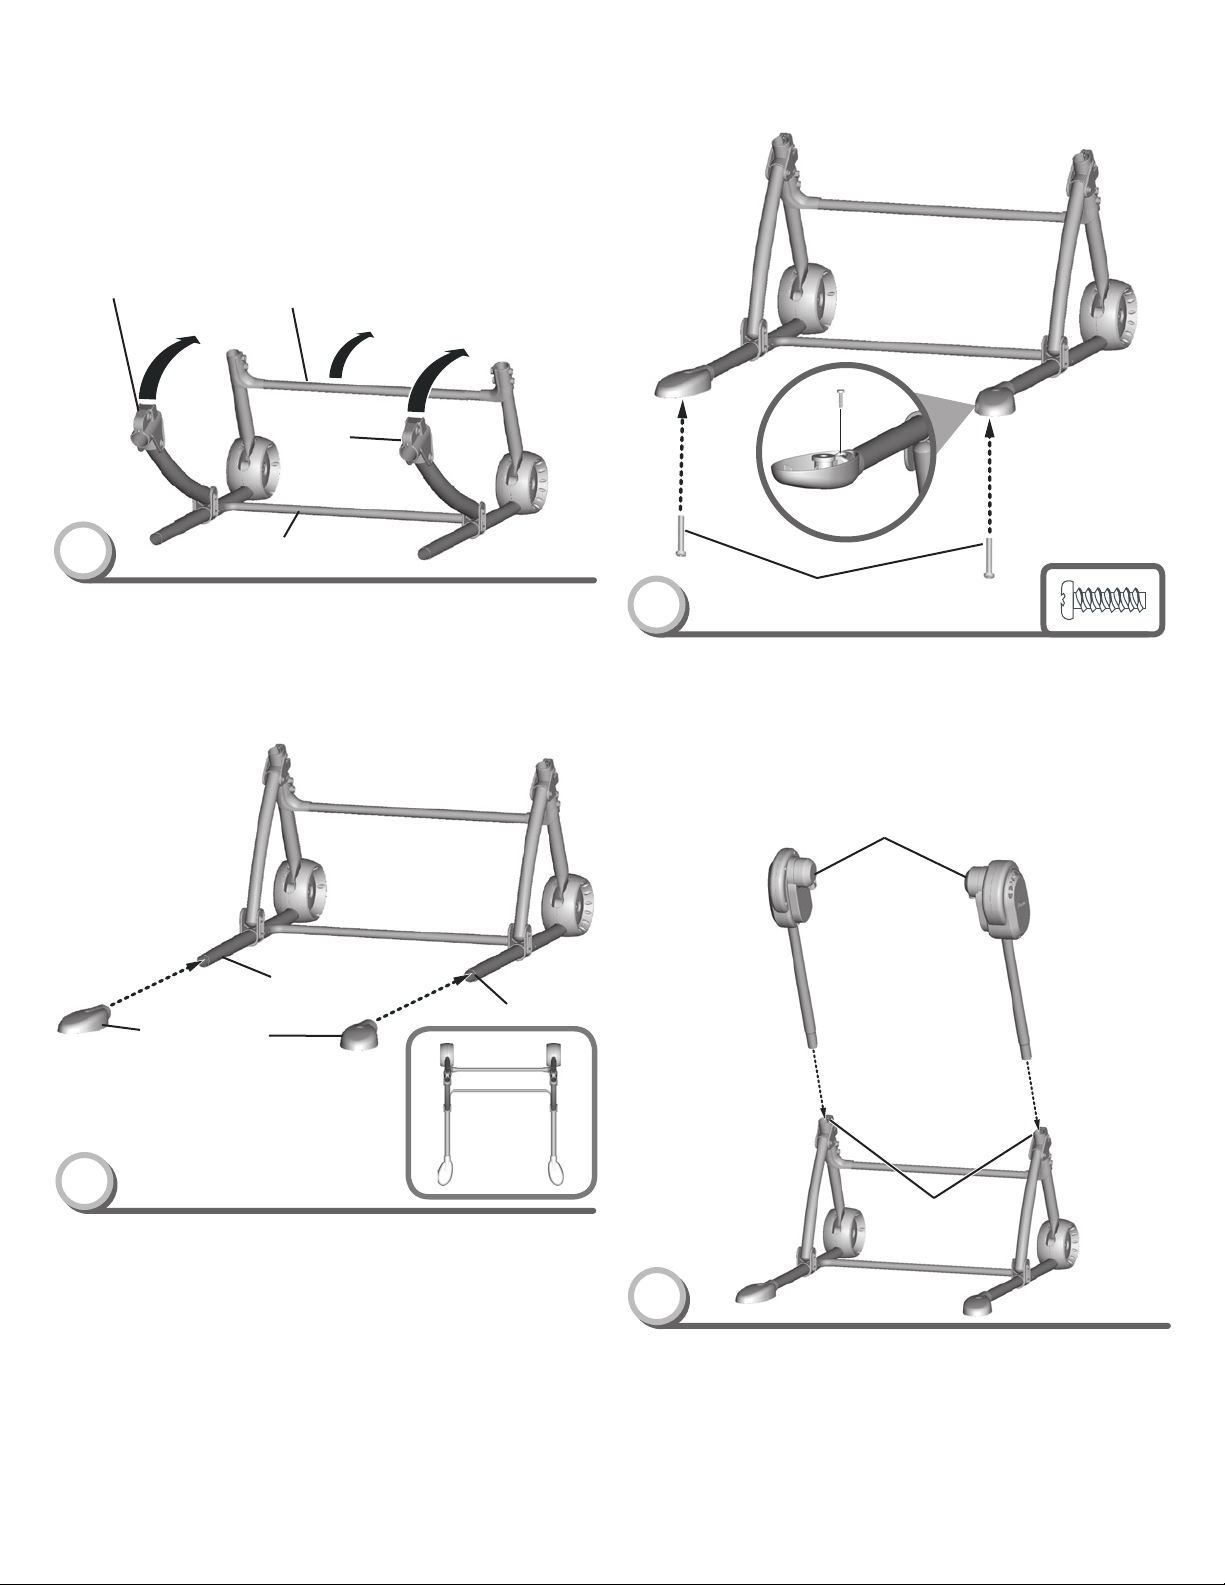
Front Tube
1
• Lift the rear and front tubes to open the frame.
Rear Tubes
Front
Tube
Frame
BOTTOM
VIEW
3
• Insert an M4.5 x 12 mm screw into the hole in the underside of
each foot and tighten with a Phillips screwdriver.
2 - M4.5 x 12 mm
Screws
Upper Frame Tube Hubs
Base Tube
Foot
Foot
2
• Fit a foot onto the end of each base tube, as shown.
Hint: Make sure the feet curve outward.
Base Tube
TOP VIEW
Rear Frame Tubes
4
• Position the upper frame tubes so that the hubs face each other.
• Fit the upper frame tubes into the rear frame tubes.
Hint: The upper frame tubes are designed to fit one way. If they do
not seem to fit, turn them around and try again.
5
Page 6
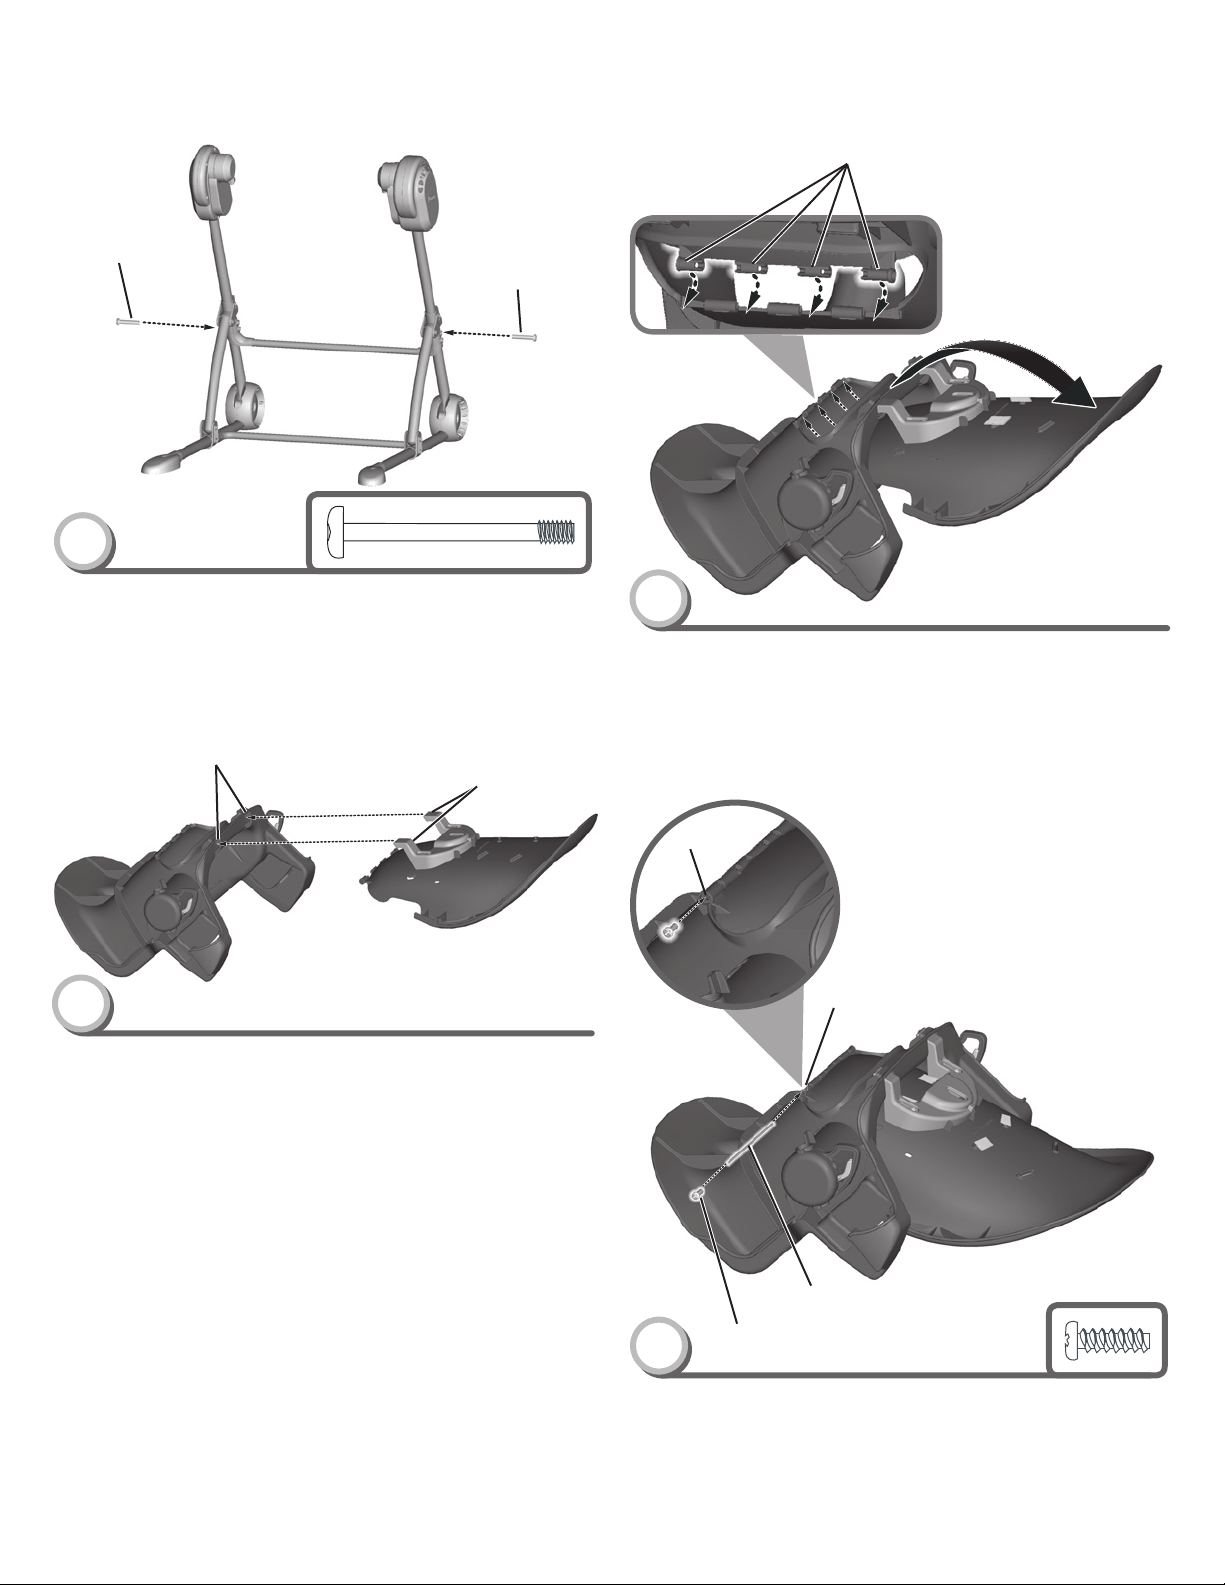
M5 x 38.5 mm
Screw
5
Assembly
Seat Back Tabs
M5 x 38.5 mm
Screw
• Insert an M5 x 38.5 mm screw into each side of the frame. Fully
tighten the screws with the Allen wrench.
Seat Bottom
Upper Slots
Seat Back
Recline Posts
6
• Position the seat bottom face down on a flat surface.
• With the seat back also face down, fit the recline posts into the
upper slots in the seat bottom.
7
• Push the seat back down to fit the tabs on the edge of the seat
back to the tabs on the seat bottom.
Hinge Rod
Hinge
Hinge Rod
M4.5 x 12 mm
8
• Insert the hinge rod through the hinge on the seat bottom.
• Insert an M4.5 x 12 mm screw into the hinge rod. Tighten the
screw with a Phillips screwdriver.
Screw
6
Page 7

Hole
Assembly
M3.5 x 25 mm
Screw
Armrest
Armrest
9
• Insert an M3.5 x 25 mm washer head screw into the hole under
each armrest. Tighten the screws with a Phillips screwdriver.
M3.5 x 25 mm
Screw
Lever
Seat Hub
Seat Hub
Seat Tubes
Notch
Tab
11
Lever
Lever
10
• Press the seat height adjustment levers on each side of the seat.
• While continuing to press the seat height adjustment levers, slide a
seat tube up through the socket in each seat hub.
Hint: One of the seat tubes includes a tab. Match this seat tube with
the socket that has a notch.
7
Page 8

Frame Tube Hubs
Assembly
Latches
12
• Fit the ends of the seat tubes up into the holes in each frame
tube hub.
Hint: You may need the help of another adult to hold the seat
assembly in place.
BACK VIEW
2 M5 x 32 mm
Screws
Tabs
14
• First lift, and then lower the latches onto the crossbar.
Elastic
Loops
Crossbar
Pad
Holes
13
Note: Do not attach the seat tubes to the frame crossbar in this
assembly step.
• While holding the seat assembly in place, insert an M5 x 32 mm
screw into the hole in each frame tube hub. Tighten the screws
with the Allen wrench.
15
• Insert both elastic loops on the pad through the holes in the
seat back.
FRONT VIEW
8
Page 9

Assembly
Elastic Loops
Tabs
16
• From the back of the seat, hook the elastic loops to the tabs on
the seat back.
BACK VIEW
Waist Belts
Lowest Slots
18
Large Slot
Crotch Belt
17
• From the front of the seat, insert the crotch belt up through the
large slot in the pad. Make sure the crotch belt is not twisted.
FRONT VIEW
• Insert the waist belts through the lowest slots in the seat pad.
Shoulder Belts
19
• Insert the shoulder belts through the slots in the pad.
Hint: The shoulder belts are assembled to the seat back in the lower
shoulder belt slots. If you would like to change to the upper slots, go
to page 12, Changing Shoulder Belt Slots.
9
Page 10

Assembly
Pad Pocket
20
• Fit the pocket at the top of the pad over the seat back.
SIDE VIEW
Battery Installation
1,5V x 4
“D” (LR20)
Seat Back
• Locate the battery compartment door on the frame.
• Loosen the screws in the battery compartment door with a
Phillips screwdriver.
• Insert four “D” (LR20) alkaline batteries.
Hint: We recommend using alkaline batteries for longer battery life.
• Replace the battery compartment door and tighten the screws. Do
not over-tighten.
• If this product begins to operate erratically, you may need to reset
the electronics. Slide the power switch off and then back on.
• When motion from the swing becomes slow or stops, replace
the batteries.
• Protect the environment by not disposing of this product with
household waste (2002/96/EC). Check your local authority for
recycling advice and facilities (Europe only).
Clips
Seat Bottom
21
• Fit both clips on the bottom edge of the pad around the edge of
the seat bottom.
Battery Safety Information
In exceptional circumstances, batteries may leak fluids that
can cause a chemical burn injury or ruin your product. To avoid
battery leakage:
• Do not mix old and new batteries or batteries of different types:
alkaline, standard (carbon-zinc) or rechargeable (nickel-cadmium).
• Insert batteries as indicated inside the battery compartment.
• Remove batteries during long periods of non-use. Always remove
exhausted batteries from the product. Dispose of batteries safely.
Do not dispose of this product in a fire. The batteries inside may
explode or leak.
• Never short-circuit the battery terminals.
• Use only batteries of the same or equivalent type, as recommended.
• Do not charge non-rechargeable batteries.
• Remove rechargeable batteries from the product before charging.
• If removable, rechargeable batteries are used, they are only to be
charged under adult supervision.
10
Page 11

Securing Your Child
Waist/Shoulder
Belt
Waist/Shoulder
Belt
Crotch Belt
1
• Place your child in the seat. Position the crotch belt between
your child’s legs.
• Slide the ends of the shoulder belts onto the ends of the
waist belts.
• Fasten both waist/shoulder belts to each side of the crotch belt.
Make sure you hear a "click" on both sides.
• Check to be sure the restraint system is securely attached
by pulling it away from your child. The restraint system should
remain attached.
Anchored End
Free End
3
To tighten the waist belts:
• Feed the anchored end of the waist belt up through the buckle to
form a loop
procedure to tighten the other waist belt.
To loosen the waist belts:
• Feed the free end of the waist belt up through the buckle to form a
loop
the buckle. Pull the anchored end of the waist belt to shorten the
free end of the waist belt
other waist belt.
A
. Pull the free end of the waist belt
A
. Enlarge the loop by pulling on the end of the loop toward
Anchored End
Free End
LOOSENTIGHTEN
B
. Repeat this
B
. Repeat this procedure to loosen the
2
• Tighten each waist belt and shoulder belt so that the restraint
system is snug against your child. Please refer to the next section
for instructions to tighten the belts.
Hold
Adjuster
Slide
Adjuster
4
To tighten the shoulder belts:
• Hold the adjuster and pull the front shoulder strap down.
To loosen the shoulder belts:
• Slide the adjuster down.
TIGHTEN
LOOSEN
11
Page 12

Changing Shoulder Belt Slots
Upper Slots
Lower Slots
1
• Use the lower shoulder belt slots for a smaller child and the upper
shoulder belt slots for a larger child.
Shoulder Belt
Shoulder Belt
Shoulder Belts
3
• From the front of the seat, pull the shoulder belts out and then fit
them back through the desired shoulder belt slots in the seat pad
and the seat back.
• Pull on the belts to be sure they are secure in the seat back.
FRONT VIEW
2
• Unbuckle the restraint system.
• From the back of the seat, push the shoulder belts through the
seat back slots.
BACK VIEW
12
Page 13

Convert to High Chair
Lever
WARNING
Never convert to high chair with child
in product.
Latches
1
• From the back of the seat, lift both latches.
BACK SIDE VIEW
3
• Fit the latches onto the crossbar and push into place. Push down
on the seat to be sure it is locked in place.
Lever Lever
BACK VIEW
Lever
Crossbar
2
• While lifting the latches, pull the seat back toward the crossbar.
4
IMPORTANT! Do not raise the seat height unless the seat is locked
to the crossbar.
• Press the levers on both seat height adjusters and lift or lower the
seat to any of three different heights.
• Make sure both sides of the seat are adjusted to the same height.
• Push on the seat to be sure it is locked in place.
13
Page 14

High Chair Use
Hint: Before use, thoroughly wash all parts (the trays) that may contact food. The tray is not dishwasher safe.
WARNING
Prevent serious injury or death from
falls or sliding out.
• The child should be secured in the
high chair at all times by the restraint
system, either in the reclining or
upright position. The restraint belts
must be adjusted to t your child
snugly. The tray is not designed to
hold the child in the chair.
• Only use as a high chair when child is
capable of sitting up unassisted.
• Never leave child unattended.
Armrests
Tray
1
• Fit the tray onto the seat armrests. Slide the tray into place.
Release Button
FRONT VIEW
2
• While pushing the release button on the front of the tray, adjust the
tray forward or backward.
14
Page 15

Tray Insert
High Chair Use
3
• Fit the tray insert into the tray, as shown.
Hint: The tray insert is not microwave safe.
• To remove the tray insert, place your finger in the notch and lift.
Release Button
5
Adjust Seat Position
• Lift the lever on the back of the seat back and push the seat back
forward or, pull it backwards to insert the tabs into the desired set
of slots. Use the front slots for the upright position and the back
slots for the recline position.
• Release the lever to secure the tabs in the desired set of slots.
• Push the seat back to be sure it is latched in position.
SIDE VIEW
4
• While pushing the release button on the front of the tray, pull the
tray towards you and remove.
15
Page 16

Lever
High Chair Use
Sound Select
Buttons
Volume
Buttons
Power
Switch
6
Adjust Seat Height
• While pressing the lever on each seat height adjuster, lift or lower
the seat to the desired height.
• Push down on the seat to be sure it is secure.
SIDE VIEW
7
Music and Sounds
• Slide the power switch ON
• Press the sound select buttons for music and other soothing sounds.
• Press the volume buttons to adjust the volume level.
Hint: The swing will not work when in high chair mode.
• Slide the power switch to to turn to sounds and music OFF.
.
•
16
Page 17

Never convert to swing with child
in product.
Release Button
Convert to Swing
WARNING
Latches
3
1
• While pushing the release button on the front of the tray, pull the
tray towards you and remove.
FRONT VIEW
PRESS
Lever
PRESS
IMPORTANT! The seat must be completely lowered before using
the latches.
• Lift the latches on the back of the seat.
2
• Press the lever on each seat height adjuster and completely lower
the seat.
BACK VIEW
4
• Push the seat forward and release the latches.
SIDE VIEW
17
Page 18

WARNING
To prevent injury or death from
falls and being strangled in the
restraint system:
• Always use the restraint system.
Never use the tray to restrain child.
• Never use with an active child who
may be able to climb out of the swing.
• Never leave child unattended.
Swing Use
Sound Select
Buttons
Volume
Buttons
Swing Speed
Buttons
Power
Switch
5
• For best performance, do not use the tray when using as a swing.
• Slide the power switch ON
• Press the swing speed buttons to adjust the speed to the desired
swing motion setting.
• Give the seat a light push to start the swinging motion.
Hints:
- After turning on power, this product may not swing unless there is
a child in the seat.
- As with most battery-power swings, a heavier child will reduce the
amount of swinging motion on all settings. In most cases, the low
setting works best for a smaller child while the higher setting works
best for a heavier child.
- If swinging stops while using a lower setting, try a higher setting.
Give the seat a light push to start the swinging motion again.
• Press the sound select buttons for music and other
soothing sounds.
• Press the volume buttons to adjust the volume level.
• When finished, slide the power switch OFF .
.
•
18
Page 19

Upper
Frame
Tube
Frame
Release
Button
Storage
Frame
Release
Button
Upper
Frame
Tube
Care
• The restraint system, frame and trays may be wiped clean using a
mild cleaning solution and a damp cloth.
• The tray insert is also top rack dishwasher safe (or use bottom
rack - without using the drying cycle).
• The pad is machine washable. Wash in cold water on the gentle
cycle. Do not use bleach. Tumble dry separately on low heat and
remove promptly.
To remove the pad:
• Remove the elastic loops from the pegs on the underside and back
of the seat.
• Unfasten the pad hooks from the front edge of the seat.
• Pull the restraint belts through the slots in the pad.
• Lift the top of the pad off of the seat back.
• To replace the pad, refer to the assembly section of
these instructions.
IMPORTANT! Never use this product without the restraint system.
1
• While holding the upper frame tubes, press the frame
release buttons.
BACK VIEW
2
• Slowly and carefully lower the upper frame towards the floor.
SIDE VIEW
19
Page 20

International Packaging & Instructions
& limited space US Packaging
Power Wheels Packaging
& Instructions
CONSU
MER ASSISTAN
CE
1-800-348-0751 (US & Canada)
Fisher-Price, Inc., 636 Girard Avenue, East Aurora, NY 14052.
Hearing-impaired consumers: 1-800-382-7470.
BabyGear Instructions
CONS
ASSISTANC
A
CONS
S
Fisher-Price, Inc., 636 Girard Avenue, East Aurora, NY 14052.
Hearing-impaired consumers/Clientes con problemas auditivos/
Pour les malentendants: 1-800-382-7470.
En México: 59-05-51-00 Ext. 5205 ó 01-800-463-59-89
YUDA AL
ERVICE À LA CLIENTÈLE
1-800-432-5437 (US & Canada)
CANADA
Mattel Canada Inc., 6155 Freemont Blvd.,
Mississauga, Ontario L5R 3W2; www.service.mattel.com.
MÉXICO
Importado y distribuido por Mattel de México, S.A. de C.V.,
Insurgentes Sur #3579, Torre 3, Oficina 601, Col. Tlalpan,
Delegación Tlalpan, C.P. 14020, México, D.F. R.F.C. MME-920701-NB3.
CHILE
Mattel Chile, S.A., Avenida Américo Vespucio 501-B, Quilicura, Santiago, Chile.
UMER
VENEZUELA
Mattel de Venezuela, C.A., RIF J301596439, Ave. Mara, C.C. Macaracuay Plaza,
Torre B, Piso 8, Colinas de la California, Caracas 1071.
ARGENTINA
Mattel Argentina, S.A., Curupaytí 1186, (1607) – Villa Adelina, Buenos Aires.
COLOMBIA
Mattel Colombia, S.A., calle 123#7-07 P.5, Bogotá.
E
UMIDOR
Fisher-Price, Inc., a subsidiary of Mattel, Inc., East Aurora, New York 14052, U.S.A.
©2010 Mattel, Inc. All Rights Reserved.
® and ™ designate U.S. trademarks of Mattel, Inc.
Fisher-Price, Inc., une liale de Mattel, Inc., East Aurora, New York 14052, É.-U.
©2010 Mattel, Inc. Tous droits réservés. PRINTED IN CHINA/IMPRIMÉ EN CHINE
® et ™ désignent des marques de Mattel, Inc. aux É.-U. T2864pr-0920
 Loading...