

Page 1
www.fi sher-price.com
R4568
R4568
www.fi sher-price.com
1
Page 2

Consumer Information
WARNING
CHOKING HAZARD – Small Parts
Not suitable for children under 3 years.
Please keep this instruction booklet for future reference, as it contains •
important information.
This product (art supplies) may stain or stick to some surfaces.•
Protect play area before use.•
Software should be installed by an adult.•
For proper use of this product we recommend that your computer •
meet minimum system requirements.
SAFETY TESTED •
GENTLE•
Minimum System Requirements
Operating System..................................... Microsoft® Windows
Vista
Processor................................................. 1.2GHz
Memory.................................................... 256MB RAM
Hard Drive................................................ 200MB available
Video Resolution...................................... 800x600 32-bit color
DirectX9.0c compatible
Sound....................................................... 16-bit DirectX compatible
CD or DVD Drive
Recommended:
Printer, Internet Connection (for software updates)
TM
or Windows XP
2
Page 3

Install
Installing Software
If you have multiple logons on your computer, be sure the logon you •
are using has the Administrator privileges. You will need Administrator
privileges to install the software.
Insert the CD into the CD-ROM or DVD drive of your computer.•
The software installer launches automatically. Follow the on-screen •
instructions to complete installation.
You will be asked to set a password as part of the installation process. Refer •
to the Parental Controls section for instructions to set a password.
Note:You will need to install all components to use this software.
If Installation of the software does not launch automatically, •
go to the “Start” menu, click on “Run” and type “D:\”.
Note: If you are using Windows Vista
computer after installing the software.
TM
, you will need to restart your
Uninstall
Uninstalling Software
Click on the following items (in order):•
- “Start” menu on your computer task bar
- “Programs”
- “Fisher-Price”
- “Play My Way”
- “Stickers – Stencils – Stampers Fun”
- “Uninstall Stickers – Stencils – Stampers Fun”
Double-click on the Stickers – Stencils – Stampers Fun icon on your •
computer desktop.
Start the Software
3
Page 4
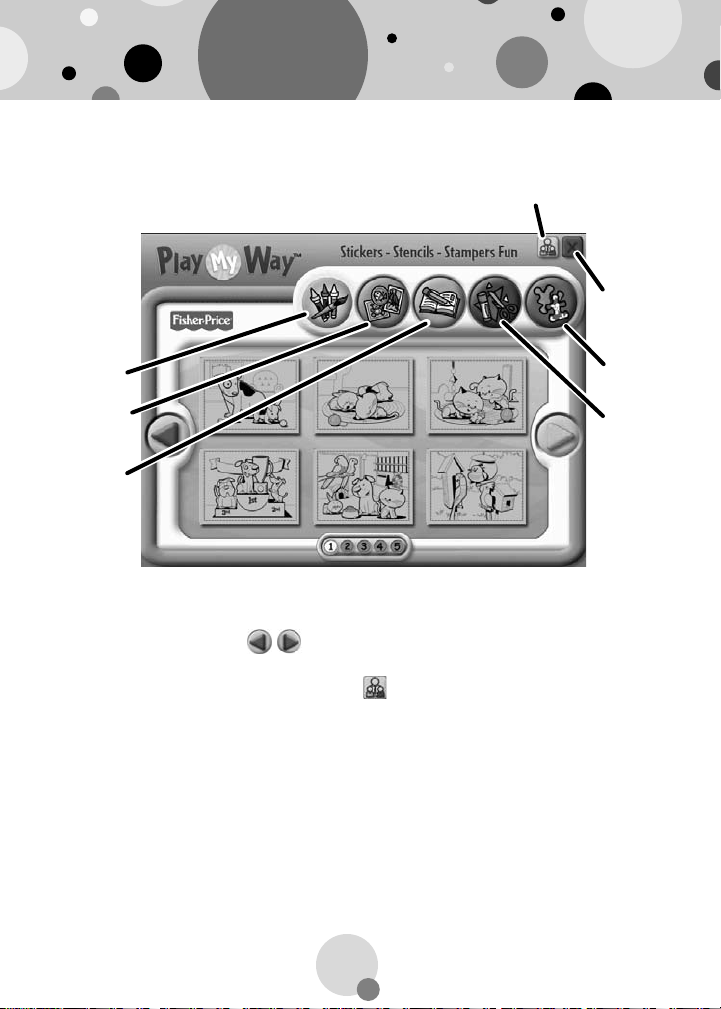
Coloring Button
Coloring Button
Stickers Button
Learning Button
Craft Button
Activity Button
Stickers Button
Learning Button
From the main menu, click on a button to choose from coloring, •
stickers, learning, craft or activity prints.
Click on the arrows • on the side of the screen or the numbers
on the bottom of the screen to view more pictures.
Click on the parental controls icon • to set a password, receive
software updates, and control the number of prints your child can
print during each session of use.
Main Menu
Parental Controls Button
Exit Button
Activity Button
Craft Button
4
Page 5

Parental Controls
Parental
Controls
Button
To set up or change parental controls, click on the Parental Controls •
button , located on the upper right portion of the main menu screen.
Click on the Password, Software Update, Number of Prints, or •
System Information button.
To exit, click on the • button.
5
Page 6

Parental Controls
Password
Protect your desktop and hard drive by setting a password.•
Click the ON radio button.•
Type your password in the Password and Confi rm Password fi elds. •
Select a hint to help you remember your password.
Note: If you set a password, you cannot enter Parental Controls or exit
the software without entering the password.
Software Update
Click the ON radio button to automatically check for software updates.•
Note: You must have an Internet connection on your computer for this
feature to work.
6
Page 7

Parental Controls
Number of Prints
Click on the arrows to select the number of prints for each session. •
Choose a number from 0 to 20 or select unlimited. If you do not •
make a choice, the number of prints defaults to unlimited.
System Information
View information about your software, operating system, fi rmware, •
and accessories.
7
Page 8

Coloring
Click on the color • button for prints you can color!
Click on the arrows or numbers to see more pictures.•
Click on a picture to print it.•
Stickers
Click on the stickers • button to print stickers you can color!
Click on a picture to print it.•
Color the stickers, then cut them out and stick them to your projects! •
Note: Use sticker paper (not included and sold separately), or use plain
paper and tape or glue your stickers to your projects.
8
Page 9

Learning
Click on the learn • button for prints with letters, numbers,
writing and addition!
Click on the arrows or numbers to see more pictures.•
Click on a picture to print it.•
Crafts
Click on the craft • button for prints with fun craft projects!
Note: Craft projects may require more than one piece of paper to print.
Click on a picture to print it.•
9
Page 10

Activities
Click on the activities • button for prints with fun activities you
can complete and then color!
Click on the arrows or numbers to see more pictures.•
Click on a picture to print it.•
Printables
Click on the picture you want to print! The printer icon will appear •
over the picture.
Hint: Make sure you printer is ON and connected to your computer.
10
Page 11

Stickers - Stencils - Stampers Fun!
Use the included art supplies to complete your printed projects!•
Cleanup and Storage
To remove markings from skin, use soap •
and water.
Replace the caps on the markers and ink •
pad after each use.
All your supplies easily store inside the bin. •
Store your bin in the art center (sold •
separately and subject to availability).
11
Page 12

Consumer Information
E
CONSUMER ASSISTANC
1-888-892-6123 (US & Canada)
1300 135 312 (Australia)
Fisher-Price, inc., 636 Girard Avenue, East Aurora, NY 14052.
Hearing-impaired consumers: 1-800-382-7470.
Outside the United States:
Canada: Mattel Canada Inc., 6155 Freemont Blvd.,
Mississauga, Ontario L5R 3W2; www.service.mattel.com.
Great Britain: Mattel UK Ltd, Vanwall Business Park,
Maidenhead SL6 4UB. Helpline: 01628 500303.
www.service.mattel.com/uk
Australia: Mattel Australia Pty. Ltd., 658 Church Street,
Locked Bag #870, Richmond, Victoria 3121 Australia.
New Zealand: 16-18 William Pickering Drive,
Albany 1331, Auckland.
Windows is a registered trademark of Microsoft Corporation in the United States and other countries.
PRINTED IN CHINA R4568pr-0920
Windows Vista is either a registered trademark or trademark
of Microsoft Corporation in the United States and/or other countries.
Fisher-Price, Inc., a subsidiary of Mattel, Inc., East Aurora, NY 14052 U.S.A.
® and TM designate U.S. trademarks of Mattel, Inc., unless otherwise indicated.
©2009 Mattel, Inc. All Rights Reserved.
 Loading...