

Page 1
P6798
MyToon TV
MyToon TV
Page 2

MyToon TV
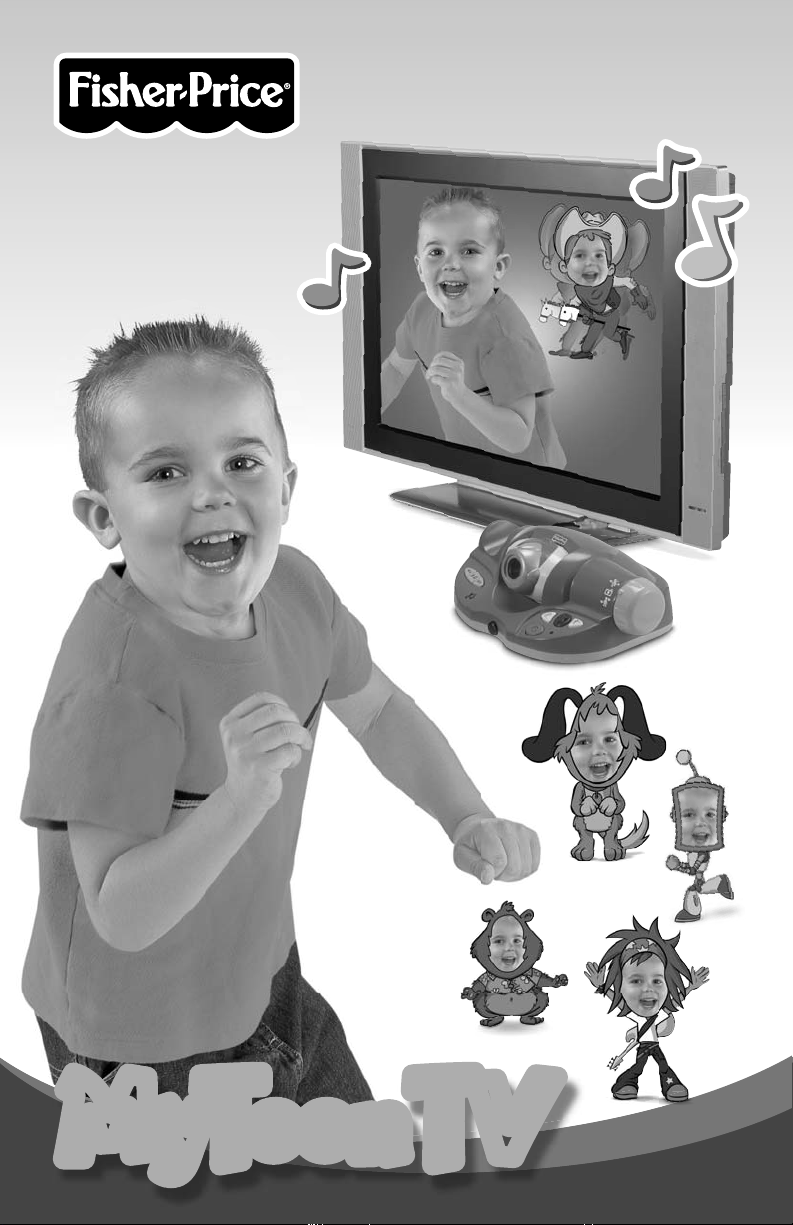
It's Fun and Easy!
Turn yourself into a rock ‘n roll robot, make your dad a dancing dog, picture your sister
as a pirouetting princess, and more! With My Toon TV, it’s fun and easy to turn yourself,
your friends and your family into 11 different hilarious dancing cartoon characters to sing,
dance and perform with—on TV!
TV not included. Image clarity may vary from package depiction.
Light-up microphone remote does not amplify or transmit voice.
2
Page 3

MMyToonToon TVTV
MyToon TV
Consumer Information
NOTICE ABOUT EPILEPSY AND SEIZURES
PLEASE READ THIS NOTICE BEFORE YOU
OR YOUR CHILD USE ANY VIDEO GAME.
A very small portion of the population
has a condition, which may cause
a momentary loss of consciousness
when viewing certain kinds of fl ashing
lights or patterns that are commonly
present in our daily environment. This
condition may cause seizures while
watching some kinds of television
pictures or playing certain video games.
Players who have not had any previous
seizures may nonetheless have an
undetected epileptic condition.
If you or anyone in your family has
experienced symptoms linked to an
epileptic condition (e.g. a seizure or loss of
awareness), consult your physician before
playing video games. We recommend that
parents observe their children while they
play video games. If you or your child
experience any of the following symptoms
such as dizziness, altered vision, eye or
muscle twitching, involuntary movements,
loss of awareness, disorientation or
convulsions, DISCONTINUE USE
IMMEDIATELY and consult your physician.
Additionally, please follow these
precautions whenever playing
a video game:
• Do not sit or stand too close to the
television screen. Play as far back from
the screen as possible.
• Do not play if you are tired or
need sleep.
• Always play in a well lit room.
• Be sure to take a 10-15 minute break
every hour while playing.
Notes
• Please keep this instruction sheet for future,
as it contains important information.
• Adult assembly is required for setup and
battery installation.
• Requires four “AA” (LR6) and three “AAA”
(LR03) alkaline batteries (batteries not
included) for operation.
• Tool required for battery installation:
Phillips screwdriver (not included).
Care
• Wipe this product with a clean cloth
dampened with a mild soap and water
solution. Do not immerse this product.
• This product has no consumer
serviceable parts. Do not take this
product apart.
3
Page 4
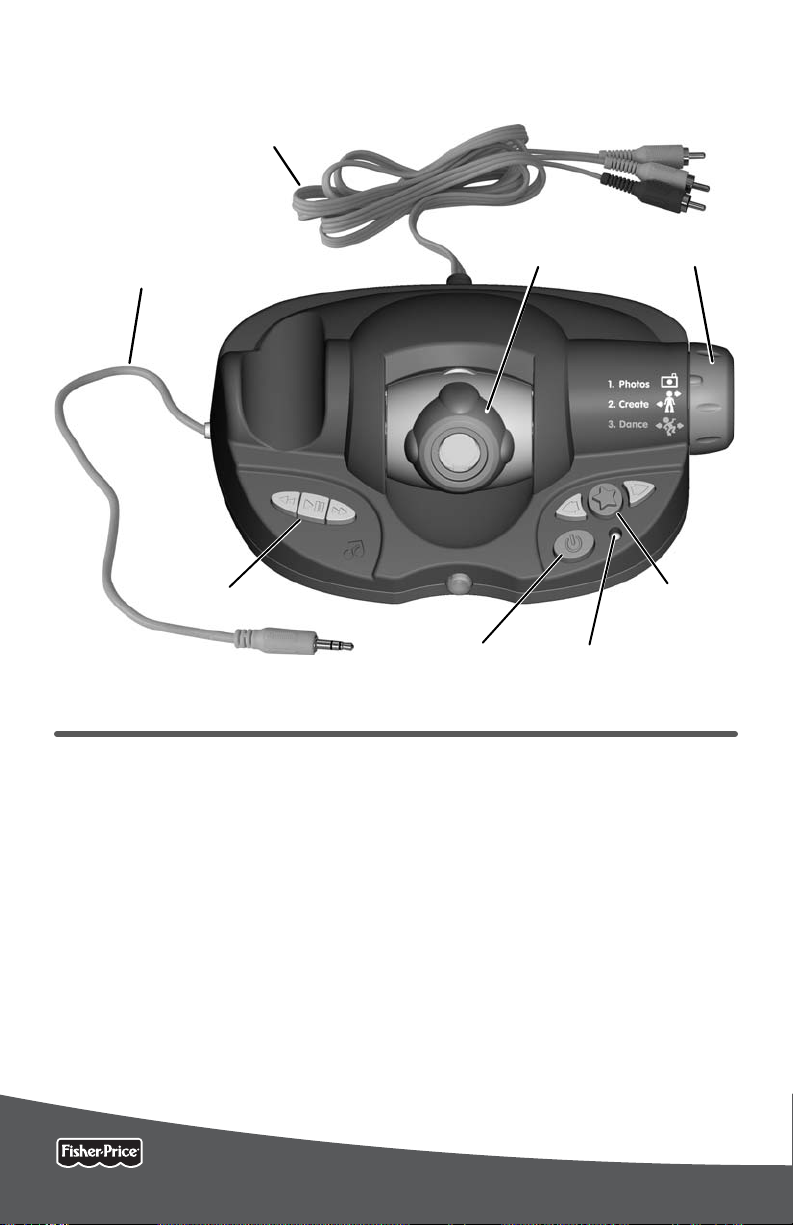
MyToon TV
Base
On-Screen
Selection Buttons
Power L.E.D
Music Buttons
Power Button
Plug-and-Play Cord
External Music
Input Cord
Features
External Music
Input Cord
Music Buttons
External Music Input Cord - Plug in to
your own CD or MP3 Player to listen
and dance to your own music!
Music Buttons - Press the green arrow
buttons to move forward or backward
through song choices included with
this toy. Press the green play/pause
music button to listen to your choice;
press again to pause music.
Camera - Stand in front of the camera
to see yourself on TV and take photos
to create a character! Camera adjusts
up or down.
Camera
On-Screen
Selection Buttons
Power Button
Base
Power Button - Press to turn power ON;
press again to turn power OFF.
Power L.E.D. - Lights when power
is ON.
Mode Dial - Turn to select a mode:
Photos, Create or Dance.
Plug-and-Play Cord - Plugs in to
your TV.
On-Screen Selection Buttons - Press
the yellow arrow buttons to scroll
through choices; press the purple
star button to make selections or take
a picture.
Power L.E.D
Mode Dial
4
Page 5
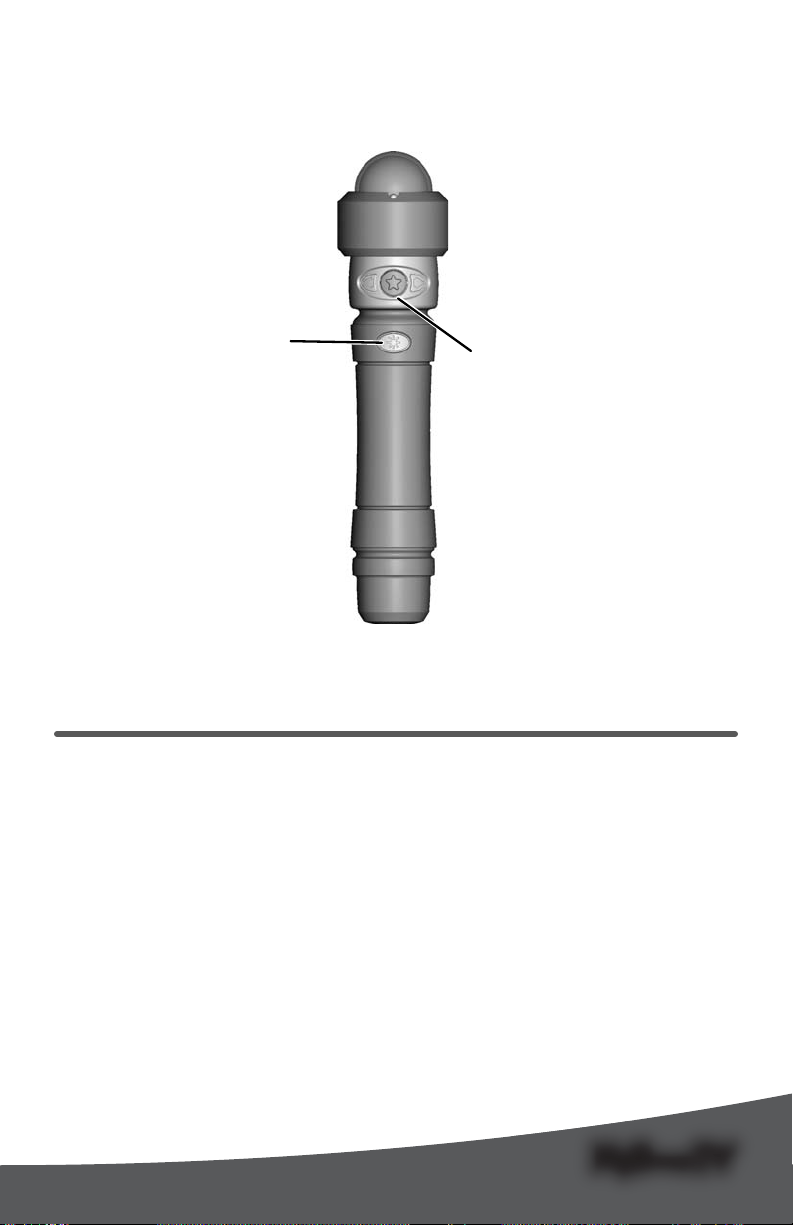
MMyToonToon TVTV
MyToon TV
On-Screen
Selection Buttons
Light Show Button
Wireless Remote
Features
On-Screen
Selection Buttons
Wireless Remote
On-Screen Selection Buttons - Press
the yellow arrow buttons to scroll
through choices; press the purple
star button to make selections or take
a picture.
Light Show Button - Press for
flashing lights!
Hint: Bright sunlight or incandescent
light may affect the range between
the wireless remote and the base. If
performance is erratic, try dimming the
light in the room you are using this toy.
5
Page 6
MyToon TV
Battery Installation
Hint: We recommend using alkaline batteries for longer battery life.
1.5V x 4
“AA” (LR6)
Base
• Locate the battery compartment on the
bottom of the base.
• Loosen the screws in the battery
compartment door, and remove the door.
• Insert four “AA” (LR6) alkaline batteries.
• Replace the battery compartment
door and tighten the screws. Do not
over-tighten.
• If the base begins to operate erratically,
you may need to reset the electronics.
Press the power button to turn power
off; press again to turn power back on.
• When function is slow or stops or you
see a low battery indicator
your TV screen, it’s time for an adult
to change the batteries.
on
1.5V x 3
“AAA” (LR03)
Wireless Remote
• Locate the battery compartment
on the back of the wireless remote.
• Loosen the screw in the battery
compartment door, and remove
the door.
• Insert three “AAA” (LR03)
alkaline batteries.
• Replace the battery compartment
door and tighten the screw. Do not
over-tighten.
• If the wireless remote begins to
operate erratically, you may need to
reset the electronics. Remove and
replace the batteries.
• When lights on the remote stop, or
the range between the remote and
base decreases, it's time for an
adult to change the batteries.
6
Page 7

MMyToonToon TVTV
MyToon TV
Battery Safety Information
In exceptional circumstances, batteries
may leak fluids that can cause a
chemical burn injury or ruin your
product. To avoid battery leakage:
• Do not mix old and new batteries or
batteries of different types: alkaline,
standard (carbon-zinc) or rechargeable
(nickel-cadmium).
• Insert batteries as indicated inside the
battery compartment.
• Remove batteries during long periods
of non-use. Always remove exhausted
batteries from the product. Dispose of
batteries safely. Do not dispose of this
product in a fire. The batteries inside
may explode or leak.
•
Never short-circuit the battery terminals.
• Use only batteries of the same or
equivalent type, as recommended.
• Do not charge non-rechargeable
batteries.
• Remove rechargeable batteries from
the product before charging.
• If removable, rechargeable batteries
are used, they are only to be charged
under adult supervision
7
Page 8

MyToon TV
Connecting to Your TV
IMPORTANT! Your TV, VCR or DVD player must have audio and video input jacks.
INPUT
White
Red
Yellow
• Place the base next to your TV at eye
level with your child.
IMPORTANT! Do not place the base on
top of your TV. Keep excess cable off the
floor and out of the way.
• Locate the plug-and-play cord on
the base. Plug the audio-video pins into
the matching colored input jacks on
your TV, VCR or DVD player (Yellow for
Video In, White for Left Audio In and
Red for Right Audio In).
Hint: We've included a detailed
illustration to show how to connect the
base to a TV or TV and VCR/DVD player.
Please refer to page 18.
AUDIO IN
LEFT
RIGHT
VIDEO IN
Power Button
• Turn your TV, VCR or DVD player
power ON.
• Press the power button on the base to
turn it ON.
• To find the picture on your TV screen,
set your TV’s, VCR’s or DVD player’s
mode selector to INPUT or VIDEO IN.
Hint: The images on the TV screen
appear best when there is good lighting
in the room. Make sure the light source
is in front of or above your child.
• Keep the remote out of direct sunlight.
8
Page 9

MMyToonToon TVTV
MyToon TV
1
Photo Frame
Adjust Camera
Angle
Stand Here
Photos
Take photos so you can create your own characters!
Adjust Camera
Angle
3 Feet (1m)
Stand Here
3
• Turn the mode dial on the base to
Photos .
Photo Frame
2
• Press the purple select button
Hint: For first-time use, all six photo
frames are blank. If you have filled some
or all of the photo frames, simply press
the yellow arrow buttons
wireless remote or the base to scroll to
the frame you'd like to fill with a photo.
on the base or wireless remote to
begin taking photos!
on the
• Stand approximately three feet (1m) from
the camera on the base.
• For the best photos, make sure your
eyes and mouth are aligned with the
on-screen guide. You may have to
adjust the camera angle or move closer
or farther away from the camera.
4
• The camera is pointed too low. Adjust the
camera on the base up.
9
Page 10

MyToon TV
Photos
5
• The camera is pointed too high. Adjust the
camera on the base down.
7
• The photo is now saved for use in
Create mode (refer to the next section
in these instructions).
6
• Press the purple select button on
the wireless remote or base to take
a picture.
• Perfect! Camera angle is just right.
Hint: You do not need to press the
purple select button to take pictures.
The camera will automatically take
a picture 45 seconds after you have
selected a photo frame to fill.
8
• Press the yellow arrow buttons
the base or the wireless remote to choose
the next frame and take more photos
Hint: If all six frames are filled or you want
to retake a picture, select the picture you
want to save over and follow this process.
If you'd like to delete all six pictures at
once, simply press and hold the green
backward
buttons and right yellow arrow button
on the base at the same time until you hear
a tone.
10
,
green forward
music
on
!
Page 11

MMyToonToon TVTV
MyToon TV
Create
Now, use the photos you took to customize the characters!
1
• Turn the mode dial on the base to
Create .
Hint: The range of the wireless remote is up
to 15 feet in this mode.
2
• Press the yellow arrow buttons
on the base or wireless remote to scroll
through character choices.
• Press the purple select button on
the base or wireless remote to select
a character.
3
• Then, press the yellow arrow buttons
on the base or wireless remote
to scroll through your photos in place
on the character.
• Press the purple select button on
the base or wireless remote to make
a selection.
4
• Press the yellow arrow buttons
on the base or wireless remote to select
another character.
• Then, repeat this process to create another
character. Create all 11 characters!
11
Page 12

MyToon TV
Dance
Adjust Camera
Angle
Stand Here
Pick your favorite character to dance with!
1
• Turn the mode dial on the base to
Dance .
2
• Press the yellow arrow buttons
on the base or wireless remote to scroll
through created characters.
4
• Watch the character you chose dance
on your TV screen!
Adjust Camera
Angle
5 Feet (1.5m)
5
Stand Here
• Now, stand about fi ve feet (1.5m) from
the camera on the base.
• Adjust the camera angle up or down
to see yourself dance with the character
on your TV screen.
3
• Press the purple select button on
the base or wireless remote to make
a selection.
12
Page 13

MMyToonToon TVTV
MyToon TV
Dance
6
• Press the green backward or
forward music buttons on the
base to choose a song.
• Press the green play/pause music
button on the base to pause the
music and watch the character dance
without music. Press the green play/
pause music button again to turn
the music back on.
7
• Press the yellow arrow buttons
on the base or wireless remote to dance
with a different character.
8
• Press the purple select button on
the base or wireless remote to pause
the character’s movement. The
character will stand and wait until you
press the purple select button again.
13
Page 14

MyToon TV
Play Your Own Tunes
Speaker Pin
External Music
Input Cord
• Use the music on your own CD or
MP3 player (not included and sold
separately) to dance to your own music!
Play/Pause Music Button
• Press the green play/pause music
button on the base to pause the
music included with this toy.
External Music
Input Cord
• Locate the external music input cord on
the bottom of the base.
• Insert the speaker pin on the external
music input cord into the headphone
jack on the CD or MP3 player.
• Turn the CD or MP3 player’s power ON.
• Turn the sound on your CD or MP3
player to about ¾ of the maximum level.
• Now, adjust the sound on your TV and
dance to your own music!
Speaker Pin
14
Page 15

MMyToonToon TVTV
MyToon TV
BOTTOM VIEW
Storage
External Music
Input Cord
• Fit the external music input cord into the
groove on the bottom of the base.
• Fit the wireless remote into the cradle
on the base.
15
Page 16

MyToon TV
Troubleshooting
Problem Cause Solution
No image on the TV TV or VCR/DVD player is
not set to the proper input
Change the TV or VCR/DVD player’s mode to
INPUT or VIDEO IN.
Press the channel down button on your TV
or VCR/DVD player to change to a channel
below channel 2.
Consult your TV or VCR/DVD player’s
instruction manual.
Batteries in the base are
weak or exhausted
Base timed out (sleep
mode and power L.E.D.
is still on)
Base shut down
(power L.E.D. is off)
No wireless connection
between the base unit and
the remote
Replace the batteries in the base with four,
new “AA” (LR6) alkaline batteries.
The base times out (sleep mode) after 10
minutes of inactivity. Press any button to
turn it back on.
The base will shut off after it has been in
sleep mode for five minutes. Press the
power button to turn the base OFF; press
it again to turn the base back ON.
Make sure you have a clear path between
the wireless remote and the base. Do not
place the base in a closed cabinet.
16
Page 17

MMyToonToon TVTV
MyToon TV
Troubleshooting
Problem Cause Solution
Music does not play Music is paused on base Press the play/pause button to turn the
music back on.
Images on TV look grainy
or lose color
Images on TV look dark Poor lighting Make sure the light source in the room is
MP3 or CD player sound
is distorted
MP3 or CD player music
is not playing
Wireless remote is
not responding
Batteries in the base are
weak or exhausted
Volume is too high Do not turn the volume on your external
Internal music not paused Press the green play/pause music button on
External music input cord
not inserted
Batteries in the wireless
remote are weak or
exhausted
Toy is being used in room
with bright sunlight
Replace the batteries in the base with four,
new “AA” (LR6) alkaline batteries.
either in front of or above your child.
music device to maximum volume. For best
sound quality volume should be set to ¾ of
the maximum volume.
the base.
Make sure the external music input cord is
completely inserted into the headphone jack
on your MP3 or CD player.
Replace the batteries in the wireless remote
with three "AAA" (LR03) alkaline batteries.
Dim the light in the room the toy is
being used.
17
Page 18

MyToon TV
Troubleshooting
Problem Cause Solution
Response on TV is
intermittent/erratic
Interference from
another infrared device
(ie.: remote control)
Do not use a remote control in the same
room when using this toy.
Image is stretched or
distorted on a wide
screen TV
Batteries in the base are
weak or exhausted
TV aspect ratio
set incorrectly
White
Red
Yellow
Replace the batteries in the base with four,
new “AA” (LR6) alkaline batteries.
This product is designed for use with a 4:3
aspect ratio (display setting) and you should
see black bars on the sides of the image. For
best picture, do not use a 16:9 aspect ratio
(stretched) wide screen setting. For more
information on changing this setting, refer
to your TV owner's manual.
INPUT
AUDIO IN
LEFT
RIGHT
VIDEO IN
TV
OR
VCR
IMPORTANT! Your TV, VCR or DVD player must have audio and video input
jacks. The input jacks may be on the back of your TV, VCR or DVD player.
TV
18
Page 19

MMyToonToon TVTV
MyToon TV
Consumer Information
FCC Statement (United States Only)
This equipment has been tested and found to comply with the limits for a Class B digital
device, pursuant to Part 15 of the FCC Rules. These limits are designed to provide reasonable
protection against harmful interference in a residential installation. This equipment generates,
uses and can radiate radio frequency energy and, if not installed and used in accordance with
the instructions, may cause harmful interference to radio communications. However, there
is no guarantee that interference will not occur in a particular installation. If this equipment
does cause harmful interference to radio or television reception, which can be determined
by turning the equipment off and on, the user is encouraged to try to correct the interference
by one or more of the following measures:
• Reorient or relocate the receiving antenna.
• Increase the separation between the equipment and receiver.
• Consult the dealer or an experienced radio/TV technician for help.
Note: Changes or modifi cations not expressly approved by the manufacturer responsible for
compliance could void the user's authority to operate the equipment.
This device complies with Part 15 of the FCC Rules. Operation is subject to the following two
conditions: (1) this device may not cause harmful interference and (2) this device must
accept any interference received, including interference that may cause undesired operation.
ICES-003
This Class B digital apparatus complies with Canadian ICES-003. Operation is subject
to the following two conditions: (1) this device may not cause harmful interference and (2)
this device must accept any interference received, including interference that may cause
undesired operation.
NMB-003
Cet appareil numérique de la classe B est conforme à la norme NMB-003 du Canada.
L’utilisation de ce dispositif est autorisée seulement aux conditions suivantes : (1) il ne
doit pas produire de brouillage et (2) l’utilisateur du dispositif doit être prêt à accepter tout
brouillage radioélectrique reçu, même si ce brouillage est susceptible de compromettre le
fonctionnement du dispositif.
• Protect the environment by not disposing of this product with household
waste (2002/96/EC). Check your local authority for recycling advice and
facilities (Europe only).
19
Page 20

Consumer Information
Visit us on line at
www.service.fi sher-price.com
Call our Consumer Relations Department, toll-free at 1-800-432-5437, 9 AM - 7 PM EST
Monday through Friday and 11 AM - 5 PM EST Saturday. Hearing-impaired consumers using
TTY/TDD equipment, please call 1-800-382-7470. Write to us at: Fisher-Price
Relations, 636 Girard Avenue, East Aurora, New York 14052.
For countries outside the United States:
CANADA: Questions? 1-800-432-5437. Mattel Canada Inc., 6155 Freemont Blvd., Mississauga, Ontario L5R 3W2;
www.service.mattel.com.
GREAT BRITAIN: Mattel UK Ltd, Vanwall Business Park, Maidenhead SL6 4UB. Helpline: 01628 500303.
www.service.mattel.com/uk
AUSTRALIA: Mattel Australia Pty. Ltd., 658 Church Street, Locked Bag #870, Richmond, Victoria 3121 Australia.
Consumer Advisory Service 1300 135 312.
NEW ZEALAND: 16-18 William Pickering Drive, Albany 1331, Auckland.
ASIA: Mattel East Asia Ltd, Room 1106, South Tower, World Finance Centre, Harbour City, Tsimshatsui, HK, China.
®
Consumer
Fisher Price, Inc., a subsidiary of Mattel, Inc., East Aurora, NY 14052 U.S.A. P6798a-0920
©2009 Mattel, Inc. All Rights Reserved. ® and ™ designate U.S. trademarks of Mattel, Inc. PRINTED IN CHINA
 Loading...