

Page 1
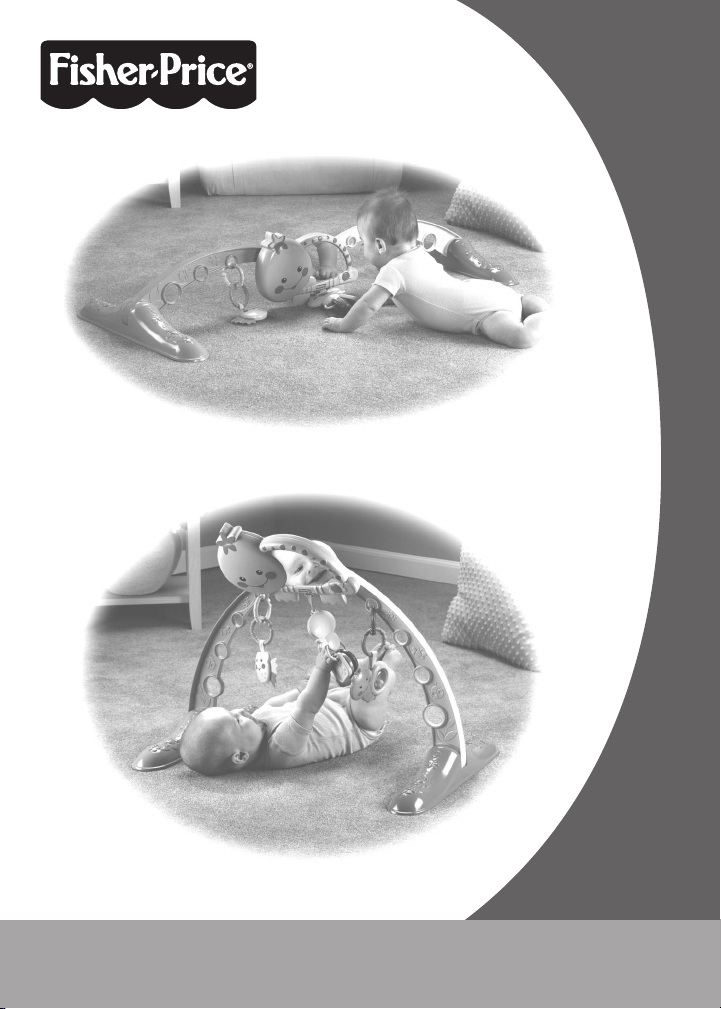
Tummy Time
M3185
Overhead Gym
www.fisher-price.com
Page 2
Consumer Information
WARNING
To prevent entanglement
injury, never place the gym
in a crib or playpen. Never
add strings, ties or other
products to the gym.
• Please keep this instruction sheet
for future reference, as it contains
important information.
• Requires three “AA” (LR6) alkaline
batteries (not included) for operation.
• Adult assembly is required.
• Tool required for battery installation:
Phillips screwdriver (not included).
2
Page 3
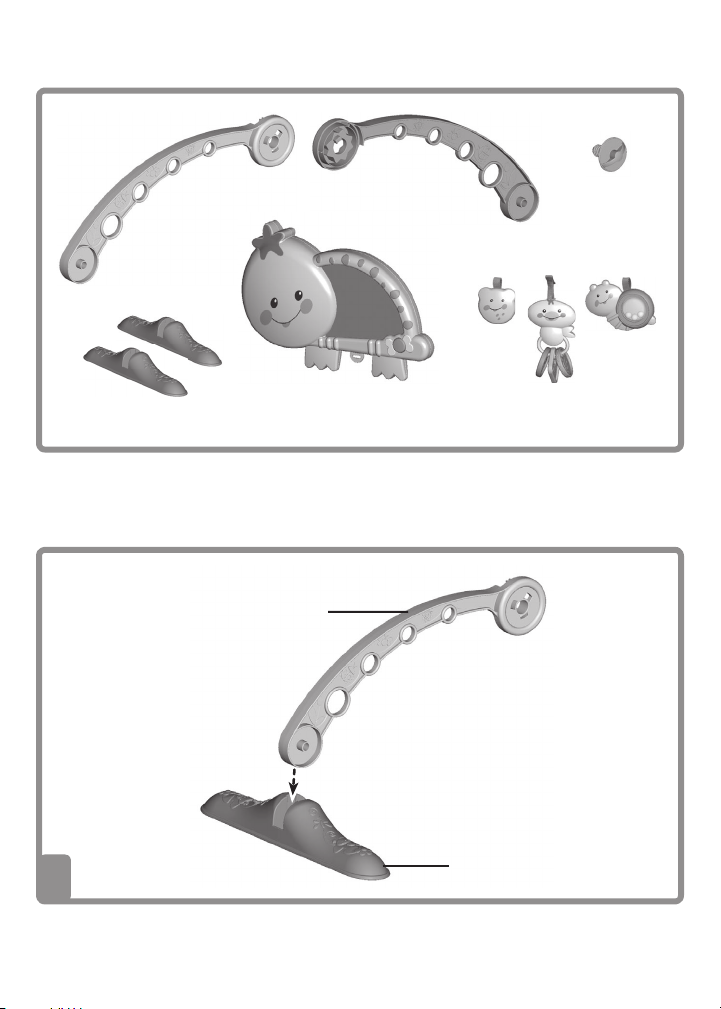
Parts
2 Bases
2 Arcs
Electronic Toy
3 Removable Toys
One-Time Assembly
Arc
Retainer
1
• Insert and “snap” the smaller end of each arc into the slot in each base.
• Pull up on each arc to be sure it is secure in the base.
3
Base
Page 4

One-Time Assembly
2
• “Snap” the hubs on the arcs together.
Hubs
4
Page 5

One-Time Assembly
3
• Fit the retainer into the hole in the hubs.
Retainer
5
Page 6

Battery Installation
1,5V x 3
“AA” (LR6)
• Locate the battery compartment door on the back of the electronic toy.
Loosen the screws in the battery compartment door and lift to remove it.
Hint: You may need to use the tip of the screwdriver to lift the battery
compartment door.
• Insert three “AA” (LR6) alkaline batteries.
Hint: We recommend using alkaline batteries for longer battery life.
• Replace the battery compartment door and tighten the screws.
• When sounds or lights become faint or stop, it’s time for an adult to
change the batteries!
• Protect the environment by not disposing of this product with
household waste (2002/96/EC). Check your local authority for
recycling advice and facilities (Europe only).
Fisher-Price, Inc., a subsidiary of Mattel, Inc. East Aurora, New York 14052, U.S.A.
©2007 Mattel, Inc. All Rights Reserved. ® and ™ designate U.S. trademarks of Mattel, Inc.
PRINTED IN CHINA
M3185pr-0920
6
Page 7

Battery Safety Information
In exceptional circumstances, batteries may leak fluids that can cause a
chemical burn injury or ruin your product. To avoid battery leakage:
• Do not mix old and new batteries or batteries of different types: alkaline,
standard (carbon-zinc) or rechargeable (nickel-cadmium).
• Insert batteries as indicated inside the battery compartment.
• Remove batteries during long periods of non-use. Always remove
exhausted batteries from the product. Dispose of batteries safely. Do not
dispose of the product in a fire. The batteries inside may explode or leak.
• Never short-circuit the battery terminals.
• Use only batteries of the same or equivalent type, as recommended.
• Do not charge non-rechargeable batteries.
• Remove rechargeable batteries from the product before charging.
• If removable, rechargeable batteries are used, they are only to be charged
under adult supervision.
7
Page 8

Overhead Gym
1
• Pull apart the hubs to unlock.
2
• Push the bases together to lift the arcs into an arch.
• Push the hubs together to lock in place.
8
Page 9

Overhead Gym
Electronic Toy
3
• Fit the electronic toy onto the end of the retainer extending at the top of
the arch.
• Turn the retainer several times to tightly secure the electronic toy.
Hint: Slide the latch on the back of the electronic toy to tilt down for
overhead gym.
4
• Attach the toys to the arch as shown.
9
Page 10

Tummy Time Fun
1
• Pull apart the hubs to unlock.
2
• Push the bases to lower the arcs to the ground.
• Push the hubs together to lock in place.
10
Page 11

Tummy Time Fun
3
• Fit the electronic toy tab onto the end of the retainer extending from the arcs.
• Turn the retainer several times to tightly secure the electronic toy.
Hint: Push the electronic toy up for tummy time fun!
4
• Attach the toys to the arcs as shown.
11
Page 12

Lots to Explore!
Tummy Time
Overhead Gym
• Bat or pull the center toy for music,
lights and sounds!
• Slide the power switch on the
electronic toy to on with low volume
; on with high volume
off O.
or
Electronic Toy
12
 Loading...