

Page 1
2-in-1 Transforming
Manny
Button
Phone
Button
2-in-1 Transforming
2-in-1 Transforming
Try-me
pull tab
BATTERY
COMPARTMENT
OFFON
BATTERY INSTALLATION:
Unscrew and lift cover away from bottom of product.
Replace batteries as indicated inside the battery compartment.
Batteries included are for demonstration purposes only.
For longer life use only alkaline batteries.
Requires 3 “AA” (LR6) batteries.
Required tool: Phillips screwdriver (not included)
1,5V x 3
“AA” (LR6)
BATTERY SAFETY INFORMATION
In exceptional circumstances batteries may leak fluids
that can cause a chemical burn injury or ruin your toy
• Do not mix old and new batteries.
• Only batteries of the same or equivalent type as
(product).
To avoid battery leakage:
• Non-rechargeable batteries are not to be recharged.
• Rechargeable batteries are to be removed from the
toy before being charged (if designed to be
removable).
• Batteries are to be inserted with the correct polarity.
• Exhausted batteries are to be removed from the toy.
• The supply terminals are not to be short-circuited.
• Dispose of battery(ies) safely.
• Do not dispose of this toy in a fire. The batteries inside
• Rechargeable batteries are only to be charged under
adult supervision (if designed to be removable).
• Do not mix alkaline, standard (carbon-zinc), or
rechargeable (nickel-cadmium) batteries.
recommended are to be used.
may explode or leak.
ID. M1131-0920 G2
Tool Truck
Tool Truck
Tool Truck
INSTRUCTIONS
Please keep these instructions for future reference as they contain important information.
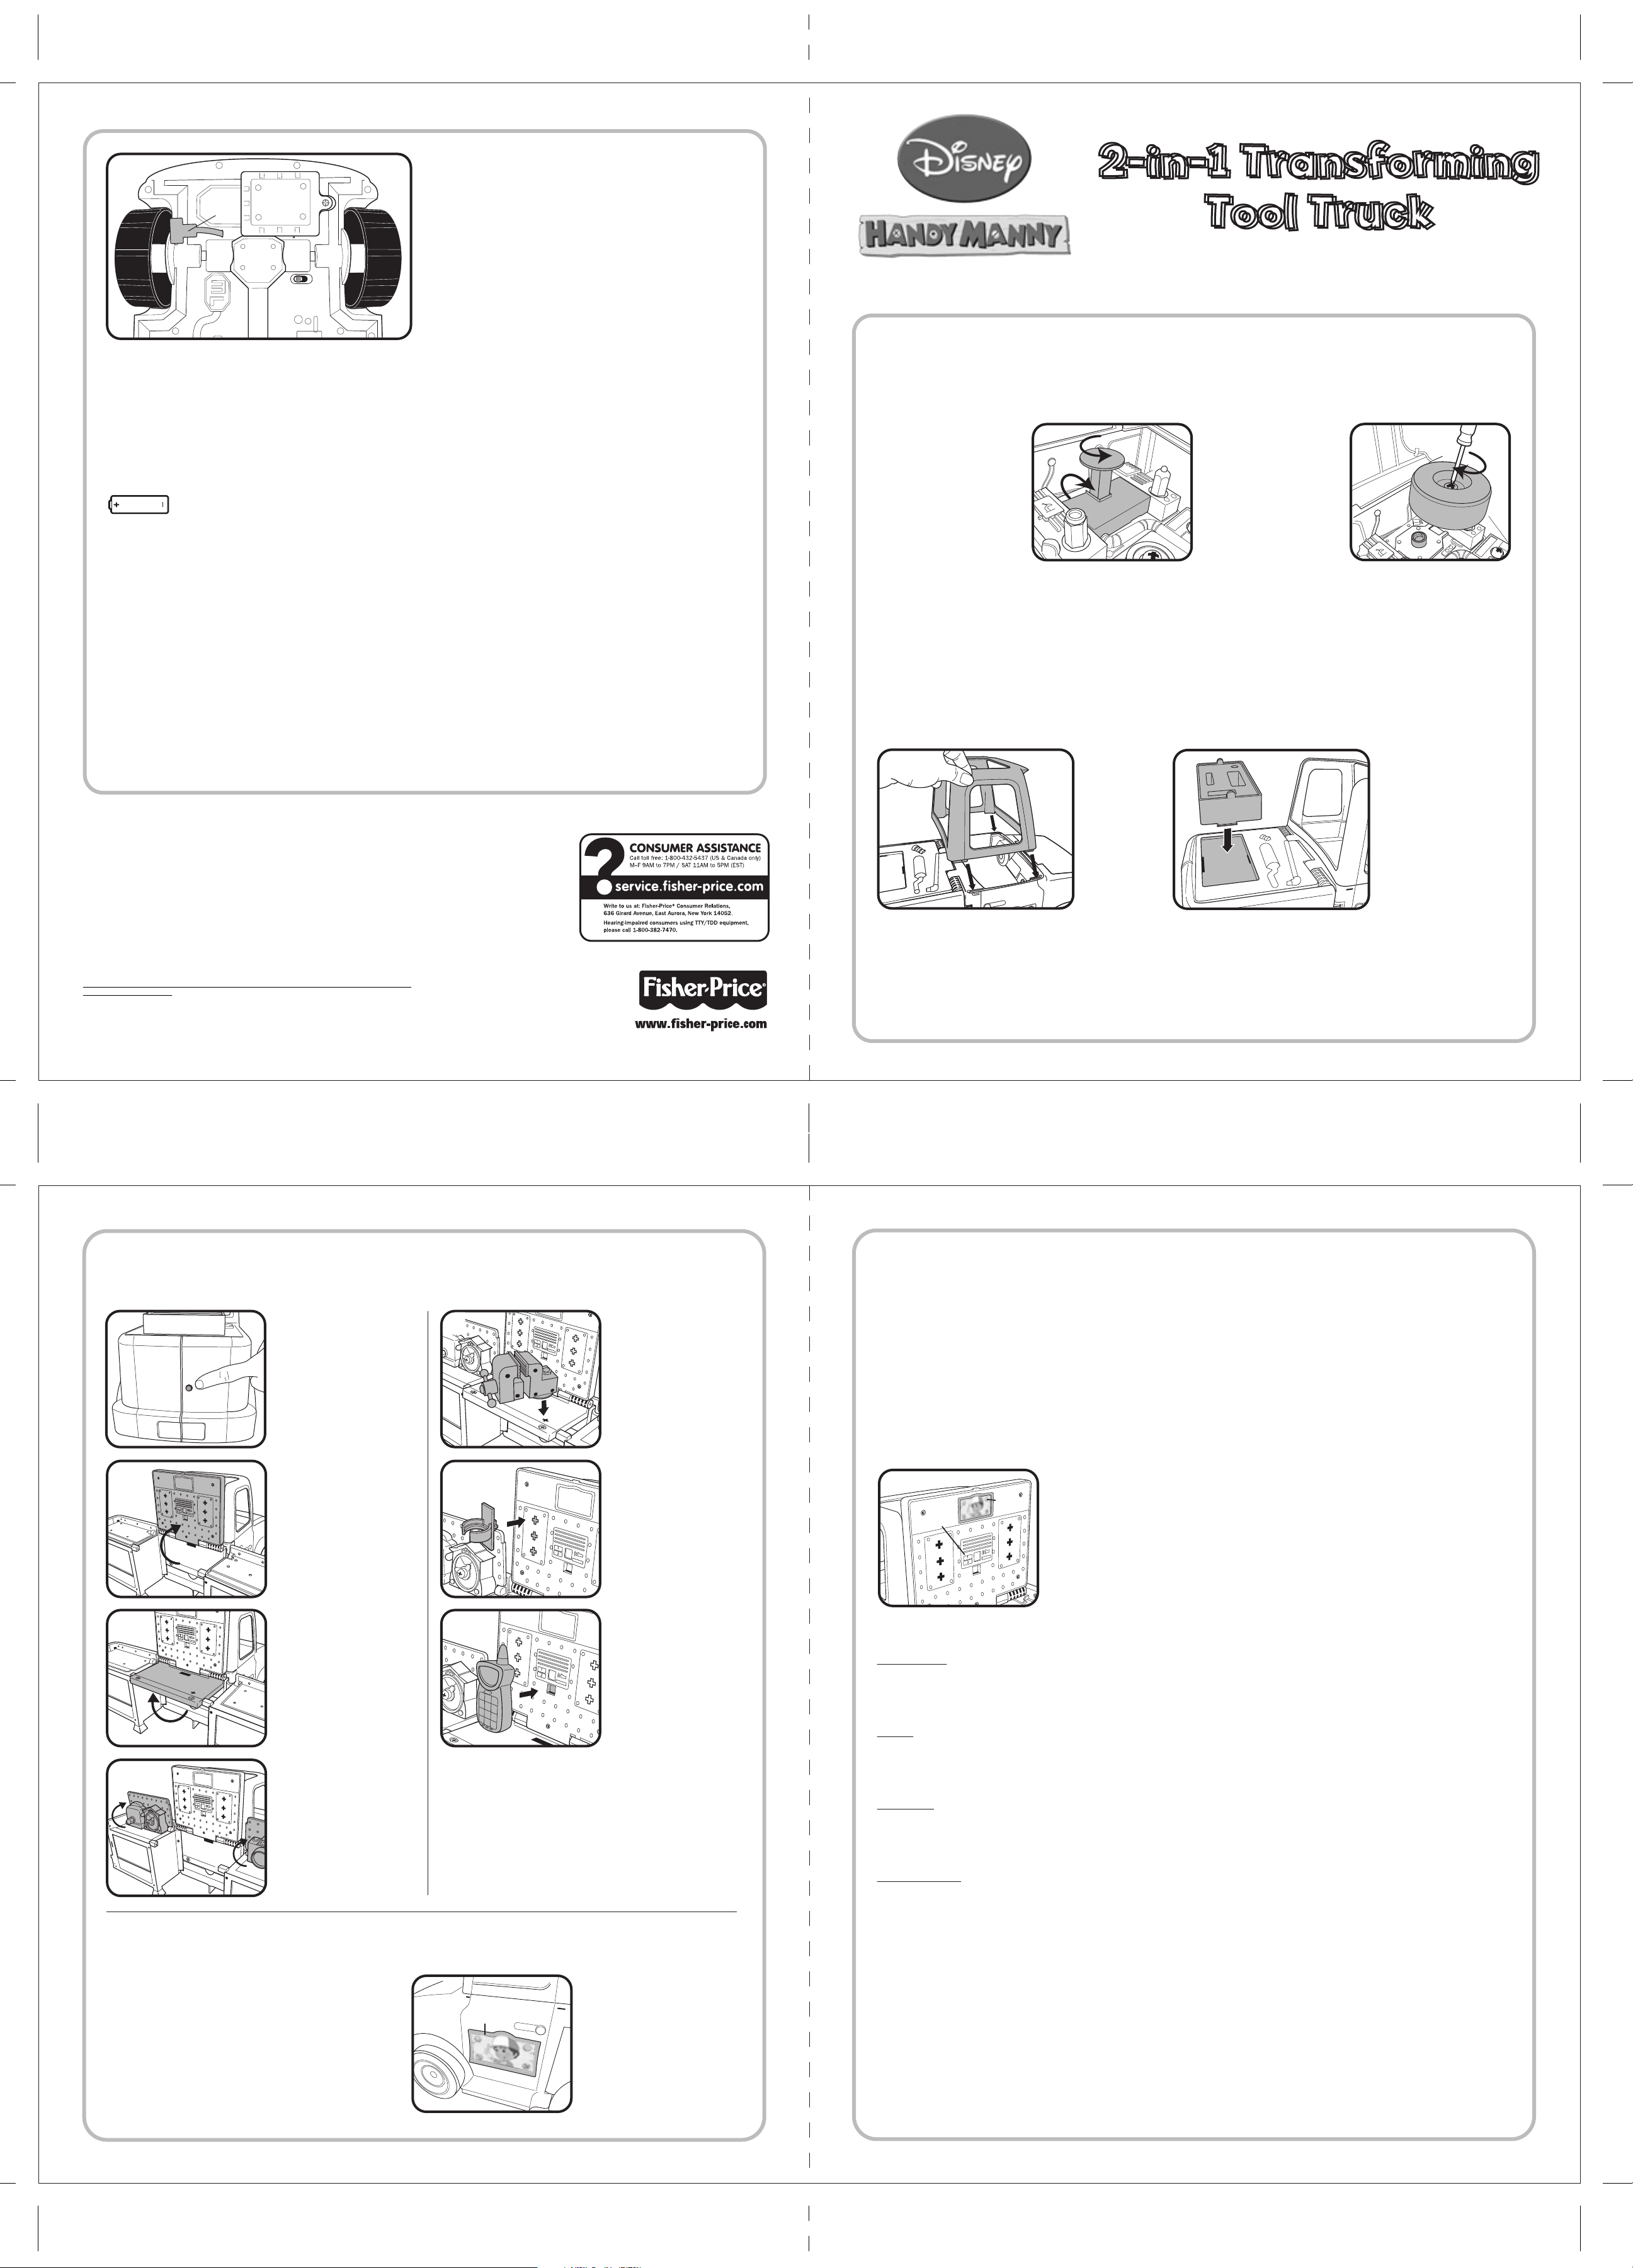
BEFORE YOU BEGIN
• Remove and discard the “try me” pull tab, located on the bottom of the truck next to the battery
compartment. See battery diagram for details.
• Remove and discard
the two “try me”
pieces, located on
1
2
the engine, as shown.
• Once both pieces
are removed, they
can be discarded.
• Once the two “try me” pieces are removed and the air filter is inserted, the toy will perform its full play
pattern as described below.
• Be sure the ON/OFF switch is in the ON position. The ON/OFF switch is also located on the bottom of
the truck, next to the battery compartment. See battery diagram for details.
HOW TO ASSEMBLE
• Snap the roof onto the truck, as shown.
• Snap the toolbox onto the rear of the truck, as shown.
• Insert the air filter
into the engine,
as shown.
"We Work Together"
Words and Music by Randy Miller and Richard Gitelson
© 2007 Wonderland Music Company, Inc. (BMI)
All Rights Reserved
© Disney
Visit the Disney Web site at www.disney.com
Fisher-Price, Inc., a subsidiary of Mattel, Inc., East Aurora, NY 14052 U.S.A.
PRINTED IN CHINA.
Manufactured for Fisher-Price. ©2008 Mattel, Inc. All Rights Reserved.
® and ™ designate U.S. trademarks of Mattel, Inc., unless otherwise indicated.
For countries outside the United States:
Canada: Mattel Canada Inc., 6155 Freemont Blvd., Mississauga, Ontario L5R 3W2; www.service.mattel.com.
Great Britain: Mattel U.K. Ltd., Vanwall Business Park, Maidenhead SL6 4UB. Helpline 01628 500303.
www.service.mattel.com/uk
Australia: Mattel Australia Pty. Ltd., 658 Church Street, Locked Bag #870, Richmond, Victoria. 3121 Australia.
Consumer Advisory Service - 1300 135 312.
New Zealand: 16-18 William Pickering Drive, Albany 1331, Auckland.
Asia: Mattel East Asia Ltd., Room 1106, South Tower, World Finance Centre, Harbour City, Tsimshatsui, HK, China.
Back Front
M1131
NOTE: Both of these pieces are a one-time assembly. Once these pieces are assembled,
they cannot be taken apart.
6/4/08 G2 Remark
- Revised line drawing on front panel
HOW TO TRANSFORM
TRUCK TO WORKSHOP
1
2
3
1. Push in the button
found on the back of
the truck and swing
open. This becomes
the two sides of the
workbench.
2. Hinge the flatbed of
the truck upward –
this becomes the
pegboard of the
workbench.
3. Hinge the center
countertop upward,
which is found
hidden in the back
of the truck.
Manny will tell you what needs to be fixed.
Refer to your blueprints for instructions on how to fix each part.
5
5. Insert the vise into
main countertop.
NOTE: At any time, you can press the Manny button to get extra help from Manny and the tools.
After several presses you will hear the “Fix It Right” song.
WORKSHOP
In workshop mode there are 4 items for you to fix:
• Clock
• Toaster
• Camera
6
6. Insert the two tool
clips into the main
pegboard.
7
7. Clip the phone onto
the hook found on
the main pegboard.
Mr. Lopart: “This is Mr. Lopart. My camera is broken! Can you please fix it?”
Remove the flash bulb with Squeeze or Rusty and Manny will tell you how you can pretend to fix it.
Replace the bulb back into the camera and you fixed it!
• Fan
• To begin play, press the Manny button found on the main peg board. One
of the characters from the show will call needing your help. Pick up the
phone to hear one of the following characters:
4
4. Hinge the two side
countertops upward
to reveal the two
side pegboards.
HOW TO PLAY
TRUCK
In truck mode, there are five different parts
for you to fix in the engine:
• Radiator
• Engine
• Air Filter
• Spark Plugs
• Battery
WORKSHOP TO TRUCK
• To transform the workshop back into the truck,
simply reverse the above steps. Be sure to
perfrom the steps in the proper reverse sequence.
To begin play, press
Manny
Button
the Manny button
found on the truck
door.
Kelly: “Hi there! This is Kelly. The clock for my store is broken! Can you fix it?”
Remove the clock hands using Felipe and Manny will tell you how you can pretend to fix it. Replace the
clock hands back onto the clock and you fixed it!
Abuelito: “Hola! This is Abuelito. Por favor, can you fix my fan? The fan blade is sticking.”
Remove the fan blade using Felipe and Manny will tell you how you can pretend to fix it. Replace the
fan blade back into the fan and you fixed it!
Mrs. Portillo: “Hola! This is Mrs. Portillo. Can you fix my toaster?”
Remove the cover plate on the toaster with Squeeze or Rusty and Manny will tell you how you can
pretend to fix it. Replace the cover back onto the toaster and you fixed it!
NOTE:
• If the phone is off the hook, you can also get phone calls by pressing the answering machine button
found under the phone.
• You can press the Manny button at any time to get extra help. After several presses you will hear the
“Fix It Right” song.
• Refer to the “blueprints” included with your 2-in-1 Transforming Tool Truck for further instructions on
how to play.
P.01 P.02
M1131 Handy Manny Tool Truck - I/S
Paper : Woodfree paper 80 gsm
Color : Black
Size : A3 (2-sided printing)
Date: 6/4/08
 Loading...