

Page 1
w
w
w
.
f
i
s
h
e
r
-
p
r
i
c
e
.
c
o
m
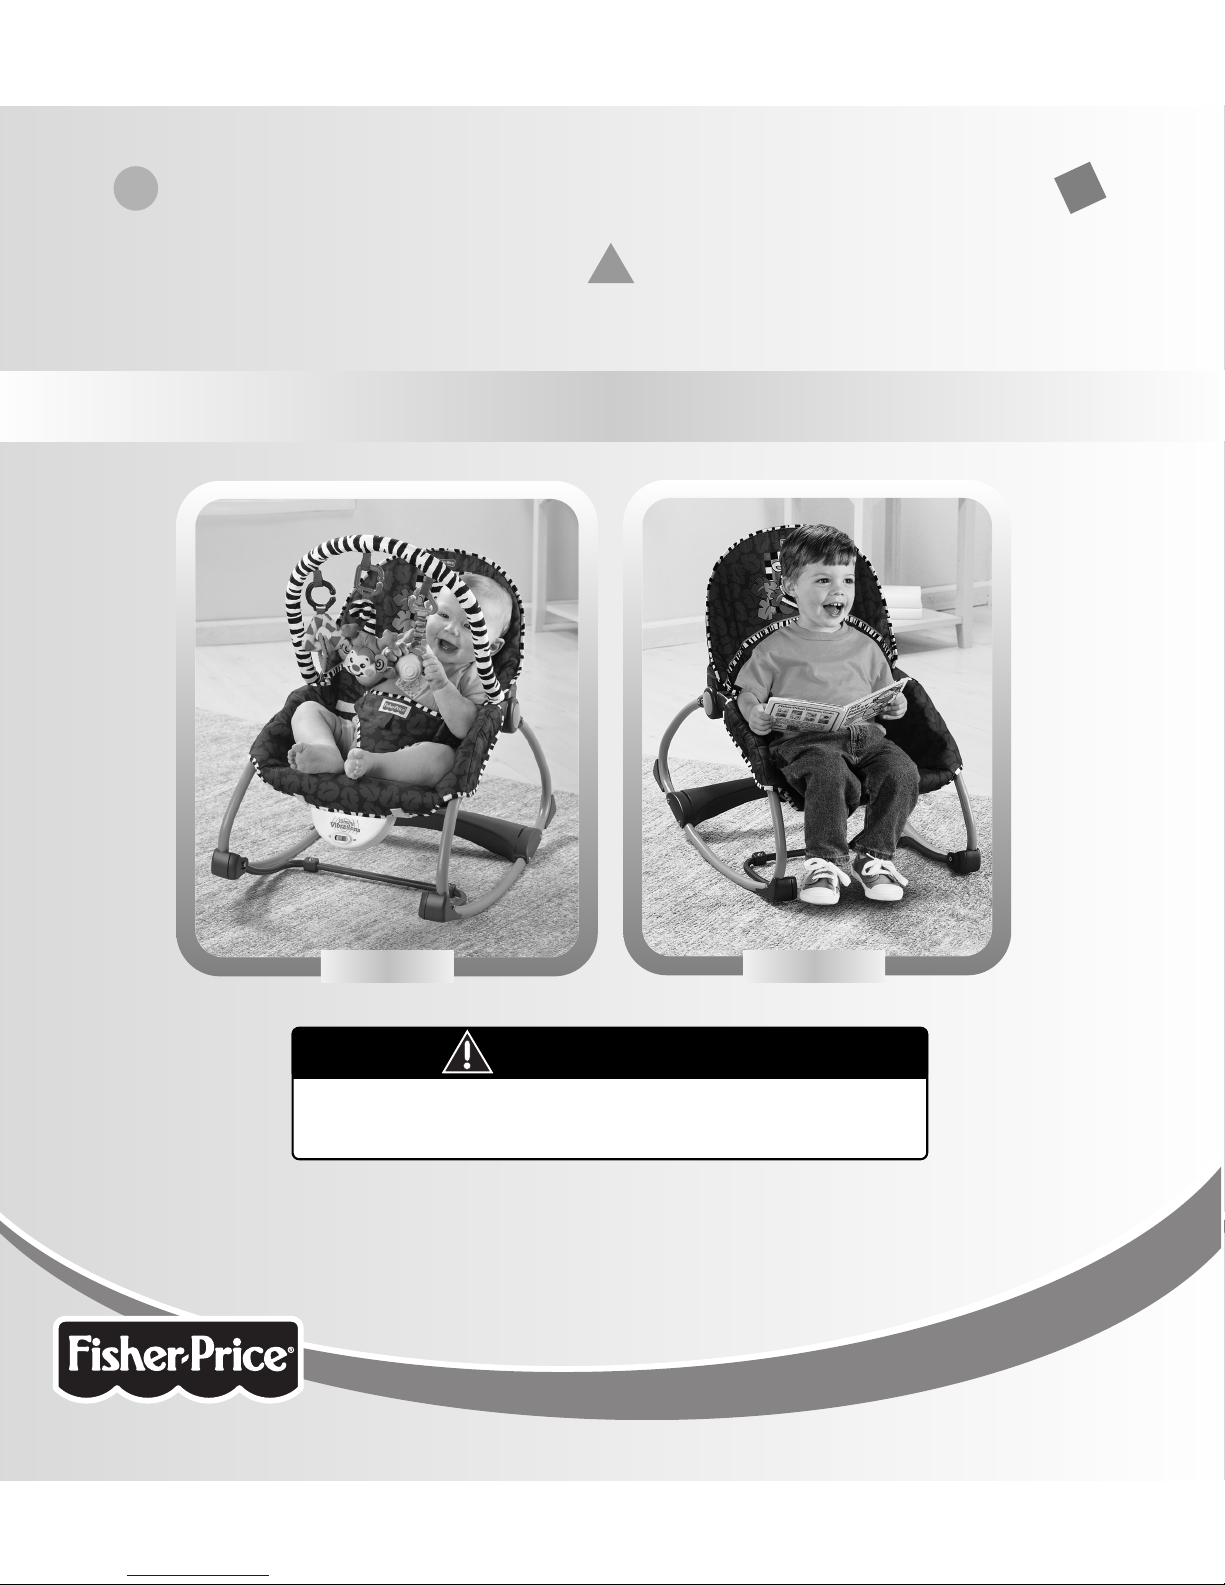
Infant-to-Toddler Rocker
Infant Seat
To ddler Seat
L
E
A
R
N
I
N
G
P
A
T
T
E
R
N
S
L
E
A
R
N
I
N
G
P
A
T
T
E
R
N
S
™
Model Number: G5911
IMPORTANT! KEEP INSTRUCTIONS
FOR FUTURE REFERENCE.
WARNING
Please keep this instruction sheet, as it contains important information.
Use the upright position only when your child has developed enough upper body control to sit without leaning forward.
Always use the restraint until your child is able to climb in and out of the chair unassisted.
Adult assembly is required.Tool needed for assembly: Phillips Screwdriver (not included).
Requires one LR20 "D" alkaline battery (not included) for vibrations unit operation.
Page 2
Warning
To prevent serious injury or death:
• It is dangerous to use this product
on an elevated surface.
•Never use on a soft surface (bed,
sofa, cushion) since product can
tip over and cause suffocation in
soft surfaces.
• Always use the restraint until child
is able to climb in and out of the
chair unassisted.
•Never leave child unattended.
• Use the upright position only when
child has developed enough upper
body control to sit without
leaning forward.
•Never use as a carrier or lift while
child is seated. Never use the toy
bar as a handle.
• Reclined position not recommended
for children who can sit up by
themselves (6 months approximately,
until 9 kg).
WARNING
2
Parts
IMPORTANT! Please remove all parts from the package
and identify them before assembly.The kickstand is
packaged within the pad at the factory. Before beginning
assembly,please remove kickstand from the pad.
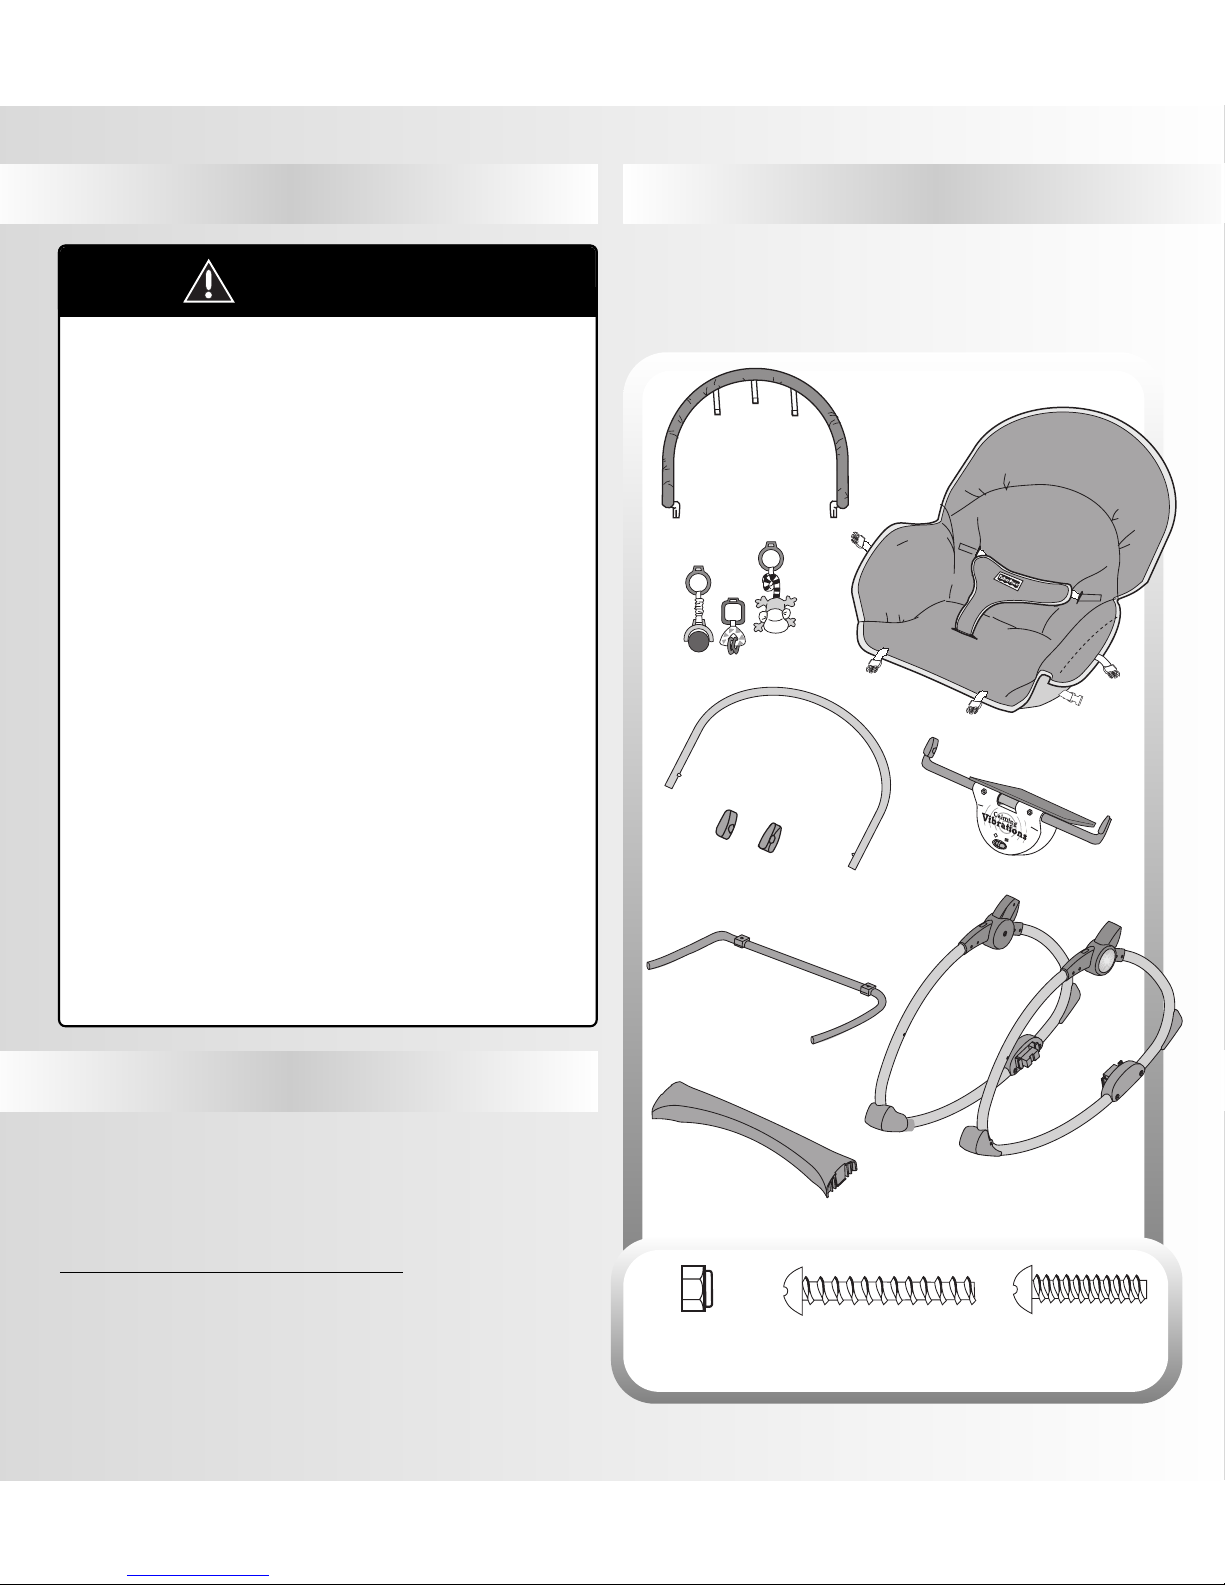
2 Side
Rails
2 Retainers with
Lock Nut
Cross Brace
Front Tube
Kickstand
Toy Bar
3 Toys
All Shown Actual Size
#8 x 1.9 cm (
3
/4")
Screw - 2
#8 x 3 cm (1
1
/8")
Screw - 2
M4 Lock Nut - 2
(Inside Retainers)
Occasionally a consumer may experience a problem with
one of our products. If this should happen, please call us,
rather than return this product to the store. Usually, we
can solve the problem over the telephone or send you
replacement parts.
Great Britain: telephone 01628 500302.
Consumer Information
Seat Back
Tube
Pad
Australia: Mattel Australia Pty. Ltd., 658 Church Street,
Locked Bag #870, Richmond,Victoria 3121 Australia.
Consumer Advisory Service 1300 135 312.
New Zealand: 16-18 William Pickering Drive, Albany 1331,Auckland.
Page 3
IMPORTANT! Before assembly, inspect this product for
damaged hardware, loose joints, missing parts or sharp
edges. DO NOT use if any parts are missing or broken.
Contact Mattel for replacement parts and instructions
if needed. Never substitute parts.
This package contains small parts
in its unassembled state.
Adult assembly is required.
CAUTION
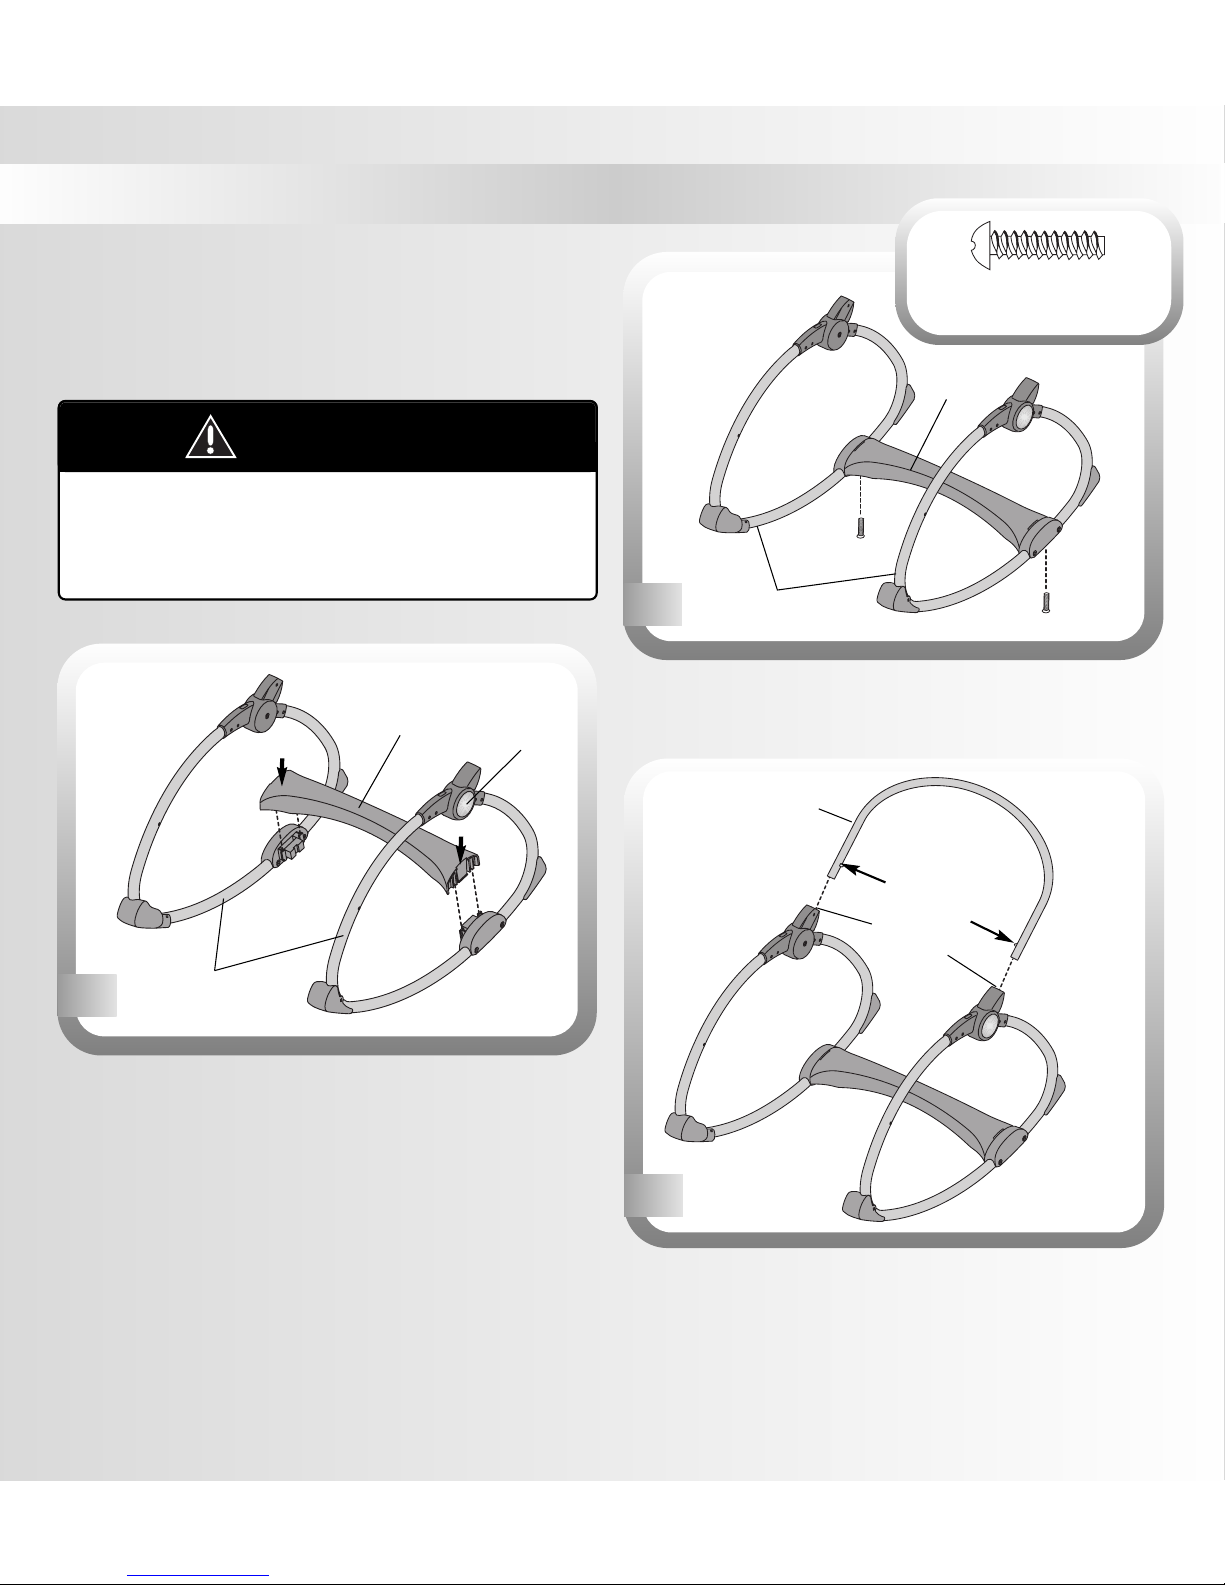
•Position each side rail so that the button faces outward.
•Fit the cross brace between the side rails, as shown.
•Push the cross brace down to “snap” it into place. This may
require a lot of force.
Side Rails
1
• Insert a screw through the hole in the bottom of each side
rail and into the cross brace.Tighten the screws with a
Phillips screwdriver. Do not over-tighten.
3
2
Shown Actual Size
#8 x 1.9 cm (3/4") Screw
Cross Brace
Button
Side
Rails
Push
Cross
Brace
• Insert the seat back tube into the socket in each side rail.
•While pressing the tabs on the ends of the seat back tube,
continue to insert the seat back tube into the sockets in
each side rail, until the tabs “snap” into place. Make sure
you hear a “snap”on each side.
•Pull the seat back tube up to be sure it is secure in the
side rail sockets.
3
Seat Back Tube
Press Tabs
Side Rail
Sockets
Push
Assembly
Page 4
4
4
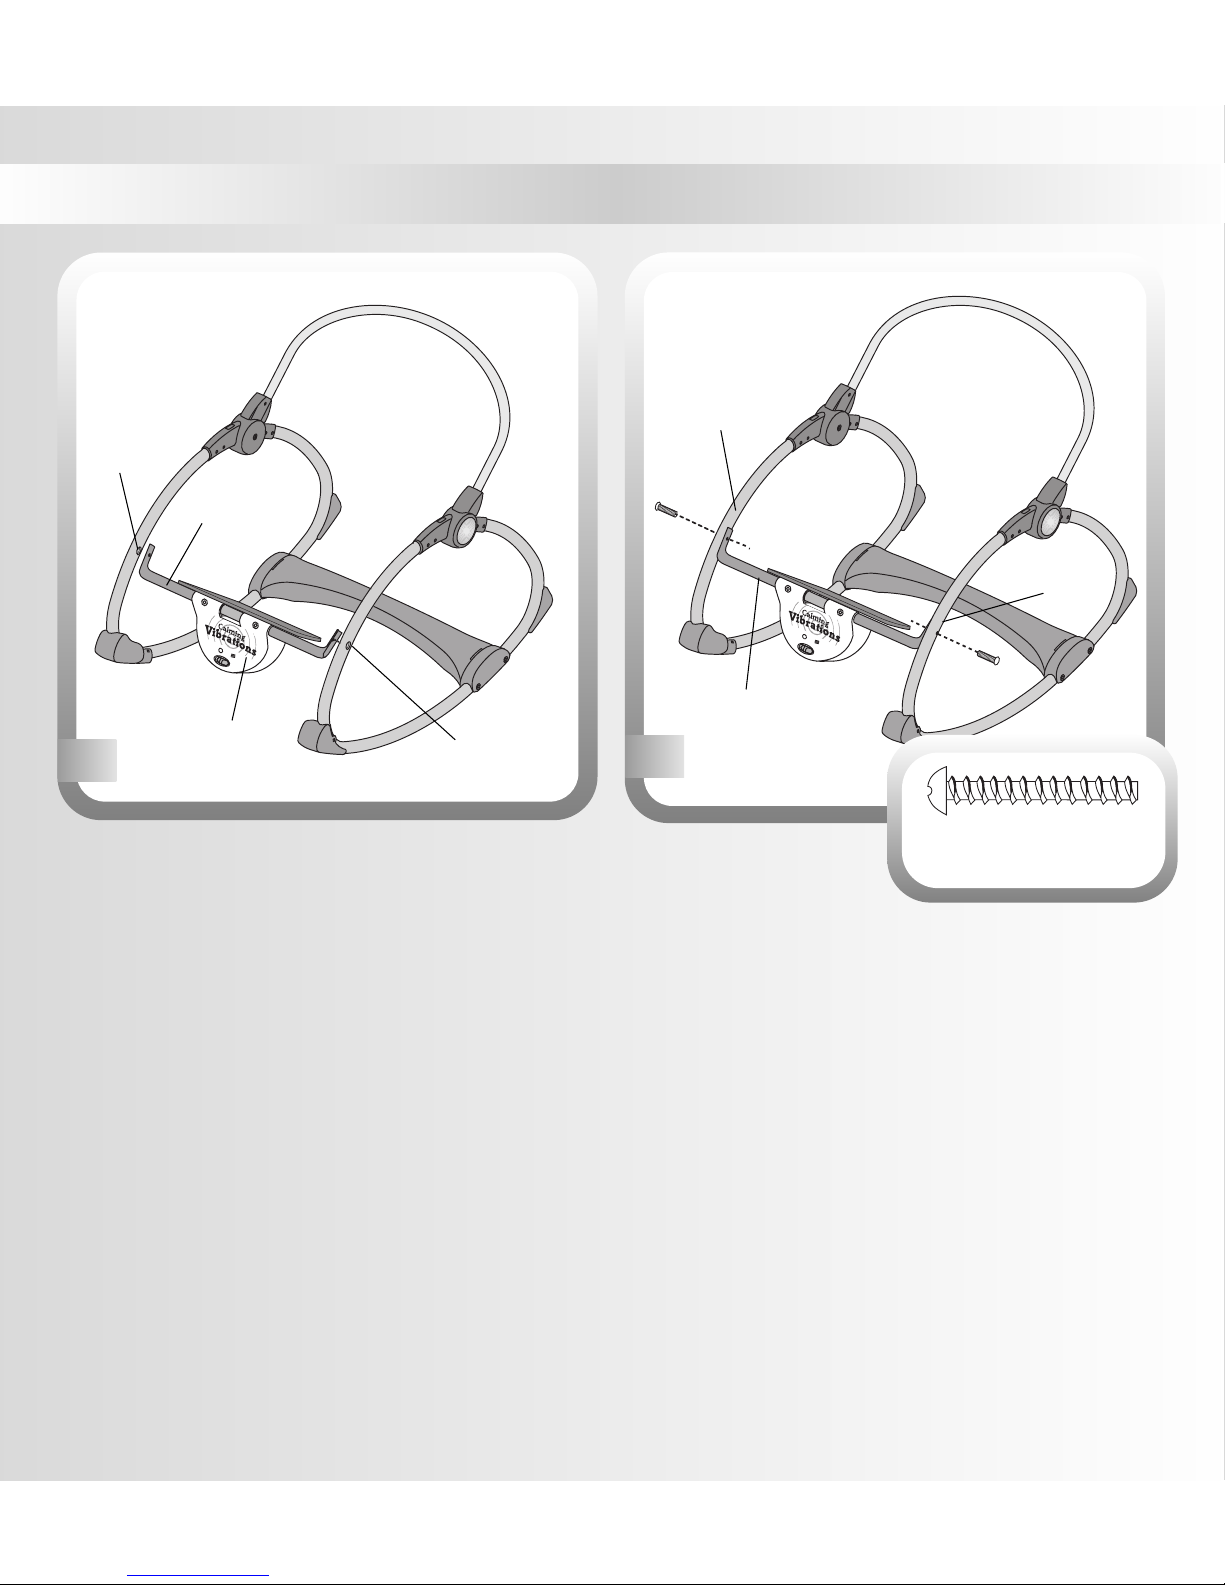
•Locate the hole in each side rail.
•With the vibrations unit facing forward, fit the front tube
to the side rails, as shown.Hold the front tube in place
and proceed to step 5.
Front Tube
Side Rail
Hole
Side Rail
Hole
Vibrations
Unit
•Insert a
#8 x 3 cm (1
1
/8")
screw through the
outside of each side rail and
into the ends of the front tube.
Side
Rail
Side
Rail
Front Tube
5
Shown Actual Size
#8 x 3 cm (1
1
/8") Screw
IMPORTANT! Please follow the next assembly (step 6)
carefully to completely secure the front tube to the
side rails.
Assembly
Page 5
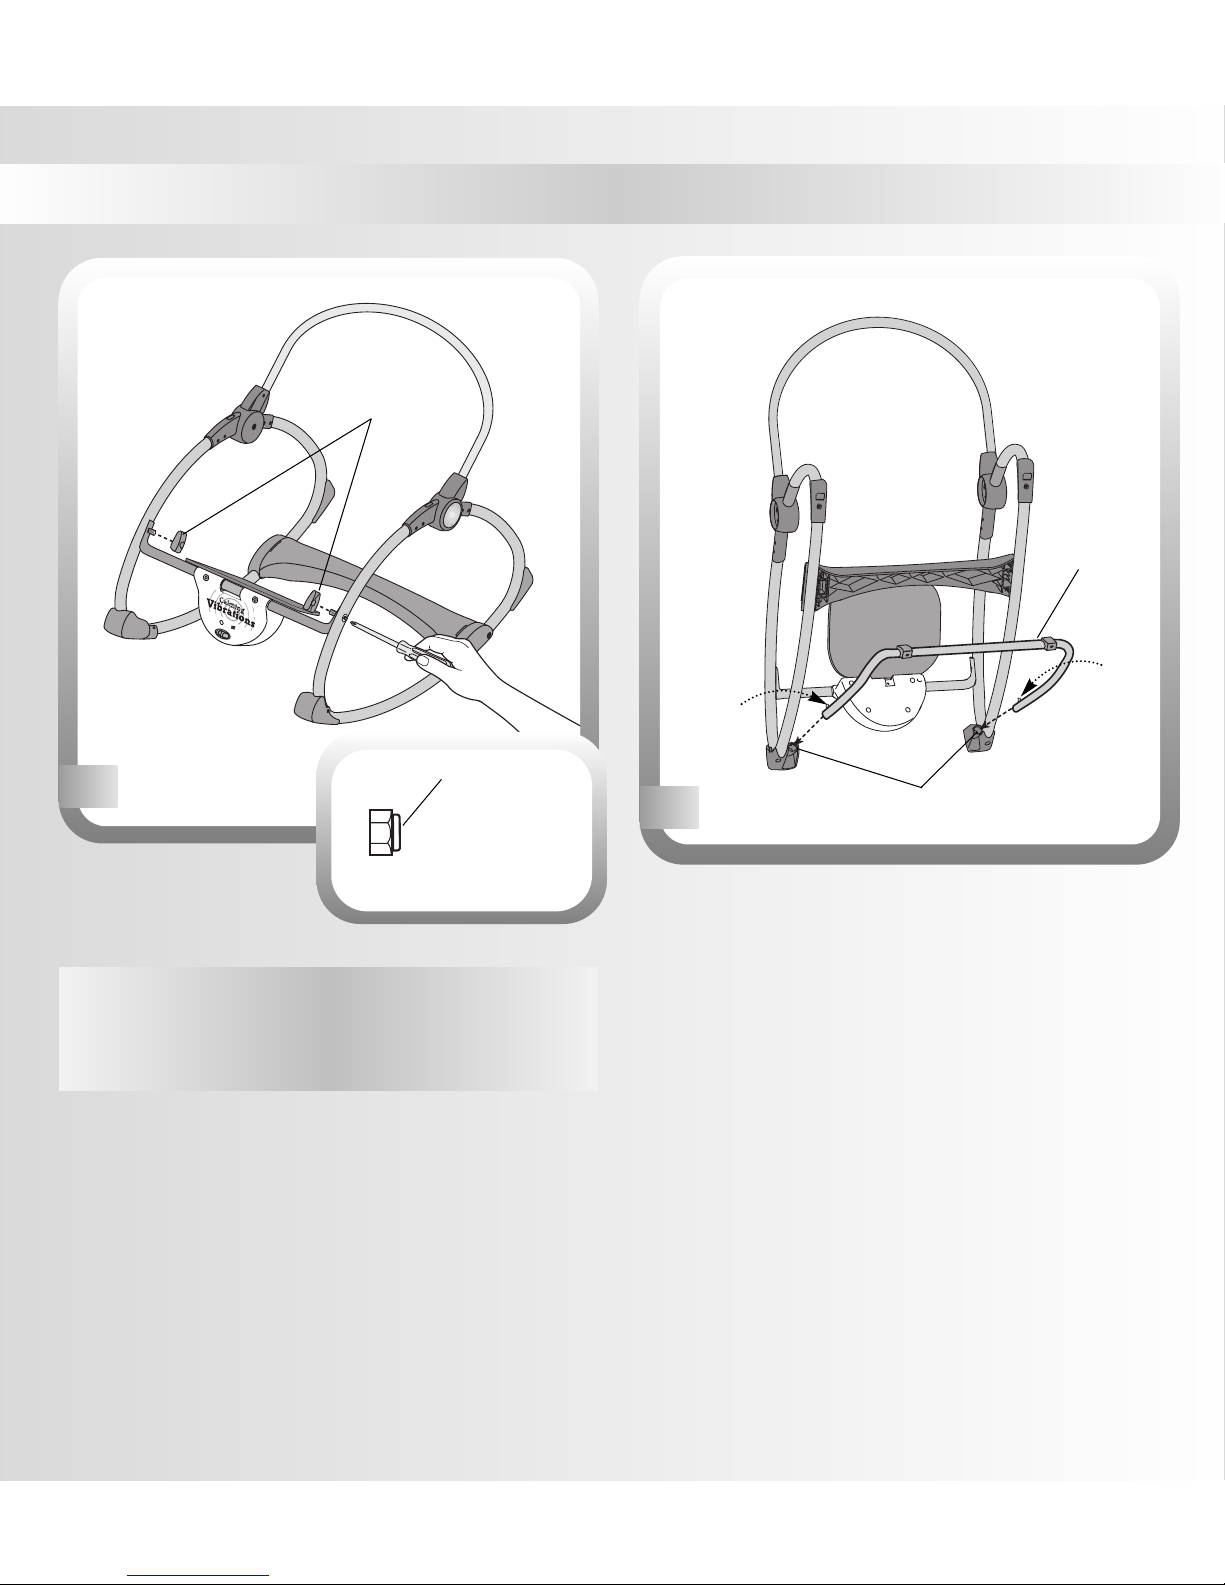
5
•Position the assembly face down,as shown.
•While pressing the tab on each end of the kickstand,
insert the kickstand into the receptacle in each side rail,
as shown.
•Push the kickstand into the receptacles until the
tabs “snap” into place. Make sure you hear a “snap” on
each side.
•Pull the kickstand to be sure it is secure in the receptacles.
7
Press
Tab
Press
Tab
Kickstand
Receptacles
6
Shown Actual Size
•Fit a retainer with lock nut
onto the end of the screw
and to the inside of a
side rail.
•Tighten the screw with a Phillips screwdriver. Do not
over-tighten.
•Repeat this procedure to fasten the screw in the other
end of the front tube and side rail, using the remaining
retainer with lock nut.
Rounded Side
M4 Lock Nut - 2
(Inside Retainer)
Retainer
with Lock Nut
Hint: A lock nut has been factory assembled to the retainer.
During shipment, the lock nut may have fallen out of the
retainer.If it has, please fit it into the hexagonal hole in the
retainer so that the rounded side of the lock nut faces out.
Assembly
Page 6
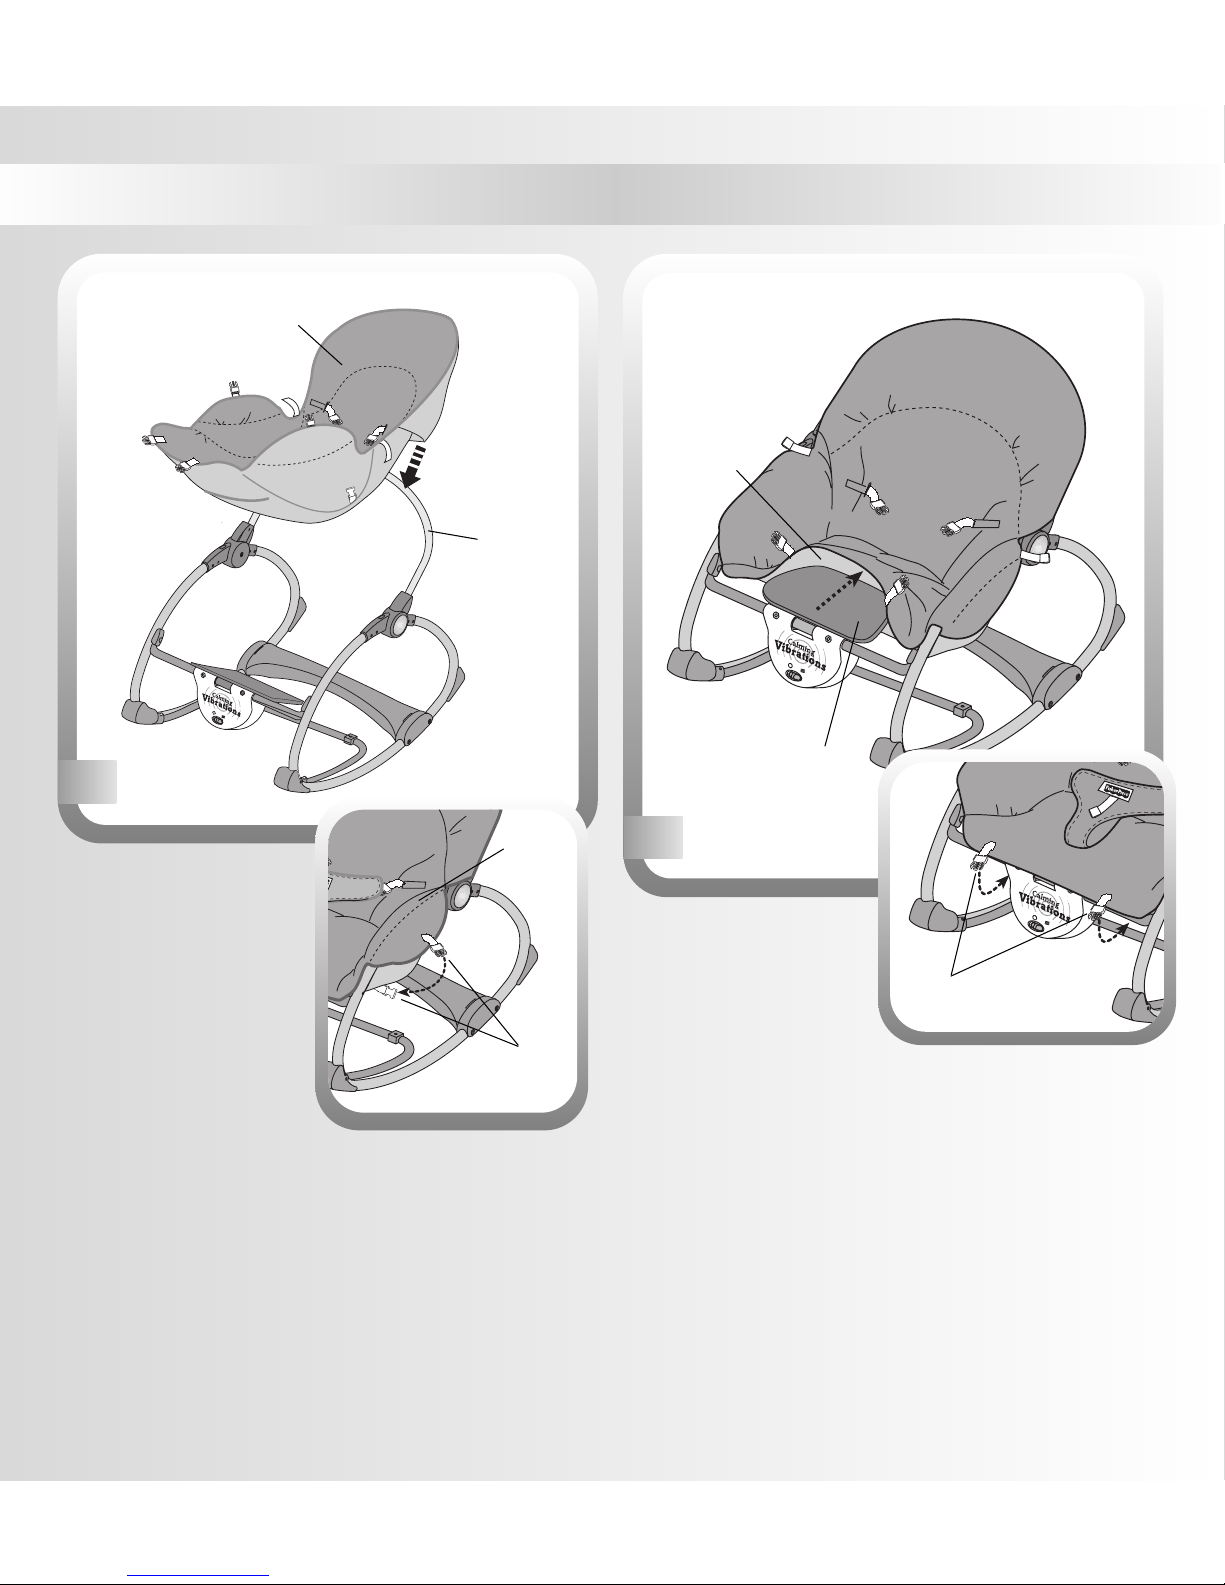
6
•Turn the hardboard
over and insert it into
the slot in the front
edge of the pad.
•Fasten the pad buckles on
the front edge of the pad
and underneath the seat. Make sure you hear a “snap” on
both sides.
•Press the fasteners together in the seat back portion of
the pad.
Assembly is now complete.
9
Pad
Buckles
•Turn the assembly upright.
•Fit the upper pocket on
the pad onto the seat
back tube.
•Fasten the pad buckles
around each side rail.
8
Pad
Pad Slot
Press
Seat Back
Hardboard
Seat Back
Tub e
Pad
Buckles
Side
Rail
Assembly
Page 7
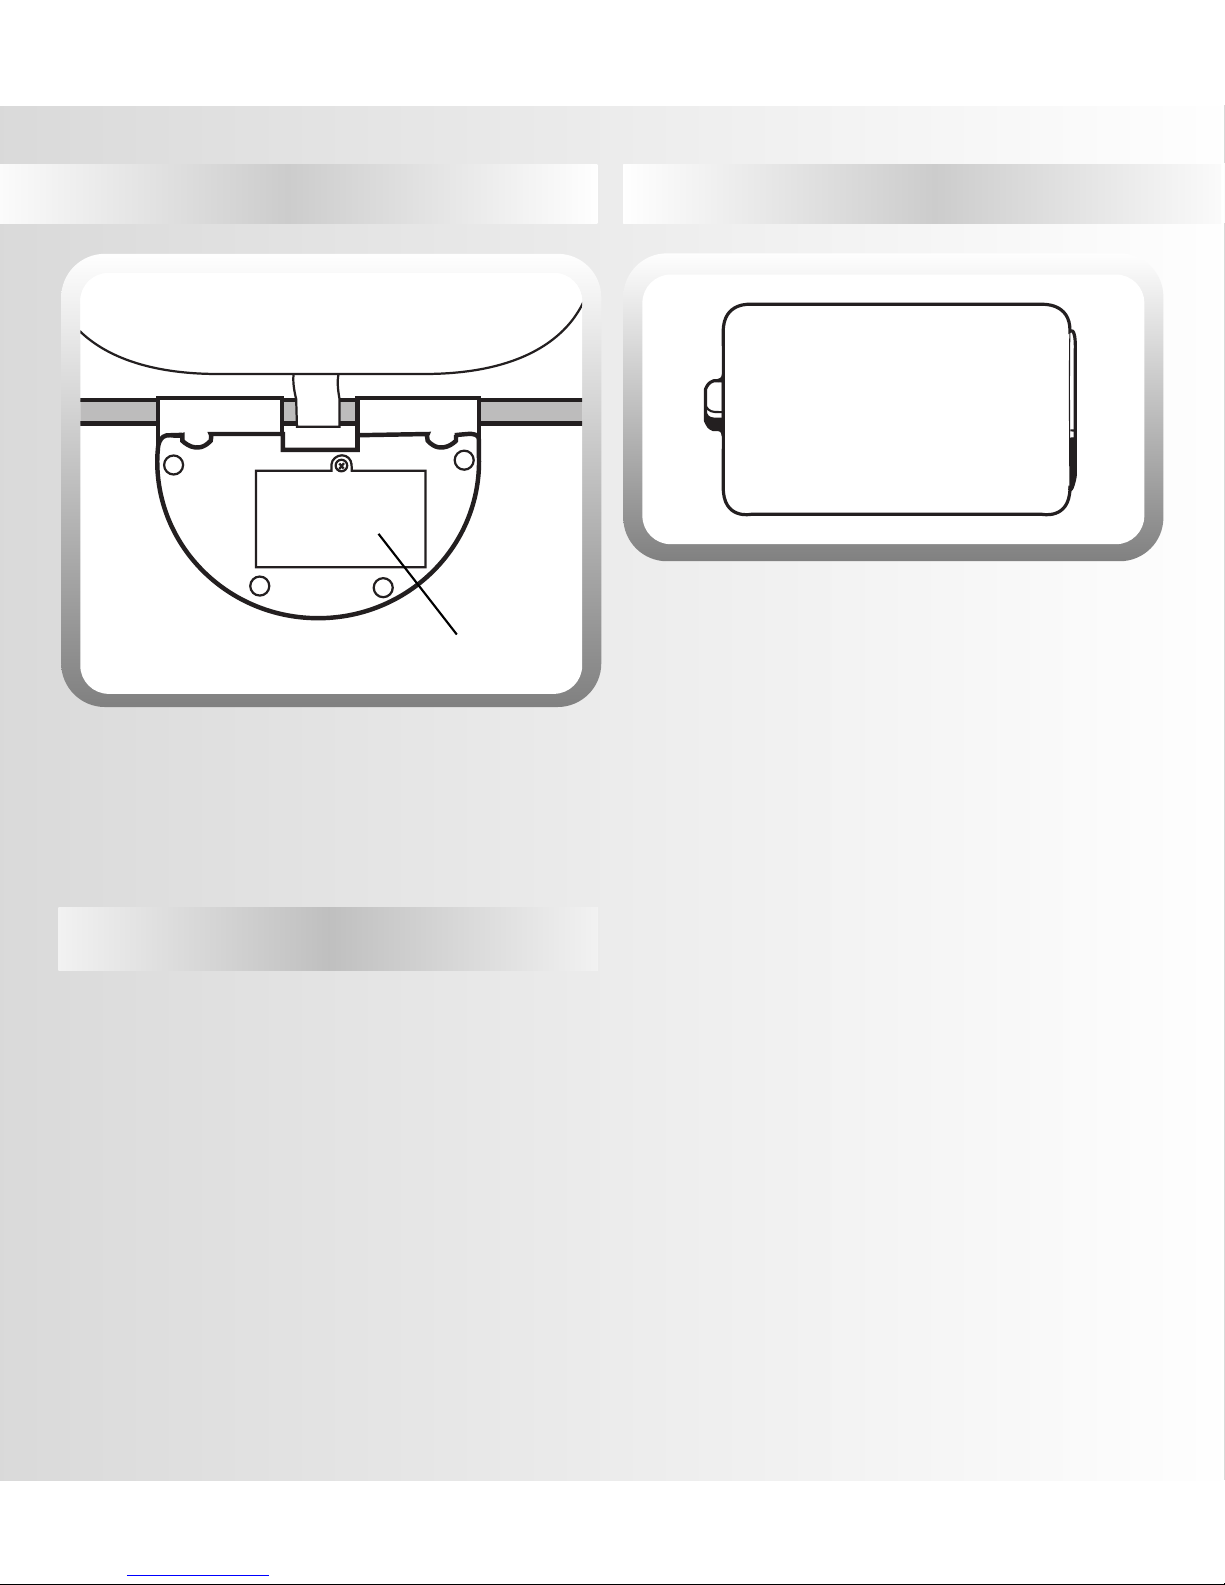
7
• Locate the battery compartment on the bottom of the
vibrations unit.
• Loosen the screw in the battery compartment door with a
Phillips screwdriver.
• Lift to remove the battery compartment door.
• Insert one LR20 "D" alkaline battery as indicated inside
the battery compartment.
• Replace the battery compartment door and tighten the
screw with a Phillips screwdriver. Do not over-tighten.
Battery
Compartment
Battery Safety Information
1.5V
LR20 "D"
SHOWN ACTUAL SIZE
+
–
Batteries may leak fluids that can cause a chemical burn
injury or ruin your product. To avoid battery leakage:
• Do not mix old and new batteries or batteries of different
types: alkaline, standard (carbon-zinc) or rechargeable
(nickel-cadmium).
• Insert batteries as indicated inside the battery compartment.
• Remove batteries during long periods of non-use. Always
remove exhausted batteries from the product. Dispose
of batteries safely. Do not dispose of batteries in a fire.
The batteries may explode or leak.
• Never short-circuit the battery terminals.
•Use only batteries of the same or equivalent type,
as recommended.
• Do not charge non-rechargeable batteries.
• Remove rechargeable batteries from the product
before charging.
•If removable, rechargeable batteries are used, they are only
to be charged under adult supervision.
Hint: We recommend using an alkaline battery for longer
battery life.
Battery Installation
Page 8
8
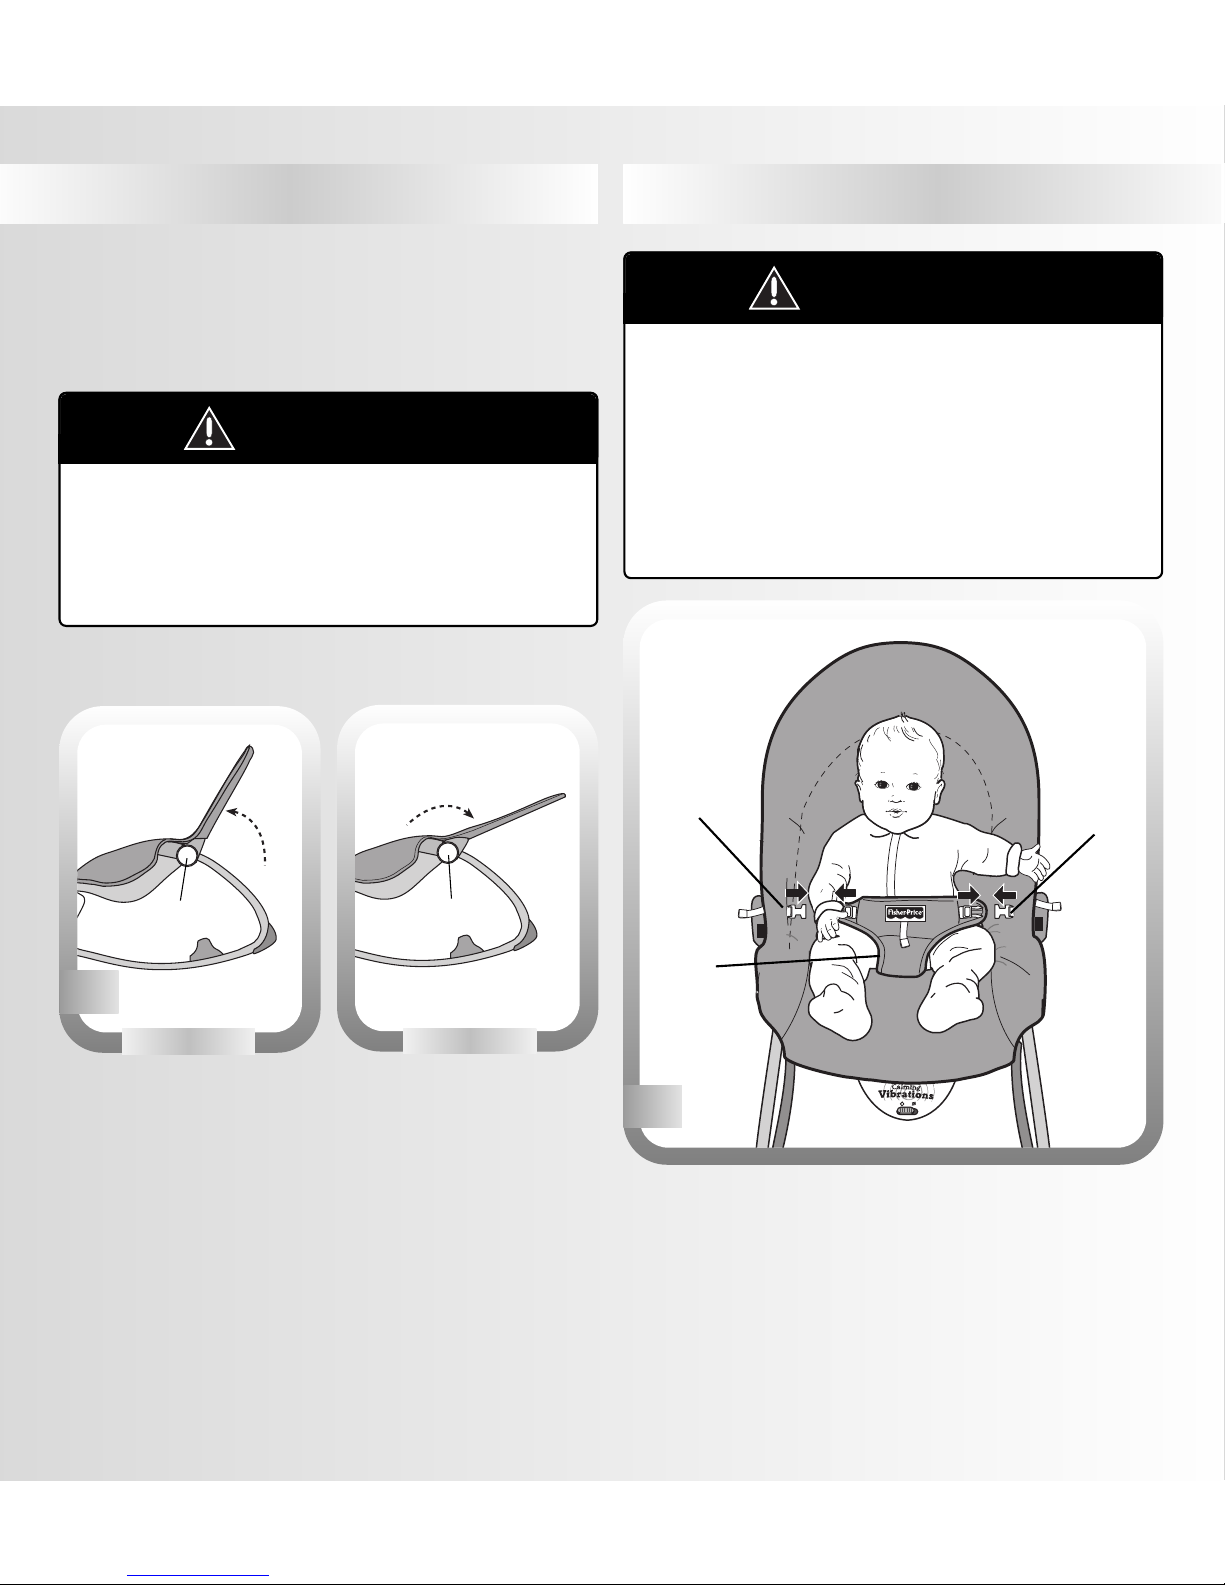
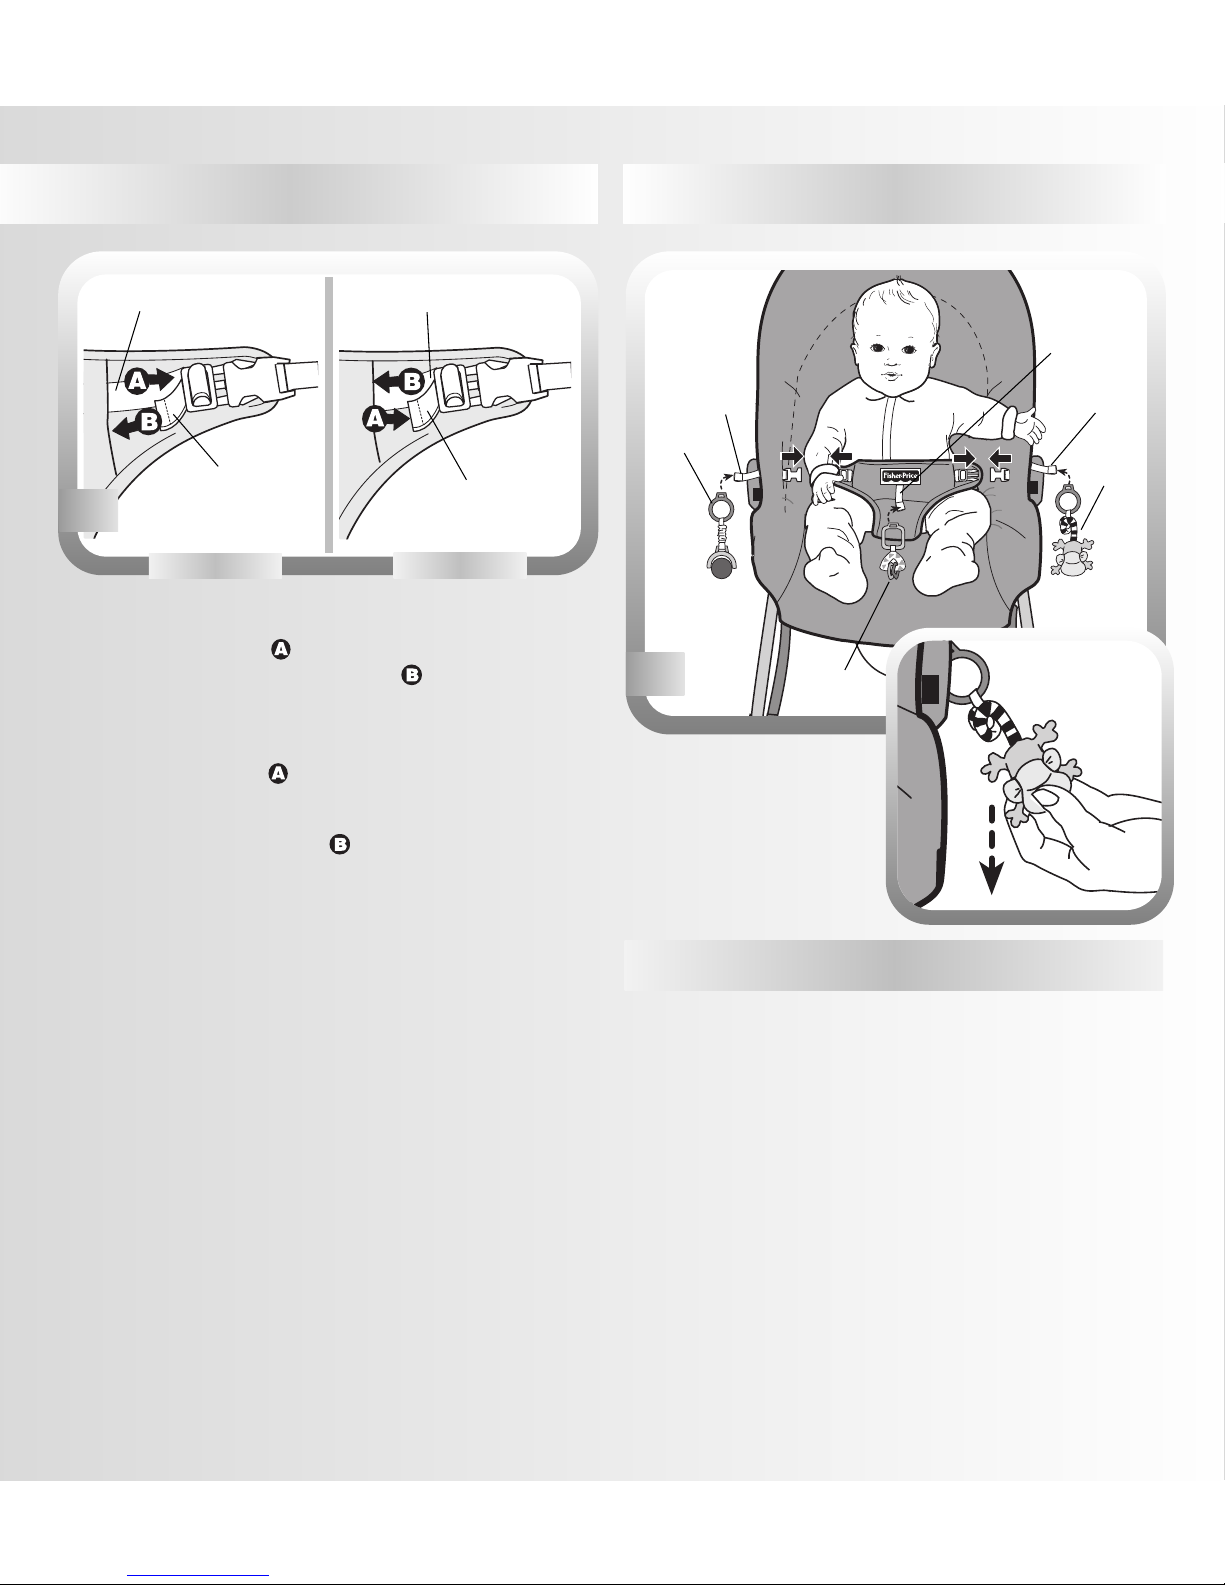
Securing Your Infant
•Place your child in the seat. Position the restraint pad
between your child’s legs.
•Fasten the restraint belts to each side of the restraint pad.
Make sure you hear a “click”on both sides.
•Check to be sure the restraint system is securely attached
by pulling it away from your child.The restraint system
should remain attached.
Restraint
Pad
Restraint
Belt
Restraint
Belt
To prevent serious injury or death:
• Always use the restraint until child
is able to climb in and out of the
chair unassisted.
• It is dangerous to use this product
on an elevated surface.
• Never leave child unattended.
WARNING
2
Recline
Select a seat position for your child’s comfort:
Upright or Recline.
Upright
While pressing the button on each side rail, lift the seat back.
Recline
While pressing the button on each side rail, lower the
seat back.
IMPORTANT! Before each use, inspect this product for
damaged hardware, loose joints, missing parts or sharp
edges. DO NOT use if any parts are missing or broken.
Contact Mattel for replacement parts and instructions if
needed. Never substitute parts.
Seat Position
Press
Button
Press
Button
Lift
1
To prevent serious injury or death:
Use the upright position only when child
has developed enough upper body
control to sit without leaning forward.
WARNING
Upright
Lower
Set-Up & Use
Page 9
9
Toys
4
•Fit the pad straps through
the slot in the toy rings.
Fasten the straps.
•Or, attach the toys to the
toy bar straps (please see
Step 5).
Toy
Toy
Toy
Strap
Loosen
Tighten
B
Anchored End
Free End
Anchored End
Free End
B
3
To tighten the belts:
•Feed the anchored end of the restraint belt up through the
buckle to form a loop .
•Pull the free end of the restraint belt .
•Repeat this procedure to tighten the other restraint belt.
To loosen the belts:
•Feed the free end of the restraint belt up through the
buckle to form a loop . Enlarge the loop by pulling on
the end of the loop toward the buckle.
•Pull the anchored end of the restraint belt to shorten the
free end of the restraint belt .
•Repeat this procedure to loosen the other restraint belt.
B
B
Strap
Strap
Hint: Pull the monkey’s head for a short tune.
Securing Your Infant
Page 10
10
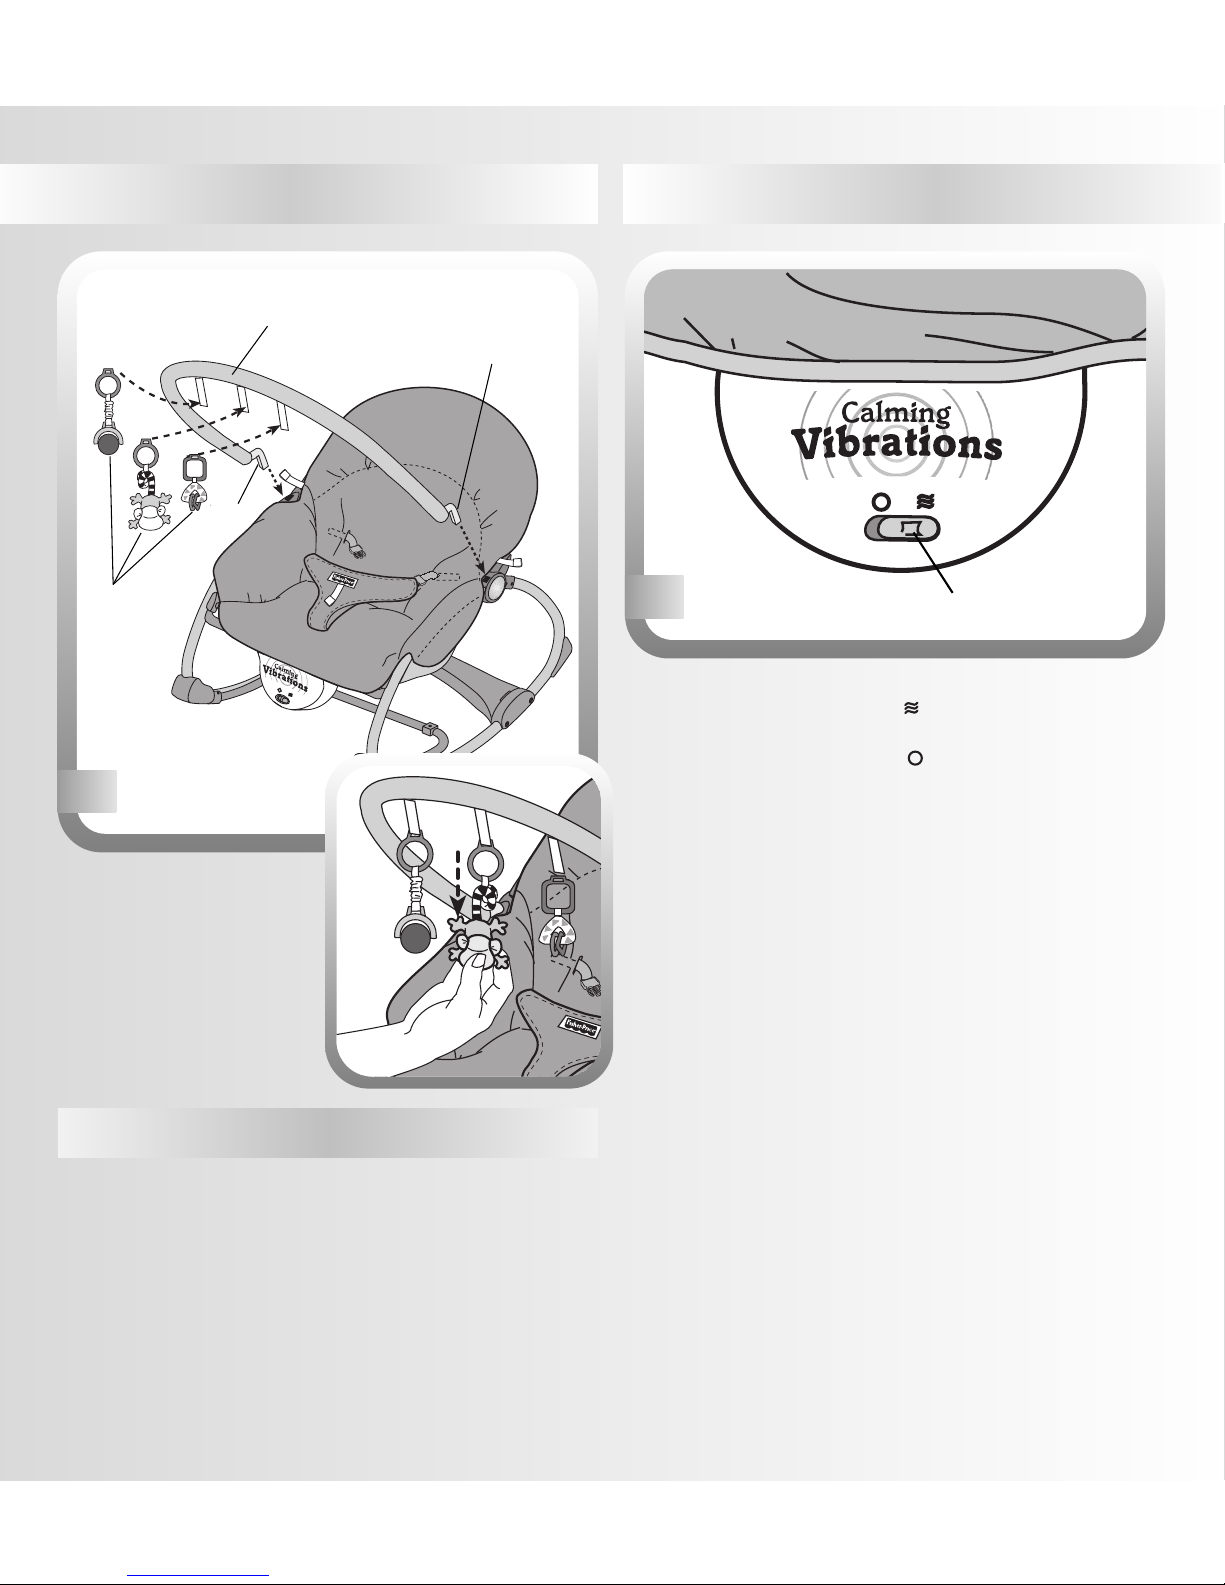
Calming Vibrations
•Make sure your child is properly secured in the seat.
•Slide the power switch to the on position for
calming vibrations.
•Slide the power switch to the off position to turn
vibrations off.
6
Power Switch
•Fit the plugs on each end
of the toy bar into the
sockets in each side rail.
•Fit the toy bar straps
through the slot in the toy
rings. Fasten the straps.
•Or, attach the toys to the
pad straps (see Step 4).
Toy Bar
5
Toy s
Plug
Plug
Toy B a r
Hint: Pull the monkey’s head for a short tune.
Page 11
11
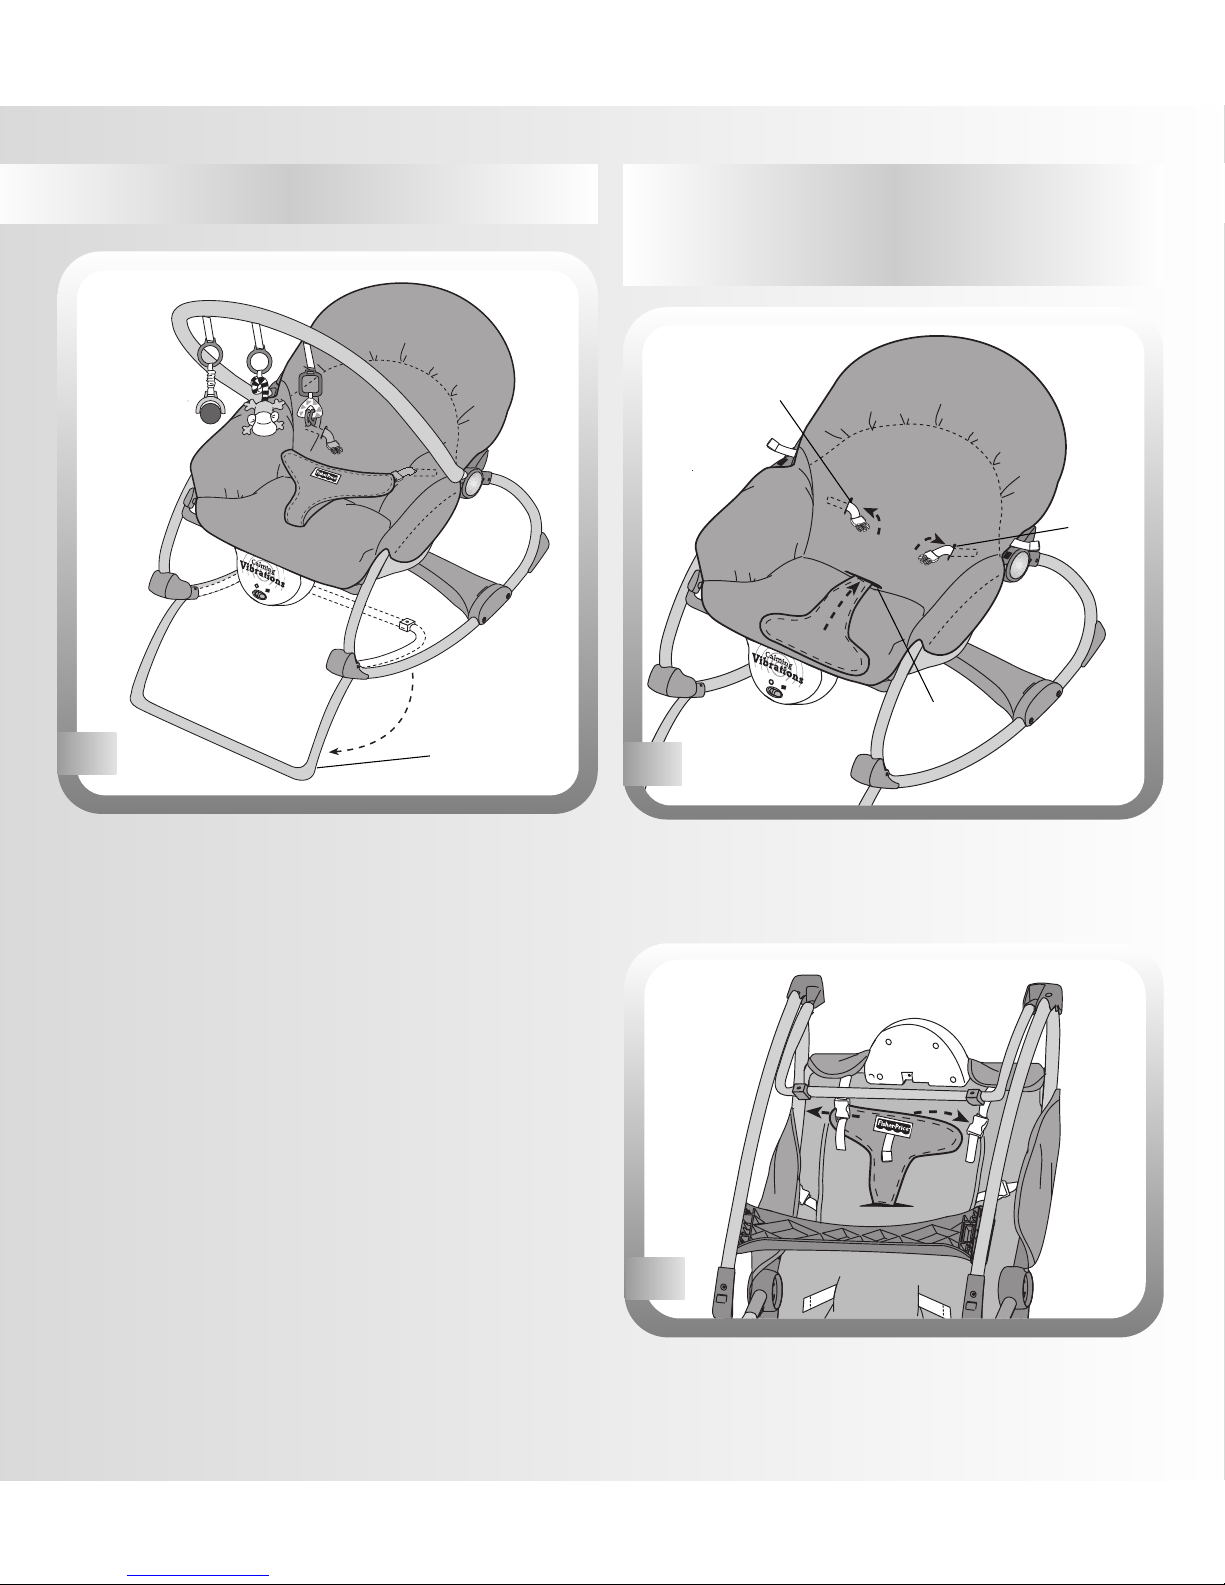
Storing the Restraint
System for Toddler Use
8
Large
Slot
Small Slot
Small
Slot
• Insert the restraint belts back through the small slots in
the pad.
• Insert the restraint pad down through the large slot in
the pad.
•Rotate the kickstand out.
•Push down on the seat bottom to be sure the kickstand
is in position.
Kickstand
7
Kickstand
•Turn the rocker face down.
•Tuck the ends of the restraint pad underneath the buckles,
as shown.
9
Page 12

Fisher-Price,Inc., a subsidiary of Mattel,Inc., East Aurora, NY 14052 U.S.A.
©2004 Mattel, Inc. All Rights Reserved.® and ™ designate U.S. trademarks of Mattel, Inc.
PRINTED IN CHINA G5911pr-0726
The frame, pad toy bar and toys may be wiped clean using a mild cleaning solution and a damp cloth. Do not use bleach.
Do not use harsh or abrasive cleaners. Rinse clean with water to remove residue.
Care
 Loading...