

Page 1

Computer Learning
System
Parent’s Guide
Please keep this guide for future
reference, as it contains
important information.
Adult assembly is required.
Tool required for assembly:
Slotted screwdriver
(not included).
L3480
1
www.fi sher-price.com
Page 2

Table of Contents
3 Grow-With-Me Levels of Learning! . . . . . . . . . . . . . . . . . . . . . . . . . . . . . . . . . . . . . . . . . . . . . . . . . . . . . 3
Message to Parents . . . . . . . . . . . . . . . . . . . . . . . . . . . . . . . . . . . . . . . . . . . . . . . . . . . . . . . . . . . . . . . . . . 4
Your Computer Learning System . . . . . . . . . . . . . . . . . . . . . . . . . . . . . . . . . . . . . . . . . . . . . . . . . . . . . . . . 5
Minimum System Requirements . . . . . . . . . . . . . . . . . . . . . . . . . . . . . . . . . . . . . . . . . . . . . . . . . . . . . . . . 6
Tips for Setup and Use . . . . . . . . . . . . . . . . . . . . . . . . . . . . . . . . . . . . . . . . . . . . . . . . . . . . . . . . . . . . . . . . .7
Installing/Uninstalling Software . . . . . . . . . . . . . . . . . . . . . . . . . . . . . . . . . . . . . . . . . . . . . . . . . . . . . . . . . 8
Assembling the keytopper to Your Keyboard . . . . . . . . . . . . . . . . . . . . . . . . . . . . . . . . . . . . . . . . . . . . . . 9
Removing the keytopper from Your Keyboard . . . . . . . . . . . . . . . . . . . . . . . . . . . . . . . . . . . . . . . . . . . . . 19
Let’s Learn Together. . . . . . . . . . . . . . . . . . . . . . . . . . . . . . . . . . . . . . . . . . . . . . . . . . . . . . . . . . . . . . . . . . 20
Level 1. . . . . . . . . . . . . . . . . . . . . . . . . . . . . . . . . . . . . . . . . . . . . . . . . . . . . . . . . . . . . . . . . . . . . . . . . . . . 22
Level 2 . . . . . . . . . . . . . . . . . . . . . . . . . . . . . . . . . . . . . . . . . . . . . . . . . . . . . . . . . . . . . . . . . . . . . . . . . . . 24
Level 3 . . . . . . . . . . . . . . . . . . . . . . . . . . . . . . . . . . . . . . . . . . . . . . . . . . . . . . . . . . . . . . . . . . . . . . . . . . . 26
Customer Support . . . . . . . . . . . . . . . . . . . . . . . . . . . . . . . . . . . . . . . . . . . . . . . . . . . . . . . . . . . . . . . . . . . 28
2
Page 3

3 Grow-With-Me Levels of Learning!
Our specially-developed, infant-appropriate software offers three levels of play for growing baby.
Tapping on the keytopper brings the screen to life with exciting animation, music, sing-along
songs, sounds, and lots of learning activities. What a great way for you and baby to play and
learn — together!
9M+ Level 1
Baby bats keys for fun sounds, and surprise animations!
18M+ Level 2
Older babies discover letters, shapes, counting and peek-a-boo fun!
24M+ Level 3
Toddlers learn and explore by touching specific keys for more advanced interaction.
3
Page 4

Message to Parents
Laugh, Smile & Learn™ Computer Learning System is designed to be a supervised activity. Under
proper supervision, the keytopper and software will provide a safe and enjoyable shared experience
for you and your child. Do not leave your infant or toddler unattended in a chair with access to the
cords and accessories that are associated with a computer.
CAUTION
To prevent strangulation, keep computer
cables away from children.
4
Page 5
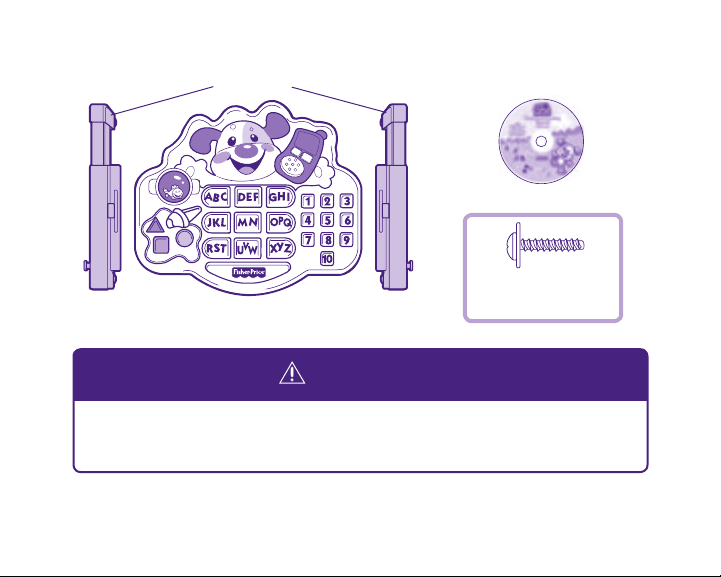
Your Computer Learning System
2 Brackets
Keytopper
CD
#4 x ½ ” Screws - 2
Shown Actual Size
CAUTION
This product contains small parts in its
unassembled state. Adult assembly is required.
5
Page 6

Minimum System Requirements
• Operating System: Windows 2000, Windows XP and Windows Vista™
• Processor: 750MHz
• Memory: 256MB RAM
• Hard Drive space: 250MB available
• Internet connection - optional for automatic software updates
Note: This software is only compatible with English keyboards.
6
Page 7
Tips for Setup and Use
1.
Make sure your computer keyboard is completely
flat before attaching the keytopper. Lower the
tabs on the back of your keyboard if necessary.
2.
Do not use the keytopper with your computer
keyboard while it is in a tray or drawer.
Be sure to place your computer keyboard
on a large, flat surface before assembling
the keytopper.
3.
Make sure the "Caps Lock" button on your
computer keyboard is off.
4.
Install the software before assembling
the keytopper.
5.
The keytopper fits over most standard
computer keyboards (but may not fit some
unique styles or ergonomic designs).
7
Page 8

Installing Software
In order to run the program, you will first need to run the installer to setup the necessary program
files on your hard drive.
1. Insert the CD-ROM disc into the CD-ROM drive in your computer.
2. Click the OK button.
3. Follow the installation instructions.
Uninstalling Software
1. Click the Start button and select Programs.
2. Navigate to Fisher-Price® then to the Laugh, Smile & Learn™ program.
3. Choose "Uninstall."
8
Page 9

Assembling the Keytopper to Your Keyboard
Bracket Long Legs
Slot
Long Leg
Peg
Short Leg
Note the long leg and short
leg on each bracket.
Keytopper
Ta b
• Pull the peg out on each bracket and extend the bracket to its widest position.
• Position the brackets so that the long leg on each is toward the top of the keytopper and the peg
on each is facing out.
• Position one of the brackets at a 45o angle to the keytopper. Insert and “snap” the bracket tab into
the slot on the side of the keytopper.
• Repeat this procedure to assemble the other bracket to the keytopper.
9
Page 10

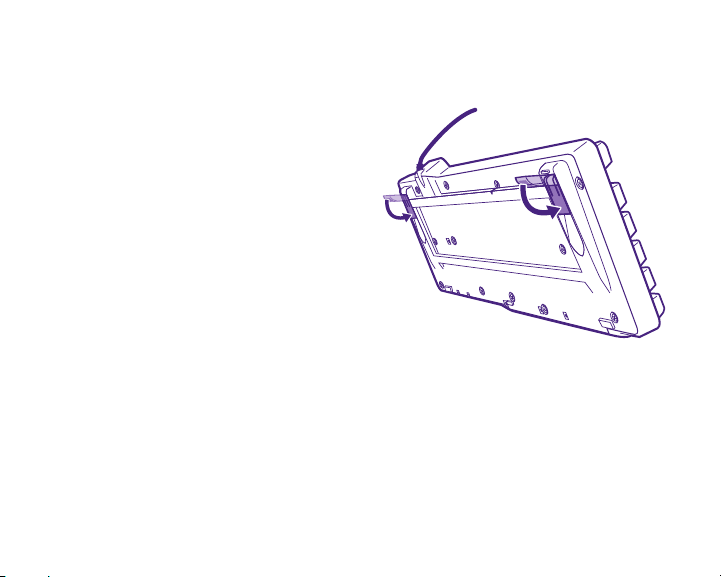
Assembling the Keytopper to Your Keyboard
Bracket
• While holding the brackets in place, carefully turn the keytopper over.
• Insert the screws through the slot in each bracket and into the keytopper. Loosely tighten the
screws with a slotted head screwdriver. Do not fully tighten the screws.
• Note the locations of the positioning ribs on the underside of the keytopper.
10
Bracket
Positioning RibPositioning Rib
Page 11

Assembling the Keytopper to Your Keyboard
Alpha-Numeric Portion
• Locate the alpha-numeric portion of your computer keyboard.
• Locate the keys highlighted in the illustration above. The keytopper positioning ribs will fit
between these keys.
Note: For proper function, be sure the "Caps Lock" button on your computer keyboard is off.
11
Page 12

Assembling the Keytopper to Your Keyboard
Positioning Rib
• With the keytopper face up, position the keytopper over the alpha-numeric portion of your
computer keyboard.
• Fit the positioning tabs between the keys shown in the illustration above.
Hint: If you have properly positioned the keytopper over your computer keyboard, the keytopper
cannot be moved from side or up or down.
12
Positioning Rib
Page 13

Assembling the Keytopper to Your Keyboard
Left Bracket
Lower Leg
Computer Keyboard Lower Edge
Right Bracket
Lower Leg
• Position the right bracket lower leg to the lower edge of your computer keyboard.
Hint: If you have properly positioned the keytopper over your computer keyboard, the left bracket
lower leg will not contact the computer keyboard bottom edge.
• Position the left bracket lower leg so that it aligns with the right bracket lower leg.
13
Page 14

Assembling the Keytopper to Your Keyboard
Fully Tighten Screws
• While keeping the brackets in position, carefully remove the keytopper from your
computer keyboard.
• Turn the keytopper over and fully tighten the screws in the brackets with a slotted screwdriver.
Do not over-tighten.
14
Page 15

Assembling the Keytopper to Your Keyboard
Positioning Rib
• Replace the keytopper over the computer keyboard, Make sure the positioning tabs fit between the
keys shown in the illustration above.
Hint: If you have properly positioned the keytopper over your computer keyboard, the keytopper
cannot be moved from side or up or down.
Positioning Rib
15
Page 16

Assembling the Keytopper to Your Keyboard
Bracket
Peg
• Pull the peg out on each bracket and slide the top legs until they contact the upper edge of
your computer keyboard.
16
Bracket
Peg
Page 17

Assembling the Keytopper to Your Keyboard
• Check to be sure you have properly positioned
the keytopper over your computer keyboard.
• Make sure your computer is on. Using your
computer keyboard mouse, click the Laugh,
Smile & Learn™ software icon.
• At the home page, click "Level 2" and then
click Start.
• Next, you will press three buttons on the
keytopper to be sure you see correct responses.
- Press the number 6 button (you should see
a 6 on your computer screen).
- Press the phone (you should see a phone on
your computer screen).
- Press a shape button (you should see a shape
on your computer screen).
• If you see and hear correct responses,
you have correctly positioned the
keytopper over your computer keyboard
(go to page 20). If not, please go to the
next page for additional instructions.
17
Page 18

Assembling the Keytopper to Your Keyboard
Leg
Foot
• If the keytopper isn't properly positioned, you may need to: raise or lower the keytopper (see
instructions on this page); or reattach the keytopper over the keyboard (see instructions beginning
on page 9).
• To adjust the height of the keytopper over the keyboard, turn the feet on each bracket to raise or
lower the keytopper.
Hint: Make sure each foot is contacting the flat surface.
• Check again for correct responses on your computer screen when pressing keytopper buttons.
Refer to page 17.
18
Foot
Page 19

Removing the Keytopper from Your Keyboard
Bracket
Peg
• Pull the peg out and slide it to enlarge the bracket to its widest position.
• Remove the keytopper from your computer keyboard.
IMPORTANT!
When placing the keytopper over your computer keyboard, remember to re-adjust the keytopper top
legs. The keytopper top legs should contact the upper edge of your computer keyboard.
Bracket
Peg
19
Page 20

Let’s Learn Together
Hint: Use your computer mouse to make selections from the Home screen. Selections on the Home
screen cannot be made using the keytopper.
20
Page 21

Let’s Learn Together
Auto Play Tips - Click to see play tips at the top of each screen.
Background Music - Click for a delightful selection of children’s music.
Web Connection - Click to automatically launch your internet software and visit our
Fisher-Price® website.*
Parent Content Guide - Click to read our Parent Content Guide. The Parent Content Guide includes
information about the software and gives you some general guidelines on ways to use the software
now and as your baby grows.
Level Selection - Click the desired level of play.
Quit - Click to exit this program.
Start - Click to begin play on the desired level.
About - Click to view program version information.
*If you do not have internet service, you will not be able to access our Fisher-Price® website.
21
Page 22

Level 1
Home
Teaches
• Colors
• Shapes
• Greetings
• Cause and Effect
22
Tips
Page 23

Level 1
• Let baby press any button on the keytopper for animated scenes, fun sounds and music! Baby is
rewarded with graphic surprises and sound effects with each key pressed!
• Using your computer keyboard mouse, click the for tips.
• Using your computer keyboard mouse, click the house to return to the home screen.
23
Page 24

Level 2
Home
Teaches
• Letters
• Words
• Numbers
• Counting
24
Tips
Page 25

Level 2
• Let baby press any button on the keytopper for a corresponding image and sound!
• Using your computer keyboard mouse, click the for tips.
• Using your computer keyboard mouse, click the to return to the home screen.
25
Page 26

Level 3
House
26
Yard
Farm
Teaches
• Numbers and
Counting
• Word Association
• Sentences
• Animals
• Matching
Page 27

Level 3
• Visit the yard, the farm or the house! Simply press the telephone to choose the location. Images
and sounds prompt baby to press corresponding letters and numbers!
• Using your computer keyboard mouse, click the for tips.
• Using your computer keyboard mouse, click the to return to the home screen.
27
Page 28

For countries outside the United States:
CANADA: Questions? 1-800-432-5437. Mattel Canada Inc., 6155 Freemont Blvd., Mississauga, Ontario L5R 3W2;
www.service.mattel.com.
GREAT BRITAIN: Mattel UK Ltd, Vanwall Business Park, Maidenhead SL6 4UB. Helpline: 01628 500303.
www.service.mattel.com/uk.
AUSTRALIA: Mattel Australia Pty. Ltd., 658 Church Street, Locked Bag #870, Richmond, Victoria 3121 Australia.
Consumer Advisory Service 1300 135 312.
NEW ZEALAND: 16-18 William Pickering Drive, Albany 1331, Auckland.
ASIA: Mattel East Asia Ltd, Room 1106, South Tower, World Finance Centre, Harbour City, Tsimshatsui, HK, China.
Windows is a registered trademark of Microsoft Corporation in the United States and other countries. Windows Vista is either a registered trademark or
trademark of Microsoft Corporation in the United States and/or other countries.
Fisher-Price, Inc., a subsidiary of Mattel, Inc., East Aurora, NY 14052 U.S.A. PRINTED IN CHINA
©2007 Mattel, Inc. All Rights Reserved. ® and ™ designate U.S. trademarks of Mattel, Inc. L3480a-0920
 Loading...