

Page 1
f you have questions or difficulty operating your Race Set
the cause is often a simple problem. And there’s often a simple fix. Usually a quick “pit stop” will get you
• You may need to clean the track.
• You may need to clean the vehicle.
• Check power connections.
• Check your vehicle’s alignment.
• Check your vehicle’s contacts.
• Check to make sure track sections are properly connected.
• Check your vehicle’s heat shield.
• You may need to clean the track.
• You may need to clean the vehicle.
• Check your vehicle’s alignment.
• Check your vehicle’s contacts.
• Check to make sure track sections are properly connected.
• Check your vehicle’s batteries.Check battery connector and replace with fresh alkaline battery.
• You may need to clean the vehicle.
• Check your vehicle’s alignment.
• Check to make sure track sections are properly connected.
• Check your vehicle’s heat shield.
• Check your vehicle for a missing guide pin.
• You may need to clean the track.
• You may need to clean the vehicle.
• Check power connections.
• Check your vehicle’s alignment.
• Check your vehicle’s contacts.
• Check to make sure track sections are properly connected.
• Check your vehicle’s heat shield.
• Your vehicle’s rear axle assembly may be installed backwards.
Remove the rear axle assembly, reverse it and reinstall.
CALL OUR RACING
SUPPORT TEAM TOLL-FREE AT 1-888-557-8926 FOR HELP.
TROUBLESHOOTING GUIDE
Page 2
a.
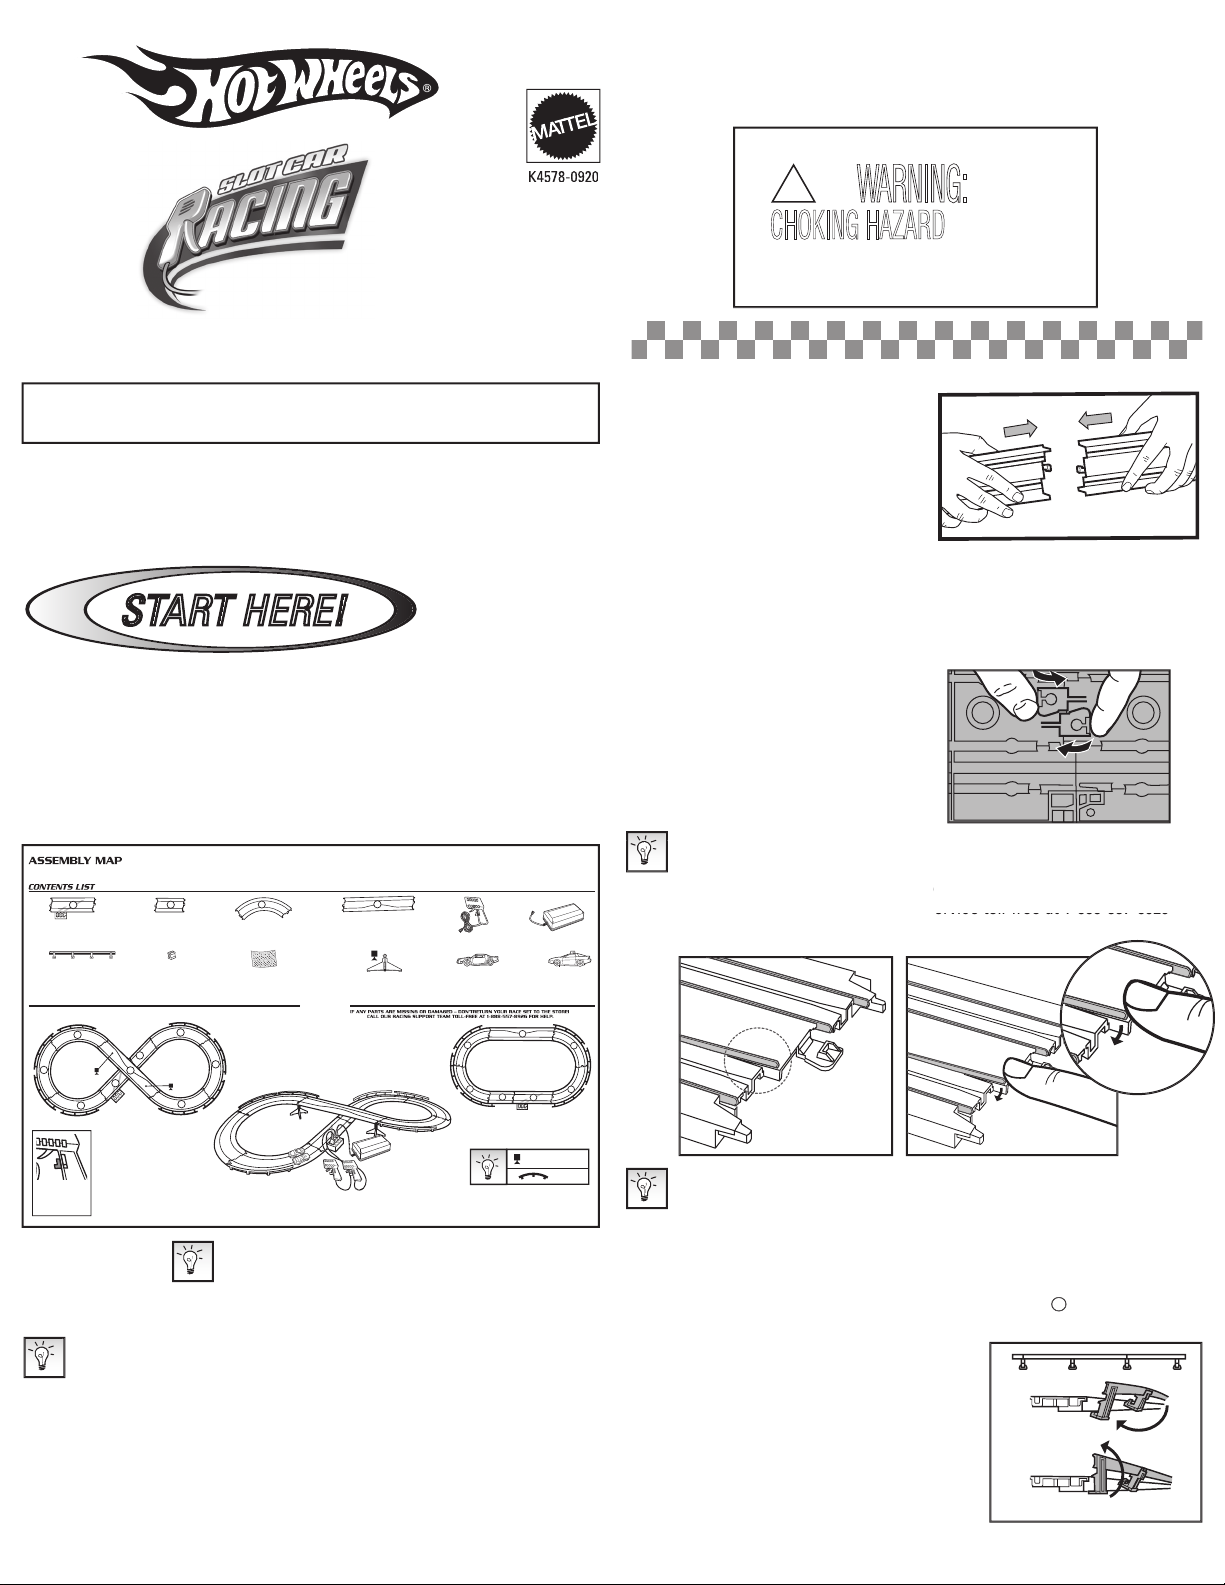
Your race set makes two different layouts. Refer to the Assembly Map for
A
b.
Once your layout is assembled, you’ll need
to add guardrails. Refer to the Assembly Map
for placement. To attach a guardrail: gently
flex the guardrail before attaching it. Carefully
1.
There are letters molded into each
track piece. These letters are used in
these instructions to indicate which
track piece goes where. Following the
you may want to lay out your track
– without connecting any track pieces.
That way you’ll be able to see how the
track layout goes together.
2.
To connect track pieces: working on
the flat surface, push the ends of the
track pieces together. Make sure they
snap together securely – you’ll hear a
from one track section to the next.
3.
To disconnect track pieces,
simply reach underneath where the
track pieces meet and press the
forefinger as shown.
the fully-assembled track. You’ll need to refer to it as you go.
The Assembly Map looks like this:
Assembly Map.
I. BASIC TRACK ASSEMBLY
Start out on a clean, hard, flat racing surface – not carpeting. Take out all the
track pieces (and other parts) and check them carefully against the contents
(see hours of operation in the Warranty section).
for future reference, as they contain important information.
throughout this manual. It indicates important infor-
ADULT ASSEMBLY REQUIRED.
®
MAIN LAYOUT DRAWING
Refer to the package for color photographs of the assembled layouts.
This page shows the contents list and large-scale Layou
t
Drawings of the fully-assembled track (tracks are not drawn to scale).
You'll need to refer to it as you assemble your race set.
Refer to the Instruction Sheet for detailed step-by-step instruction
s
for setting up and using your race set.
8
GUARDRAILS
6
F
9" RADIUS CURVE
1
C
6" STRAIGHT
1
A
9" TERMINAL TRACK
1
SANDPAPER
1
S
15" SQUEEZE
2
CONTROLLERS
1
2
3
1
3
= GUARDRAILS
= TRACK SUPPORTS
1 = Beginner
2 = Average player
3 = Skilled player
1
2
3
2
#2 SUPPORTS
1
6
CLIPS
Use either a diorama or a guardrail on the outside of the curves.
1
BATTERY PACK
F
F
F
F
S
C
A
1
1
F
F
C
S
F
F
F
F
A
1
2
3
1
2
3
ALTERNATE LAYOUT DRAWING
K4578-0921
© 2006 Mattel, Inc., PRINTED IN CHINA. All Rights Reserved.
1
VEHICLE
1
VEHICLE
CHOKING HAZARD
–
Small parts.
Not for children under 3 years.
W
AR
NING:
!
Page 3

c.
Next you’ll need to add the track supports. Refer to the Assembly Map for
the pieces as shown and snap off the connector tabs (discard the tabs).
CONGRATULATIONS!
CONGRATULATIONS!
You’re ready to race. For “pro” competition, please read the following driving
You’re ready to race. For “pro” competition, please read the following driving
tips and maintenance hints.
Always race on a clean, hard, flat surface. For best
Clean track is IMPORTANT for best performance! Please refer to the
3.
Races are won in the curves! Slow down going into
the curves…then speed up coming out of them.
Accelerate to build up speed for loops and jumps.
4
they’ve “warmed up.”
5.
Experienced racers know that regular maintenance is the key to top racing
the easy steps in Section II.
6.
If you have questions or difficulty operating your Race Set, check the
Troubleshooting Chart first. Usually a quick “pit stop” will get you racing
ADULTS NOTE: All “pro” racers know that their vehicles need mainte-
steps to keep your car running at its best!
This diagram will help you understand the parts of your vehicle, and how they
go together.
❶
Guide Pin
❷
Front Tires
❸
Rear Tires
❹
Rear Axle Assembly
❺
Contacts
❻
Front Axle Assembly
❼
Springs
➑
Heat Shield
(where disposable batteries are called for). Replace batteries when vehicle
zinc) batteries for initial use and/or demonstration purposes, we recommend
Always unplug your Battery Pack when not in use!
a.
The cables for the Battery Pack and
the hand controllers have color-coded
the yellow hand controllers into the yellow
b.
To test track and power connections, hold
touching the metal track rails. Gently
vehicle by its rear tires). Squeeze the hand
c.
Your hand controller is your car’s “throttle.”
The more you squeeze the trigger the faster
your car will go. Practice at a slow speed
for a few laps, until you’re ready to race!
• Always make sure your Race Set is unplugged before assembling or
• In the event of any damage, this toy must not be used with the battery
• If this toy is being operated in the presence of children under 5 years
• This toy is not intended for children under 3 years old.
• Disconnect from the battery box before cleaning.
III. BATTERY BOX / HAND CONTROLLER ASSEMBLY
(LR20) alkaline batteries (not included) as shown.
A
1
2
3
1
2
3
3
4
1
2
7
2
3
5
6
7
8
Page 4

E. CONTACTS
Worn-out contacts can be replaced.
Your vehicle’s contacts should last a
the contacts if they become overly worn or
The best way to replace contacts is one
at a time, using the remaining contact
assembly as a guide. Be careful not to
(especially wide slotted end).
a.
Hold chassis bottom side up. Hold the
spring as shown (with your thumb on one
side of the chassis and your forefinger on
the other). You’ll need to hold the spring
securely throughout the assembly process.
b.
Hook the narrow end of the contact under
the motor shaft. Hook the curved side tab
will be held in place by the curved tab.
the slot. Making sure not to over bend the
c.
Still holding the spring securely, turn the
top of the contact into place with the tip of
tact will spring back when pushed.
The heat shield is an important compo-
side tabs of the heat shield are properly
the heat shield is not correctly installed, it
fering with operation. To check for this
sit for 5 minutes. Remove the heat shield
the heat shield as described above.
shield. If the heat shield is lost, or can’t
(back view)(back view)
(back view)
(back view)
B. TRACK CLEANING
mance!
1.
Dirty track may cause your vehicle to
stall. Usually you can get it going again
vehicle a slight push from behind. After
3-4 laps your vehicle will run properly.
2.
Sometimes oxidation may form on the
track rails, and this may cause your car
to stall. If this happens, you’ll have to
sandpaper, GENTLY rub the track rails.
they’re shiny. After cleaning, wipe the
track with a soft, clean, lint-free cloth to
track: severe damage can result if a
fiber of steel wool is picked up by the
magnets in your car’s motor. Use only
very fine sandpaper for cleaning.
3.
track slots. If this happens, use a tooth-
traction and spin. To clean the tires,
flat surface, with the sticky side facing
this may cause the car to run slowly. Use
tweezers or a toothpick to remove lint as
shown.
Your car’s axle assembly may become
the assembly back into the chassis.
chassis back in place. Use only your
fingers.
Page 5

Mattel Australia Pty Ltd.,
Tsimshatsui, HK, China. Diimport & Diedarkan Oleh: Mattel SEA Ptd Ltd.(993532-
Tel:03-78803817, Fax:03-78803867
• Non-rechargeable batteries are not to be recharged.
• Rechargeable batteries are to be removed from the product before
• Rechargeable batteries are only to be charged under adult supervi-
sion (if designed to be removable).
• Do not mix alkaline, standard (carbon-zinc), or rechargeable (nickel-
• Do not mix old and new batteries.
• Only batteries of the same or equivalent type as recommended are to
• Batteries are to be inserted with the correct polarity.
• Exhausted batteries are to be removed from the product.
• The supply terminals are not to be short-circuited.
• Dispose of battery(ies) safely.
• Do not dispose of this product in a fire. The batteries inside may
90-DAY LIMITED WARRANTY
®
SLOT CAR RACING
ty (90) days (unless specified in alternate warranties) from the date
of purchase. Mattel will replace the product in the event of such a
toll-free number listed below. Many problems can be solved in this
sales receipt, and a brief explanation of the
This warranty does not cover damage resulting from unau-
thorized modification, accident, misuse or abuse. If the product is
from coverage under this warranty.
warranty shall be
This warranty is exclusive,
and is made in lieu of any express or
Valid only in U.S.A.
This warranty gives you spe-
cific
legal rights and you may have other rights, which vary from
state to state. Some states do not allow the exclusion of incidental
or consequential damages, so the above exclusions or limitations
TOLL-FREE NUMBER: 1-888-557-8926
(valid only in U.S.A.)
some delay in January following the holiday season. Please be
ADDRESS FOR RETURNS: CONSUMER RELATIONS
636 GIRARD AVENUE
Page 6

MAIN LAYOUT DRAWING
Refer to the package for color photographs of the assembled layouts.
This page shows the contents list and large-scale Layou
t
Drawings of the fully-assembled track (tracks are not drawn to scale).
You'll need to refer to it as you assemble your race set.
Refer to the Instruction Sheet for detailed step-by-step instruction
s
for setting up and using your race set.
8
GUARDRAILS
6
F
9" RADIUS CURVE
1
C
6" STRAIGHT
1
A
9" TERMINAL TRACK
1
SANDPAPER
1
S
15" SQUEEZE
2
CONTROLLERS
1
2
3
1
3
= GUARDRAILS
= TRACK SUPPORTS
1 = Beginner
2 = Average player
3 = Skilled player
1
2
3
2
#2 SUPPORTS
1
6
CLIPS
Use either a diorama or a guardrail on the outside of the curves.
1
BATTERY PACK
F
F
F
F
S
C
A
1
1
F
F
C
S
F
F
F
F
A
1
2
3
1
2
3
ALTERNATE LAYOUT DRAWING
K4578-0921
© 2006 Mattel, Inc., PRINTED IN CHINA. All Rights Reserved.
1
VEHICLE
1
VEHICLE
 Loading...