

Page 1
K4316-0920G1
For best performance, here is a list of
recommended cars for this track set.
Phastasm™
Rapid Transit®
We want you AND your kids to have fun with our products, so
please give us your feedback by filling out a short survey.
Children may do so with their parents’ permission.
Go to: http://service.mattel.com/us/
Thanks for helping us make great toys even better!
Horseplay®
Power Pistons™
Backdraft™
Sling Shot™
5+
INSTRUCTIONS
®
®
™
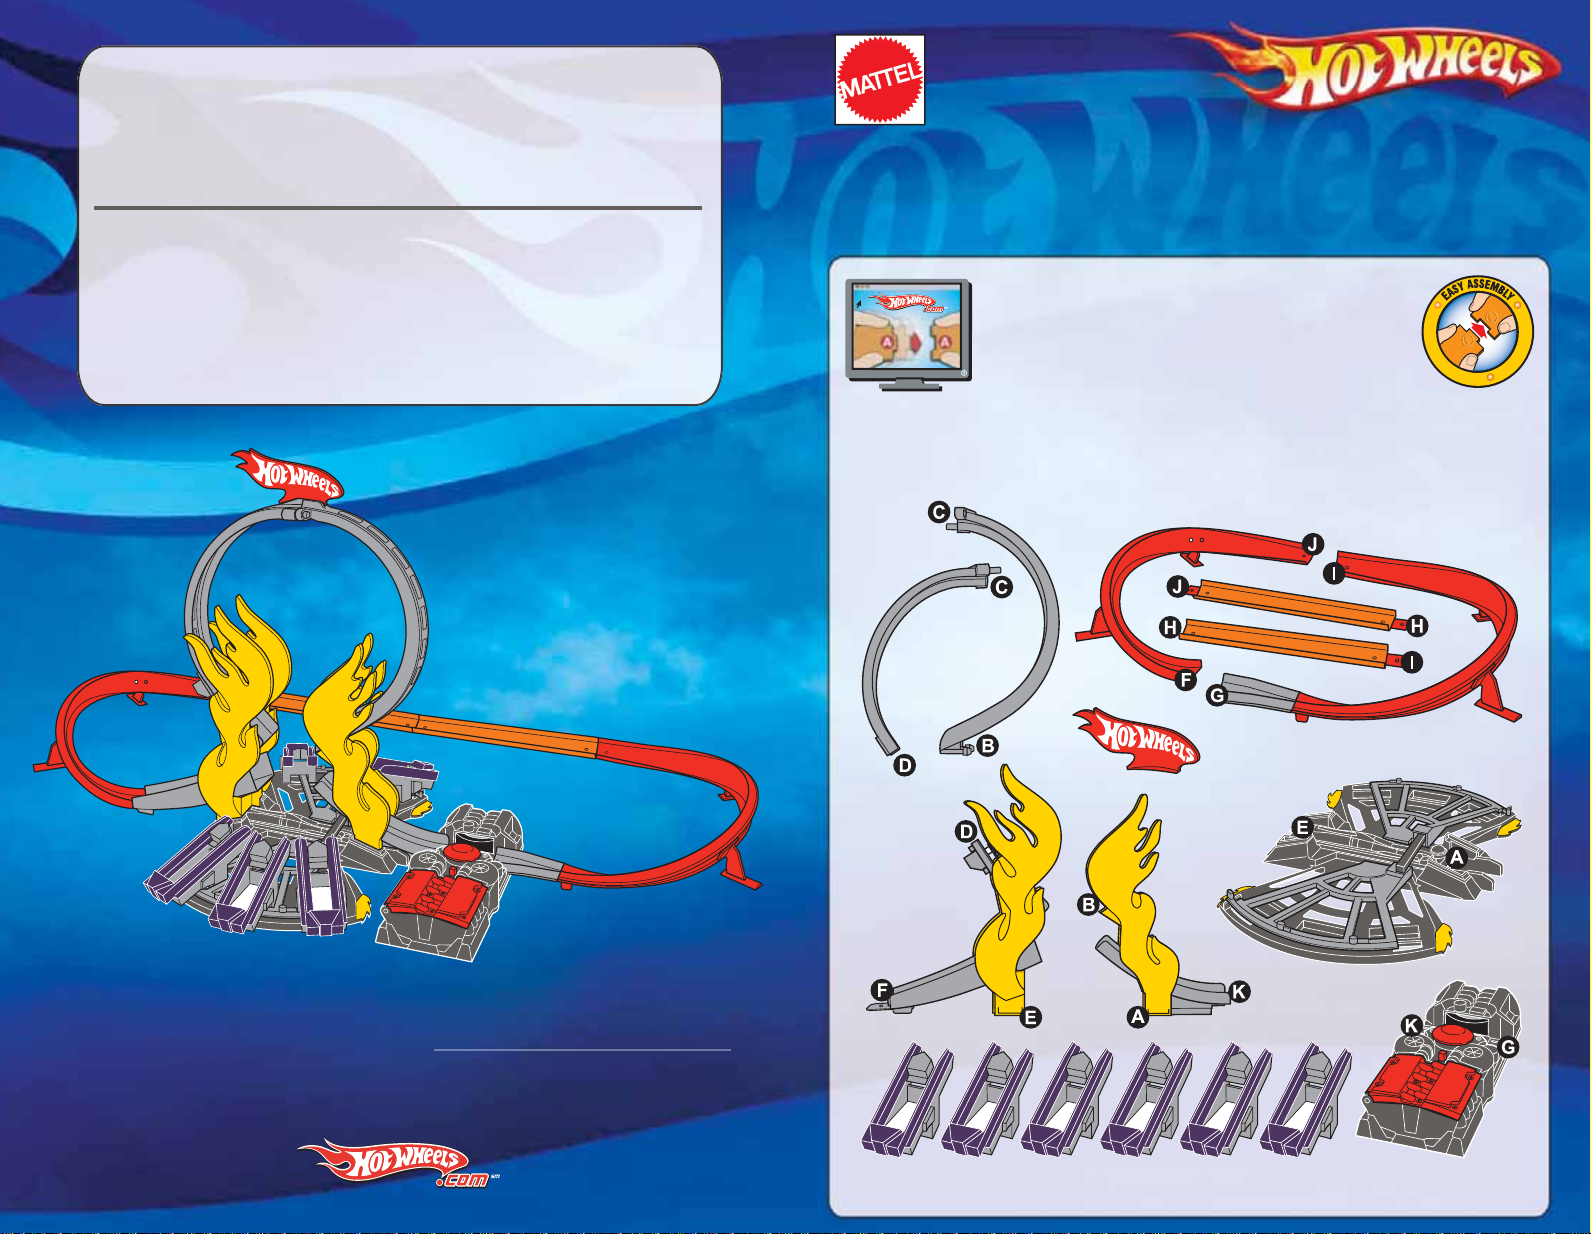
BLAST AND CRASH
Track Set
Requires 2 “D” alkaline batteries (not included).
Refer to letters on parts to assist with assembly.
FOR HELP WITH ASSEMBLY CHECK OUT OUR
ANIMATED INSTRUCTIONS ONLINE!
http://service.mattel.com/K4316_blastandcrash
Keep these instructions for future reference as they contain important information.
Please remove everything from the package and compare to the contents shown here.
Mattel, Inc., 333 Continental Blvd., El Segundo, CA 90245 U.S.A. Consumer Relations 1 (800) 524-8697 service.mattel.com. • Mattel Canada
Inc., Mississauga, Ontario L5R 3W2. You may call us free at 1-800-524-8697. •
Helpline 01628500303 • Mattel Australia Pty., Ltd., Richmond, Victoria. 3121.Consumer Advisory Service - 1300 135 312. • Mattel East Asia
Ltd., Room 1106, South Tower, World Finance Centre, Harbour City, Tsimshatsui, HK, China. • Diimport & Diedarkan Oleh: Mattel SEA Ptd
Ltd.(993532-P) Lot 13.5, 13th Floor, Menara Lien Hoe, Persiaran Tropicana Golf Country Resort, 47410 PJ. Tel:03-78803817, Fax:03-78803867
Mattel U.K. Ltd., Vanwall Business Park, Maidenhead SL6 4UB.
© 2006 Mattel, Inc. All Rights Reserved.
Page 2
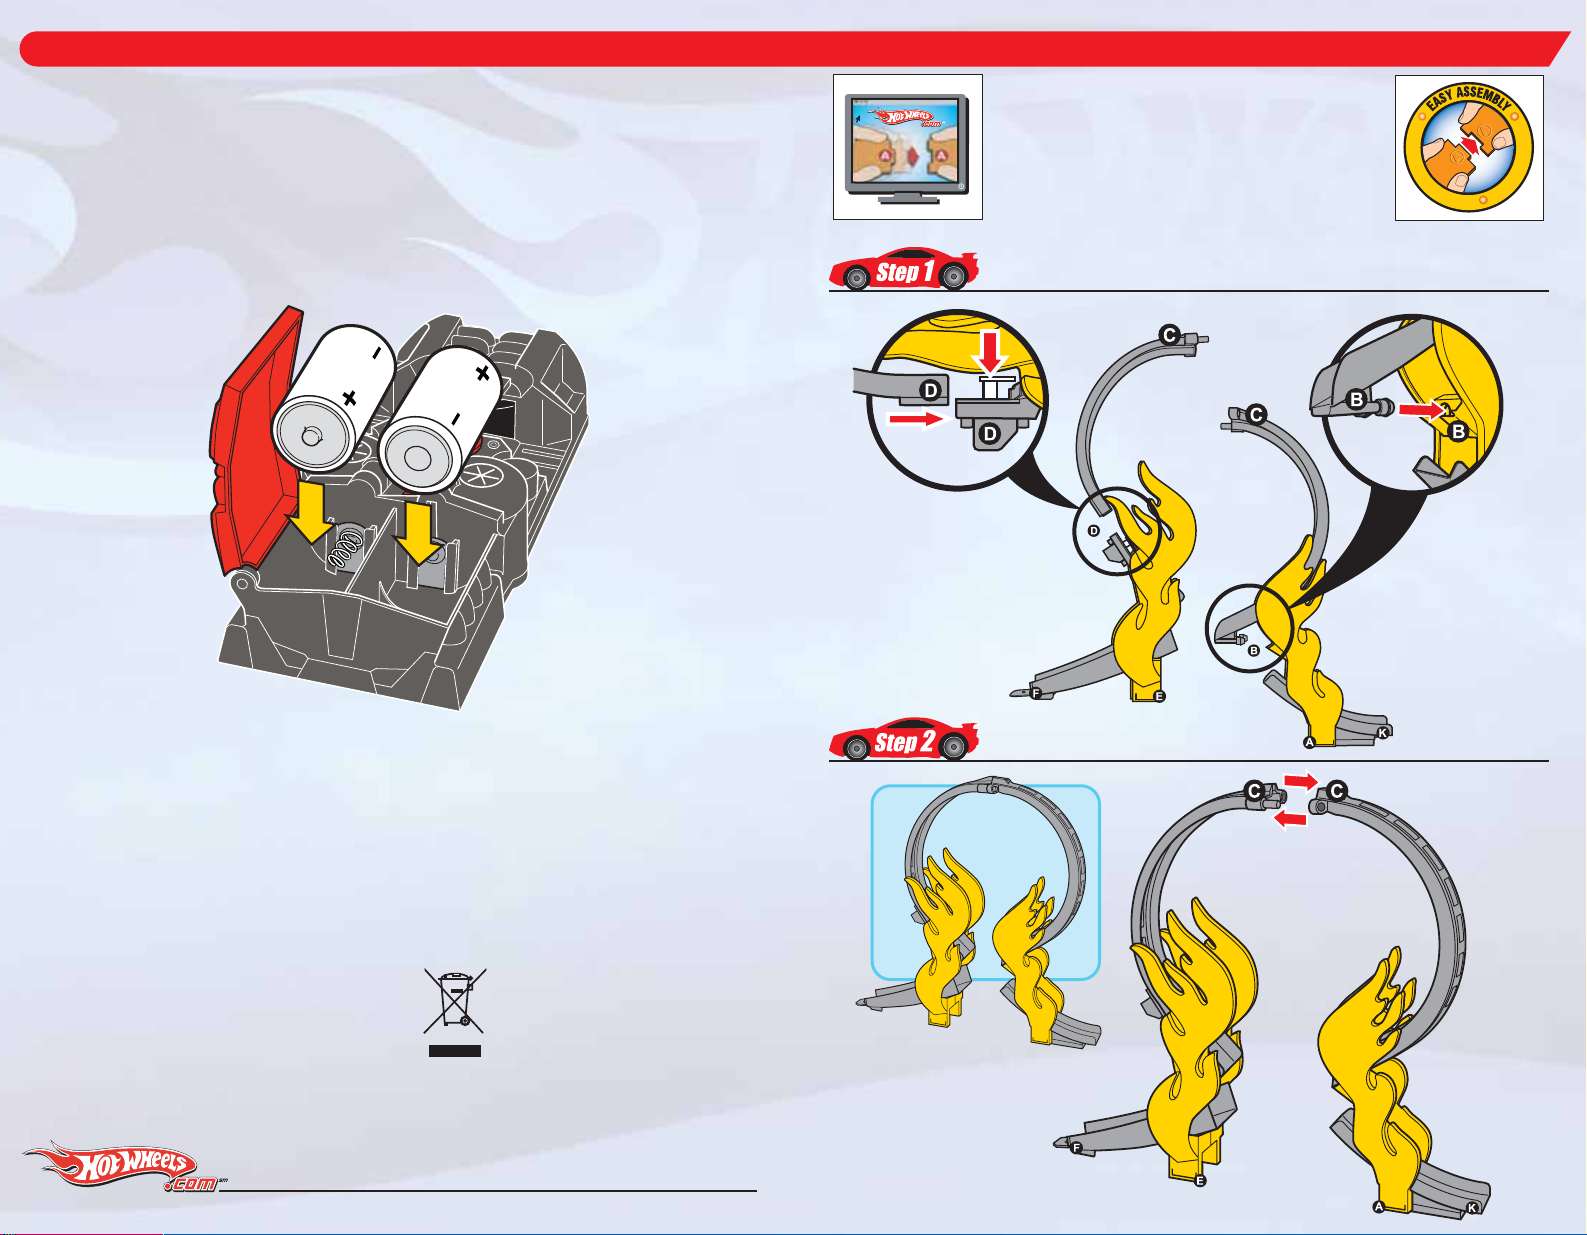
BATTERY INFORMATION
BATTERY INSTALLATION/REPLACEMENT:
Open battery cover. Insert 2 “D” alkaline batteries in the orientation
shown. Close battery cover. For optimal performance use only alkaline
batteries. Replace the batteries when the booster runs slowly or no
longer propels the cars through the set.
ASSEMBLY
Refer to letters on parts and contents
page to help with assembly.
For additional help with assemgly
check out our animated instructions
online!
http://service.mattel.com/K4316_blastandcrash
SNAP!
Push the tab
down as you
slide the track in.
BATTERY SAFETY INFORMATION
In exceptional circumstances batteries may leak fluids that can
cause a chemical burn injury or ruin your product. To avoid
battery leakage:
• Non-rechargeable batteries are not to be recharged.
• Rechargeable batteries are to be removed from the product
before being charged (if designed to be removable).
• Rechargeable batteries are only to be charged under adult
supervision (if designed to be removable).
• Do not mix alkaline, standard (carbon-zinc), or rechargeable
(nickel-cadmium) batteries.
• Do not mix old and new batteries.
• Only batteries of the same or equivalent type as recommended
are to be used.
• Batteries are to be inserted with the correct polarity.
• Exhausted batteries are to be removed from the product.
• The supply terminals are not to be short-circuited.
• Dispose of battery(ies) safely.
• Do not dispose of this product in a fire. The batteries inside
may explode or leak.
Protect the environment by not disposing of
this product with household waste
[2002/96/EC]. Check your local authority for
recycling advice and facilities.
Page 3
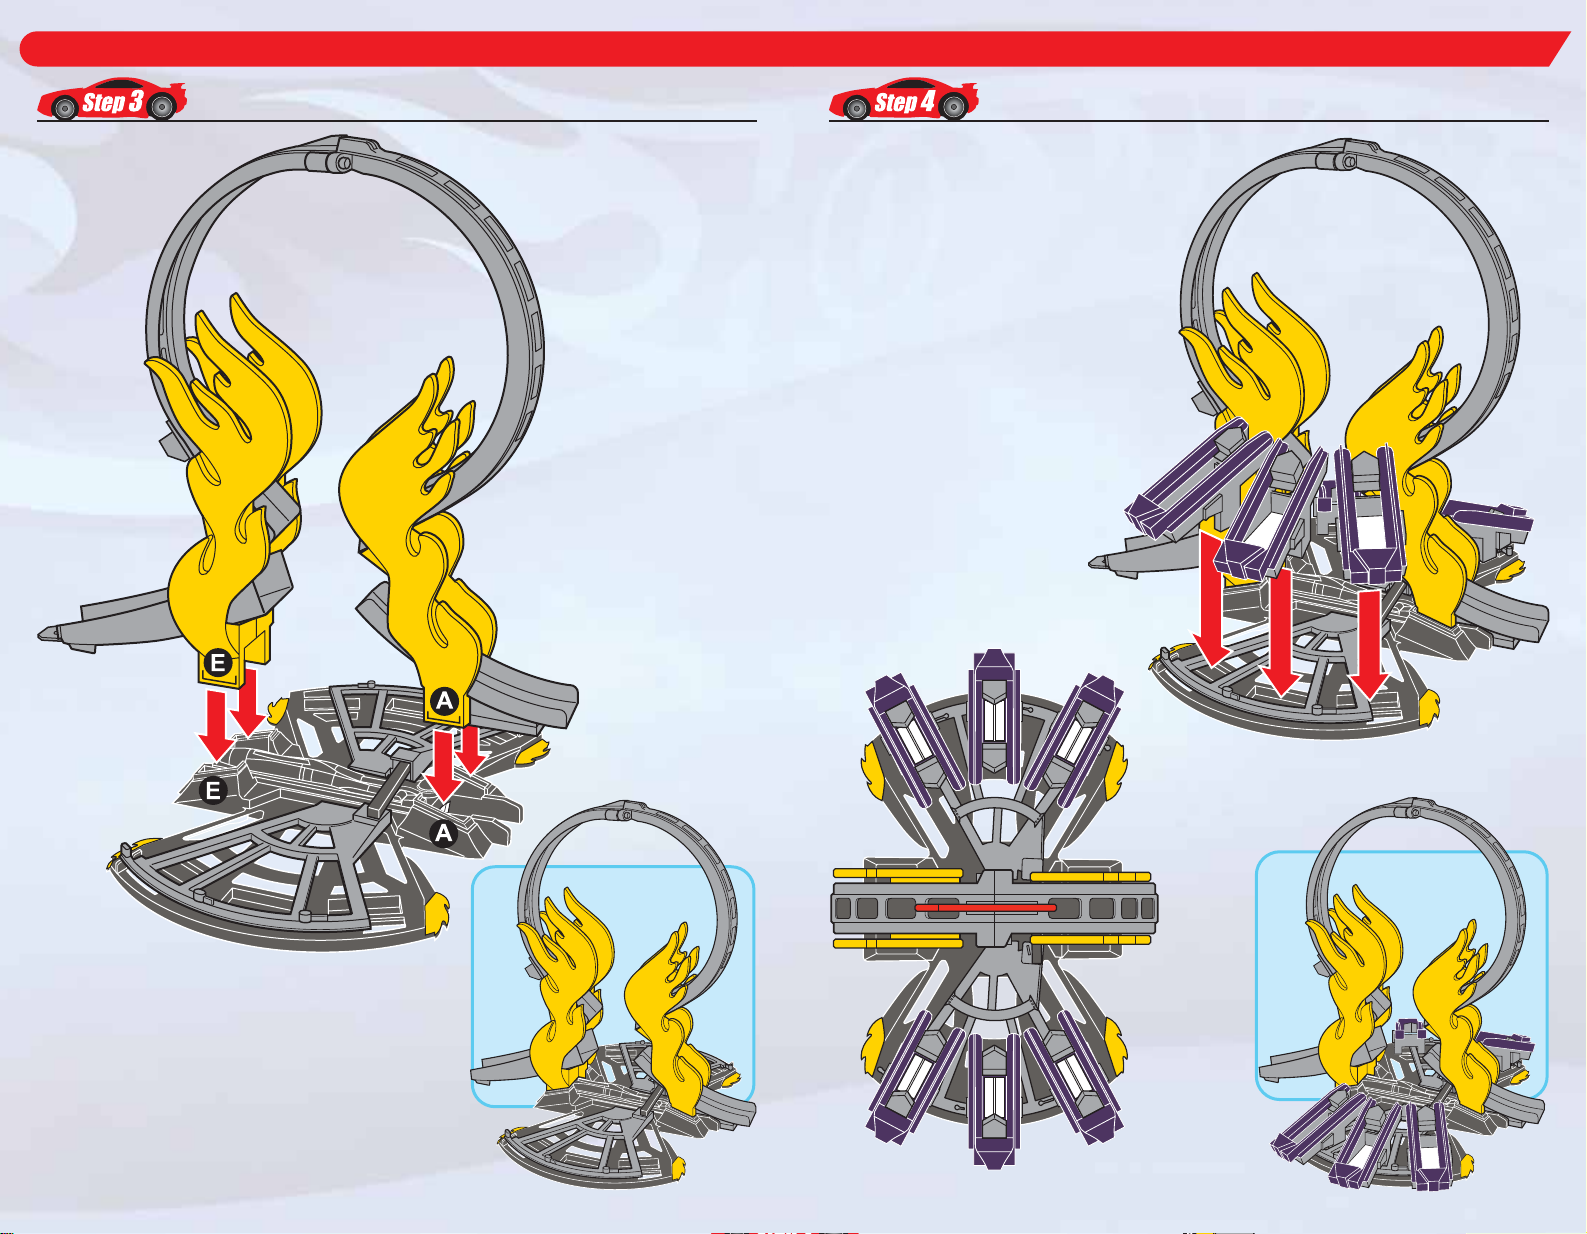
ASSEMBLY
ASSEMBLY
Snap on the blasters in
6 locations (3 blasters
on each side).
SNAP!
SNAP!
TOP VIEW
6
1
SNAP!
5
4
SNAP!SNAP!
SNAP!
3
2
SNAP!SNAP!SNAP!
Page 4

ASSEMBLY
Now, add the booster and track.
Finally, place the Hot Wheels
®
emblem on top of the loop track
and the assembly is complete!!
TRACK
SUPPORT
TAPE
NOTE: Place the set on a smooth surface for optimal performance.
TO STABILIZE SET: On carpet use books. On a smooth floor,
tape the 4 support stands to the floor as shown.
You Are Now Ready to Play!!
Turn the page and let the fun begin!
OPERATING TIPS
Adjust track side walls at each connection point as shown.
Make sure tabs are on the inside of the track wall as shown here.
Make sure track supports are lined up with holes on track.
Page 5

PLAY: Basic Play
Turn ON
the booster.
Place a car on the
track in the direction
of the arrow.
Push it between the
rotating wheels of
the booster and
watch it GO!!
Page 6

PLAY: Modes and Objectives
Objective: To knock out the speeding car as it flies
through the “Split-Loop Crash Zone”.
You can aim for the car
as it motors its way up the
track through the
“Split-Loop Crash Zone”. . .
OR
. . . as it comes thundering
down the loop!!
Split-Loop
Crash Zone
LEVERS
Page 7

PLAY: One-Player Mode
Set lever to 1-Player locked position.
1
2
Place cars in blasters (1 to 6 cars).
Turn the booster ON and
3
launch the car.
1-Player
locked position
1
As the speeding car flies through the
4
“Split-Loop Crash Zone” push lever
to activate blasters.
Target: Hit and WIN!!
4
Two-Car Blast
2
LEVERS
3
4
4
For the Ultimate Action!!
Four-Car Blast
Six-Car Blast!!
Page 8

PLAY: Two-Player Mode
Did you get enough practice with 1-Player mode? Now, challenge
a friend for the ultimate head-to-head blasting battle!
Set lever to 2-Player unlocked position.
1
2
Place cars in blasters (1 to 3 cars on each side).
3
Switch on the booster and launch the car.
2-Player unlocked position
(This will allow blasters
on each side to operate
independently.)
1
As the speeding car flies through the
4
“Split-Loop Crash Zone” push
levers to activate blasters.
Hit the “Target” and WIN!!
Player 2
4
4
Player 1
One-Car per Player Blast
4
Player 2
Player 2
4
2
LEVERS
Player 1 blasters
Player 2
blasters
3
4
Two-Cars per Player Blast
Player 1
Player 1
For the Extreme Pile-Up!!
Three-Car per Player Blast!!
4
 Loading...