

Page 1
™
®
5+
K4103-0920
™
®
INSTRUCTIONS
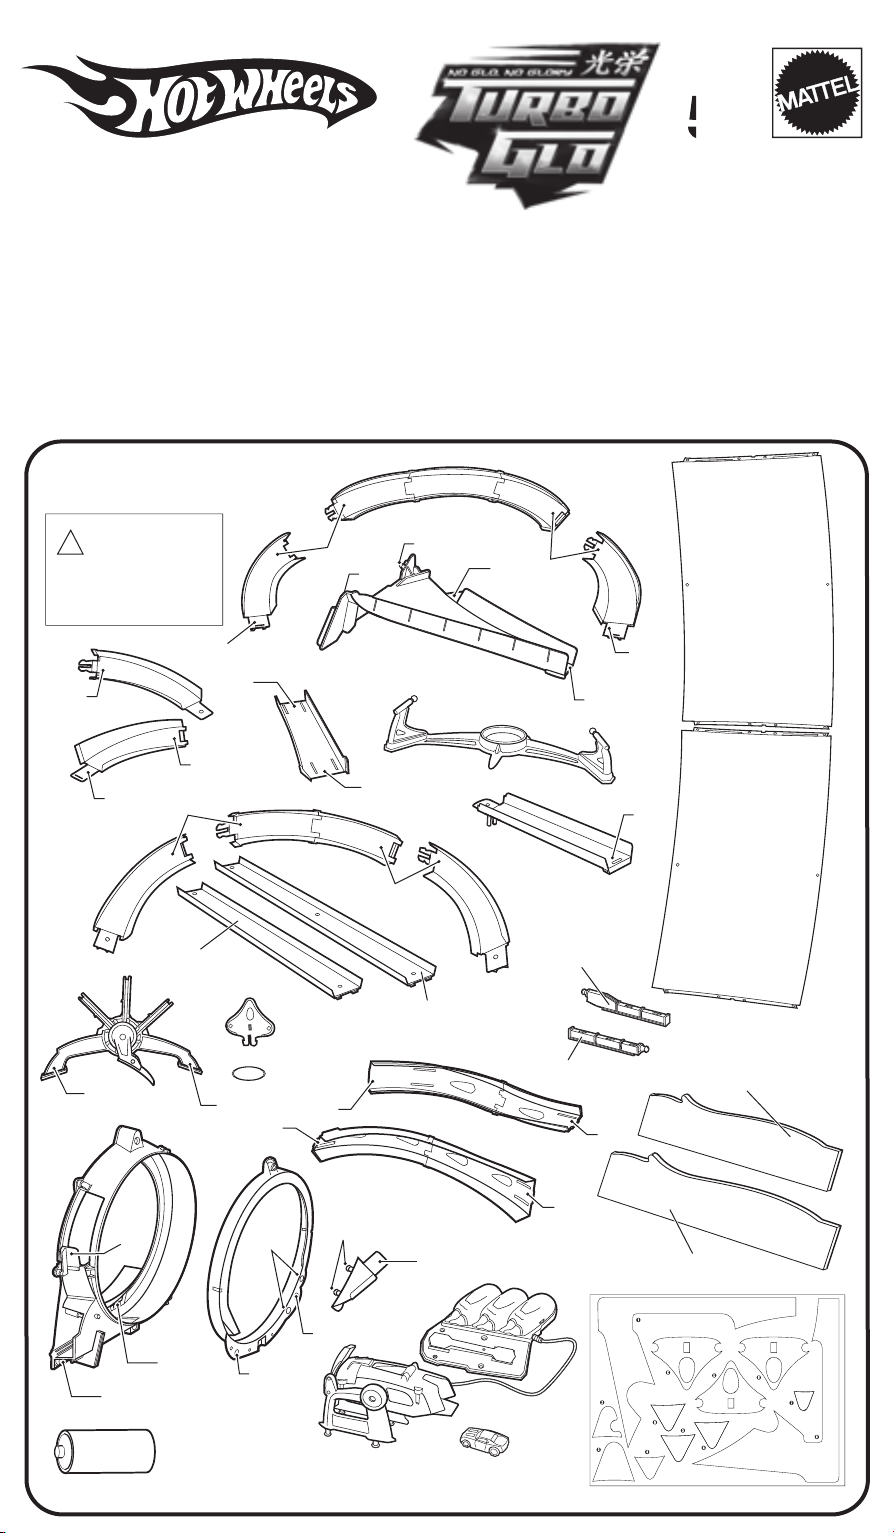
Please remove everything from the package and compare to the contents shown here.
Please keep these instructions for future reference as they contain important information.
ADULT ASSEMBLY REQUIRED.
CONTENTS
!
WARNINGWARNING:
CHOKING HAZARDCHOKING HAZARD
Not for children under 3 years.
B2
c4
B1
–
Small parts.
A6
B2
B3
Short track
A6
c3
c2
x3
x3
c4
A5
A1
A7
B4
A2
Long track
A7
A4
A3
Long end
Short end
A3
B5
x2
x2
Short cardboard
c5
C5
c1
c1
c2
A2
B5
B1
3X "D"
A1
Requires 3 "D" (LR20) alkaline batteries (not included).
c3
Long cardboard
K4103-0310
© 2006 Mattel, Inc.
All Rights Reserved.
Tous Droits Réservés.
Page 2
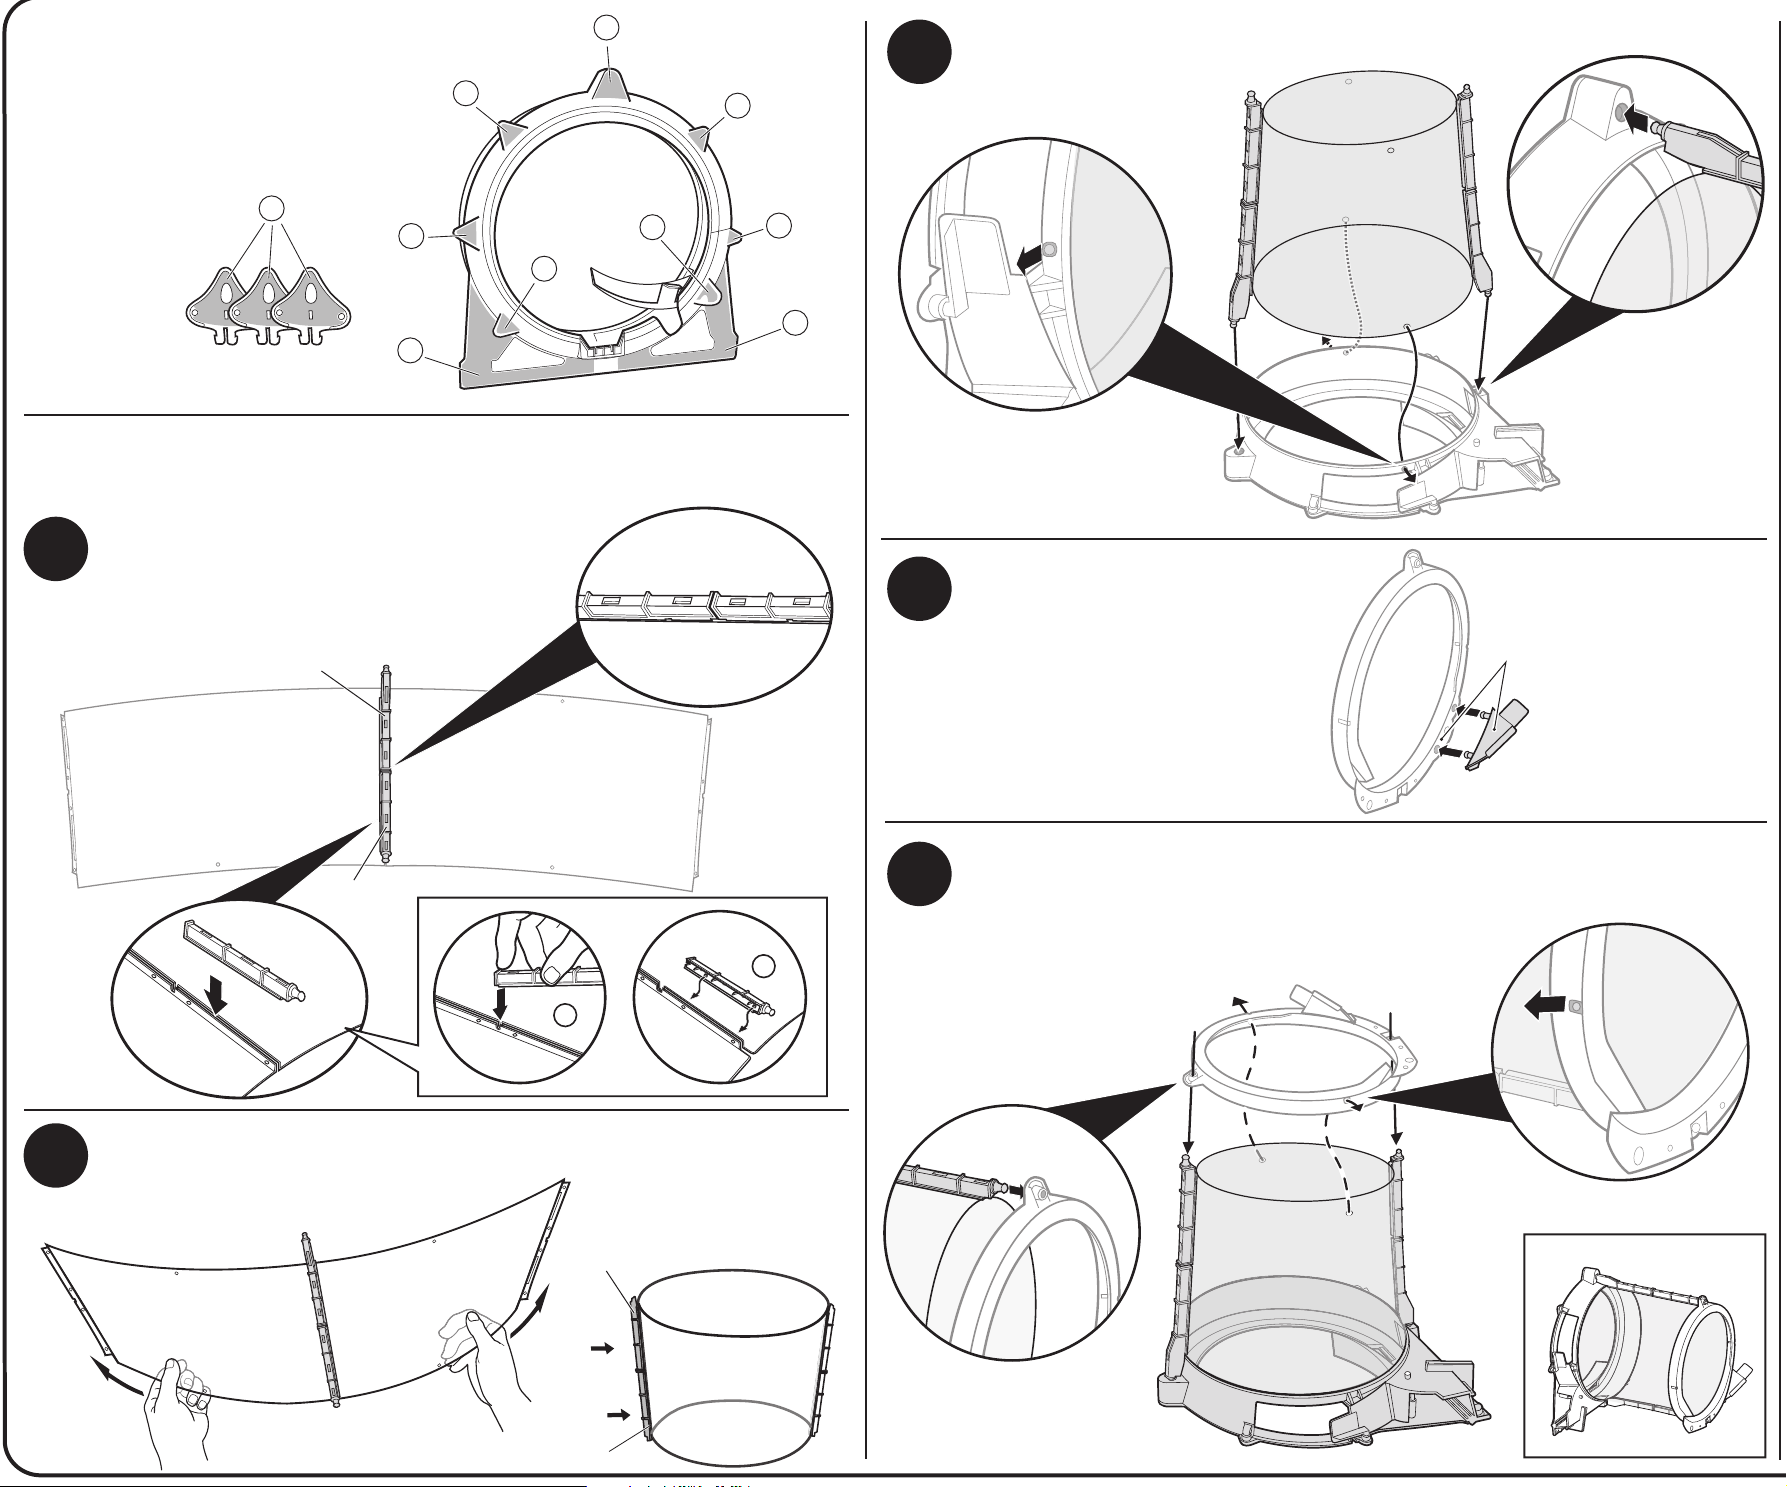
APPLY LABELS
3
Insert chamber onto base as shown.
3
Apply labels as shown.
6
HELPFUL HINT: Apply labels before assembly.
ASSEMBLY
Connect panels together using snap-on
1
fasteners. Make sure that the flat ends are
flush in the middle as shown. Fasteners
should be attached to outside of chamber.
Long end
5
5
5
8
2
4
7
1
4
Connect small track to chamber
ring as shown.
C1
2
Short end
2
1
Fold chamber and insert other snap-on fasteners on other side as shown.
Long end
5
Be sure to align the small chamber ring to chamber
in correct orientation and attach as shown.
Short end
Page 3

6
Assemble the charger. Slide track through the
charger as shown. Make sure to align hole in the
middle of the track with the center of the charger.
7
9
Long track
8
1
B3
B4
B2
From step 7.
4
From step 8.
3
5
Short track
B5
B5
2
B1
6
Page 4

10
12
C4
C3
11
1
A1
A5
A6
A7
A2
A4
A7
2
A3
Long
C5
Short cardboard
Slide the cardboard parts into each side by lifting up the chamber as shown.
13
Insert launching flags as shown. Reset flags to play again.
cardboard
C2
A3
3
1
3
FINAL ASSEMBLY
2
From step 10.
Page 5

INSTALL BATTERIES
Open the battery cover. Insert 3 "D" (LR20) alkaline batteries (not included)
in the orientation shown. Close the battery cover. For optimal performance
use only alkaline batteries.
!
TOP VIEW
CAUTION:
- Vehicle contains a rechargeable cell. If fluid leaks, avoid contact with eyes and discard vehicle.
- Do not recharge the vehicle if it feels hot. Allow it to cool before recharging.
- Only use the charger supplied with this toy. Use of an alternate charging source will damage your
rechargeable vehicle.
- Do not attempt to hold wheels while charging. Wheels must spin during charging period.
- Your car will be fully charged after 10 seconds. Additional charging will not improve performance.
Overcharging may reduce the life of your rechargeable vehicle.
- Do not run vehicles on shag carpet. Use only on a hard floor or on track.
- To prevent entanglement, keep hair away from wheels.
Vehicles are not recommended for use on loose dirt or wet surfaces.
Do not immerse in water.
If the vehicle and/or charger get wet, discontinue use until they are completely dry. Thoroughly
wipe off all moisture and allow them to air-dry completely before use.
Only use projectiles supplied with this toy. Do not fire at people or animals or at point blank range.
Protect the environment by not disposing of this product with household waste
[2002/96/EC]. Check your local authority for recycling advice and facilities.
© 2006 Mattel, Inc. All Rights Reserved. Mattel, Inc., 333 Continental Blvd., El Segundo, CA 90245 U.S.A. Consumer
Relations 1 -800-524-8697. service.mattel.com Mattel U.K. Ltd., Vanwall Business Park, Maidenhead SL6 4UB.
Helpline 01628500303 Mattel Australia Pty Ltd., Richmond, Victoria. 3121. Consumer Advisory Service - 1300 135
312. Mattel East Asia Ltd., Room 1106, South Tower, World Finance Centre, Harbour City, Tsimshatsui, HK, China.
Diimport & Diedarkan Oleh: Mattel SEA Ptd Ltd.(993532-P) Lot 13.5, Menara Lien Hoe, Persiaran Tropicana Golf
Country Resort, 47410 PJ. Tel:03-78803817, Fax:03-78803867.
Page 6

CHARGE/RE-CHARGE
TO PLAY
OPERATING TIPS
Charge your vehicle.
1
3
Push until you hear a "click" sound
2
which lets you know the vehicle is
locked in place.
4
Watch the glo-streaking action as your vehicle travels around the track!
The vehicle will speed around the default track until you press down the lever.
If you press and hold down the lever, the vehicle will travel around the upper track.
Each time the vehicle does one lap around the upper track, one or two rapid-fire
flags will fly off depending on the speed of the vehicle.
Adjust track side walls at each
connection point as shown.
Upper track
To charge the vehicle, press and hold it down on the charger
for approximately 10 seconds.
During charging, the vehicle may cause radio or television interference.
If so, move the vehicle away from the item being interfered with.
After several charges, the vehicle performance may begin to decrease.
If this occurs, please install fresh batteries in the charger.
LEVER
Tape
When the vehicle starts to slow down, press down on the charger so the vehicle can enter the charger.
Follow the instructions on recharging your vehicle to continue play.
Designed to work with Hot Wheels® Turbo Glo™ vehicles only.
TO STABILIZE SET: On carpet, use books. On smooth floor, tape base to surface.
 Loading...