

Page 1
COMPLIANCE WITH FCC REGULATIONS (VALID IN U.S. ONLY)
This device complies with part 15 of the FCC Rules. Operation is subject to the following two conditions:
(1) This device may not cause harmful interference, and (2) this device must accept any interference
received, including interference that may cause undesired operation.
This device generates and uses radio frequency energy and if not used properly may cause interference to
radio and television reception. It has been tested and found to comply with the limits set by the FCC which
are designed to provide reasonable protection against such interference.
NOTE: Changes or modifications not expressively approved by the manufacturer responsible for
compliance could void the user’s authority to operate the equipment.
Battery Safety Information
In exceptional circumstances batteries may leak fluids that can cause a chemical burn injury or ruin your product. To avoid battery
leakage:
• Non-rechargeable batteries are not to be recharged.
• Rechargeable batteries are to be removed from the product before being charged (if designed to be removable).
• Rechargeable batteries are only to be charged under adult supervision (if designed to be removable).
• Do not mix alkaline, standard (carbon-zinc), or rechargeable (nickel-cadmium) batteries.
• Do not mix old and new batteries.
• Only batteries of the same or equivalent type as recommended are to be used.
• Batteries are to be inserted with the correct polarity.
• Exhausted batteries are to be removed from the product.
• The supply terminals are not to be short-circuited.
• Dispose of battery(ies) safely.
• Do not dispose of this product in a fire. The batteries inside may explode or leak.
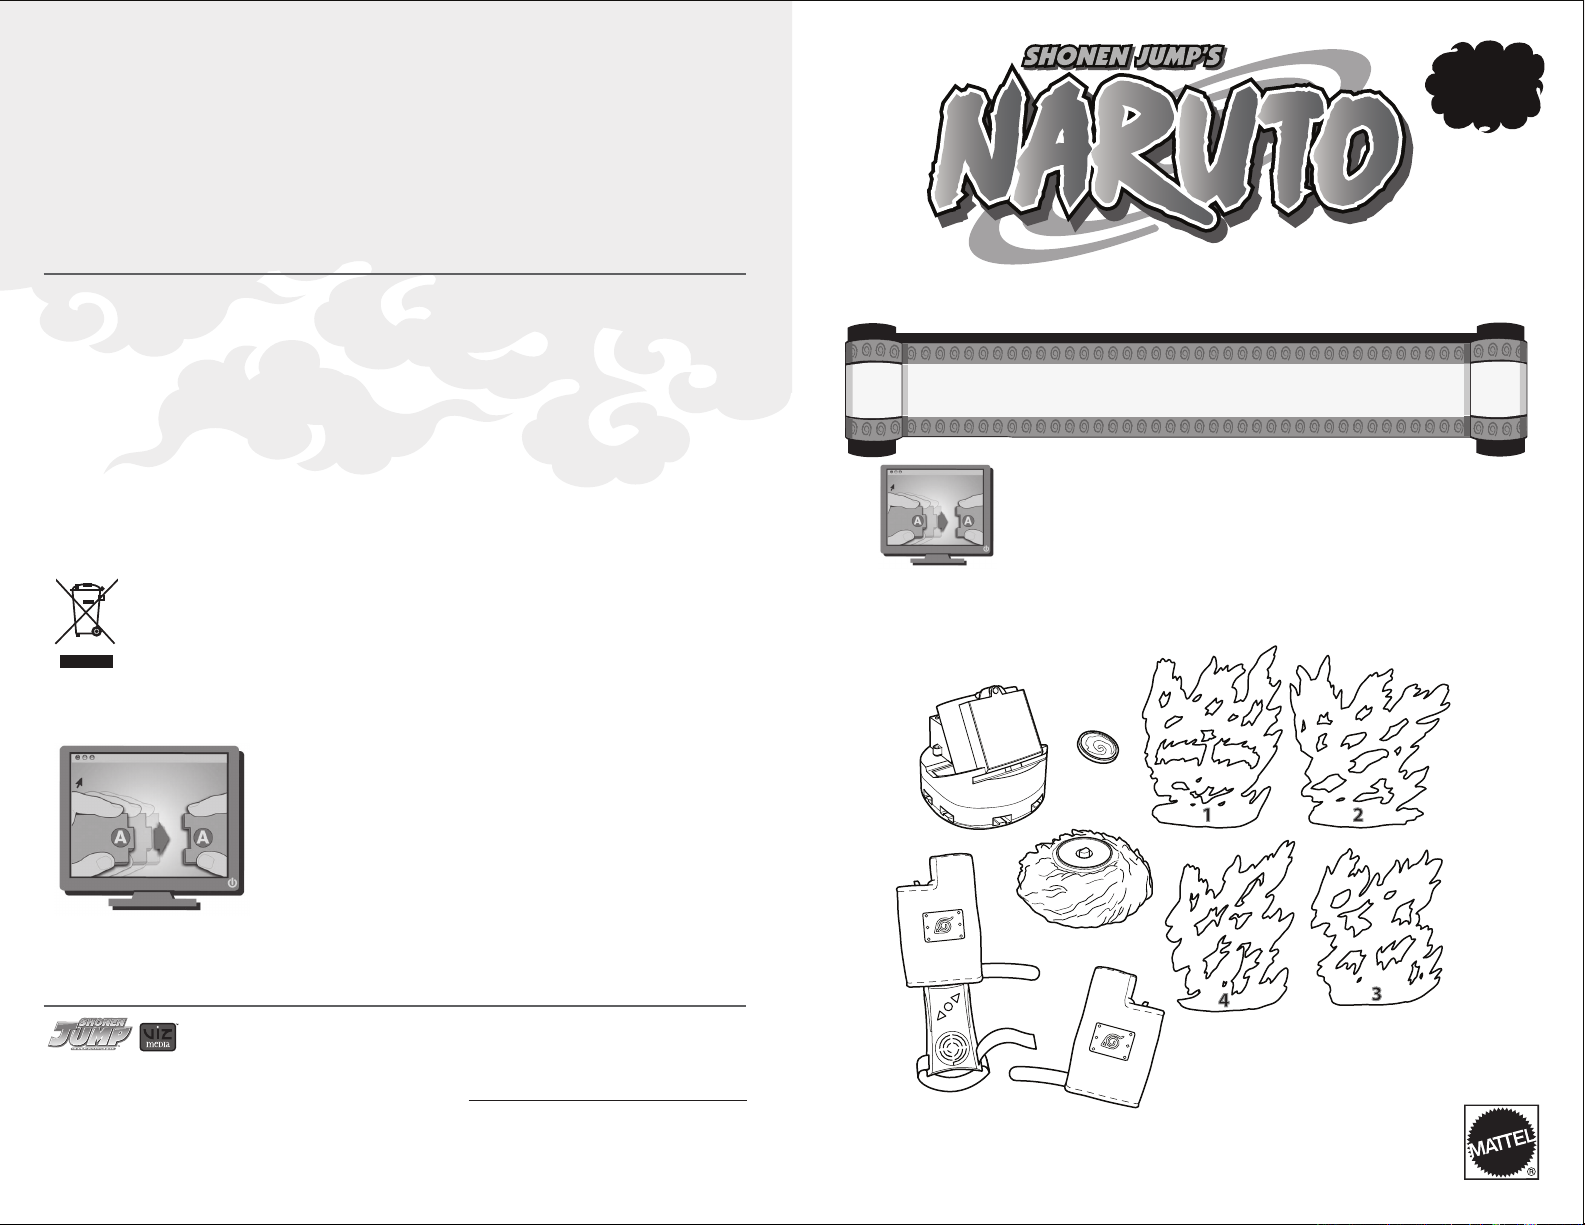
6+
TM
TM
NINJA CHALLENGE
INSTRUCTIONS
Animated instructions and additional
secret hand sign sequences available online!
Go to: http://www.narutoninjachallenge.com/j7838
Protect the environment by not disposing of this product with household waste [2002/96/EC]. Check your
local authority for recycling advice and facilities.
Animated instructions and additional
secret hand sign sequences available online!
Go to: http://www.narutoninjachallenge.com/j7838
© 2002 MASASHI KISHIMOTO
© 2006 Mattel, Inc., 333 Continental Blvd., El Segundo, CA 90245 U.S.A. All Rights Reserved. Consumer Relations 1 (800) 524-8697 service.mattel.com.
• Mattel Canada Inc., Mississauga, Ontario L5R 3W2. You may call us free at 1-800-524-8697. • Mattel U.K. Ltd., Vanwall Business Park, Maidenhead SL6 4UB.
Helpline 01628500303 • Mattel Australia Pty., Ltd., Richmond, Victoria. 3121.Consumer Advisory Service - 1300 135 312. • Mattel East Asia Ltd., Room 1106,
South Tower, World Finance Centre, Harbour City, Tsimshatsui, HK, China. • Diimport & Diedarkan Oleh: Mattel SEA Ptd Ltd.(993532-P) Lot 13.5, 13th Floor,
Menara Lien Hoe, Persiaran Tropicana Golf Country Resort, 47410 PJ. Tel:03-78803817, Fax:03-78803867.
20
Keep these instructions for future reference as they contain important information.
CONTENTS
30X
J7838-0920G1
• Requires 4 “AAA” and 4 “AA” alkaline batteries (not included).
• Gloves are surface washable only. Do not wash in washing machine.
Page 2
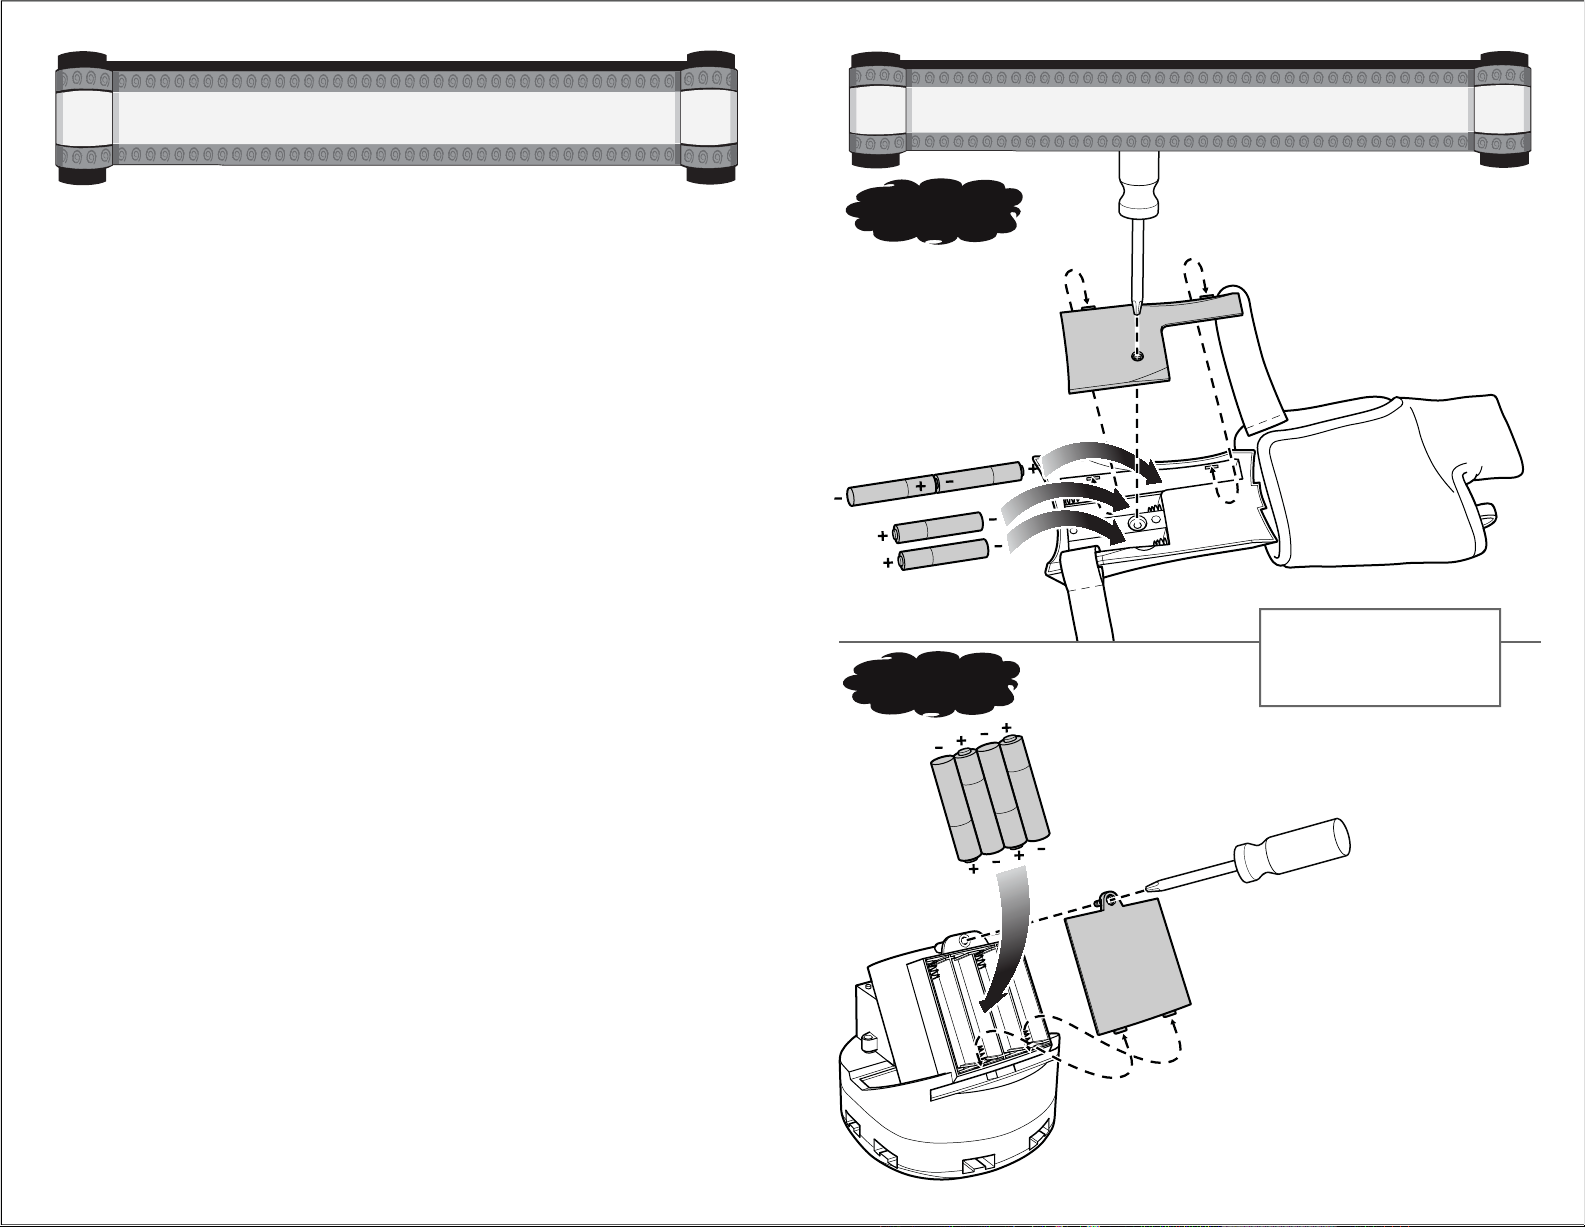
1) Use a Phillips head screwdriver
(not included) to loosen screw.
2) Remove battery cover.
3) Install 4 new “AA” batteries in the
orientation shown. For longer life
use only alkaline batteries
4) Replace battery cover
and t
ighten screw.
1) Use a Phillips head screwdriver
(not included) to loosen screw.
2) Remove battery cover.
3) Install 4 new “AAA” batteries in
the orientation shown. For longer
life use only alkaline batteries
4) Replace battery cover
and tighten
screw.
Battery Installation / Replacement
…………………………… 3
Assembly
…………………………………………………………… 4
Get Ready To Play
………………………………………………… 5
Load Projectiles ………………………………………………… 5
Put on Gloves …………………………………………………… 5
Wrist Keypad Controls ………………………………………… 6
LET’S Play
………………………………………………………… 6
Object of the Game ……………………………………………… 6
Hand Signs ……………………………………………………… 6
One-Sensor Hand Signs ……………………………………… 7
Two-Sensor Hand Signs ……………………………………… 8
Three-Sensor Hand Signs …………………………………… 9
Four-Sensor Hand Signs …………………………………… 10
Four-Sensor Hand Signs (Alternate Method) ……………… 11
Hand Sign Sequences ……………………………………… 12
On / Off Switches …………………………………………… 13
Set-Up Diagram ……………………………………………… 13
Test Mode…………………………………………………… 13
Select Skill Level ………………………………………… 14
Select Game Path ………………………………………… 14
The Way of the Shinobi …………………………………… 15
The Sensei Command ……………………………………… 15
The Chakra Speed Test …………………………………… 16
Punishments ……………………………………………… 16
Final Round………………………………………………… 17
End of Game Successful…………………………………… 18
End of Game Unsuccessful ……………………………… 18
Pause the Game …………………………………………… 18
Quitting the Game ……………………………………… 18
Sleep Mode ………………………………………………… 19
Reset Buttons ……………………………………………… 19
Bonus Feature ……………………………………………… 19
TROUBLESHOOTING TIPS …………………………………… 19
2
2
3
3
1
1
TABLE OF CONTENTS
GLOVE
BASE UNIT
When the product does not
respond, slows down, or loses
range, change the batteries.
BATTERY INSTALLATION / REPLACEMENT
32
Page 3

15X
BASE UNIT
OUTER
‘FLAMES’
15X
CORRECT LOADING
(Cut-away view)
INCORRECT LOADING
(Cut-away view)
1
1
1
2
2
2
3
4
5
6
NOTE: Match number on
assembly part (outer ‘flames’)
with the identical number on the base unit.
Rotate base unit (step 3) to find the next
number. Continue as shown until finished.
Only use projectiles supplied with this toy.
Do not fire at people or animals or at point blank range.
LOAD PROJECTILES
PUT ON LEFT GLOVE
AND WRIST KEYPAD
PUT ON
RIGHT GLOVE
ASSEMBLY
GET READY TO PLAY
54
Page 4

GET READY TO PLAY
(continued)
HAND SIGNS
(continued)
wrist keypad controls
Use the wrist keypad controls to:
• Turn the Keypad On/Off [ / ].
• Scroll through Options [ ].
• Select the Level of Difficulty [ ].
• Select the Game [ ].
• Pause/Resume Play [ ].
• Quit t
he Game [ or ].
• Awaken Keypad from “Sleep Mode” [ ].
• Skip Back to Previous Option [ ].
LET’S PLAY
OBJECT OF THE GAME
The object of the Naruto Ninja Challenge™ is
to learn and master, simple to complex Hand
Sign Sequences
communicate from your gloves to the base
unit in a timed race with dynamic payoffs – or
punishments!
Each hand sign, or hand sign sequence, the
pl
ayer is able to execute correctly will launch
. These signs will
ON/OFF
SWITCH
SPEAKER
projectiles from the base unit in a variety of
combinations. The more complex hand signs,
or hand sign sequences, you perform, the
more projectiles launched, and
hand signs you perform, the less projectiles
are launched. If you perform an incorrect hand
sign, the base unit will punish you and launch
a projectile at you!
The ult
imate goal is to launch all your
projectiles within a set time, resulting in the
Best Time or Highest Score for the chosen
game.
BUTTON 1 []
BUTTON 2 []
BUTTON 3 []
the simpler
NOTE:
Every time a sensor is pressed, you will hear a “swish” sound effect. The sensor sound
effect increases in power, as your Hand Sign sequence increases in length
One-Sensor Hand Signs -
Press any one of the four sensors (A, B, C, D)
on the left glove to execute a one-sensor hand
sign. Once pressed, you can release the sensor
ately or hold onto it, until the two
immedi
second rule elapses and the game reads your
sign. The game will let you know it has “read”
your hand sign with positive phrases and
sound effects
away from you. Following is a list of the
One-Sensor Hand Signs.
HAND SIGN ‘A’ HAND SIGN ‘B’
, and will launch one projectile
SIGN SCORE
A (1 hand sign) = 1 Point
B (1 hand sign) = 1 Point
C (1 hand sign) = 1 Point
D (1 hand sign) = 1 Point
HAND SIGNS
LEFT HAND
PALM SIDE
B
A
Press the sensor locations on the left glove (see below) to perform
hand signs.
Multi-Sensor Hand Signs are described on pages 8 - 12.
LEFT HAND
TOP SI DE
D
C
6 7
Press sensor ‘A’.
HAND SIGN ‘C’ HAND SIGN ‘D’
Press sensor ‘C’.
Press sensor ‘B’.
Press sensor ‘D’.
Page 5

12
++
12
+
Two-Sensor Hand Signs -
Press two of the four sensors (A, B, C, D) on
the left glove in any of the combinations shown
below to execute a two-sensor hand sign. After
pressing t
he first sensor, you have two seconds
to press the second sensor. Once pressed, you
can release the sensors immediately or hold
onto them, until the two second rule elapses
and the game reads your sign. The game will
let you know it has ‘read’ your hand sign with
positive phrases and sound effects
, and will
launch one projectile away from you.
Example: Hand Sign ‘AB’ (see below). Press
and hold sensor ‘A’. While holding sensor ‘A’,
press and hold sensor ‘B’ with a different f
inger.
Release both.
HAND SIGN ‘AB’
SIGN SCORE
AB (1 hand sign) = 2 Points
AC (1 hand sign) = 2 Points
AD (1 hand sign) = 2 Points
BA (1 hand sign) = 2 Points
BC (1 hand sign) = 2 Points
BD (1 hand sign) = 2 Points
CA (1 hand sign) = 2 Points
CB (1
hand sign) = 2 Points
CD (1 hand sign) = 2 Points
DA (1 hand sign) = 2 Points
DB (1 hand sign) = 2 Points
DC (1 hand sign) = 2 Points
Press and hold sensor ‘A’. Hold ‘A’, and press sensor ‘B’.
HAND SIGN ‘AD’
Press and hold sensor ‘A’. Hold ‘A’, and press sensor ‘D’.
Example: Hand Sign ‘AD’ (see below). Press and hold sensor ‘A’. While holding
sensor ‘A’, press and hold sensor ‘D’ with a different finger. Release both.
Three-Sensor Hand Signs -
Press three of the four sensors (A, B, C, D) on
the left glove in any of the combinations shown
below to execute a three-sensor hand sign.
After
pressing and holding the first sensor, you
have two seconds to press and hold the second
sensor. While holding the two sensors, you
have two more seconds to press the third
sensor. Once pressed, you can release the
sensors immediately or hold onto them, until
the two second rule elapses and the game reads
your sign. The game will let you know it has
“read” your hand sign with positive phrases and
sound effects
, and will launch one projectile
away from you.
HAND SIGN ‘ADC’
Press and hold sensor ‘A’.
Hold
‘A’
, and press and hold
‘D’.Hold ‘AD’, and press ‘C’.
HAND SIGN ‘CDA’
Press and hold sensor ‘C’.
Hold
‘C’
, and press and hold
‘D’.Hold ‘CD’, and press ‘A’.
SIGN SCORE
ABC = 2 Points
ABD = 2 Points
BAC = 2 Points
BAD = 2 Points
CAB = 2 Points
CAD = 2 Points
DAB = 2 Points
DAC = 2 Points
ACB = 2 Points
ACD = 2 Points
BCA = 2 Points
BCD = 2 Points
Example: Hand Sign ‘CDA’ (see below). Press and hold sensor ‘C’. While holding sensor ‘C’, press
and hold sensor ‘D’ with a different finger. While holding sensor ‘C’, and ‘D’
, press and hold sensor
‘A’ with a different finger. Release all.
SIGN SCORE
CBA = 2 Points
CBD = 2 Points
DBA = 2 Points
DBC = 2 Points
ADC = 2 Points
ADB = 2 Points
BDA = 2 Points
BDC = 2 Points
CDA = 2 Points
CDB = 2 Points
DCA = 2 Points
DCB = 2 Points
Example: Hand Sign ‘ADC’ (see below). Press and hold sensor ‘A’. While holding sensor ‘A’, press
and hold sensor ‘D’ with a different finger. While holding sensors ‘A’, and ‘D’, press and hold sensor
‘C’ with a different finger. Release all.
1
23
+ +
123
+ +
EACH OF THE FOLLOWING IS CONSIDERED
1 HAND SIGN
98
Page 6

Four-Sensor Hand Signs -
Press four of the four sensors (A, B, C, D) on
the left glove in any of the combinations shown
below to execute a four-sensor hand sign. After
ing and holding the first sensor, you have
press
two seconds to press and hold the second
sensor. While holding the two sensors, you
have two more seconds to press the t
sensor. While holding the three sensors, you
have two more seconds to press the fourth
sensor. Once pressed, you can release the
sensors immediately or hold onto them, until
he two second rule elapses and the game reads
t
your sign. The game will let you know it has
“read” your hand sign with positive phrases and
sound effects
away from you.
Example: Hand Sign ‘ABCD’ (see below). Press and hold sensor ‘A’. While holding sensor ‘A’, press
and hold sensor ‘B’ with a different finger. While holding sensors ‘A’, and ‘B’, press and hold sensor
‘C’ with a different finger. While holding sensors ‘A’, ‘B’, and ‘C’, press and hold sensor ‘D’ with a
different finger. Release all.
HAND SIGN ‘ABCD’
, and will launch two projectiles
hird
EACH OF THE FOLLOWING IS CONSIDERED
1 HAND SIGN
SIGN SCORE
ABCD = 5 Points
ABDC = 5 Points
ADBC = 5 Points
ADCB = 5 Points
ACDB = 5 Points
ACBD = 5 Points
BACD = 5 Points
BADC = 5 Points
BCAD = 5 Points
BCDA = 5 Points
BDAC = 5 Points
BDCA = 5 Points
SIGN SCORE
CABD = 5 Points
CADB = 5 Points
CBDA = 5 Points
CBAD = 5 Points
CDAB = 5 Points
CDBA = 5 Points
DABC = 5 Points
DACB = 5 Points
DBCA = 5 Points
DBAC = 5 Points
DCAB = 5 Points
DCBA = 5 Points
Sensor Hand Signs - Alternate Method
Four-
Example: Hand Sign ‘ABCD’ (see below). Press and hold sensor ‘A’ against your body. While
holding sensor ‘A’ against your body, press and hold sensor ‘
sensors ‘A’, and ‘B’ against your body, press and hold sensor ‘C’ with a finger. While holding
sensors ‘A’, ‘B’, and ‘C’, press a
HAND SIGN “ABCD” ALTERNATE METHOD
nd hold sensor ‘D’ with a different finger. Release all.
B’ against your body. While holding
12
+ +
Press and hold sensor ‘A’.
Hold
‘A’
, and press and hold
‘B’
.
12
++ +
Press and hold sensor ‘A’.
, and press and hold
‘B’
.
Hold
‘A’
34
+
Hold ‘AB’, and press and hold ‘C’.
Alternate method of making Hand Signs: Use your body as a surface to press the sensors on the
glove as illustrated in the example on the next page.
Hold ‘ABC’, and press ‘D’.
34
+
Hold ‘AB’, and press and hold ‘C’.
Hold ‘ABC’, and press ‘D’.
1110
Page 7

HAND SIGNS SEQUENCES
Hand Sign Sequences - A Hand Sign Sequence is made of two or more Hand Signs. Example: "A + BA" is a
Hand Sign Sequence with two hand signs. "D + BC + A + CD + D" is a Hand Sign Sequence of four hand
signs. One, two, three, and four-sensor Hand Signs can be put together to form a sequence. Illustrated below is
a Hand Sign Sequence composed of five hand signs: “A + ADC + AD + D + AB”.
HAND SIGN ‘A’
12
+ +
Press and hold sensor ‘A’.
HAND SIGN ‘ADC’
Release all.
NOTE: Every time a sensor is
pressed, you will hear a “swish”
sound effect. The sensor sound
effect increases in power , as
your Hand Sign sequence
increases in length.
34 5 6
TURN ON
BASE UNIT
I = ON
O = OFF
TURN ON
wrist keypad
+ + + +
Press and hold sensor ‘A’. Hold ‘A’, press sensor ‘D’. Hold ‘AD’, press sensor ‘C’.
HAND SIGN ‘AD’
798
+ +
Press and hold sensor ‘A’. Hold ‘A’, and press sensor ‘D’. Release all.
HAND SIGN ‘D’
10 11
+ +
Press and hold sensor ‘D’. Release all.
HAND SIGN ‘AB’
12 13 14
+ +
Press and hold sensor ‘A’. Release all.Hold ‘A’, and press sensor ‘B’.
12 13
Release all.
Remember, you have
only two seconds to
release a hand sign
and start the next.
Otherwise, the game
will think that you have
finished your hand
sign or sequence.
+
SET-UP
DIAGRAM
6’ - 10’ FT.
BASE UNIT
WHITE SPOT
BASE UNIT
TEST MODE
IMPORTANT: When you turn the game ON, check to make sure
the base unit is receiving the signal from your wrist keypad. Press
any sensor on the left glove (A, B, C, D) and
word “Test”. If the base unit rotates, it’s working properly. If it
does not, adjust your distance and try again.
To escape from TEST MODE, press button 2 [], shown on p. 14.
To re-enter TES
T MODE, press button 3 [ ], shown on p. 14.
POINTING TO PLAYER
TOP VIEW
WHITE SPOT
Set up the base unit on a flat floor
approximately 6 to 10 feet away from
player.
NOTE: Make sure that the white spot on
the base unit faces the player as shown.
you will hear the
PLAYER
Refer to SET-UP DIAGRAM
above for correct positioning.
Page 8

WRIST KEYPAD CONTROLS
BUTTON 1 BUTTON 2
(Shown for reference)
SELECT YOUR SKILL LEVEL
Once you have exited the Test Mode you will
hear, “Welcome to the Challenge”, followed by
“Choose your skill”. There are two levels of
difficulty to choose from:
Chunin (easy)
Jonin (hard)
SELECT YOUR GAME PATH
Once you have selected the skill level, the
game will say, “Choose your Path”. There are
three game paths to choose from:
“The Way of the Shinobi”
“The Sensei Command”
“The Chakra Speed Test”
BUTTON 3
• Scroll through options press button 1 [].
• Select level of difficulty press button 2 [ ]
Once this button has
difficulty has been selected. The game will
repeat your selected choice.
(see Wrist Keypad shown above).
• Scroll through options press button 1 []
• Select Game press button 2 []
Once this button has been pressed, level of
difficulty has been selected. The game will
repeat your selected choice.
• Skip back to previous option press
button 3 [].
Descriptions of the three game paths are
contained in the following section.
been pressed, level of
THE GAME PATHS
You are trying for the Best Time or Highest Score
for each game.
The Way of the Shinobi
GOAL:
To l aunch all 30 projectiles as fast as you can.
• The longer your Hand Sign Sequences, the
faster you launch the projectiles.
RULES:
• Easy or Difficult does not matter in this
game.
• There is no FINAL ROUND in this game (see
FINAL ROUND, p. 17).
• Only five punishments are allowed (see
PUNISHMENTS, p. 16) before you are kicked
out of th
ended – Game over!” (see END OF GAME
UNSUCCESSFUL!, p. 18).
TO P L AY:
When the game begins, you will hear,
“Ready… Begin!” This is your cue to start
play. Starting early will result in punishment.
Make as many hand signs and hand sign
sequences as fast as you can (see section on
HAND SIGNS, starting on p. 6). Once you have
launched all 30 projectiles, the game is over.
You will hear, “You have mastered the way of
the Shinobi,” and will be automatically taken to
End of Game SUCCESSFUL! to check your
score and time (see END OF GAME
SUCCESSFUL!, p. 18).
SPECIAL CIRCUMSTANCES
There may be a situation where you have
launched all 30 projectiles, but you are in the
process of completing a long hand
sequence. The game will allow you to
complete your hand sign sequence beyond 30
projectiles until you stop or make a mistake.
This circumstance will cause your time to
suffer, but you will receive a higher score. How
long can you make your hand sign sequence?
40 hand signs? 60 hand signs?
e game and hear, “Challenge has
sign
The Sensei Command
GOAL:
To o bey and correctly execute all verbal
commands within the time alloted.
RULES:
• Chunin (easy level) - Commands start at 1
hand sign and proceed incrementally up to 8
hand signs.
• Jonin (hard level) - Commands are randomly
selected from 5 hand si
• Successfully complete the commands and
you are sent to the FINAL ROUND (see FINAL
ROUND, p. 17).
• Only five punishments are allowed (see
PUNISHMENTS, p. 1
out of the game and hear, “Challenge has
ended – Game over!” (see END OF GAME
UNSUCCESSFUL!, p. 18).
TO P L AY:
When the game begins you will hear,
“Ready… Begin!” Listen for the game to
announce the first hand sign or hand sign
sequence, followed by the command, “Begin!”
Example: "5 Hand Signs . . . Begin!"
NOTE: Hand sign commands of 2 or more hand
signs must be completed as a sequence, NOT as
individual hand signs.
If you make a mistake, you will be
punished. Once punishment i
will hear “Continue.” The game will repeat the
last hand sign sequence command that was
not correctly executed. Try again until you
successfully complete the command.
IMPORTANT NOTE:
In this game you will NOT
launching of projectiles as in other games. You
will only get a payoff after you have completed
the entire command sequence.
gns to 10 hand signs.
6) before you are kicked
If you want to hear the
hand sign instruction
again, press button 3 []
on your wrist keypad,
before you hear the word
“Begin!” Pay attention!
s complete, you
get an immediate
1514
Page 9

The Chakra Speed Test
GOAL:
To l aunch 20 projectiles before the time alloted
runs out.
RULES:
• Chunin (easy level) - Longer time frame,
randomly selected, from one minute, thirty
seconds (90 seconds) to three minutes.
• Jonin (hard level) - Shorter time frame,
randomly selected, from 30
minute, thirty seconds (90 seconds).
• Successfully launch 20 projectiles within the
time frame and you are sent to the FINAL
ROUND (see FINAL ROUND, p. 17).
• Only five punishments are a
PUNISHMENTS below) before you are kicked
out of the game and hear,“Challenge has ended
– Game over!” (see END OF GAME
UNSUCCESSFUL!, p. 18).
TO PLAY:
The game will announce the time frame, for
example: “2 minutes”. You will hear “Ready…
Begin!” Use any hand signs or hand sign
sequences to launch the projectiles.
If you make a mistake, you will be puni
Once punishment is complete, you will hear,
“Continue”. Resume playing.
IMPORTANT NOTE:
Even if you do not launch 20 projectiles within
the alloted time, you will still proceed to the
FINAL ROUND (see FINAL ROUND, p. 17), b
your score will not be as high.
seconds to one
llowed (see
shed.
ut
PUNISHMENTs
Punishments result when you do not complete
a game, do not correctly obey a command, or
perform any of the following:
• Sliding Hand Sign - This occurs
to press and release multiple sensors, while
holding down another sensor.
Example: Press and hold sensor ‘A’, then, while
holding sensor ‘A’, press and
‘D’. Then while still holding sensor ‘A’, press
sensor ‘C’. For more information see section
HAND SIGNS starting on page 6.
when you try
release sensor
• Time Violation - This occurs when you press
and hold
Does not apply to some Secret Hand Signs
(see BONUS FEATURES, p. 19).
• Four Identical Single-Sensor Hand Signs The game only allows you to repeat identical
sing
Example: ‘A, A, A, A’. Press sensor ‘A’, then
press sensor ‘A’ again. Repeat. Repeat.
Press the same sensor 4 times in a row and
you will be punished
• Six Different Single-Sensor Hand Signs The game will only allow you to use 5
DIFFERENT single-sensor hand signs in a row.
Example: ‘A, B, C, D, A, B’
Press and release sensor ‘A’,
Then press a
Then press and release sensor ‘C’,
Then press and release sensor ‘D’.
Then press and release sensor ‘A’.
Then press and release sensor ‘B’.
A
punished.
• Four Identical Multi-Sensor Hand Signs
in a Sequence - The game will only allow you
to repeat a multi-sensor hand sign THREE
times in a row.
Example: ‘AB’, ‘
Press and hold sensor ‘A’ and then sensor ‘B’.
Release. Repeat. Repeat. Repeat.
The fourth time you will be punished.
• Two Identical Hand Sign Sequences - The
game will not allow you to
sequence two times in a row.
Example: Perform the hand sign sequence ‘AB,
A, C, D, A’, and wait two seconds. Repeat this
same sequence and you will be punished.
Punishments are delivered in two ways:
• Verbal Admonishments
selects a negative verbal phrase.
• Physical Consequence - The base unit will
spin around and fire between one and three
projectil
any sensor longer than five seconds.
le sensor hand signs THREE times.
.
nd release sensor ‘B’.
t the sixth sensor pressed, you will be
AB’, ‘AB’, ‘AB’
repeat a hand sign
- The game randomly
es at you.
PUNISHMENTs
During punishment, your hand sign abilities are
temporarily disabled. After the punishment is
complete you will hear, “Continue”, at which
time the game will resume.
(continued)
FINAL ROUND
Upon successful completion of The Sensei
Command or The Chakra Speed Test, you will
get into the Final Round. At that time the game
will announce, “The Sensei Command or The
Chakra Speed Test Final Round!”
GOAL:
To o bey and correctly perform the ONE final
Hand Sign Sequence command within the
given time.
RULES:
• Chunin (easy level) - Longer time frame and a
shorter hand sign sequence to complete. These
are randomly selected from 8 hand signs in 20
seconds to 10 hand signs in
In the Chunin level you get two chances…
If you make a mistake, you will be punished.
Once punishment is complete, the game will
repeat the same command that was not
correct
ly executed. If you make a second error,
or time runs out, you will be kicked out of the
game. At that time the game will announce,
“Challenge has ended. Game over!” You will be
taken to End of Game UNSUCCESSFUL! (See
END OF GAME UNSUCCESSFUL! on p. 18.)
• Jonin (hard level) - Shorter time frame and a
longer hand sign sequence to complete. These
are randomly selected from 15 hand signs in
seconds to 25 hand signs in 30 seconds.
In Jonin level you will only get ONE chance.
If you make any error, or time runs out, you
will be kicked out of the game. At that time the
game will
Game Over!” You will be taken to End of Game
UNSUCCESSFUL! (See END OF GAME
UNSUCCESSFUL!” on p. 18.)
announce, “Challenge has ended.
30 seconds.
20
TO P L AY:
The game will announce the number of hand
signs and the time frame. You will hear for
example, “15 Hand Signs, 20 Seconds…
Ready… Begin!” You must begin within two
seconds. Use any hand signs or hand sign
sequences to complete the command.
If you want to hear the hand
sign sequence instruction
again, press button 3 [ ] on
your wrist keypad, before you
hear the word, “Begin!”
IMPORTANT NOTE:
In the Final Round, no projectiles will
launched until you have completed the entire
command sequence.
SUCCESSFUL COMPLETION: The game will
congratulate you with verbal praise and
announce, “Ultimate Shinobi, You have
Mastered (game title)”. All remaining
projectiles will be launched
(See END OF GAME SUCCESFUL on p. 18.)
away from you.
be
1716
Page 10

WRIST KEYPAD CONTrOLS
BUTTON 1 BUTTON 2 BUTTON 3
(Shown for reference)
End of Game SUCCESSFUL!
Upon entering End of Game SUCCESSFUL!,
the game will announce, “Well Done!” You will
automatically hear the phrase, “Your Score”
and the game will announce your score.
• To check YOUR SCORE press button 1 []
on the wrist keypad.
check YOUR TIME press button 1 [ ] on
• To
the wrist keypad TWO times.
• To check HIGH SCORE press button 3 []
on the wrist keypad.
End of Game UNSUCCESSFUL!
Upon entering
the game will announce, “Game Over!”, and
hear a blast sound effect. If you try to check
your score, you will get nothing but verbal
admonishment.
• To check HIGH SCORE press button 3 []
on the wrist keypad.
End of Game UNSUCCESSFUL!
PAUSE THE GAME
• During a game press button 2 [] to pause
any game for 45 seconds. You may do this as
many times as you want. At any time before
the 45 seconds elapses, press button 2 []
again to resume the game.
QUITTING THE GAME
When a game has been paused by pressing
button
2 [], press either
button
3 [] to quit. The game will return to
the game selection menu.
button
1 [] or
• To check
the wrist keypad TWO times.
• When the game is turned off, ALL scores and
times are reset. The HIGH SCORE and BEST
TIME cannot be saved for a futu
• To exit End of Game SUCCESSFUL!, press
button 2 [ ] on the wrist keypad. Game will
announce “Continue”. Press button 2 [ ]
again, and you are taken to game select to
begin a new game.
• To check BEST TIME press button 3 [ ] on
,
the wrist keypad TWO times
• To exit End of Game UNSUCCESSFUL!,
press button 2 [ ] on the wrist keypad. Game
will announce, “Continue”. Press button 2 [ ]
again, and you are taken to game select to
begin a new game.
When you hear the phrase, “Continue”, game
play resumes.
• The game will not pause during the Final
Round.
BEST TIME press button 3 [ ] on
re game.
SLEEP MODE
Both the wrist keypad and the base unit will go
into SLEEP MODE if nothing is pressed within
one minute, 30 seconds (90 seconds). You will
hear the game say, “3, 2, 1” and go into
SLEEP MODE. Press button 2 [] to awaken
the wrist keypad. See below to awaken base.
RESET BUTTONS
Press button as shown in diagram on base
unit to ‘awaken’ the base unit from ‘sleep
mode’ or to reset projectile counter when
starting a new game.
BONUS FEATURES
Secret Hand Sign Sequences There are twelve Secret Hand Sign Sequences
waiting to be discovered. When performed
properly, they give you cheats, shortcuts and
unexpected payoffs.
Secret Ha
used in the following games:
The Way of the Shinobi
Chakra Speed Test
They may NOT be used in Sensei Command
and the Final Round.
Everytime you successfully complete a
Secret Hand
‘whistle’ sound, followed by a verbal phrase
and a physical payoff (if any). Game will
continue after that.
A Secret Hand Sign Sequence may only be
used ONCE durin
Some Secret Hand Sign Sequences allow
you to break the rules of the game in order to
TROUBLESHOOTING TIPS
• If game does not respond, press the reset
button or turn base unit "off", then back "on".
• Remember that ONE hand sign can be made
with one sensor --- or with multi-sensors!
• Remember th
hand signs are considered a SEQUENCE and
each one must be executed with no more than
2 seconds between each sign.
nd Sign Sequences can only be
Sign Sequence, you will hear a
g a game.
at TWO or MORE consecutive
complete the sequence. Be aware that this is
the only exception to the rules.
To get you started, below are two partial
Secret Hand Sign sequences:
“CD + DC + CA + CB + B + B + B + _”
Hint: The last hand sign in the sequence is a
single-sensor hand sign.
“A + B +
Hint: The last three hand signs in the sequence
are single-sensor hand signs. You will have to
figure out the order of them to complete the
seq
Hints for additional Secret Hand Sign
Sequences will appear on the website over a
period of time.
Go to:
http://www.narutoninjachallenge.com/j7838
for more information.
• HAND SIGN SEQUENCES
• ANIMATED INSTRUCTIONS ONLINE
C + D + DC + BA + A + _ + _ + _”
uence.
Explanation of Sequences - see p. 12.
Secret Sequences - see p. 19.
Sequence Punishment examples - see p. 16
http://www.narutoninjachallenge.com/j7838
1918
 Loading...