

Page 1

J3893-0920G3
For best performance, here is a list of recommended cars for
this track set.
16 Angels™
Low Carbs™
Ferrari 360 Modena
Phastasm™
Krazy 8s®
Speed Blaster®
FINAL ASSEMBLY
NOT FOR USE WITH SOME
HOT WHEELS® VEHICLES.
Mattel, Inc., 333 Continental Blvd., El Segundo, CA 90245 U.S.A. Consumer Relations 1 (800) 524-8697 service.mattel.com. • Mattel Canada Inc.,
Mississauga, Ontario L5R 3W2. You may call us free at 1-800-524-8697. • Mattel U.K. Ltd., Vanwall Business Park, Maidenhead SL6 4UB. Helpline
01628500303 • Mattel Australia Pty., Ltd., Richmond, Victoria. 3121.Consumer Advisory Service - 1300 135 312. • Mattel East Asia Ltd., Room
1106, South Tower, World Finance Centre, Harbour City, Tsimshatsui, HK, China. • Diimport & Diedarkan Oleh: Mattel SEA Ptd Ltd.(993532-P) Lot
13.5, 13th Floor, Menara Lien Hoe, Persiaran Tropicana Golf Country Resort, 47410 PJ. Tel:03-78803817, Fax:03-78803867.
Keep these instructions for future reference as they
contain important information.
FOR HELP WITH ASSEMBLY CHECK OUT OUR
ANIMATED INSTRUCTIONS ONLINE!
http://www.hotwheels.com/J3893_Terrordactyl
CONTENTS: Please remove everything from the package
and compare to the contents shown here. Refer to
numbers on parts to help with assembly.
H
I
C5
C2
A4
LKC
R
G
B2
P
B1
M
D
Q
C2
C4
C3
C1
C1
J
B
R
A1
A3
A
C4
C3
B2
B1
I
A2
Q
L
C8
B3
A2
H
B3
C
C9
© 2006 Mattel, Inc. All Rights Reserved.
®
5+
®
INSTRUCTIONS
A3
A1
A4
K
A
C6
C7
J
B
C6
C7
C8
C9
C5
G
P
M
D
Page 2

1
ASSEMBLY - A
Swing up one side of the
launcher and snap the
two halves together.
SNAP!SNAP!SNAP!
3
Attach both ends of loop track
to launcher.
A2
A1
A4
TOP VIEW
A3
A2
A1
A4
A3
2
SNAP!
SNAP! SNAP! SNAP!
Add track loops to
launcher as shown.
4
R
TOP VIEW
B
J
I
R
B
A
I
R
I
I
R
K
K
A
J
Page 3
5
G
P
SNAP!SNAP!SNAP!
ASSEMBLY - B
7
P
G
B2
D
6
M
B1
B3
C
L
C
L
B2
B1
8
P
G
B3
B3
G
P
M
D
D
M
Page 4

9 11
10
Q
Q
ASSEMBLY - C
C3
C2
H
H
C5
12
Snap track support onto
C5
C4
C4
back of track connectors.
SNAP!
C6
C7
SNAP!
C7
C3
C8
SNAP!
C8
SNAP!
C9
C6
C9
C2
BACK VIEW
C1
C1
Page 5

13
BOTTOM
VIEW
!
SNAP!SNAP
SNAP!
BOTTOM
VIEW
NAP
S
SNAP!
SNAP!
CONGRATULATIONS
YOUR SET IS COMPLETE!
!
14
Insert pterodactyl's tail into
cave until it locks into place.
GET READY
TO PLAY
OTHER
SIDE
ON/OFF SWITCH
(UP=OFF / DOWN=ON)
With the switch in the
OFF position, wind
the knob clockwise.
Keep switch OFF
until ready to start
play.
Page 6

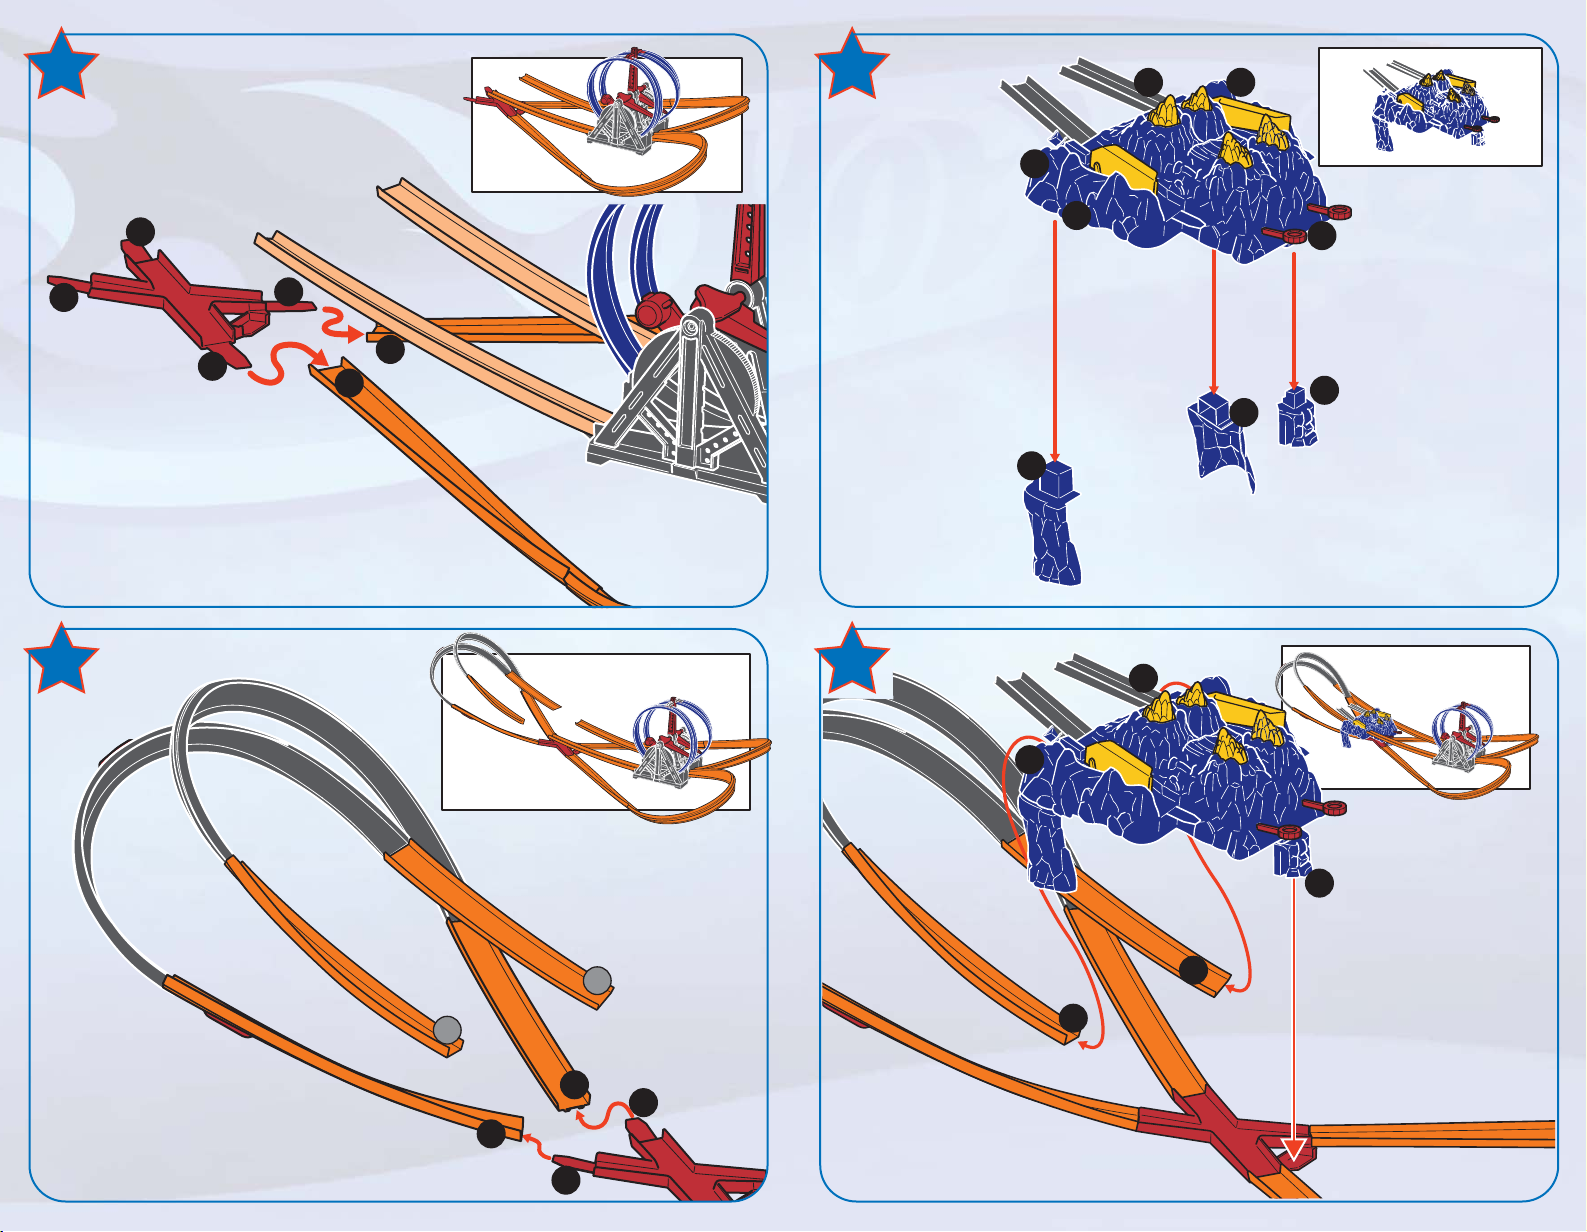
GET READY TO PLAY
(CONTINUED)
TOP VIEW
Place cars
in front of
red levers
on inner
loop to
start.
A
CAR
DIRECTION
TOP VIEW
B
(A) Pull rings completely
out. Push track diverters
in as shown.
(B) Then push down all four
volcano peaks until they lock.
Page 7

TO PLAY
2-PLAYER
NOTE: 1-player
game play is the
same as the 2-player
game play shown here
you just won’t have
the head to head
racing action.
1.
Push switch to
1.
the ON position
to start.
Watch as the
pterodactyl
moves from
side to side.
ACCELERATOR
LEVER
2.
2. Place cars in front of red
levers on inner loop to start.
3. Push down on
accelerator levers to propel
your car through the track.
TOP VIEW
Place cars
in front of
red levers
on inner
loop to
start.
IT’S ALL ABOUT TIMING!
As the car travels around the track put
pressure on the accelerator lever to be prepared to send
your car through the set again.
HELPFUL HINT: Wait until your car enters the
launcher and apply pressure to the accelerator lever to
send your car through the set again.
TIP: If the lever comes out of alignment,
pull it back and rotate it back into position.
3.
ACCELERATOR
LEVER
Page 8

TO PLAY (CONTINUED)
Continue sending your car through the track. Once you
complete 3 laps through the volcanoes, one volcano
will erupt. Complete 6 laps and the other
volcano will erupt and trigger the track
diverter. The next lap will send your car
towards the pterodactyl.
The first one to hit the target trigger and send the pterodactyl
flying WINS!
If the 6 laps are not completed by the time the pterodactyl stops
moving players can stop playing, rewind the pterodactyl and
keep playing until someone wins.
Option: Place extra cars over volcanoes. When
your car completes 3 laps, one of the volcanoes
on the other side of the track will erupt and knock
the car off the mountain.
Page 9

STORE YOUR SET
UNDER YOUR BED!
1. Unsnap track from support
and remove support arm.
2.
3.
4. Unsnap the two
halves of the
launcher/loop and fold
down flat as shown.
4.
2. Remove rear support
assembly and store.
3. Drop curve track assembly and tilt perch assembly backward
until it lies flat.
NOTE: support arms are hinged to allow perch to bend forward.
Animated assembly instructions available online! Go to:
http://www.hotwheels.com/J3893_Terrordactyl
Refer to numbers on parts and contents page to help with
assembly.
We want to hear your feedback on this toy. Go to:
http://service.mattel.com/us/
 Loading...