

Page 1
MODEL 76013
For 1 player/Ages 8 and up
INSTRUCTION MANUAL
Talk, play and interact with your new best friend, Jibbi ! Play games, dress
up, earn Jibbi beans and keep Jibbi healthy by talking and playing with Jibbi.
P/N 823A3200 Rev.A
SET UP
WARNING: EPILEPSY AND SEIZURES READ BEFORE OPERATING
YOUR “JIBBI”
A few people may experience epileptic seizures when viewing flashing
lights or patterns in our daily environment. These persons may experience seizures while watching TV pictures or playing video games. Players who have not had any seizures may nonetheless have an undetected
epileptic condition.
Consult your physician before playing video games if you have an
epileptic condition or experience any of the following symptoms while
playing video games: altered vision, eye or muscle twitching, other
involuntary movements, loss of awareness of your surroundings, mental
confusion and /or convulsions.
BATTERY INSTALLATION
This game is powered by four (4) C (LR14) batteries.
• Using a screwdriver, loosen the screw until the battery compartment
door can be removed.
• Insert four (4) C (LR14) batteries (we recommend alkaline) as indicated
inside the battery compartment.
• Replace the battery compartment door and tighten the screw with a
screwdriver. Do not over-tighten.
ADULT SUPERVISION IS RECOMMENDED WHEN CHANGING
BATTERIES.
CONNECTING TO YOUR TV
To connect Jibbi directly to a TV, the TV must be equipped with audio
and video input jacks. They are commonly found on the front of the TV
near the contrast, color, and picture adjustment controls; or on the back
of the TV near the antenna and cable /satellite jacks.
Insert the yellow video plug from the game into the Video-In (yellow) jack
on the TV.
Insert the white audio plug from the game into the left Audio-In (white)
jack on the T V.
Set your TV to the appropriate video input mode. (See your TV’s operating manual for details.)
E
• Speak clearly
• Only 1 person speak at a time
• Keep background noise (like music and conversations to a minimum)
• Wait until the word is on the screen before you speak it
Turn Jibbi on using the on/off switch and you will be asked “Continue
Existing Game?”
• If you respond Yes you will start where you last left off
• If you respond No you will be asked “Are you Sure? ”
When asked Are You Sure?
• If you respond Yes you will erase your data and start over!
• If you respond No you will continue where you left off
JIBBI MODES
Turn Off Mode– It is not necessary to turn Jibbi of f. If there is no interaction for over 20 minutes, Jibbi will go into “Sleep Mode” (See below).
Jibbi will give you an onscreen prompt when batteries are low. Another
power source for the unit is a 6 V D.C. adapter ( not included ).
Please note : Leaving Jibbi in sleep mode is suggested however, if
you choose to turn Jibbi off, you must put Jibbi on Vacation Mode in
order to save your progress.
Turn On Mode – Once you turn Jibbi on either by a double hand clap
or the on/off switch, Jibbi will appear on the screen.
Please note : If you don’t talk to Jibbi within 30 seconds, Jibbi will go
into Hey Jibbi Mode (See Below)
Sleep Mode – If you don’t play with Jibbi for a period of 20 minutes Jibbi
will automatically go into sleep mode. Clap twice to wake Jibbi up !
Please note : Jibbi will randomly ask you to play when in sleep mode
(between the hours of 1pm and 7pm). Jibbi’s icon on the front of the
console will flash and Jibbi’s voice will come out of the console.
Hey Jibbi Mode – Keep Jibbi entertained! To get his attention just say
“Hey Jibbi!”
PLAYING WITH JIBBI
Insert batteries into the Jibbi console and turn your TV on to the appropriate settings. (See Set Up – TV Connection)
Jibbi is your friend who lives in your TV. Talk to Jibbi by speaking the
word prompts on your T V screen. When Jibbi understands you the
words will become transparent. Play games and nurture Jibbi to earn
Jibbi Beans. The more Jibbi beans you earn the more fun things you
can buy! Make sure you pay attention to everything Jibbi says to keep
Jibbi happy and healthy.
•
Food Meter – If the food meter gets too low Jibbi will complain about
being hungry. Feed Jibbi to increase the meter.
Bath Meter – If the bath meter gets too low Jibbi will complain about
•
being stinky. Give Jibbi a bath to increase the meter.
Work Out Meter – If the work out meter gets too low Jibbi will need to
•
work out. Exercise with Jibbi to increase the meter.
Trash Meter –
•
appears Jibbi will get sick! Ask Jibbi to Clean Up to increase the meter.
•
Boredom Meter – Jibbi gets bored if you do the same activities over and
over. To increase the boredom meter visit different game play areas often.
Please note : You can view all the Jibbi Meters in the Other Stuff Mode.
Trash will star t to appear in Jibbi’s room, if too much trash
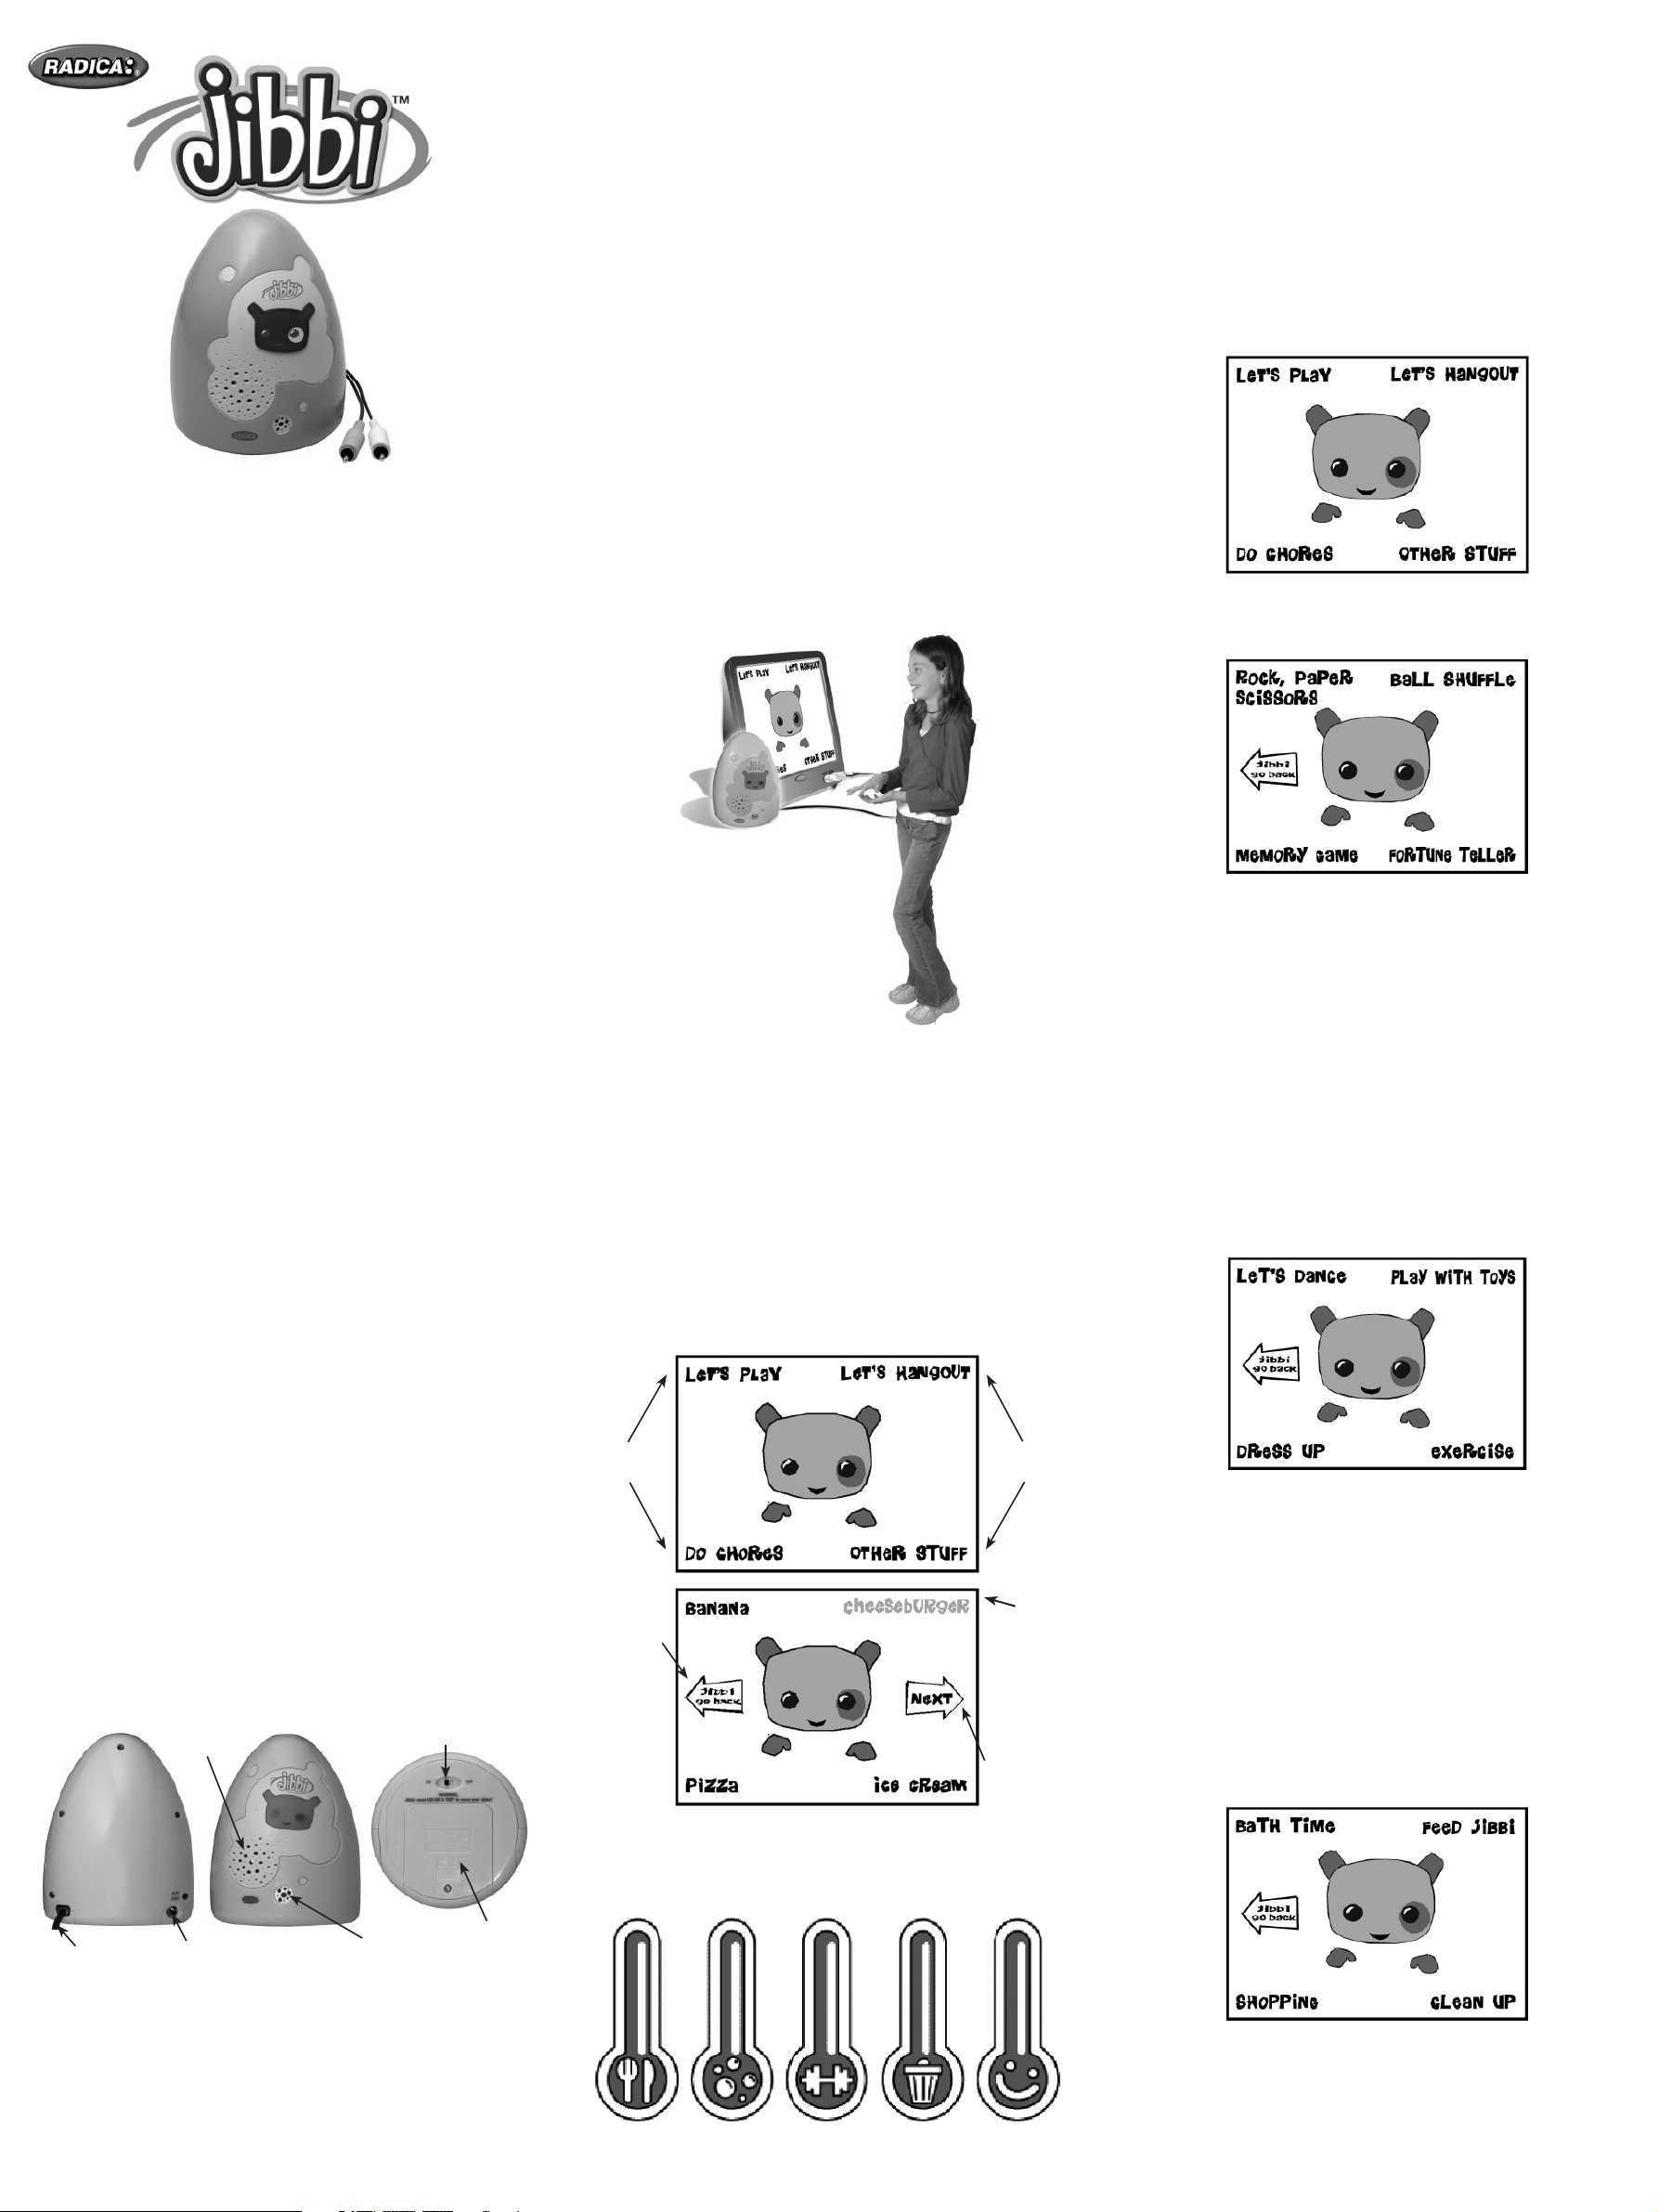
MAIN MENU
Jibbi is waiting to hear you speak one of the four commands on the main
menu!
Let’s Play Mode – This mode includes all of the fun games you can
play with Jibbi and earn Jibbi Beans ! Use your Jibbi Beans to buy food,
clothes and lots of other things for Jibbi !
Rock, Paper, Scissors – The traditional game of Rock, Paper, Scis-
•
sors with a Jibbi twist. When Jibbi asks you what did you pick? The
words Rock, Paper, Scissor will appear on your screen. Speak your
choice and see if you beat Jibbi! You will play a game of best 3 out of
5. If you win you will earn Jibbi Beans!
Ball Shuffle – Which cup is the ball under? Jibbi will try to trick
•
you with quick moves! You will be prompted to speak Left, Middle
or Right when choosing which cup the ball is under. You will play a
game of best 3 out of 5. If you win you will earn Jibbi Beans !
Memor y Game – How good is your memory? A series of animals
•
with a Jibbi twist are displayed on your screen starting with a single
animal. Repeat the series back to Jibbi in the correct order to earn
Jibbi beans! Once you guess incorrectly, the game ends.
Fortune Teller – Does Jibbi know your future? Ask Jibbi a question
•
that can be answered ‘Yes’ or ‘No’, concentrate ver y very hard and
Jibbi will answer!
Let’s Hang Out Mode – This mode includes all of the awesome activities including dress up, dancing, playing with Toys and exercising !
CONNECTING TO YOUR VCR
If your TV doesn’t have audio and video input jacks, you can connect
Jibbi to your VCR.
Insert the yellow video plug from the game into the Video-In (yellow) jack
on the VCR.
Insert the white audio plug from the game into the left Audio-In (white)
jack on the VCR.
Set your TV and VCR to the appropriate video input mode. (See your T V
and VCR operating manuals for details.)
NOTE: If your TV or VCR does not have AV inputs, a “Y” adapter may be
purchased separately at any electronics store.
ADULT SUPERVISION IS RECOMMENDED WHEN CONNECTING
CABLES TO A T V AND VCR.
PRODUCT FEATURES:
ON/OFF switch
Battery door
A/ V cables
Speaker
dc voltage jack
Microphone
word
prompts
“JIBBI GO
BACK” will
either take
you back to
the previous menu
or to the
main menu
word
prompts
a word
prompt that
is transparent means
that you
cannot select
that word
“NEXT”
means
that there
are more
selections to
choose from
JIBBI METERS
If any of the Jibbi Meters get too low Jibbi will get sick. So watch those
meters !
Dance – Jibbi loves to dance! Choose Hip Hop, Rock, Disco or
•
Country and watch Jibbi move to the music!
Dress Up – Jibbi likes to try new looks. Choose Hats, Outfits,
•
Glasses or Outrageous and give Jibbi a whole new makeover. Don’t
forget to earn Jibbi beans to buy new clothes at the Jibbi Mall!
Play With Toys – Jibbi loves to play. Look in Jibbi’s toy box and you
•
will find Crazy Robot, Painting, Bouncy Ball and Magic Trick. Don’t
forget to earn Jibbi beans to buy new toys at the Jibbi toy store !
Exercise – No pain no gain! Jibbi needs to stay healthy and you can
•
help him. To help Jibbi work out, say the word you see on screen,
each time you successfully say the word on screen Jibbi will slowly lift
the weights. Don’t miss a word or Jibbi will drop the weights. Each
rep completed earns you more Jibbi beans!
Do Chores – No one likes chores but the activities in this mode will
reward you with new objects for Jibbi to collect!
GETTING STARTED
The optimal placement of the Jibbi console is on top of your TV; however,
placing the console any where near your TV is acceptable. Jibbi will respond to your voice commands therefore ambient noises need to be kept
to a minimum. Speak clearly and stay directly in front of the microphone.
Turn Jibbi on using the off /on switch located on the bottom of the unit.
Here are some tips when talking to Jibbi:
• Talk directly in line with the microphone
• Stay 3-5 feet away from Jibbi
FOOD
METER
BATH
METER
WORK OUT
METER
TRASH
METER
BOREDOM
METER
Page 2
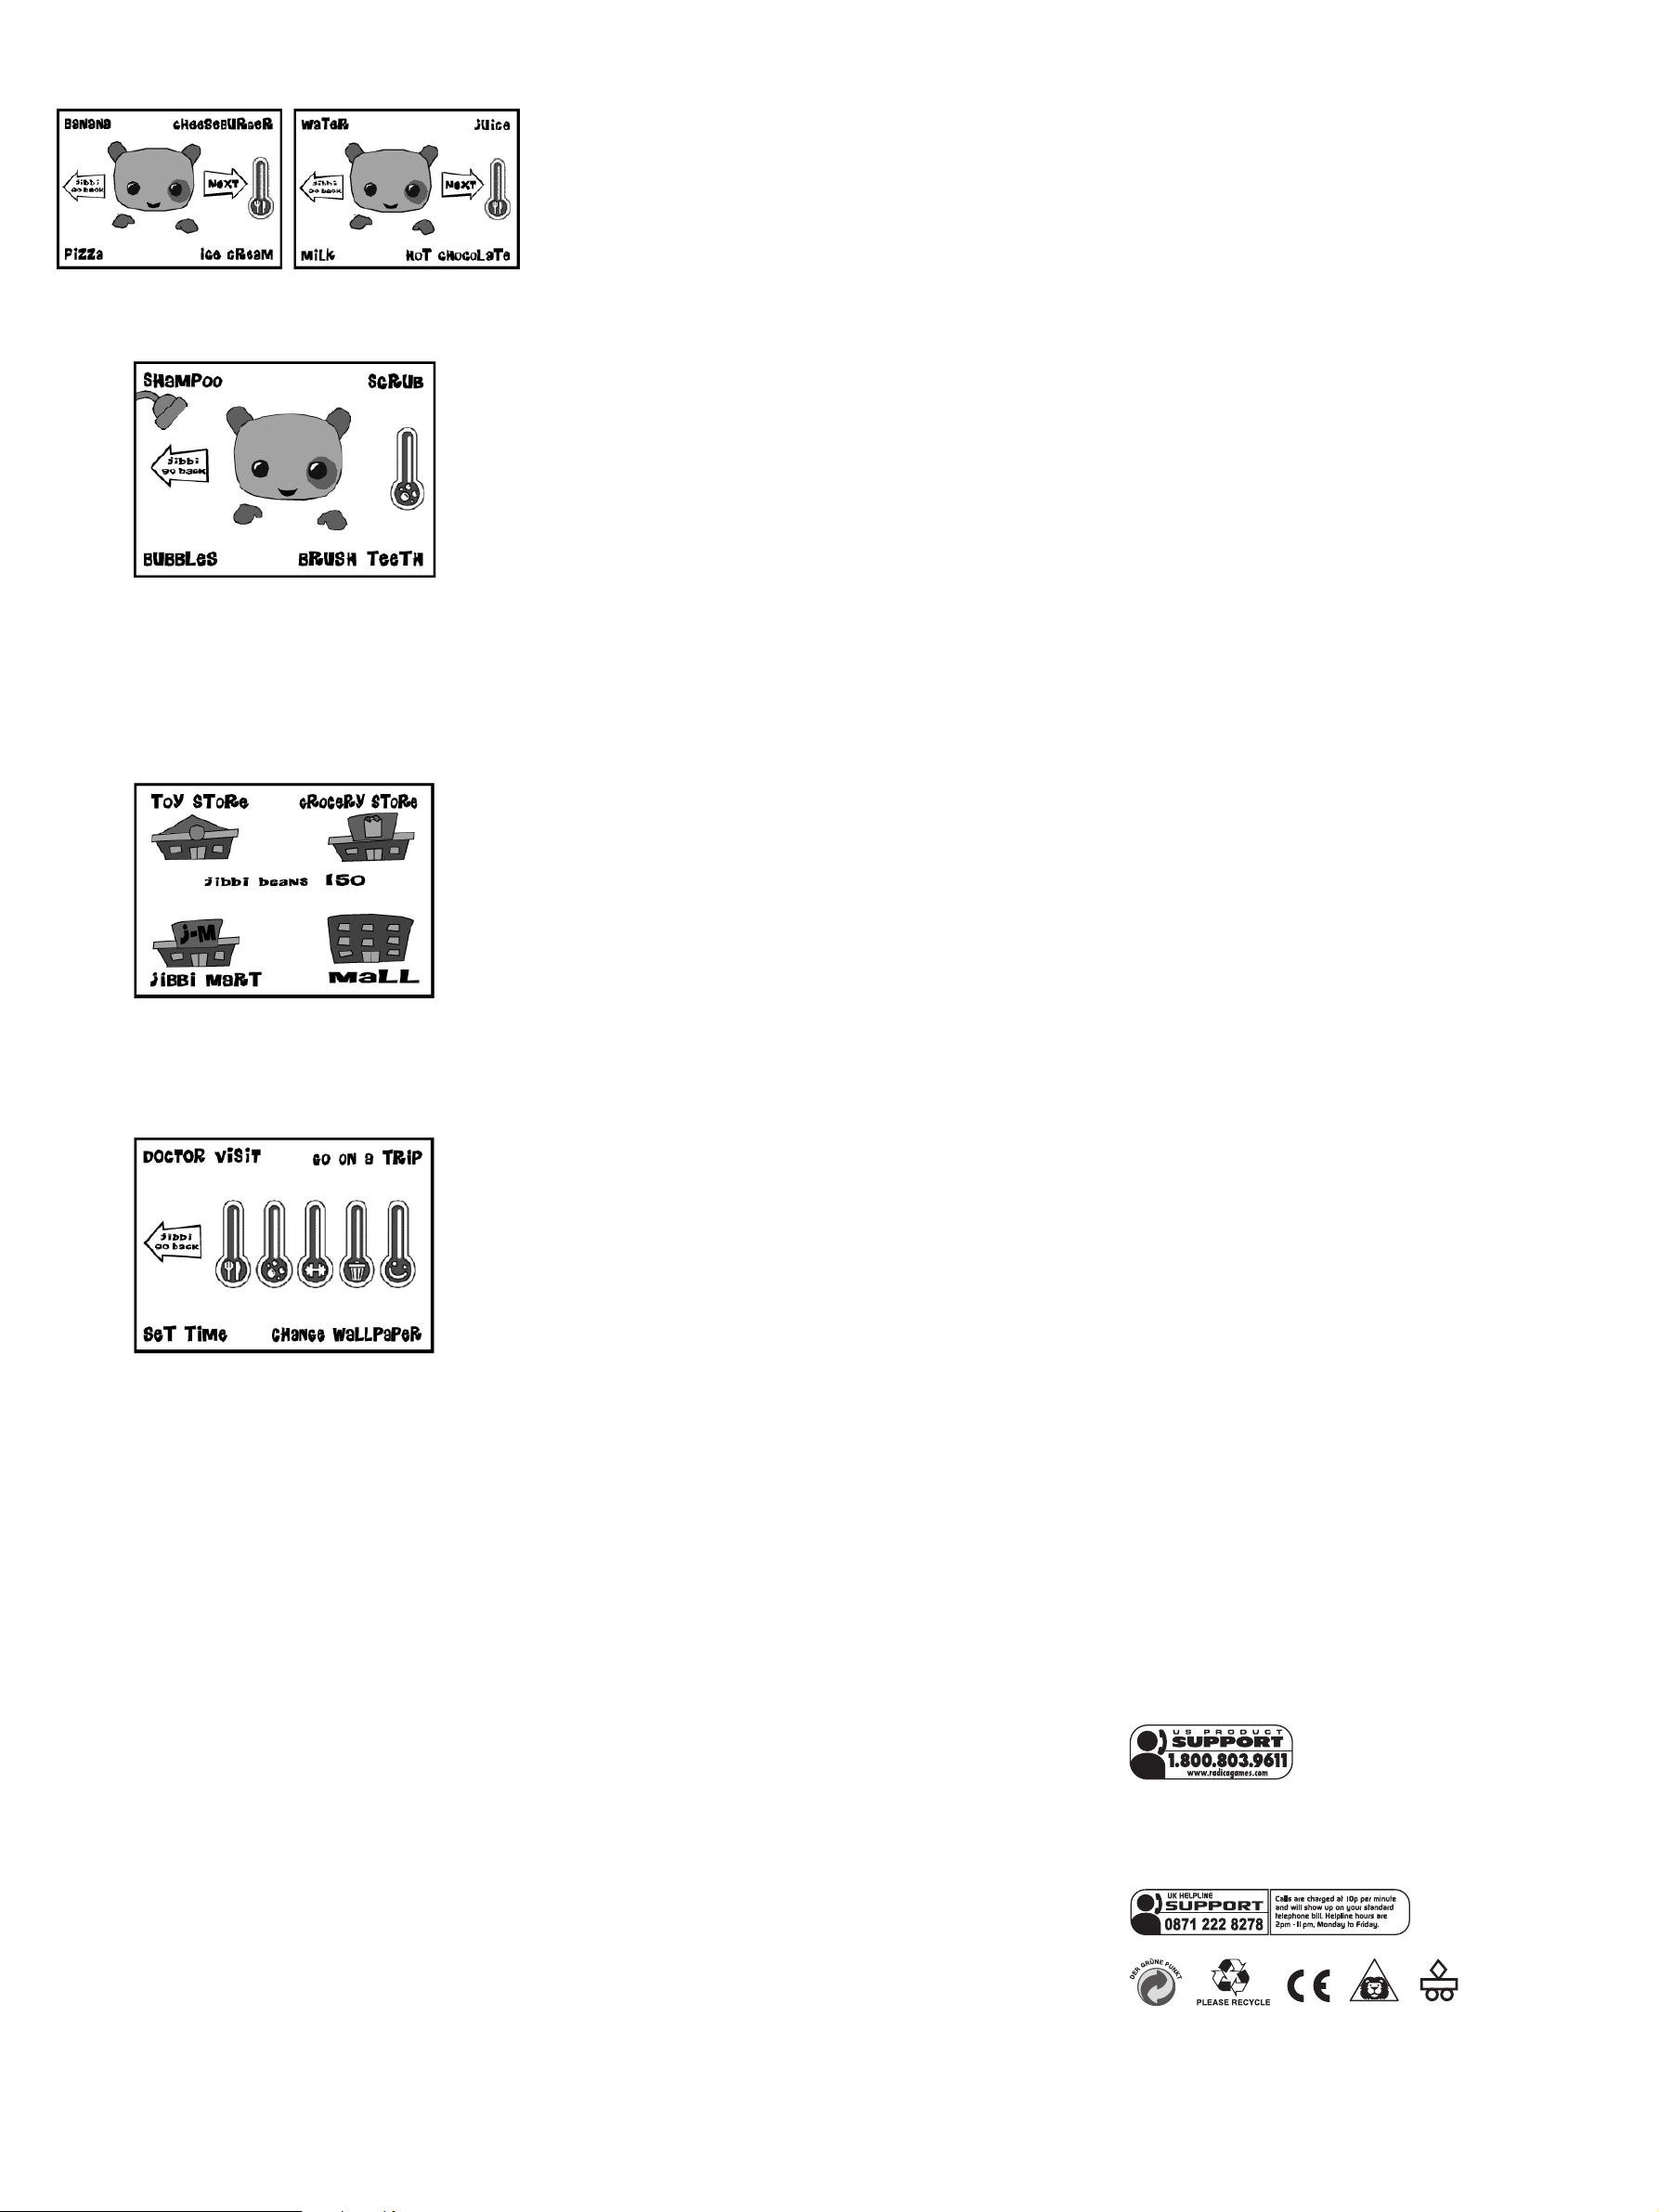
Feed Jibbi – Jibbi must eat to stay strong and healthy. Several differ-
•
ent types of food and drink are available for Jibbi to eat. New menu
items can be bought with earned Jibbi beans at the grocery store.
•
Bath Time – You don’t want Jibbi to get stinky! Make sure Jibbi
washes regularly to keep the doctor away! New menu items can be
bought with earned Jibbi beans at the grocery store.
• Shopping – Here’s where you get to spend your earned Jibbi beans !
Buy Jibbi food, outfits, toys and much much more.
You will find
• Toys at the Toy Store
• Food and Bath items at the Grocery Store
• Wallpaper at the Jibbi Mart
• Clothes at the Mall
Clean Up – If you let too much trash pile up in Jibbi’s room Jibbi will
•
get sick. Ask Jibbi to Clean Up when you see trash appear!
Other Stuff – Here’s where you can change the clock, change Jibbi’s
wallpaper, visit the Doctor if Jibbi gets sick or send Jibbi on a vacation!
You can also view and check the status of your Jibbi Meters.
Doctor Visit – If Jibbi isn’t feeling well the Jibbi Health Meter will be-
•
gin to drop. Take Jibbi to the doctor for a healthy recovery. Each visit
to the doctor will raise the meter halfway.
Change Wallpaper – Here’s where you can change the look of Jibbi’s
•
room. Express you mood with these different wallpapers – Simple,
Cute, Wacky, and Modern. Remember to look for Wallpaper at the
Jibbi Mart
Go on a Trip – In this mode you can save your progress and turn
•
Jibbi off. When you return all of your progress will be saved.
Please note : If you decide to turn off Jibbi make sure you save your
progress in the Go on a Trip Mode
Set Clock – In order for the internal clock to function properly it is
•
necessary to set the current time. The Jibbi unit has an internal clock
which when set will allow Jibbi to ask you to come play when Jibbi
gets bored. This will only happen between 1pm – 7pm, so don’t worry
about Jibbi waking you up in the middle of the night!
To Set the Clock:
• Say Stop when the correct time appears
• Say Move Up or Move Down to change the time
Please note : Jibbi will automatically go back to the main menu after the
clock has been set.
CREDITS
Farsight Studios
Technical Director
Jay Obernolte
Game Programming
Mike Reitmeyer
Art Director
Tom Green
Lead Animator
Darrin Hart
Design
Bobby King
Scott Shelton
Studio Director
Bobby King
Tools Development
Mike Reitmeyer
Sean Shannon
Senior Artist
Migo Wu
Animator
Amy Drobek
Quality Assurance
Norman Stepansky
Stacy Crumpler
J-San Toth
Design Director
Ron Bagley
Audio
Rene Coronado
Industrial Designer
Ryan Paxson
Voice
Kristy Vaughan
TROUBLE SHOOTING
TV
To locate your auxiliary channel, which is usually not 3 or 4, but a gaming channel found between 2 and 99 (example 2, 1, 0, 99), first try 00 to
see if it is the auxiliary channel. Channels downwards from 3 until a Line
1 or Line 2, Video 1 or Video 2, Front, Aux, AV, etc., appears on screen,
then push the power button on the game and it should automatically
come on if you have selected the correct channel. If this does not work,
another way to determine your auxiliary channel is to take a look at your
television remote. There may be a button on the remote that may take
you directly to the correct channel. The buttons you are looking for may
be labeled Input, AUX, AV, Line, TV/ Video, or Video. If your remote has
one of these buttons, turn your television back to Channel 3 and select
that button. The power button on the game should be turned on in order
for the game to appear on the television. If your television remote does
not have any of these buttons, and channel 00 is not working, you may
need to search the main menu for a way to determine your auxiliary
channel. If none of these methods have helped you locate your auxiliary
channel, you may need to check your owner’s manual and /or contact a
local television repair company.
VCR
When connecting to a VCR, you must first start with a blue background
showing on your television screen. To obtain a blue screen, try inserting
a videotape into the VCR, let it start to play, then hit the stop button. This
may give you a blue screen, then you can channel down to your auxiliary
channel. If the blue screen still does not appear, try entering your T V
and/or VCR main menu and see if it gives you options to select a blue
screen background. Many times if you enter the main menu on your
television you can change the setting from cable to video and display a
blue screen. Also if you have an older television, you may locate a hidden door on your television that has color, picture, horizontal, vertical,
and cable, antennae buttons. If your television includes this panel, you
can select the antennae/cable button and see the blue screen appears.
If you have tried all of these options and are still unsuccessful connecting the console, then you may need to check your VCR owner’s manual
or contact the manufacturer to find out how to set up your VCR for
console games.
Remember, you can’t play our games through a cable box or satellite, so
if you own one of these make sure it is turned off before connecting the
game. You can connect our games through DVD players with the same
connection as a VCR.
If you still have difficulty with setup or operation of your game, please
call our players helpline mentioned at the end of this manual.
If you choose to use an AC Adapter we suggest the following :
Recommended Adaptor Output:
-Voltage: 6 Volts DC
-Current: 300 mA (minimum)
Polarity: Negative Center
Plug Size: 5.5 mm outside diameter, 2.1 inside diameter.
AC Adapters are available at most electronic stores.
If you use the product with a transformer, regularly examine for damage
to the cord, plug, enclosure and other parts. In the event of any damage, do not use the toy with the transformer.
CAUTION
• As with all small batteries, the batteries used with this device
should be kept away from small children who might still put
things in their mouths. If a battery is swallowed, consult a physician immediately.
• Be sure you insert the battery correctly and always follow the
device and battery manufacturer’s instructions.
• Do not dispose of bat teries in fire.
• Batteries might leak if improperly installed, or explode if re
-
charged, disassembled or heated.
• Batteries might leak if improperly installed, or explode if re
-
charged, disassembled or heated.
• Sometimes, a build-up of static electric ( from carpets, etc) may
cause the game to stop working. Just reset the game by switching the power button off for a few seconds and it will work again.
• The unit may malfunction when there is radio interference on the
power line and signal line. The unit will revert to normal operation
when the interference stops.
• In an environment with radio frequency interference, the product
may malfunction and require user to reset the product.
MAINTENANCE
• Handle this device carefully.
• Store this device away from dusty or dirty areas.
• Keep this device away from moisture or extreme temperature.
Do not disassemble this device. If a problem occurs, switching the
•
power button off for a few seconds, or remove and replace the batteries
to reset the device, or try new batteries. If problems persist, consult
the warranty information located at the end of this instruction manual.
• Use only the recommended battery type.
• Do not mix old and new batteries.
• Do not mix alkaline, standard (carbon-zinc) or rechargeable (nickelcadmium) batteries.
• Do not use rechargeable batteries.
• Do not attempt to recharge non-rechargeable batteries.
• Remove any exhausted batteries from the device.
• Do not short-circuit the supply terminals.
• Inser t batteries with the correct polarity.
• This product is not suitable for children under 36 months.
• Use only with the recommended transformer type.
• Disconnect the transformer before cleaning the console or controller.
• The transformer is not a toy.
• Transformers used with the toy are to be regularly examined for dam
age to the cord,plug, enclosure and other parts. In the event of such
-
damage, the toy must not be used with this transformer until the
damage has been repaired.
• The toy is not to be connected to more than one power supply.
• Packaging should be kept as it contains important information.
Please retain this for future reference.
NOT SUITABLE FOR CHILDREN UNDER 3 YEARS DUE TO LONG
CABLES
This device complies with Part 15 of the FCC Rules. Operation is
subject to the following two conditions: (1) this device may not cause
harmful interference and (2) this device must accept any interference
received, including inter ference that may cause undesired operation.
WARNING: Changes or modifications to this unit not expressly approved by the party responsible for compliance could void the user’s
authority to operate the equipment.
NOTE: This equipment has been tested and found to comply with the
limits for a Class B digital device, pursuant to Part 15 of the FCC Rules.
These limits are designed to provide reasonable protection against
harmful interference in a residential installation. This equipment generates, uses and can radiate radio frequency energy and if not installed
and used in accordance with the instructions, may cause harmful
interference to radio communications. However, there is no guarantee
that inter ference will not occur in a particular installation. If this equipment does cause harmful interference to radio or television reception,
which can be determined by turning the equipment off and on, the user
is encouraged to try to correct the interference by one or more of the
following measures:
• Reorient or relocate the receiving antenna.
• Increase the separation between the equipment and receiver.
• Connect the equipment into an outlet on a circuit different from that to
which the receiver is connected.
• Consult the dealer or an experienced radio TV technician for help.
6-MONTH LIMITED WARRANTY FOR USA
(This product warranty is valid in the United States and Canada only)
Radica Games Limited warrants this product for a period of 6 months
from the original purchase date under normal use against defective
workmanship and materials (batteries excluded). This warranty does
not cover damage resulting from accident, unreasonable use, negligence, improper service or other causes not arising out of defects in
material or workmanship. Radica Games Limited will not be liable for
any costs incurred due to loss of use of this product or other incidental
or consequential costs, expenses or damages incurred by the purchaser. Some states do not allow the exclusion or limitation of incidental or
consequential damages, so the above limitations may not apply to you.
This warranty gives you specific legal rights and you may also have other
legal rights, which vary from state to state.
During this 6-month warranty period, the game will either be repaired or
replaced (at our option) without charge to the purchaser when returned
prepaid with proof of date of purchase to: Radica USA , Ltd., 13628-A
Beta Road, Dallas, Texas 75244, USA. Please remove the batteries and wrap the unit carefully before shipping. Please include a brief
description of the problem along with your return address and mail it
postage prepaid.
IMPORTANT: Before returning the unit for repair, test it with fresh
alkaline batteries. Even new batteries may be defective or weak and low
batter y power is a frequent cause of unsatisfactory operation.
6 MONTH PRODUCT WARRANTY FOR UK
(This product warranty is valid in the United Kingdom only)
All products in the RADICA® range are fully guaranteed for a period
of 6 months from the original purchase date under normal use, against
defective workmanship and materials (batteries excluded). This warranty
does not cover damage resulting from accident, unreasonable use,
negligence, improper service or other causes not arising out of defects
in material or workmanship.
In the unlikely event that you do experience a problem within the first 6
months, please telephone the Technical Suppor t team: Tel. 0871 222
8278. Calls are charged at 10p per minute and will show up on your
standard telephone bill. Helpline hours are 2pm-11pm, Monday to
Friday.
IMPORTANT: Always test the product with fresh alkaline batteries.
Even new batteries may be defective or weak and low battery power is a
frequent cause of unsatisfactor y operation.
THIS WARRANT Y IS IN ADDITION TO YOUR STATUTORY RIGHTS.
Distributed in the USA by:
RADICA USA Ltd.
13628-A Beta Road
Dallas, TX 75244-4510
Distributed in the UK by:
RADICA UK Ltd.
The Old Stables, Munns Farm,
Cole Green, Hertfordshire,
SG14 2NL, England
RADICA:®
JIBBI IS A TRADEMARK OF
RADICA GAMES LTD.
©2006 RADICA GAMES LTD.
PRODUCT SHAPE™
ALL RIGHTS RESERVED
 Loading...