

Fisher-Price I5031, I8031 Instruction Sheet

E
B
UTTON FUNCTIONS
odel 75031
M
For 1 player / Ages 8 and up
I
NSTRUCTION MANUAL
P/N 82393000 Rev.B
WARNING: EPILEPSY AND SEIZURES READ
BEFORE OPERATING YOUR PLAY TV
LEGENDS MENACER
A few people may experience epileptic seizures when viewing flashing lights or
patterns in our daily environment. These persons may experience seizures while
watching TV pictures or playing video games. Players who have not had any
seizures may nonetheless have an undetected epileptic condition.
Consult your physician before playing video games if you have an epileptic
condition or experience any of the following symptoms while playing video
games: altered vision, eye or muscle twitching, other involuntary movements,
loss of awareness of your surroundings, mental confusion and/or convulsions.
THE MENACER 6 IN 1 GAME INCLUDES 6
DIFFERENT GAMES TO TEST YOUR SHOOTING ACCURACY.
• Space Station Defender – Defend your lunar station from waves of
machine gun-toting aliens.
omatoes! –
, Aim, T
• Ready
while Earl keeps scor
• Frontline – Defend your post with anti-aircraft, anti-tank and machine gun
fire.
• Whackball! – Grab control and win! Be the Ball!
• Pest Control – Can you exterminate the pizza-loving bugs before they
clean you out.
• Rockman’s Zone – Train to be a G-Man and pick out the bad guys before
they pick you out.
e.
oeJam and lob tomatoes at wacky enemies
Be T
SETTING UP
TTER
BA
On the front of the Menacer loosen the screw on the battery compartment
and insert four (4) “AA” batteries as indicated inside the compartment (alkaline batteries recommended). Replace the battery compartment door.
NOTE: Batteries in the Menacer should give you about 10 hours of game
play (if alkaline batteries are used). The game will not operate normally when
the batteries begin to run low. The screen may be blurred and resetting the
game may not work. Be sure to install fresh batteries. There is also no
memory function. All game data will be erased when the power is turned off
or batteries are replaced.
ADULT SUPERVISION IS RECOMMENDED WHEN INSTALLING
BATTERIES.
Y INST
ALLATION
Loosen the screw on the
battery compartment
TV CONNECTION
NOTE: To connect Menacer directly to a TV, the TV must be equipped with
audio and video input jacks. They are commonly found on the front of the TV
near the contrast, color, and picture adjustment controls or on the rear of the TV
near the antenna and cable/satellite jacks.
B Button
C Button
Power
Trigger
A Button
CHOOSING A GAME
1. Aim at the Menacer logo on the screen and pull the TRIGGER. The MENU
for the six different Menacer games will appear.
Point the
2.
TRIGGER.
Menacer at the game title you want to highlight it and pull the
GETTING READY TO PLAY
A series of scr
tions on each scr
• If your game features the ACCU-SIGHT cursor, you’ll see a screen that lets
you turn it ON or OFF. Point the Menacer at your choice and pull the TRIGGER.
• When you turn the ACCU-SIGHT cursor OFF, you will see screens for set-
ting Binocular Module Attached/Binocular Module Off. Point at your choices
to select (both will get the same result) and pull the TRIGGER. Then you will
see screens for setting your aim for deadeye shooting. Follow the instructions on each screen to continue.
Use the ADJUST AIM SCREEN to set your tar
•
center of the tar
mark appears somewher
aim a little dif
• Use the TEST AIM SCREEN to practice your shooting. Hold down the
TRIGGER for MACHINE GUN ACTION.
eens may appear befor
een to get r
get. If the mark hits the center
e else, adjust the sight on the Binocular Module, or
ently down the BARREL of the Master Module.
fer
e your game starts. Follow the instruc
eady to play
.
geting accuracy
, your aim is perfect. If the
. Aim at the
-
Zillions of wiggly insects are running off with your pizza. Track them with
your Menacer’s laser beam, and stop them cold with a quick shot.
SCORE
• Pupa – 5 points
• Tiny Bug – 10 points
• Normal Bug – 25 points
• Large Bug – 50 points
S
URVIVING THE ICHY INVASION
• Blast the Drones before they can drag their tidbits to the edge of the
screen.
• Press the A or B Button to light the entire screen. Please note: You can
not shoot any bugs while the A or B Button is depressed.
• Queens explode into tiny Baby Bugs. Now you’ve really got a swarm on
your hands!
• Nail two bugs at once when they are close together
• Zap the BUG SPRAY to whap all pests on the screen.
• Watch your score skyrocket as you blast away. But when the pizza is gone,
the game is over.
• Don’t overheat your Menacer by shooting too fast!
READY AIM TOMATOES
Jam packed fun! Lob tomatoes at Crazed Dentists, Bogeymen, and loads of
funky foes with those hip-hoppin’ aliens ToeJam & Earl.
You’re ToeJam, tossing squishy tomatoes at a field full of Earth-freaks. Earl
keeps score and lays on the good words (even when your aim is way off –
NOT!).
Before the game starts, shoot at ACCU-SIGHT ON to get the ACCU-SIGHT
cursor in the first five levels. If you choose ACCU-SIGHT OFF, you are on
your own!
• SCORE: Earl adds up the points as you fire away.
TOES:
TOMA
•
• LIFE: As long as you have LIFE, the game goes ON.
• ACCURACY: Percent of tossed tomatoes that actually hit a target.
Amount of ripe ammo left.
HINTS FOR SHOOTIN’ THE FRUIT
• At the start of each level, Earl tells you how many points you need to clear
the round.
• You start with 25 tomatoes, and get a new one every few seconds, Use up
all your ammo and you’re a sitting duck!
Starting at Level 2, you’ll lose 5% of your Life every time you get hit (watch
•
for the big tomato splats).
• Smack Hamburgers, Fudge Cakes, and other snacks to gain back 5% of
your life plus 500 points!
• Shoot Bushel Baskets for 10 extra tomatoes at once!
Get giant scor
•
whacked-out beings you can.
• Smaller critters are harder to hit so they’re worth more points.
• Blast a bomb and blow up every enemy on the screen.
Hit a Star T
•
and right without pulling the TRIGGER. Star T
ammo or af
• Whack a Sign and the game scrolls backward. Now fire away at the foes
you missed before.
• Tornadoes pack a wallop – and always shoot back.
You can hit the Bogeyman even when he’s invisible.
•
• Smack the Wizard for luck – and see what you get!
• Look for surprises as the levels get higher. For example, make it to Level
13, shoot the Clock and watch what happens.
• Gain bonus points after each round for Accuracy and tomatoes left over. If
your score isn’t high enough to clear the round, you’ll play the level over.
es! Plop juicy fruit on Cupids, Chicken Gangs and all the
omato for rapid fir
fect your accuracy
e. Suddenly
.
, you’re plastering tomatoes left
omatoes don’
t use up your
FRONTLINE
Eat dust while battling an onslaught of tanks, jets and helicopters! The ACCUSIGHT cursor pinpoints your targets.
If your TV does not have audio and video input jacks, you may connect
Menacer
Please note: If your TV does not have AV Input Jacks, you can connect your
game through your VCR or use an RF Modulator. RF Modulators can be pur
chased at most electronic stores.
through a VCR connected to your TV.
-
CONNECTING TO A VCR
To connect Menacer to your VCR, insert the yellow video plug from the Main
Unit into the video-in (Yellow) jack on your VCR, the white audio plug into the
left audio-in (white) jack. Then set the VCR to the appropriate video input mode
(see your VCR’s operating manual for details).
ADULT SUPERVISION IS RECOMMENDED WHEN CONNECTING
CABLES TO A TV AND VCR.
• You can practice for as long as you want. When you are ready to start a
game, shoot at the OK.
NOTE: For the best accuracy
e than 3 feet fr
mor
om the scr
, play the whole game at the same distance and
een. Eight feet is the ideal distance.
PEST CONTROL
Blast away at bugs, bugs, and more bugs as you search in the dark for creepy
crawlers who crave your food!
s a scrappy
It’
the sweat. Ache to the pounding ammo blasts. Spit the grit fr
and grab your Menacer
• SCORE: Blast the enemy and watch your points add up!
• LIFELINE: You can take 10 hits before the game ends.
• ATMS(Anti-Tank Missiles): You begin each level with 10 Anti-Tank
Missiles. Use the B-Button to launch missiles.
, non-stop war for survival. In a hot, dirty desert dustbowl. Feel
om your teeth
. Now shoot to win!
• AAMS(Anti-Aircraft Missiles): You begin each level with 10 Anti-Aircraft
Missiles. Use the B-Button to launch missiles.
SURVIVING THE FRONTLINE
• If it moves, blast it.
• Hold down the TRIGGER for a steady, unlimited burst of machine gun fire
and red tracer bullets.
• Some vehicles and aircraft can return fire. Sweep the field with machine
gun blasts to keep attackers to a minimum.
• Missiles kill in one hit. You start each level with 10 ATM’s and 10 AAM’s. If
you need them, use them!
• You regain some of your LIFELINE between levels.
S
PACE STATION DEFENDER
Defend Lunar Station 1 by disintegrating wave after wave of laser-gunning
aliens.
In a lonely outpost on an empty planet, you face the aggressive strikes of
mutant insectoids. Take aim as the pods land. Then open fire before the
unearthly beings who emerge blast you with searing laser beams.
• SCORE: Points add up as you annihilate the enemy
• LEVEL: Shows the current level (1-999) and alien attack wave (1-8)
• LIFE: Each alien hit costs you one LIFE. When you are down to zero the
game ends.
• SHIELD: Layer on SHIELDS to protect yourself from alien laser blasts.
• POWER ZONE: Recharge your laser gun by pointing it in this zone at the
bottom of the screen.
PREPARE FOR BATTLE
Before the game starts, shoot at your choices on screen to select them:
• ACCU-SIGHT ON turns on the ACCU-SIGHT cursor; ACCU-SIGHT OFF
disables it.
• With NORMAL, the alien pods will open in an orderly pattern; with RANDOM they’ll open in an unpredictable pattern.
T begins the game
AR
ST
•
DEEP SP
• Destroy the invaders before they shoot. You can only hit them when their
pods are open.
• Insectoid weapons are highly accurate. Every alien blasts hits its mark –
ou! And you lose one life.
y
• Fire on the satellites that flash by overhead to gain Shields. Each Shield
protects you from one alien hit.
• Shields disintegrate in a grid pattern when blasted by enemy lasers.
our laser gun gobbles ener
Y
•
een and r
scr
point the Menacer at the POWER ZONE at the bottom of the scr
longer you leave it ther
• Recharge between waves, when you have a few seconds’ breather from the
mutant attacks.
ACE SURVIVAL GUIDE
atch the gauge at the bottom of the
. W
echar
ge befor
, the more ener
e
gy
e your ener
gy runs dry
gy you’ll r
o restore laser energy,
. T
egain.
e
en. The
WHACKBALL
Whack the bouncing ball into the right tiles for big success!
our Menacer’
Y
the box. The tiles change color when the ball bounces against them. Race
to change all the tiles befor
ound!
r
• SCORE: Earn big points with your expert ball handling.
TIMER:
•
you’ll clear the level.
BALLS: You get thr
•
s a paddle, and you’r
Change the color of every tile befor
ee balls per level to whack against the tiles.
e a pinball wizar
e the timer r
eaches zer
d! Smack the ball around
o, and you’ve clear
e the timer reaches zero and
ed the
WHACKBALL WIZARDRY
Use the Menacer alone. Just move it around – you don’t even have to the
•
trigger.
• Watch the escape hatch – it moves around. If your ball falls through, you
lose it.
• Use the paddle to guide the ball, and also to block the escape hatch.
• The flashing tile is a POWER-UP. Whack your ball against it and get one of
these (for better or worse):
• STICKY PADDLE holds onto the ball.
• TWO BALLS for double whammy whacking.
• EXTRA BALL for more chances to win.
• LOST SECONDS off the timer. The higher you go in the levels, the more
seconds you lose.
• TINY PADDLE makes you work harder to keep the ball in play.
• RESET turns all the tiles back to their original colors, and you start the level
over.
• Time bonus! Clear a level and get bonus points for time left over
• Ball Bonus! Any balls left at the end of a level earn bonus points. The
bonus points are added to your score after every five rounds.
.
R
OCKMAN’S ZONE
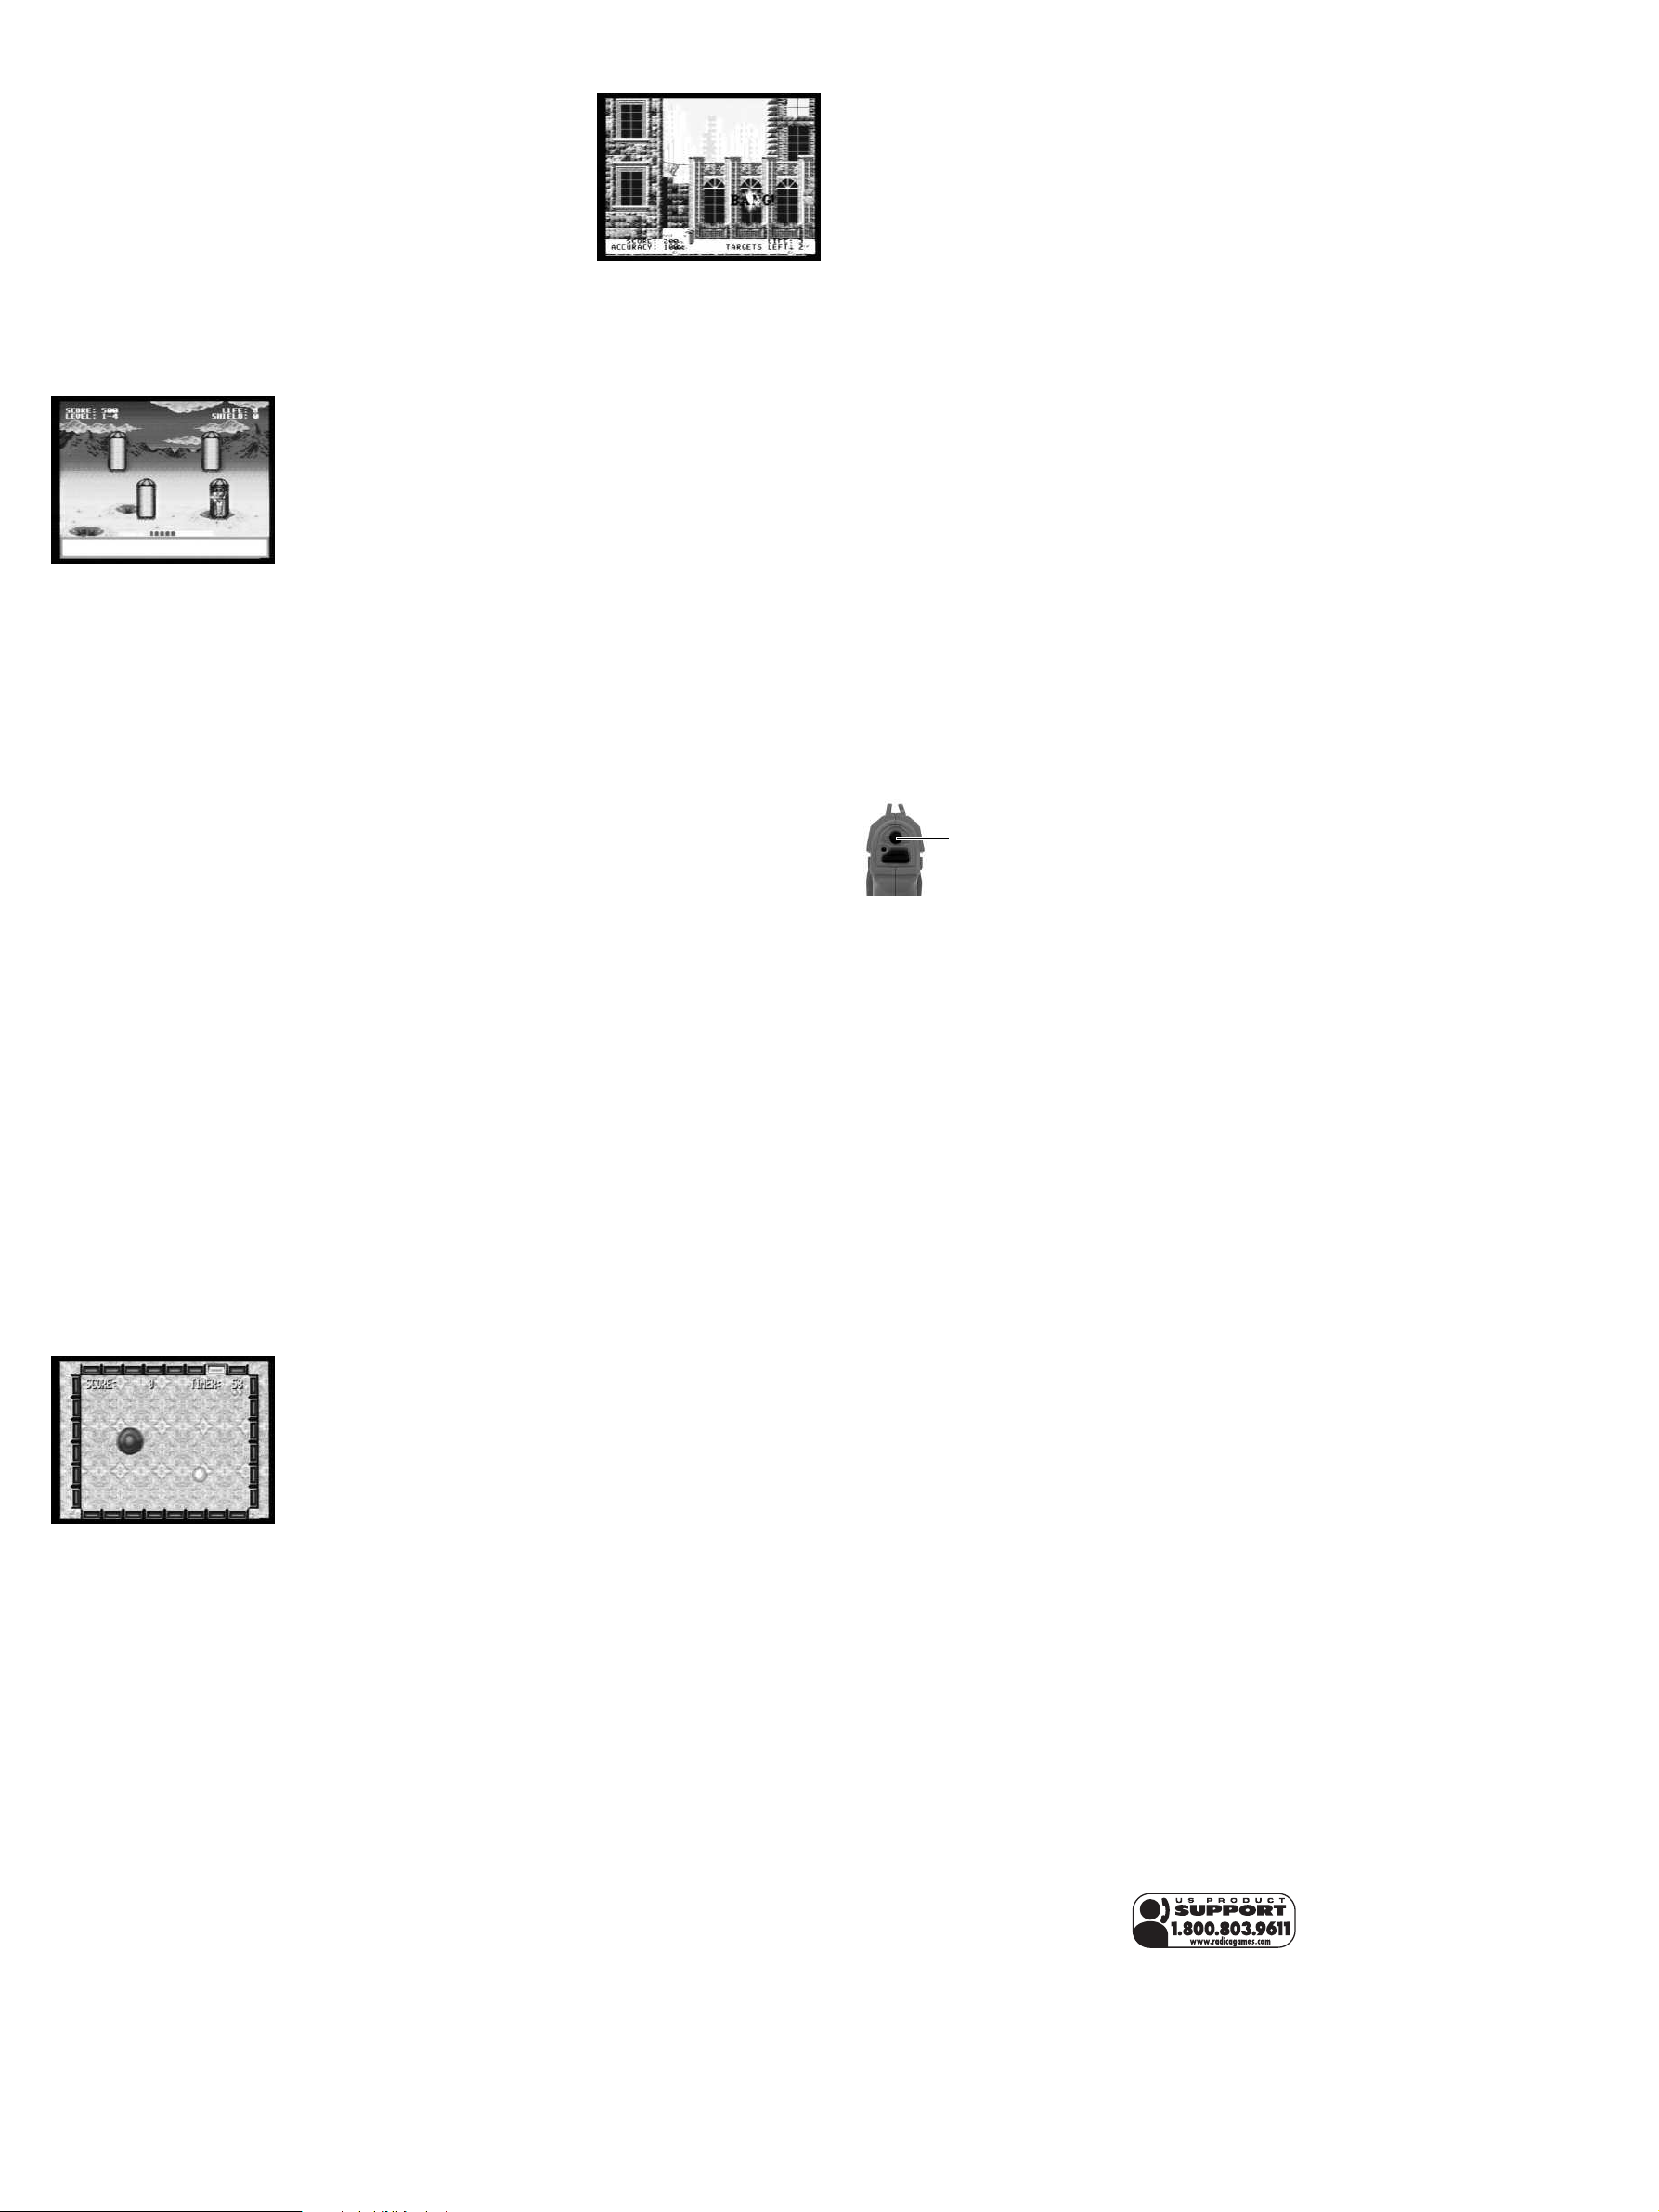
Train as an FBI crackshot, sharpening your aim on bad-guy cutouts.
Rockman’s Zone is no place for amateurs. Its seven city blocks where a
quick eye and split-second timing make all the difference between pass and
fail. Shoot at the cutouts as they pop up. Hit the bad guys, but don’t harm
the honest citizens.
So you want to be a G-Man? Prove yourself first – in Rockman’s Zone!
• SCORE: Aim for big points by demolishing the right targets.
• LIVES: Start your training with five lives. Lose them all and you’re dog
meat.
• TARGETS: Number of enemy cutouts on the street. Shoot this number
down to zer
• ACCURACY: Percent of shots that hit the right targets.
o to clear the round.
SURVIVING THE ZONE
• Cutouts pop-up in doors and windows. The bad guys look sinister and
shoot back. Drop them before they fire.
• Each enemy hit you take costs you one life.
• Firing on cutouts of innocent onlookers and children is bad. Hit them and
you lose a life. Look before you shoot!
• Use all the ammo you want; you have an unlimited supply.
• Chase down four targets in Level 1. Then get a move on. Targets may get
closer together or increase as the levels get higher.
• You gain points for your ACCURACY level at the end of each round.
• No-HIT bonus! Clean up a level without getting hit for a high-point reward.
PAUSING A GAME
Press the PAUSE BUTTON on the
Menacer to pause a game at any time.
Press the PAUSE BUTTON again to
resume play.
Pause Button
HANDLING YOUR MENACER CONSOLE
• The Menacer Gun is intended for use exclusively with the Play TV
Menacer Game.
• Do not bend it, crush it or submerge it in liquids.
Do not leave it in dir
•
• Be sure to take an occasional break during extended play, to rest yourself
and the Play TV system.
ect sunlight or near a radiator or other sour
ce of heat.
IMPORTANT!
This product will not operate properly if connected to a Projection, LCD,
Plasma, Flat Screen or High Definition TV (HDTV). Use only a standard tube
type glass screen TV.
een is too dark, please incr
If the scr
try again. If brightness incr
ease is not satisfactory
ease the brightness on the television and
, check for low batteries.
TROUBLE SHOOTING
TV
o locate your auxiliary channel, which is usually not 3 or 4, but a gaming chan
T
nel found mostly found between 2 and 99 (example 2, 1, 0, 99), first try 00 to
see if it is the auxiliary channel. Channels downwar
ideo 1 or V
Line 2, V
the power button on the game and it should automatically come on if you have
selected the corr
your auxiliary channel is to take a look at your television r
a button on the r
buttons you ar
ideo. If your r
V
Channel 3 and select that button. The power button on the game should be
ned on in or
tur
emote does not have any of these buttons, and channel 00 is not working, you
r
may need to sear
nel. If none of these methods have helped you locate your auxiliary channel,
you may need to check your owner's manual and/or contact a local television
epair company
r
ideo 2, Fr
ect channel. If this does not work, another way to determine
emote that may take you dir
e looking for may be labeled Input, AUX, A
emote has one of these buttons, turn your television back to
der for the game to appear on the television. If your television
ch the main menu for a way to determine your auxiliary chan
.
ont, Aux, AV, etc., appears on screen, then push
ectly to the corr
om 3 until a Line 1 or
ds fr
emote. Ther
ect channel. The
V, Line, TV/Video, or
e may be
VCR
.
ound show
, pictur
e, horizon
When connecting to a VCR, you must first start with a blue backgr
ing on your television scr
into the VCR, let it start to play
een, then you can channel down to your auxiliary channel. If the blue
blue scr
een still does not appear
scr
see if it gives you options to select a blue scr
you enter the main menu on your television you can change the setting fr
cable to video and display a blue scr
you may locate a hidden door on your television that has color
tal, vertical, and cable, antennae buttons. If your television includes this panel,
you can select the antennae/cable button and see the blue screen appears. If
you have tried all of these options and are still unsuccessful connecting the
console, then you may need to check your VCR owner’s manual or contact the
manufacturer to find out how to set up your VCR for console games.
Remember, you can't play our games through a cable box or satellite, so if
you own one of these make sure it is turned off before connecting the game.
You can connect our games through DVD players with the same connection
as a VCR.
If you still have dif
players helpline mentioned at the end of this manual.
If you choose to use an AC Adapter we suggest the following :
Output:
oltage: 6 V
- V
ent: 300 mA (minimum)
- Curr
Polarity: Negative Center
Plug Size: 5.5 mm outside diameter
AC Adapters ar
ficulty with setup or operation of your game, please call our
olts DC
e available at most electr
o obtain a blue scr
een. T
, then hit the stop button. This may give you a
, try entering your TV and/or VCR main menu and
een. Also if you have an older television,
, 2.1 inside diameter
een, try inserting a videotape
een backgr
onic stor
ound. Many times if
es.
-
-
-
om
-
If you use the product with a transformer, regularly examine for damage to
the cord, plug, enclosure and other parts. In the event of any damage, do
not use the toy with the transformer.
CAUTION
• As with all small batteries, the batteries used with this device should
be kept away from small children who might still put things in their
mouths. If a battery is swallowed, consult a physician immediately.
• Be sure you insert the battery correctly and always follow the device
and battery manufacturer’s instructions.
• Do not dispose of batteries in fire.
• Batteries might leak if improperly installed, or explode if recharged,
disassembled or heated.
• Sometimes, a build-up of static electricity (from carpets, etc) may
cause the game to stop working. Just reset the game, and it will work
again.
• The unit may malfunction when there is a radio interference on the
power line. The unit will revert to normal operation when the interference stops.
• Under the environment with radio frequency interference, the sample
may malfunction and require user to reset the sample.
MAINTENANCE
• Handle this device carefully.
• Store this device away from dusty or dirty areas.
• Keep this device away from moisture or extreme temperature.
• Do not disassemble this device. If a problem occurs, press the Power button off and on, or remove and replace the batteries to reset the device, or
try new batteries. If problems persist, consult the warranty information
located at the end of this instruction manual.
•
Use only the recommended battery type.
• Do not mix old and new batteries.
• Do not mix alkaline, standard (carbon-zinc) or rechargeable (nickel-cadmium) batteries.
• Do not use rechargeable batteries.
• Do not attempt to recharge non-rechargeable batteries.
• Remove any exhausted batteries from the device.
• Do not short-circuit the supply terminals.
• Insert batteries with the correct polarity.
Please retain this for future reference.
This product complies with Part 15 of the FCC Rules. Operation is subject to
the following two conditions: (1) this device may not cause harmful interference and (2) this device must accept any interference received, including
interference that may cause undesired operation.
WARNING: Changes or modifications to this unit not expressly approved by
the party responsible for compliance could void the user’s authority to operate the equipment.
NOTE: This equipment has been tested and found to comply with the limits
for a Class B digital device, pursuant to Part 15 of the FCC Rules. These limits are designed to provide reasonable protection against harmful interference
in a residential installation. This equipment generates, uses and can radiate
radio frequency energy and if not installed and used in accordance with the
instructions, may cause harmful interference to radio communications.
However, there is no guarantee that interference will not occur in a particular
installation. If this equipment does cause harmful interference to radio or television reception, which can be determined by turning the equipment off and
on, the user is encouraged to try to correct the interference by one or more
of the following measures:
• Reorient or relocate the receiving antenna.
.
ease the separation between the equipment and r
Incr
•
• Connect the equipment into an outlet on a circuit different from that to
which the receiver is connected.
• Consult the dealer or an experienced radio TV technician for help.
90-DA
(This pr
Radica Games Limited warrants this product for a period of 90 days from the
original purchase date under normal use against defective workmanship and
materials (batteries excluded). This warranty does not cover damage resulting
from accident, unreasonable use, negligence, improper service or other causes not arising out of defects in material or workmanship. Radica Games
Limited will not be liable for any costs incurr
pr
incurr
tion of incidental or consequential damages, so the above limitations may not
apply to you. This warranty gives you specific legal rights and you may also
have other legal rights, which vary fr
During this 90-day warranty period, the game will either be repaired or
replaced (at our option) without charge to the purchaser when returned prepaid with proof of date of purchase to: Radica USA, Ltd., 13628-A Beta
Road, Dallas, T
unit car
lem along with your r
IMPORTANT: Before returning the unit for repair, test it with fresh alkaline
batteries. Even new batteries may be defective or weak and low battery
power is a frequent cause of unsatisfactory operation.
Distributed by:
RADICA USA Ltd.
13628-A Beta Road
Dallas, TX 75244-4510
RADICA:®
PLA
OF RADICA GAMES LTD.
©2005 RADICA GAMES LTD.
PRODUCT SHAPE™
ALL RIGHTS RESERVED
©1992 SEGA
SEGA, the Sega logo are either registered trademarks or trademarks of Sega Corporation.
Manufactur
Y LIMITED W
oduct warranty is valid in the United States and Canada only)
oduct or other incidental or consequential costs, expenses or damages
ed by the pur
efully befor
Y TV
IS A REGISTERED TRADEMARK
ed and distributed by Radica under license by Sega T
chaser
exas 75244, USA.
e shipping. Please include a brief description of the prob-
etur
ARRANTY
ed due to loss of use of this
. Some states do not allow the exclusion or limita
om state to state.
emove the batteries and wrap the
Please r
n address and mail it postage prepaid.
eceiver
-
oys
 Loading...