

Page 1
RC73150 Manual (US/UK)
P/N: 82378300 Rev.B
Date: Aug. 12, 2003
RADICA: ®
GAMESTER ®
©2003 RADICA GAMES LTD.
PRODUCT SHAPE™
ALL RIGHTS RESERVED
Distributed in the U.K. by:
RADICA U.K. Ltd.
The Old Stables, Munns Farm,
Cole Green, Hertfordshire,
SG14 2NL, England
All other product and company names mentioned are
the trademarks of their respective owners.
Not suitable for children under 8 years of age.
Nicht für Kinder unter 8 Jahren geeignet.
Ne convient pas aux enfants de moins de 8 ans.
Playstation is a registered trademark of Sony
Computer Entertainment Inc (SCEI).
This product is not designed, manufactured,
sponsored or endorsed by SCEI.
Please retain this for future reference
Distributed in the U.S. by:
RADICA USA, Ltd.
13628 - A Beta Road, Dallas,
Texas 75244 - 4510, U.S.A
US Player Helpline
1.800.803.9611
UK Player Helpline
+44 (0)906 213 0001
Calls from the UK are charged at £0.25 per minute and will show up on
your standard telephone bill. Helpline hours are 8am-11pm, 7 days a week.
www.theunfairadvantage.com
®
P/N 82378300 Rev.B
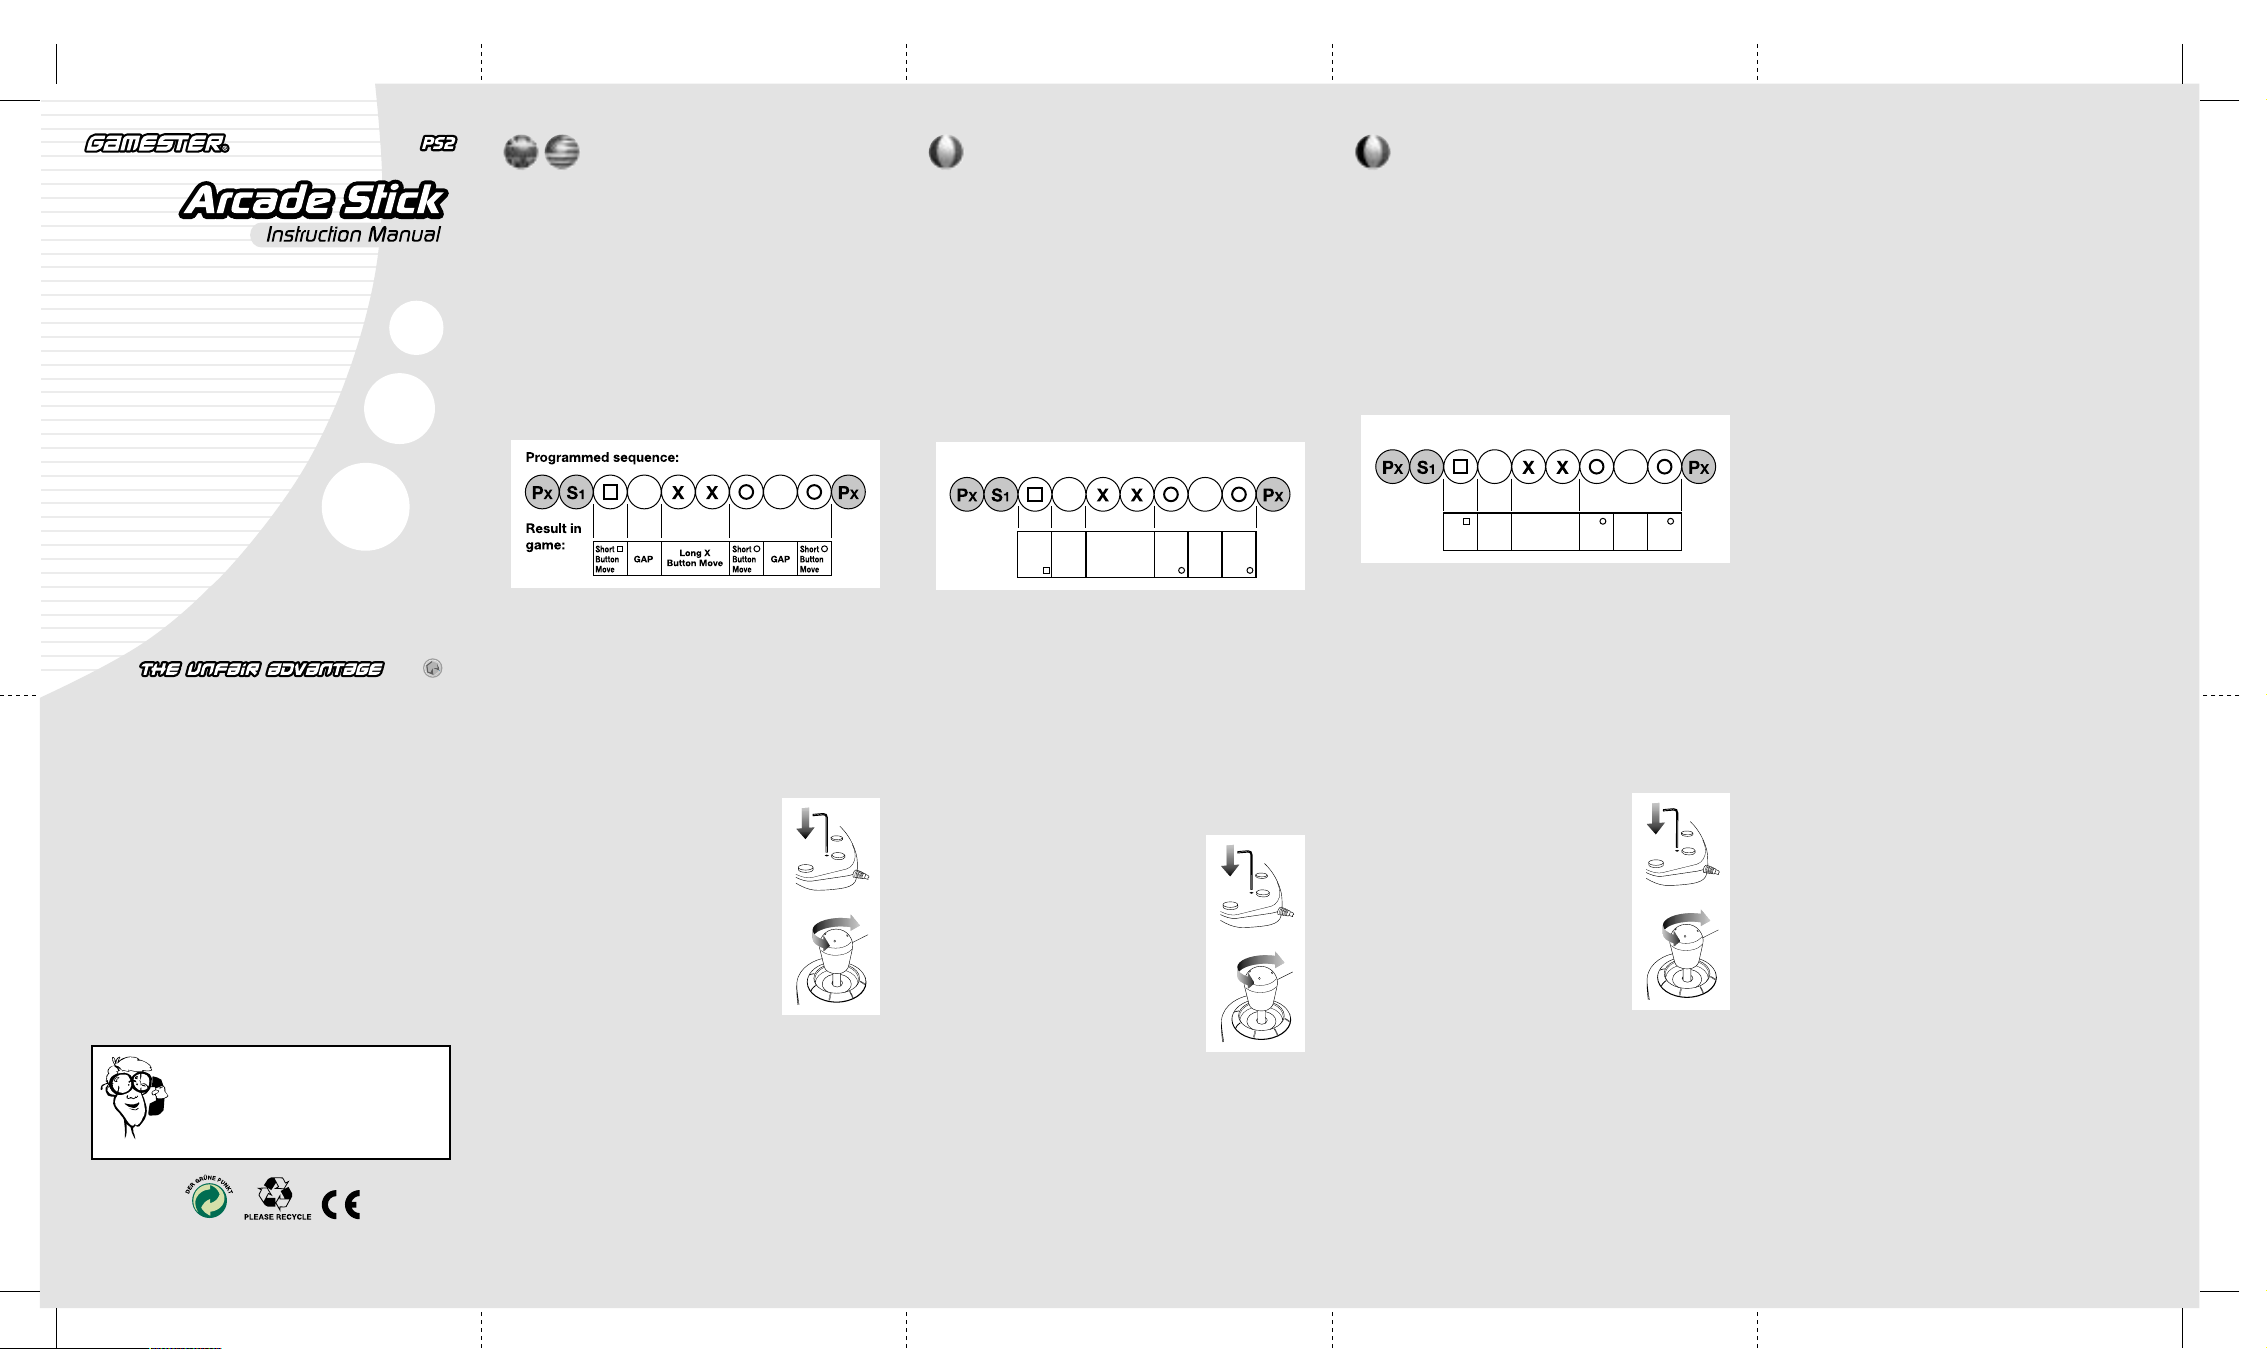
PROGRAMMING YOUR ARCADE STICK:
1. Press Program (Px) button until the green light is ON.
2. Press the combo button (S1 or S2) you wish to program. The
green light flashes once and is ON.
3. Press the Action buttons in the sequence that you wish to
program. If a delay is required between actions, the SELECT
button is used. If holding a button down is part of the combo,
press the action button multiple times in a row. Each press
represents 1/20 of a second. The green light flashes once to
confirm each button press.
4. When finished programming your sequence, press the Program
(Px) button. The green light goes out to confirm.
5. During gameplay, simply press the programmed combo button
(S1 or S2) to execute your personal combo.
EXAMPLE:
Select Select
SELECTING CONTROLLER MODE:
Analog Dpad Mode (AD-Mode):
1. Press the mode button once to go into Analog Dpad Mode. The
red light is ON. The joystick would be mapped to the Dpad.
2. Press the mode button again to return to Digital Mode.
Analog L.Stick Mode (AS-Mode):
1. Press the mode button and hold (2-3 sec) till the red light flashes
to go into Analog L.Stick Mode. The joystick would be mapped to
the Left Analog Stick.
2. Press the mode button again to return to Digital Mode.
CHANGING YOUR JOYSTICK:
1. Remove the hex key from the right back of
the base.
2. Insert the hex key into the hole with a white
circle around it on the bottom of the arcade
stick beneath the joystick position.
3. Select your desired joystick and place into
position.
4. Hold the hex key in position and spin the
joystick clockwise into the base until it is
secure. Note: When hex key is removed
joystick will still be able to spin freely.
5. Return hex key to its storage slot on the
right back of the base.
TROUBLESHOOTING:
The Arcade Stick is not working:
1. Power off your PS2 console.
2. Make sure the connector plug is firmly attached to the PS2
console.
3. Power on your PS2 console.
The programmable buttons are not working:
1. Pause game.
2. Reprogram S1 or S2 buttons using the steps outlined above.
3. Resume Game.
Note: Arcade Stick will only be fully functional with Arcade Stick
compatible games.
PROGRAMMER VOTRE STICK DE JEU :
1. Appuyez sur le bouton ‘Program’ (Px) jusqu’à ce que la lumière verte
s’allume.
2. Appuyez sur le bouton de combo (S1 ou S2) que vous souhaitez
programmer. La lumière clignote une fois et elle s’allume.
3. Appuyez sur les boutons d’action dans l’ordre dans lequel vous
souhaitez les programmer. Si un délai est nécessaire entre les actions, il
faut se servir du bouton SELECT. Si le combo nécessite qu’un bouton
soit maintenu enfoncé, appuyez sur le bouton d’action plusieurs fois de
suite. Chaque pression représentant 1/20 de seconde. La lumière verte
clignote une fois pour confirmer chaque pression de bouton.
4. Une fois que vous avez terminé de programmer votre séquence,
appuyez sur le bouton ‘Program’ (Px). La lumière verte s’éteint pour le
confirmer.
5. Pendant le jeu, il suffit d’appuyer sur le bouton de combo programmé (S1
ou S2) pour exécuter votre combo personnalisé.
EXEMPLE :
Séquence programmée :
Effet dans
le jeu :
Select
Brève
pression
sur la
touche
Longue
pression sur
DÉLAI DÉLAI
la touche X
Brève
pression
sur la
touche
Select
Brève
pression
sur la
touche
SÉLECTION DU MODE DE LA MANETTE :
Mode analogique - touches directionnelles (mode AD) :
1. Appuyez une fois sur la touche de mode afin de passer en mode
analogique - touches directionnelles. Le témoin lumineux rouge sera
allumé. Le joystick sera associé aux touches directionnelles.
2. Appuyez de nouveau sur la touche de mode pour revenir en mode
numérique.
Mode joystick analogique gauche (mode AS) :
1. Pour passer en mode Joystick analogique gauche, appuyez sur le
bouton de mode et maintenez-le enfoncé pendant 2 à 3 secondes
jusqu'à ce que le témoin lumineux rouge clignote. Le joystick sera
associé au joystick analogique gauche.
2. Appuyez de nouveau sur la touche de mode pour revenir en mode
numérique.
CHANGEMENT DE JOYSTICK :
1. Extrayez la clé six pans de la partie droite du
socle.
2. Insérez la clé six pans dans le trou entouré d'un
cercle blanc situé à l'arrière du Stick Arcade,
sous l'emplacement du joystick.
3. Sélectionnez le joystick de votre choix et mettezle en place.
4. Maintenez la clé six pans en position, insérez le
joystick dans le socle et faites-le tourner dans le
sens des aiguilles d'une montre jusqu'à ce qu'il
soit fixé. Note : vous pourrez orienter librement
le joystick après avoir retiré la clé six pans.
5. Replacez la clé six pans dans son logement
situé dans la partie droite du socle.
DÉPANNAGE :
Le Stick Arcade ne fonctionne pas :
1. Éteignez la console PS2.
2. Vérifiez que le connecteur est fermement inséré dans la console PS2.
3. Rallumez la console PS2.
Les touches programmables ne fonctionnent pas :
1. Mettez le jeu en pause.
2. Reprogrammez la touche S1 ou S2 en suivant les étapes détaillées plus
haut.
3. Reprenez la partie.
Note: le Stick Arcade ne sera intégralement fonctionnel que dans le cadre
des jeux compatibles Stick Arcade.
DIE PROGRAMMIERUNG IHRES ARCADE-STICKS:
1. Drücken Sie die Programmiertaste (Px), bis das grüne Licht leuchtet.
2. Drücken Sie die Kombo-Taste (S1 oder S2), die Sie programmieren
möchten. Das grüne Licht blinkt einmal und ist AN.
3. Drücken Sie die Aktionstasten in der Reihenfolge, die Sie programmieren
möchten. Falls eine Pause zwischen Aktionen erforderlich ist, wird dazu
die SELECT-Taste benutzt. Falls eine Taste als Teil der Kombo gedrückt
gehalten wird, drücken Sie die betreffende Aktionstaste mehrmals
hintereinander. Jeder Tastendruck steht für 1/20 einer Sekunde. Das
grüne Licht blinkt jeweils einmal, um jeden Tastendruck zu bestätigen.
4. Wenn Sie die gewünschte Sequenz programmiert haben, drücken Sie
die Programmiertaste (Px). Zur Bestätigung erlischt das grüne Licht.
5. Beim Spielen können Sie nun einfach die programmierte Kombo-Taste
(S1 oder S2) drücken, um Ihre persönliche Kombo auszuführen.
BEISPIEL:
Programmierte Sequenz:
Select
Select
Ergebnis
im Spiel:
Kurze TastenBewegung
Lange X-
Lücke Lücke
Tasten-
Bewegung
Kurze TastenBewegung
Kurze TastenBewegung
AUSWAHL DES STEUERUNGSMODUS:
Analoger Steuerkreuz-Modus (AD-Modus):
1. Drücken Sie die Modus-Taste einmal, um in den analogen SteuerkreuzModus zu wechseln. Das rote Licht ist AN. Das Steuerkreuz ist aktiviert.
2. Drücken Sie die Modus-Taste erneut, um in den digitalen Modus
zurückzukehren.
Analoger L.Stick-Modus (AS-Modus):
1. Drücken Sie die Modus-Taste und halten diese für 2-3 Sek. gedrückt, bis
das rote Licht aufleuchtet, um in den analogen L.Stick-Modus zu
wechseln. Der linke analoge Stick ist aktiviert.
2. Drücken Sie die Modus-Taste erneut, um in den digitalen Modus
zurückzukehren.
AUSWECHSELN DES JOYSTICKS:
1. Nehmen Sie den Sechskantstiftschlüssel rechts
hinten vom Gehäuse ab.
2. Stecken Sie den Sechskantstiftschlüssel in das
von einem weißen Kreis umgebene Loch an der
Unterseite des Arcade Sticks unterhalb der
Joystick-Position.
3. Wählen Sie den gewünschten Joystick und
bringen Sie ihn in die richtige Position.
4. Halten Sie den Sechskantstiftschlüssel fest und
drehen Sie den Joystick im Uhrzeigersinn in das
Gehäuse, bis er richtig sitzt. Hinweis: Wenn der
Sechskantstiftschlüssel entfernt wird, ist der
Joystick weiterhin frei beweglich.
5. Stecken Sie den Sechskantstiftschlüssel wieder
in den Halterungsschlitz rechts hinten am
Gehäuse.
PROBLEMBEHANDLUNG:
Der Arcade Stick funktioniert nicht:
1. Schalten Sie Ihre PS2-Konsole aus.
2. Stellen Sie sicher, dass der Gerätestecker richtig an die PS2-Konsole
angeschlossen ist.
3. Schalten Sie Ihre PS2-Konsole wieder ein.
Die programmierbaren Tasten funktionieren nicht:
1. Pausieren Sie das Spiel.
2. Programmieren Sie die S1 und S2 Tasten neu, indem Sie die oben
aufgeführten Schritte durchführen.
3. Fahren Sie mit dem Spiel fort.
Bemerkung: Der Arcade Stick ist nur mit Arcade Stick kompatiblen Spielen
voll funktionstüchtig.
This device complies with Part 15 of the FCC Rules. Operation is
subject to the following two conditions: (1) this device may not
cause harmful interference and (2) this device must accept any
interference received, including interference that may cause
undesired operation.
WARNING: Changes or modifications to this unit not expressly
approved by the party responsible for compliance could void the
user’s authority to operate the equipment.
NOTE: This equipment has been tested and found to comply with
the limits for a Class B digital device, pursuant to Part 15 of the FCC
Rules. These limits are designed to provide reasonable protection
against harmful interference in a residential installation. This
equipment generates, uses and can radiate radio frequency energy
and if not installed and used in accordance with the instructions,
may cause harmful interference to radio communications. However,
there is no guarantee that interference will not occur in a particular
installation. If this equipment does cause harmful interference to
radio or television reception, which can be determined by turning the
equipment off and on, the user is encouraged to try to correct the
interference by one or more of the following measures:
• Reorient or relocate the receiving antenna.
• Increase the separation between the equipment and receiver.
• Connect the equipment into an outlet on a circuit different from
that to which the receiver is connected.
• Consult the dealer or an experienced radio TV technician for help.
90-DAY LIMITED WARRANTY
(This product warranty is valid in the United States
and Canada only)
Radica Games Limited warrants this product for a period of 90 days
from the original purchase date under normal use against defective
workmanship and materials (batteries excluded). This warranty
does not cover damage resulting from accident, unreasonable use,
negligence, improper service or other causes not arising out of
defects in material or workmanship. Radica Games Limited will not
be liable for any costs incurred due to loss of use of this product or
other incidental or consequential costs, expenses or damages
incurred by the purchaser. Some states do not allow the exclusion
or limitation of incidental or consequential damages, so the above
limitations may not apply to you. This warranty gives you specific
legal rights and you may also have other legal rights, which vary
from state to state.
During this 90-day warranty period, the game will either be repaired
or replaced (at our option) without charge to the purchaser when
returned prepaid with proof of date of purchase to: Radica USA,
Ltd., 13628-A Beta Road, Dallas, Texas 75244, USA. Please
remove the batteries and wrap the unit carefully before shipping.
Please include a brief description of the problem along with your
return address and mail it postage prepaid.
PRODUCT WARRANTY
(This product warranty is valid in the United Kingdom only)
All products in the RADICA® range are fully guaranteed for a period
of 3 months from the original purchase date under normal use,
against defective workmanship and materials (batteries excluded).
This warranty does not cover damage resulting from accident,
unreasonable use, negligence, improper service or other causes not
arising out of defects in material or workmanship.
In the unlikely event that you do experience a problem within the
first 3 months, please telephone the UK Technical Support team:
Tel. 0906 213 0001 (call cost 25p a minute).
YOUR STATUTORY RIGHTS ARE NOT EFFECTED.
 Loading...