

Fisher-Price I3037 Instruction Sheet
ABOUT TAP-LOCK
SECRET CASE
The Girl Tech Tap-Lock Secret Case uses state of
the art ‘rhythm recognition’ technology to protect
your stuff from intruders!
Simply tapping your special code on the lid
of the Tap-Lock Secret Case will make it
magically open. But miss a beat or get the
timing wrong and the lid will remain shut.
Record a new code whenever you want to
ensure your case is always safe, but
remember – always keep it a secret!
Inside you will find an accessories box with
a lockable secret drawer and special star
key as well as a mirror compact to check
that you are looking great all the time!
With cool twinkly lights and groovy sound
effects, the Tap-Lock Secret Case is the
ultimate in privacy with style!
SETTING UP TAP-LOCK
SECRET CASE
Unscrew the battery compartment on the underside of the Tap-Lock Secret Case and insert 3 x
AAA batteries into the unit. Replace the cover.
NOTE: If the On/Wake button is accidentally
pressed and turns red when the batteries
are inserted, the Tap-Lock Secret Case's
"Rhythm Recognition" system will not
function properly. If this happens, reinsert
the batteries without pressing the button or
insert a blunt object into the pinhole - the
Ta p-Lock Secret Case will then work
normally.
SETTING YOUR CODE
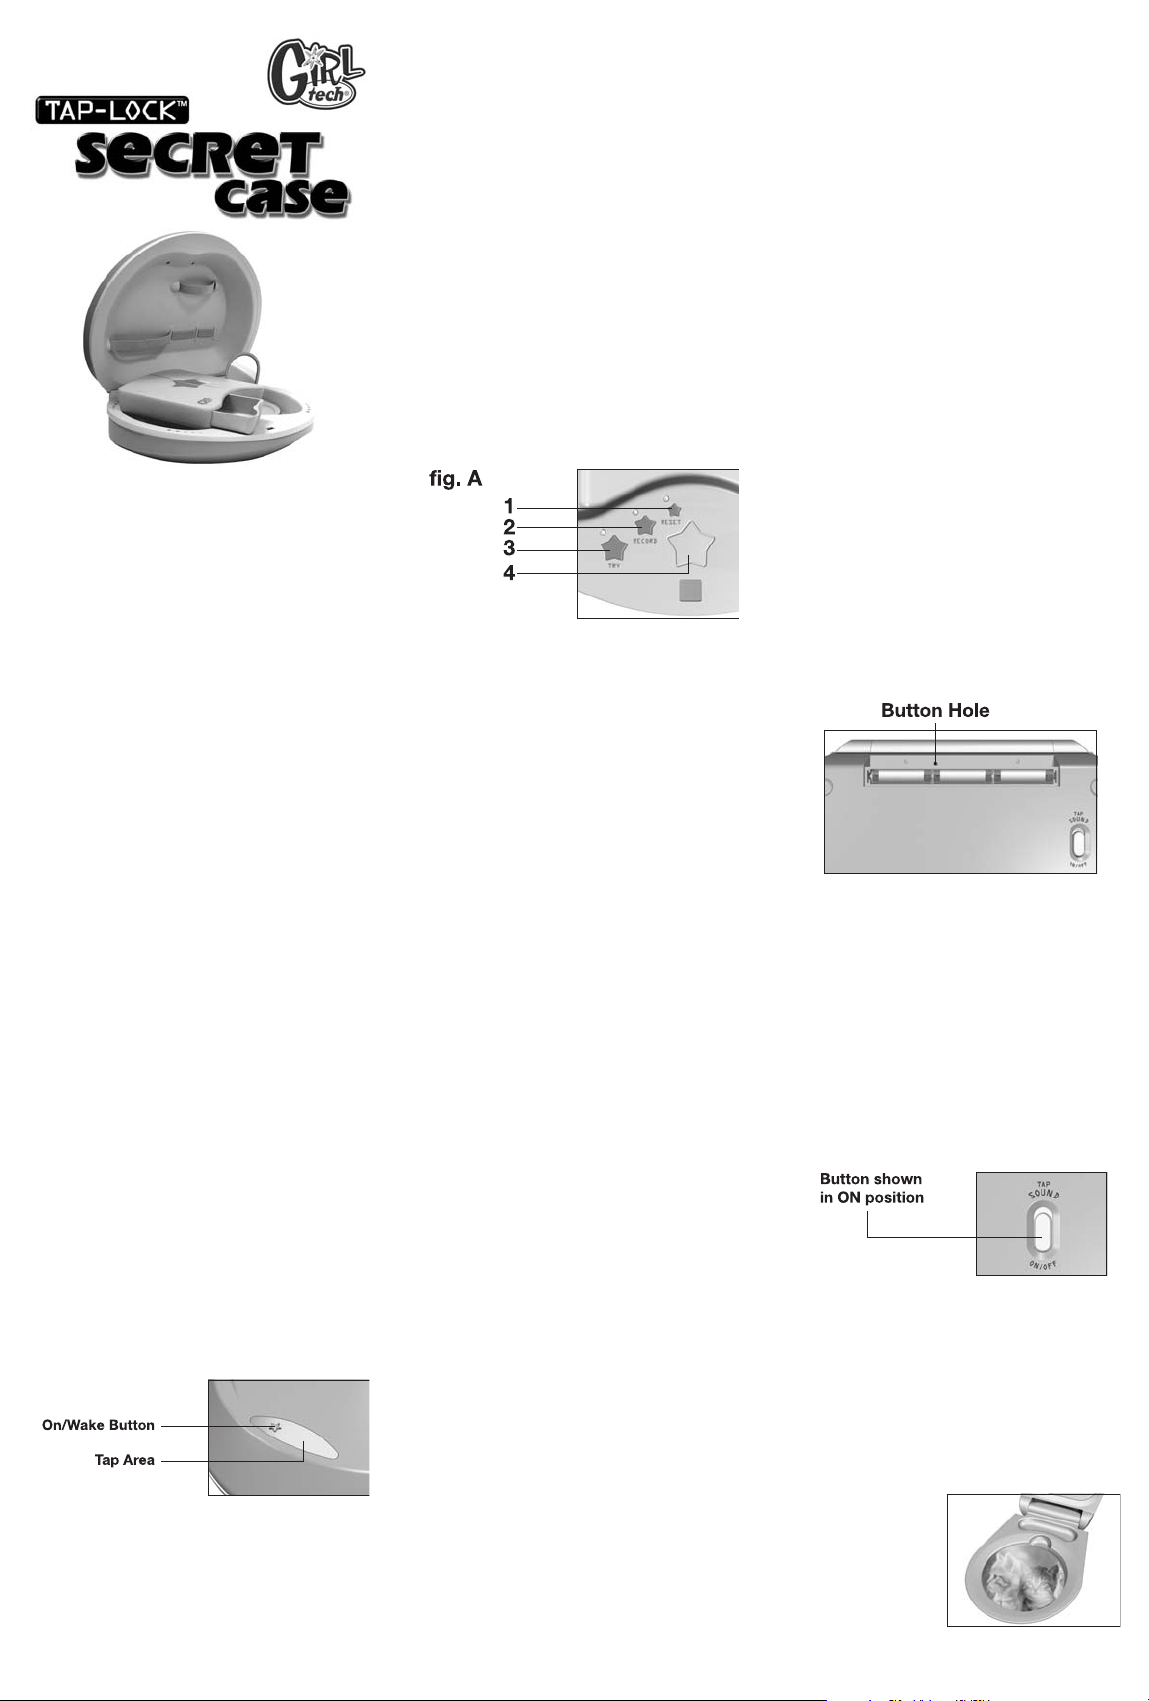
1. Press the On/Wake star button on top of
the
Tap-Lock Secret Case
(positioned on
the silver panel).
2. The button will glow green.
Model G73037
For 1 player / Ages 6 and up
INSTRUCTION MANUAL
P/N 82375300 Rev.B
E
3. The default code is 3 taps.
4. Enter the default code by tapping in the
silver area next to the On/Wake button.
The star button will light each time to
register a tap.
5. If the code you entered is correct, you will
hear a ‘magical’ sound, which will indicate
your code has been accepted. The light
on the star button will go out and the
case will open.
6. However, if the code you entered is
incorrect, the button will glow red and you
will hear a buzzer sound effect. The case
will remain closed.
NOTE: If you don't get the case open the
first time, don't worry just return to step 1
and try again.
ONCE INSIDE THE TAP-LOCK
SECRET CASE...
RECORDING YOUR NEW CODE
1. Press and hold the 'RECORD' button
(fig. A, 2).
2. A light will glow red above the button –
you are now ready to record.
3. While still holding the 'RECORD' button,
record the tap sequence of your choice
by tapping onto the larger star area next
to the buttons (fig. A, 4).
4. When the tap sequence has been
recorded, the light will go out and the
green 'TRY' light will glow. The 'magical'
acceptance sound will also be triggered.
5. Release the 'RECORD' button. To ensure
your code is accepted, do not release the
'RECORD' button until you hear the
acceptance sound.
NOTE: You can change your tap sequence
code by following these steps at any time.
TRYING YOUR NEW CODE
1. To make sure you can get back into the
secret case when the lid is shut and
locked you can "try" your new tap
sequence.
2. Press and hold the star shaped ‘TRY’
button (fig. A, 3) while the Tap-Lock
Secret Case is open.
3. The light above the button will glow
green.
4. Enter the tap code onto the star panel
(fig. A, 4).
5. If correct, the green light will go out and
you will hear the 'magical' sound. Now
release the 'TRY' button.
6. If incorrect, the light will flash red and the
buzzer sound will be heard indicating the
code is wrong.
NOTE: If your code is not accepted, try your
tap sequence again, either slowing it down
or making it slightly faster. Please note that
if you release your finger from the 'RECORD'
button before your code is accepted, this
may register as an additional tap and you
will be denied access.
OPENING THE TAP-LOCK
SECRET CASE WITH YOUR
NEW CODE
1. Close the lid on the Tap-Lock Secret
Case.
2. Press the On/Wake star shaped button
positioned on the silver panel.
3. The button will glow green.
4. Enter your own tap sequence onto the lid
of Tap-Lock Secret Case. The button will
flash to register code and you will hear a
tapping noise.
5. If the code you entered is correct, you will
hear a ‘magical’ sound, which will indicate
your code has been accepted. The light
on the star button will go out and the
case will open.
6. However, if the code you entered is
incorrect, the button will glow red and you
will hear a buzzer sound effect. The case
will remain closed.
TO MANUALLY OPEN THE LID
If you need to open the Tap-Lock Secret Case
without entering your tap code, simply unscrew
the battery compartment and insert a dull pointed
object (like the end of a paperclip) into the button
hole. Voila!!
RESET BUTTON (fig. A, 1)
This is positioned on the inside of the TapLock Secret Case above the ‘TRY’ and
‘RECORD’ buttons. By holding this button
down for 2 seconds, the code will default
back to the 3 tap sequence. To make sure
this has worked, you can use the ‘TRY’
function before closing the lid.
SOUND ON/OFF SWITCH
This button is located on the bottom of the
product. By turning the switch to the ‘off’
position, you can turn off the tap sound.
NOTE: This switch will only turn off the
tapping sound. All other sounds and lights
will still work as normal.
FEATURES OF THE TAP-LOCK
SECRET CASE
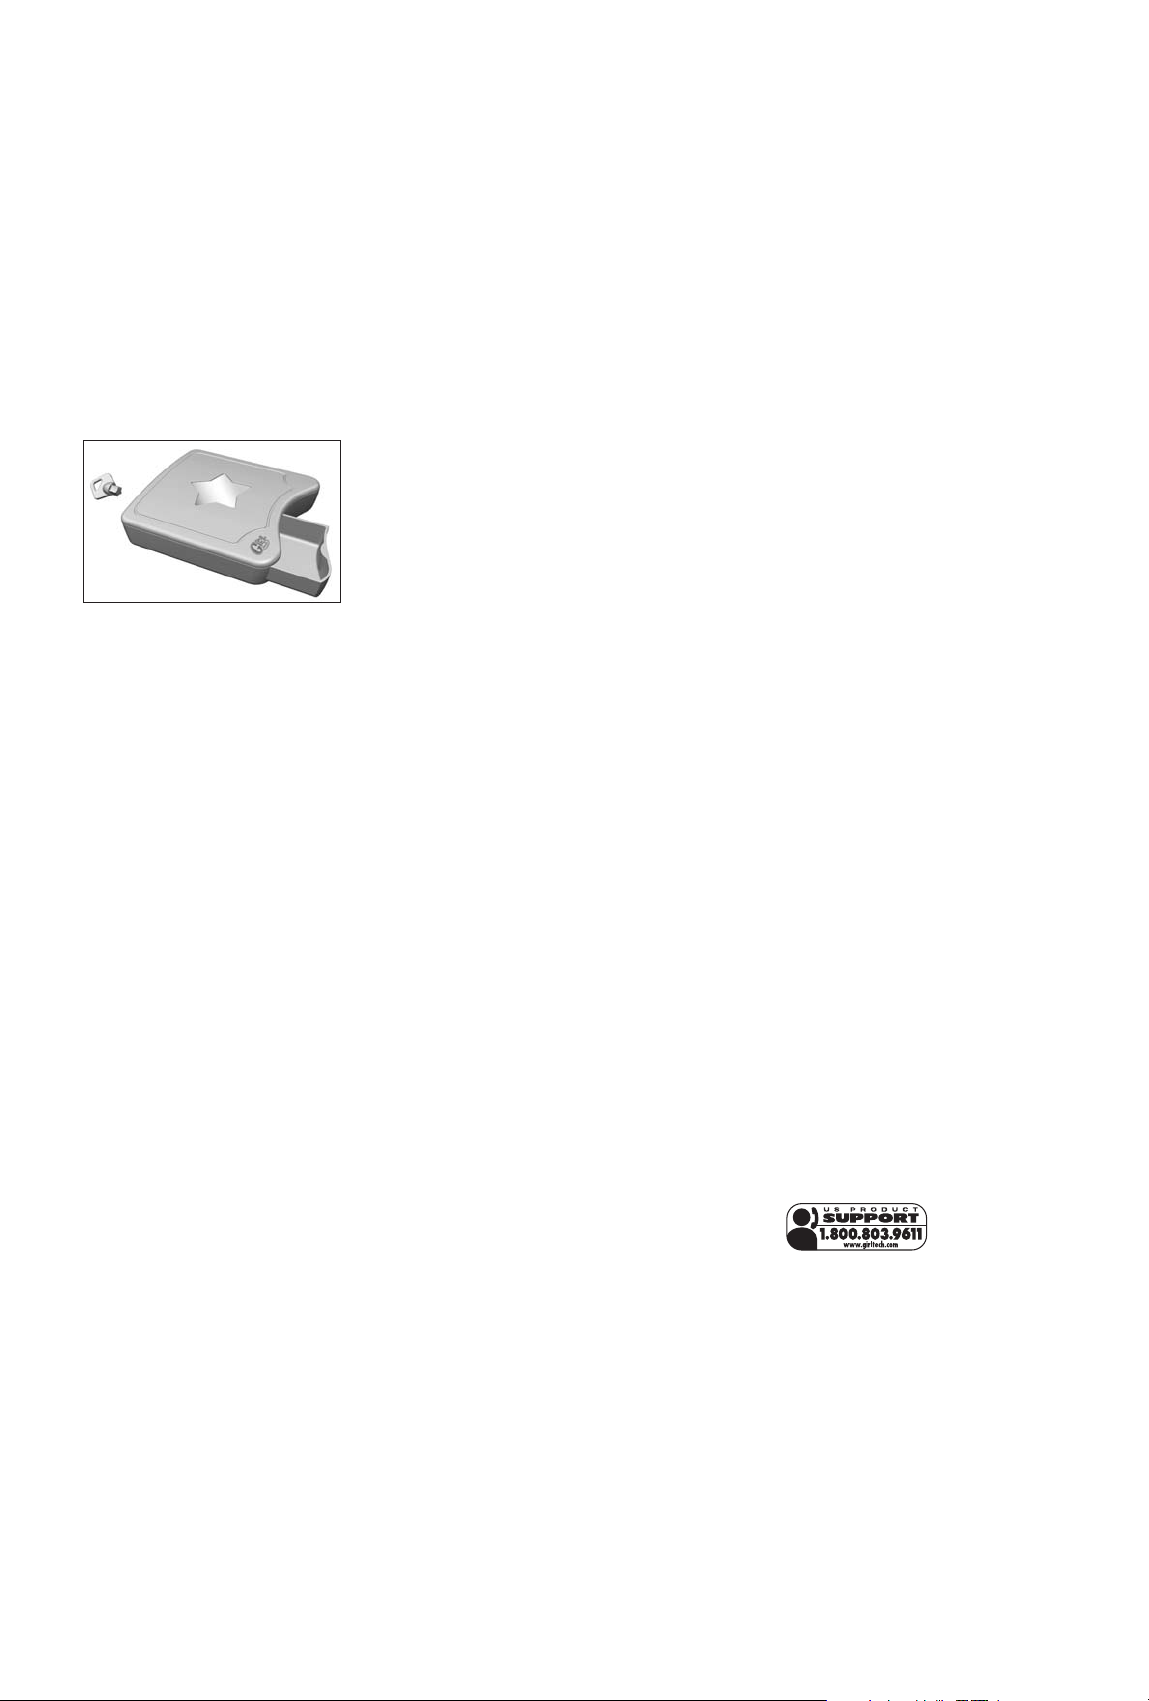
MIRROR COMPACT
To place a
photograph into
the compact
simply remove the
window, insert
picture and snap
the window back
into place.
ACCESSORY BOX
To keep your stuff safe. While inside the case,
only the right hand side can be used freely by
simply opening up the lid. On removing the
accessory box from the case, you are now able
to access the secret drawer with the blue star
shaped key.
1. Insert the key into star shaped lock at the
back of the tray.
2. Turn the key counter clockwise.
3. The drawer is now unlocked and can be
slid out from the front of the accessory
box using the groove.
4. To lock the drawer, simply close the
drawer and re-insert the star key into the
lock. Turn the key clockwise.
5. Remember to keep your secret star key
safe, as it protects your most secret stuff.
TOP SECRET COMPARTMENT
Inside the bottom of your Tap-Lock Secret Case
you will find another top secret compartment just
big enough to keep your most private notes away
from prying eyes. To open, simply flick the catch
on the edge of the door and lift it upwards.
ELASTIC STRAPS
These can be used to either hold the Mirror
Compact in place or for securing other items of
your choice.
CARRYING HANDLE
Flip up to carry. The handle will lock when it
reaches a 90 degree angle to the lid of the case.
FORGOTTEN YOUR CODE?
If you have forgotten your code, read the
sections 'TO MANUALLY OPEN THE LID',
followed by 'RESET BUTTON'.
Alternatively, remove and re-insert the
batteries to make the unit reset to the
default code of 3 taps. Open the unit again
with this code and enter a new tap
sequence.
BATTERY INSTALLATION
This game is powered by three (3) AAA batteries.
The battery compartment is located on the back
of the game.
• Using a screwdriver, loosen the screw
until the battery compartment door can
be removed.
• Insert three (3) AAA batteries (we
recommend alkaline) as indicated inside
the battery compartment.
• Replace the battery compartment door
and tighten the screw with a screwdriver.
Do not over-tighten.
Adult supervision is recommended when
changing batteries.
RADICA:®
GIRL TECH®
TAP-LOCK IS A TRADEMARK OF RADICA GAMES LTD.
©2002 RADICA GAMES LTD
PRODUCT SHAPE™
ALL RIGHTS RESERVED.
CAUTION
• As with all small batteries, the batteries
used with this game should be kept away
from small children who might still put
things in their mouths. If a battery is
swallowed, consult a physician
immediately.
• Be sure you insert the battery correctly
and always follow the game and battery
manufacturer’s instructions.
• Do not dispose of batteries in fire.
• Batteries might leak if improperly
installed, or exploded if recharged,
dissembled or heated.
MAINTENANCE
• Handle this product carefully.
• Store this product away from dusty or
dirty areas.
• Keep this product away from moisture or
temperature extremes.
• Do not disassemble this product. If a
problem occurs, press the Reset button,
or remove and replace the batteries to
reset the product, or try new batteries. If
problems persist, consult your warranty
information at the end of this instruction
manual.
• Only batteries of the same or equivalent
type as recommended are to be used.
• Do not mix old and new batteries.
• Do not mix alkaline, standard (carbonzinc) or rechargeable (nickel-cadmium)
batteries.
• Do not use rechargeable batteries.
• Do not attempt to recharge nonrechargeable batteries.
• Remove any exhausted batteries from the
product.
• The supply terminals are not to be shortcircuited.
• Batteries are to be inserted with the
correct polarity.
Please retain this for future reference.
This product complies with Part 15 of the
FCC Rules. Operation is subject to the
following two conditions: (1) this device
may not cause harmful interference and (2)
this device must accept any interference
received, including interference that may
cause undesired operation.
WARNING: Changes or modifications to
this unit not expressly approved by the party
responsible for compliance could void the
user’s authority to operate the equipment.
NOTE: This equipment has been tested and
found to comply with the limits for a Class B
digital device, pursuant to Part 15 of the
FCC Rules. These limits are designed to
provide reasonable protection against
harmful interference in a residential
installation. This equipment generates, uses
and can radiate radio frequency energy and
if not installed and used in accordance with
the instructions, may cause harmful
interference to radio communications.
However, there is no guarantee that
interference will not occur in a particular
installation. If this equipment does cause
harmful interference to radio or television
reception, which can be determined by
turning the equipment off and on, the user is
encouraged to try to correct the interference
by one or more of the following measures:
• Reorient or relocate the receiving antenna.
• Increase the separation between the equipment
and receiver.
• Connect the equipment into an outlet on a circuit
different from that to which the receiver is
connected.
• Consult the dealer or an experienced radio TV
technician for help.
90-DAY LIMITED WARRANTY
(This product warranty is valid in the United
States and Canada only)
Radica Games Limited warrants this product
for a period of 90 days from the original
purchase date under normal use against
defective workmanship and materials
(batteries excluded). This warranty does not
cover damage resulting from accident,
unreasonable use, negligence, improper
service or other causes not arising out of
defects in material or workmanship. Radica
Games Limited will not be liable for any
costs incurred due to loss of use of this
product or other incidental or consequential
costs, expenses or damages incurred by the
purchaser. Some states do not allow the
exclusion or limitation of incidental or
consequential damages, so the above
limitations may not apply to you. This
warranty gives you specific legal rights and
you may also have other legal rights, which
vary from state to state.
During this 90-day warranty period, the
game will either be repaired or replaced (at
our option) without charge to the purchaser
when returned prepaid with proof of date of
purchase to: Radica USA, Ltd., 13628-A
Beta Road, Dallas, Texas 75244, USA.
Please remove the batteries and wrap the
unit carefully before shipping. Please
include a brief description of the problem
along with your return address and mail it
postage prepaid.
IMPORTANT: Before returning the unit for
repair, test it with fresh alkaline batteries.
Even new batteries may be defective or
weak and low battery power is a frequent
cause of unsatisfactory operation.
 Loading...