

Page 1
E
TM
MODEL 71071 P/N 82357200 Rev.A
Tiger Woods Ultimate 18™
For 1 or 2 players / Ages 8 and up
INSTRUCTION MANUAL
PLEASE NOTE: To exit demo mode, push
"RESET" button on the front of the game.
the
Fore! With Ultimate 18™, you’ll enjoy the
excitement and realistic action of professional
golf—rain or shine, all year round. Choose
your skill level, and set out on the green. You
can play through all 18 holes, take a few practice shots, or work on your swing at the driving range. Ready to play?
BUTTON FUNCTIONS
On/Hit - Press this button to turn the game on
and to hit the ball
Directional Buttons - Press any of the directional buttons to select game mode and move
the aiming cursor over the course.
Enter - Enters a selection.
Sound - Turns sound on and off.
Mulligan - Replays the last ball position. (For
practice mode only.)
New Game/Best Score - Starts a new
game/Checks the highest score.
Reset - Resets the game.
SKILL LEVEL
There are three skill levels: Beginner, Amateur
and Pro. These refer to the skill level required
to hit a ball, with Beginner being the easiest
and Pro being the most difficult.
GAME MODES
There are three game modes: Practice, Tour
and Range. One or two players may play tour
mode.
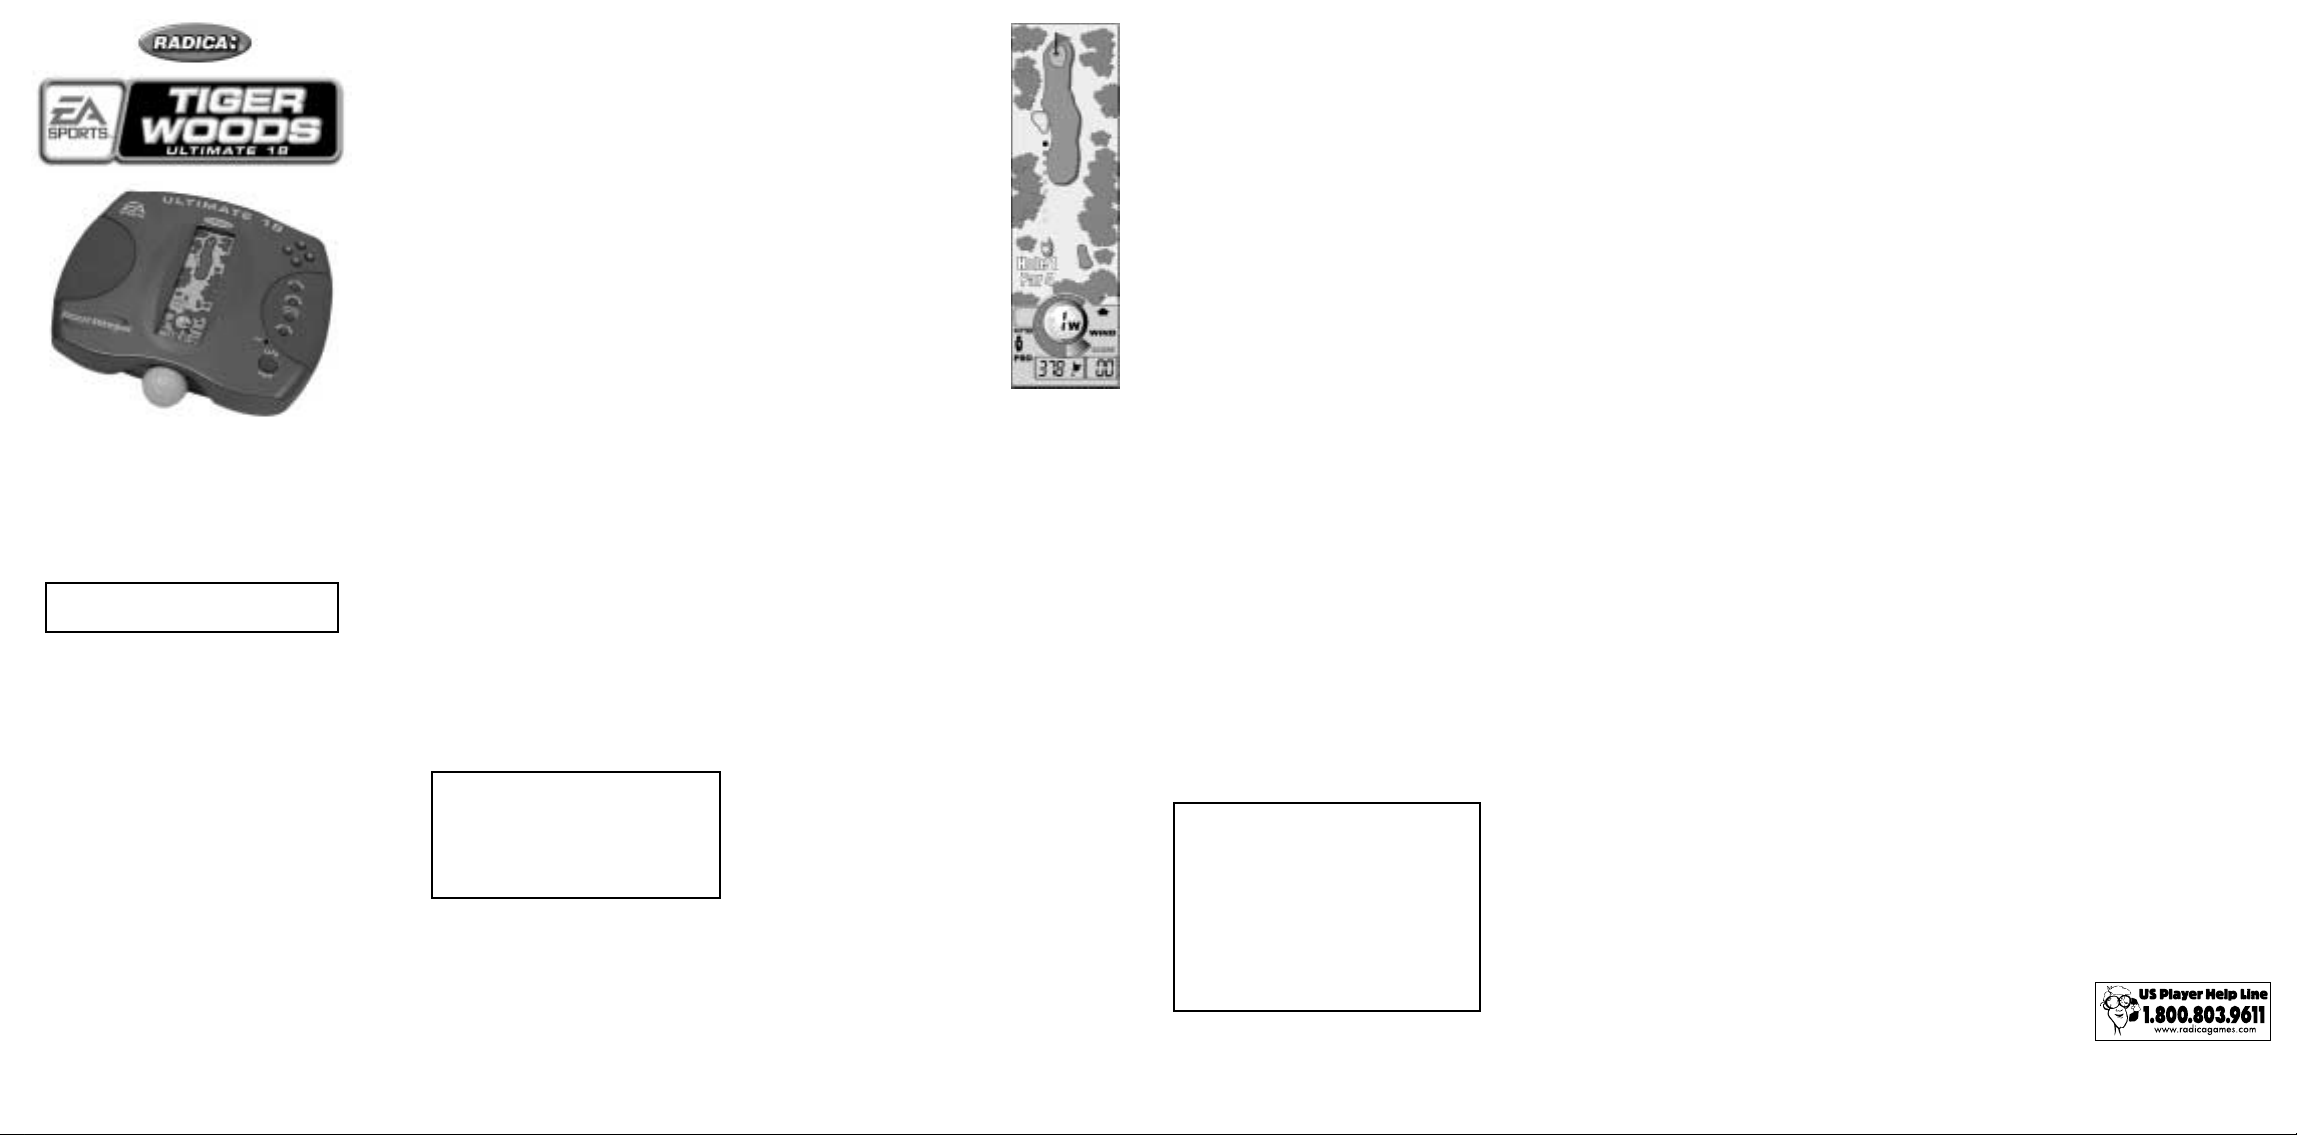
USING THE AIMING CURSOR
The Aiming Cursor appears on the course as a
cross of five small dots. The flashing center
dot shows your target area.
•The Aiming Cursor is located at the maximum distance that the selected club can hit
the ball.
•You will use the Aiming Cursor to aim the
ball. Wherever the Cursor is, the ball will
land there - if you make a perfect swing.
When aiming the cursor, be sure to check
the wind direction. The wind direction and
swing are the two main factors determining
where your shot will land.
•To move the Aiming Cursor around the
course, use the directional keys. As you
move the Cursor, your club settings will
change according to how far the Cursor is
from you.
CLUB SELECTION
The game will automatically choose the best
club for each shot. The number of the club
you are using is displayed in the center of the
golf ball at the bottom of the screen.
1 - Wood 6 - Iron
3 - Wood 7 - Iron
3 - Iron 8 - Iron
4 - Iron 9 - Iron
5 - Iron Pitching Wedge
Sand Wedge
GETTING STARTED
Press the ON/HIT button to turn on the game.
• Next, you will see "Practice" flashing on the
bottom of the screen. You will also see "Tour"
and "Range". To choose "Practice", press
the enter key. To choose "Tour" or "Range",
press any of the four (4) directional buttons to
make your selection, then press enter.
•If you selected "Tour"
mode, you will see a
player number icon flash.
To choose one player,
press enter, to choose two
players, press any of the
four directional keys and
press enter. NOTE: If you
are not on Hole 1, you will
see the SCROLL icon with
an arrow pointing in the
direction that you need to
manually scroll the film to
get back to the first hole.
•If you selected "Practice
Mode", you can begin your
game from any hole on the
course. After you have
scrolled to the desired
hole, either wait about two
(2) seconds to confirm your hole selection or
press enter to confirm your selection.
•If you selected "Range" mode you will need
to scroll the film until you see the Driving
Range hole.
•Next you will see "Pro", "Am" and "Beg".
"Pro" will be flashing.
•To choose "Pro" (Professional) press enter.
To choose "Am" (Amateur), press any
directional key one time and press enter.
To choose "Beg" (Beginner), press any
directional key two times and press enter.
•Once you have made your selection and
entered them, you will see icons indicating
wind direction, distance to the pin, score
register, swing meter and best club selection
(the computer will choose your best club
automatically).
•You will also see a flashing aim cursor in the
fairway that shows the maximum distance
that the selected club can hit the ball if you
succeed in making "the perfect swing".
•The aiming cursor can be moved around the
fairway by using the four directional buttons.
However, it will not move to a spot further
than where the designated club can hit. You
will notice that as the cursor is moved, the
club selection will change, if needed, automatically.
PLAYING THE GAME
• To start a swing, you must press the ON/HIT
button to activate the back swing. Then,
press the ON/HIT button again to terminate
the back swing and swing the club forward
to hit the ball.
•Once you land on the green, the screen will
briefly display the distance the ball was hit
and then show the updated distance to the
pin (based on the new ball position). Your
score will be updated to reflect the number
of strokes it took you to reach the green.
Now you must putt. The computer will
choose the best putter for you automatically
and display how far it can putt. To putt the
ball, follow the above instruction. When the
ball goes into the hole, you will see an
update of your score.
Hint: Check the maximum putting distance
of the computer-selected putter and the
distance to the pin indicated next to the flag
icon. For example, if your ball is 63' from the
pin, the game will automatically select a 70'
maximum distance putter. Adjust your back
swing accordingly to achieve a 63' putt with
the computer-selected 70' putter. In this
case a 90% back swing on the swing meter
will provide a perfect distance and sink the
ball into the hole.
•Now you will see the "SCROLL" icon
prompting you to scroll the film to the next
hole. NOTE: The game will not respond to
any player inputs unless it is on the correct
background frame.
SCORING
Your score will count the number of strokes
for the current hole. After the hole is completed, your score will show the score against par
(+ or -).
CLUB DISTANCE BREAKDOWN
CLUB DISTANCE HIT (100% NO WIND)
1 WOOD 275 248 220
3 WOOD 250 225 200
3 IRON 205 185 164
4 IRON 195 176 156
5 IRON 185 167 148
6 IRON 172 155 138
7 IRON 160 144 128
8 IRON 148 133 118
9 IRON 135 122 108
P WEDGE 120 108 96
S WEDGE 90 80 72
FAIRWAY ROUGH BUNKER
BATTERY INSTALLATION
This game is powered by two (2) AA batteries.
The battery compartment is located on the
bottom of the game.
•Using a screwdriver, loosen the screw until
the battery compartment door can be
removed.
•Insert two AA batteries (we recommend alkaline) as indicated inside the battery compartment.
•Replace the battery compartment door and
tighten the screw with a screwdriver. Do not
over-tighten.
Adult supervision is recommended when
changing batteries.
CAUTION
• As with all small batteries, the batteries used with this game should
be kept away from small children
who might still put things in their
mouths. If a battery is swallowed,
consult a physician immediately.
• Be sure you insert the battery correctly and always follow the game
and battery manufacturer’s instructions.
• Do not dispose of batteries in fire.
• Batteries might leak if improperly
installed, or explode if recharged,
disassembled or heated.
MAINTENANCE
•Handle this game carefully.
• Store this game away from dusty or dirty
areas.
• Keep this game away from moisture or
extreme temperature.
• Do not disassemble this game. If a problem
occurs, press the Reset button, or remove
and replace the batteries to reset the game,
or try new batteries. If problems persist,
consult your warranty card for replacement
instructions.
• Use only the recommended battery type.
• Do not mix old and new batteries.
• Do not mix alkaline, standard (carbon-zinc)
or rechargeable (nickel-cadmium) batteries.
• Do not use rechargeable batteries.
• Do not attempt to recharge non-recharge-
able batteries.
• Remove any exhausted batteries from the
game.
• Do not short-circuit the supply terminals.
• Insert batteries with the correct polarity.
Please retain this for future reference.
This device complies with Part 15 of the FCC
Rules. Operation is subject to the following
two conditions: (1) this device may not cause
harmful interference and (2) this device must
accept any interference received, including
interference that may cause undesired operation.
WARNING: Changes or modifications to this
unit not expressly approved by the party
responsible for compliance could void the
user’s authority to operate the equipment.
NOTE: This equipment has been tested and
found to comply with the limits for a Class B
digital device, pursuant to Part 15 of the FCC
Rules. These limits are designed to provide
reasonable protection against harmful interference in a residential installation. This equipment generates, uses and can radiate radio
frequency energy and if not installed and used
in accordance with the instructions, may
cause harmful interference to radio communications. However, there is no guarantee that
interference will not occur in a particular
installation. If this equipment does cause
harmful interference to radio or television
reception, which can be determined by turning
the equipment off and on, the user is encouraged to try to correct the interference by one
or more of the following measures:
•Reorient or relocate the receiving antenna.
• Increase the separation between the
equipment and receiver.
• Connect the equipment into an outlet on a
circuit different from that to which the
receiver is connected.
• Consult the dealer or an experienced radio
TV technician for help.
THE NAME, LIKENESS AND OTHER ATTRIBUTES OF
TIGER WOODS, THE "TIGER WOODS" LOGO, AND THE
NAME, LOGOS, AND OTHER INDICIA OF NIKE, INC.
REPRODUCED ON THIS PRODUCT ARE THE
TRADEMARKS AND COPYRIGHTED DESIGNS, AND/OR
OTHER FORMS OF INTELLECTUAL PROPERTY, THAT
ARE THE EXCLUSIVE PROPERTY OF TIGER WOODS,
ETW CORP., AND/OR NIKE, INC. AND MAY NOT BE USED
IN WHOLE OR IN PART, WITHOUT THEIR RESPECTIVE
WRITTEN CONSENTS.
RADICA IS AN AUTHORIZED ELECTRONIC ARTS™
DISTRIBUTOR. EA SPORTS AND THE EA SPORTS
STYLIZED DESIGN ARE TRADEMARKS OR REGISTERED
TRADEMARKS OF ELECTRONIC ARTS INC. IN THE U.S.
AND/OR OTHER COUNTRIES.
RADICA:®
ULTIMATE 18 IS A TRADEMARK OF RADICA CHINA LTD.
© 2000 RADICA CHINA LTD.
PRODUCT SHAPE™
ALL RIGHTS RESERVED
 Loading...