

Page 1
SETTING YOUR PASS CODE
You’ll need to enter your pass code every time
you use Personology.
Helpful Hint: Make sure you write down your
combination and keep it in a safe place!
You will use the Sun, Moon and Star buttons
to create your 3-digit pass code. You can use
these symbols in any combination.
• To enter the first digit, press the Sun, Moon
or Star button. The first padlock symbol is
now locked.
• To enter the second digit, press the Sun,
Moon or Star button. The second padlock
symbol is now locked.
• To enter the third digit, press the Sun, Moon
or Star button. The third padlock symbol is
now locked.
“ARE YOU SURE?” scrolls across the screen.
To change your pass code, press the
Star/Right button to select NO icon and press
Enter, then follow the above instructions for resetting your pass code. To accept your pass
code, make sure the YES icon is flashing and
press Enter. Your pass code is now complete!
SETTING THE TIME
• To enter the correct hour, press the Moon/Up
button to scroll through the hours and minutes. Use the Star/Right button to move
between hour and minutes. When you reach
the correct time, press the Enter button.
SETTING THE DATE
• To enter today’s date, press the Moon/Up
button to scroll through each month and
date. You can use the Star/Right button to
move between month and date. When you
reach the correct date, press the Enter button.
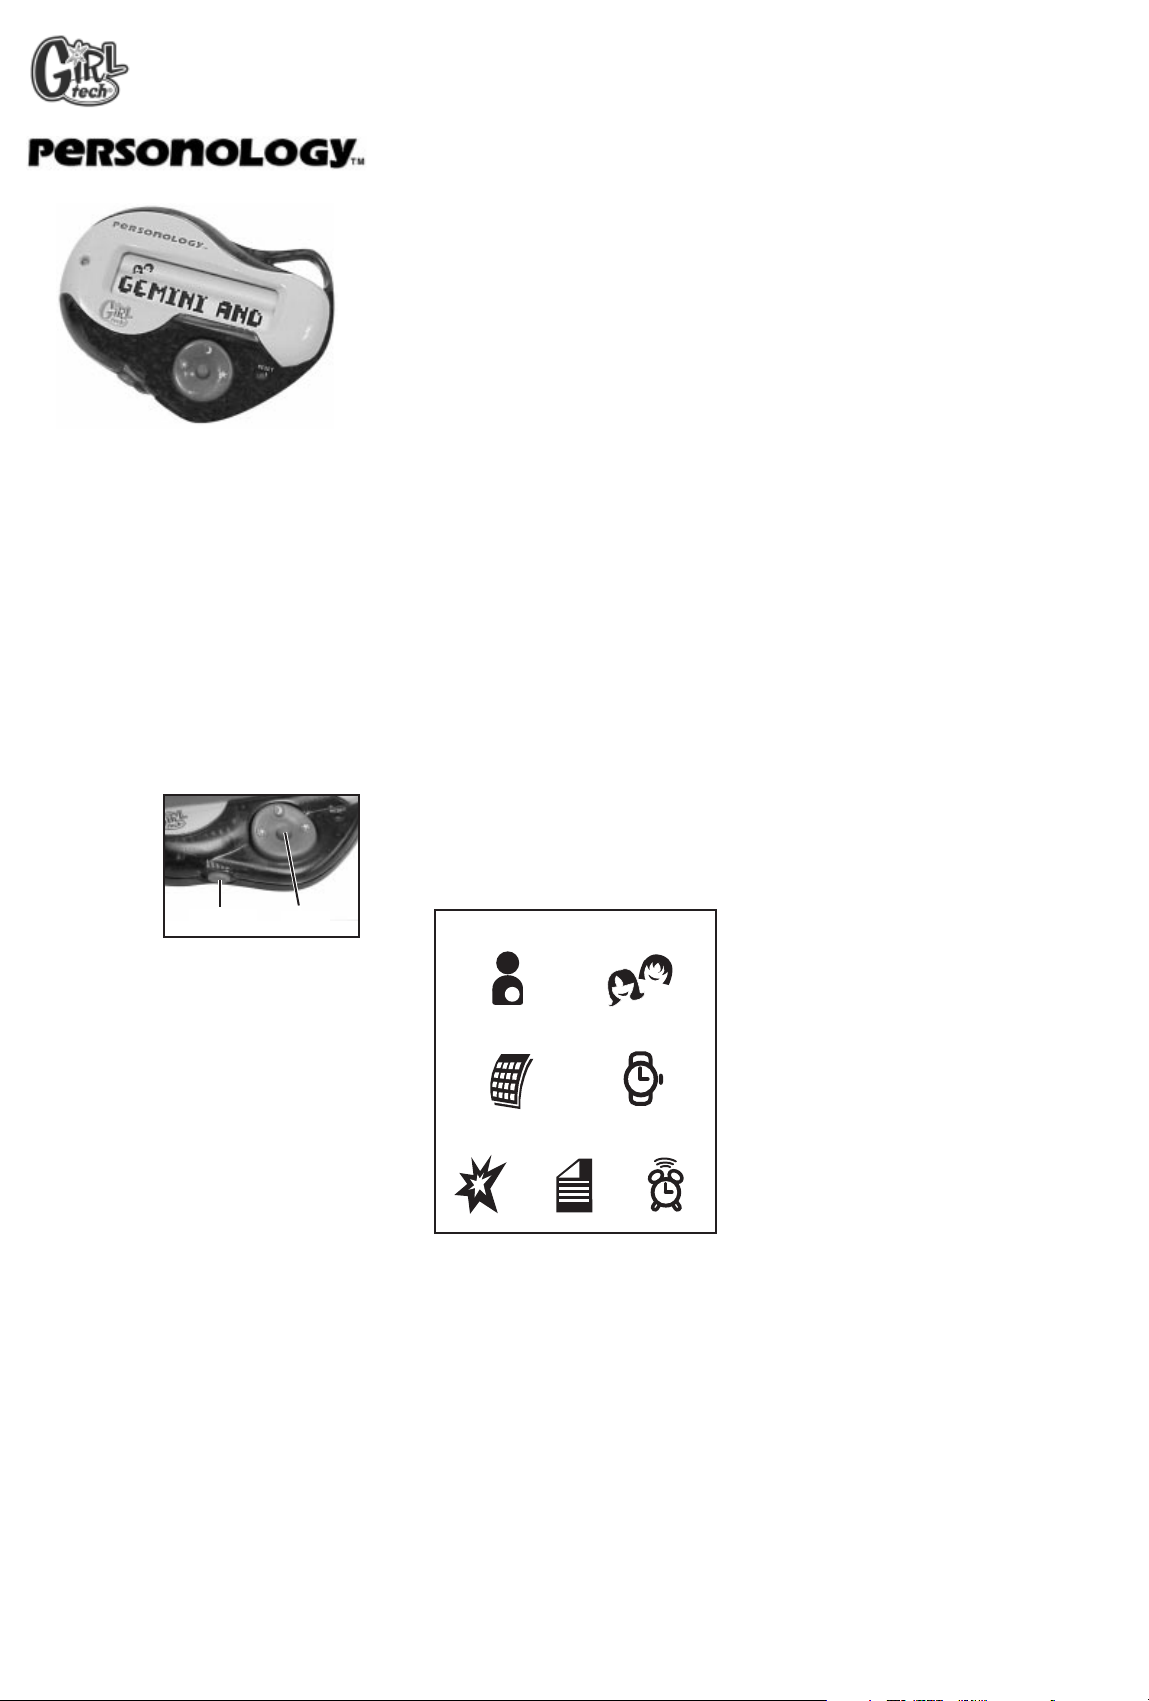
CHOOSING A FUNCTION
Now you’re ready to have some fun with
Personology! There are seven functions that
appear on the top of the screen:
• Use the Sun/Left and Star/Right buttons to
scroll back and forth through the icons.
• Press the Enter button to enter your selection.
PERSONOLOGY™
Personology creates a fun character profile,
including your astrological sign, personality,
strengths and weaknesses, as well as the
names of a few extraordinary women who
share your birthday.
• Use the Sun/Left and Star/Right buttons to
select the Personology icon and press the
Enter button.
• Use the Moon/Up and Star/Right buttons to
enter your birthday.
Date
With Personology, it can show your own personality profile, or check your compatibility
with your best friend (or someone special!).
Want to remember an important date or
event? Create a message and set the alarm
to remind you. And don’t worry—your personal pass code keeps all of your secrets
safe!
BUTTON FUNCTIONS
Enter - Press
this button to
enter a selection, or to wake
Personology
from sleep
mode.
Volume slide
switch - there are three settings: Off, Low &
High.
Sun/Left button - This button allows you to
scroll through icons, moving toward the lefthand side of the screen. It also works as the
“Sun” symbol during the pass code
sequence.
Star/Right button - This button allows you
to scroll through icons, moving toward the
right-hand side of the screen. It also works
as the “Star” symbol during the pass code
sequence.
Moon/Up button - This button allows you to
scroll up through highlighted selections (A-Z,
0-9). It also works as the “Moon” symbol during the pass code sequence.
Down - This button allows you to scroll down
through highlighted selections (A-Z, 0-9).
Reset - Clears all saved information.
GETTING STARTED
PLEASE NOTE: The currently selected icon
will flash when entering information.
ENTERING YOUR BIRTHDAY
• To enter your birthday, press the Moon/Up
button to scroll through each month and
date. You can use the Star/Right button to
move between month and date. When you
reach the correct date, press the Enter button.
• Your personal character profile will scroll
across the screen:
For example: “APR 1 ARIES YOU ARE
CALM, SINCERE, TECHNICAL. BUT
SOMETIMES LONELY, WIMPY, ONETRACK MIND. PROFILE: YOU’RE NO
APRIL FOOL! YOU HAVE STAR QUALITY,
BUT YOU DUCK THE LIMELIGHT. PEOPLE FEEL GOOD JUST BEING AROUND
YOU! SHARED BIRTHDAY WITH: CLARA
MCBRIDE HALE, DEBBIE REYNOLDS.”
COMPATIBILITY
The Compatibility feature creates a profile for
you and another person, highlighting how
you click and what you are best and worst
for in your relationship.
• Use the Sun/Left and Star/Right buttons to
select the Compatibility icon and press the
Enter button.
• Use the Moon/Up and Star/Right buttons to
enter your birthday. Then press the Enter
button.
• Use the Moon/Up and Star/Right buttons to
enter your friend’s birthday. Then press the
Enter button.
• You and your friend’s Compatibility profile
will scroll across the screen.
DATE
Scroll to the Date icon and press enter. Then
press and hold enter until the date is flashing. Use the Moon/Up button to scroll
through each month and date. You can use
the Star/Right button to move between
month and date. When you reach the correct
date, press the Enter button.
TIME
Scroll to the Time icon and press enter. Then
press and hold enter until the time is flashing. Use the Moon/Up button to scroll
through the hours and minutes. Use the
Star/Right button to move between hour and
minutes. When you reach the correct time,
press the Enter button.
SFX (SOUND EFFECTS)
Personology can play eight silly sound
effects.
• Use the Sun/Left and Star/Right buttons to
select the SFX icon.
• Use the Moon/Up and Down buttons to
scroll through the eight different sound
effects.
• Press the Enter button to hear each sound
effect.
MESSAGE
Personology allows you to create eight different messages. You can even set the alarm
to help you remember important events!
• Use the Sun/Left and Star/Right buttons to
select the Message icon and press the
Enter button.
• The words “MESSAGE: 1” will appear on
the screen. To create Message 1, press the
Enter button. (See CREATING A NEW
MESSAGE)
• To scroll or create other messages, use the
Moon/Up button. When you have selected
the desired message, press the Enter button.
CREATING A NEW MESSAGE
The words “ENTER MESSAGE” will scroll
across the screen, followed by a grid.
Personology
Compatibility
SFX Message Alarm
E
Model G71030
For 1 player / Ages 8 and up
INSTRUCTION MANUAL
P/N 82355400 Rev.A
Enter
Volume
Time
Page 2

• Use the Moon/Up button to see a flashing
“A” .
• Use the Moon/Up and Down button to
scroll through the alphabet (A-Z), numbers
(0-9) and symbols.
• Use the Sun/Left and Star/Right buttons to
move forward and backward one space, or
leave a blank space.
• When you have finished entering your
message, press the Enter button.
• You will see the words “EDIT? YES NO.” If
you’d like to change your message, press
the Sun/Left button to select “YES” and
press the Enter button. You will return to
your message.
• If you don’t want to change your message,
use the Star/Right button to select “NO”
and press the Enter button.
• Next, you’ll see “ATTACH TO ALARM 1?
YES NO.” If you select “YES,” you’ll see
“ON 12:00 AM.”
• Use the Moon/Up button to scroll through
the hours and AM/PM. When you reach the
correct hour, press the Star/Right button.
• Next, use the Moon/Up button to scroll
through the minutes. When you are finished, press the Enter button.
• The words “SELECT SFX” will scroll across
the screen, followed by “SFX: 1.” Use the
Moon/Up button to scroll through the eight
sound effects. When you have selected a
sound effect, press the Enter button.
SETTING THE ALARM
• Use the Star/Right button to scroll through
the icons and highlight the Alarm 1 clock
icon. Then press the Enter button.
• The words “OFF 12:00 AM” will appear on
the screen. Use the Moon/Up and Down
button to toggle from “ON” to “OFF.” When
you have made your selection, press and
hold the Enter button.
• Next, the hour and “AM” will flash. Use the
Moon/Up button to scroll through the hours
and AM/PM. When you have made your
selection, press the Star/Right button.
• Use the Moon/Up button to scroll through
the minutes. When you are finished, press
the Enter button.
• The words “SELECT SFX” will scroll across
the screen, followed by “SFX: 1.”
• Use the Moon/Up button to scroll through
the eight sound effects. When you have
selected a sound effect, press the Enter
button.
• The words “ATTACH TO MESSAGE 1?
YES NO” will scroll across the screen. If
you’d like to attach your alarm to a message, follow the instructions in the “CREATING A NEW MESSAGE” section.
CHECKING THE ALARM
Sometimes, you may want to check an alarm
time, or turn an alarm on or off without going
through the entire setting sequence.
• Use the Star/Right button to scroll through
the icons and highlight the Alarm icon.
• Use the Moon/Up button to scroll through
the eight alarms. NOTE: If a message is
attached to an alarm, the Message icon will
appear on the screen.
• To turn the alarm on or off, press the Enter
button. Then, use the Moon/Up button to
toggle between on or off and press the
Enter button again.
• To change the time, press and hold the
Enter button until the hour flashes. Once
you have selected the hour, press the
Star/Right button to change the minutes.
When you reach the correct time, press the
Enter button.
• To select a SFX (sound effect), use the
Moon/Up button to toggle between sound
effects. Remember, you can press the
Star/Right button to hear the sound effect
again. Then press Enter.
• To attach a message, use the Star/Right button to select YES icon and press the Enter
button. If you need to create a message to
attach to the alarm, see CREATING A MESSAGE. If you do not want to attach a message, use the Star/Right button to select NO
icon and press the Enter button.
SLEEP MODE
Personology will automatically go to sleep
after one minute of non-activity. Press any
button to wake the game. You’ll need to enter
your pass code each time you wake the game
from sleep mode. Personology will have no
display in Sleep Mode if you have not completed the initial set up.
ENTERING YOUR PASS CODE
Personology will ask for your pass code each
time you wake the game from sleep mode.
• Press each symbol in the correct sequence.
As you enter each symbol, a small red light
will light up, accompanied by a sound effect.
• If you enter the correct pass code,
Personology will greet you. “WELCOME
BACK.”
• If you enter the incorrect pass code,
Personology will display “ACCESS DENIED.”
You’ll have a second chance to re-enter your
pass code.
HAPPY BIRTHDAY!
• Personology will send you a special birthday
greeting on your special day:
JAN 1 HAPPY BIRTHDAY FROM GIRL TECH
BATTERY INSTALLATION:
This game is powered by two (2) AAAbatteries.
• Using a screwdriver, loosen the screw until
the battery compartment door can be
removed.
• Insert two (2) AAA batteries (we recommend
alkaline) as indicated inside the battery compartment.
• Replace the battery compartment door and
tighten the screw with a screwdriver. Do not
over-tighten.
Adult supervision is recommended when
changing batteries.
CAUTION:
• As with all small batteries, the batteries used
with this game should be kept away from
small children who might still put things in
their mouths. If a battery is swallowed, consult a physician immediately.
• Be sure you insert the battery correctly and
always follow the game and battery manufacturer’s instructions.
• Do not dispose of batteries in fire, batteries
might leak if improperly installed, or explode
if recharged, disassembled or heated.
MAINTENANCE:
• Handle this game carefully.
• Store this game away from dusty or dirty
areas.
• Keep this game away from moisture or
temperature extremes.
• Do not disassemble this game. If a problem occurs, press the Reset button or
remove and replace the batteries to reset
the computer, or try new batteries. If problems persist, consult your warranty card for
replacement instructions.
• Only batteries of the same or equivalent
type as recommended are to be used.
• Do not mix old and new batteries.
• Do not mix alkaline, standard (carbon-zinc)
or rechargeable (nickel-cadmium) batteries.
• Do not use rechargeable batteries.
• Do not attempt to recharge non-rechargeable batteries.
• Remove any exhausted batteries from the
game.
• The supply terminals are not to be shortcircuited.
• Batteries are to be inserted with the correct
polarity.
Keep this package because it contains
important information.
This device complies with Part 15 of the
FCC Rules. Operation is subject to the following two conditions: (1) this device may
not cause harmful interference and (2) this
device must accept any interference
received, including interference that may
cause undesired operation.
WARNING: Changes or modifications to this
unit not expressly approved by the party
responsible for compliance could void the
user’s authority to operate the equipment.
NOTE: This equipment has been tested and
found to comply with the limits for a Class B
digital device, pursuant to Part 15 of the
FCC Rules. These limits are designed to
provide reasonable protection against harmful interference in a residential installation.
This equipment generates, uses and can
radiate radio frequency energy and if not
installed and used in accordance with the
instructions, may cause harmful interference
to radio communications. However, there is
no guarantee that interference will not occur
in a particular installation. If this equipment
does cause harmful interference to radio or
television reception, which can be determined by turning the equipment off and on,
the user is encouraged to try to correct the
interference by one or more of the following
measures:
• Reorient or relocate the receiving antenna.
• Increase the separation between the equipment and receiver.
• Connect the equipment into an outlet on a
circuit different from that to which the
receiver is connected.
• Consult the dealer or an experienced radio
TV technician for help.
RADICA:®
GIRL TECH®
PERSONOLOGY IS A TRADEMARK
OF RADICA GAMES LTD.
© 2000 RADICA GAMES LTD.
PRODUCT SHAPE™
ALL RIGHTS RESERVED
CUSTOMER SUPPORT LINE: 1-800-803-9611
www.girltech.com
 Loading...