

Page 1

Keep this USER’S MANUAL and SET-UP DISC for future
reference as they contain important information.
TABLE OF CONTENTS
1. BATTERY INSTALLATION
2. 3-POSITION MEMORY SWITCH
3. SETTING UP THE CONTROLLER
• WHAT YOU’LL NEED TO SET UP THE CONTROLLER
• METHOD 1 - PROGRAMMING THE UNIT USING THE
REMOTE LEARNING METHOD
• METHOD 2 - PROGRAMMING THE UNIT USING THE
MANUFACTURER CODES
• METHOD 3 - PROGRAMMING THE UNIT USING
MANUAL SEARCH
4. TESTING THE CONTROLLER
5. HOW TO PLAY
6. BUTTON FUNCTIONS
7. MANUFACTURERS CODES
2
3
4
4
6
7
8
9
10
11
8. CONSUMER INFORMATION
back cover
1
Page 2
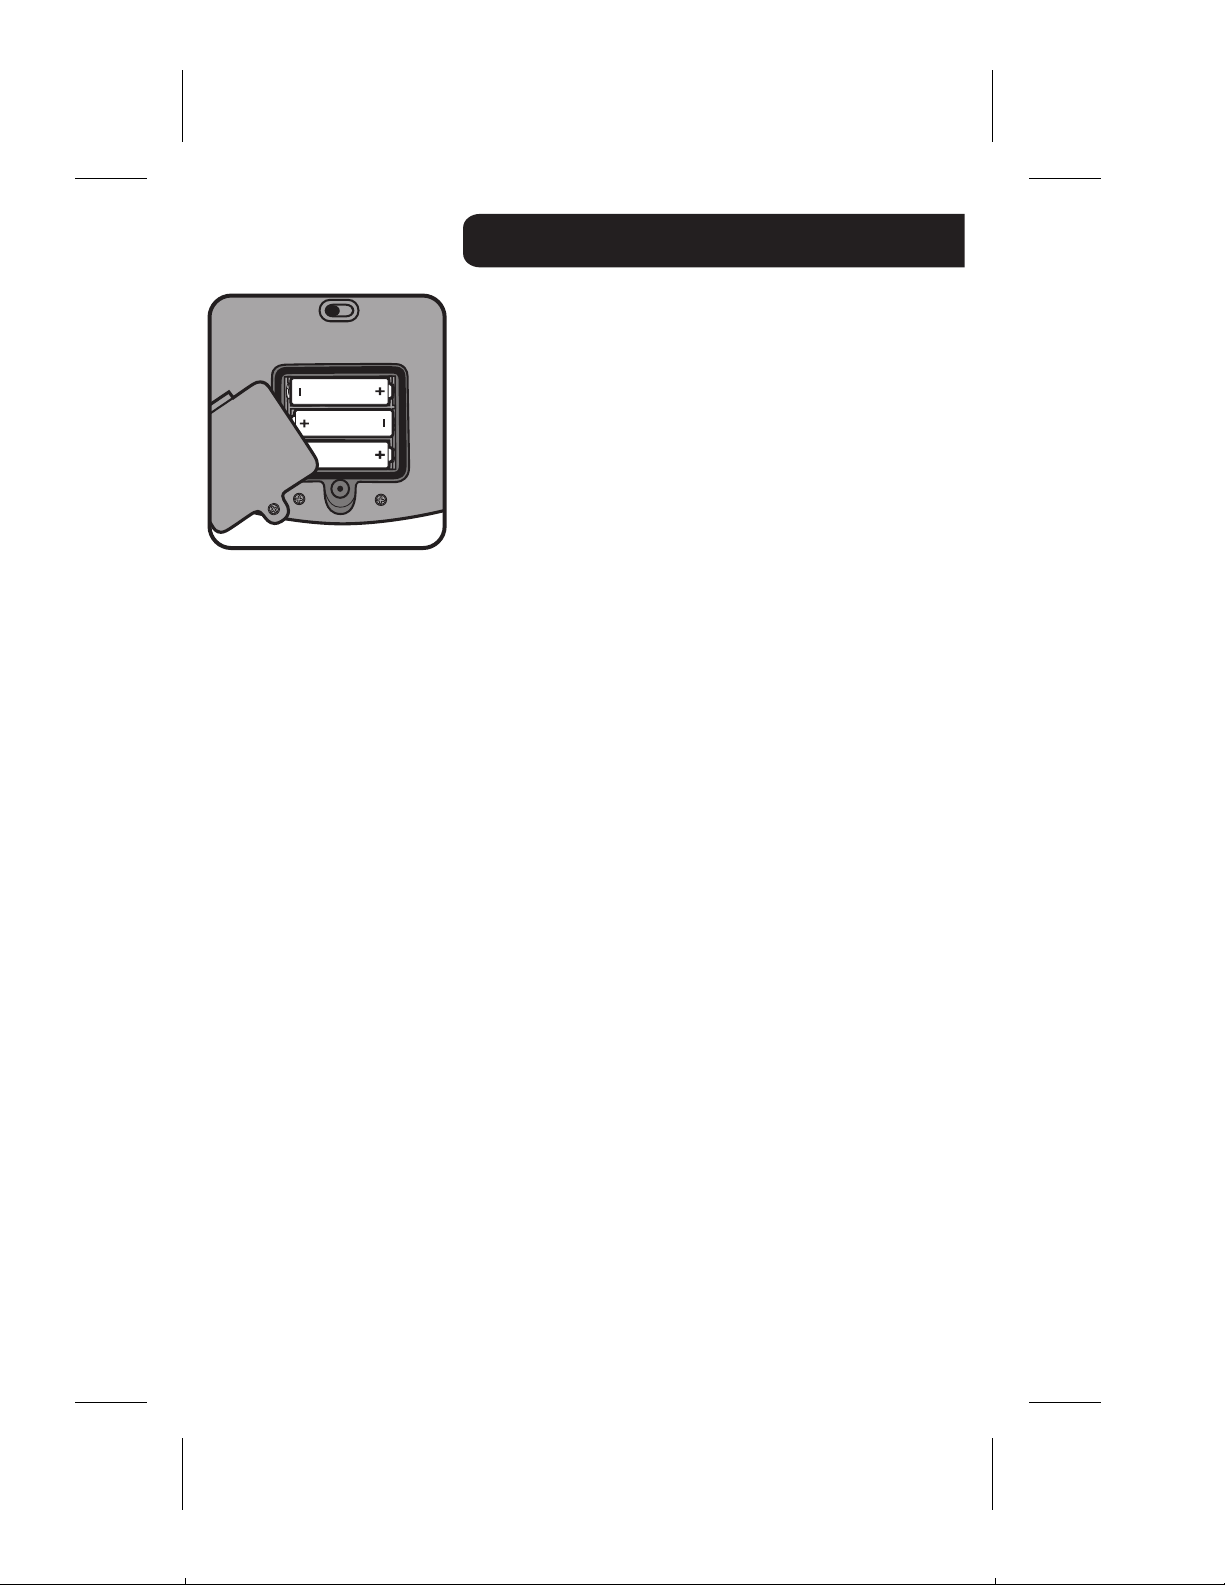
BATTERY INSTALLATION
• The battery compartment is located on the back of
the unit.
• Unscrew and lift the cover away from the battery
compartment.
• Insert 3 “AA” batteries as shown.
• For longest life and best performance use only
alkaline batteries.
• Replace the battery compartment cover.
BATTERY SAFETY INFORMATION
In exceptional circumstances batteries may leak fluids
that can cause a chemical burn injury or ruin your toy
(product). To avoid battery leakage;
• Non-rechargeable batteries are not to be recharged.
• Rechargeable batteries are to be removed from the
product before being charged (if designed to be
removable).
• Rechargeable batteries are only to be charged under
adult supervision (if designed to be removable).
• Do not mix alkaline, standard (carbon-zinc), or
rechargeable (nickel-cadmium) batteries.
• Do not mix old and new batteries.
• Only batteries of the same or equivalent type as
recommended are to be used.
• Batteries are to be inserted with the correct polarity.
• Exhausted batteries are to be removed from the
product.
• The supply terminals are not to be short-circuited.
• Dispose of battery(ies) safely.
• Do not dispose of this product in a fire. The batteries
inside may explode or leak.
NOTE:
• If your DVD player does not respond properly to the
controller, you may have to replace the batteries.
• After replacing the batteries, you do NOT have to
re-program the codes into your controller - the codes
you programmed will be automatically saved.
2
Page 3
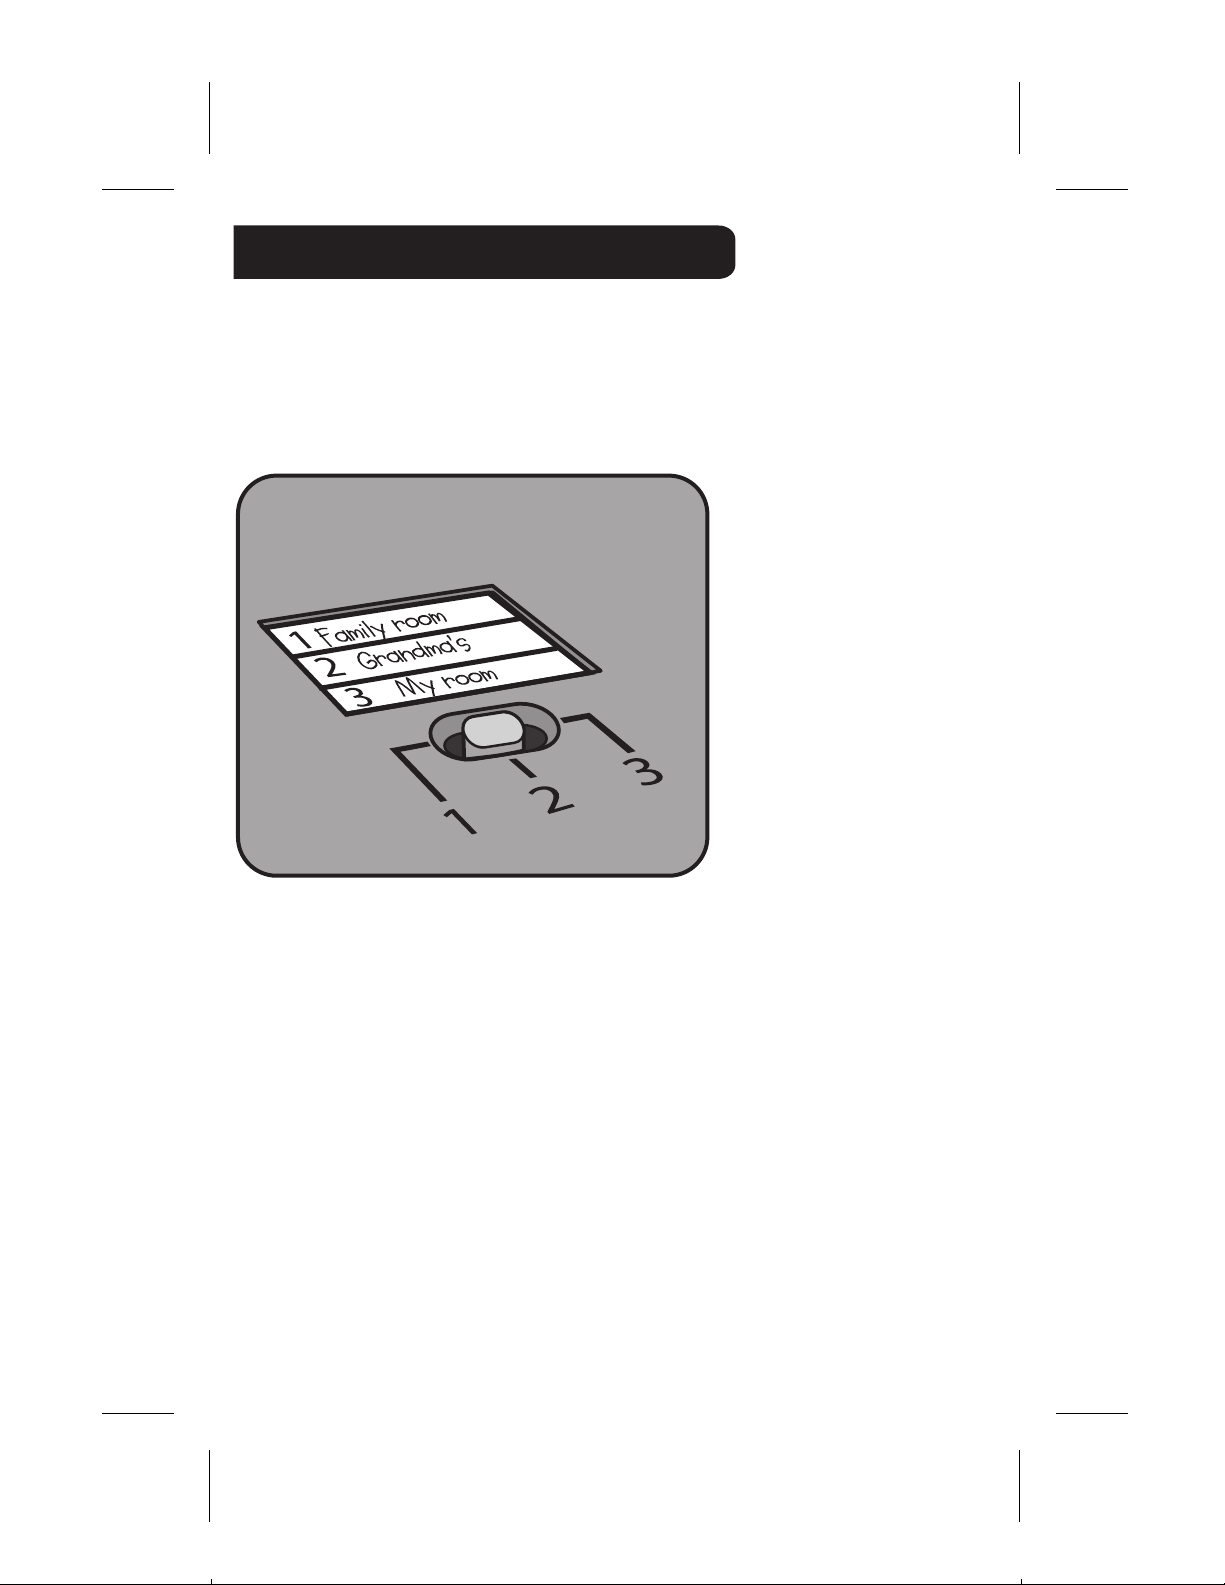
3-POSITION MEMORY SWITCH
Your Read With Me controller can be set-up to be played with
3 different DVD players. There is a 3-position memory switch and a blank
label located on the back of the unit to indicate which DVD player you want
to program.
Before programming the unit slide the switch to position 1, 2, or 3.
Don’t forget to mark the label for easy reference.
Remember - you must perform the following steps for each DVD player
you wish to use with the controller.
Now you are ready to program the controller.
There are 3 methods that can be used to set-up the controller for each
DVD player.
Begin with method 1.
3
Page 4
1
3
45
7
8
9
0
SEARCH
CODE
ENTRY
1
4
5
C
O
DE
EN
T
R
Y
ON
SET-UP
DISC
Read With Me
D
V
D
controller
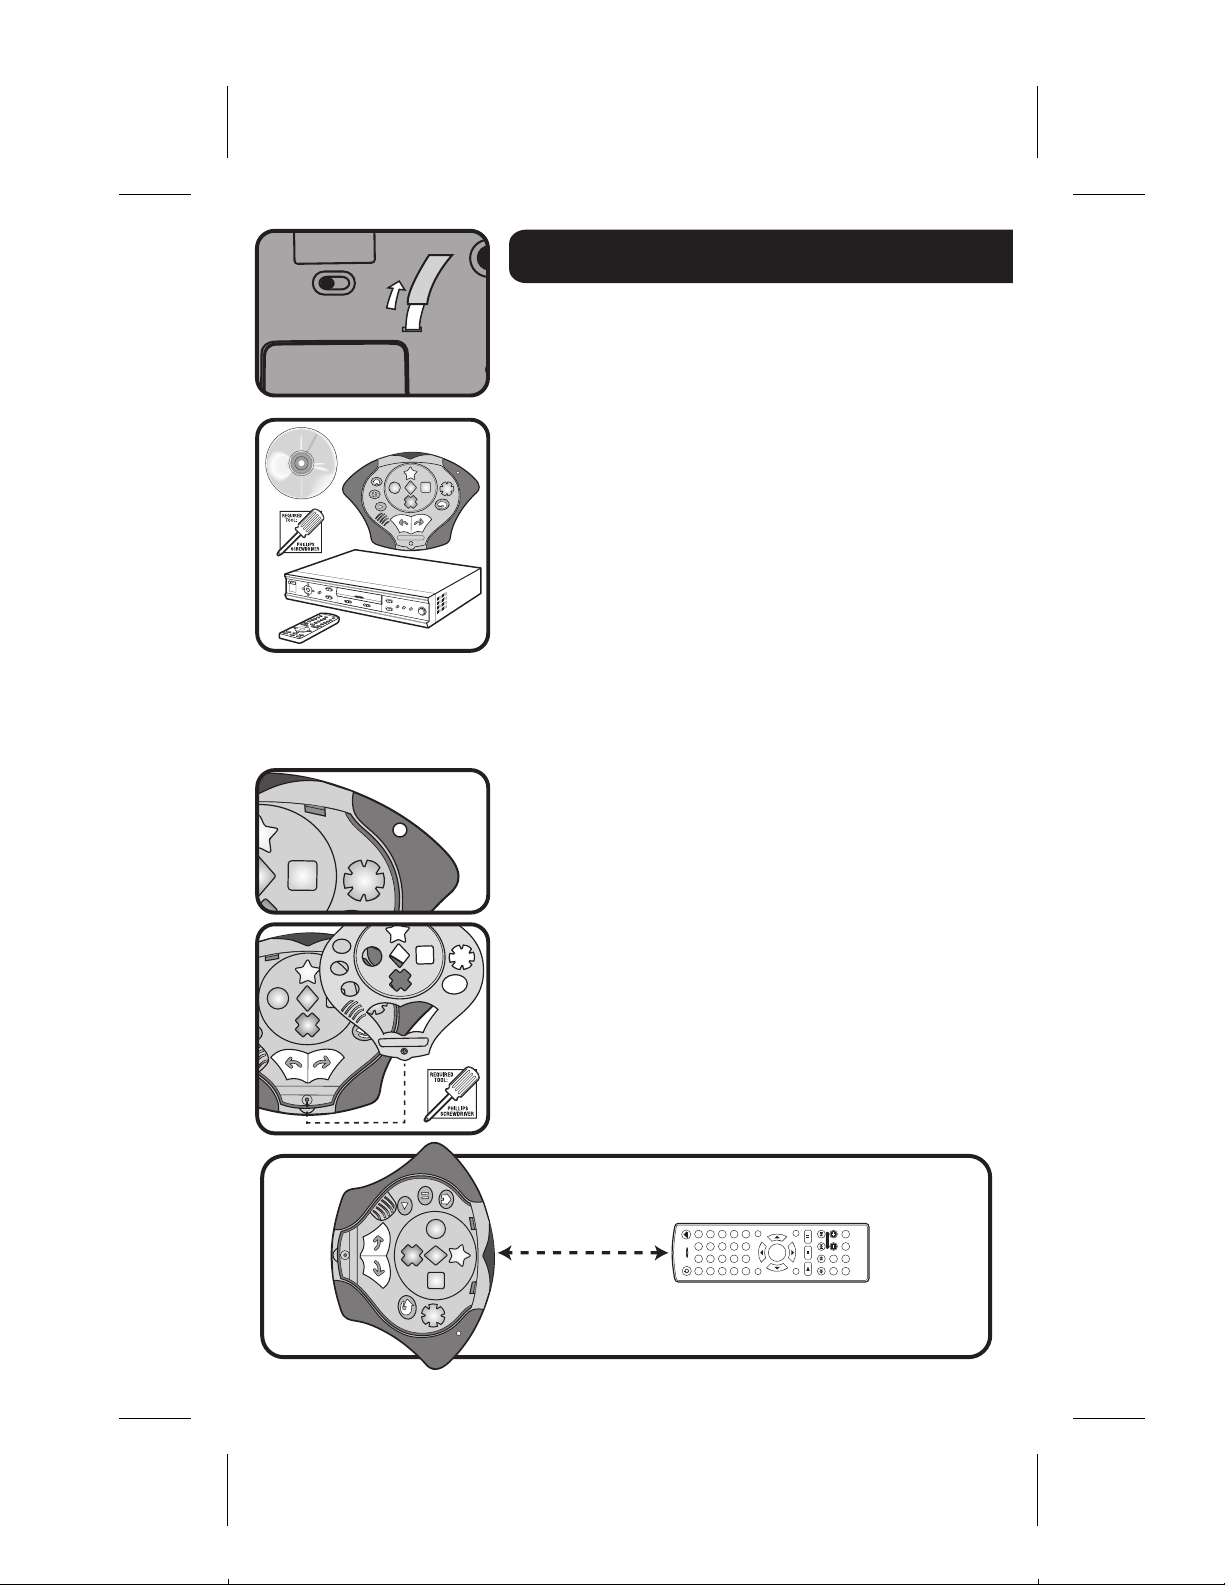
SETTING UP THE CONTROLLER
BEFORE YOU BEGIN: Make sure you have
removed the TRY ME pull-tab from the back
of the Read With Me controller.
WHAT YOU’LL NEED TO SET UP
THE CONTROLLER
To set up the Read With Me controller to work with
your DVD Player, you will need the following:
• A DVD player
• The Read With Me controller
• Your DVD Player’s remote control
• A small Phillips screwdriver
• The Read With Me SET-UP DISC.
METHOD 1 - PROGRAMMING THE UNIT
USING THE REMOTE LEARNING METHOD
This method is the same method of
programming that was described on your
SET-UP DISC and on the QUICK SET-UP
INSTRUCTIONS.
1. Make sure your DVD player is turned off while
programming your Read With Me controller.
2. Press the “ON” button found on the front of your
Read With Me controller.
3. Remove the cover of your Read With Me controller
using a Phillips screwdriver.
4. Place the Read With Me controller on a flat surface
facing your DVD Player’s remote.
Your controller and your DVD player’s remote
should always be pointed directly at each other on
a flat surface approximately 3 inches apart. Always
be sure your hand is not covering the red window
on the front of the controller.
6
2
8
S
E
ARCH
0
3
4
1
7
5
9
C
E
N
O
TR
D
E
Y
3 inches
OPEN/CLOSE
POWER
VIDEO
DVD
MUTE
AUDIO
123456780
SUBTITLE
9
4
VIDEO
OSD
ANGLE
VIEW
OUTPUT
VOLUME
ENTER
+10
RETURN SEARCH TITLE
PLAY STOP PAUSE/STEP
FR FF PREV NEXT
A-B REPEAT
SLOW ZOOM PROGRAM N/P
SET UP
MENU/PBC CLEAR
Page 5
5. Follow the step-by-step audio instructions from
the Read With Me controller, pressing the buttons
on your DVD player’s remote when prompted by
the voice from the controller. It is necessary that
you wait until the audio prompt from the controller
is finished and the green light becomes lit before
you begin pressing the appropriate button on
your DVD player’s remote.
When pressing the buttons on your DVD player’s
remote, make sure you press each button firmly,
and hold until the green light goes off on the
controller.
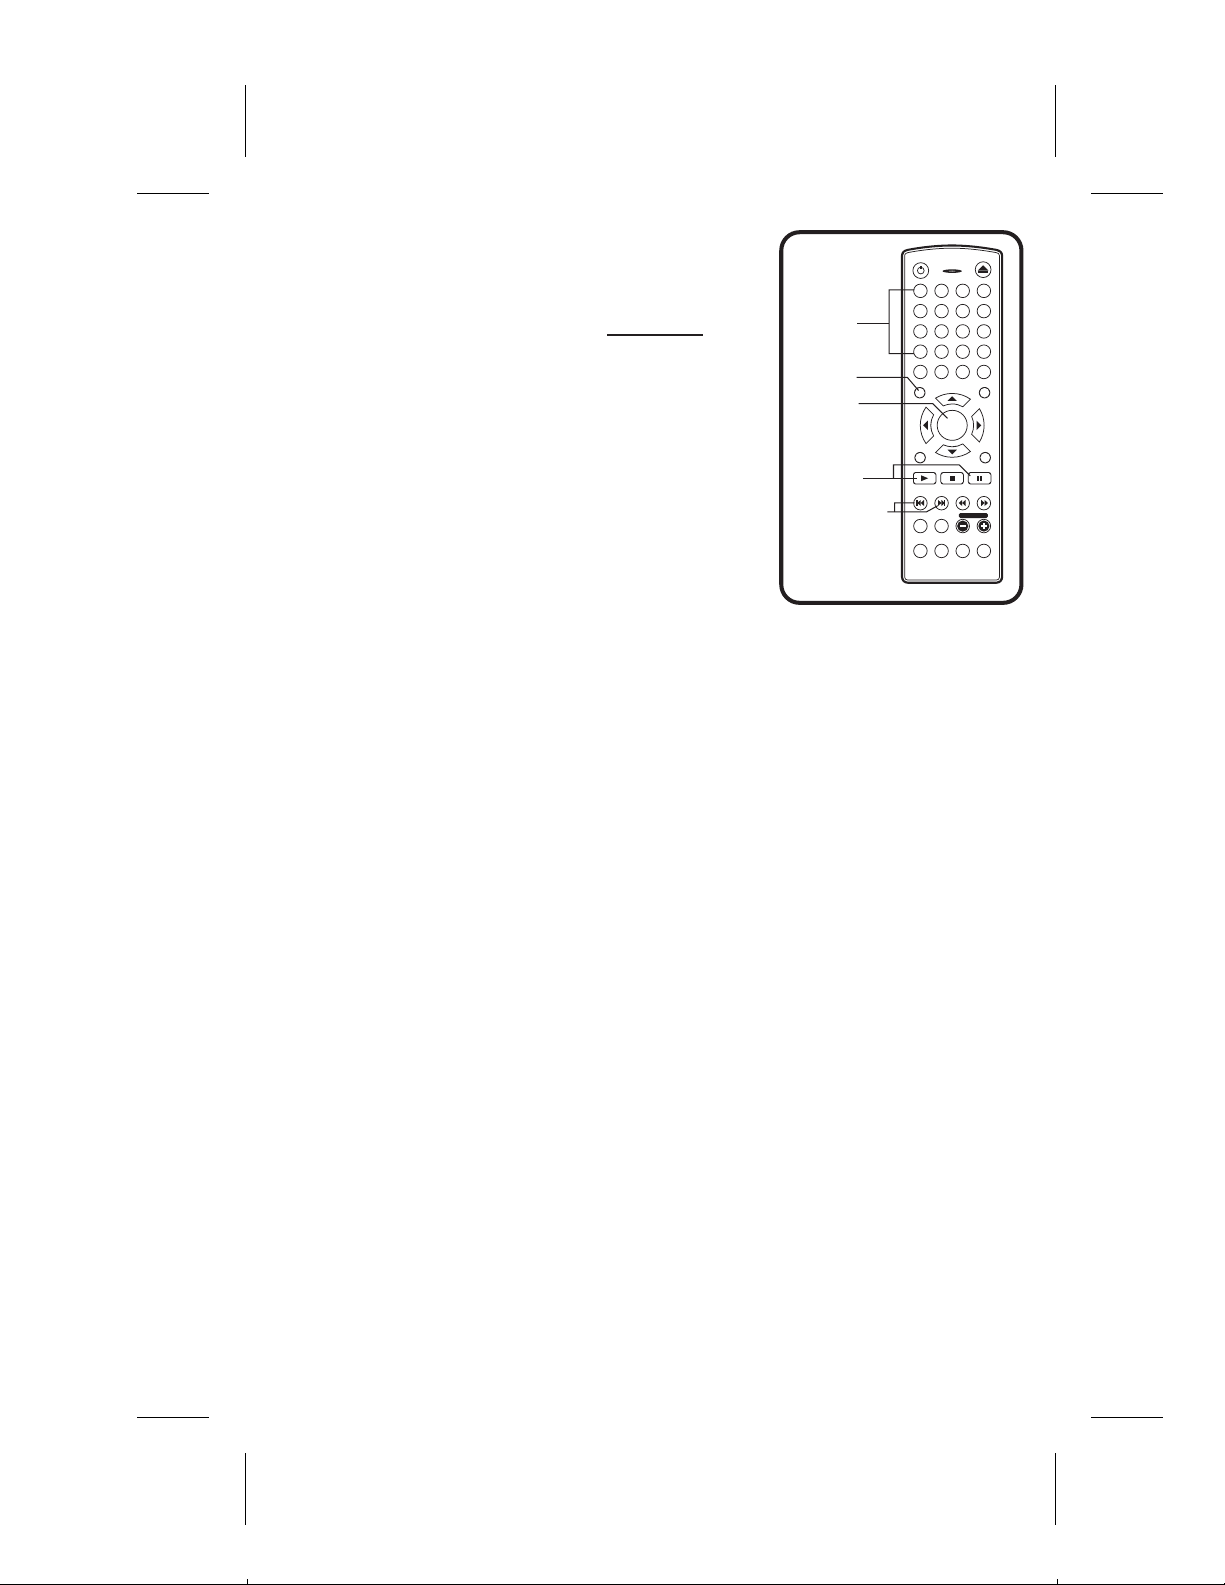
If you hit the wrong button on your DVD player’s
Number
buttons
Menu
button
Enter
button
Play and
Pause
buttons
Previous and
Next buttons
(also called
Skip Forward and
Skip Back buttons)
OPEN/CLOSE
POWER
DVD
VIDEO
1
23
4
56
7
9
8
VIEW
+10
0
RETURN SEARCH TITLE
MENU/PBC CLEAR
ENTER
SET UP
PLAY STOP PAUSE/STEP
FR FFPREV NEXT
VOLUME
A-B REPEAT
SLOW ZOOM PROGRAM N/P
SUBTITLE
MUTE
AUDIO
ANGLE
OSD
VIDEO
OUTPUT
remote during the SET-UP procedure, simply
begin the SET-UP procedure again by placing
the cover back on the controller briefly and taking
it off again. This resets the controller back to the
beginning of programming mode. Try the
REMOTE LEARNING METHOD again starting from step 3.
NOTE:
• During the SET-UP procedure, if no buttons are pressed for a period of time,
the Read With Me controller will automatically shut-off to preserve battery life
and you will have to begin the SET-UP procedure again. Replace the cover,
press the "ON" button on the controller, and then remove the cover. This will
re-start the SET-UP procedure.
• The Previous and Next buttons, also called Skip Forward and Skip Back
buttons, are the double arrow buttons pointing to a line.
• DVD remote controls can vary. On some remotes, both the PLAY and PAUSE
functions are dedicated to one button. If your DVD player’s remote uses the
same button for both PLAY and PAUSE, simply press this same button at both
prompts during the SET-UP procedure.
• If your DVD player’s remote control does not have all of these buttons, refer to
the two alternate methods for programming your Read With Me controller.
6. Once you’ve entered all the buttons as instructed, screw the cover back on
your controller and test that the controller is programmed properly by
proceeding to the TESTING YOUR CONTROLLER section of this manual.
5
Page 6

METHOD 2 - PROGRAMMING THE UNIT
5
CODE
ENT
RY
USING THE MANUFACTURER CODES
1. Press the “ON” button found on the front of your
Read With Me controller.
2. Remove the cover of your Read With Me
controller using a Phillips screwdriver.
3. When you hear the controller begin the audio
prompt, press and hold the Asterisk “*” button for
2 seconds.
The controller will switch to Manual Programming
Mode. The following audio prompt will play: “You
are now in Manual Programming Mode.”
4. Look up the manufacturer’s code for your DVD
player in the back of this USER’S MANUAL.
If there are multiple codes for a particular
manufacturer, start with the first code.
5. Enter the first code number using the numbers
indicated next to each button.
6. After the 4th digit is pressed, the Green LED light
will display a long blink.
7. Screw the cover back on your controller and test
that the controller is programmed properly by
proceeding to the TESTING YOUR
CONTROLLER section of this manual.
8. If all the shapes and buttons do NOT light up on
your TV screen properly during the TEST, begin
the SET-UP procedure again from STEP 1 of this
method using the next code number listed for your
manufacturer.
9. If you have tried all the codes for your
manufacturer and the unit still does not function
with the DVD player, try programming the unit
using the next method.
6
Page 7

METHOD 3 - PROGRAMMING THE UNIT
PAGE BACK
BUTTON
USING MANUAL SEARCH
1. Turn off the power to your DVD player.
2. Press the “ON” button found on the front of your
Read With Me controller.
3. Remove the cover of your Read With Me controller
using a Phillips screwdriver.
4. When you hear the controller begin the audio
prompt, press and hold the asterisk (“*”) button for
2 seconds. When you hear the controller say “You
are now in Manual Programming Mode”, point the
controller directly at the DVD player and begin
pressing the Page Back button. The green LED will
blink a short blink each time the Page Back button
is pressed. As you press the Page Back button,
your controller will search through all its codes to
find a proper code for your DVD player.
5. Continue pressing the Page Back button SLOWLY
until the power to your DVD player turns ON.
When the power goes on, the controller has found
a code that should work. Stop pressing the Page Back button and replace
the cover.
NOTE: THIS STEP MAY TAKE SEVERAL MINUTES - PLEASE BE PATIENT.
6. Test that the controller is properly programmed by proceeding to the
TESTING YOUR CONTROLLER section of this manual.
7. If all the shapes and buttons do NOT light up on your TV screen properly
during the TEST, begin the MANUAL SEARCH procedure again from
STEP 1.
8. If you have tried all the DVD codes, the Green LED button will stop blinking.
To start over, replace the cover and then take it of again. This resets the
controller back to the beginning of programming mode. Try the MANUAL
SEARCH method again starting from STEP 3.
IMPORTANT
If you continue to experience trouble programming your Read With Me
controller, DO NOT RETURN THE PRODUCT TO THE STORE.
We’re just a phone call away. Call our consumer affairs hotline toll free at
1-888-892-6123 or visit us online at www.fisher-price.com/us/readwithme
7
Page 8

TESTING YOUR CONTROLLER
1. Turn your DVD player back on and insert the
SET-UP DISC.
2. Select “Test your controller” from the main menu.
3. Follow the “Test your controller” instructions to
make sure your Read With Me controller has been
ON
set up correctly.
4. If all the shapes and buttons light up on your TV
screen properly during the TEST, then your
controller is now set up for this DVD player. Insert
any Read With Me DVD to start playing.
5. If all the shapes and buttons do NOT light up on
your TV screen properly during the TEST, refer to
one of the other two methods for setting up your
Read With Me controller.
NOTE:
• During the TEST procedure, if no buttons are
pressed for a period of time, the Read With Me
controller will automatically shut-off to preserve
battery life. To resume the TEST procedure, press
the "ON" button on the controller.
• During the TEST procedure and when you are
playing Read With Me DVD, your controller should
always be pointed directly at your DVD player.
• During the TEST procedure and when you are
playing Read with Me DVD, make sure there are no
objects between your controller and your DVD
player.
• During the TEST procedure, always make sure you
press each letter or arrow button on your controller
one at a time, and then wait a moment for the
corresponding letter or arrow button to light up on
your TV screen.
8
Page 9

HOW TO PLAY
Insert any Read With ME DVD into your DVD player. Press the “ON” button
found on the front of your Read With Me controller. From the main menu,
choose one of the following 5 options using your Read With Me controller.
1. READ & PLAY
• Read the animated story and play in the book pages.
2. STORY GAMES
• Fun games that reinforce learning
3. READ TO ME
• The entire story is read to the child without interruption.
4. MY TURN TO READ
• Encourages the child to read the story on their own and at their own pace,
without any narration.
5. PARENT GUIDE
• Ideas and information for grown-ups.
NOTE:
• During PLAY, if no buttons are pressed for a period of time, the Read With
Me controller will automatically shut-off to preserve battery life. To resume
PLAY, press the "ON" button on the controller.
9
Page 10

BUTTON FUNCTIONS
ON
Turns your Read With Me controller on.
PLAY
Begins the story.
PAUSE
Pauses the story.
MENU
Returns the reader to the main menu screen.
PAGE FORWARD
Advances the reader to the beginning of the next
page.
PAGE BACK
Returns the reader to the previous page.
REPEAT
Replays the current page, game interaction, or
question.
ACTIVITY BUTTON
Begins the next game interaction or question.
ANSWER BUTTONS
Inputs the answers to the questions during play.
ANSWER
BUTTONS
MENU
PAU SE
PLAY
PAG E
BACK
10
ACTIVITY
BUTTON
ON
BUTTON
ON
REPEAT
PAG E
FORWARD
Page 11

MODEL MANUFACTURER CODE
3DLab ALL MODELS 0463
Acoustic Solutions ALL MODELS 1113
Advent dvd8200 1173
Advent ALL MODELS 1053,'1173,1179
AEG ALL MODELS 1114,1069,1134
Afreey ALL MODELS 1130
Aim ALL MODELS 1029
Aiwa portable 0465
Aiwa XDDV370 0465
Aiwa XDDW1 0465
Aiwa ALL MODELS 0465,0456, 1022,1063,1064,0921
Aiwa AVD57 0921
Aiwa XDAX1 1022
Akai DVPS760 0884
Akai DVM9500 1136
Akai ALL MODELS 1152,0884,0878,1139, 1051,1124,1114,1136, '1174
Akai DVDP5851 1174
Akira ALL MODELS 1129,1029
Alba 0456,1129,0460,1132, 1124,1045,1044
Albatros ALL MODELS 1111, 1110 ,10 67
Alco ALL MODELS 0878*
Allegero ABV341 1136
Allergo ALL MODELS 1081,0475*, 1136
Alpine ALL MODELS 1098
Amitech ALL MODELS 1069,1134, 1056
Amoisonic ALL MODELS 1152
Amstrand ALL MODELS 1124
AMW T352 1140
AMW ALL MODELS 1140,1141
Anaba ALL MODELS 1143
Anam ALL MODELS 0894,0201
Anim ALL MODELS 0201
Apex AD1225 1006
Apex ADV3800 1006
Apex GT2015DV 1009
Apex GT2715DV 1009
Apex HA7000 1031
Apex MD100 1059
Apex PD450 1060
Apex PD650 1060
Apex AD1100W 1067
Apex AD1201 1067
Apex PD100 1075
Apex AD1010W 0437
Apex AD1110W 0437
Apex AD1200 0437
Apex AD1500 0437
Apex AD1600 0437
Apex AD1700M 0437
Apex AD500 0437
Apex ADR1000 0437
Apex AD1000 0437
Apex AD3201 0437
Apex AD500 0437
Apex AD5131 0437
Apex AD660 0455
Apex AD700 0455
Apex ALL MODELS 0455,1132,0460,0437, 0921,0461,0485,1067,
Apex AD2100 0460
Apex AD2600 1006
Apex HT150 1006
Apex AD2500 1030
1068,1069,1070*,1073*,1156,1157,1158,1030,
1031, 1010,1009,1006,1089, 1059
11
Page 12

MODEL MANUFACTURER CODE
Apex AD2100 1030
Apex AD2500 1030
Apex PD10 1075
Apex PD50 1075
Apex portable 1075,1059,1060
Apex AD800A 1132
Apex DRX9000 1156
Apex AD800 1157
Apex GT2025DV 1158
Apex AT2014DV 1159
Arena ALL MODELS 1139
Aria ALL MODELS 1145
Arianet ALL MODELS 1145
Ariston Acoustics ALL MODELS 1035,1034
Aspire Digital AD1100 1171
Aspire Digital ALL MODELS 1171
A-Trend ALL MODELS 1130
Audiosonic ALL MODELS 1152
Audiovox DVD1210 1042
Audiovox D2010 1115
Audiovox D1800 0437
Audiovox ALL MODELS 0878,0437, 1115
Audiovox ME20 1042
Audiovox PE702 1042
Audiovox VBP4000 1042
Audiovox D1501 1062
Audiovox VBP5000 1062
Audiovox VOD806 1062
Audiovox portable 1062,1042,1046,0437,1132
Audiovox D1530 1132
Audiovox D1730 1132
Audiovox D1830 1132
Audiovox PE701 1132
Auvio ALL MODELS 1036,1037
AWA ALL MODELS 1113
Baier ALL MODELS 0986
Black Dimand ALL MODELS 1124
Blaupunkt ALL MODELS 1132,0460,0658*
Blue Parade ALL MODELS 0453
Blue Sky ALL MODELS 0457,0437,0456,1129, 1024,1037
Boman ALL MODELS 0881
Bose Bose321 0489
Bose ALL MODELS 0489
Brain Wave ALL MODELS 1069,1134
Brandt ALL MODELS 1120,0457
Brooksonic ALL MODELS 0925*,0456
Bush ALL MODELS 1152,0456,1129,0460,1132,1029, 1045,1124,1123
California Audio ALL MODELS 0445
Cambridge SoundWorks 1143
Cambridge ALL MODELS 1143, 1046,1121
Cary ALL MODELS 0459
CAT ALL MODELS 1129,0448, 1055,1054,1053
Celestial ALL MODELS 1006, 0437
Centrex ALL MODELS 0437, 1030
Centrios EDW8020 1167
Centrios ALL MODELS 1167
Centrum ALL MODELS 0448, 1124
CGE ALL MODELS 1044
cineULTRA ALL MODELS 1129
CineVision ALL MODELS 1081, 1024
Classic PV7000 1047
Classic portable 1047,1141
Classic ALL MODELS 1113
Claton ALL MODELS 1124
12
Page 13

MODEL MANUFACTURER CODE
Clatronic ALL MODELS 1114
Coby DVD707 1021
Coby DVD7500 1115
Coby portable 1021,1115
Coby ALL MODELS 1029, 1113,1115
Concept ALL MODELS 0460,0877
Conia ALL MODELS 1152,0437,1139, 1109
Continental Edison ALL MODELS 1141
Crown ALL MODELS 1152,1069,1134,0457
C-Tech ALL MODELS 0484
Cybercom ALL MODELS 1005
Cyberhome CHDVD500 1172
Cyberhome CHDVD300 1130
CyberHome ALL MODELS 1130, 1172
Cytron ALL MODELS 0884, 0457
Daewoo DVG4000S 1061
Daewoo DV6T834B 1106
Daewoo DVG5200S 1154
Daewoo DVG9000N 1061
Daewoo DVG3000D 1069
Daewoo ALL MODELS 1130,1141,0884,1106*,1129,1130,1069,1134, 1029,
Dalton ALL MODELS 1055
Dansai ALL MODELS 1069,1134,0881
Dantax ALL MODELS 1045
Dargon ALL MODELS 1005
Dawoo portable 1061
Daytek ALL MODELS 1141
Dayton ALL MODELS 1141
DEC ALL MODELS 1129,1029
Decca ALL MODELS 1069,1134
Denon portable 0886
Denon DVD1500KE3 0886
Denon DVD1000 0886
Denon DVD2800 0886
Denon 0886
Denon ALL MODELS 0886,0477,0472,0478,0439,0869,0481,0482,0444,
Denver ALL MODELS 1129,1029, 1114
Denzel ALL MODELS 1141
Desay DS501 1163
Desay ALL MODELS 1102, '1163
Diamond ALL MODELS 1029,0457,0484, 1045,1046
Digihome ALL MODELS 1124
digiRED ALL MODELS 1132,0460
Digital I ALL MODELS 1145
Digitor ALL MODELS 1069
Digitrex ALL MODELS 1067,0437
DIK ALL MODELS 1005
Dinamic ALL MODELS 1114
Disney DVD2000C 0487
Disney ALL MODELS 0487
DiViDo ALL MODELS 0884
DK ALL MODELS 1005
DMTECH ALL MODELS 0881,0878
Dual ALL MODELS 0457,1141,0881,0878, 1124,1113
Duraband ALL MODELS 0448
DVD2000 ALL MODELS 0470, 1033
DVX ALL MODELS 1041
E-Boda ALL MODELS 1045
Eclips ALL MODELS 1045
Electrohome ALL MODELS 1069,1134
Elin ALL MODELS 1069,1134
Ellion ALL MODELS 1056
1061,1154
0884,0452
13
Page 14

MODEL MANUFACTURER CODE
Elta ALL MODELS 1152,1069,1134,0878, 1114
Emerson 0487
Emerson Ewd7002 0487
Emerson EWD2004 0487
Emerson EWD2204 0487
Emerson DVD2000 1136
Emerson ALL MODELS 1151,1136,0884,0487*, 1097, '1168
Encore ALL MODELS 1130
Enterprise ALL MODELS 1136,1097
Enzer ALL MODELS 1141,0438
esa DP3220 1004
esa E4000 1106
esa ALL MODELS 1004,1106
Escent dvdm100 0451
Escent ALL MODELS 0451
Farenheit portable 1038
Farenheit ALL MODELS 1144, 1038
Ferguson ALL MODELS 0457
Finlux ALL MODELS 1136,1069,1134,0881
Firstline ALL MODELS 1136,0484, 0457
Fisher DVDS1100 0436
Fisher DVDS1500 0436
Fisher DVDS2000 0436
Fisher DVDS1000 0436
Fisher ALL MODELS 1137,0445,1154,0436
Funai ALL MODELS 1074,0456
Funi ALL MODELS 1019
GE GE1401p 0450
GE ALL MODELS 0450,0460,1132,0441, 1108
GE 0460/1132
Genica ALL MODELS 1102
Giec GX3500 1178
Giec ALL MODELS 1178
Global Solutions ALL MODELS 0484
Global Sphere ALL MODELS 0484
Goldstar ALL MODELS 1136,0475
Goodmans ALL MODELS 1152,0881,0878, 1030,0457,1045
GoVideo portable 1008,0460,1113
GoVideo ALL MODELS 1128,0881,1107,0446,0466, 460,1076,1106
Go-Video DP7030 1008
Go-Video DV2150 1106
Go-Video DVR4300 1107
Go-Video DVR5000 107
Go-Video GVP5850 0460/1131
GPX DV1010 1005
GPX portable 1005
GPX ALL MODELS 1129, 1005
Gradiente ALL MODELS 0457
Graetz ALL MODELS 1141
Greenhill ALL MODELS 1132,0878,0460
Grundig ALL MODELS 0457,0436,0456,0438,0884,0878,
Grunkel ALL MODELS 1069,1134
H&B ALL MODELS 1124
Haaz ALL MODELS 0484
Hanseatic ALL MODELS 1136
Harmon Kardon DVD 25 1088
Harmon Kardon DVD5RC 0468
Harmon Kardon DVD22 0468
Harmon Kardon ALL MODELS 0468, 1028,1025,1088
HDT ALL MODELS 0884
He ALL MODELS 1113
HenB ALL MODELS 1124
Himage ALL MODELS 1041,1040
1045,0463,112 4, 1112
14
Page 15

MODEL MANUFACTURER CODE
Himax ALL MODELS 1037
Hitachi DVP505 0447
Hitachi DVP315 0447
Hitachi DVP533u 0447
Hitachi DVP743u 0447
Hitachi ALL MODELS 1141,0447,0464, 1072
Hitech D2108 0437
Hitech D2004 0437
Hitech ALL MODELS 0437
Hiteker ALL MODELS 0437, 1031
HMC ALL MODELS 1114
Home Electronics ALL MODELS 1113
Hypson ALL MODELS 1035
Hyundai ALL MODELS 0881, 1058,1057,1056
i2dvd ALL MODELS 1122
Ingelen ALL MODELS 1114
initial portable 0460,1132
Initial RC1700 1132
Initial CDS160 1132
Initial ALL MODELS 0460
Integra ALL MODELS 0488
IRT ALL MODELS 0881
ISP ALL MODELS 0456
Jaton ALL MODELS 1141
JBL ALL MODELS 0468,0022*, 1028
Jeken ALL MODELS 1129,1029
Jensen ALL MODELS 1053
Jindian ALL MODELS 0484
JMB ALL MODELS 0456
JNL ALL MODELS 1103
JVC HRXVC1U 1150
JVC HRXVC25U 1150
JVC HRXVC27 1150
JVC MXJ70 0485
JVC XV421BK 0485
JVC XV521BK 0485
JVC XVM555BK 0485
JVC XVM567GD 0485
JVC XVN30BK 0485
JVC XVN33SL 0485
JVC XVN3SL 0485
JVC XVN50BK 0485
JVC XVN55SL 0485
JVC XVS300BK 0485
JVC XVS302SL 0485
JVC XVS402SL 0485
JVC XVS500BK 0485
JVC XVS502SL 0485
JVC XVS550SL 0485
JVC XVS62SL 0485
JVC XVS65SL 0485
JVC XVSA70BK 0485
JVC XVS30BK 0485
JVC XVS40BK 0485
JVC XVS45BK 0485
JVC XVS200 0485
JVC XVSA602SL 0485
JVC XVN310 0485
JVC XVNP10SL 0485
JVC HRXVC25U 1144
JVC ALL MODELS 1144,0461,0485,0451,1133,1150, 0463, '1185
JVC HRXVC26U 1185
Jwin ALL MODELS 1138
Karcher ALL MODELS 0881
15
Page 16

MODEL MANUFACTURER CODE
Kawasaki SVP500 0878
Kawasaki ALL MODELS 0878
Kendo ALL MODELS 1129
Kenwood DV5700 1180
Kenwood ALL MODELS 0452,0480, 0482,1122, '1180
Kenwood DVF3080 1122
Kiiro ALL MODELS 1069,1134
King DHome ALL MODELS 0484
Kiss ALL MODELS 1141
KLH ALL MODELS 1132,0448,0878*,0460, 1013
Konka ALL MODELS 1099,1116,1117
Koss DVP2161 1176
Koss KD270 0457
Koss KD210 0457
Koss KS4110 0457
Koss KS4127 0457
KOSS ALL MODELS 0457*, 1003, '1176
Koss portable 1003
Koss KD305A 1003
Koss DVD3116 1003
Krell ALL MODELS 1095
Kyocera ALL MODELS 0869,0481,0482,0439
Lasonic DVD8092 0484
Lasonic ALL MODELS 0484
Lawson ALL MODELS 0884,0484
Lecson ALL MODELS 1121
Legacy portable 1039
Legacy LDVD35 1039
Lenco ALL MODELS 1129,1069,1134,1029, 0457
Lenoxx ALL MODELS 1152,0448
Lexia ALL MODELS 1129
Lexicon ALL MODELS 1093,1094
Lg ALL MODELS 1081*,1136,1097,0475
Lifetec ALL MODELS 0457
Light On DVDRHD04 1175
Light On LWV5101 1181
Light On ALL MODELS 1175,1181
Limit ALL MODELS 0484
Loewe ALL MODELS 0463
LogicLab ALL MODELS 0484
Logix ALL MODELS 0884,0881
Lumatron ALL MODELS 0884
Luxman ALL MODELS 0464
Luxor ALL MODELS 1030
LXI ALL MODELS 0553*
Magnavox 27MDTR20/17 1074
Magnavox MDV422 1086
Magnavox 27MDTR10S 1153
Magnavox DVD611 0463
Magnavox MDV530 1023
Magnavox ALL MODELS 1153,1074,0477,0472,0478,0870,0463,0451,
Magnavox PLDVD01 0463, 1023
Magnavox MDV410SL 1023
Magnex ALL MODELS 1045
Manhattan ALL MODELS 0884
Marantz ALL MODELS 0463, 1080,1087
Marantz portable 1086,1087
Mark ALL MODELS 1124,1049,0451
Matsui ALL MODELS 0456, 0457
MBO ALL MODELS 1152,1113
MDS ALL MODELS 1129,1029
Mediencom ALL MODELS 1101
Medion ALL MODELS 0881, 1005,0457
0487,0435,1023,1086,1145
16
Page 17

MODEL MANUFACTURER CODE
Memorex MVD2027 1005
Memorex MVD2256 0456
Memorex ALL MODELS 0456,0487, 1005,1124
Memorex DVD2000 0487
Meridian ALL MODELS 1092
Metz ALL MODELS 0453
Mico ALL MODELS 1045,1046
Micromaxx ALL MODELS 0456
Micromedia ALL MODELS 0451, 0463
Micromega ALL MODELS 0463
Microsoft ALL MODELS 0450
Microstar ALL MODELS 1005
Minato ALL MODELS 0986
Minax ALL MODELS 1124
Minoka ALL MODELS 1069,1134
Mintek RC-320H 0460,1132
MinTek ALL MODELS 1132,0460,0469
Mitsubishi DD4020 0470
Mitsubishi DD4030 0470
Mitsubishi DD6030 0470
Mitsubishi DD6040 0470
Mitsubishi ALL MODELS 0477,0472,0478,0470, 1124
Monyka ALL MODELS 1141
MP ALL MODELS 1037
MPX ALL MODELS 1037
Mustek portable 1113
Mustek ALL MODELS 1113
Mx Onda ALL MODELS 1045,1046,0457
Myryad ALL MODELS 0466, 1091
NAD ALL MODELS 1135,1136,0477,0472,0478,0894
Naiko ALL MODELS 1069,1134
Nakamichi ALL MODELS 1090
NEC ALL MODELS 1135,1136,0894
Nesa ALL MODELS 1132,0460
Neufunk ALL MODELS 1141
NextBase ALL MODELS 1058
NexxTech DP3222 1162
NexxTech EDP3110 1162
Nexxtech ALL MODELS 1162
Nickelodeon SB325 1005
Nickelodeon ALL MODELS 1005
Nintaus ALL MODELS 1142
Norcent ALL MODELS 1131,0448, 1141,1047, '1161
Norcent DP312 1161
Norcent DP315 1161
Nordmende ALL MODELS 1005
Noriko ALL MODELS 0986
Okano ALL MODELS 0986
Omni ALL MODELS 1130,1129,1029, 1152
Onix ALL MODELS 1051
Onkyo ALL MODELS 0488,0032*,0451,0553, 1002
Optimus ALL MODELS 0453,0474, 0458
Optiview ALL MODELS 1143
Orion ALL MODELS 0456, 1124
Oritron DVD100 0457
Oritron DVD3116 0457
Oritron DVD4119 0457
Oritron ALL MODELS 1067,0457
Pacific ALL MODELS 0484,0878, 1005,1124
Palladium ALL MODELS 0456
Palsonic ALL MODELS 1152,1139,0437, 1123
Panasonic PV-DM2791 1083
Panasonic PVD4742 1084
Panasonic PVD47545 1177
17
Page 18

MODEL MANUFACTURER CODE
Panasonic SCHT720 0434
Panasonic PVD4743 0439
Panasonic ALL MODELS 0439,0869,0481,0482,0445,1096,0479,1020,0486,
Panasonic DMRE85Hs 0452
Panasonic DMRE30 0452
Panasonic DMRE50 0452
Panasonic DVDLV55 0452
Panasonic DVDLV60 0452
Panasonic DVDRV20 0452
Panasonic DVDRV30 0452
Panasonic DVDRV31K 0452
Panasonic DVDRV65 0452
Panasonic DVDS25 0452
Panasonic PVD4752 0452
Panasonic DMRE505 0452
Panasonic DMRE85HS 0452
Panasonic DVD547 0452
Panasonic DVDF875 0452
Panasonic DVDF86K 0452
Panasonic 0452,0482
Panasonic DVDCV52P 0456
Panasonic DVDS27 0481
Panasonic DVDRP56 0482
Panasonic CXdv700u 0486
Panasonic DVDF84 0869
Panasonic DVDRV32K 0869
Panasonic DVDS35 0869
Panasonic DVDLS5 0869
Panasonic portable 1043,0452
Panda ALL MODELS 0881
Philco ALL MODELS 1114,1152,1045,1044
Philips DVD750VR 1023
Philips DVDR985 1027
Philips DVD740VR 1166
Philips DVD724AT 0463
Philips ALL MODELS 0463,0870,0451,0435,1074,1027,1023,1105,1080,
Philips DVP620VR 1165
Philips DVP642 1166
Philips* DVD712 0463
Philips* DVD726 0463
Philips* DVD711/171 1086, 1087, 1023
Phonotrend ALL MODELS 1129
Pile PLDVD82 1048
Pile PLDVD140 1048
Pile ALL MODELS 1048
Pioneer DVR310S 1182
Pioneer portable 0453
Pioneer V434 0453
Pioneer DV414 0453
Pioneer DV440 0453
Pioneer DV578AS 0453
Pioneer DV275S 0453
Pioneer DV270S 0453
Pioneer DV-45A 0453
Pioneer DVC302D 0453
Pioneer ALL MODELS 0477,0472,0478,0453,0458,0869,1146,1014,0021*,
Pointer ALL MODELS 1069,1134
Polaroid PDV0700 1141
Polaroid portable 1141
Polaroid ALL MODELS 1141, 1115
0477,0472,0478,0434,0886,0452,0488, 1011,1083,
1084,1085, '1177
1086,1087,1082, '1166,1165
1078,1079,1077,0481, '1182
18
Page 19

MODEL MANUFACTURER CODE
Polkaudio ALL MODELS 0463
Popular_Mech ALL MODELS 0471
Prima ALL MODELS 1053
Proline ALL MODELS 0437,0878, 0457
Proscan ALL MODELS 0450,0441
Prosonic ALL MODELS 1129
Provision ALL MODELS 1129
Pyle portable 1038,1048
Quasar ALL MODELS 0445, 1039
Qwestar portable 1039,1048
Radionette ALL MODELS 1136
Raite ALL MODELS 1141
RCA DRC105N 0450
RCA DRC350N 0450
RCA RC5220 0450
RCA RC5240P 0450
RCA RC5231Z 0450
RCA RT-DVD-1 0450
RCA ALL MODELS 0450,0477,0472,0478,0878*,0894,0201*,0440, 0441,
RCA DRC108N 0457
RCA portable 0460,1132,0450
RCA* DRC220N 0450
RCA* DRC6100N 0450, 0441
Realistic ALL MODELS 0474
REC ALL MODELS 0452, 0482,1123
Red Star ALL MODELS 1134,1069, 1114
Reoc ALL MODELS 0986,0484
Revoy ALL MODELS 1129
Rex ALL MODELS 1051
Rilo DVDR04 1175
Rilo ALL MODELS 1175
Rio Audio ALL MODELS 1136
Roadstar ALL MODELS 1129, 1124,1152
Ronin ALL MODELS 1141
Rotel ALL MODELS 1133,0485
Rowa ALL MODELS 0490, 1030
Saba ALL MODELS 0457
Sabaki ALL MODELS 0484
Salora ALL MODELS 1136
Sampo portable 0986
Sampo ALL MODELS 1148,1130,0986,1029
Samsung 1107
Samsung DVDV3500 1107
Samsung DVDHD841 1126
Samsung portable 0464
Samsung DVDM301 0464
Samsung DVDP231 0464
Samsung DVDP421 0464
Samsung DVDS221 0464
Samsung DVDS321 0464
Samsung DVDC631p 0464
Samsung DVDp241 0464
Samsung ALL MODELS 1016,1129,1126,0464,0447,0452,1107,0466, 0446*,
Samsung DVDV1000 1107
Samsung DVDV2000 1107
Samsung DVDVR4600 1107
Samsung DVDP241 1126
Samsung DVD511 1130
Samsung HTDB600 1160
Samsung DVDV2500 1107
Sansui VRDVD4000 0456
Sansui CDVD2500 0456
1012,1007,0457,0453,1132
1076,1072,1160
19
Page 20

MODEL MANUFACTURER CODE
Sansui ALL MODELS 0456,0484,1069,1134, 1045,1046
Sanyo RBDMW770 1137
Sanyo DWM1000 1137
Sanyo DVD5010 0436
Sanyo DVD1100 0436
Sanyo DVD9201 0436
Sanyo DVD9501 0436
Sanyo DVD1500 0436
Sanyo DVD6000 0436
Sanyo DVD6040 0436
Sanyo DVD6070 0436
Sanyo DMW360 0436
Sanyo DVD7000 0436
Sanyo RB470MT 0436
Sanyo DMW380 0436
Sanyo DMW1000 1137
Sanyo ALL MODELS 1154,0436,0827,0456,0878,1137,0476
Scan ALL MODELS 1152,0884, 1056
ScanMagic ALL MODELS 1113
Schaub Lorenz ALL MODELS 1069,1134, 1114
Schneider ALL MODELS 0884,0881,0878, 1005,1114,0457
Schwaiger ALL MODELS 0986
Scientific Labs ALL MODELS 0484
Scott ALL MODELS 1144,0437, 0457
SEG ALL MODELS 1141,0484, 1124
Shanghai ALL MODELS 0437
Sharp portable 0491
Sharp DVS1U 0491
Sharp DVL70 0491
Sharp DVL78 0491
Sharp DV600U 0491
Sharp DVSR3U 0491
Sharp ALL MODELS 0491,0986,0456,0480, 1017
Sharp DV740U 0986
Sherwood VD4500 1026
Sherwood ALL MODELS 1132,1136,0460, 1026
Shinco DVD868 1132
Shinco ALL MODELS 1132,0460
Shinsonic ALL MODELS 0469,0460, 1015
Shinsonic portable 1132
Shinsonic ODELS 1005,1114
Simaudio ALL MODELS 1087
Singer ALL MODELS 1152,1045,1046
Skymaster ALL MODELS 0484, 1113
Slim Art ALL MODELS 1069,1134
SM Electronic ALL MODELS 1152,0484, 1113
Smart ALL MODELS 0884, 1124
Sonic Blue ALL MODELS 1136
Sony DAVS300 1015
Sony SLVD100 1118
Sony S1V300P 1118
Sony SLVD300P 1118
Sony DVPC670D 0469
Sony DVPF21 0469
Sony DVPNC600 0469
Sony DVPNS300 0469
Sony DVPNS325 0469
Sony DVP-NS315 0469
Sony DVPNS415 0469
Sony DVPNS425P 0469
Sony DVPNS700 0469
Sony DVPNS715 0469
Sony DVP-NS725P 0469
Sony DVP-S560D 0469
20
Page 21

MODEL MANUFACTURER CODE
Sony DVPNs975V 0469
Sony DVPNC615 0469
Sony DVPPQ1 0469
Sony DVPNS575P 0496
Sony portable 0827
Sony ALL MODELS 1018,0469,1015,0464,0827,0024*,0443, 1118,
Sony RDRGX300 1169
Sony RDRGX300 1170
Soundmaster ALL MODELS 0484
Soundmax ALL MODELS 0484
Soundwave ALL MODELS 0881
Standard ALL MODELS 0484, 0457
Starmedia ALL MODELS 1145, 1058
Sungale ALL MODELS 1139
Sunwood ALL MODELS 1114
Supervision ALL MODELS 0484, 1113
SVA ALL MODELS 0437
Sylvania 6520FDE 1074
Sylvania DVC860D 0487
Sylvania DVL100 0487
Sylvania DVL700E 0487
Sylvania ALL MODELS 0487*,1074*,1107,0446, 1168
Sylvania portable 1074,0487
Symphonic ALL MODELS 1074,0487*, 1168
Symphonic WF20D4 1168
Synn ALL MODELS 0484
Ta g McLaren ALL MODELS 1091
Tandberg ALL MODELS 1124
Tandy ALL MODELS 0658*
Tatung ALL MODELS 1069,1134, 0466
Teac ALL MODELS 1132,1136,0438,0871,0872,0882,0453,0894,
Technics ALL MODELS 1096,1151,0445,0479,1020,0452,1136,0434,
Technika ALL MODELS 1069,1134, 0482
Techwood ALL MODELS 0894,1135, 1124
Tensai ALL MODELS 1152,0457
Tevion ALL MODELS 0484, 0457
Thakral ALL MODELS 0438
Theta Digital ALL MODELS 0870,0453,0435
Thompson ALL MODELS 1120
Tokai ALL MODELS 1130, 1141,1114
Tokaido ALL MODELS 1130
Tokiwa ALL MODELS 0884
Toshiba SD1200 0451
Toshiba SD1700 0451
Toshiba SD2150 0451
Toshiba SD2705 0451
Toshiba SD2800 0451
Toshiba SD2900 0451
Toshiba SD3750 0451
Toshiba SD3800 0451
Toshiba SD3900 0451
Toshiba SD3960 0451
Toshiba SD4700 0451
Toshiba SD4900 0451
Toshiba SDP2500 0451
Toshiba SDV280 0451
Toshiba SDV290 0451
Toshiba SDV291 0451
Toshiba SD1800 0451
Toshiba SDP1400 0451
Toshiba SDV392 0451
'1169,1170
113 5, 046 0,0484,0878
0488, 1011
21
Page 22

MODEL MANUFACTURER CODE
Toshiba portable 0451,0456
Toshiba ALL MODELS 0463,0456,0925,0451*,0477,0472,0478,0892,
Trans-Continents ALL MODELS 1141
Tredex ALL MODELS 0484, 1102
TView ALL MODELS 1143
Umax ALL MODELS 1152
United ALL MODELS 1141,1113,0878
Universum ALL MODELS 1136, 1124
Urban Concepts ALL MODELS 0451
US Logic portable 0460
Uslogic 1132
V inc ALL MODELS 1125
Venture ALL MODELS 0878*, 1065,0491
Venturer portable 0491
Vieta ALL MODELS 0884
Vocapro DVG390K 1164
Vocapro ALL MODELS 1164
Voxson ALL MODELS 1005,1113
Walkvision ALL MODELS 1132,0460
Welkin ALL MODELS 1005
Wesder ALL MODELS 1129
Wharfedale ALL MODELS 1130,0986, 1121,1045,1046
Windy Sam ALL MODELS 0464
XLogic ALL MODELS 1069,1134,1144,0484
XMS ALL MODELS 1123,1114
Xoro ALL MODELS 1052
Xwave ALL MODELS 1119
Yahoo YDP305 1183
Yahoo YDP700 1184
Yahoo ALL MODELS 1183,1184
Yamada ALL MODELS 1030
Yamaha ALL MODELS 0462,0471,0439,0869,0481,0482,0473,1027,
Yamaha DVD5550 0463
Yamaha DVS5750 0463
Yamaha DVDSL100 0463
Yamakawa ALL MODELS 1141
Yukai ALL MODELS 1113
Zenith XBV342 1081
Zenith ALL MODELS 1081*,1136,1097,0475, 0451
Zenith XBV442 1097
Zenith XBV443 1097
Zenith portable 1136
Zenith DVB312 1136
*combo model (DVD/VCR or DVD/TV or DVD/VCR/TV)
0452,0480, 1104,1071
1023,1100,1066,1086,0452,0463
22
Page 23

FCC NOTE (UNITED STATES ONLY)
Note: This equipment has been tested and found to comply with the limits for a Class B
digital device, pursuant to part 15 of the FCC rules. These limits are designed to provide
reasonable protection against harmful interference in a residential installation. This
equipment generates, uses and can radiate radio frequency energy and, if not installed
and used in accordance with the instructions, may cause harmful interference to radio
communications. However, there is no guarantee that interference will not occur in a
particular installation. If this equipment does cause harmful interference to radio or
television reception, which can be determined by turning the equipment off and on, the user
is encouraged to try to correct the interference by one or more of the following measures:
• Reorient or relocate the receiving antenna.
• Increase the separation between the equipment and receiver.
• Consult the dealer or an experienced radio/TV technician for help.
Note: Changes or modifications not expressively approved by the manufacturer
responsible for compliance could void the user’s authority to operate the equipment.
FISHER-PRICE and MATTEL shall not be liable for operational, technical, or editorial
errors/omissions made in this manual.
The information in this manual may be subject to change without prior notice.
H4656-0920A-G3
Fisher-Price, Inc., a subsidiary of Mattel, Inc., East Aurora, NY 14052 U.S.A.
PRINTED IN CHINA. Manufactured for Fisher-Price.
©2005 Mattel, Inc. All Rights Reserved.
Fisher-Price and the Fisher-Price logo are U.S. trademarks of Mattel, Inc.
Packaging and address should be retained for future reference.
Mattel Canada Inc., Mississauga, Ontario L5R 3W2. You may call us free at 1-888-892-6123.
Mattel U.K. Ltd., Vanwall Business Park, Maidenhead SL6 4UB. Helpline 01628500303.
Mattel Australia Pty., Ltd., Richmond, Victoria. 3121. Consumer Advisory Service - 1300 135 312.
Mattel East Asia Ltd., Room 1106, South Tower, World Finance Centre, Harbour City, Tsimshatsui, HK, China.
Diimport & Diedarkan Oleh: Mattel SEA Ptd Ltd.(993532-P) Lot 13.5, 13th Floor, Menara Lien Hoe,
Persiaran Tropicana Golf Country Resort, 47410 PJ. Tel:03-78803817, Fax:03-78803867.
Mattel, Inc., 333 Continental Blvd., El Segundo, CA 90245 U.S.A. Consumer Affairs 1 (800) 524-Toys.
back
www.fisher-price.com/us/readwithme
Questions?
In US and Canada
1-888-892-6123
ITEM NO. H4656
Page 24

User’s Manual
User’s Manual
front
 Loading...