

Page 1
Figures sold separately and subject to availability.
w
w
w
.
r
e
s
c
u
e
h
e
r
o
e
s
.
c
o
m
Instructions: C5959
Please keep this instruction sheet for future reference, as it contains important information.
Requires three “C” (LR14) and three “AAA” (LR03) alkaline batteries (not included).
Adult assembly is required.
Tool required for battery installation:
Phillips screwdriver (not included).
TM
Page 2
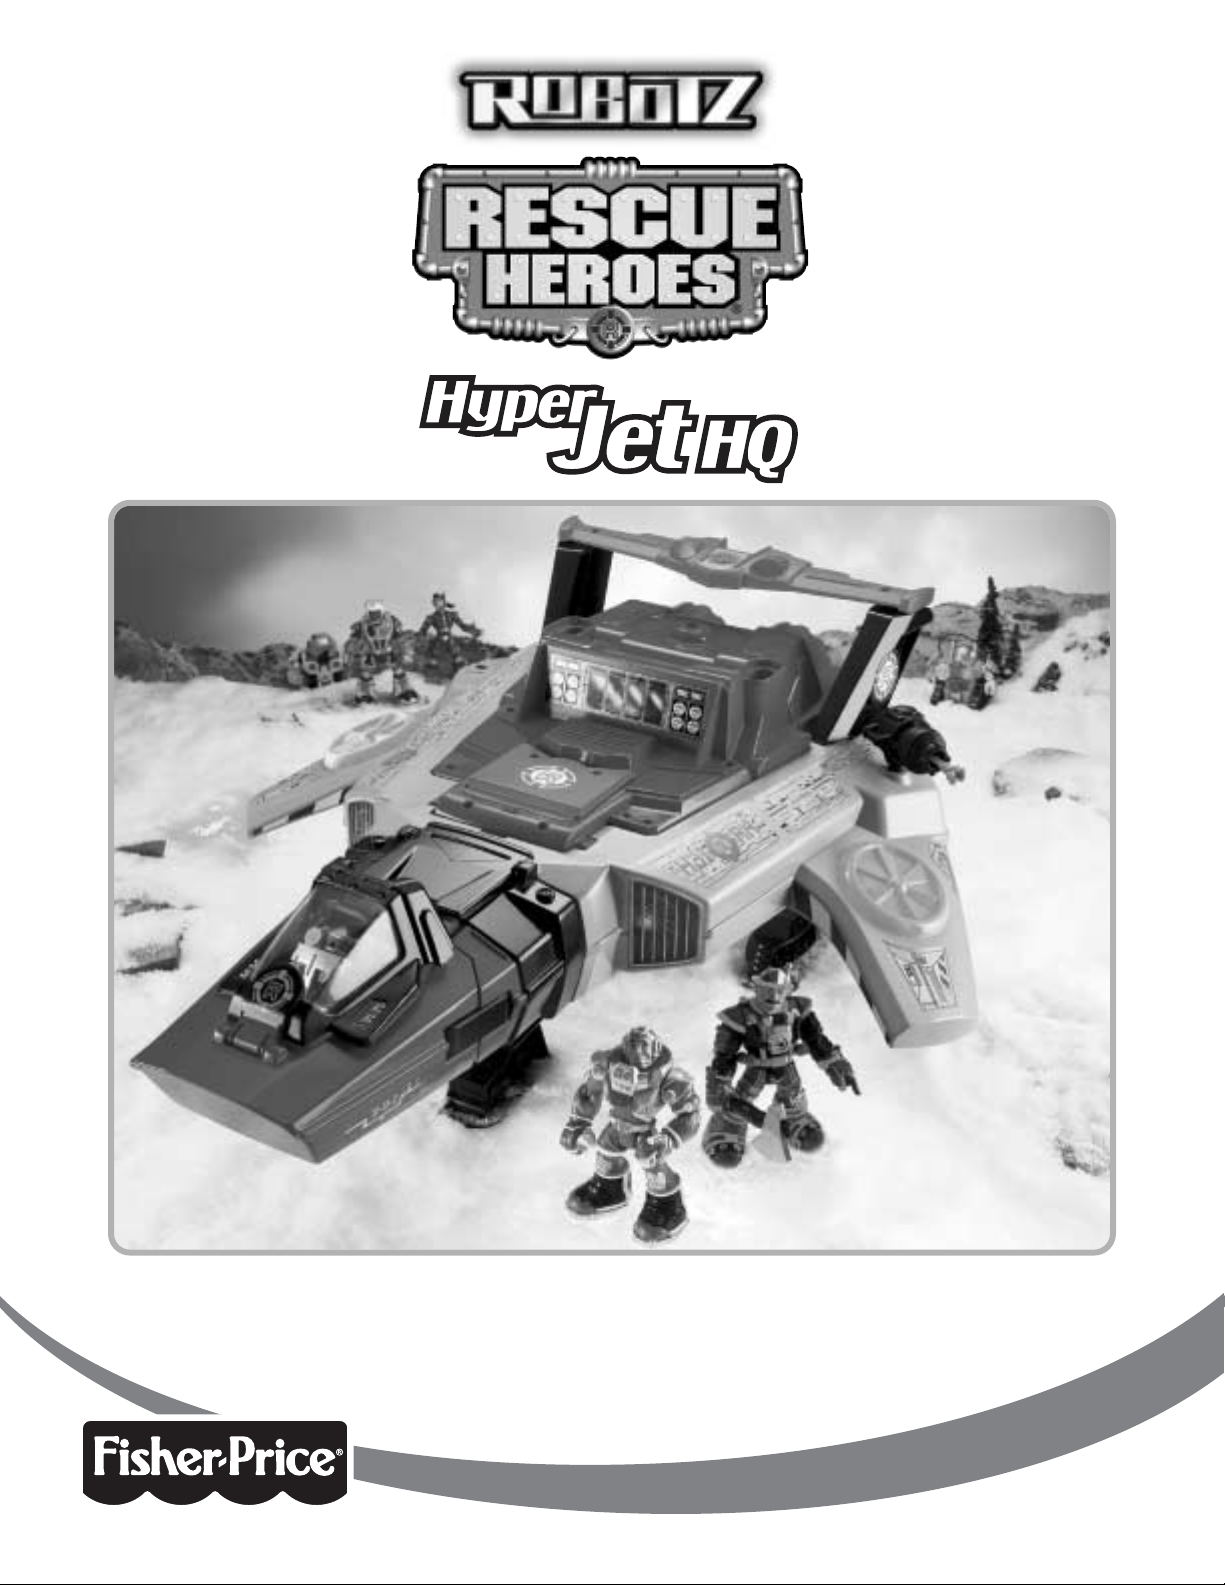
Parts
2
Not Shown: Label Sheet
Front Landing Gear (Smaller)
Tough Terrain Vehicle
Keytron™ Robot
2 Glider Supports
Water Cannon Launcher
Cargo Door
2 Water Missiles
Mission Central
Console
2 Rear Landing Gear (Larger)
Jet Body
Space Pod
Glider Wing
Stretcher
Ramp
Hose
2 Wings
Page 3
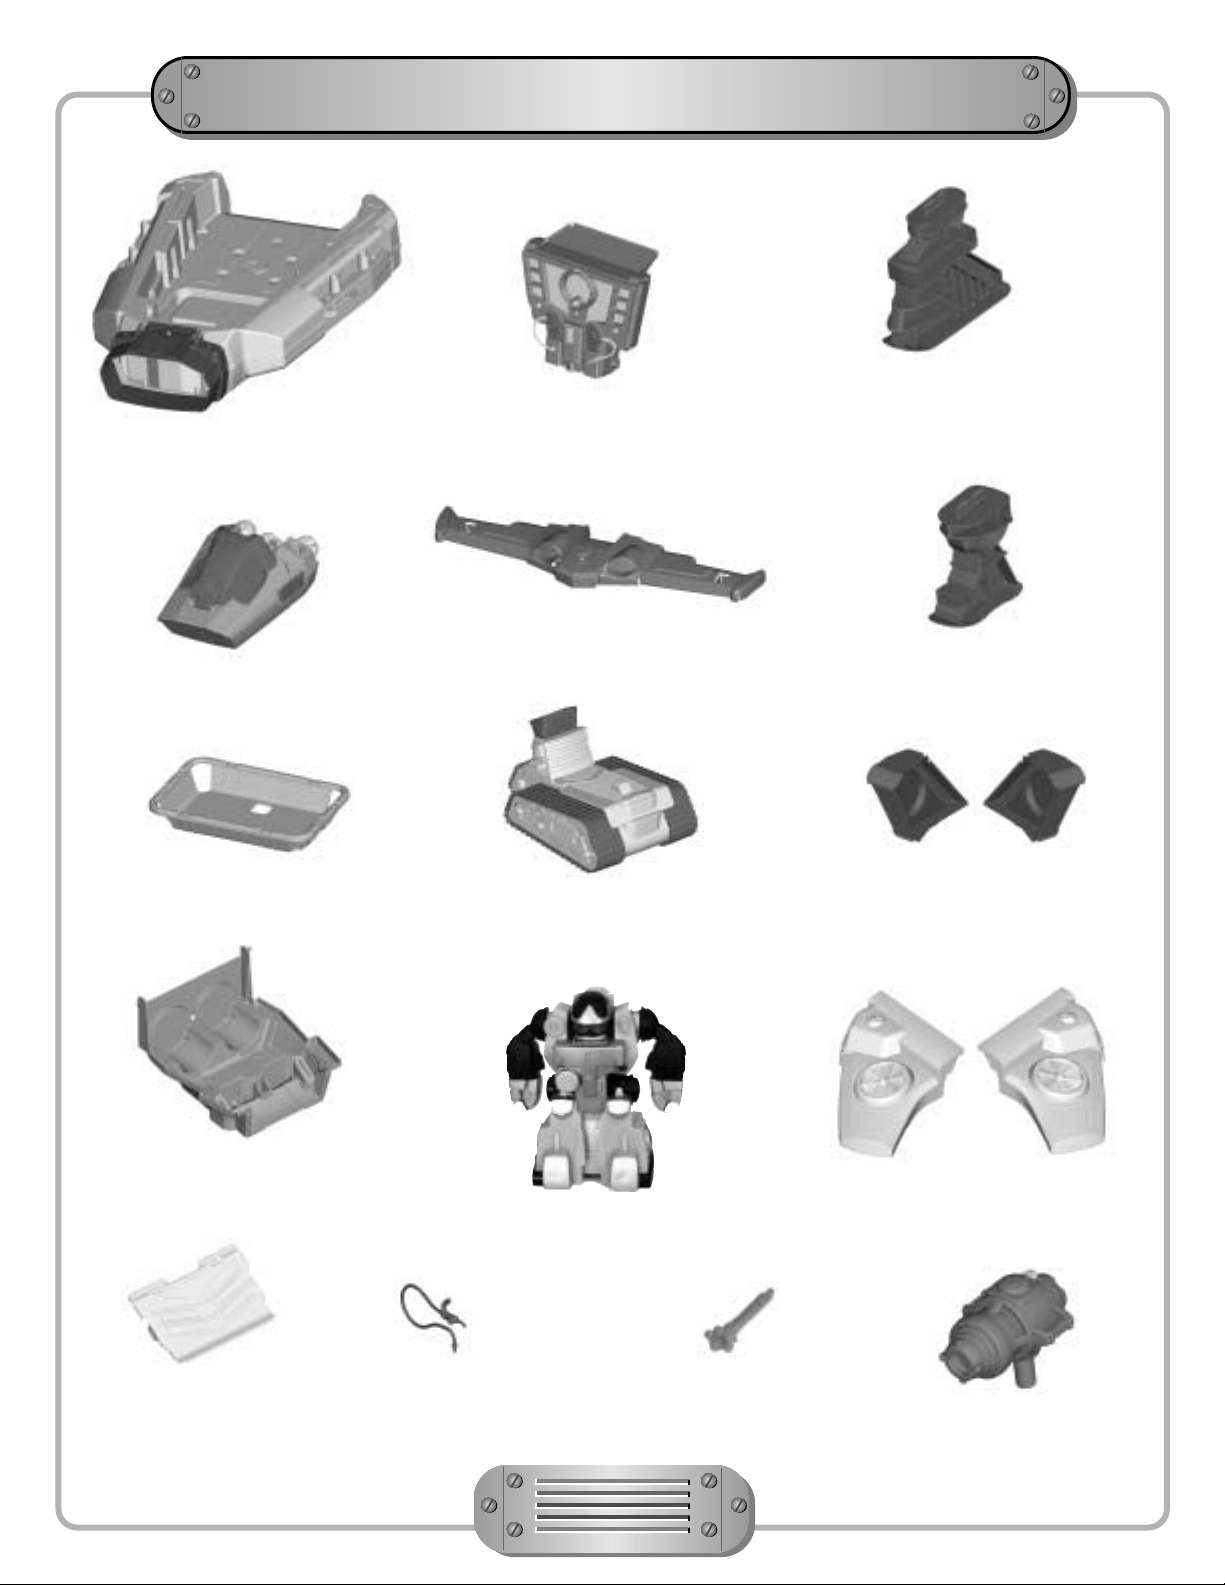
Building the Hyper Jet
™
• Position the jet body with the bottom facing you.
• “Snap” the smaller front landing gear into the
jet body.
• “Snap” the two larger rear landing gear into the
jet body.
• Turn the jet body upright.
• “Snap” the hose into the hole in the cargo bay.
1
3
•
“Snap” the two wings into the jet body, as shown.
• “Snap” the ramp into the cargo door, as shown.
2
4
3
Rear Landing
Gear (Larger)
Hose
Cargo Door
Ramp
Front Landing
Gear (Smaller)
Wing
Page 4
Building the Hyper Jet
™
• Position the cargo door near the back of the jet with
the ramp facing up.
• At an angle, fit the right side door peg into the right
hole in the jet body .
• Bend the door slightly and fit the left side door peg
into the left hole in the jet body .
• Rotate the cargo door up to close it.
• Fit the pegs on the sides
of the Mission Central
Console into the two
grooves on the top of
the jet body, as shown.
• Rotate the Mission Central Console down to store it
in the jet cargo bay.
5 7
• “Snap” the two glider supports into the jet body,
as shown.
6
4
Cargo Door
Mission Central
Console
Glider Support
Peg
Groove
A
B
A
B
Page 5
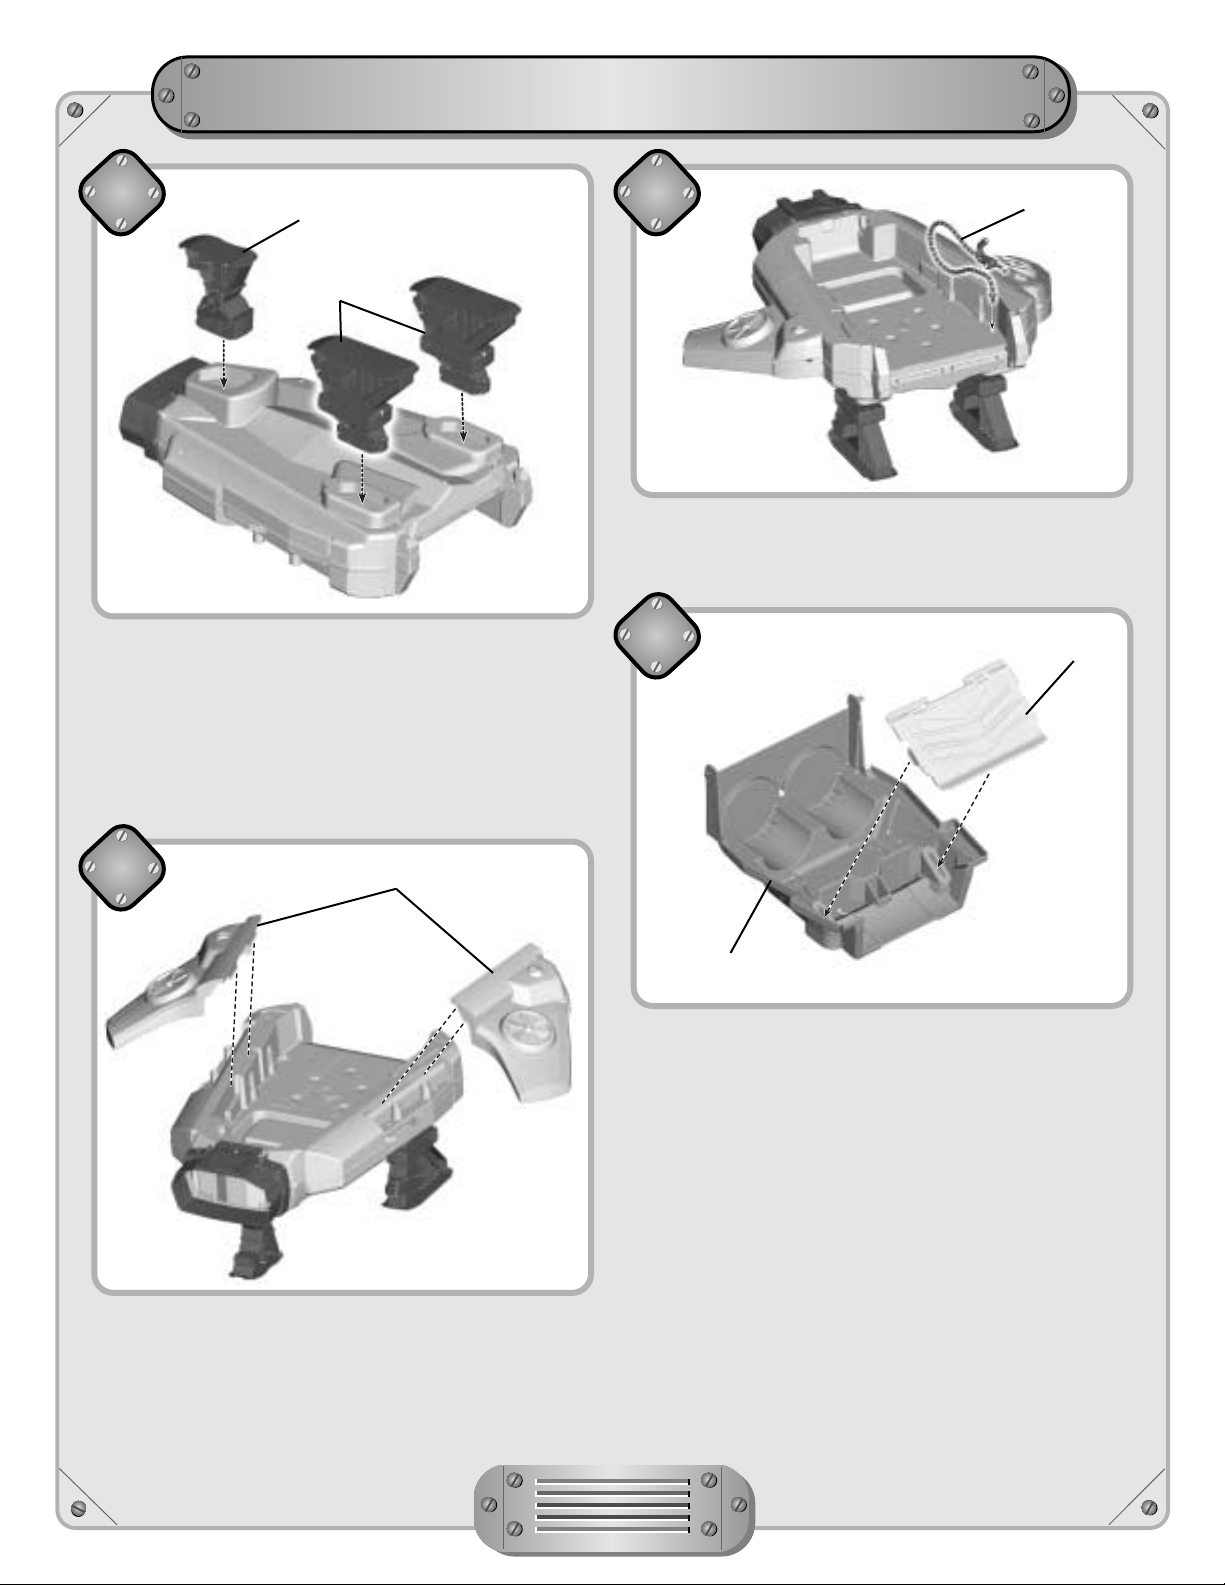
Building the Hyper Jet
™
• Fit the glider wing onto the two pegs on the
glider supports.
• The glider wing is removable and will attach to the
back of most figures.
8
• Press and hold the latch on the jet body.
• Fit the space pod into the opening at the front of the
jet body and release the latch.
9
5
Glider Wing
Space Pod
P
R
E
S
S
Page 6

Label Decoration
6
®
®
®
®
33
2
5
29
14
24
25
30
30
28
1
17
3
27
34
20
31
31
23
4
16
• Make sure the areas where the labels will be applied are clean and dry. Apply the labels as shown in the
illustration above.
• For best results, do not attempt to apply a label more than once.
21
6
26
26
15
15
32
Page 7

Label Decoration
7
11
10
19
19
9
10
11
7
8
12
13
18
18
22
Page 8

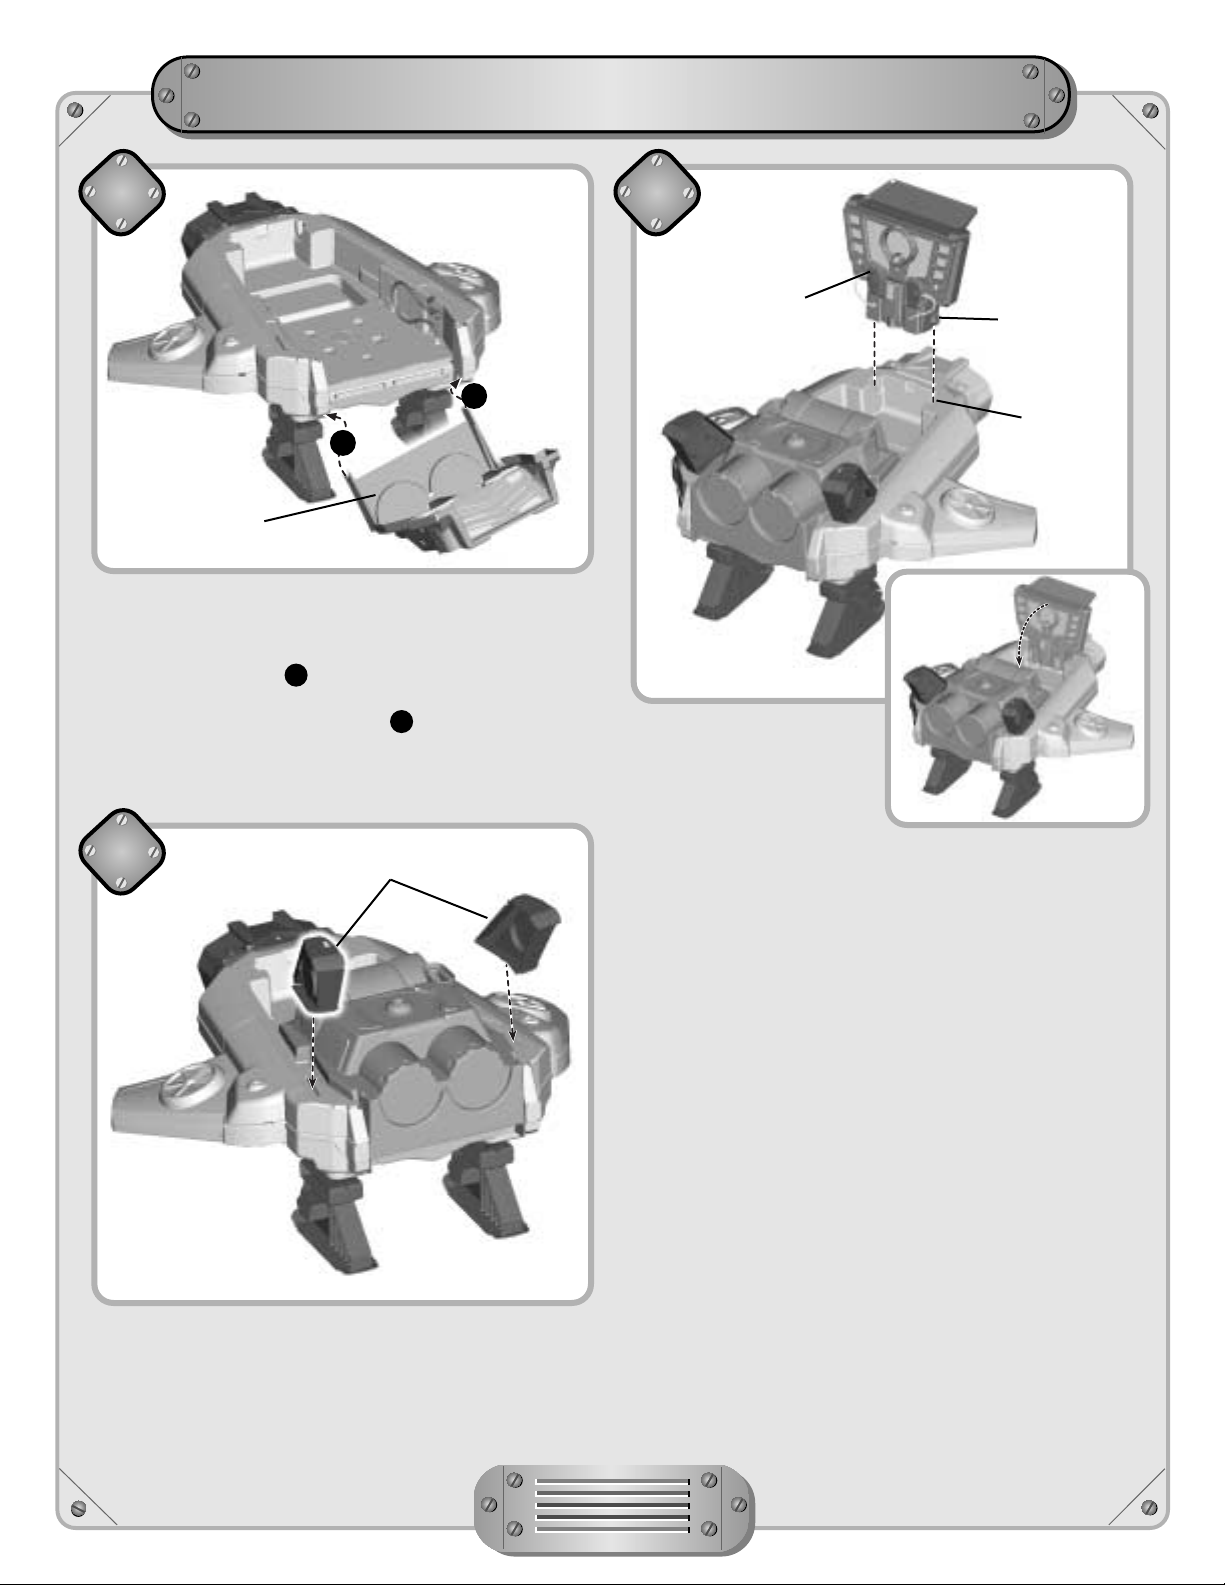
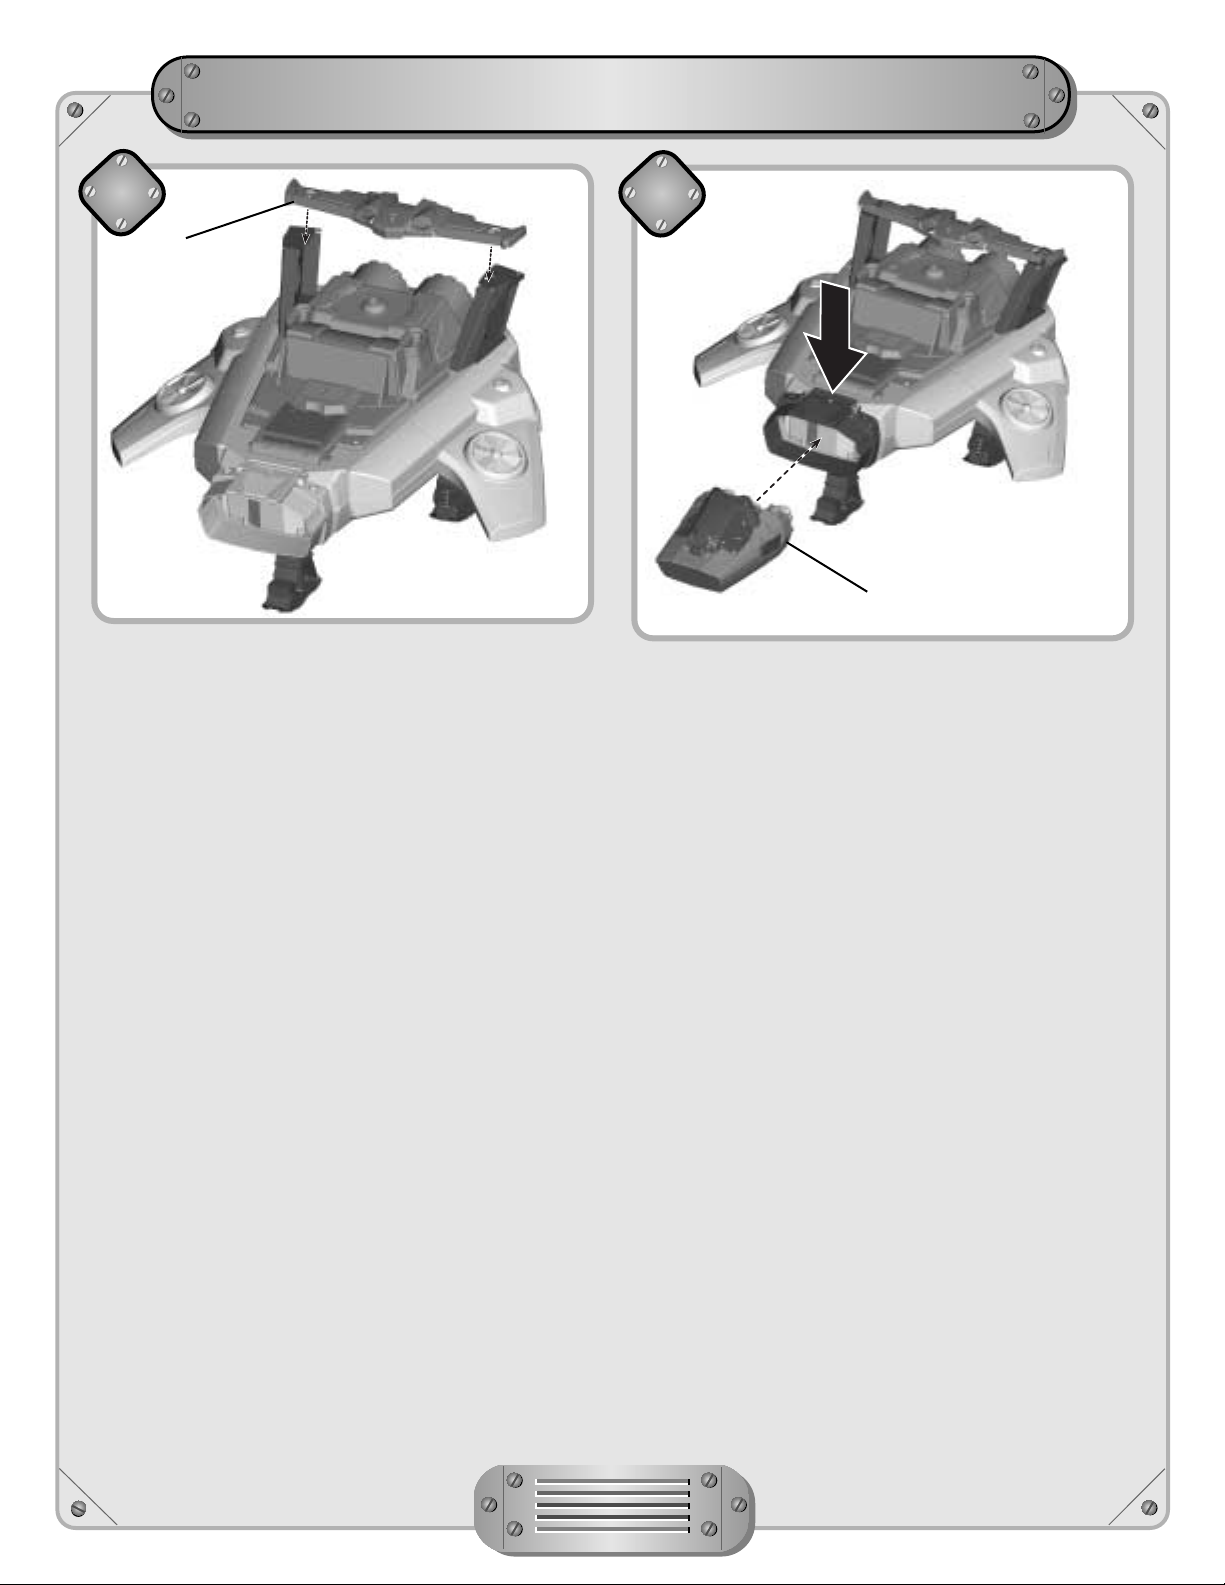
Battery Installation -
Mission Central Console
• Locate the battery compartment on the back of the
Mission Central Console.
• Loosen the screws in the battery compartment door
with a Phillips screwdriver. Remove the battery
compartment door.
• Insert three “C” (LR14) alkaline batteries as indicated
inside the battery compartment.
Hint: We recommend using alkaline batteries for
longer life.
• Replace the battery compartment door and tighten the
screws with a Phillips screwdriver. Do not over-tighten.
• When lights or sounds from the Mission Central
Console become faint or stop, it’s time for an adult to
change the batteries.
8
Battery
Compartment Door
1.5V x 3
“C” (LR14)
Shown Actual Size
Battery Installation - Keytron™Robot
• Locate the battery compartment on the bottom of
the robot.
• Loosen the screw in the battery compartment door
with a Phillips screwdriver. Open the battery compartment door.
• Insert three “AAA” (LR03) alkaline batteries as
indicated on the outside of the door.
Hint: We recommend using alkaline batteries for
longer life.
• Close the battery compartment door and tighten the
screw with a Phillips screwdriver. Do not over-tighten.
• When sounds from the robot become faint or stop,
it’s time for an adult to change the batteries.
Battery
Compartment Door
1.5V x 3
“AAA” (LR03)
Shown Actual Size
Bottom View
Page 9

9
Battery Safety Information
Batteries may leak fluids that can cause a chemical burn injury or ruin your toy.
To avoid battery leakage:
• Do not mix old and new batteries or batteries of different types: alkaline, standard (carbon-zinc) or rechargeable (nickel-cadmium).
• Insert batteries as indicated.
• Remove batteries during long periods of non-use. Always remove exhausted batteries from the toy. Dispose
of batteries safely. Do not dispose of batteries in a fire. The batteries may explode or leak.
• Never short-circuit the battery terminals.
• Use only batteries of the same or equivalent type, as recommended.
• Do not charge non-rechargeable batteries.
• Remove rechargeable batteries from the toy before charging.
• If removable, rechargeable batteries are used, they are only to be charged under adult supervision.
Page 10

Build the Hyperbot™!
• Press the latch on the jet body to detach the
space pod.
• Open the canopy and slide a figure into the cockpit.
• Rotate the “arms” towards the front of the space pod.
• Close the canopy.
Space Pod
10
Figures sold separately and subject to availability.
2
1
• Fit the post on the bottom of the pod into the
rectangular opening on the Tough Terrain Vehicle.
• Rotate the “head” up over the canopy.
• Fit the water cannon into the hole in the “hand.”
• Place the stretcher on the back of the Tough
Terrain Vehicle.
3
• Hyperbot™ is now ready for action!
4
Hyperbot™
Page 11

To the Rescue!
• The Tough Terrain Vehicle also works as a
“stand alone” vehicle. Place any figure on top of
the vehicle and set out to explore the area or
respond to emergencies.
11
• Insert a water missile into the slot in the
water cannon.
• Press the button on top of the cannon to launch
the missile.
IMPORTANT! Only use projectiles supplied with this
toy. Do not launch at people or animals or at point
blank range.
Launch the
Water Cannon!
• The glider wing easily detaches from the jet and
slides onto the back of most Rescue Heroes® figures
including Keytron™.
Using the
Glider Wing
Tough Terrain Vehicle
Figure sold separately and subject to availability.
Page 12

On Board Storage
• Place the stretcher and tough terrain vehicle into the
cargo bay as shown.
• Slide the two loading ramps into the jet.
• Close the rear cargo door.
• Rotate the Mission Central Console into the
cargo bay.
• Reattach the glider wing.
12
2
1
Page 13

Welcome Aboard the Hyper Jet™HQ!
Connect the backpack from the
console with the one from your
Robotz minibot.
Slide Keytron™into the slot in the
center of the console.
Slide the other backpack from the
console onto the back of your
Robotz figure.
13
Figures sold separately and subject to availability.
Hear Keytron™ or Warren Waters™ assign missions to the crew on the Mission Central
Screen. Just connect the tethered backpacks to your Robotz figure and minibot and press
the mission button in the center of the screen to start the adventure!
Copy that!
Beep Bzzt
Bleep Bloop
Good to see
you Billy.
Greetings
Ember.
Note: Mission Select™ and Voice Tech™ figures also work with the Mission Central Console.
Page 14

Keytron™has a Mission for the Team!
14
Mission Button
Attach a Roboz figure and a Robotz minibot to the tethered backpacks. Press the Mission
button to hear a conversation between the attached figures and either Warren Waters™ or
Keytron™ (if attached). If the light under the button is blinking, press again to hear more
about the mission.
Press with no figures attached to hear phrases from Warren Waters™.
Note: Mission Select™ and Voice Tech™ figures also work with the Mission Central Console.
Sound Effects Button
Press to hear various realistic
sound effects.
Phrases Button
Press to hear phrases from the
computer’s voice or Keytron
™
(if attached).
On/Off Switch
• Slide to either on or off .
• When your child is finished playing with this toy,
slide the on/off switch to the off position .
Hint: If the on/off switch is turned on
and sounds and lights do not work, try sliding the
switch off , then on again.
If sounds and lights still do not work, replace the
batteries as indicated on page 8.
Page 15

Care
15
• Wipe this toy with a clean damp cloth dampened with a mild soap and water solution.
• Do not immerse this toy.
FCC Note (United States Only)
Note: This equipment has been tested and found to comply with the limits for a Class B digital device,
pursuant to Part 15 of the FCC Rules. These limits are designed to provide reasonable protection against harmful interference in a residential installation. This equipment generates, uses and can radiate radio frequency
energy and, if not installed and used in accordance with the instructions, may cause harmful interference to
radio communications. However, there is no guarantee that interference will not occur in a particular installation.
If this equipment does cause harmful interference to radio or television reception, which can be determined by
turning the equipment off and on, the user is encouraged to try to correct the interference by one or more of the
following measures:
• Reorient or relocate the receiving antenna.
• Increase the separation between the equipment and receiver.
• Consult the dealer or an experienced radio/TV technician for help.
Note: Changes or modifications not expressly approved by the manufacturer responsible for compliance could
void the user's authority to operate the equipment.
Page 16

Consumer Information
Questions? We'd like to hear from you!
Call Fisher-Price®Consumer Relations, toll-free at 1-800-432-KIDS (5437), 8 AM - 6 PM EST
Monday through Friday. Hearing-impaired consumers using TTY/TDD equipment, please call
1-800-382-7470. Or, write to: Fisher-Price®Consumer Relations, 636 Girard Avenue,
East Aurora, New York 14052.
For other countries, outside the United States:
CANADA
Questions? 1-800-567-7724. Mattel Canada Inc., 6155 Freemont Blvd., Mississauga, Ontario L5R 3W2.
GREAT BRITAIN
Mattel UK Ltd, Vanwall Business Park, Maidenhead SL6 4UB. Helpline: 01628 500302.
AUSTRALIA
Mattel Australia Pty. Ltd., 658 Church Street, Locked Bag #870, Richmond, Victoria 3121 Australia.
Consumer Advisory Service 1300 135 312.
NEW ZEALAND
16-18 William Pickering Drive, Albany 1331, Auckland.
ASIA
Mattel East Asia Ltd, Room 1106, South Tower, World Finance Centre, Harbour City, Tsimshatsui, HK, China.
Fisher-Price, Inc., a subsidiary of Mattel, Inc., East Aurora, NY 14052 U.S.A.
©2004 Mattel, Inc. All Rights Reserved. ® and ™ designate U.S. trademarks of Mattel, Inc.
PRINTED IN MEXICO C5959pr-0920
 Loading...