

Page 1
MONSTER MAKER
Manual
©2014 Mattel. All Rights Reserved.
Page 2
8+
iPad and Retina are trademarks of Apple Inc.,
registered in the U.S. and other countries.
iPad Air and iPad mini are trademarks of Apple Inc.
Apple and the Apple logo are trademarks of Apple
Inc., registered in the U.S. and other countries.
App Store is a service mark of Apple Inc.
We reserve the right to terminate these services after June 30, 2016.
TABLET COMPATIBILITY
Made for iPad Air, iPad mini with Retina display, iPad (4th generation), iPad mini, iPad (3rd
generation), iOS 7.0 or higher required.
Samsung Galaxy Tab®, Samsung Galaxy Tab® 2, Samsung Galaxy Tab® 3, Samsung Galaxy Tab®
8.9, Samsung Galaxy Tab® 10.1, Samsung Galaxy Note®, Google Nexus 7 (2012), Google Nexus
7 (2013), Google Nexus 10, Sony Xperia™ Tablet Z, Toshiba Excite™. Not compatible with
mobile phones.
Ask a parent for help.
Please remove everything from the package and compare to the
contents shown here. If any items are missing, please contact your
local Mattel oce. Keep these instructions for future reference as
they contain important information.
For product sold in USA
This device complies with Part 15 of the FCC Rules.
Operation is subject to the following two conditions:
(1) This device may not cause harmful interference, and (2) this device must accept any interference
received, including interference that may cause undesired operation.
• This equipment has been tested and found to comply with the limits for a Class B digital device,
pursuant to part 15 of the FCC rules. These limits are designed to provide reasonable protection against
harmful interference in a residential installation. This equipment generates, uses and can radiate radio
frequency energy and, if not installed and used in accordance with the instructions, may cause
harmful interference to radio communications. However, there is no guarantee that interference will
not occur in a particular installation. If this equipment does cause harmful interference to radio or
television reception, which can be determined by turning the equipment o and on, the user is
encouraged to try to correct the interference by one or more of the following measures:
• Reorient or relocate the receiving antenna.
• Increase the separation between the equipment and receiver.
• Connect the equipment into an outlet on a circuit dierent from that to which the receiver is connected.
• Consult the dealer or an experienced radio/TV technician for help.
NOTE: Changes or modications not expressly approved by the manufacturer responsible for
compliance could void the user’s authority to operate the equipment.
CONSUMER INFORMATION
Need Assistance? Visit service.mattel.com or call 1-800-524-8697
(US and Canada only).
SERVICE.MATTEL.COM
Mattel, Inc., 636 Girard Avenue, East Aurora, NY 14052, U.S.A. Consumer Services
1-800-524-8697. Mattel U.K. Ltd., Vanwall Business Park, Maidenhead SL6 4UB. Helpline
01628 500303. Mattel Australia Pty., Ltd., Richmond, Victoria. 3121.Consumer Advisory
Service - 1300 135 312. Mattel East Asia Ltd., Room 503-09, North Tower, World Finance
Centre, Harbour City, Tsimshatsui, HK, China. Diimport & Diedarkan Oleh: Mattel Southeast
Asia Pte. Ltd., No 19-1, Tower 3 Avenue 7, Bangsar South City, No 8, Jalan Kerinchi, 59200
Kuala Lumpur, Malaysia. Tel: 03-78803817, Fax: 03-78803867.
TABLET USERS SEARCH:
Monster High Monster Maker
COMPUTER USERS GO TO:
www.monsterhigh.com/monster-maker
®
BLT07-0920G2
Google Play™ store is a
trademark of Google Inc.
PC/MAC® - MINIMUM REQUIREMENTS
Latest version of your favorite web browser.
PC: Windows Vista, Windows 7, Windows 8,
Windows 8.1, Intel® Core™ i3 Processor,
2 GB RAM
Mac: Mac OS® X 10.7
USB A-to-B printer cable required for Windows
and Mac users. USB cable not included.
Protect the environment by not disposing of this
product with household waste [2002/96/EC]. Check
your local authority for recycling advice and facilities.
Below Information Only Suitable for Battery Operated or
Dual Supply (battery and transformer) Operated Products.
BATTERY SAFETY INFORMATION
In exceptional circumstances batteries may leak uids that can cause
a chemical burn injury or ruin your product. To avoid battery leakage:
• Non-rechargeable batteries are not to be recharged.
• Rechargeable batteries are to be removed from the product before
being charged.
• Rechargeable batteries are only to be charged under adult supervision.
• Do not mix alkaline, standard (carbon-zinc), or rechargeable
(nickel-cadmium) batteries.
• Do not mix old and new batteries.
• Only batteries of the same or equivalent type as recommended are
to be used.
• Batteries are to be inserted with the correct polarity.
• Exhausted batteries are to be removed from the product.
• The supply terminals are not to be short-circuited.
• Dispose of battery(ies) safely.
• Do not dispose of this product in a re. The batteries inside may
explode or leak.
2.4 GHz
Contents
Connect to your tablet device
Getting ready to print
Erasing ink from doll parts
Designing fashions
Markers
Cancelling a print job
&
Troubleshooting
Tips
Table of Contents
4
5Get to know Monster Maker
5Battery installation
6
8
14
14
14
14
15
3 2
Page 3
Contents
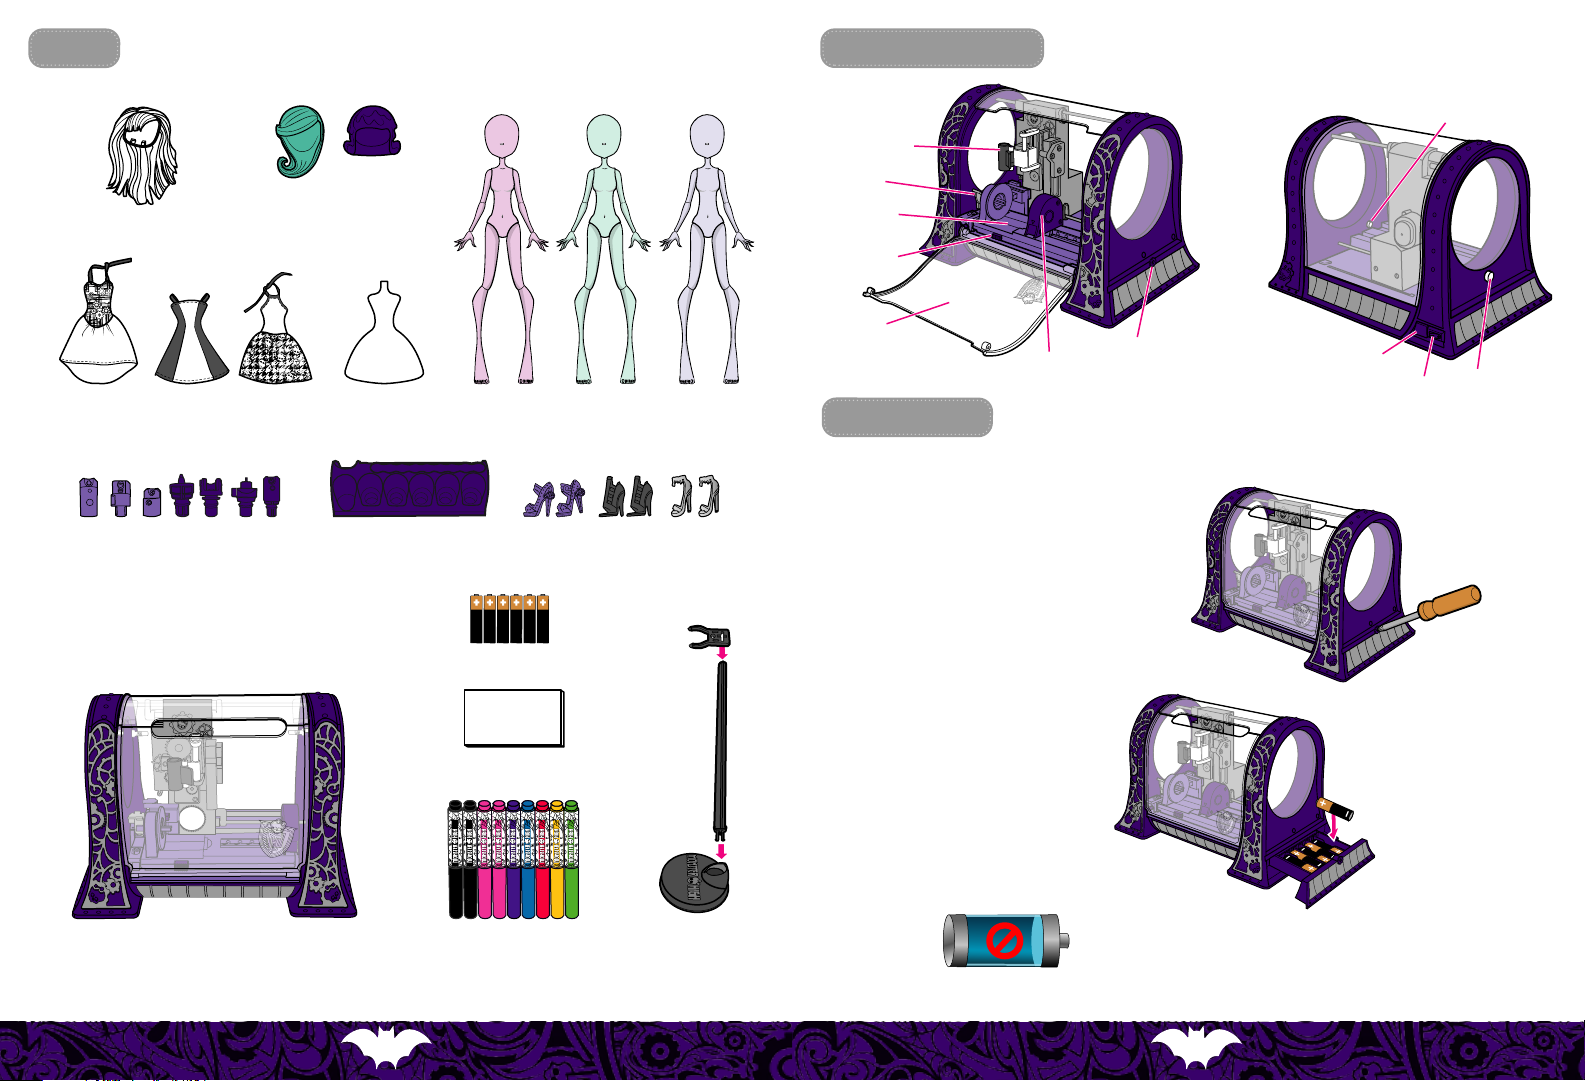
Wig x 1
Wig cap x 2
Get to know Monster Maker
marker holder
latch
carriage
carriage
release
button
connection light
Adapter x 7
Chip insert x 1Dress x 3 Doll x 3
Tool stand x 1
AA battery x 6
Sponge x 1
Shoes x 3 pairs
door
battery drawer
slide
Battery installation
Your Monster Maker comes with 6 AA batteries. Use only new AA alkaline (LR6) batteries.
1. Open battery drawer on the side of the Monster Maker
with a Phillips head screwdriver (not included).
2. Install 6 new batteries in the
orientation (+/-) shown on the
battery drawer.
3. Close battery drawer and tighten the screw.
USB cover
power switch
action button
Monster Maker machine x 1 Doll stand x 3
Dispose of batteries safely. Colors and decorations may vary.
Marker x 9
Replace batteries when the battery
meter in the Monster Maker design
software no longer has any bars.
5 4
Page 4

Setup
Remove the cardboard sleeve from the mechanism and discard.
4. Installing the app
App Not Installed
The accessory “MH Monster Maker”
uses an app you do not have
installed. Would you like to get it
from the App Store?
App Store
lgnore
Once Monster Maker pairs with your iPad, a dialog box
will prompt you to go to the App Store to download the
free app. The connection light will stop blinking and
glow a steady blue.
Touch “App Store” and you will be taken to the App Store page where you can download the free Monster High Monster Maker app.
Monster Maker prompts you to download the app only the rst time you pair with your iPad. If you touch “Ignore” at that time, you
will need to go to the App Store on your own, search for Monster High Monster Maker and download the free app.
5. Touch the Monster Maker app icon on your home screen to launch the app.
Connect to your device
Find your device below and follow the instructions to connect to the Monster Maker.
IPad® devices
1. Turn the Monster Maker on. The
connection light will blink blue.
Back View
3. Touch “
Bluetooth
” then move the slider to “On”.
Airplane Mode
Wi-Fi
Bluetooth
When your iPad detects the Monster Maker, “MH Monster Maker” will appear in the Devices list.
Touch “MH Monster Maker” to pair with your iPad.
On
Bluetooth
DEVICES
MH Monster Maker
2. Pair with Bluetooth® wireless technology.
Touch the settings icon on your iPad.
You only need to complete Bluetooth pairing the
rst time you use your iPad with Monster Maker.
Connected
Android devices
Note that the connection process may vary slightly depending on your Android device.
1. Go to the Google Play store to download the free Monster High Monster Maker app.
2. Turn the Monster Maker on. The connection light will blink blue.
3. Touch the settings icon on your Android device.
Bluetooth.
4. Turn on
5. Touch "MH Monster Maker" to pair with your device. The connection light will stop blinking and glow a steady blue.
6. Touch the Monster Maker app icon on your home screen to launch the app.
Windows or Mac computer
1. Remove the USB cover.
2. Connect a USB A-to-B printer cable (not included) to the Monster Maker and your computer.
3. Turn the Monster Maker on. The connection light will glow a steady blue.
4. Go to www.monsterhigh.com/monster-maker to download the design software.
5. Install and launch the design software.
Back View
7 6
Page 5

Getting ready to print
Open the door.
1
Lift the latch.
2
3
a. Press and hold the release button on the front of the carriage.
b. Slide the carriage out of the Monster Maker.
Find the doll part you want to print below. Follow the steps to assemble adapters to the doll part and load it in the carriage.
4
Each adapter is marked with the shapes of the doll part it goes with.
Head
a. Connect adapter to the head.
b. Snap adapter into the slide.
c. Move slide to the left until the arrow is pointing at the head icon. Connect the head to the carriage.
Torso
a. Snap adapter to the torso.
c. Move slide to the left until the arrow is pointing at
the torso icon. Connect the torso to the carriage.
Back View
b. Snap adapter to the slide.
9 8
Page 6

Upper arm
Upper arms are marked with one dot for doll's left arm and two dots for right.
a. Rotate connector as shown.
b. Snap arm to light purple adapter.
c. Connect light purple adapter to carriage and
snap dark purple adapter to the slide.
Lower arm
Lower arms are marked with one dot for doll's left arm and two dots for right.
a. Rotate connector as shown.
d. Move slide to left until the arrow is pointing at the
upper arm icon. Connect dark purple adapter to
the upper arm.
d. Move slide to left until the arrow is pointing at the
lower arm icon. Connect dark purple adapter to
the lower arm.
Upper leg
Upper legs are marked with one dot for doll's left leg and two dots for right.
a. Snap light purple adapter to upper leg.
b. Connect light purple adapter to carriage and
snap dark purple adapter to the slide.
Lower leg
Lower legs are marked with one dot for doll's left leg and two dots for right.
a. Rotate connector as shown.
c. Move slide to left until the arrow is pointing at
the upper leg icon. Connect dark purple
adapter to the upper leg.
d. Move slide left until the arrow is pointing at
the lower leg icon. Connect the lower leg to
the carriage.
b. Snap lower arm to light purple adapter.
c. Connect light purple adapter to carriage and
snap dark purple adapter to the slide.
b. Snap lower leg to adapter.
c. Snap adapter to slide.
11 10
Page 7

Slide the carriage into the Monster Maker until you hear a click.
5
Close the latch.
6
Close the door. The Monster Maker will not print if the door is open.
8
Click
If your design includes more than one color, change markers when prompted by the design software. Replace the marker cap
and put it back in the tool holder, cap side down. After printing is complete, open the door, remove the marker, and take the
doll part out by reversing the steps above.
Remove the dark purple adapter by pushing it out of the slide.
The design software shows you which marker to install. Remove the cap and install the marker in the holder as shown.
7
C
a
Markers may stain fabrics and other surfaces. Avoid
contact with carpet, clothing, walls and furniture.
b
12
Store adapters in the tool stand.
13
Page 8

Erasing ink from doll parts
Tips
&
Troubleshooting
Use the provided sponge to erase ink from doll parts so you can design them again and again. Add water and a little dish soap
(not included) and rub with the sponge until the ink is removed. Dry the doll part thoroughly before putting it back in the
Monster Maker. Please protect play surfaces before use. Dry all items thoroughly before storing.
Designing fashions
You can design the provided fashions using the included markers.
IMPORTANT: Don't put the fashions in the Monster Maker.
You can only draw on them by hand.
1. Place the chip insert inside a fashion.
2. Draw on the fashion with the markers.
Ink is permanent on fabric.
1
2
Markers
Always remove the marker from the Monster Maker when printing is
complete. Replace cap on marker immediately after use. Store the
markers in the tool holder, cap side down, when not in use.
If left uncapped, markers will dry out. Markers can be partially restored
by replacing the caps and storing them in the tool holder, cap side down,
for 24 hours. Use the included markers only with the Monster Maker.
Go to service.mattel.com for how-to videos.
After 15 minutes of inactivity, the Monster Maker will power down. To resume play, press the action button or cycle the power
switch o then back on.
What do the lights mean?
Your Monster Maker has two indicator lights—a blue connection light inside the drawing chamber and a multicolor light on the
action button.
Blue light Action light Meaning
On
On
Flashing Purple
On / O / Flashing
On / O / Flashing
O O
If you can’t connect your tablet device to the Monster Maker using
Bluetooth
Enable
If the blue light is glowing steady blue and you can’t connect to your tablet device, turn o Bluetooth on any nearby tablet device
that has been paired to the Monster Maker.
on your tablet device.
Purple
Flashing yellow
Flashing red
Solid red Firmware update failure.
Everything is ok.
Printing is paused, check the design software.
Bluetooth
Searching for USB or
Error—check for open door or low batteries.
Also may indicate a motor failure.
Machine has gone to sleep or power switch is o.
Bluetooth
:
connection.
Legal
“Made for iPad” means that an elec tronic accessory has been designed to connect specifically to iPad and has been certified by the
developer to meet Apple performance standards. Apple is not responsible for the operation of this device or its compliance with
safety and regulatory standards. Please note that the use of this accessory with iPad may aect wireless performance.
Cancelling a print job
If you cancel a print job, wait a moment for the mechanism to stop moving before opening the door.
14
Bluetooth
The
Inc. is under license. Other trademarks and trade names are those of their respective owners.
Windows is a registered trademark of Microsoft Corporation in the United States and other countries.
Macintosh is a trademark of Apple Computer Inc.
word mark and logos are registered trademarks owned by Bluetooth SIG, Inc. and any use of such marks by Mattel,
15
 Loading...