

Page 1
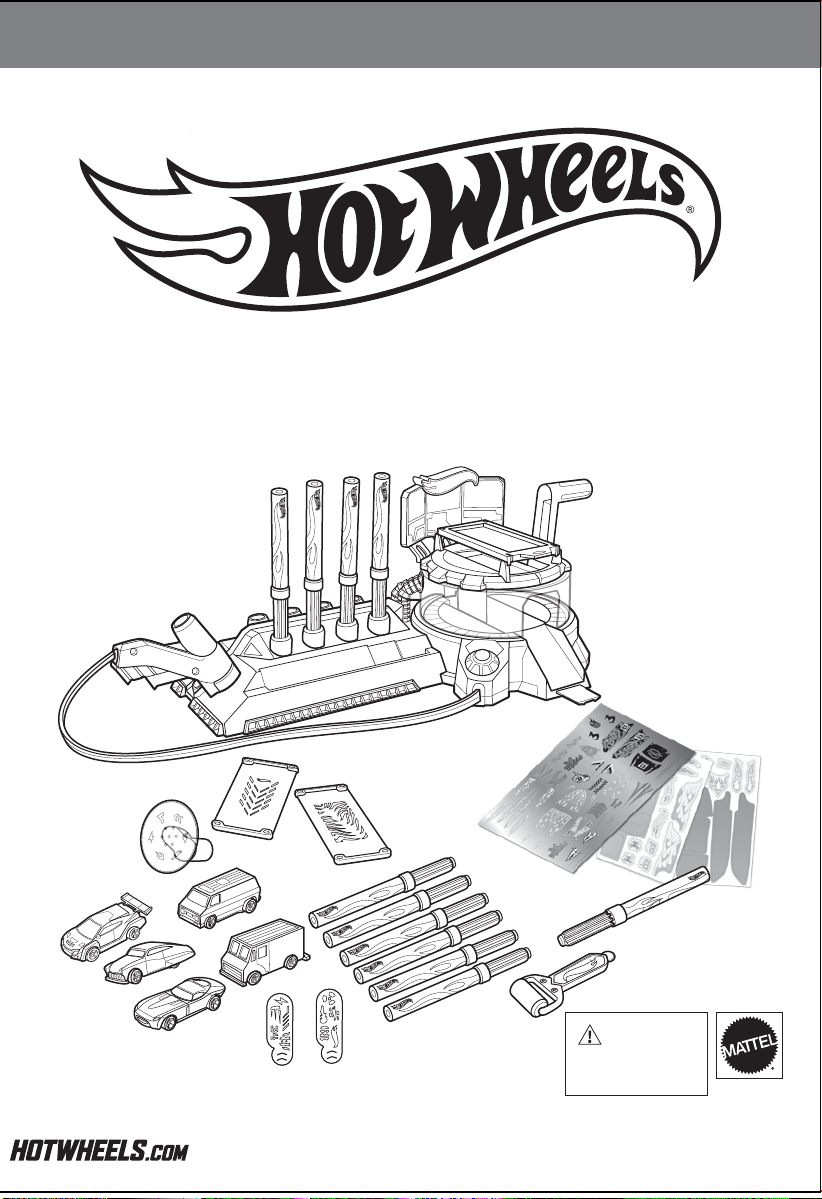
INSTRUCTIONSTION
WORKSHOP
AIRBRUSH AUTO DESIGN COMBO PACK
5+
service.mattel.com
WARNING:
CHOKING HAZARD
Not for children under 3 years.
PLEASE KEEP THESE INSTRUCTIONS FOR FUTURE
REFERENCE AS THEY CONTAIN IMPORTANT INFORMATION.
PROTECT PLAY SURFACES BEFORE USE.
1107 8 9
PENS CONFORM TO ASTM D4236.
– Small parts.
BHT79-0920
Page 2
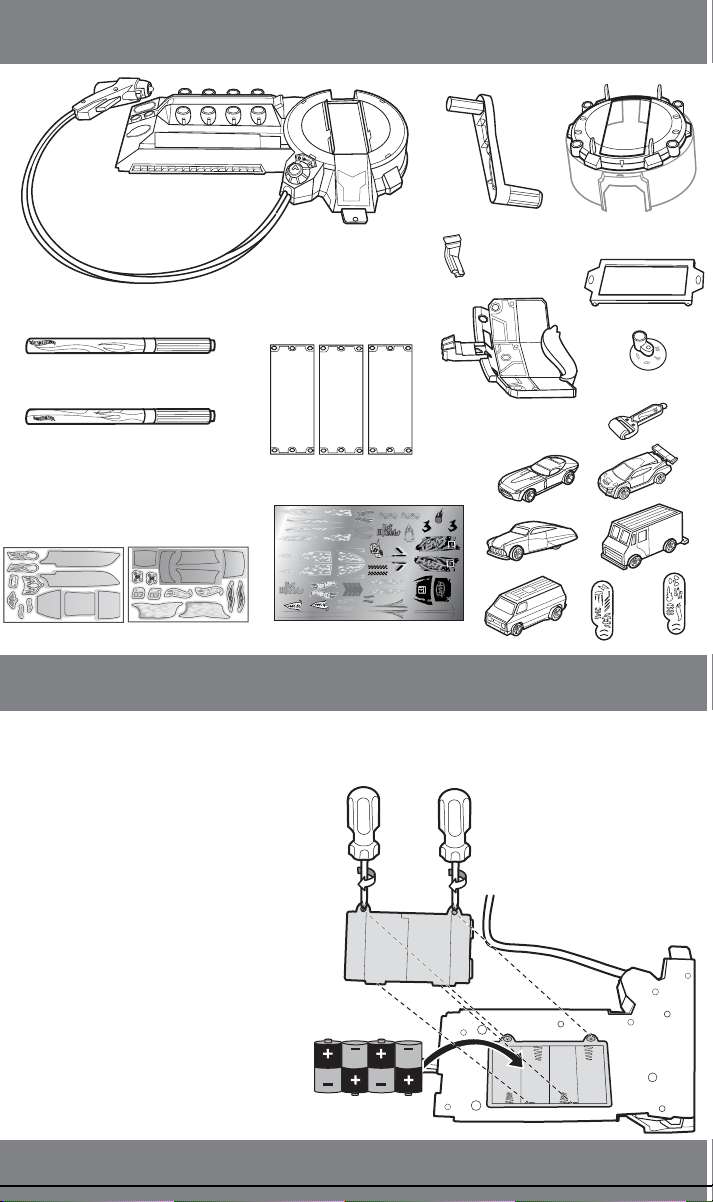
CONTENTS ASSEMBLY AIRBRUSH – FREE HAND AIRBRUSH – SPRAY PATTERN
a
b
x10
Ink Pens
x1
Color Revealing Pen
ASSEMBLY
COLOR REVEAL DECAL SHEET x 2 FOIL DECAL SHEET x 1
BATTERY INSTALLATION
• Unscrew the battery cover with a Phillips head screwdriver (not included).
• Install 4 new “C” size (LR14) alkaline batteries (not included) in the orientation (+/-) shown.
• Replace battery cover and tighten screws.
• For longer life use alkaline batteries.
• Replace batteries when the
airbrush can no longer spray ink.
• When exposed to an electrostatic
source, the product may malfunction.
To resume normal operation, remove
and re-install the batteries.
Page 3
1.
a
b
2.
3.
4.
SIDE VIEW
5.
SIDE VIEW
b
6.
a
BACK VIEW
CLICK
2
1
BACK VIEW
Page 4

SET UP
a
b
Remove cap and insert ink pen into airbrush until it clicks in.
1.
CLICK
a
Rotate switch to select airbrush ( ).
2.
b
Place a piece of paper (not included) under airbrush. Pull trigger
and spray ink between half an inch and 1.5 inches from paper.
a
b
3. Adjust nozzle until sprayed ink is fine and even.
If little or no ink comes out,
turn dial slightly toward .
If ink foams at the tip,
turn dial slightly toward .
NOTE: You must re-adjust the nozzle every time a new ink pen is loaded.
TO PREVENT INK FROM DRYING, RECAP PENS AFTER USE AND REPLACE IN HOLDER.
PENS MAY STAIN FABRICS AND OTHER SURFACES.
AVOID CONTACT WITH CARPET, CLOTHING, WALLS AND FURNITURE.
42 3 5 6
+
-
Page 5

a
a
b
Load vehicle inside chamber and center on the platform.
1.
Lift handle to raise vehicle.
b
a
2.
Hold airbrush between half an inch and 1.5 inches away,
then pull trigger to spray.
4.
When finished spraying, rotate the platform so the
vehicle faces you.
b
a
Press handle down halfway to lower the platform.
5.
Rotate switch to fan ( ) and dry for at least 30 seconds.
b
TO PLAY
Rotate platform to spray other sides.
3.
a
Rotate switch to OFF ( ).
6.
Press handle down all the way to release vehicle.
b
b
a
NOT FOR USE WITH SOME HOT WHEELS® VEHICLES.
Page 6

TO PLAY B - SPRAY PATTERN
1.
Attach spray pattern to frame as shown.
Attach to platform with tabs facing down.
2.
3.
Press frame down to bottom position for shorter vehicles.
Load vehicle inside and center on the platform.
4.
a
Lift handle to raise vehicle into the spray pattern.
b
a
Hold airbrush between half an inch and 1.5 inches away
5.
and pull trigger to spray pattern onto vehicle.
b
Lift frame up to top position for taller vehicles.
6.
Repeat steps 4-6 under AIRBRUSH – FREE HAND to
dry vehicle.
Page 7

TO PLAY – STENCIL TOOLS MORE WAYS TO PLAY
A. AIRBRUSH
1.
Attach stencil tool to airbrush.
Press stencil tool flush against the vehicle. Pull and hold trigger for around 10 seconds to spray
3.
graphic onto vehicle.
2.
Select a graphic and align with the nozzle.
4.
Repeat steps 4-6 under AIRBRUSH – FREE HAND to dry vehicle.
B. INK PENS
Use stencil pieces to draw designs directly onto vehicles.
Page 8

TO PLAY – DECAL SHEETS CLEAN UP – AIRBRUSH
A. COLOR REVEAL DECAL SHEETS
Peel off and apply color reveal panels onto each vehicle.
1.
3.
2.
Flatten the panels with the
smoothing tool.
4.
Apply color revealing pen to decals to uncover
graphics.
awesome
Add color reveal decals onto the panels to create your design.
Reveal whatever portion you want of the decals or panels to
5.
customize your design!
Only use pens that come with the toy.
Recap pens after use.
B. FOIL DECAL SHEET
Decorate your vehicles with foil decals for a shiny look!
NOTE: Foil decals do not work with Color Revealing Pen.
NOT FOR USE WITH SOME HOT WHEELS® VEHICLES.
Page 9

To create a new design, use a damp cloth
1.
(not included) to wipe off the ink until
vehicle is clean.
To clean the inside of the stencil tool, use
3.
a damp cloth or cotton swab (not included).
2.
Wipe the nozzle clean with a damp cloth.
Wipe platform, spray patterns and stencil tool
4.
clean with a damp cloth.
CLEAN OFF COLOR REVEAL DECALS TO REDESIGN
1.
To remove your design, rinse vehicle under
running water.
Drain, clean and dry all items thoroughly before storing.
2.
Let dry until design disappears and start again!
Page 10

Connect to other Hot Wheels® sets (sold separately).
PERFORMANCE TIPS
A. Take time to adjust the nozzle until the sprayed ink is fine and even. If ink is
blotchy, it will smear and spoil your design.
B. While spraying, point nozzle straight down so it is perpendicular to the vehicle.
Apply a thin coat of ink with smooth, back and forth strokes.
C. For a deeper color, airbrush additional thin coats of ink onto the vehicle after
drying.
D. Keep nozzle clean by wiping down occasionally during use or when there is ink
build-up.
E. Always keep pens stored cap side down in holder.
©2014 Mattel. All Rights Reserved. Mattel, Inc., 636 Girard Avenue, East Aurora, NY 14052, U.S.A. Consumer Relations 1-800-524-8697. Mattel U.K. Ltd.,
Vanwall Business Park, Maidenhead SL6 4UB. Helpline 01628 500303. Mattel Australia Pty., Ltd., Richmond, Victoria. 3121.Consumer Advisory Service 1300 135 312. Mattel East Asia Ltd., Room 503-09, North Tower, World Finance Centre, Harbour City, Tsimshatsui, HK, China. Diimport & Diedarkan Oleh:
Mattel SEA Ptd Ltd.(993532-P) Lot 13.5, 13th Floor, Menara Lien Hoe, Persiaran Tropicana Golf Country Resort, 47410 PJ. Malaysia.Tel:03-78803817,
Fax:03-78803867.
 Loading...