


IMPORTANT! Please keep these instructions for future
• • Adult assembly is required. No tool needed for assembly.
Assembly instructions on back side of this sheet.
• • Some models include a soothing unit that requires one
D (LR20) alkaline battery (not included). Tool required for
battery installation: Phillips screwdriver (not included).
• • Requiere montaje por un adulto. No tool needed for assembly.
Ver el dorso de esta hoja para las instrucciones de montaje.
• • Algunos modelos incluyen una unidad relajante que
funciona con una pila alcalina D (LR20) x 1,5V (no incluida).
Herramientanecesaria para el montaje: desatornillador de cruz
(no incluido).
• • Las características y decoración del producto pueden variar
de las mostradas.
reference. Please read these instructions before assembly and
use of this product.
Adult assembly is required. No tool needed for assembly.
Assembly instructions on back side of this sheet.
Some models include a soothing unit that requires one
D (LR20) alkaline battery (not included). Tool required for
battery installation: Phillips screwdriver (not included).
• Product features and decorations shown in photographs and
illustrations may vary from your product.
¡IMPORTANTE! Guardar estas instrucciones para futura
referencia. Leer estas instrucciones antes de ensamblar
y usar este producto.
Requiere montaje por un adulto. No tool needed for assembly.
Ver el dorso de esta hoja para las instrucciones de montaje.
Algunos modelos incluyen una unidad relajante que
funciona con una pila alcalina D (LR20) x 1,5V (no incluida).
Herramientanecesaria para el montaje: desatornillador de cruz
(no incluido).
Las características y decoración del producto pueden variar
de las mostradas.
fisher-price.com
1
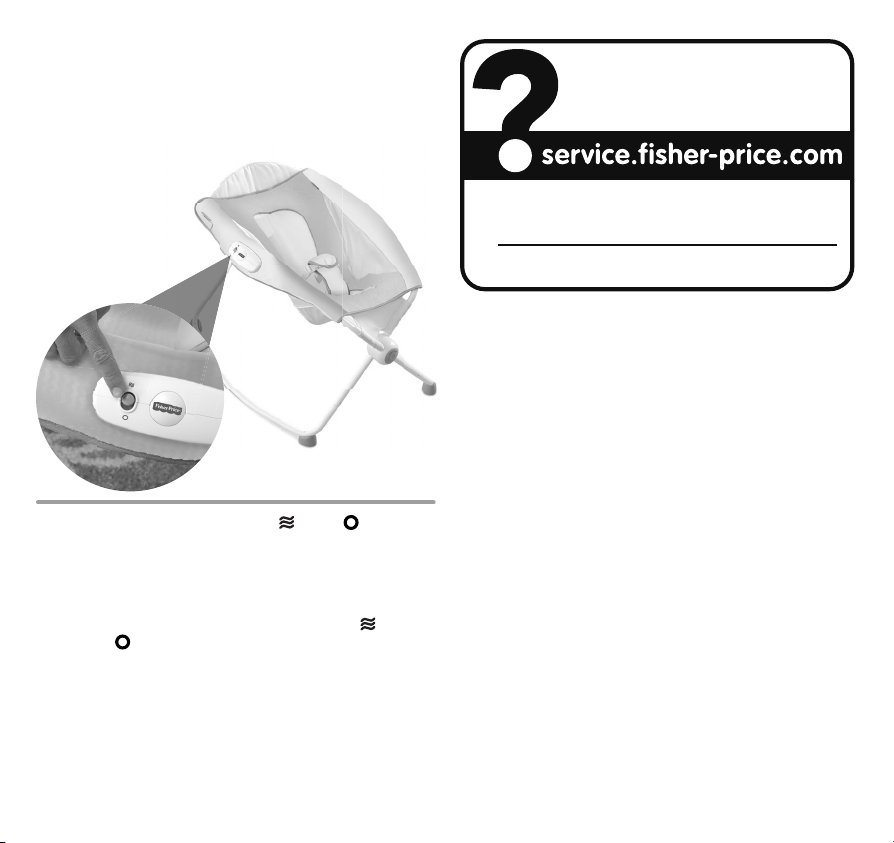
Soothing Unit
CONSU
AYUDA AL CONSU
(Included on some models.)
Unidad relajante
(Incluida en algunos modelos.)
• Slide the power switch to: Vibrations
IMPORTANT! Low battery power may cause the soothing unit
to operate erratically: no vibrations and the product may not
turn off. Remove and discard the battery and replace with
a new D (LR20) alkaline battery.
• Poner el interruptor de encendido en: Vibraciones
o Apagado .
¡IMPORTANTE! Si la pila está gastada, el producto no
funcionará correctamente (sin vibraciones ni función de
apagado). Sacar y descartar la pila y sustituirla por 1 pila nueva
alcalina D (LR20) x 1,5V.
or OFF .
MER ASSISTANCE
MIDOR
1-800-432-5437 (US)
Fisher-Price, Inc., 636 Girard Avenue, East Aurora, NY 14052.
Hearing-impaired consumers/Clientes con problemas auditivos
1-800-382-7470.
Centro de Servicio en México:
59-05-51-00 Ext. 5206 ó 01-800-463-59-89
MÉXICO
Importado y distribuido por Mattel de México, S.A. de C.V.,
Miguel de Cervantes Saavedra No. 193, Pisos 10 y 11, Col.
Granada, Delegación Miguel Hidalgo, C.P. 11520, México, D.F.
R.F.C. MME-920701-NB3.
CHILE
Mattel Chile, S.A., Avenida Américo Vespucio 501-B, Quilicura,
Santiago. Tel.: 1230-020-6213.
VENEZUELA
Servicio al consumidor Venezuela: Tel.: 0-800-100-9123.
ARGENTINA
Mattel Argentina, S.A., Curupaytí 1186, (1607) – Villa Adelina,
Buenos Aires. Tel.: 0800-666-3373.
COLOMBIA
Mattel Colombia, S.A., Calle 123#7-07 P.5, Bogotá.
Tel.: 01800-710-2069.
PERÚ
Mattel Perú, S.A., Av. Juan de Arona # 151, Centro Empresarial
Juan de Arona, Torre C, Piso 7, Oficina 704, San Isidro,
Lima 27, Perú. RUC: 20425853865. Reg. Importador:
02350-12-JUE-DIGESA. Tel.: 0800-54744.
E-mail Latinoamérica: Servicio.Clientes@Mattel.com.
PRINTED IN CHINA BGB21pr-0821
©2014 Mattel. All Rights Reserved.
2

WARNING
Failure to follow these warnings and the instructions could result in serious injury
or death.
• ALWAYS use the restraint system.
• ALWAYS use the pad provided, which includes the restraint. NEVER add a mattress,
pillow, comforter, or padding.
• SUFFOCATION HAZARD – Infants can suffocate:
- in gaps between an extra pad and the side of the product.
- on soft bedding.
• FALL HAZARD – To prevent falls, DO NOT use this product when the infant begins to
push up on hands and knees, can pull up or sit unassisted or has reached 25 lbs
(11 kg), whichever comes first.
• Strings can cause strangulation! NEVER place items with a string around a child’s neck
such as hood strings or pacifier cords. NEVER suspend strings over product or attach
strings to toys.
• NEVER place product near a window where cords from blinds or drapes can strangle
a child.
• To reduce the risk of Sudden Infant Death Syndrome (SIDS), pediatricians recommend
healthy infants be placed on their backs to sleep, unless otherwise advised by
your physician.
• Always provide the supervision necessary for the continued safety of your child.
• When used for playing, never leave child unattended.
3

ADVERTENCIA
El incumplimiento de estas advertencias e instrucciones puede resultar en lesiones
graves o la muerte.
• SIEMPRE usar el sistema de sujeción.
• SIEMPRE usar la almohadilla proporcionada que incluye el sistema de sujeción.
NO añadir un colchón, almohada, edredón o almohadilla.
• PELIGRO DE ASFIXIA – Los niños pequeños se pueden asfixiar:
- En los espacios entre un colchón adicional y el lado del producto.
- En ropa de cama suave.
• PELIGRO DE CAÍDAS – Para evitar caídas, NO usar este producto cuando el bebé
empiece a incorporarse por sí solo con las manos y rodillas, se pare impulsándose con
las manos, se siente por sí solo o llegue a pesar 11 kg, lo que ocurra primero.
• ¡Los cordones pueden causar estrangulación! NO poner artículos con cordones, tales
como capuchas o chupones, alrededor del cuello del niño. NO suspender cordones
sobre el producto ni amarrar cordones a los juguetes.
• NO poner el producto cerca de una ventana donde los cordones de las persianas
o cortinas pueden estrangular al niño.
• Para reducir el riesgo de síndrome de muerte súbita del lactante (SMSL), los pediatras
recomiendan acostar a dormir a los bebés sanos boca arriba, salvo que se indique lo
contrario por un médico.
• Para seguridad del niño, siempre usar bajo la vigilancia de un adulto.
• Cuando se use para jugar, no dejar al niño fuera de su alcance.
4
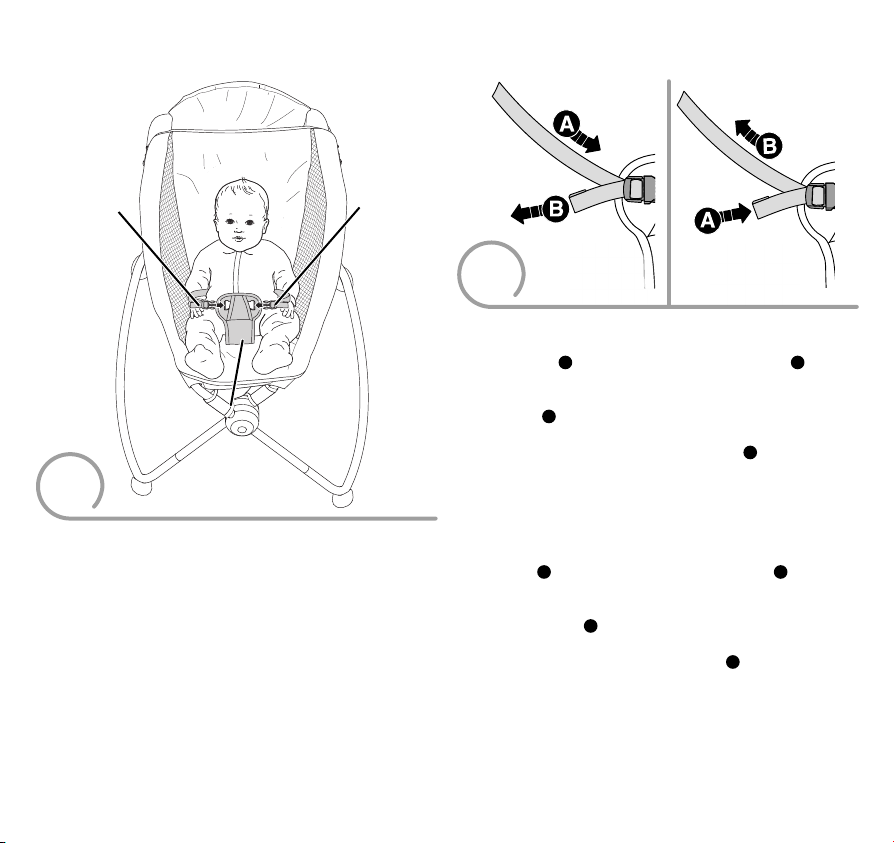
Waist Belt
Cinturón
Waist Belt
Cinturón
Securing Your Child Sistema de sujeción
LOOSEN
AFLOJAR
TIGHTEN
APRETAR
Restraint Pad
(Style may vary.)
Almohadilla de sujeción
(El estilo puede variar.)
Waist Belt
Waist Belt
Cinturón
Restraint Pad
(Style may vary.)
Almohadilla de sujeción
(El estilo puede variar.)
Cinturón
1
• Place your child in the seat.
• Position the restraint pad between your child’s legs.
• Fasten both waist belts to the restraint pad. Make sure you hear
a “click” on both sides.
• Tighten each waist belt so that the restraint system is snug
against your child. Please refer to the next section for
instructions to tighten the waist belts.
• Sentar al niño en el asiento.
• Colocar la almohadilla de sujeción entre las piernas del niño.
• Ajustar ambos cinturones de la cintura en la almohadilla de
sujeción. Asegurarse de oír un clic en ambos lados.
• Apretar cada cinturón de modo que el sistema de sujeción
quede bien ajustado al niño/a. Consultar la siguiente sección
para mayores detalles sobre cómo apretar los cinturones.
TIGHTEN
2
To tighten the waist belts:
• Feed the anchored end of the waist belt up through the buckle
to form a loop A. Pull the free end of the waist belt B.
To loosen the waist belts:
• Feed the free end of the waist belt up through the buckle to
form a loop A. Enlarge the loop by pulling on the end of the
loop toward the buckle. Pull the anchored end of the waist
belt to shorten the free end of the waist belt B.
• Check to be sure the restraint system is securely attached by
pulling it away from your child. The restraint system should
remain attached.
Para apretar los cinturones:
• Introducir el extremo fijo del cinturón en la hebilla para formar
un espacio A. Jalar el extremo libre del cinturón B.
Para aflojar los cinturones:
• Introducir el extremo libre del cinturón en la hebilla para
formar un espacio A. Agrandar el espacio jalando el extremo
del cinturón hacia la hebilla. Jalar el extremo fijo del cinturón
para acortar el extremo libre del cinturón B.
• Asegurarse de que el sistema de sujeción esté bien asegurado,
jalándolo en dirección opuesta al niño. El sistema de sujeción
debe permanecer conectado.
5
APRETAR
LOOSEN
AFLOJAR

Preventing Baby’s Head from Flattening
Cómo evitar que la cabeza del bebé se aplane
Pediatricians and child health organizations agree that healthy
babies should be placed on their backs to sleep for naps and at
nighttime, to reduce the risk of Sudden Infant Death Syndrome
(SIDS). But babies who are always on their backs can
sometimes develop flat spots on their head (plagiocephaly).
Most cases of positional plagiocephaly can be prevented (and
sometimes corrected) by repositioning your baby to relieve
pressure on the back of the head. Here are some tips and
techniques from the experts to keep in mind as you care for
your baby:
• Change the location of your baby’s sleeper or crib in the room,
so she has to look in different directions to see the door, or the
window, or interesting things going on around her.
• When your baby is awake, provide opportunities for adultsupervised “tummy time” play. Playing on his tummy helps
take the pressure off the back of his head, which will help
prevent flat spots from developing. Tummy time play also
helps your baby’s head, neck and shoulder muscles get
stronger as part of normal development.
• Try tummy time two or three times a day, for short periods of
time, until your baby gets used to being on her tummy. Once
your baby begins to enjoy this position, try longer periods of
time or increase the frequency of tummy time play.
• Help your baby avoid resting his head in the same position
all the time by frequently changing the direction he lies in the
crib. For example, have your baby’s feet point toward one end
of the crib for a few days, and then change the position so his
feet point toward the other end of the crib. This will encourage
your baby to turn and look in different directions.
• Try to minimize the amount of time your baby spends in car
seats, carriers and bouncy seats while awake.
• Lastly, make sure you enjoy lots of “cuddle time” with your
baby by holding her upright over your shoulder.
For additional information on positional plagiocephaly and the
benefits of tummy time play for your baby, speak with your
pediatrician or family physician.
National Institute of Health (NIH) Eunice Kennedy Shriver National
Institute of Child Health and Human Development
6

Preventing Baby’s Head from Flattening
Cómo evitar que la cabeza del bebé se aplane
Tanto pediatras como organizaciones de salud de niños están
de acuerdo en que los bebés sanos deben dormir siestas
y periodos más largos boca arriba para reducir el riesgo de
síndrome de muerte súbita infantil. Sin embargo, los bebés
que siempre están boca arriba, a veces pueden desarrollar
plagiocefalia (aplanamiento de la cabeza). La mayoría de casos
de plagiocefalia posicional puede ser prevenida (y a veces
corregida) reposicionado al bebé para aliviar la presión en
el dorso de la cabeza. A continuación se presentan consejos
y técnicas de los peritos para el cuidado del bebé:
• Cambia la ubicación de la camita o cuna del bebé en el cuarto
de modo que, para ver la puerta, ventana o algún otro objeto
de interés, tenga que ver en diferentes direcciones.
• Cuando el bebé esté despierto, date tiempo para jugar boca
abajo con él/ella. Jugar boca abajo ayuda a quitar la presión
del dorso de la cabeza y ayuda a prevenir el aplanamiento.
Jugar boca abajo también ayuda a fortalecer los músculos de la
cabeza, cuello y hombros del bebé como parte de un
desarrollo normal.
• Juega boca abajo dos o tres veces al día, por periodos breves,
hasta que el bebé se acostumbre a estar boca abajo. Ya que el
bebé esté a gusto en esta posición, aumenta los periodos de
tiempo o la frecuencia del juego boca abajo.
• Ayuda al bebé a evitar apoyar su cabeza en la misma posición
todo el tiempo, cambiando con frecuencia la dirección en la
que está acostado/a en la cuna. Por ejemplo, por unos días,
apunta los pies del bebé hacia un extremo de la cuna y, luego,
cambia la posición de los pies hacia el otro extremo de la
cuna. Esto estimulará al bebé a voltearse y ver en
diferentes direcciones.
• Intenta minimizar la cantidad de tiempo que el bebé pasa en
asientos de auto, cargadores y sillas de rebote mientras está
despierto/a.
• Por último, asegúrate de pasar mucho tiempo con el bebé en
brazos, cargándolo con la cabeza derecha sobre tu hombro.
Habla con el pediatra o médico para obtener más información
sobre plagiocefalia posicional y los beneficios para el bebé de
jugar boca abajo.
Instituto Nacional de Salud (NIH) Instituto Nacional de Salud de Niños
y Desarrollo Humano Eunice Kennedy Shriver
7

Storage
PUSH
EMPUJAR
PUSH
EMPUJAR
PRESS
PRESIONAR
PRESS
PRESIONAR
Almacenamiento
PUSH
EMPUJAR
PRESS
PRESIONAR
PUSH
EMPUJAR
PRESS
PRESIONAR
• Press the button on each hub and push the liner tubes together.
• Lean against a wall for storage.
• Presionar el botón de cada conexión y unir los tubos del forro
empujándolos.
• Apoyar el producto contra una pared para guardarlo.
Models with Soothing Unit:
Protect the environment by not disposing of this product with
household waste (2002/96/EC). Check your local authority for
recycling advice and facilities.
Modelos con unidad relajante:
Ayúdenos a proteger el medio ambiente y no tire este producto
en la basura doméstica (2002/96/EC). Para más información
sobre la eliminación correcta de residuos, contactar con la
Junta de Residuos o el Ayuntamiento de su localidad.
To Remove the Pad
Para quitar la almohadilla
Unfasten
Desajustar
Unbuckle
Desabrochar
• Unbuckle the restraint system. Unfasten the pad button holes
from the liner brackets. Unbuckle the straps on the pad. Pull
the pad off the fasteners. Pull the restraint system down
through the slots in the pad. Remove the pad from the liner.
• To replace the pad, follow the assembly instructions.
• Desabrochar el sistema de sujeción. Desajustar los orificios
de botón de la almohadilla de las abrazaderas del forro.
Desabrochar los cinturones de la almohadilla. Separar la
almohadilla de los sujetadores. Jalar hacia abajo el sistema
de sujeción por las ranuras de la almohadilla. Quitar la
almohadilla del forro.
• Para regresar la almohadilla a su lugar, seguir las
instrucciones de montaje.
8

Assembled Parts
Piezas ensambladas
Liner
Note: Some models
include a soothing unit.
Forro
Atención: Algunos modelos
incluyen una unidad relajante.
Pad
Note: Some models
include an attached
head support.
Almohadilla
Atención: Algunos modelos
incluyen un soporte de
cabeza integrado.
2 Base Tubes
2 tubos de base
2 Hubs
2 conexiones
Assembly
Montaje
IMPORTANT! Before assembly and each use, inspect this
product for damaged hardware, loose joints, missing parts or
sharp edges. DO NOT use if any parts are missing or broken.
Contact Fisher-Price® for replacement parts and instructions if
needed. Never substitute parts.
Hint: You may need the help of another adult to steady the
product during assembly steps 1-4.
¡IMPORTANTE! Antes del montaje y de cada uso, revisar que
el producto no tenga piezas dañadas, conexiones sueltas,
piezas faltantes o bordes filosos. NO usar el producto si falta
o está rota alguna pieza. Póngase en contacto con la oficina
Mattel más próxima a su localidad para obtener piezas de
repuesto e instrucciones, en caso de ser necesarias. Visite
http://service.mattel.com/intl/es.asp para un listado completo.
No usar piezas de terceros.
Atención: Pida la ayuda de otra persona para mantener el
producto estable durante los pasos de montaje 1 a 4.
Infant Support
Note: Some models include an
infant support. Infant support
styles may vary.
Cojín de soporte infantil
Atención: Algunos modelos incluyen
un soporte infantil. Los estilos de
soporte infantil pueden variar.
9

Assembly Montaje
Hub
Conexión
Base Tube
Tubo de la base
1
• Fit the end of one of the base tubes into a tube on one of the
hubs, as shown.
Hint: Each hub is designed to fit on the base tubes one way. If
one of the hub tubes does not seem to fit, try the other tube.
• Insertar el extremo de uno de los tubos de base en un tubo en
una de las conexiones, tal como se muestra.
Atención: Cada conexión está diseñada para ajustarse en los
tubos de base de una sola manera. Si uno de los tubos con
conexión no se ajusta, intentar montarlo en el otro tubo.
• Insertar el otro extremo del tubo de base en un tubo en la
conexión restante, tal como se muestra.
Hub Tubes
Tubos con conexión
3
• Fit the ends of the remaining base tube into the free ends of
the hub tubes.
Hint: Each hub is designed to fit onto the base one way.
If either base tube does not seem to fit, turn the base tube
around and try again!
• Insertar los extremos del tubo de base restante en los
extremos libres de los tubos de la conexión.
Atención: Cada conexión está diseñada para ajustarse en la
base de una sola manera. Si no se ajustan, voltear la base
e intentar de nuevo.
2
• Fit the other end of the base tube into a tube on the remaining
hub, as shown.
10

Assembly Montaje
PULL
JALAR
PRESS
PRESIONAR
PRESS
PRESIONAR
Liner Tubes
Liner
Forro
PRESS
PRESIONAR
Tubos del forro
5
PULL
JALAR
PULL
JALAR
PRESS
PRESIONAR
4
• Fit the liner tubes onto the hub tubes.
Hint: The liner is easier to assemble if the base remains in the
folded position.
• Ajustar los tubos del forro en los tubos de la conexión.
Atención: Es más fácil montar el forro si la base permanece en
posición plegada.
• Press the button on each hub and pull apart the liner tubes.
• Make sure you hear a "click" on each end.
• Presionar el botón de cada conexión y separar los tubos
del forro.
• Asegurarse de oír un clic en cada extremo.
11

Pad Button Holes
Waist Belt
Cinturón de
la cintura
Waist Belt
Cinturón de
la cintura
Waist Belts
Cintrones de la cintura
Slots
Ranuras
Orificios de botón
de la almohadilla
Warning Label
(not visible)
Etiqueta de
advertencia (no visible)
Assembly Montaje
Waist Belt
Cinturón de
la cintura
7
• Fold the top of the pad down and insert the waist belts
through the slots in the pad. Make sure the waist belts are
not twisted.
• Doblar hacia abajo la parte de arriba de la almohadilla e insertar
los cinturones de la cintura en las ranuras de la almohadilla.
Asegurarse de que los cinturones no estén torcidos.
Slots
Ranuras
Waist Belt
Cinturón de
la cintura
6
• Position the pad so that the button holes are toward the
warning label on the liner. Place the pad on the liner.
• Colocar la almohadilla de modo que los orificios de botón
apunten hacia la etiqueta de advertencia en el forro. Poner la
almohadilla sobre el forro.
Infant Support
(Included with
some models.
Style may vary.)
Soporte infantil
(Incluido con
algunos modelos. El
estilo puede variar.)
Waist Belts
8
• Lift the top of the pad up.
• If your model includes an infant support, insert the waist belts
and restraint pad through the slots in the infant support.
• Levantar la parte de arriba de la almohadilla.
• Si el modelo incluye un soporte infantil, introducir los
cinturones de la cintura y la almohadilla de sujeción en las
12
ranuras del soporte infantil.
Cintrones de la cintura
Restraint Pad
(Style may vary.)
Almohadilla
de sujeción
(El estilo
puede variar.)

Assembly Montaje
Liner Bracket
Abrazadera del
forro
PRESS
PRESIONAR
Straps
Cinturones
Soothing Unit
(Included with
some models.)
Unidad relajante
(Incluida con
algunos modelos.)
Liner Bracket (not visible)
Button Hole
Orificio
de botón
Liner Bracket
Abrazadera del
forro
9
• Fit the button holes on the pad around the brackets on the liner.
• If your model includes a soothing unit, fit the edges of the
soothing unit through the large opening the pad.
• Ajustar los orificios de botón de la almohadilla alrededor de
las abrazaderas
• Si el modelo incluye una unidad relajante, ajustar los bordes
de la unidad relajante en el orificio grande de la almohadilla.
Abrazadera del forro (no visible)
Soothing Unit
(Included with
some models.)
Unidad relajante
(Incluida con
algunos modelos.)
Button Hole
(not visible)
Orificio de botón
(no visible)
Straps
Cinturones
10
• Pull the bottom of the pad around the liner.
• Buckle the straps on the pad. Make sure you hear a "click".
• Jalar la parte inferior de la almohadilla alrededor del forro.
• Abrochar los cinturones de la almohadilla. Asegurarse de oír
un clic.
PRESS
PRESIONAR
11
• Press the pad edges onto the fasteners on the liner.
• Presionar los bordes de la almohadilla en los sujetadores
del forro.
13

Battery Installation
(For models with included Soothing Unit.)
Colocación de las pilas
(Para modelos con unidad relajante.)
1,5V
D (LR20)
• Loosen the screw in the battery compartment door with
a Phillips screwdriver. Remove the battery compartment door.
• Insert one D (LR20) alkaline battery into the battery
compartment.
• Replace the battery compartment door and tighten the screw.
• If this product begins to operate erratically, you may need to
reset the electronics. Slide the power switch off and then
back on.
Battery Safety Information
In exceptional circumstances, batteries may leak fluids that can
cause a chemical burn injury or ruin your product. To avoid
battery leakage:
• Do not mix old and new batteries or batteries of different
types: alkaline, standard (carbon-zinc) or rechargeable
(nickel-cadmium).
• Insert batteries as indicated inside the battery compartment.
• Remove batteries during long periods of non-use. Always
remove exhausted batteries from the product. Dispose of
batteries safely. Do not dispose of product in a fire. The
batteries inside may explode or leak.
• Never short-circuit the battery terminals.
• Use only batteries of the same or equivalent type
as recommended.
• Do not charge non-rechargeable batteries.
• Remove rechargeable batteries from the product
before charging.
• If removeable, rechargeable batteries are used, they are only
to be charged under adult supervision.
• Destornillar el tornillo de la tapa del compartimento de la pila
con un desatornillador de cruz. Retirar la tapa.
• Insertar 1 pila alcalina D (LR20) x 1,5V en el compartimento.
• Cerrar la tapa del compartimento de la pila y apretar el tornillo.
• Si este producto no funciona correctamente, restablecer los
circuitos electrónicos. Poner el interruptor de encendido en
apagado y nuevamente en encendido.
Información de seguridad sobre las pilas
En circustancias excepcionales, las pilas pueden derramar
líquido que puede causar quemaduras o dañar el producto.
Para evitar derrames:
• No mezclar pilas nuevas con gastadas ni mezclar pilas
alcalinas, estándar (carbono-cinc) o recargables
(níquel-cadmio).
• Cerciorarse de que la polaridad de las pilas sea la correcta.
• Sacar las pilas gastadas del producto y desecharlas
apropiadamente. Sacar las pilas si el producto no va a ser
usado durante un periodo prolongado. No quemar las pilas
ya que podrían explotar o derramar el líquido incorporado
en ellas.
• No provocar un cortocircuito con las terminales.
• Usar sólo el tipo de pilas recomendadas (o su equivalente).
• No cargar pilas no recargables.
• Sacar las pilas recargables antes de cargarlas.
• La carga de las pilas recargables sólo debe realizarse con la
supervisión de un adulto.
14

Keep this product clean and dry!
¡Mantener este producto limpio y seco!
Note: Some models do not include an infant support/soft toy/
hard toy.
Regular Care
• During regular use, the pad, infant support and the liner may
become damp.Periodically remove the pad and infant support
from the liner to air-out and prevent moisture buildup.
• We also recommend machine washing the pad and infant
support once a week (or each time they becomes soiled).
Machine wash separately in cold water with a mild detergent
on the gentle cycle.Do not use bleach for routine washing.
Tumble dry on low.
• While laundering the pad and infant support, clean the liner,
frame and hard toy with a mild solution of liquid detergent
and water. Do not use abrasive cleaners. Rinse thoroughly
with clean water to remove soap residue. Pat dry with a towel
and air dry completely before replacing the pad on the liner.
• The soft toy is machine washable. Wash separately in cold
water with a mild detergent on the gentle cycle. do not use
bleach. Tumble dry separately on low heat.
Advanced Care
• Moisture buildup may lead to mildew. If you see mildew on
your pad, infant support or liner, follow these instructions to
kill mildew.
Pad and Infant Support
• Machine wash separately in cold water with a mild detergent
and ¼ cup (0,06 liters) bleach. Use the highest water setting
on the gentle cycle and tumble dry on low. Use of bleach may
result in some color loss of the fabric.
Liner
• Place the product on a protected surface in
a well-ventilated room.
• Mix 1 gallon (about 4 liters) of water with 1½ cups (0,35 liters)
of chlorine bleach. Apply with a sponge and wipe to clean. Be
sure to wear gloves and protective eye wear and clothing when
cleaning with bleach. Never mix bleach with ammonia or other
household cleaners. Use of bleach may result in some color
loss of the fabric. Rinse thoroughly with clean water.
• After cleaning with bleach and water, wash the liner using
a small amount of liquid detergent. Gently scrub with a soft
brush. Rinse thoroughly with clean water.
• Pat dry with a towel and air dry completely before replacing
the pad on the liner.
For more cleaning information, please contact Fisher-Price
Consumer Relations at service.fisher-price.com or call
1-800-432-5437.
®
15

Keep this product clean and dry!
¡Mantener este producto limpio y seco!
Atención: Algunos modelos no incluyen un soporte
infantil/juguete suave/juguete duro.
Mantenimiento regular
• Con el uso normal del producto, la almohadilla, soporte
infantil y forro pueden humedecerse. Quitar periódicamente la
almohadilla y soporte infantil del forro para orear el producto
y evitar la acumulación de humedad.
• Recomendamos lavar a máquina la almohadilla y soporte
infantil una vez a la semana (o cada vez que se ensucien).
Lavarlos a máquina por separado en agua fría con un
detergente neutro en ciclo delicado. Para lavados normales,
no usar blanqueador. Meter a la secadora a temperatura baja.
• Mientras se lava la almohadilla y soporte infantil, limpiar el
forro, armazón y juguete duro con una solución neutra de
detergente líquido y agua. No usar limpiadores abrasivos.
Enjuagar por completo con agua limpia para eliminar el
residuo de jabón. Secarlo inicialmente con una toalla y dejar
que se seque al aire por completo antes de colocar la
almohadilla en el forro.
• El juguete suave se puede lavar a máquina. Lavarlo a máquina
por separado en agua fría con un detergente neutro en ciclo
delicado. No usar blanqueador. Secar en la secadora
a temperatura baja.
Mantenimiento avanzado
• La acumulación de humedad puede crear moho. Si nota
moho en la almohadilla, soporte infantil o forro, seguir estas
instrucciones para eliminarlo.
Almohadilla y soporte infantil
• Lavarlos a máquina por separado en agua fría con un
detergente neutro y ¼ de taza (0,06 litros) de blanqueador.
Usar el nivel de agua más alto en el ciclo delicado y secar
a temperatura baja. El uso de blanqueador puede causar que
la tela se decolore un poco.
Forro
• Colocar el producto sobre una superficie protegida en un
cuarto bien ventilado.
• Mezclar 4 litros de agua con 1½ tazas (0,35 litros) de
blanqueador. Usar una esponja para limpiarlo. Asegurarse
de usar guantes y anteojos protectores y ropa al limpiar con
blanqueador. No mezclar blanqueador con amoníaco u otros
desinfectantes caseros. El uso de blanqueador puede causar
que la tela se decolore un poco. Enjuagar por completo con
agua limpia.
• Después del lavado con blanqueador y agua, lavar el forro
con una cantidad pequeña de detergente líquido. Cepillar
suavemente con un cepillo suave. Enjuagar por completo con
agua limpia.
• Secarlo inicialmente con una toalla y dejar que se seque al
aire por completo antes de colocar la almohadilla en el forro.
Para más información sobre el lavado, en los EE.UU.,
contactarse con el Departamento de atención al cliente
de Fisher-Price en service.fisher-price.com o llamar al
1-800-432-5437. Fuera de los EE.UU., consultar la guía
telefónica para un listado de Mattel.
16
 Loading...