

Page 1

• Répéter ce procédé pour xer
l'autre jeu de garnitures de
protection à l'autre patte arrière.
5
Directives
d'installation
Renseignements
pour les
consommateurs
Au Canada : pour toute question
concernant l'installation des
garnitures, communiquer sans
frais avec le Service à la clientèle
de Fisher-Price au 1-800-432-5437
du lundi au vendredi, de 9 h à 18
h. Les personnes malentendantes
qui utilisent un ATS peuvent
composer le 1-800-382-7470.
Ou écrire à : Fisher-Price,
Service à la clientèle,
Mattel Canada Inc.,
6155 Freemont Blvd.,
Mississauga, Ontario L5R 3W2.
Instructions
Peg Covers Installation
Model Numbers: 79638, 79639, 79640, 79641, B0326, B2105, B2875,
C4630, C4632, C5936, G4406, G8659, H0796, H1152, H4864, H7241,
H8906, H9178, J4011, J6292, J8229, K2927, L1912
LACERATION HAZARD
Children can fall against the
tray storage pegs and be
injured. DO NOT use this
product until you have installed
the peg covers to the back legs
of your high chair.
WARNING
This kit includes small parts
in an unassembled state.
Adult assembly is required.
CAUTION
Kit Parts
Tool needed for installation:
Phillips Screwdriver (not included).
#8 x ¾˝ (1,9 cm) Screw - 4
Peg Covers - 2 Sets
Instruction Sheet
Garnitures de Garnitures de
protectionprotection
s
P
Model Numb
C
H
C
t
i
prod
th
W
G
This kit includ
i
Adul
d.
T
:
P
).
#
4
Peg
I
t
Fisher Price, Inc., a subsidiary of Mattel, Inc., East Aurora, NY 14052 U.S.A.
©2010 Mattel, Inc. All Rights Reserved. ® and ™ designate U.S. trademarks of Mattel, Inc.
Fisher Price, Inc., une filiale de Mattel, Inc., East Aurora, NY 14052 É.-U.
©2010 Mattel, Inc. Tous droits réservés. ® et ™ désignent des marques de Mattel, Inc. aux É.-U.
PRINTED IN MEXICO/IMPRIMÉ AU MEXIQUE 00989pr-1038
Instruction
eg Covers Installation
ers: 79638, 79639, 79640, 79641, B0326, B2105, B2875,
4630, C4632, C5936, G4406, G8659, H0796, H1152, H4864, H7241,
8906, H9178, J4011, J6292, J8229, K2927, L1912
ARNIN
LACERATION HAZARD
hildren can fall against the
ray storage pegs and be
njured. DO NOT use this
uct until you have installed
e peg covers to the back legs
of your high chair.
CAUTION
n an unassembled state.
t assembly is require
es small parts
8 x ¾˝ (1,9 cm) Screw -
ool needed for installation
hillips Screwdriver (not included
Covers - 2 Sets
nstruction Shee
Page 2
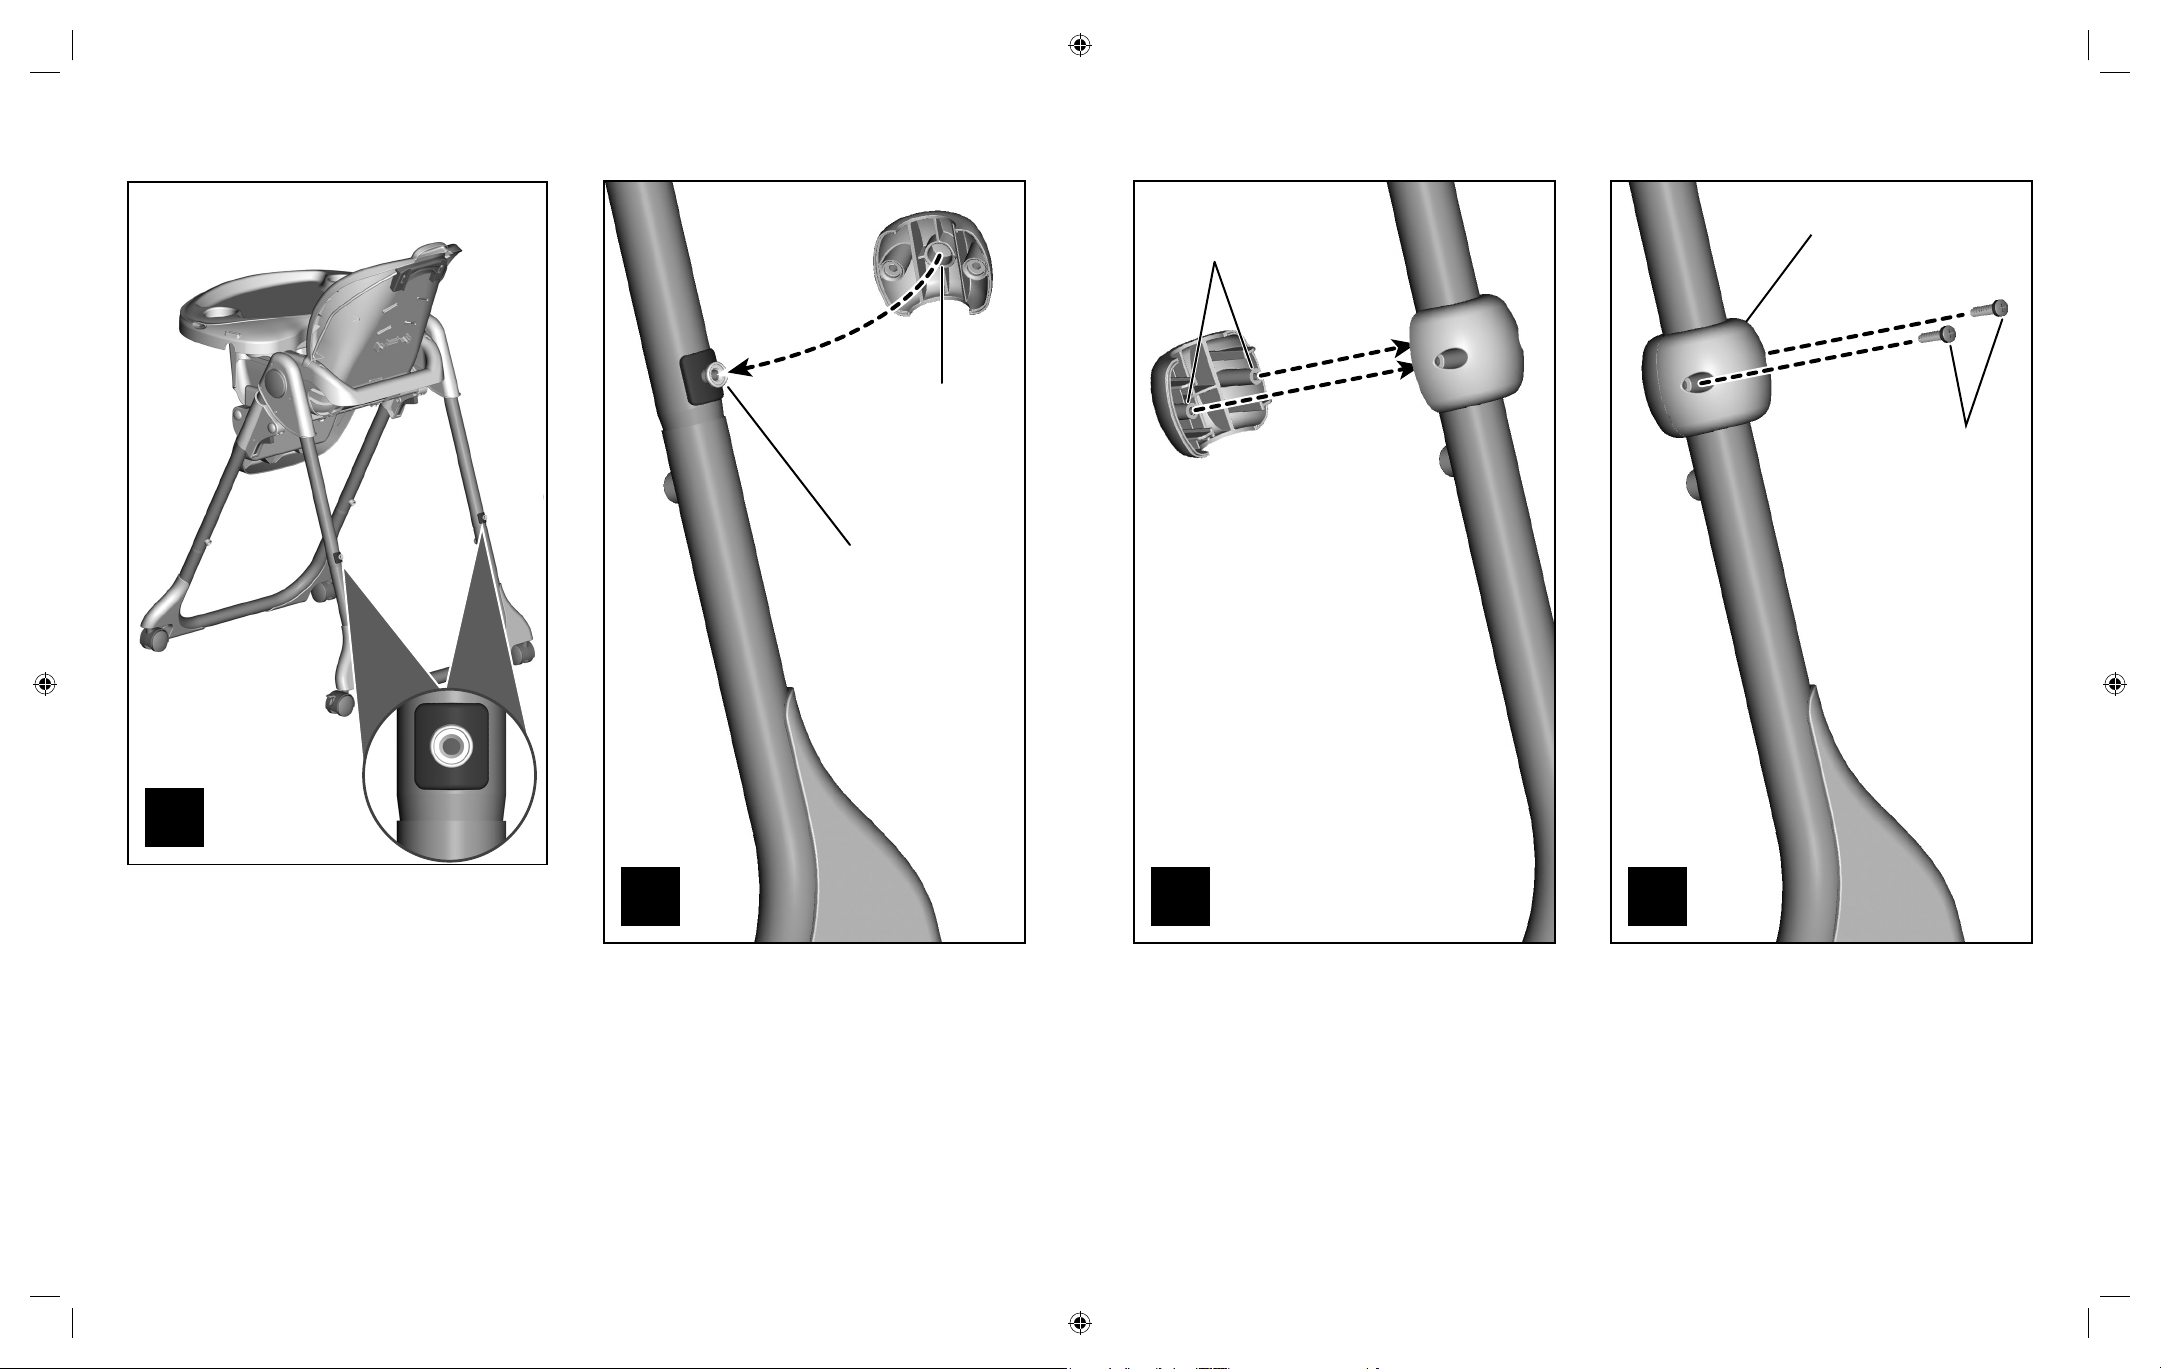
Installation Instructions
• Fit the prongs on the matching
peg cover into the outer sockets
in the assembled cover.
3
• Insert two #8 x ¾˝ (1,9 cm)
screws into the peg cover
and tighten with a Phillips
screwdriver. Do not over-tighten
the screws.
#8 x ¾˝ (1,9 cm)
Screws
Peg CoverPeg Cover
Prongs
4
Installation Instructions
BACK VIEW
Hint: Each set of peg covers
includes a side with sockets
and a side with prongs. For this
step you will use a peg cover
with sockets.
• Fit the center socket on a peg
cover to a tray storage peg.
• From the back of the high chair,
locate the tray storage pegs on
the back legs.
Note: While your high chair
may look different than the one
shown, the tray storage pegs are
located only on the back legs in
approximately the same location.
2 3
2
1
Tray Storage
Peg
Peg Cover
Center Socket
Tray Storage Tray Storage
PegsPegs
Page 3

• Repeat steps 1-4 to install the
other set of peg covers to the
other back leg.
5
Installation
Instructions
Consumer
Information
If you have further questions
regarding installation of the peg
covers, please call Fisher-Price
®
Consumer Relations at
1-800-432-5437, 9 AM – 6 PM
EST Monday through Friday.
Hearing-impaired consumers
using TTY/TDD equipment,
please call 1-800-382-7470.
In the United States, write
to: Fisher-Price
®
Consumer
Relations, 636 Girard Avenue,
East Aurora, New York 14052.
In Canada, write to: Mattel
Canada Inc., 6155 Freemont
Blvd., Mississauga, Ontario
L5R 3W2.
Instrucciones
Instalación de las tapas de las clavijas
Modelos 79638, 79639, 79640, 79641, B0326, B2105, B2875, C4630,
C4632, C5936, G4406, G8659, H0796, H1152, H4864, H7241, H8906,
H9178, J4011, J6292, J8229, K2927, L1912
PELIGRO DE LACERACIÓN
Los niños pueden caerse
contra las clavijas de
almacenamiento de la bandeja
y lesionarse. NO usar este
producto hasta después
de instalar las tapas de las
clavijas en las patas traseras
de la silla alta.
ADVERTENCIA
Este estuche contiene piezas
pequeñas en su estado
desmontado. Requiere montaje
por un adulto.
PRECAUCIÓN
Peg Covers
Piezas del estuche
Herramienta necesaria para la
instalación: desatornillador de
cruz (no incluido).
Tornillo № 8 x 1,9 cm - 4
Tapas de clavija – 2 juegos
Instrucciones
Instrucciones
M
C
H
P
ÓN
L
y
p
de i
de la s
a.
A
E
p
p
.
c
).
T
4
T
4 5
Instalación de las tapas de las clavijas
odelos 79638, 79639, 79640, 79641, B0326, B2105, B2875, C4630,
4632, C5936, G4406, G8659, H0796, H1152, H4864, H7241, H8906,
9178, J4011, J6292, J8229, K2927, L1912
ADVERTENCI
ELIGRO DE LACERACI
os niños pueden caerse
contra las clavijas de
almacenamiento de la bandeja
lesionarse. NO usar este
roducto hasta después
nstalar las tapas de las
clavijas en las patas traseras
illa alt
PRECAUCIÓN
ste estuche contiene piezas
equeñas en su estado
desmontado. Requiere montaje
or un adulto
Piezas del estuche
ornillo № 8 x 1,9 cm -
apas de clavija – 2 juegos
Herramienta necesaria para la
instalación: desatornillador de
ruz (no incluido
Page 4

• Desde la parte de atrás de la
silla alta, localizar las clavijas de
almacenamiento de la bandeja
en las patas traseras.
Atención: Si bien su silla
alta puede ser diferente a
la mostrada, las clavijas de
almacenamiento de la bandeja
solo están ubicadas en las patas
traseras, aproximadamente en la
misma ubicación.
Instrucciones de instalación
• Insertar los dientes de la tapa
de la clavija correspondiente en
los ori cios exteriores de la tapa
ensamblada.
3
• Insertar dos tornillos
№ 8 x 1,9 cm en la tapa de
la clavija y apretarlos con un
desatornillador de cruz. No
apretar en exceso.
Tornillos
№ 8 x 1,9 cm
Tapa de clavija
Dientes de tapa
de clavija
4
Instrucciones de instalación
VISTA DESDE ATRÁS
Atención: Cada juego de tapas
de clavijas incluye un lado con
ori cios y un lado con dientes.
Para este paso usará una tapa
de clavija con ori cios.
• Ajustar el ori cio central de una
tapa de clavija en una clavija de
almacenamiento de bandeja.
2
1
Clavija de
almacenamiento
de la bandeja
Ori cio
central de
la tapa de
la clavija
Clavijas de Clavijas de
almacenamiento almacenamiento
de la bandejade la bandeja
6 7
Page 5

• Repetir los pasos 1 a 4 para
instalar el otro juego de tapas
de clavija en la otra pata trasera.
5
Instrucciones de
instalación
Información al
consumidor
Si tiene alguna otra pregunta
sobre cómo instalar las tapas de
las clavijas, contactarse con la
o cina Mattel más próxima a
su localidad.
Mattel de México, S.A. de C.V.,
Insurgentes Sur # 3579, Torre
3, O cina 601, Col. Tlalpan,
Delegación Tlalpan, C.P. 14020,
México, D.F. R.F.C. MME-920701NB3. Tels.: 59-05-51-00 Ext. 5205
ó 01-800-463-59-89.
Mattel Chile, S.A., Avenida
Américo Vespucio 501-B,
Quilicura, Santiago.
Mattel de Venezuela, C.A., RIF
J301596439, Ave. Mara, C.C.
Macaracuay Plaza, Torre B,
Piso 8, Colinas de la California,
Caracas 1071.
Mattel Argentina, S.A., Curupaytí
1186, (1607) - Villa Adelina,
Buenos Aires.
Mattel Colombia, S.A., calle
123#7-07 P.5, Bogotá.
Importado por: Mattel Perú, S.A.,
Av. República de Panamá
N° 3531, O cina 1003,
San Isidro, Lima, Perú.
Directives
Installation de garnitures de protection
Modèles de chaises hautes : 79638, 79639, 79640, 79641, B0326,
B2105, B2875, C4630, C4632, C5936, G4406, G8659, H0796, H1152,
H7241, H4864, H8906, H9178, J4011, J6292, J8229, K2927, L1912
RISQUE DE LACÉRATION
En tombant, les enfants
risquent de frapper les tiges
de rangement du plateau et de
se blesser. NE PAS utiliser ce
produit tant que les garnitures
de protection n'ont pas été
installées sur la chaise haute.
AVERTISSEMENT
MISE EN GARDE
Pièces incluses
Outil nécessaire : un tournevis
cruciforme (non fourni).
Vis nº 8 de 1,9 cm – 4
Garnitures de protection – 2 jeux
Directives
Tapas de
clavija
es
n
H
E
r
d
ées su
e.
A
E
s
).
4
G
C
t
p
8 9
Cette trousse contient
de petites pièces non
assemblées. Assemblage
par un adulte requis.
Directiv
Installation de garnitures de protectio
Modèles de chaises hautes : 79638, 79639, 79640, 79641, B0326,
B2105, B2875, C4630, C4632, C5936, G4406, G8659, H0796, H1152,
7241, H4864, H8906, H9178, J4011, J6292, J8229, K2927, L1912
VERTISSEMENT
RISQUE DE LACÉRATION
n tombant, les enfants
isquent de frapper les tiges
e rangement du plateau et de
se blesser. NE PAS utiliser ce
produit tant que les garnitures
de protection n'ont pas été
install
MISE EN GARD
ette trousse contien
de petites pièces non
assemblées. Assemblage
ar un adulte requis.
r la chaise haut
Pièces incluse
Vis nº 8 de 1,9 cm –
arnitures de protection – 2 jeux
Outil nécessaire : un tournevis
cruciforme (non fourni
Page 6

• Localiser les tiges de
rangement du plateau situées
sur les pattes arrière de la
chaise haute.
Remarque : Même si votre
chaise haute n'est pas identique
à celle illustrée, les tiges de
rangement du plateau se trouvent
presque au même endroit sur les
pattes arrière.
1
Tiges de Tiges de
rangement du rangement du
plateauplateau
Directives d'installation
• Insérer les pattes de la garniture
correspondante dans les trous
de la garniture déjà installée.
3
• Insérer deux vis n° 8 de 1,9 cm
dans les trous de la garniture
de protection et les serrer avec
un tournevis cruciforme. Ne pas
trop serrer.
Vis n° 8 de 1,9 cm
Garniture de
protection
Pattes de la
garniture de
protection
4
Directives d'installation
VUE ARRIÈRE
Remarque : Chaque jeu de
garnitures contient une pièce
avec des trous et une pièce
avec des pattes. Pour la présente
étape, utiliser une garniture avec
des trous.
• Placer le trou central d'une
garniture de protection sur la
tige de rangement du plateau.
2
Tige de
rangement
du plateau
Trou central
de la garniture
de protection
10 11
 Loading...