

Page 1
Model Numbers: B0655, B0656, B0657,B0658
Owner’s Manual
Page 2
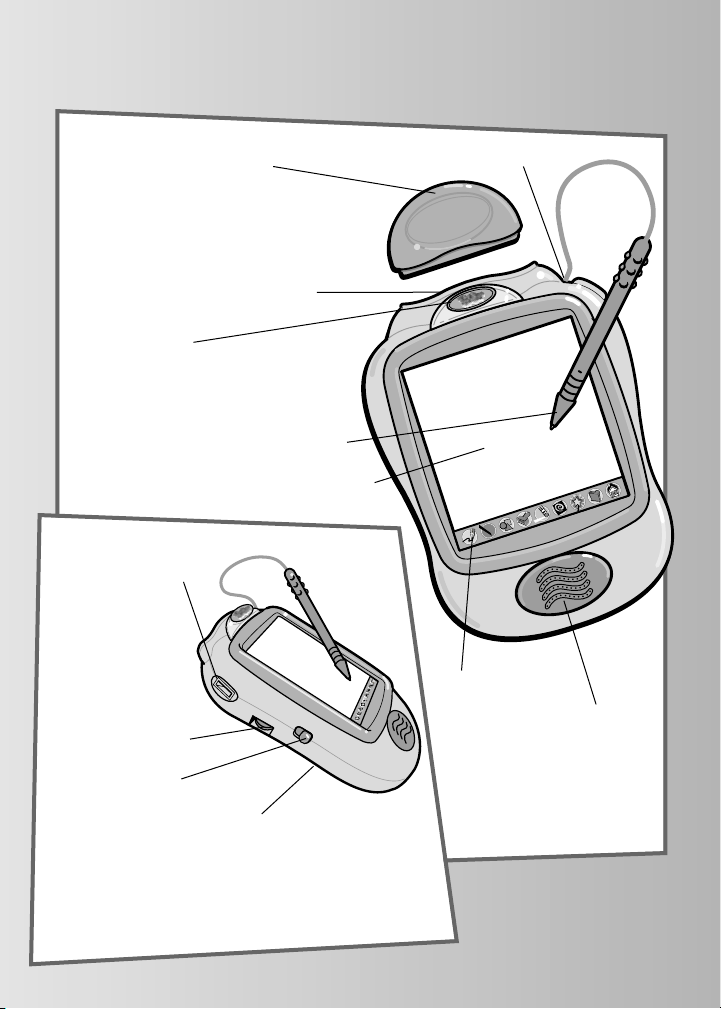
PixterTMCreativity Computer
Drawing Stylus
Touch Sensitive Screen
Software Port
Insert a software cartridge
(sold separately) into this slot.
Speaker
Stylus Storage
To ol
Menu
2
Contrast Dial
Rotate to make
the image on
the screen
darker or lighter.
Power Switch
Slide the power
switch to turn the
toy on or off.When
not in use, this toy
automatically turns
off after about
three minutes.
Software Cartridge
Software cartridge not
included (sold separately).
Calibration Hole
(on back of toy)
You must calibrate the
stylus and screeen
before first-time use.
Light Port
(Flexible screen light
sold separately)
Signal Dome
Send and receive messages
from another Pixter 2.0 unit
(sold separately)
Page 3
Before you begin, take note!
3
• Please keep this manual for future reference,as it contains important
information.
• Adult assembly is required to install batteries.
• Tool needed for battery installation: Phillips screwdriver (not included).
• Requires four “AA” (LR6) alkaline batteries for operation (not included).
• Replace batteries when:
- Display on the screen becomes difficult to see.
- Toy functions erratically.
- Sounds become faint or there are no sounds at all.
• Use only the drawing stylus on the screen. Never use any other object,
such as a regular pen or pencil, on the screen. Markings from regular pens
or pencils cannot be removed and will damage the screen.
• Be sure to turn PixterTMpower off before inserting a software cartridge
(sold separately) into the software port. Turn Pixter power back on to play!
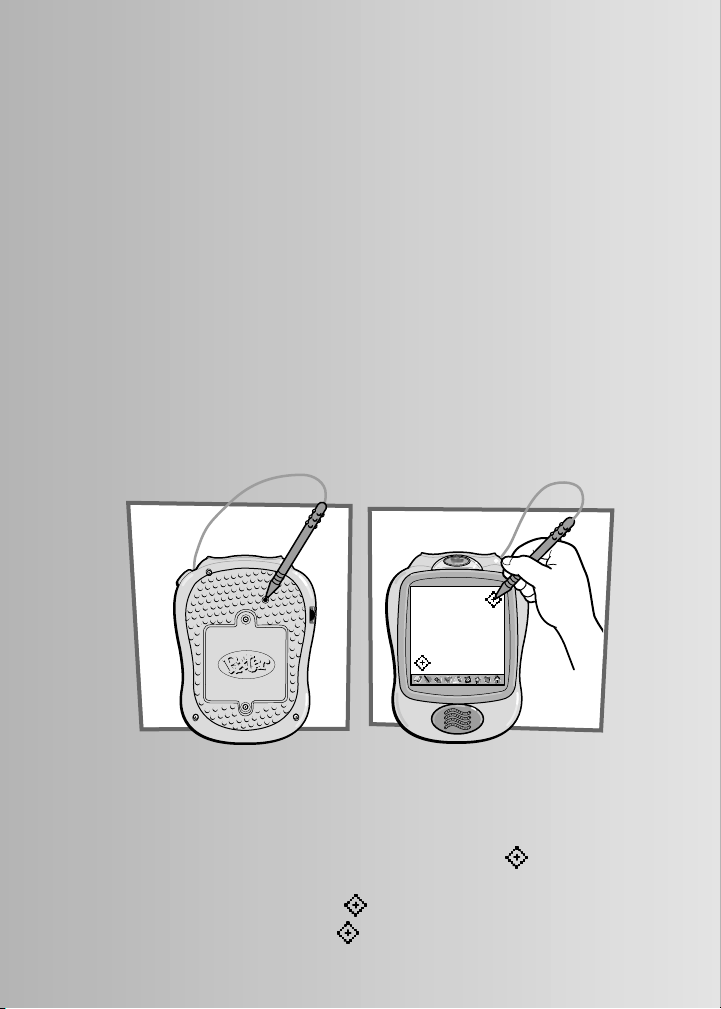
IMPORTANT! You must calibrate the stylus to the screen before
first-time use.
• Install four “AA” alkaline batteries. Turn Pixter power on.Wait until you
see the Home Screen.
• Turn Pixter over and locate the calibration hole.
• Insert, push and hold the stylus in the calibration hole.Turn Pixter over so that
you can see the screen. When you see two plus signs remove the stylus
from the calibration hole.
• First touch the upper right corner with the tip of the stylus.
• Then, touch the lower left corner with the tip of the stylus.
™
Page 4
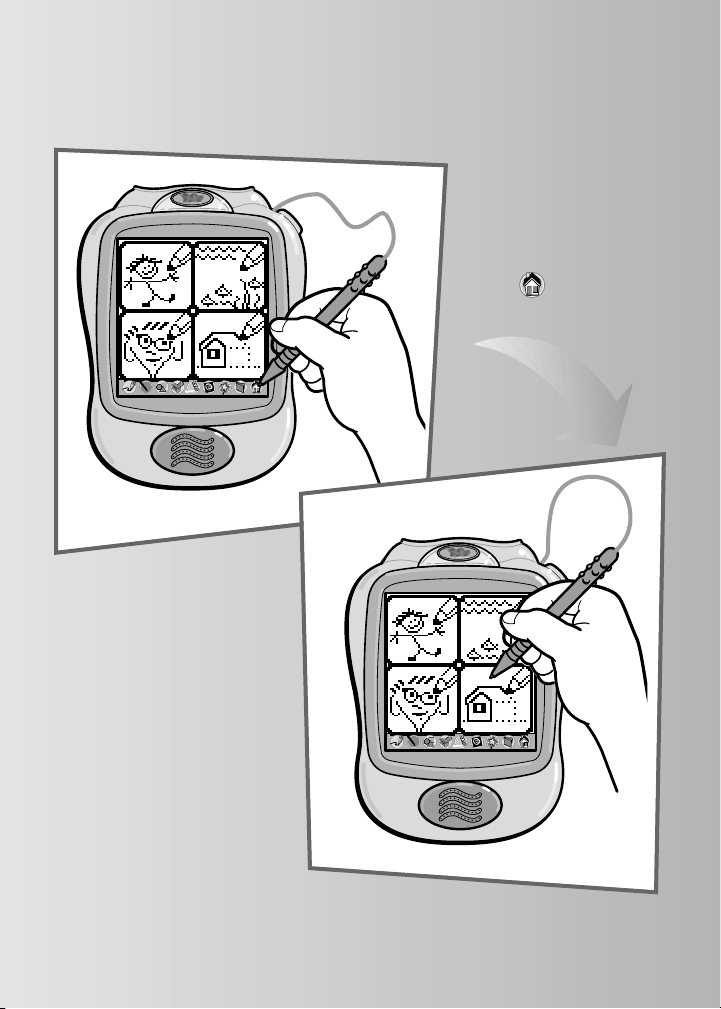
Awesome Activities
Touch an activity on the
screen with the stylus.
4
Touch the tool menu Home
Screen with the stylus.
Choose a fun activity from the Home Screen.
Page 5
5
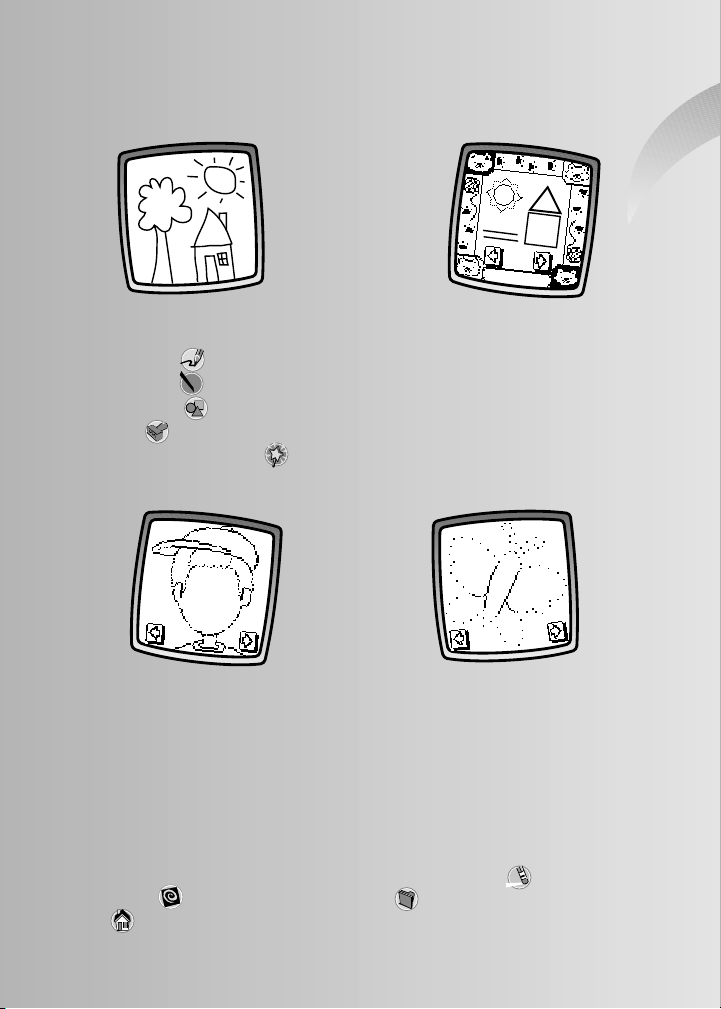
Awesome Activities
Freestyle Drawing
Scene Starters
• Use any of the cool tools to
make your own creation:
“Pencil” Tool
Straight Line
Shape Maker
Stamp It
Special Effects Selector
• Touch the arrows on the bottom
of the screen with the stylus to
scroll through choices.
• When you find a scene that you like,
touch the screen with the stylus.
• Use any of the tools to make
the scene!
Face Templates
Connect-the-Dots
• Touch the arrows on the bottom
of the screen with the stylus to
scroll through each funny face.
• When you find a face that
you like, touch the screen
with the stylus.
• Finish the face using any of
the tools.
Hint: When you finish a drawing, you can Erase It (touch ), Full Screen
Erase (touch ), Save It or Send It! (touch ) or go back to the Home Screen
(touch ). Please refer to the instructions in the Tool Menu section for more
details about using each of these tools.
• Touch the arrows on the bottom
of the screen with the stylus
to scroll through each pattern.
Can you guess what it will be?
• When you find a pattern that you
like, touch the screen with the stylus.
• Connect the dots to see if you
were right!
Page 6

Tool Menu
After you choose an activity from the Home Screen, choose a tool!
Touch the tool with the stylus.
“Pencil” Tool
Straight Line
Touch for freestyle drawing or writing.
Create your own drawing or write a message with
the stylus.
Touch to make straight lines.
Now,choose the thickness for your “pencil” tool.
Touch the screen with the stylus, drag it and stop.
Look – a straight line!
Hint: Make your own shapes or create your own
connect-the-dots.
6
Page 7

Tool Menu
Shape Maker
Touch the screen and drag the stylus to make small or
large shapes.
Hint: To make a triangle, touch the screen and drag the
stylus to make the base of the triangle.Then,touch the base
line with the stylus and drag it to complete the triangle.
Touch to make shapes.
Now,choose the shape – triangle, circle, square/
rectangle or make your own shape!
Touch the screen as many times as you like with the
stylus for lots of stamper fun!
Hint: Choose more than one stamper to make a picture!
Simply touch the Stamp It tool ; touch the arrows to
scroll through the different stampers; and touch the
screen with the stylus to choose a stamper.Look – you’re
back to your picture. Use the new stamper in your picture.
Touch for stamper art.
Stamp It
Touch the arrows on the bottom of the screen
with the stylus to scroll through stamper designs.
Touch the screen with the stylus to choose a stamper.
7
Page 8

Erase It
Use your stylus to erase any part of what’s
on the screen.
Tool Menu
Touch to make your stylus an eraser.
Full Screen Erase
Hint: After using the full screen erase, you’re still in
the same activity using the tool you used before you
erased the screen.
Touch to choose an animated full screen erase with
cool sound effects.
Choose from four differents screens.Touch the
screen with the stylus and watch and listen as
your picture disappears.
Now,choose a thickness for the eraser.
8
Page 9

9
Tool Menu
Special Effects Selector
Switch from white to black or black to white;
rotate it, mirror it, fill in a selected drawing area
or write a caption.
Touch to choose a special effect.
To create your own caption, touch each letter of
each word with the stylus. Touch the bottom of
the screen with the stylus. You’re back to your
creation.Touch the screen with the stylus to
“stamp”your caption on the screen.
Touch the screen with the stylus and watch
the special effect.
White to Black/Black to White/Rotate/Mirror Tool
To fill in a selected drawing area, select the area.
Watch the selected area fill in.
Quick-Paint Tool
Typing Tool
Page 10

10
Save It or Send It
(Add a Subject Line to your
message and Adjust the Volume too)
Save It
Touch the IN file to save; touch the
OUT of file to retrieve; touch the
volume control to increase or decrease
sound to a comfortable level.
Touch this tool to save or retrieve your drawing,
send a message, add a subject line to your message
or adjust the volume.
Add a Subject Line to Your Message
To create a subject line for messages, touch each
letter of each word with the stylus.When you
are finished, touch the screen.Your subject line
is automatically stored.
Send It
To send a picture or message, make sure the receiver
(the other Pixter™ 2.0 unit) is no more than five feet
away and signal domes are aligned! Touch the on
the screen to send your message.
To receive a message touch the nodding yes face
on the screen.
Message Tips
• Make sure the signal dome on each Pixter 2.0 unit is in a direct
line and no more than five feet away.
• Make sure the path between the signal domes is free of obstacles.
• For best performance, avoid using in areas of bright light.
Hints:
- You can save one picture at a time! Each time you save a picture,
it replaces the one already there.
- After you save a picture, it will appear on your screen again.
To make a new picture, choose another activity.
Page 11

Tool Menu
Home
Touch to go back to the Home Screen.
Choose an activity: Freestyle Drawing,
Scene Starters, Face Templates or Connect-the-Dots!
11
Page 12

Battery Installation
• Locate the battery compartment on the back of the toy.
• Loosen the screws in the
battery compartment door
with a Phillips screwdriver.
• Lift to remove the battery
compartment door.
Battery Compartment
1.5V x 4
“AA” (LR6)
Shown Actual Size
• Insert four “AA” (LR6) alkaline batteries as indicated inside the battery
compartment.
Hint: We recommend using alkaline batteries for longer battery life.
• Replace the battery compartment door and tighten the screws with
a Phillips screwdriver. Do not over-tighten.
12
™
Page 13

Battery Tips
• Do not mix old and new batteries.
• Do not mix different types of batteries: alkaline, standard (carbon-zinc)
or rechargeable (nickel-cadmium).
• Remove the batteries during long periods of non-use. Always remove
exhausted batteries from the toy. Battery leakage and corrosion can
damage this toy.Dispose of batteries safely.
• Do not dispose of batteries in a fire.The batteries may explode or leak.
• Never short circuit the battery terminals.
• Non-rechargeable batteries are not to be recharged.
• Only batteries of the same or equivalent type as recommended in the
“Battery Installation” instructions are to be used.
• If removable rechargeable batteries are used, they are only to be
charged under adult supervision.
• Rechargeable batteries are to be removed from the toy before they
are charged.
• If you use a battery charger,it should be examined regularly for
damage to the cord, plug, enclosure and other parts. Do not use a
damaged battery charger until it has been properly repaired.
Care
• Keep water,sand and dirt off of this toy.
• Keep this toy away from direct sunlight and excessive heat.
• Wipe this toy with a clean cloth dampened with a mild soap and
water solution. Do not immerse this toy.
• This toy has no consumer serviceable parts. Please do not take this
toy apart.
• Do not drop this toy on a hard surface.
13
Page 14

14
Calibrating the Stylus
• Turn PixterTMover and locate the calibration hole.
• Insert, push and hold the stylus in the calibration hole.Turn Pixter over
so that you can see the screen.When you see two ,you can remove the
stylus from the calibration hole.
• First touch the upper right corner with the tip of the stylus.
• Then, touch the lower left corner with the tip of the stylus.
IMPORTANT!
From time to time,the mark made
on your screen from the stylus and
the location of the tip of the stylus
may not align. When this happens,
you must calibrate the stylus.
Mark on Screen
Tip of
Stylus
™
Page 15

Fisher-Price,Inc., 636 Girard Avenue, East Aurora, New York 14052 warrants
Pixter 2.0™ is free from all defects in material and workmanship when used
under normal conditions for a period of one (1) year from the date of purchase.
Should the product fail to perform properly, we will repair or replace it at our
option, free of charge. Purchaser is responsible for shipping the product to
Consumer Relations at the address indicated above and for all associated freight
and insurance cost. Fisher-Price,Inc. will bear the cost of shipping the repaired or
replaced item to you. This warranty is void if the owner repairs or modifies
the product. This warranty excludes any liability other than that expressly
stated above including but not limited to any incidental or consequential
damages.
SOME STATES DO NOT ALLOW THE EXCLUSION OR LIMITATION OF
INCIDENTAL OR CONSEQUENTIAL DAMAGES, SO THE ABOVE LIMITATION
OR EXCLUSION MAY NOT APPLY TO YOU.
THIS WARRANTY GIVES YOU SPECIFIC LEGAL RIGHTS, AND YOU MAY ALSO
HAVE OTHER RIGHTS WHICH MAY VARY FROM STATE TO STATE.
One (1) Year Limited Warranty
15
FCC Statement (United States Only)
This equipment has been tested and found to comply with the limits for a Class B
digital device, pursuant to part 15 of the FCC rules.These limits are designed
to provide reasonable protection against harmful interference in a residential
installation. This equipment generates,uses and can radiate radio frequency
energy and, if not installed and used in accordance with the instructions, may
cause harmful interference to radio communications. However, there is no
guarantee that interference will not occur in a particular installation. If this
equipment does cause harmful interference to radio or television reception,
which can be determined by turning the equipment off and on, the user
is encouraged to try to correct the interference by one or more of the
following measures:
- Reorient or relocate the receiving antenna.
- Increase the separation between the equipment and receiver.
- Connect the equipment into an outlet on a circuit different from that to which
the receiver is connected.
- Consult the dealer or an experienced radio/TV technician for help.
Note: Changes or modifications not expressly approved by the manufacturer
responsible for compliance could void the user’s authority to operate
the equipment.
Page 16

Fisher-Price, Inc., a subsidiary of Mattel, Inc., East Aurora, NY 14052 U.S.A.
©2002 Mattel, Inc. All Right Reserved. ® and ™ designate
U.S. trademarks of Mattel, Inc.
Printed in China B0655-0920
Consumer Information
Questions? We’d like to hear from you!
Call Fisher-Price® Consumer Relations, toll-free at 1-800-432-KIDS,
8 AM- 6 PM EST Monday through Friday. Hearing-impaired consumers
using TTY/TDD equipment, please call 1-800-382-7470.Or,write to:
Fisher-Price®
Consumer Relations
636 Girard Avenue
East Aurora, New York 14052
For other countries,outside the United States:
Canada: call 1-800-567-7724, or write to:Mattel Canada Inc.,6155 Freemont Blvd.,
Mississauga, Ontario L5R 3W2.
Gr
eat Britain:
telephone 01628 500303.
Australia: Mattel Australia Pty.Ltd.,658 Church Street, Locked Bag #870,Richmond,
Victoria 3121 Australia. Consumer Advisory Service 1300 135 312.
New Zealand: 16-18 William Pickering Drive, Albany 1331, Auckland.
 Loading...