

Page 1
Model Number: 79602, 79458, 79615
INSTRUCTIONS
Please save these instructions for future reference.
Tool needed for assembly: Phillips Screwdriver (not included).
Requires four "C" (LR14) alkaline batteries (not included).
Never use with a child who is able to push up on hands and knees or able to sit upright unassisted.
ROCK-A-BYE CRADLETTE
™
Page 2
SHOWN ACTUAL SIZE
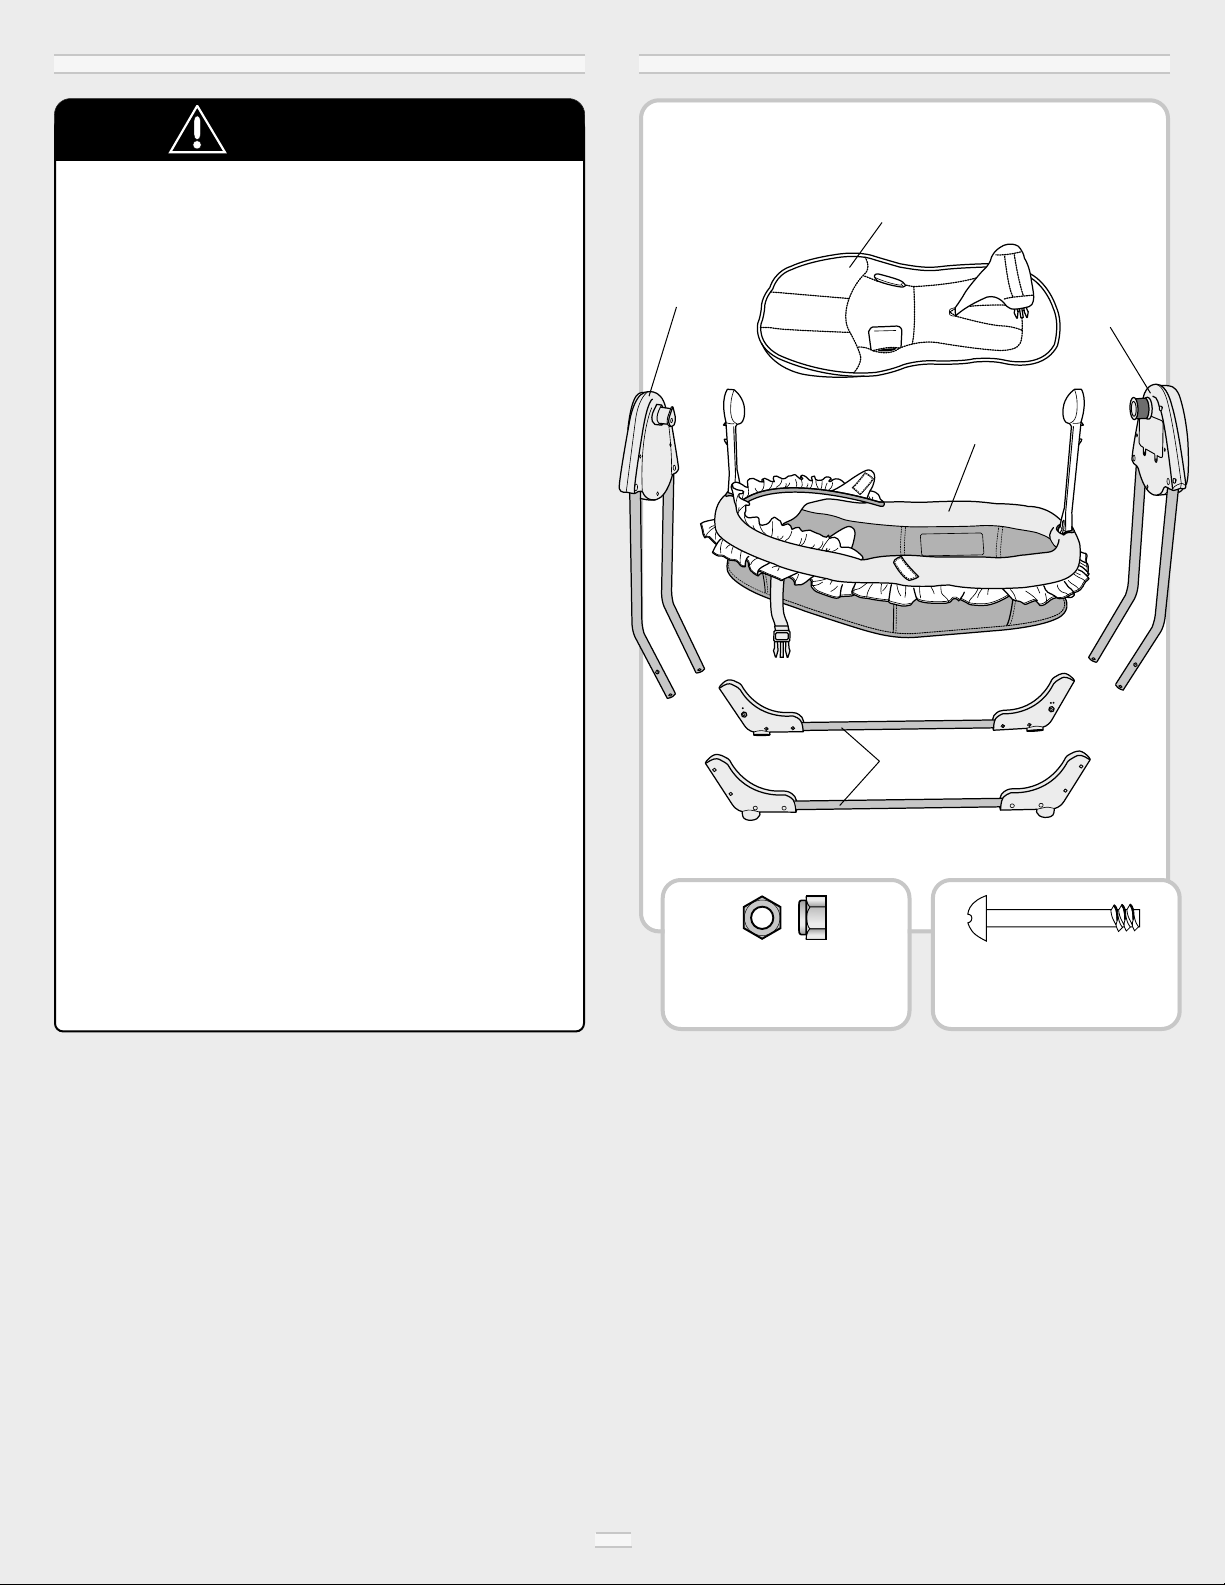
M4 x 11/16" Bolt – 6
SHOWN ACTUAL SIZE
M4 Lock Nut - 4
Motorized
Panel
Cradlette
Panel
2 Base Tubes
Pad
To prevent serious injury or death:
• Suffocation Hazard
- Never add padding, blankets or
additional items under baby. Use
only the pad provided.
- Never use plastic shipping bags
or other plastic film as mattress
covers.
• Fall Hazard
- Never use on any elevated
surface.
• Strangulation Hazard
- Never place items with a string,
such as hood strings or pacifier
cords, around a child’s neck.
- Never place product near a
window where cords from blinds
or drapes can strangle a child.
• Never leave child unattended.
• Never use with a child who is able
to push up on hands and knees or
able to sit upright unassisted.
• Use only with the stand provided.
• Always use the restraint system.
WARNING
WARNINGS
2
IMPORTANT! Please remove all parts from the package
and identify them before assembly.
PARTS
Page 3
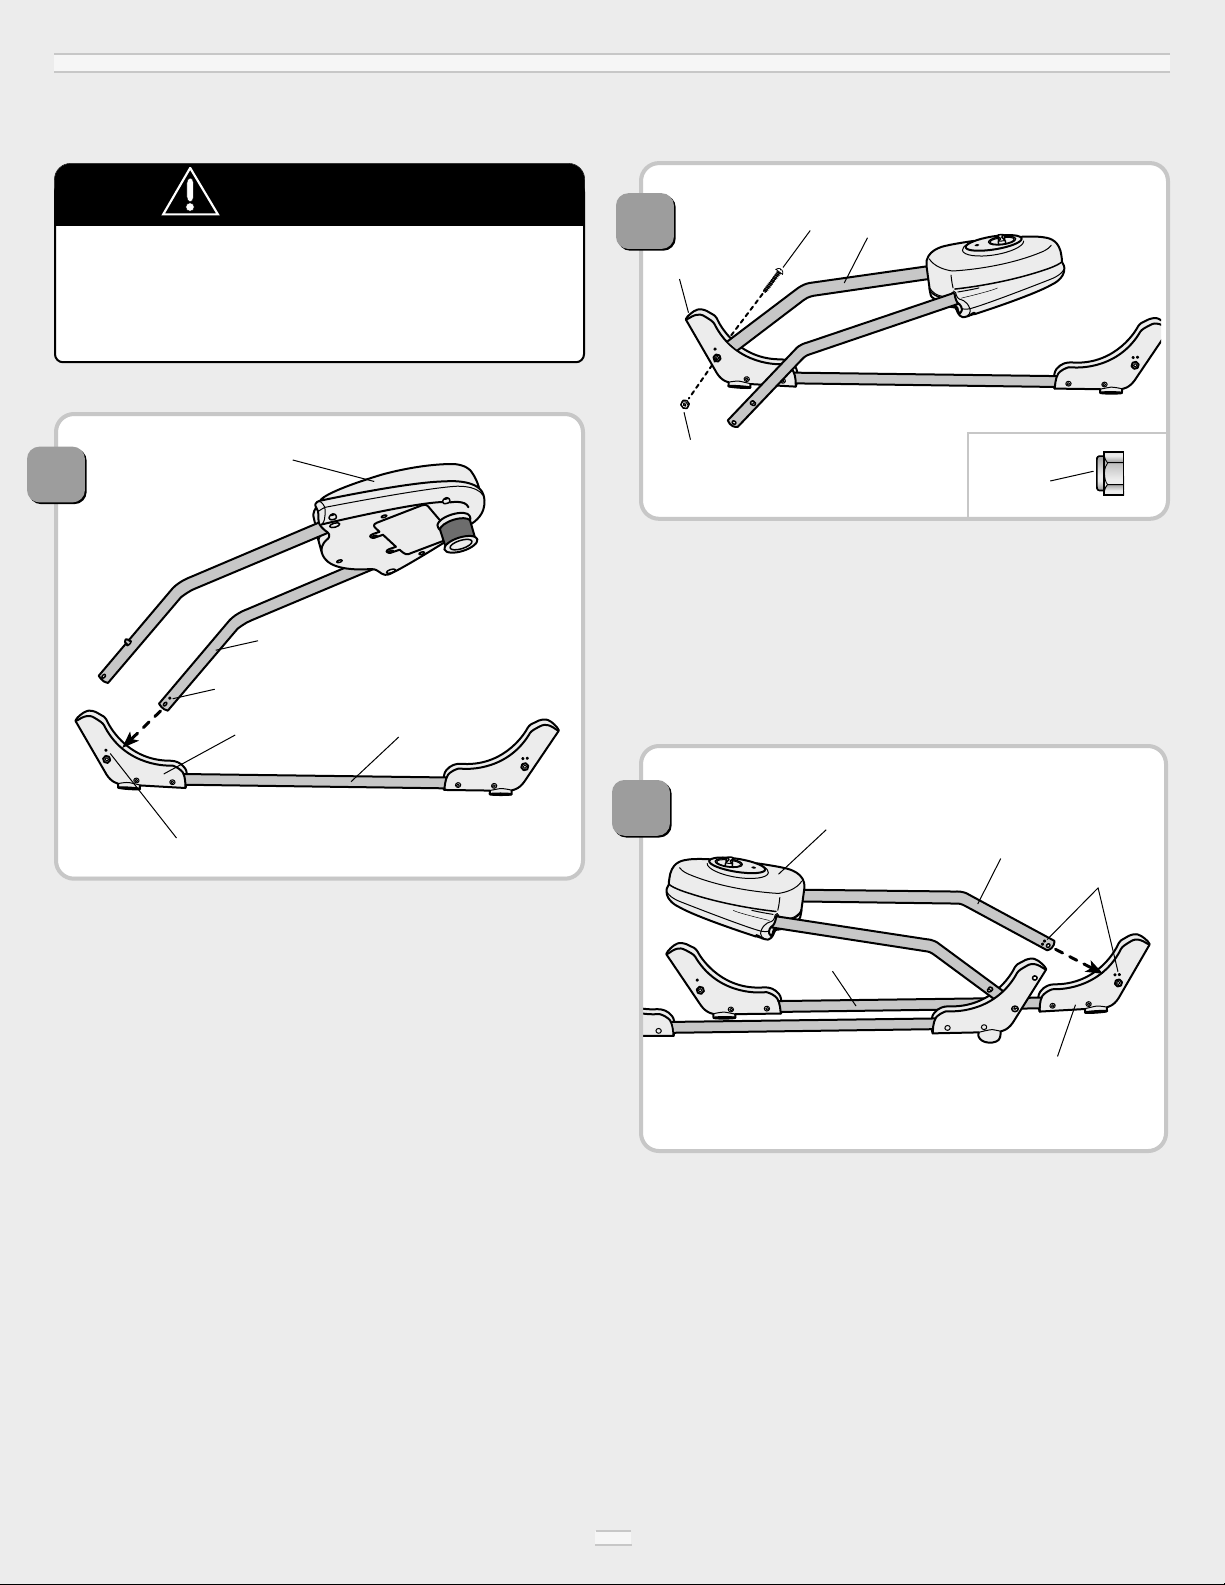
• Fit a lock nut into the hexagonal opening in the base tube foot.
Make sure the protruding side is facing outward.
• Then, insert a bolt through the hole in the opposite side of the base
tube foot and into the motorized panel tube. Tighten the bolt with
a Phillips screwdriver.
IMPORTANT! Do not over-tighten this bolt. If the bolt is overtightened, the tube will not pivot open and closed.
• Place a base tube on a flat surface. Note the location of the single
dot on the foot.
• Position the motorized panel so that the tubes bend down. Locate
the single dot on one of the tubes.
• Fit the motorized panel tube (labeled with a single dot) into the
groove in the base tube foot (labeled with a single dot).
IMPORTANT! Before assembly or each use, inspect this product for damaged hardware, loose joints, missing parts or sharp edges.
3
ASSEMBLY
1
2
Protruding
Side
Foot
Motorized Panel
Base Tube
Single Dot
Single Dot
Bolt
Foot
Lock Nut
This product contains small parts
in its unassembled state.
Adult assembly is required.
CAUTION
3
• Turn the assembly around so the opposite side faces you.
• Place the other base tube on a flat surface. Note the location of the
double dots on the foot.
• Locate the double dots on the motorized panel tube.
• Fit the motorized panel tube (labeled with double dots) into the
groove in the base tube foot (labeled with double dots).
Foot
Motorized Panel
Base Tube
Double Dots
Tube
Tube
Tube
Page 4
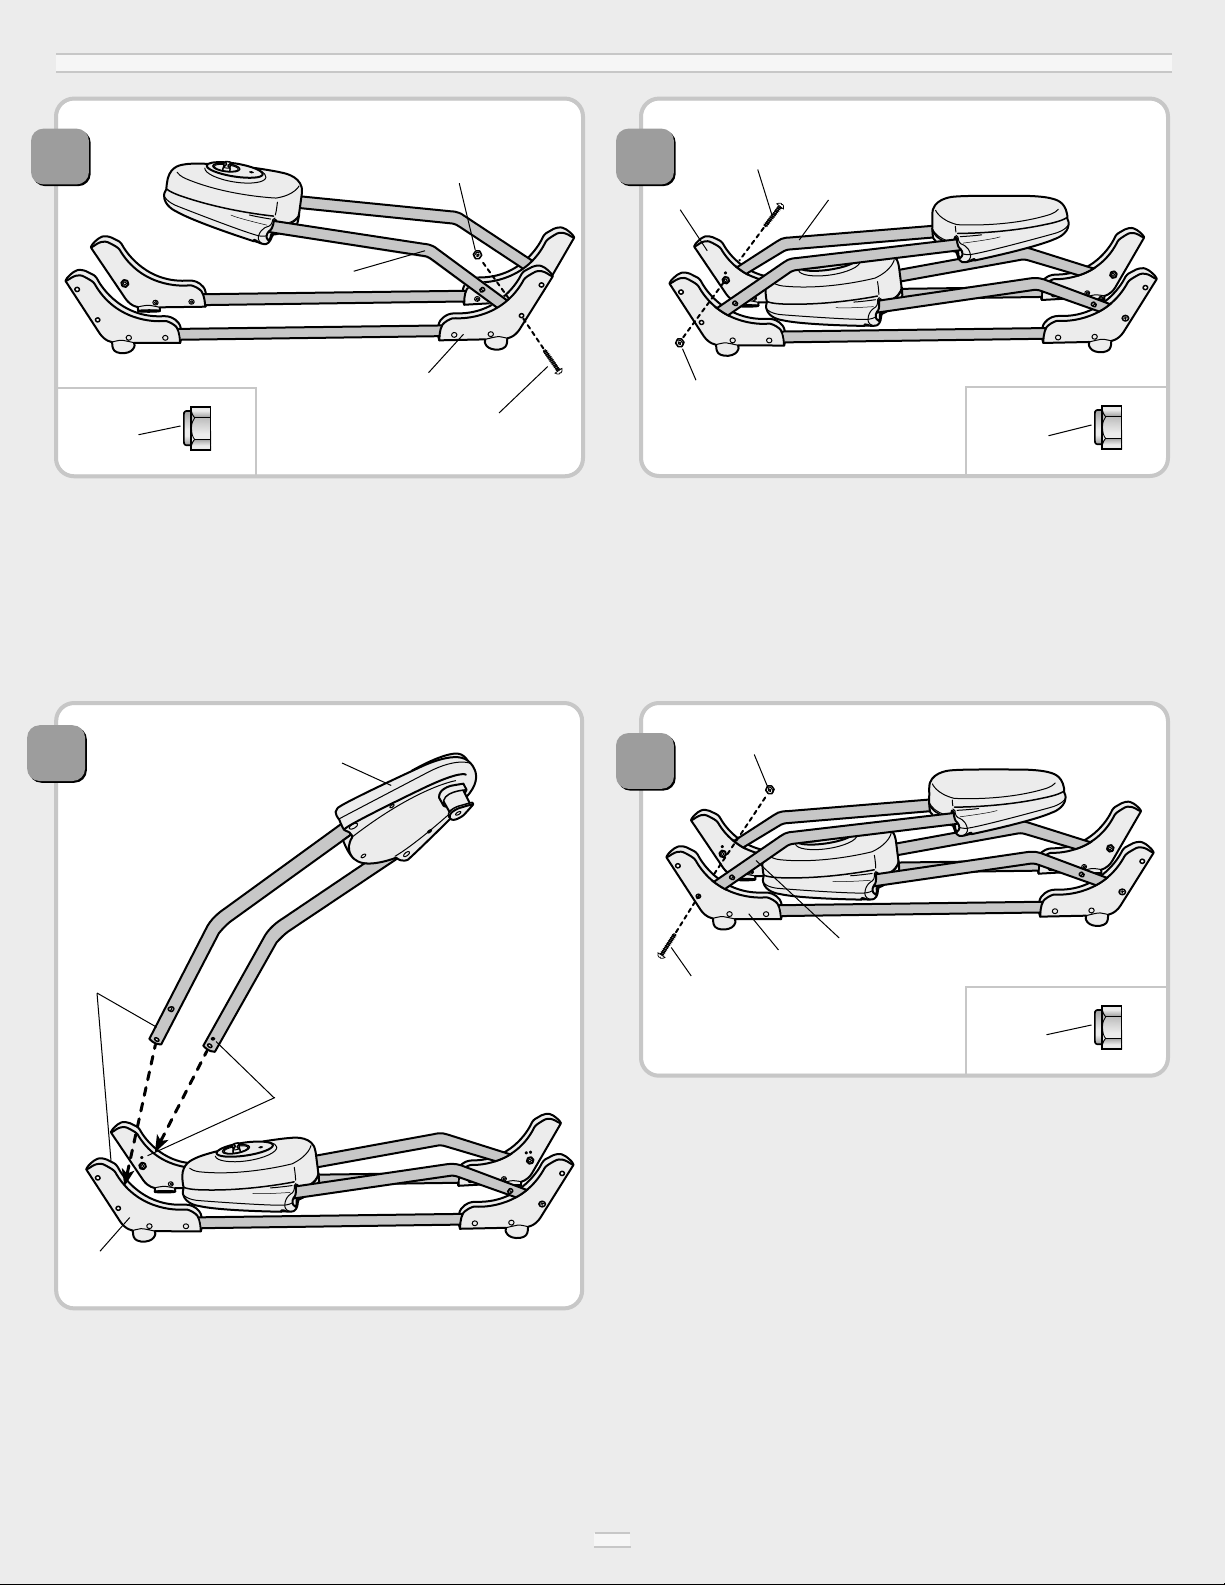
• Turn the assembly around so the opposite side faces you.
• Position the panel so that the tubes bend down. Locate the single
and double dots on the panel tubes.
• Fit the panel tubes into grooves in the base tube feet.
Hint: Match the single and double dots on the panel tubes with the
single and double dots on the base tube feet.
5
ASSEMBLY
Foot
Single Dots
Double Dots
(Not showing
from this
view.)
Panel
4
• Fit a lock nut into the hexagonal opening in the base tube foot.
Make sure the protruding side is facing outward.
• Then, insert a bolt through the hole in the opposite side of the base
tube foot and into the motorized panel tube. Tighten the bolt with
a Phillips screwdriver.
IMPORTANT! Do not over-tighten this bolt. If the bolt is overtightened, the tube will not pivot open and closed.
4
Bolt
Foot
Lock Nut
• Fit a lock nut into the hexagonal opening in the base tube foot.
Make sure the protruding side is facing outward.
• Then, insert a bolt through the hole in the base tube foot and into
the panel tube. Tighten the screw with a Phillips screwdriver.
IMPORTANT! Do not over-tighten this bolt. If the bolt is overtightened, the tube will not pivot open and closed.
6
Bolt
Foot
Lock Nut
• Fit a lock nut into the hexagonal opening in the base tube foot.
Make sure the protruding side is facing outward.
• Then, insert a bolt through the hole in the base tube foot and into
the panel tube. Tighten the bolt with a Phillips screwdriver.
IMPORTANT! Do not over-tighten this bolt. If the bolt is overtightened, the tube will not pivot open and closed.
7
Screw
Foot
Lock Nut
Protruding
Side
Protruding
Side
Protruding
Side
Tube
Tube
Tube
Page 5

5
ASSEMBLY
8
9
11
10
• Lift a panel until it "clicks" into place. Make sure you hear a
"click".
End Panel
Panel
• Lift the other panel until it "clicks" into place. Make sure you
hear a "click".
• Pull each base tube out until each "clicks" into place. Make sure
you hear a "click” for each base tube.
• Position the cradlette upright.
• Press the tab down on one of
the cradlette end caps.
• Fit the end cap to one of the
pegs on a panel.
• Release the tab to secure
the cradlette end cap in place.
• Repeat this procedure to attach
the other end of the cradlette
to the other panel.
• Push down in the center of the cradlette to be sure it is secure to
the frame.
Base Tubes
Peg
Peg
Panel
Panel
End Caps
Cradlette
End
Cap
Tab
Press
Page 6

BATTERY INSTALLATIONASSEMBLY
• Locate the battery compartment in the motorized panel.
• Loosen the screws in the battery compartment door with a
Phillips screwdriver.
• Remove the battery compartment door.
• Insert four "C" (LR14) alkaline batteries as shown inside the
battery compartment.
Hint: Use only alkaline batteries for longest battery life.
• Replace the battery compartment door and tighten the screws with
a Phillips screwdriver. Do not over-tighten.
Battery Tips
• Do not mix old and new batteries.
• Do not mix different types of batteries: alkaline, standard (carbonzinc) or rechargeable (nickel-cadmium).
• Remove the batteries during long periods of non-use. Always
remove exhausted batteries from the product. Battery leakage and
corrosion can damage this product. Dispose of batteries safely.
• Never short circuit the battery terminals.
• Non-rechargeable batteries are not to be recharged.
• Only batteries of the same or equivalent type as recommended in
the Battery Installation instructions are to be used.
• If removable rechargeable batteries are used, they are only to be
charged under adult supervision.
• Rechargeable batteries are to be removed from the toy before they
are charged.
• If you use a battery charger, it should be examined regularly for
damage to the cord, plug, enclosure and other parts. Do not use
a damaged battery charger until it has been properly repaired.
12
• Fit the restraint belts up through the pad slots.
• Attach the pad fastener to the cradlette fastener.
Assembly is now complete. Please refer to the next section for
Battery Installation and then to Operation and Use, beginning
with step 1, page 8.
Pad
Slots
Restraint Belts
6
Battery
Compartment
SHOWN ACTUAL SIZE
1.5 x 3
"C" (LR14)
+
-
Page 7

SETUP
To prevent serious injury or death:
• Fall Hazard
- Never use on any elevated surface.
• Strangulation Hazard
- Never place product near a window
where cords from blinds or drapes
can strangle a child.
• Use only with the stand provided.
WARNING
7
IMPORTANT! Before each use or assembly, inspect this product for damaged hardware, loose joints, missing parts or sharp edges. Do not use if any
parts are missing or broken. Contact Fisher-Price
®
for replacement parts and instructions if needed. Never substitute parts.
1
2
• Place the frame on a flat surface.
• Lift a panel until you hear the legs "click" into place. Make sure
you hear a "click" and the buttons on each leg snap into the
holes in each foot.
Panel
Panel
Button
Foot
Buttons
Buttons
Panels
Foot
Button
• Lift the other panel until you hear the legs "click" into place.
Make sure you hear a "click" and the buttons on each leg
snap into the holes in each foot.
• Pull each base tube out until each "clicks" into place. Make sure
you hear a "click" and the buttons are visible in each panel.
Base Tubes
3
Page 8

1
Restraint
Belt
Restraint
Belt
Restraint
Pad
• Place your baby in the cradlette.
• Position the restraint pad between your baby's legs.
• Fasten both restraint belts to the buckles on each side of the
restraint pad. Make sure you hear a "click" on both sides.
• Check to be sure the restraint is securely attached by pulling it away
from your baby. The restraint should remain attached.
To prevent serious injury or death:
• Suffocation Hazard
- Never add padding, blankets or
additional items under baby. Use
only the pad provided.
- Never use plastic shipping
bags or other plastic film as
a mattress cover.
• Strangulation Hazard
- Never place items with a string,
such as hood strings or pacifier
cords, around a child’s neck.
• Never leave child unattended.
• Never use with a child who is able to
push up on hands and knees or able
to sit upright unassisted.
• Always use the restraint system.
WARNING
8
RRee ssttrraaiinntt UUss ee
4
• Position the cradlette upright.
• Press the tab down on one of
the cradlette end caps.
• Fit the end cap to one of the
pegs on a panel.
• Release the tab to secure
the cradlette end cap in place.
• Repeat this procedure to attach
the other end of the cradlette
to the other panel.
• Push down in the center of the cradlette to be sure it is secure to
the frame.
Peg
Peg
Panel
Panel
End Caps
Cradlette
End
Cap
Tab
• Normal, healthy infants should ALWAYS sleep on their backs.
• Quilts, comforters and blankets should NEVER be placed under
an infant.
• NEVER place any covering higher than an infant's shoulders.
• NEVER place infants to sleep on pillows, sofa cushions, adult beds,
waterbeds, beanbags, or any other surface not specifically designed
for infant sleep.
• Do not overdress your baby. If you feel comfortable, your baby
will too.
* This important safety message is brought to you by the Juvenile Products
Manufacturers Association.
SETUP
OPERATION AND USE
WHEN PUTTING BABY
TO SLEEP*
Press
Page 9

OPERATION AND USE
Buckle
• You can adjust the cradlette to an upright or recline position for
baby's comfort.
To adjust the cradlette to upright:
• Lift the back of the cradlette and then fasten the buckle. Make sure
you hear a "click".
To adjust the cradlette to recline:
• Support the back of the cradlette with your hand, unfasten the
buckle and guide the back of the cradlette down into position.
• Tuck the buckle straps in the pockets on each side of the cradlette.
9
4
CCrraaddlleettttee PPooss iittiioonn AAddjjuussttmmeenntt
BACK VIEW
UPRIGHT
RECLINE
3
To tighten the restraint belts:
• Feed the anchored end of the restraint belt up through the buckle
to form a loop .
Anchored End
Free End
Buckle
Anchored End
Free End
• Pull the free end of the restraint belt .
• Repeat this procedure to tighten the other restraint belt.
To loosen the restraint belts:
• Feed the free end of the restraint belt up through the buckle to
form a loop .
• Enlarge the loop by pulling on the end of the loop toward
the buckle.
• Pull the anchored end of the restraint belt to shorten the free end
of the restraint belt .
• Repeat this procedure to loosen the other restraint belt.
Note: After adjusting the restraint belts to fit your baby, make sure
you pull on them to be sure they are securely fastened.
TO TIGHTEN TO LOOSEN
2
Page 10

O
k
g
.
3
4
5
6
7
8
l
b
.
7
9
1
1
1
3
1
5
1
7
6
To start:
•
Turn the power dial to the weight of your baby. The power
indicator lights.
• Give the cradlette a light push to start the swinging motion.
• As baby grows, turn the dial to the appropriate weight for ideal
swinging motion.
IMPORTANT! If the swinging motion slows down considerably (on all
settings) or does not work at all, replace the batteries with four, new
"C" (LR14) alkaline batteries (see Battery Installation section).
Power Dial
• Press the tab on one of the
cradlette end caps.
• Remove the cradlette end cap
from the peg on the panel.
• Repeat this procedure to
remove the other cradlette
end cap from the other panel.
Peg
Peg
End Caps
Panel
Panel
• Press the buttons on the panels and push the base tube inward.
• Repeat this procedure to unlock and store the other base tube.
Panels
Base Tube
Base Tube
Buttons
10
1
2
SSwwiinngg SS eettttiinn ggss
• The canopy can be adjusted up or down.
• Fasten the fasteners on each side of the canopy for the up position.
Fasteners
5
CCaann oo ppyy AAddjjuussttmmeenntt
CANOPY UP
CANOPY DOWN
End
Cap
Tab
OPERATION AND USE
STORAGE
IMPORTANT! You must first store
the base tubes before the legs.
Buttons
Press
Power
Indicator
Page 11

STORAGE
3
4
Button
Foot
Leg
• Press the button on each foot and pull to release the legs.
• Lower the panel.
Panel
• Press the button on each foot and pull to release the legs.
• Lower the panel.
5
• Fold the end caps down into the cradlette.
• Fit the frame into the cradlette.
11
Frame
Cradlette
End Cap
End Cap
15
• Fit the frame and cradlette into the cover.
• Fasten the fasteners on the cover closed.
Cover
Foot
Button
Buttons
Legs
Page 12

TToo RReemmoovv ee tthhee PP aadd
• Feed the restraint belts down through the slots in the pad.
• Unfasten the fasteners on the pad from the cradlette.
TToo RRee--aassssee mmbb llee tt hhee PP aadd
• Fit the restraint belts up through the pad fastener slots.
• Attach the pad fasteners to the cradlette.
CARE CONSUMER INFORMATION
ONE (1) YEAR
LIMITED WARRANTY
• Machine wash the pad and cover in cold water with a mild
detergent. Do not use bleach. Tumble dry on low heat and
remove promptly.
• Surface wash the frame, cradlette and restraint system with a
mild detergent and water. Do not use bleach. Do not use harsh
or abrasive cleaners. Rinse clean with water to remove residue.
Do not immerse the frame.
Fisher-Price, Inc., a subsidiary of Mattel, Inc., East Aurora, NY 14052 U.S.A. 79602pr-0920
©2000 Mattel, Inc. All Rights Reserved. ® and ™ designate U.S. trademarks of Mattel, Inc. Printed in China
Occasionally a consumer may experience a problem with one of our
products. If this should happen please call us, toll-free, rather than
return this product to the store. Usually we can solve the problem
on the telephone or by sending you replacement parts. Please call
Fisher-Price
®
Consumer Relations, toll-free at 1-800-432-KIDS,
8 AM - 6 PM EST Monday through Friday. Hearing-impaired
consumers using TTY/TDD equipment, please call 1-800-382-7470.
Or, write to: Fisher-Price
®
Consumer Relations, 636 Girard Avenue,
East Aurora, New York 14052.
Restraint Belts
Slot
Pad
If you have any questions about this product: In Canada, call 1-800-567-7724, or write to: Mattel Canada Inc., 6155 Freemont Blvd., Mississauga, Ontario L5R 3W2.
In Gr
eat Britain, telephone 01628 500303.
In Australia, call the Fisher-Price Australian Consumer Advisory Service toll-free at 1-800-800-812, or write to: Mattel Pty. Ltd., 658 Church Street, Locked Bag #870, Richmond Victoria, 3121 Australia.
Fisher-Price, Inc., 636 Girard Avenue, East Aurora, New York 14052 warrants
Rock-A-Bye Cradlette™ is free from all defects in material and workmanship
when used under normal conditions for a period of one (1) year from the
date of purchase.
Should the product fail to perform properly, we will repair or replace it at our
option, free of charge. Purchaser is responsible for shipping the product to
Consumer Relations at the address indicated above and for all associated
freight and insurance cost. Fisher-Price, Inc. will bear the cost of shipping the
repaired or replaced item to you. This warranty is void if the owner repairs or
modifies the product. This warranty excludes any liability other than that
expressly stated above including but not limited to any incidental or
consequential damages.
SOME STATES DO NOT ALLOW THE EXCLUSION OR LIMITATION OF
INCIDENTAL OR CONSEQUENTIAL DAMAGES, SO THE ABOVE
LIMITATION OR EXCLUSION MAY NOT APPLY TO YOU.
THIS WARRANTY GIVES YOU SPECIFIC LEGAL RIGHTS, AND YOU
MAY ALSO HAVE OTHER RIGHTS WHICH MAY VARY FROM STATE
TO STATE.
 Loading...