

Page 1
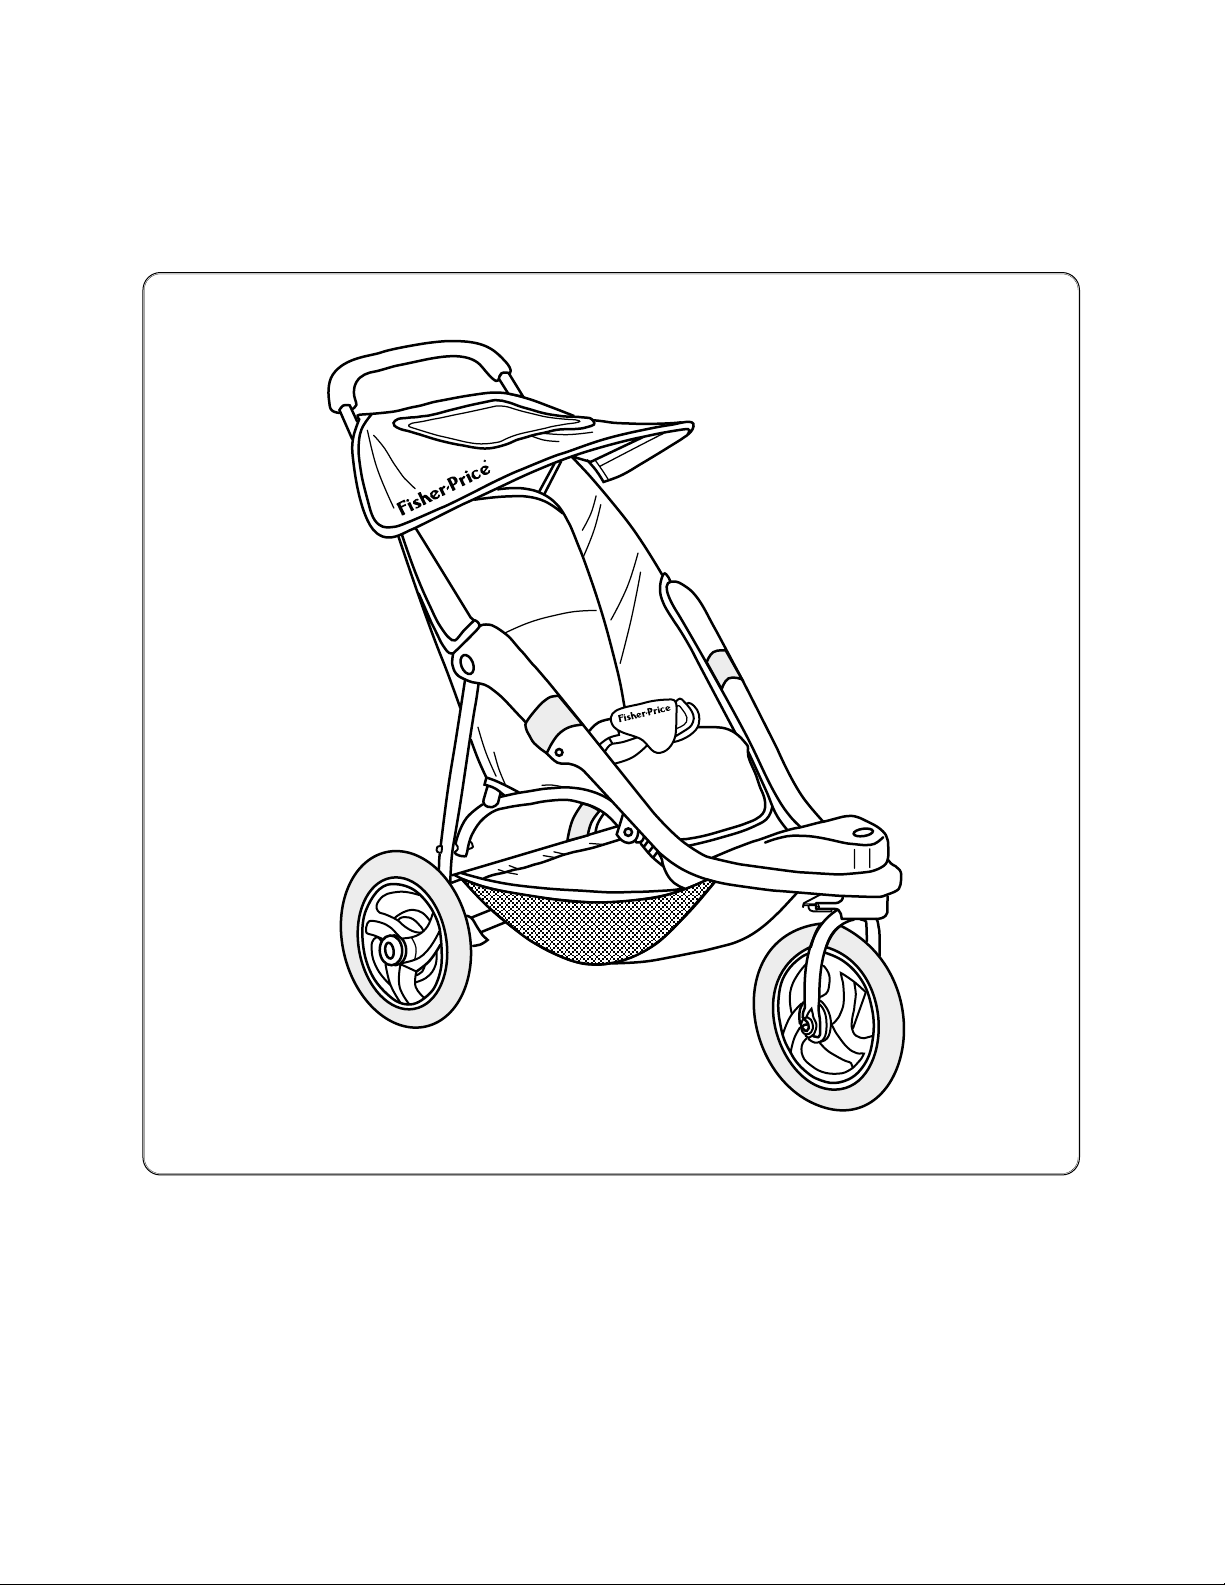
Town & Country
™
Stroller
Model Numbers: 79235, 79278, 79292
Fishe r- Price
• Please save these instructions for future reference.
• Adult assembly is required.
• Tool needed for assembly: Adjustable Wrench.
• Tool needed for maintenance: Large Adjustable Wrench,
Long Shaft Phillips Screwdriver.
• Maximum weight of child: 40 lbs.
• Maximum height of child: 38 inches.
• Maximum storage weight for carry compartment: 8 lbs.
®
Page 2

The safety of your child while in the Town & Country Stroller depends on you!
Please read and understand the following warnings and instructions before use.
• Never leave your child unattended.
• To prevent serious injury or death from falls or sliding out, always use the restraint belts.
• Do not carry additional children, goods or accessories in or on the Town & Country Stroller,
except as recommended in the instructions.
• The Town & Country Stroller may become unstable if items are hanging from or placed on the
handle. Do not hang shopping bags, purses or accessories on the handle.
• The Town & Country Stroller may become unstable if the maximum storage weight of the carry
compartment is exceeded. Do not exceed the maximum storage weight of 8 lbs. in the carry
compartment.
Thank you for purchasing the Fisher-Price Town & Country Stroller.The design of this stroller makes it easier to take your
child everywhere you go...over sand, over grass and even gravel.We believe you will find the features of this Fisher-Price
product to be a great help in the day-to-day care of your child.
Occasionally a consumer may experience a problem with one of our products.If this should happen, please call us toll-free,
rather than returning this product to the store. Usually, we can solve the problem on the telephone or by sending you
replacement parts. Please call Fisher-Price Consumer Affairs, toll-free at 1-800-432-KIDS, 8 AM - 6 PM EST Monday through
Friday, 9 AM - 5 PM EST Saturday. Hearing-impaired consumers using TTY/TDD equipment, please call 1-800-382-7470. Or,
write to: Fisher-Price Consumer Affairs, 636 Girard Avenue, East Aurora, New York 14052.
Message to Parents
2
WARNING
Page 3
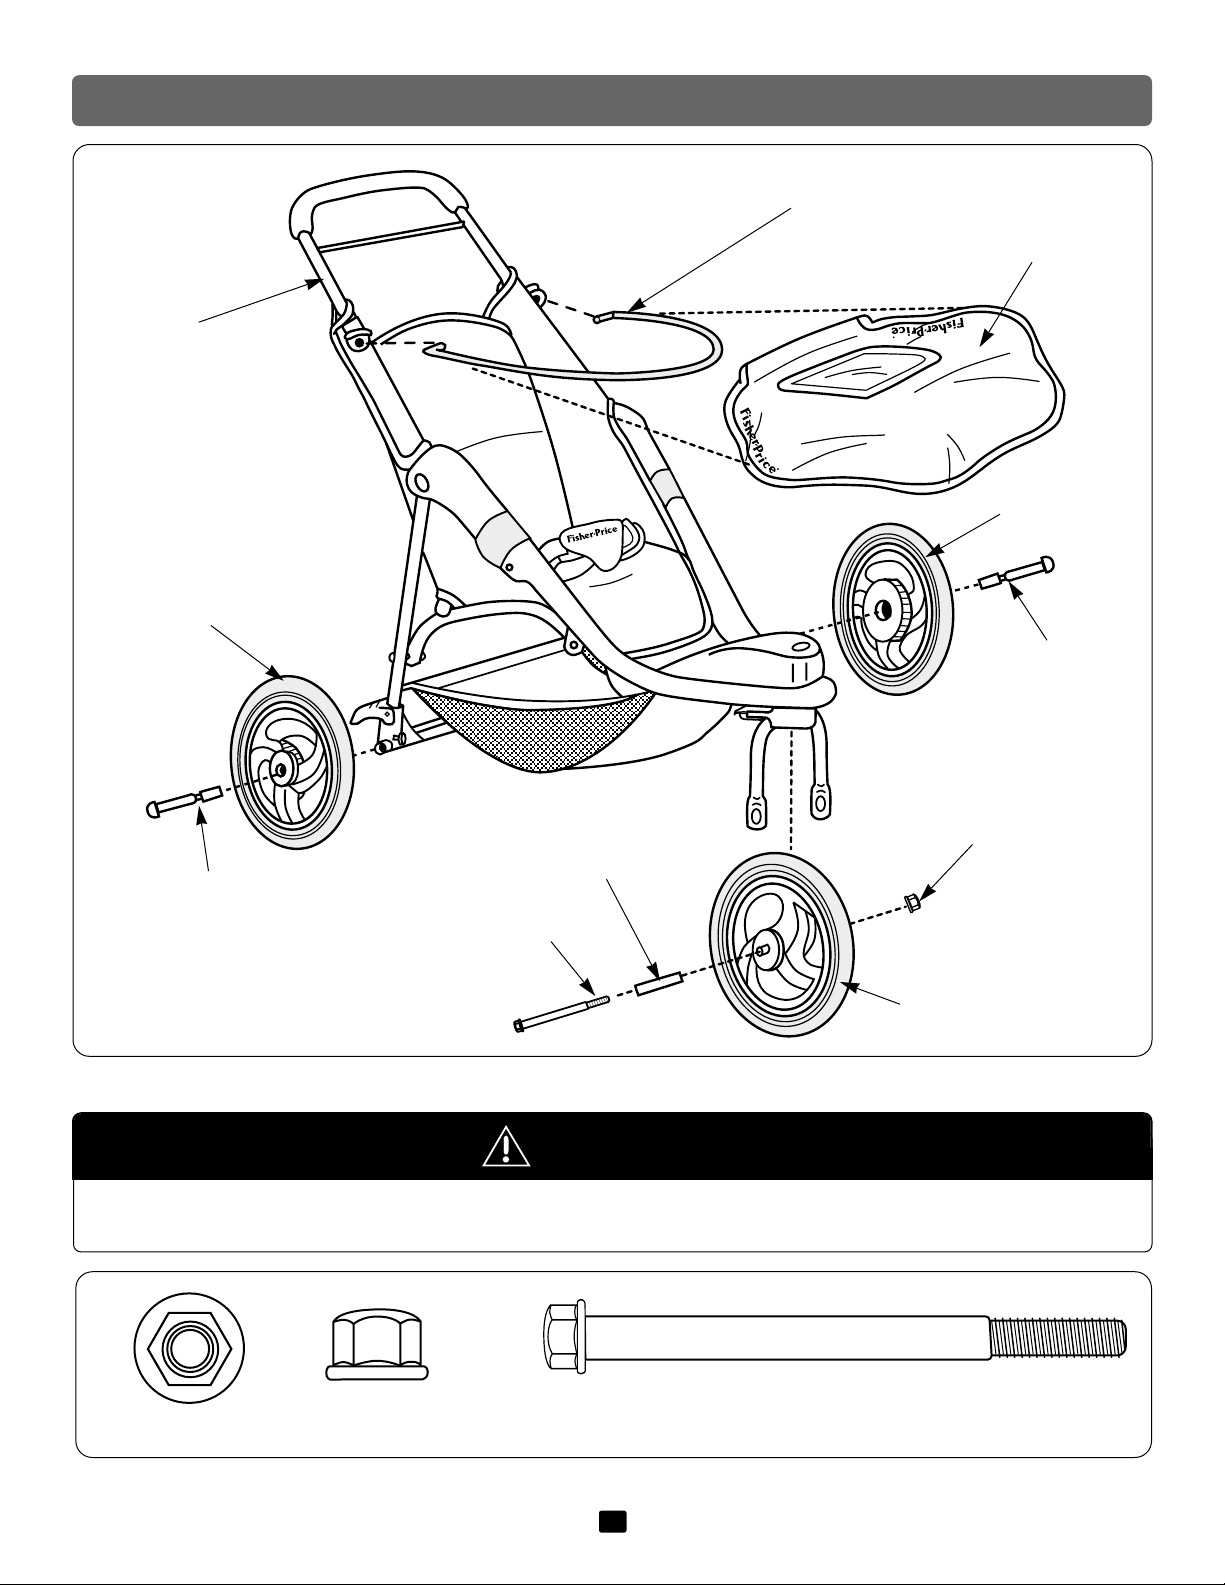
Frame
Front Wheel
Bolt
Front Axle Tube
Rear Wheel
Rear Axle
Canopy
Canopy Stay
BOTH SHOWN ACTUAL SIZE
Rear Axle
Rear Wheel
Nut
Bolt - 3/8" x 3 13/16"
Nut
CAUTION
Please keep small parts and plastic bags out of children’s reach.
Parts
3
Page 4
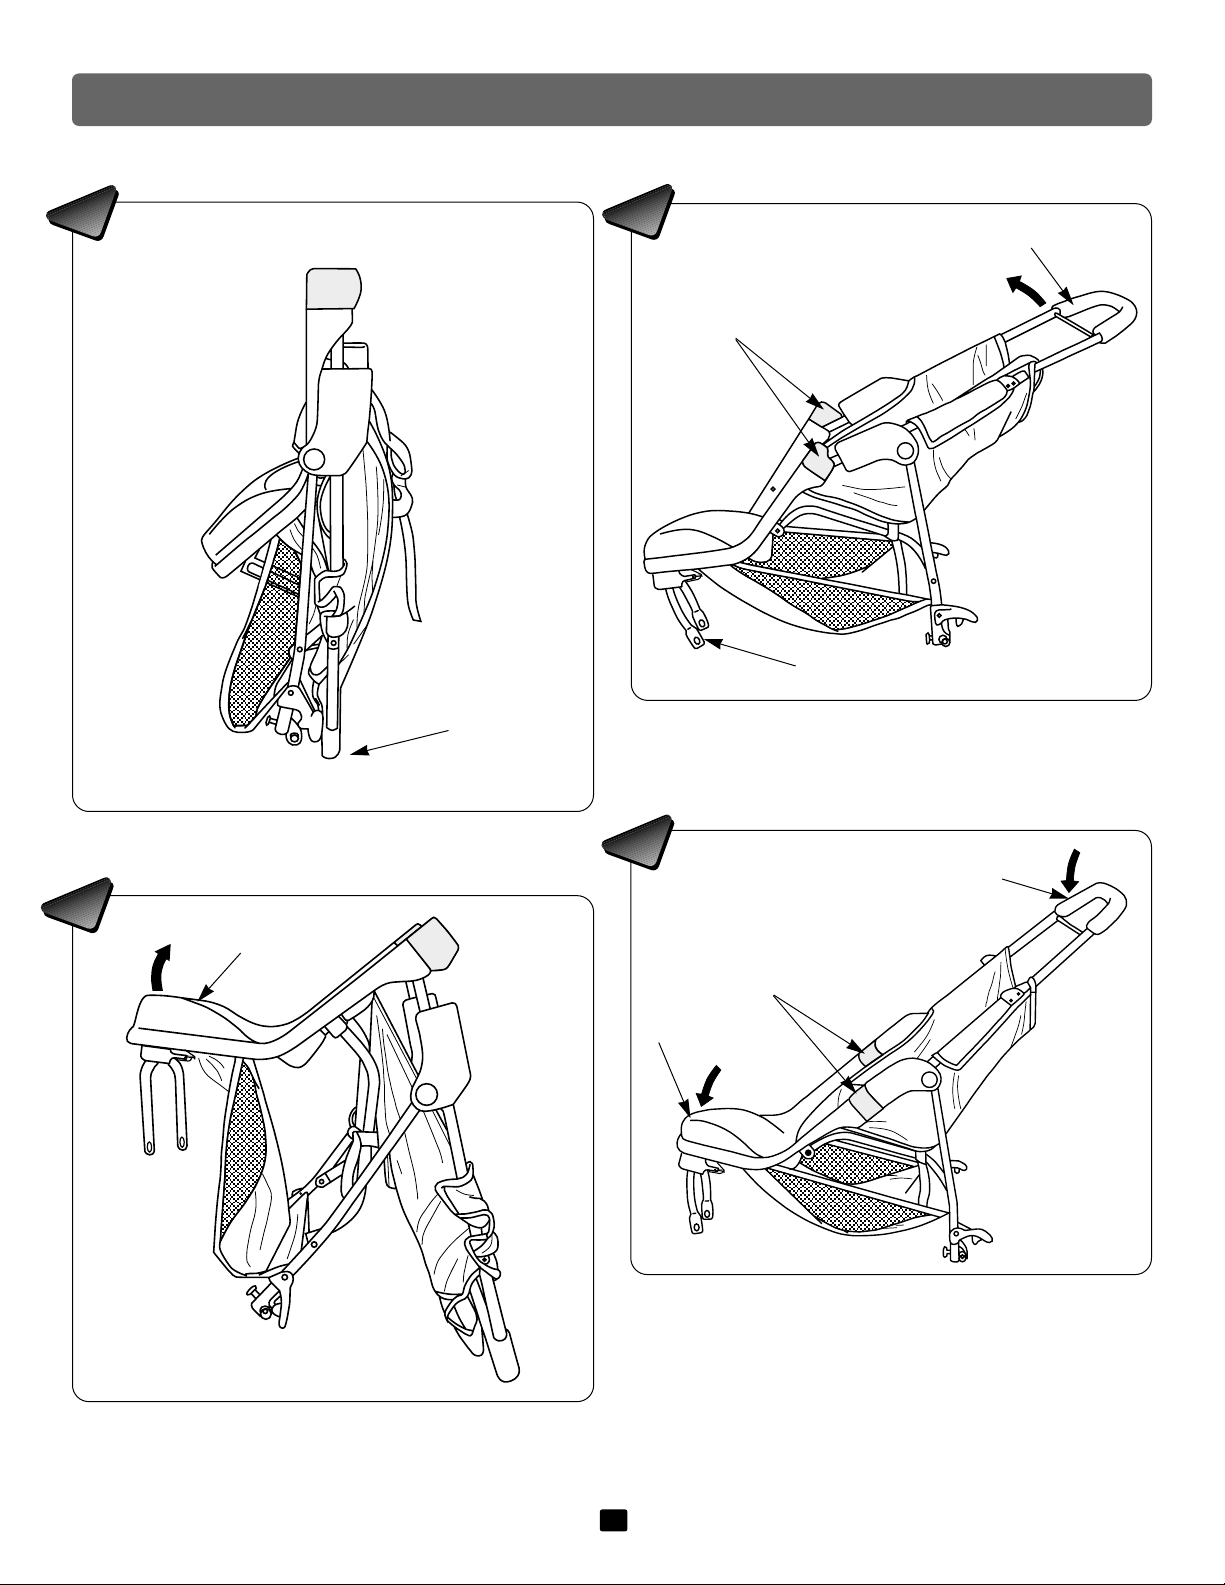
• Test to be sure both frame latches are secure by lightly
pushing down on the handle while holding the footrest
down.The frame latches should remain locked in
position.
• Position the stroller with the handle on the floor.
• Rest the fork on the floor.
• Lift the handle up until the frame latches “snap” into
position.
• Lift the footrest.
To Unfold
Handle
Footrest
Fork
Handle
Frame Latches
Frame Latches
Assembly
Handle
1
2
3
4
Footrest
4
Page 5

Rear Wheel Assembly
• Position the stroller with the handle on the floor.
• Place the front wheel between the fork.
• Insert the 3
13
/16" bolt through the fork hole and into the
front axle tube.
• Attach the nut onto the end of the bolt.
• Turn the stroller on its side.
• Make sure the brake pedals are in the unlocked
(up) position.
• Position a rear wheel near the rear axle tube with the flat
hub side outward.
• Insert a rear axle into the rear wheel.
• Insert the end of the rear axle (with rear wheel) into the
rear axle tube.
• Pull the axle retaining knob out while pushing the rear
axle into the rear axle tube.
• Release the axle retaining knob and push the rear axle in
until you hear a “click”.
• Tighten the nut with an adjustable wrench.
Rear Axle
Flat Hub Side
Rear Wheel
Brake Pedal
• Insert the front axle tube completely into the hole in the
front wheel.
Front Wheel Assembly
Front Wheel
Front Axle Tube
Axle Retaining
Knob
5
6
7
8
Rear Axle Tube
Please Note: To reduce friction and prevent excessive heat
build-up, lubricate the rear axles with a light oil before
assembly and regularly during use.
Bolt
Nut
5
Page 6

• Test to be sure the rear wheel is secure by pulling on it.
• Repeat this procedure to attach the other rear axle and
rear wheel.
• Turn the stroller upright.
• Position the canopy over the stroller, with the window
flap upward.
• Align and insert the tabs on one end of the canopy stay
into the keyhole in the canopy mount.
• Repeat this procedure to attach the other end of the
canopy stay to the stroller.
• Insert and slide the canopy stay through the canopy
tunnel.
Canopy Assembly
Canopy
Keyhole
Canopy
Mount
Canopy
Stay
Tunnel
Canopy Stay
• Lift the canopy .
• Wrap the back of the canopy around the canopy bar and
press the fasteners together .
2
1
Fasteners
Canopy Bar
Canopy
1
2
9
Window Flap
One-time assembly is now complete.
6
11
10
12
Page 7

• For baby’s comfort, the seat back can be adjusted to an
upright or a recline position.
Seat Back Adjustment
Recline Position
Upright Position
Operation and Use
To Unfold
• Position the stroller with the rear wheels on the floor.
• Lift the footrest and the handle.
• Rest the front wheel on the floor.
• Lift the handle up until the frame latches “snap” into
position.
• Test to be sure both frame latches are secure by lightly
pushing down on the handle while holding the footrest
down.The frame latches should remain locked in
position.
Footrest
Handle
Frame
Latches
1
2
3
4
5
Handle
Frame Latches
Footrest
7
Page 8

• The canopy can be adjusted up or down.
Down
Up
Canopy Adjustment
To adjust the seat back:
• Turn the stroller so that the back is facing you.
• For the recline position, unsnap the buckle and guide the
seat back down.
• For the upright position, lift the seat back and then snap
the buckles together. Make sure you hear a “click”.
Please Note: Push down (from the front of the stroller) on
the seat back to be sure it is secure.
Restraint Belts
Buckle
Free End
Waist Belt
Waist Belt
Triangular
Pad
Seat Back
To prevent serious injury or death from falls
or sliding out, always use the restraint belts.
Free End
WARNING
• Place your child in the stroller.
• Pull the triangular pad up between your child’s legs.
• Fasten both waist belts to the buckles on each side of the
triangular pad. Make sure you hear a “click” on both
sides.
• Make sure the waist belts are properly adjusted to fit your
child.
6
7
To loosen the waist belts:
• Feed the free end of the waist belt up through the buckle to
form a loop .
• Enlarge the loop by pulling on the end of the loop toward
the buckle.
• Pull the anchored end of the waist belt to shorten the free
end of the waist belt .
• Repeat this procedure to loosen the other waist belt.
Please Note: After adjusting the waist belts to fit your child,
make sure you pull on them to be sure they are securely
fastened.
2
1
Anchored End
Free End
1
2
2
1
Anchored End
Free End
8
10
9
8
• Pull the free end of the waist belt .
• Repeat this procedure to tighten the other waist belt.
Please Note: After adjusting the waist belts to fit your child,
make sure you pull on them to be sure they are securely
fastened.
2
To tighten the waist belts:
• Feed the anchored end of the waist belt up through the
buckle to form a loop .
1
Page 9

• Pull up on the frame latches so that the frame rotates to
the folded position.
• Face the front of the stroller.
• Make sure the canopy is in the up position.
• Rotate the bottom of the frame latches outward.
Frame Latches
Frame Latches
To Fold for Storage
Please Note: When folding the stroller, the handle will automatically push the brake pedals down and lock them so that
the stroller can be stored upright.
To lock the rear wheel brakes:
• Press both brake pedals down until they click into the
locked position. Make sure the brake pedals are pressed
down completely.
• Always set both brake pedals whenever you park the
stroller.
To unlock the rear wheel brakes:
• Lift both brake pedals until they click into the unlocked
position.
Brake Pedals
UNLOCK
LOCK
Rear Wheel Brakes
13
14
15
Canopy
• To lock, pull the swivel lock bar out.
• To unlock, push the swivel lock bar in.
Front (Swivel) Wheel
®
Please Note: Lock the front (swivel) wheel to prevent wobbling at higher speeds, or to keep the front (swivel) wheel
straight when strolling over sand, grass or gravel.
12
11
Lock
Unlock
Swivel
Lock Bar
9
Page 10

Over time, the fork may loosen causing the front of the stroller to wobble. To eliminate wobbling, please follow
maintenance steps through
.
10
1
• Position the stroller with the handle on the floor.
• Remove the two screws in the swivel lock bar with a
Phillips screwdriver. Put the screws aside for re-assembly
step .
10
1
Maintenance
• Turn the swivel lock bar to the side.
• Remove the two screws in the front frame retainer with a
long shaft Phillips screwdriver.
• Remove the front frame retainer and put it and the two
screws aside for re-assembly steps
and
.
9
8
2
• Remove the washer from the fork tube.Put the washer
aside for re-assembly step
.
Please Note: Your stroller may be equipped with more than
one washer. Remove all washers.
6
4
• Loosen the lock nut on the fork tube clockwise with an
adjustable wrench. Remove the lock nut and put it aside
for re-assembly step
.
7
3
Swivel Lock Bar
Fork Tube
Lock Nut
Front Frame
Retainer
Swivel Lock Bar
Fork Tube
Washer
10
Page 11

• With your hand, tighten the cone nut counter-clockwise a
1
/4turn.
5
• Fit the tab on the washer into the notch in the fork tube.
Please Note: If your stroller is equipped with more than
one washer, replace all washers.
6
• Replace the lock nut onto the fork tube.
• Tighten the lock nut counter-clockwise with an adjustable
wrench. Do not over-tighten.
7
• Slide the front frame retainer under the front frame.
• Make sure the pegs and tabs on the footrest fit into the
front frame retainer.
8
Cone Nut
Lock Nut
Fork Tube
Fork Tube
Washer
Front Frame Retainer
Front
Frame
11
Page 12

• Turn the stroller upright.
• Push the stroller forward and check to see if the fork is
still too loose (wobbles) or perhaps too tight (hard to
pivot front wheel).
• If the fork is too loose, repeat Maintenance steps
through .
10
1
• Insert two screws into the front frame retainer and tighten
with a long shaft Phillips screwdriver. Do not over-tighten.
9
• Reposition and fit the swivel lock bar onto the front frame
retainer.
• Insert two screws into the swivel lock bar and tighten
with a Phillips screwdriver. Do not over-tighten.
10
Cleaning
The Town & Country Stroller is surface washable with a
damp cloth and a mild cleaning solution. Do not use bleach.
Rinse clean with water to remove soap residue.
©1995 Fisher-Price, Inc., East Aurora, New York 14052 79235, 79278, 79292 1 79235-0920
12
If you have any questions about this product:
In Canada, call 1-800-567-7724, or write to: Mattel/Fisher-Price, 6155 Freemont Blvd., Mississauga, Ontario L5R 3W2.
In Great Britain, telephone 01734 770488.
In Australia, call the Fisher-Price Australian Consumer Advisory Service toll-free at 1-800-800-812, or write to: Fisher-Price, Mattel Pty. Limited, 461 Plummer
Street, Port Melbourne, Victoria 3207.
Front Frame Retainer
Swivel Lock Bar
Front Frame Retainer
• If the fork is too tight, repeat Maintenance steps
through , but be sure to loosen the cone
nut 1/4turn.
10
1
11
 Loading...