

Page 1
Stay-in-View
™
Infant
Car Seat
OWNER’S MANUAL
Model 79052
e
Page 2

Page 3
Thank you for choosing the Fisher-Price
®
Stay-in-View™Infant Car Seat. Before you use
your car seat, please take time to read and
understand this manual completely. It includes
important step-by-step instructions on how to
assemble, setup and install your car seat properly and how to secure your child. DO NOT
allow others to use this car seat until they
understand these instructions on proper use.
Your child’s safety depends on you!
No one can predict when the use
of a car seat
will prevent injury or death. When this car seat
is used properly, it will reduce the risk of injury
in a sudden stop or crash.
Message to Parents
Stay-in-View™ Infant Car Seat
1
Page 4
Table of Contents
WARNING . . . . . . . . . . . . . . . . . . . . . . . . . . . . . . . . . . . . . . . . . . .4
IMPORTANT! . . . . . . . . . . . . . . . . . . . . . . . . . . . . . . . . . . . . . . . . . .7
Aircraft Use . . . . . . . . . . . . . . . . . . . . . . . . . . . . . . . . . . . . . . . . . . .9
Register Your Car Seat . . . . . . . . . . . . . . . . . . . . . . . . . . . . . . . . . . .9
All About Your Car Seat . . . . . . . . . . . . . . . . . . . . . . . . . . . . . . . . .10
Selecting a Vehicle Seating Location For Your Car Seat . . . . . . . . . . . .12
What Kind of Vehicle Belt System Do You Have? . . . . . . . . . . . . . . . .14
NEVER USE These Vehicle Belt Systems . . . . . . . . . . . . . . . . . . . . . . . .16
OK to USE These Vehicle Belt Systems . . . . . . . . . . . . . . . . . . . . . . . .17
Stay-in-View™ Infant Car Seat
2
Page 5
Table of Contents
Assembly and Setup . . . . . . . . . . . . . . . . . . . . . . . . . . . . . . . . . . . .18
Securing Your Child . . . . . . . . . . . . . . . . . . . . . . . . . . . . . . . . . . . .28
Removing Your Child From the Car Seat . . . . . . . . . . . . . . . . . . . . . .34
Car Seat Installation with Base . . . . . . . . . . . . . . . . . . . . . . . . . . . . .35
Car Seat Installation without Base . . . . . . . . . . . . . . . . . . . . . . . . . . .48
Carry Handle . . . . . . . . . . . . . . . . . . . . . . . . . . . . . . . . . . . . . . . .58
Carry Strap . . . . . . . . . . . . . . . . . . . . . . . . . . . . . . . . . . . . . . . . . .59
Cleaning and Washing . . . . . . . . . . . . . . . . . . . . . . . . . . . . . . . . . .61
Stay-in-View™ Infant Car Seat
3
Page 6

WARNING
Proper installation and use depends on you! If you do
not follow the instructions in this manual and the labels
on the car seat, paying particular attention to the warning statements, your child could be at risk of striking the
vehicle’s interior during a sudden stop or crash, resulting
in serious injury or death.
ALWAYS secure this car seat with your vehicle belt system
exactly as described in this manual. Refer also to your vehicle
owner’s manual for specific information on your vehicle belt
system and specific instructions on how to install a car seat
in your vehicle.
Stay-in-View™ Infant Car Seat
4
Page 7

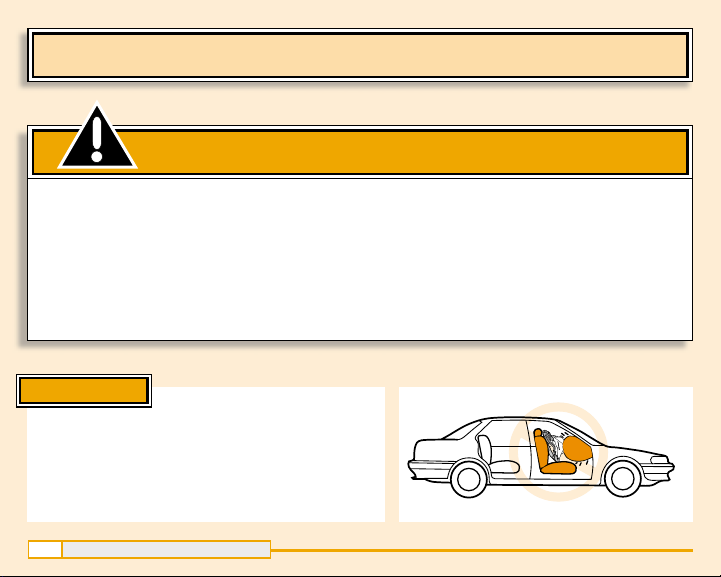
NEVER install this rear-facing car seat in a vehicle seating
location equipped with an airbag. The airbag impact can
cause severe head injury or death. If your vehicle is equipped
with a passenger airbag, please refer to your vehicle owner’s
manual for child restraint installation instructions.
NEVER install and secure your child (Birth- 9 kg, 20 lbs) in
this car seat facing the front of the vehicle. You must install
the car seat in the rear-facing position to avoid serious neck
injuries in a sudden stop or crash.
NEVER allow the harness shoulder straps to be loose around
your child. If the harness shoulder straps are not snug against
your child, your child will not be properly restrained.
WARNING
Stay-in-View™ Infant Car Seat
5
Page 8

NEVER dress your child in clothing that interferes with fastening the harness latch plate into the latch located between
your child’s legs. If you do not properly fasten and adjust the
harness, your child could eject from the car seat in a crash.
NEVER leave an unsecured car seat or base in your vehicle.
If left unsecured, even when not occupied, the car seat or
base could injure other occupants in a sudden stop or crash.
NEVER use the car seat or the base after either is involved
in a crash. A crash can cause damage to the car seat or the
base that you cannot see.
WARNING
Stay-in-View™ Infant Car Seat
6
Page 9
IMPORTANT!
• Please read this entire manual carefully before using this car seat. Keep this
manual under the car seat, using the clips provided.
• This child restraint system conforms to all applicable Canadian Motor Vehicle
Safety Standards (section 213.1) and is certified for use in motor vehicles
and aircraft.
• This car seat is intended for use by children birth to 9 kg (20 lbs) and up to
74 cm (29") in height.
• The American Academy of Pediatrics recommends that infants be secured
in a rear-facing car seat until they are at least one year of age and 9 kg
(20 lbs) to reduce the risk of cervical spine injury in the event of a crash. Since
an infant’s head size is very large relative to body size and the neck is still
developing strength, a rear-facing car seat is safer because it better supports
an infant’s head and back in the event of a frontal crash.
• This car seat is NOT designed to be attached to a shopping cart. It does not
include an attachment mechanism.
• Complete the registration card attached to the car seat and mail it in today!
Stay-in-View™ Infant Car Seat
7
Page 10
IMPORTANT!
• This car seat includes a locking clip (stored on this car seat) for use with a particular vehicle belt system. Always attach the locking clip to a vehicle lap and
shoulder belt system with a sliding latch plate. Please refer to pages 14 -17 to
help identify this type of vehicle belt system and instructions beginning on page
35 (installation with base) or 48 (installation without base) for locking clip use.
• Store the locking clip under the car seat, using the clip provided, for future use.
• Fisher-Price®recommends that child restraints be replaced after eight years
to provide the best assurance that the child restraint is: in reliable working
condition; well-suited for use in constantly changing automobile interior designs;
and reasonably current in relation to Canadian regulations. When you replace
your car seat for any reason, make sure that another child can no longer use
it by disposing of it properly.
• If you have any questions about proper use of your car seat or would like
to order replacement parts, please call
1-800-567-7724.
Or write to:
Mattel Canada Inc.
6155 Freemont Blvd.
Mississauga, Ontario L5R 3W2
Stay-in-View™ Infant Car Seat
8
Page 11

Aircraft Use
You can install this car seat in aircraft seats that face forward. Before bringing
the car seat on board, notify the airline of your intent to do so. The airline may
have restrictions regarding its use.
To install the car seat in an aircraft seat, follow the instructions of the flight
attendant regarding placement of the car seat. Be sure the car seat faces
the rear of the aircraft. For specific instructions, please see pages 35-47 for
installation with the base; 48-57 for installation without the base.
Stay-in-View™ Infant Car Seat
9
Register Your Stay-in-View™Car Seat
Child restraints could be recalled for safety reasons. You must
register this restraint to be reached in a recall. Send your name,
address, and the restraint’s model number and manufacturing
date (located on the side of the seat) to: Mattel Canada Inc.,
6155 Freemont Blvd., Mississauga, Ontario L5R 3W2. For recall information,
call 1-800-567-7724.
N
O
P
O
S
T
A
G
E
N
E
C
E
S
S
A
R
Y
P
O
S
T
A
G
E
W
I
L
L
B
E
P
A
I
D
B
Y
A
D
D
R
E
S
S
E
E
B
U
S
IN
E
S
S
R
E
P
L
Y
M
A
IL
F
I
R
S
T
C
L
A
S
S
M
A
I
L
P
E
R
M
I
T
N
O
.
1
0
6
W
E
B
S
T
E
R
,
N
Y
Page 12
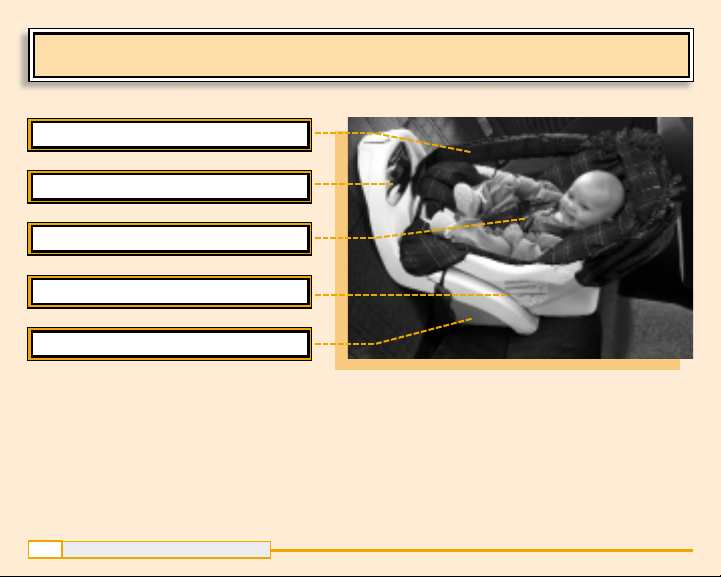
All About Your Car Seat
The safety features of this Fisher-Price®car seat
will reduce the risk of injury to your child in a
crash; however, no car seat can prevent serious
injury or death in all accidents.
CARRY HANDLE
BASE WITH BUILT-IN MIRROR
A SAFER RIDE FOR BABY
CORRECT POSITION INDICATOR
THREE-POINT HARNESS
Stay-in-View™ Infant Car Seat
10
Page 13
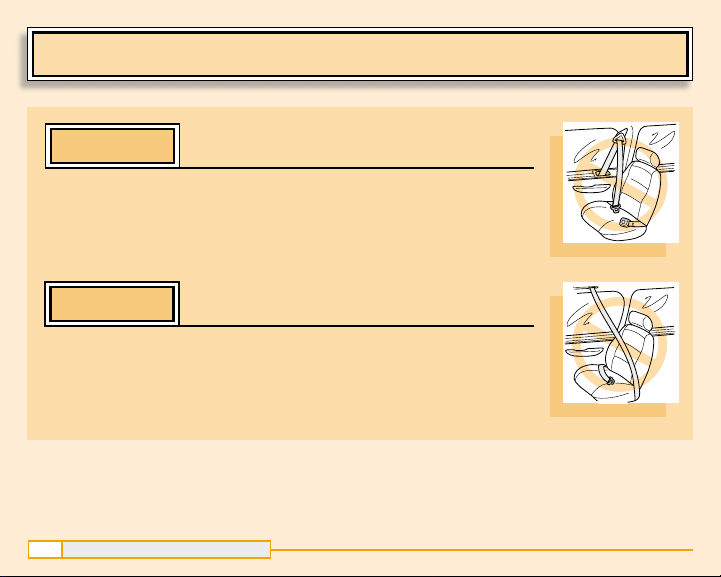
All About Your Car Seat
Carry Handle – Convenient handle makes it easy to carry baby and
converts to a shoulder strap.
Base with Built-in Mirror – Helps you keep your rear-facing infant in full
view at all times.
Three-Point Harness – This restraint system makes it easier to get baby in
and out, while safely securing your child in the car seat.
Correct Position Indicator – Check this line to see if you’ve installed the car
seat at the proper angle.
A Safer Ride For Baby – Contoured base allows for a snug and secure fit in
virtually all vehicles. Car seat snaps easily and securely into base.
Stay-in-View™ Infant Car Seat
11
Page 14
Selecting a Vehicle Seating Location for Your Car Seat
WARNING
NEVER install this rear-facing car seat in a vehicle seating
location equipped with an airbag. The airbag impact can
cause severe head injury or death. If your vehicle is equipped
with a passenger airbag, please refer to your vehicle owner’s
manual for child restraint installation instructions.
Accident statistics show that children are
safer when properly secured in rear
vehicle seating locations than
in front seating locations.
IMPORTANT!
Stay-in-View™ Infant Car Seat
12
Page 15

Selecting a Vehicle Seating Location for Your Car Seat
The rear seating locations
are ALWAYS preferred.
ALWAYS use vehicle seats that
face the front of the vehicle.
Front of Vehicle
NEVER use vehicle seats that
face the side of the vehicle.
NEVER use vehicle seats that
face the rear of the vehicle
.
Front of Vehicle
Front of Vehicle
Stay-in-View™ Infant Car Seat
13
Page 16
What Kind of Vehicle Belt System Do You Have?
WARNING
ALWAYS secure this car seat with your vehicle belt system
exactly as described in this manual. Refer also to your vehicle
owner’s manual for specific information on your vehicle belt
system and specific instructions on how to install a car seat in
your vehicle.
Stay-in-View™ Infant Car Seat
14
Page 17
What Kind of Vehicle Belt System Do You Have?
There are many different types of vehicle belt systems. Some vehicle belt systems
can never be used to install this car seat. Check your vehicle to determine which
type of vehicle belt system or systems it has.
Many vehicles have more than one type of vehicle belt system. For example, you
may find lap-only belts in center seating locations and lap and shoulder belts in
side seating locations. If you are not sure which type of vehicle belt system you
have, contact your vehicle dealer or manufacturer.
The illustrations on pages 16 and 17 show vehicle belt systems that can never be
used to install the car seat and vehicle belt systems that are acceptable for use.
If you do not have a seating location with a usable vehicle belt system, DO NOT
use the car seat. Contact your vehicle manufacturer. The vehicle manufacturer
may be able to install a vehicle belt system that will enable you to install the car
seat properly. NEVER alter your vehicle belt system yourself.
Stay-in-View™ Infant Car Seat
15
Page 18
Explanation – This lap and shoulder belt system is attached
to the vehicle’s door and moves when the door is opened.
You will not be able to keep the car seat secure.
NEVER USE
NEVER USE These Vehicle Belt Systems
D
oor Mounted Lap and Shoulder Belt
Explanation – Usually, the lap belts with these systems
cannot be tightened for a firm fit. Also, the shoulder belt
moves along a track and may become entangled with the
car seat when the door is opened.
Motorized Shoulder Belt
NEVER USE
Stay-in-View™ Infant Car Seat
16
Page 19
OK to USE These Vehicle Belt Systems
OK
✔
Manual Lap Belt
Explanation
Pulling the free
end tightens the
lap belt.
Automatic Locking
Retractor Lap Belt
Explanation
The lap belt slack
retracts automatically and locks.
It can be further
tightened by pushing the belt in near
the retractor.
OK
✔
OK
✔
OK
✔
Lap and Shoulder
Belt with Sliding
Latch Plate
Explanation
Pull the shoulder portion of the belt to
tighten. The shoulder
belt retracts automatically. Use the enclosed locking clip
with this type of lap
and shoulder belt.
Lap and Shoulder
Belt with Locking
Latch Plate
Explanation
Pull the shoulder
portion of the belt
to tighten.
Stay-in-View™ Infant Car Seat
17
Page 20
Push the release button to remove the
harness latch plate from the latch.
1
1
Assembly and Setup
Stay-in-View™ Infant Car Seat
18
Page 21

Assembly and Setup
Place the pad onto the shell.
Carefully place your child
in the car seat to select
the appropriate harness
shoulder strap slots.
- If your child’s shoulders
are even with or below
the lower strap slots, you
will position the harness
shoulder straps in the
lower strap slots in the
car seat.
- If your child’s shoulders
are above the lower strap
slots, you will insert the
harness shoulder straps
through the upper strap
slots in the car seat.
2
®
3
3
Stay-in-View™ Infant Car Seat
19
Lower Strap Slots Upper Strap Slots
3
2
2
®
Page 22

Assembly and Setup
Remove your child from the seat.
After selecting the strap slots, open
the desired fastener
(upper or lower) in
the pad.
Fit the harness through
the opening in the pad.
4
5
5
Stay-in-View™ Infant Car Seat
20
4
4
To change the harness shoulder strap
slots, simply open either pad fastener. You
do not need to remove the pad to change the
harness shoulder strap slots!
HINT
Lower Pad Fastener
Upper Pad Fastener
Page 23

Assembly and Setup
Position the harness
shoulder straps in the
desired strap slots (lower
or upper) in both the shell
and pad. Make sure the
harness shoulder straps
are not twisted.
6
Stay-in-View™ Infant Car Seat
21
Note: For clarity, these illustrations show the
shell without the pad.
Lower Strap Slots
Upper Strap Slots
6
6
Page 24

Assembly and Setup
Fasten the pad fastener.
Fasten the harness latch
plate to the latch.
7
Stay-in-View™ Infant Car Seat
22
DO NOT remove the harness shoulder straps from the adjuster to change the
them to different slots. To change the harness shoulder straps to a different
height, please refer to pages 19-22, steps 2-7.
IMPORTANT!
Lower Pad Fastener Upper Pad Fastener
7
7
®
®
Page 25

Assembly and Setup
Lift the bottom of the pad. Insert the
pad elastic loops through the holes
in the shell.
While holding the elastic loops in
place, position the shell face down
on a flat surface. Attach the pad
elastic loops to the pegs on the shell.
8
9
8
9
Stay-in-View™ Infant Car Seat
23
FRONT VIEW
BOTTOM VIEW
Page 26

Assembly and Setup
Position the shell upright on a flat
surface. Fit the bottom edges of the
pad around the bottom edge of the
shell. Wrap the pad elastic loops
around the bottom edge of the shell.
Position the shell face down on a flat
surface. Attach the pad elastic loops
to the pegs on the shell.
10
11
Stay-in-View™ Infant Car Seat
24
10
11
BOTTOM VIEW
Page 27

Position the shell upright on a flat
surface. Fit the top edges of the pad
around the top edge of the shell.
Wrap the pad elastic loops around
the top edge of the shell.
Turn the shell around so that the back
is facing you. Attach the pad elastic
loops to the pegs on the shell.
Assembly and Setup
12
13
Stay-in-View™ Infant Car Seat
25
12
13
BACK VIEW
Page 28

Assembly and Setup
Insert both canopy stays into the
sleeves in the inside of the canopy.
Place the canopy under the fabric
handle. Insert the ends of the exposed
canopy stay into the canopy retainers
on each side of the shell.
Turn the shell around so that the back
is facing you. Attach the canopy
elastic loops to the pegs on the shell.
14
15
16
Stay-in-View™ Infant Car Seat
26
16
14
15
Page 29

Assembly and Setup
Peel and remove the protective film
from the mirror on the base. Discard
the protective film properly.
17
Stay-in-View™ Infant Car Seat
27
17
Page 30

Securing Your Child
Press the release button to remove
the harness latch plate from the
latch. Lower the chest clip on the
harness shoulder straps.
Place your child in the car seat.
Make sure your child’s lower back is
against the car seat. This will allow
you to snugly position the three-point
harness around your child properly.
Position the harness shoulder
straps over your child’s shoulders.
Make sure the harness shoulder
straps are not twisted.
Insert the harness latch plate into the
latch. Make sure you hear a “click.“
1
2
4
2
3
Stay-in-View™ Infant Car Seat
28
3
4
1
Page 31

WARNING
NEVER dress your child in clothing that interferes with fastening the harness latch plate into the latch located between
your child’s legs. If you do not fasten and adjust the harness,
your child could eject from the car seat in a crash.
Stay-in-View™ Infant Car Seat
29
Securing Your Child
Page 32

Securing Your Child
To tighten the harness
shoulder straps every time
you place your child in
the car seat:
Pull the right (as you look
at the car seat) harness shoulder strap down to remove
slack . Then, pull the free
end of the harness shoulder
strap up to tighten .
To loosen the harness
shoulder straps:
Press the adjuster and
pull the right harness shoulder strap (as you look at
the car seat) up . Balance
the harness by pulling the
other harness shoulder strap
down .
5
5
C
B
A
A
B
A
B
A
B
Stay-in-View™ Infant Car Seat
30
C
TO TIGHTEN
TO LOOSEN
Page 33

Securing Your Child
Slide the chest clip up so that it is
level with your child’s underarm area.
6
Stay-in-View™ Infant Car Seat
31
6
Page 34

Securing Your Child
Check to be sure the harness is
latched and securing your child properly. Pull the harness shoulder straps
up and away from your child firmly.
The harness shoulder straps should
remain latched and should not pull
more than 2,5 cm (1" – two fingers)
away from your child’s chest. If the
harness shoulder straps are loose or
unlatch, please re-read pages 28- 32,
and repeat steps 1- 7.
7
Stay-in-View™ Infant Car Seat
32
7
Page 35

Securing Your Child
WARNING
NEVER allow the harness shoulder straps to be loose around
your child. If the harness shoulder straps are not snug against
your child, your child will not be properly restrained.
Stay-in-View™ Infant Car Seat
33
Page 36

Removing Your Child
1
1
2
Stay-in-View™ Infant Car Seat
34
To remove your child from the car seat:
Lower the chest clip.
Press the release button and
remove the harness latch plate
from the latch. Lift the harness
shoulder straps over your child’s
head. Remove your child from
the car seat.
Note: Insert the harness latch
plate into the latch.
2
Page 37

Car Seat Installation with Base
WARNING
ALWAYS secure this car seat with your vehicle belt system
exactly as described in this manual. Refer also to your vehicle
owner’s manual for specific information on your vehicle belt
system and specific instructions on how to install a car seat in
your vehicle.
NEVER install this rear-facing car seat in a vehicle seating
location equipped with an airbag. The airbag impact can
cause severe head injury or death. If your vehicle is equipped
with a passenger airbag, please refer to your vehicle owner’s
manual for child restraint installation instructions.
NEVER install and secure your child in this car seat facing
the front of the vehicle. You must install the car seat in the
rear-facing position to avoid serious neck injuries in a sudden
stop or crash.
Stay-in-View™ Infant Car Seat
35
Page 38

Car Seat Installation with Base
Once you have selected an
acceptable seating location,
place the base on the vehicle
seat so that the mirror faces the
front of the vehicle.
Route the vehicle belt across the
indents in the base.
Buckle the vehicle belt.
1
2
3
Stay-in-View™ Infant Car Seat
36
1
2
3
Front of Vehicle
Page 39

Car Seat Installation with Base
For a manual lap belt system:
With the vehicle belt buckled,
push down on the base with
your knee and pull the free end
of the vehicle belt for the tightest
possible fit.
4
A
4A
Stay-in-View™ Infant Car Seat
37
Page 40

Car Seat Installation with Base
For a lap and shoulder belt system:
With the vehicle belt buckled,
push down on the base with
your knee and pull the shoulder
belt for the tightest possible fit.
4
B
Some vehicle belt systems have
labels with instructions for use with car
seats. Read the instructions on your
vehicle’s belt or refer to your vehicle
owner’s manual for specific instructions
on how to tighten and lock your vehicle
belt system.
HINT
Stay-in-View™ Infant Car Seat
38
4B
Page 41

Check to see if the lap
portion of the vehicle lap
and shoulder belt system
loosens. Move the base
from side to side. If you
can loosen the lap portion
of the vehicle lap and
shoulder belt system, the
lap portion probably does
not have a locking mode
and you will need a locking clip (included with
your car seat).
If the lap portion of the
vehicle lap and shoulder
belt system does not
loosen, please proceed
to step 11, page 43.
5
Car Seat Installation with Base
Stay-in-View™ Infant Car Seat
39
NO LOCKING
CLIP NEEDED
LOCKING
CLIP NEEDED
5
5
Page 42

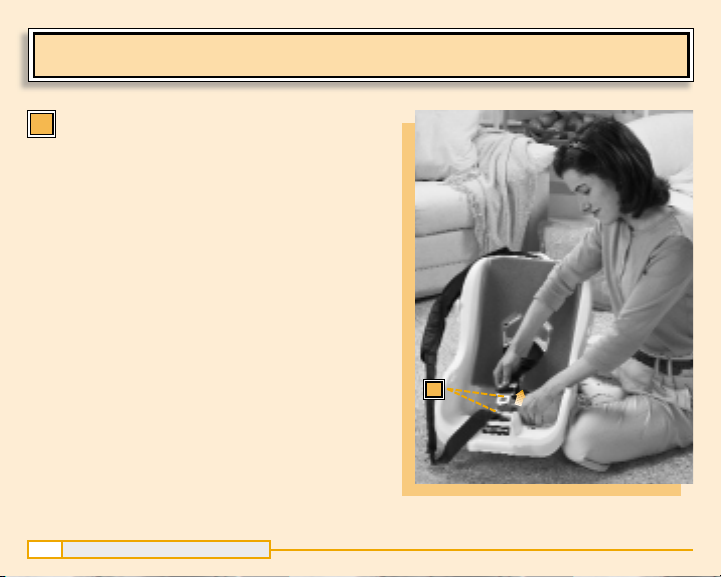
To install the locking clip:
Re-tighten the vehicle lap and
shoulder belt system (see page
38). Hold the lap and shoulder
belts together just behind the
tongue and unbuckle the vehicle
belt. Continue to hold the lap
and shoulder belts together.
6
Car Seat Installation with Base
Stay-in-View™ Infant Car Seat
40
6
Page 43

Car Seat Installation with Base
While holding the belts together,
tuck the edges of the vehicle belts
under the arms of the locking clip.
Make sure the locking clip is
positioned approximately 1.3 cm
(1/2") from the sliding tongue (but
no more than 7.6 cm (3").
While pushing down on the base
with your knee, buckle the vehicle
belt system.
Note: Make sure the locking
clip does not rest on the
top edge of the base.
Tuck the shoulder portion
of the vehicle lap and
shoulder belt behind
the base.
7
8
Arms
Stay-in-View™ Infant Car Seat
41
7
8
9
9
/
1
1.3 cm
(
")
2
Page 44

Car Seat Installation with Base
Test your installation of the base again, by
moving the base from side to side. You should
NOT be able to move the base easily and
loosen the vehicle belt system.
Note: Regularly check to be sure your base
installation is secure.
Stay-in-View™ Infant Car Seat
42
If, after following these installation instructions,
you cannot firmly install the base, choose a
different rear vehicle seating location to install
the base.
IMPORTANT!
10
CORRECT
INCORRECT
10
10
Page 45

Firmly hold the car seat so that it
faces the rear of the vehicle.
At an angle, fit the foot of the car
seat into the opening below the
mirror on the base.
Push the car seat down until you
hear a “click.”
Car Seat Installation with Base
12
11
Stay-in-View™ Infant Car Seat
43
13
12
Rear of Vehicle
11
12
13
Page 46

Pull up at the head and foot of the car
seat to be sure it is secure in the base.
Car Seat Installation with Base
14
14
Stay-in-View™ Infant Car Seat
44
PULL UP
PULL UP
PULL UP
PULL UP
Page 47

Car Seat Installation with Base
Check to be sure the car seat correct position indicator is parallel with the
floor of your vehicle. If the car seat is too inclined, your child will be too
upright, allowing your child’s head to droop forward.
15
15
Stay-in-View™ Infant Car Seat
45
CORRECT
15
INCORRECT
Page 48

Car Seat Installation with Base
If the correct position indicator is
not parallel with the floor of your
vehicle, try inserting a rolled bath
towel between the vehicle seat and
the bottom, back side of the base.
This will raise the back of the base
and car seat so that the correct
position indicator is parallel with
the floor of your vehicle.
16
Stay-in-View™ Infant Car Seat
46
16
Page 49

To remove the car seat:
Simply pull the car seat release up
and lift to remove the car seat from
the base.
Car Seat Installation with Base
17
Stay-in-View™ Infant Car Seat
47
17
Page 50

Car Seat Installation without Base
ALWAYS secure this car seat with your vehicle belt system
exactly as described in this manual. Refer also to your vehicle
owner’s manual for specific information on your vehicle belt
system and specific instructions on how to install a car seat in
your vehicle.
NEVER install this rear-facing car seat in a vehicle seating
location equipped with an airbag. The airbag impact can
cause severe head injury or death. If your vehicle is equipped
with a passenger airbag, please refer to your vehicle owner’s
manual for child restraint installation instructions.
NEVER install and secure your child in this car seat facing
the front of the vehicle. You must install the car seat in the
rear-facing position to avoid serious neck injuries in a sudden
stop or crash.
WARNING
Stay-in-View™ Infant Car Seat
48
Page 51

Once you have selected an acceptable
seating location, place the car seat so
that it is facing the rear of the vehicle.
Fit the vehicle belt through the belt path
slots in the top sides of the car seat.
2
1
2
Car Seat Installation without Base
Stay-in-View™ Infant Car Seat
49
1
Rear of Vehicle
Page 52

Car Seat Installation without Base
Buckle the vehicle belt.
3
3
Stay-in-View™ Infant Car Seat
50
Page 53

Car Seat Installation without Base
For a manual lap belt system:
With the vehicle belt buckled, pull the
free end of the vehicle belt just until the
back of the car seat begins to rise.
4
A
4A
Stay-in-View™ Infant Car Seat
51
Page 54

Car Seat Installation without Base
For a lap and shoulder belt system:
With the vehicle belt buckled, pull the
vehicle shoulder belt just until the back
of the car seat begins to rise.
4
B
4B
Some vehicle belt systems have labels
with instructions for use with car seats. Read
the instructions on your vehicle’s belt or refer
to your vehicle owner’s manual for specific
instructions on how to tighten and lock your
vehicle belt system.
HINT
Stay-in-View™ Infant Car Seat
52
Page 55

Futura 20/60™ Car Seat
45
Car Seat Installation without Base
After tightening the vehicle belt system, make sure the car seat correct
position indicator is parallel with the floor of your vehicle. If the car seat is
too inclined, your child will be too upright, allowing your child’s head to
droop forward.
5
Stay-in-View™ Infant Car Seat
53
CORRECT
5
5
INCORRECT
Page 56

Car Seat Installation without Base
Check to see if the lap
portion of the vehicle lap
and shoulder belt system
loosens. Lightly push down
on the head of the car seat.
If you can loosen the lap
portion of the vehicle lap
and shoulder belt system,
the lap portion probably
does not have a locking
mode and you will need a
locking clip (included with
your car seat).
If the lap portion of the
vehicle lap and shoulder
belt system does not loosen,
you have completed car
seat installation.
6
6
NO LOCKING
CLIP NEEDED
LOCKING
CLIP NEEDED
Stay-in-View™ Infant Car Seat
54
6
Page 57

Car Seat Installation without Base
To install the locking clip:
Re-tighten the vehicle lap and shoulder
belt system (see page 52). Hold the
lap and shoulder belts together just
behind the tongue and unbuckle the
vehicle belt. Continue to hold the lap
and shoulder belts together.
7
7
Stay-in-View™ Infant Car Seat
55
Page 58

Car Seat Installation without Base
While holding the belts together,
tuck the edges of the vehicle belts
under the arms of the locking clip.
Make sure the locking clip is positioned approximately 1.3 cm (1/2")
from the sliding tongue.
Buckle the vehicle belt system.
8
Stay-in-View™ Infant Car Seat
56
8
Arms
9
9
/
1
1.3 cm
(
")
2
Page 59

Stay-in-View™ Infant Car Seat
57
Car Seat Installation without Base
Test your car seat installation again by lightly
pushing on the head of the car seat. The car
seat should NOT easily rotate down.
10
If, after following these installation instructions,
you cannot firmly install the car seat, choose a
different rear vehicle seating location to install
the car seat.
IMPORTANT!
10
10
CORRECT
INCORRECT
Page 60

Carry Handle
To carry baby, simply lift using the
padded handle grip.
Stay-in-View™ Infant Car Seat
58
Page 61

Carry Strap
Unfasten the padded grip
on the handle.
Unfasten the strap from
the hook.
Extend the carry strap.
Adjust the length of
the carry strap.
To Shorten the Carry Strap:
- Roll the end of the carry
strap to the desired
length and fit it into the
slot in the base.
To Lengthen the Carry Strap:
- Un-roll the end of the
carry strap and fit it into
the slot in the base.
1
2
3
4
Stay-in-View™ Infant Car Seat
59
3
4
1
2
Page 62

Futura 20/60™ Car Seat
45
Carry Strap
Place the carry strap over your head
and around one shoulder.
5
5
Stay-in-View™ Infant Car Seat
60
Page 63

Cleaning and Washing
• Machine wash the pad in cold water and a mild detergent. Do not use bleach.
Tumble dry on low heat.
• To clean the shell, harness, canopy and strap, use a mild cleaning agent
and damp cloth. Rinse with clear water to remove soap residue.
• Clean the inside of the latch with a mild soap and water solution. Run warm
water into the latch to remove residue. DO NOT use detergents. DO NOT
lubricate the latch.
To remove the pad:
• Position the seat face down on a flat surface.
• Unfasten all six elastic loops from the pegs on the back and bottom of the shell.
• Turn the seat upright. Unfasten the harness latch.
• Unfasten the strap fasteners in the pad.
• Pull to remove the pad from the shell.
To replace the pad:
• Please see assembly and setup instructions beginning on page 18.
Stay-in-View™ Infant Car Seat
61
Page 64

S
HOULDER STRAPS
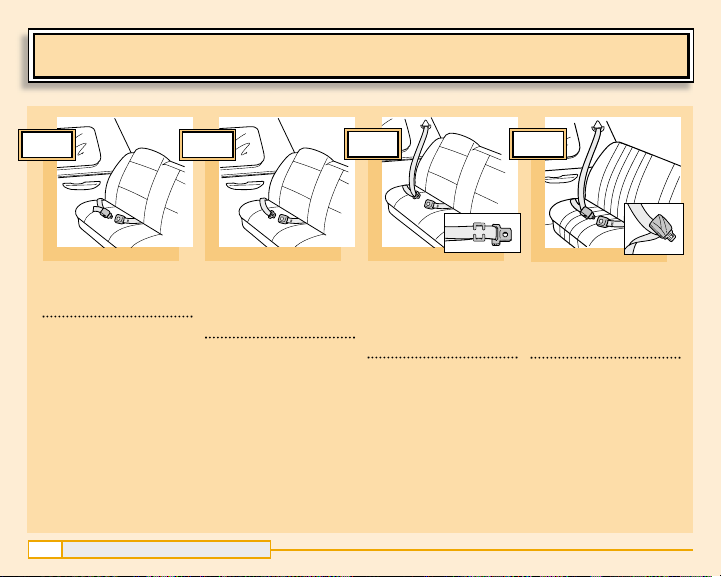
…on three-point harness inserted in lower or upper strap slots, depending on size of child
ADJUST
…harness shoulder straps to fit child snugly after latching
FASTEN
…vehicle belt system after properly routing it on base (installation with base) or through
belt path slots (installation without base)
EVALUATE
…to be sure car seat is NOT installed in a vehicle seating location equipped with an airbag
…installation to be sure car seat is in appropriate seating location and is a firm fit in vehicle
…to be sure harness shoulder straps are snug against child
Safe Check
✔
✔
✔
✔
✔
1-800-567-7724
Fisher-Price, Inc., a subsidiary of Mattel, Inc., East Aurora, New York 14052, U.S.A.
© 2001 Mattel, Inc. All Rights Reserved.
®
andTMdesignate U.S. trademarks of Mattel, Inc.
Printed in U.S.A. 79052pr-0820
 Loading...