

Page 1
Futura 20/60
®
™
Car Seat
OWNER’S MANUAL
Models 79013, 79014
Page 2

Page 3
Message to Parents
Thank you for choosing the Fisher-Price
®
Futura 20/60™Car Seat. Before you use this
car seat, please take time to read and understand this manual completely. DO NOT allow
others to use this car seat until they understand
these instructions for proper use.Your child’s
safety depends on you!
To reduce injuries in a crash, stricter Federal
safety regulations require all forward-facing
car seats, such as this one, to meet certain
standards to minimize forward motion. Most
other car seats require a tether strap to meet
these standards, but the Futura 20/60
™
Car
Seat meets these standards without an added
tether strap.
No one can predict when the use
of a car seat
will prevent injury or death. When this car seat
is used properly, it will reduce the risk of injury
in a sudden stop or crash.
Futura 20/60™ Car Seat
1
Page 4
Table of Contents
WARNING . . . . . . . . . . . . . . . . . . . . . . . . . . . . . . . . . . . . . . . . . . .4
IMPORTANT! . . . . . . . . . . . . . . . . . . . . . . . . . . . . . . . . . . . . . . . . . .6
All About Your Car Seat . . . . . . . . . . . . . . . . . . . . . . . . . . . . . . . . . .8
What Kind of Vehicle Belt System Do You Have? . . . . . . . . . . . . . . . .10
NEVER USE These Vehicle Belt Systems . . . . . . . . . . . . . . . . . . . . . . . .12
OK to USE These Vehicle Belt Systems . . . . . . . . . . . . . . . . . . . . . . . .13
Selecting a Vehicle Seating Location for Your Car Seat . . . . . . . . . . . . .14
Assembly and Setup
Retainer . . . . . . . . . . . . . . . . . . . . . . . . . . . . . . . . . . . . . . . . . . .16
Pads . . . . . . . . . . . . . . . . . . . . . . . . . . . . . . . . . . . . . . . . . . . . .17
Shoulder Straps . . . . . . . . . . . . . . . . . . . . . . . . . . . . . . . . . . . . . .21
Futura 20/60™ Car Seat
2
Page 5
Table of Contents
Installing Your Car Seat in a Vehicle . . . . . . . . . . . . . . . . . . . . . . . . .24
Restraining Your Child . . . . . . . . . . . . . . . . . . . . . . . . . . . . . . . . . . .35
Removing Your Child . . . . . . . . . . . . . . . . . . . . . . . . . . . . . . . . . . .42
Aircraft Use . . . . . . . . . . . . . . . . . . . . . . . . . . . . . . . . . . . . . . . . . .43
Cleaning and Washing . . . . . . . . . . . . . . . . . . . . . . . . . . . . . . . . . .44
Registering Your Car Seat . . . . . . . . . . . . . . . . . . . . . . . . . . . . . . . .45
Consumer Information . . . . . . . . . . . . . . . . . . . . . . . . . . . . . . . . . . .45
Futura 20/60™ Car Seat
3
Page 6
WARNING
Proper installation and use depends on you! If you do
not follow the instructions in this manual and the labels
on the car seat, paying particular attention to the warning statements, your child could be at risk of striking the
vehicle’s interior during a sudden stop or crash, resulting
in serious injur y or death.
ALWAYS secure this car seat with your vehicle belt system
exactly as described in this manual. Refer also to your vehicle
owner’s manual for specific information on your vehicle belt
system and specific instructions on how to install a car seat
in your vehicle.
NEVER leave an unsecured car seat in your vehicle. If left
unsecured, even when not occupied, the car seat could
injure other occupants in a sudden stop or crash.
Futura 20/60™ Car Seat
4
Page 7
WARNING
NEVER dress your child in clothing that inter feres with positioning the crotch strap between your child’s legs. If the crotch
strap is not positioned between your child’s legs, your child
could eject from the car seat in a crash.
NEVER allow the shoulder straps to be loose around your
child. If the shoulder straps are not snug against your child,
your child will not be properly restrained.
NEVER use the car seat after it is involved in a crash. A crash
can cause damage to the car seat that you cannot see.
Futura 20/60™ Car Seat
5
Page 8
IMPORTANT!
•Please read this entire manual carefully before using this car seat. Keep this
manual under the tab on the back side of the car seat for easy reference.
•This child restraint system conforms to all applicable Federal Motor Vehicle
Safety Standards (FMVSS) and the Society of Automotive Engineers
(SAE) J1819 for child restraint systems; and is certified for use in motor
vehicles and aircraft.
•This car seat is intended for use by children who weigh between
20 and 60 lbs. (9 and 27 kg) and are between between 28”and 48”
(71 and 122 cm) tall. If your child does not meet these criterion,
DO NOT use this car seat.
•The American Academy of Pediatrics recommends that a child be at
least 1 year old and 20 lbs. to ride in a forward-facing car seat.
•Adult assembly is required to attach the pad, plastic grommets and
retainers to the car seat shell. A hammer and screwdriver, or other
blunt ended tool (not included) are needed for assembly. Please refer
to page 16 for assembly instructions.
Futura 20/60™ Car Seat
6
Page 9

IMPORTANT!
•If your child weighs between 20 and 60 lbs. (9 and 27 kg), but cannot sit
upright unassisted, please contact your physician to determine how best to
use a car seat.
•This car seat includes a locking clip (stored with this manual) for use with
a particular vehicle belt system. Always attach the locking clip to a vehicle
lap and shoulder belt systems with a sliding latch plate. Please refer to
page 13 to help identify this type of vehicle belt system and instructions
beginning on page 30 for locking clip use.
•Store the locking clip within the pages of this manual. Replace the manual
under the tab on the back side of the car seat for future use.
•Fisher-Price®recommends that child restraints be replaced after eight years
to provide the best assurance that the child restraint is: in reliable working
condition; well-suited for use in constantly changing automobile interior
designs; and reasonably current in relation to Federal regulations. When
you replace your car seat for any reason, make sure that it can no longer
be used by another child by disposing of it properly.
Futura 20/60™ Car Seat
7
Page 10
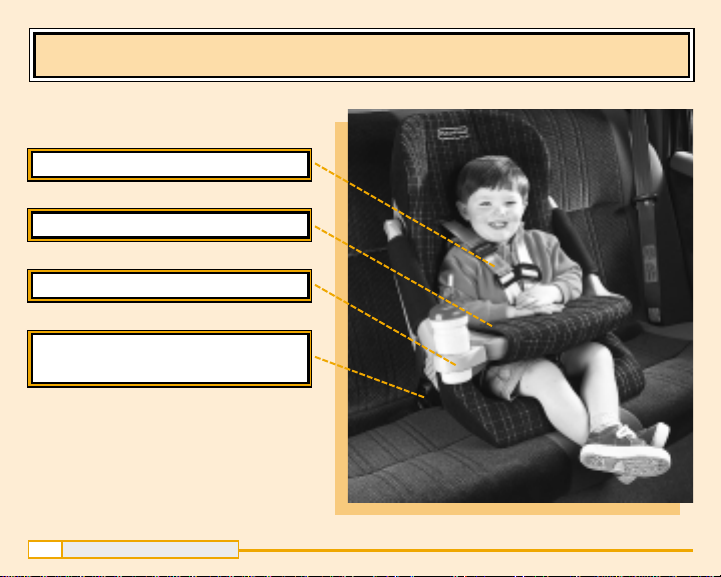
All About Your Car Seat
FOUR-POINT RESTRAINT
EASY-TO-USE OVERHEAD SHIELD
BUILT-IN TRAY & CUP HOLDER
CAN ALSO BE USED IN VEHICLES
THAT HAVE ONLY LAP BELTS
The safety features of this Fisher-Price®car seat
will reduce the risk of injury to your child in a
crash; however, no car seat can prevent serious
injury or death in all crashes.
Futura 20/60™ Car Seat
8
Page 11
All About Your Car Seat
THE ONLY CAR SEAT YOUR CHILD WILL NEED FROM 20-60 LBS!
Four-Point Restraint: This up -front harness adjuster is easily accessible, with
four anchorage points to safely restrain your child in the car seat. Harness is
used all the way up to 60 lbs.
Easy-to-Use Overhead Shield: Spring-lift action gets it up and out of your
way so you can quickly get your child in and out of the car seat.
Built-In Tray & Cup Holder: Remove the front overhead shield pad to reveal
a tray! Cup holder snaps onto either side of the overhead shield. (Cup
not included.)
Can also be used in vehicles that have only lap belts: A vehicle shoulder
belt is not required to properly secure this car seat for children up to 60 lbs.
This allows you to put your child in the center rear seating location.
Futura 20/60™ Car Seat
9
Page 12
What Kind of Vehicle Belt System Do You Have?
There are many different types of vehicle belt systems. Some vehicle belt systems
can never be used with this car seat. Check to determine which type of vehicle
belt system or systems you have in your vehicle.
Many vehicles have more than one type of vehicle belt system. For example,
you may find lap only belts in center seating locations and lap and shoulder
belts in side seating locations. If you are not sure which type of vehicle belt
system you have, contact your vehicle dealer or manufacturer.
The illustrations on pages 12 and 13 show vehicle belt systems that can never
be used with this car seat and vehicle belt systems that are acceptable for use.
If you do not have a seating location with a usable vehicle belt system, DO NOT
use this car seat. Contact your vehicle manufacturer. The vehicle manufacturer
may be able to install a vehicle belt system that can restrain your child properly
in this car seat. NEVER alter your vehicle belt system yourself.
Futura 20/60™ Car Seat
10
Page 13
What Kind of Vehicle Belt System Do You Have?
WARNING
ALWAYS secure this car seat with your vehicle belt system
exactly as described in this manual. Refer also to your
vehicle owner’s manual for specific information on your
vehicle belt system and specific instructions on how to
install a car seat in your vehicle.
Futura 20/60™ Car Seat
11
Page 14
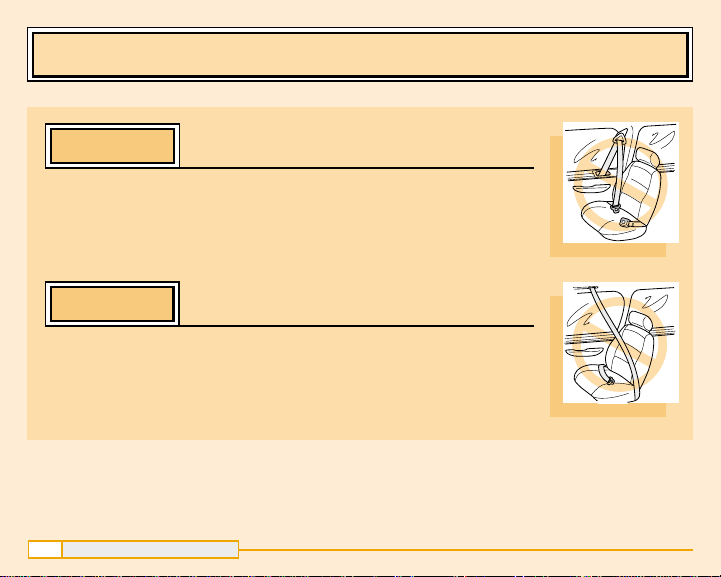
NEVER USE These Vehicle Belt Systems
NEVER USE
Explanation – This lap and shoulder belt system is attached
to the vehicle’s door and moves when the door is opened.
You will not be able to keep the car seat secure.
NEVER USE
Explanation – Usually, the lap belts with these systems
cannot be tightened for a firm fit. Also, the shoulder belt
moves along a track and may become entangled with the
car seat when the door is opened.
Futura 20/60™ Car Seat
12
D
oor Mounted Lap and Shoulder Belt
Motorized Shoulder Belt
Page 15
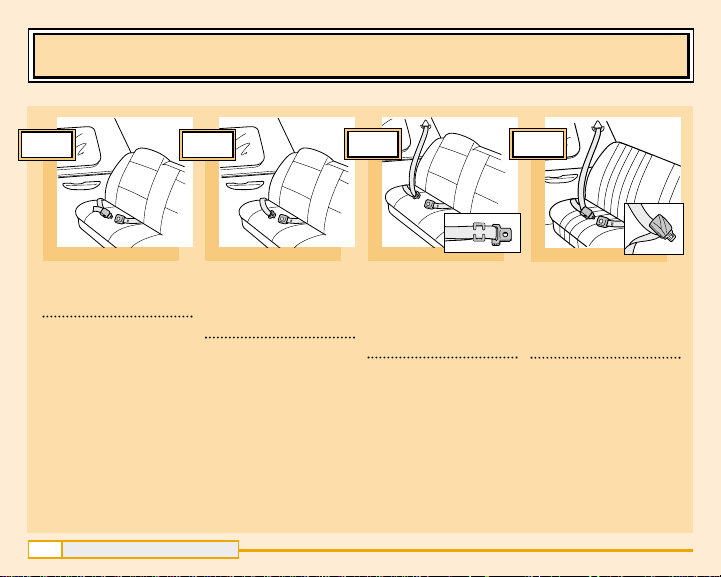
OK to USE These Vehicle Belt Systems
OK
✔
Manual Lap Belt
Explanation
The lap belt is tightened by pulling the
free end.
Futura 20/60™ Car Seat
13
OK
✔
Automatic Locking
Retractor Lap Belt
Explanation
The lap belt slack
retracts automatically and locks.
It can be further
tightened by pushing the belt in near
the retractor.
OK
✔
Lap and Shoulder
Belt with Sliding
Latch Plate
Explanation
Pull the shoulder portion of the belt to
tighten.The shoulder
belt retracts automatically . Use the enclosed locking clip
with this type of lap
and shoulder belt.
OK
✔
Lap and Shoulder
Belt with Locking
Latch Plate
Explanation
Pull the shoulder
portion of the belt
to tighten.
Page 16

Selecting a Vehicle Seating Location for Your Car Seat
IMPORTANT!
Accident statistics show that children are
safer
when restrained properly
in rear vehicle seating locations than in front seating locations.
Only use the front seat when no acceptable rear seating location is available. If the front seating location is equipped with an airbag but must be
used, adjust the vehicle seat as far back from the dashboard as possible.
Please refer to your vehicle owner’s manual regarding front seat child
restraint use.
Futura 20/60™ Car Seat
14
Page 17

Selecting a Vehicle Seating Location for Your Car Seat
Front of Vehicle
The rear seating locations
are ALWAYS preferred.
NEVER use vehicle seats that
face the side of the vehicle.
Futura 20/60™ Car Seat
15
Front of Vehicle
ALWA YS use vehicle seats that
face the front of the vehicle.
Front of Vehicle
NEVER use vehicle seats that
face the rear of the vehicle
.
Page 18

Assembly and Setup
Position one of the retainers so that
1
the long, flat side is upright. Fit the
pegs on the retainer into the holes in
one side of the overhead shield. Tap
the retainer with a hammer to secure
the retainer to the overhead shield. Pull
on the retainer to be sure it is secure.
Repeat this procedure to attach the
other retainer.
Futura 20/60™ Car Seat
16
Long, Flat Side
1
Page 19

Assembly and Setup
Fit the end of a blunt object, such
2
as a screwdriver, into the end of the
metal tube on the back of the car
seat. Pry the metal tube from the
groove in the shell.
Remove the metal tube from the
3
shoulder straps. Set the metal
tube aside.
Futura 20/60™ Car Seat
17
2
3
Page 20

Assembly and Setup
Lift the overhead shield and place it
4
behind the shell.
Fit the top of the pad over the top
5
edge of the shell.
Lift the bottom of the pad and insert
6
the pad’s elastic loops through the
slots in the shell.
Fit the crotch strap buckle up through
7
the slot in the pad.
Futura 20/60™ Car Seat
18
5
4
6
7
Page 21

Assembly and Setup
Lower the overhead shield.
8
Fit the bottom of the pad over the
9
bottom edge of the shell.
Attach the pad’s elastic loops (on
10
the bottom of the shell) to the clip
on each side of the pad.
Futura 20/60™ Car Seat
19
8
9
10
Page 22
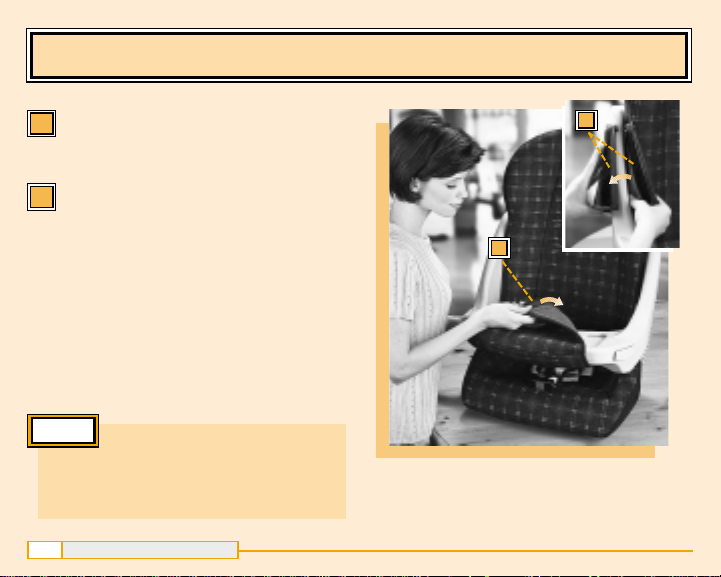
Assembly and Setup
Wrap the large overhead shield
11
pad around the front of the
overhead shield and fasten.
Wrap one of the small overhead
12
shield pads around an arm of the
overhead shield and fasten. Repeat
this procedure to attach the other
small overhead shield pad.
HINT
20
Remove the large overhead
shield pad to reveal a tray! Keep the
large overhead shield pad in a safe
place for future use.
Futura 20/60™ Car Seat
12
11
Page 23

Assembly and Setup
Place your child in the car seat to
13
select the appropriate shoulder
strap slots.
- If your child’s shoulders are even
with or below the lower strap slots,
insert the plastic grommets into the
lower strap slots in the car seat.
- If your child’s shoulders are above
the lower strap slots, insert the
plastic grommets into the upper
strap slots.
Note: Be sure to position
the grommets so that the
hooked end is up.
Futura 20/60™ Car Seat
21
®
13
Lower Strap Slots
®
13
Hooked End
Upper Strap Slots
Page 24

Assembly and Setup
Remove your child from the car seat.
14
Insert the shoulder straps through the
plastic grommets and slots in the shell.
Make sure the shoulder straps are
not twisted.
Futura 20/60™ Car Seat
22
14
Page 25

Assembly and Setup
Turn the car seat around so that
15
the back is facing you. Fit the
metal tube through the loops in
the shoulder straps.
While pushing the plastic grommets
16
from the front of the car seat (one
at a time) push the metal tube (near
each plastic grommet) into the groove
in the shell. Make sure the metal tube
“snaps” into place. This may require a
lot of force.
Note: If the metal tube does not “snap”
into place or if the plastic grommets
are not secured to the shell, you
probably have not inserted the plastic
grommets with the
Please re-read pages
Futura 20/60™ Car Seat
23
hooked end up.
21 and 22.
15
16
Page 26

Installing Your Car Seat in a Vehicle
Once you have selected an accept-
1
able seating location (see pages
14-15), place the car seat on the
vehicle seat firmly against the vehicle
seat back.
Pull the pad away from the shell.
2
From the front of the car seat, insert
the vehicle belt though the slot in
the shell.
Futura 20/60™ Car Seat
24
2
1
Note: For clarity,
this illustration
shows the shell
2
without the pad.
Page 27

Installing Your Car Seat in a Vehicle
Continue to route the vehicle belt
3
behind the car seat shell.
Pull the vehicle belt out through the
4
slot in the opposite side of the car
seat shell.
Note: DO NOT route the vehicle belt
on the front middle section of the car
seat shell.
Futura 20/60™ Car Seat
25
4
3
Note: For clarity,
these illustrations
show the shell
without the pad.
Page 28

Installing Your Car Seat in a Vehicle
WARNING
ALWAYS secure this car seat with your vehicle belt system
exactly as described in this manual. Refer also to your
vehicle owner’s manual for specific information on your
vehicle belt system and specific instructions on how to
install a car seat in your vehicle.
Futura 20/60™ Car Seat
26
Page 29

Installing Your Car Seat in a Vehicle
Buckle the vehicle belt.
5
Note: Be sure the vehicle belt
is over the edge of the car
seat shell.
Futura 20/60™ Car Seat
27
Front of Vehicle
5
Page 30

Installing Your Car Seat in a Vehicle
For a manual lap belt system:
6
A
With the vehicle belt buckled,
push down on the car seat with
your knee and pull the free end
of the vehicle belt for the tightest
possible fit.
Futura 20/60™ Car Seat
28
Front of Vehicle
6A
Page 31

Installing Your Car Seat in a Vehicle
For a lap and shoulder belt system:
6
B
With the vehicle belt buckled,
push down on the car seat with
your knee and pull the shoulder
belt for the tightest possible fit.
Front of Vehicle
HINT
29
Some vehicle belt systems have
labels with instructions for use with car
seats. Read the instructions on your vehicle’s belt or refer to your vehicle owner’s
manual for specific instructions on how to
tighten and lock your vehicle belt system.
Futura 20/60™ Car Seat
6B
Page 32

Installing Your Car Seat in a Vehicle
Check to see if the lap portion
7
of the vehicle lap and shoulder
belt system loosens. Move the
car seat from side to side. If you
can loosen the lap portion of the
lap and shoulder vehicle belt
system, the lap portion probably
d
oes not have a locking mode
and you will need a locking clip
(included with your car seat).
If the lap portion of the lap and
shoulder vehicle belt system does
not loosen, please proceed to
step 11, page 33.
7
HINT
30
If you do not need a locking clip,
store it within the pages of this manual.
Replace the manual under the tab on the
back side of the car seat for future use.
Futura 20/60™ Car Seat
Page 33

Installing Your Car Seat in a Vehicle
To install the locking clip:
8
Re-tighten the vehicle lap and
shoulder belt system (see page
29). Hold the lap and shoulder
belts together just behind the
tongue and unbuckle the vehicle
belt. Continue to hold the lap and
shoulder belts together.
Futura 20/60™ Car Seat
31
8
Page 34

Installing Your Car Seat in a Vehicle
While holding the belts together,
9
tuck the edges of the vehicle
belts under the arms of the locking clip. Make sure the locking
clip is positioned approximately
1
/2” from the sliding tongue (but
no more than 3”).
While pushing down on the car
10
seat with your knee, buckle the
vehicle belt system.
Note: Make sure the locking
clip does not rest on the front
edge of the car seat shell.
1"
2
Futura 20/60™ Car Seat
32
Arms
9
10
Page 35

Installing Your Car Seat in a Vehicle
Test your installation of the car seat again, this
11
time by rocking the car seat forward and backward. You should NOT be able to pull the back
of the car seat away from the vehicle seat more
than one inch.
Note: Regularly check to be sure your car seat
installation is secure.
Futura 20/60™ Car Seat
33
11
CORRECT
CORRECT
11
INCORRECT
INCORRECT
Page 36

Installing Your Car Seat in a Vehicle
IMPORTANT!
If the lap belt continues to loosen after testing your installation, choose
another vehicle seating location to install this car seat. If there is not a position which will keep this car seat secured with a lap belt, contact your vehicle manufacturer. The vehicle manufacturer may be able to install a vehicle
belt system that can restrain your child properly in this car seat. NEVER
alter your vehicle belt system yourself.
Note: This forward-facing car seat does not require the use of a tether strap
to pass applicable Federal regulations. If, however, you cannot find a seating
location in your vehicle to tightly install this car seat (determined after rocking
the car seat forward and backward - see page 33, step 11), you may require
a tether strap to achieve a tight installation. Please call Fisher-Price®Consumer
Affairs at 1-800-432-KIDS to obtain a tether strap kit.
34
IMPORTANT!
Futura 20/60™ Car Seat
Page 37

Restraining Your Child
After installing the car seat in your
1
vehicle, lower the chest clip. Press
the button on the crotch strap buckle
and lift the overhead shield.
Futura 20/60™ Car Seat
35
1
Page 38

Restraining Your Child
Place your child in the car seat.
2
Make sure your child’s lower back
is against the car seat. This will allow
you to position the car seat restraint
around your child properly.
Lower the overhead shield.
3
Insert the overhead shield tongue into
4
the crotch strap buckle. Make sure you
hear a “click”.
HINT
The metal and plastic parts of the car
seat may become very hot when exposed to
the sun. When not in use, cover the car seat
with a blanket if it will be exposed to the sun
for prolonged periods of time.
Before placing your child in the car seat,
remove the blanket and check to be sure the
metal and plastic parts are not too hot.
Futura 20/60™ Car Seat
36
2
3
4
Page 39

Restraining Your Child
WARNING
NEVER dress your child in clothing that inter feres with positioning the crotch strap between your child’s legs. If the crotch
strap is not positioned between your child’s legs, your child
could eject from the car seat in a crash.
Futura 20/60™ Car Seat
37
Page 40

Restraining Your Child
1
2
To Loosen
A
B
T o Tighten
A
B
To tighten the shoulder straps:
5
Pull the attached shoulder strap
up to remove slack. Then, pull the
free end of the shoulder strap
down to tighten. If necessary,
repeat this procedure to comfortably tighten the shoulder straps.
To loosen the shoulder straps:
Fit your finger through the loop
and press the metal plate on the
adjuster . Pull the attached
shoulder strap down.
Futura 20/60™ Car Seat
38
A
B
A
B
5
Page 41

Restraining Your Child
Slide the chest clip up so that it is level
6
with your child’s underarm area.
Futura 20/60™ Car Seat
39
6
Page 42

Restraining Your Child
Check to be sure the shoulder straps
7
are snug against your child. Pull the
shoulder straps away from your child’s
chest. They should not move more than
one inch (two fingers) from your child’s
chest. If the shoulder straps are loose,
tighten them (refer to page 38, step 5).
If desired, attach the cup holder to
8
either retainer on the overhead shield.
IMPORTANT!
Place only a cup in the cup holder.
DO NOT place pencils, crayons or
other similar objects in the cup holder.
In a sudden stop or crash, these objects
could injure your child.
Futura 20/60™ Car Seat
40
7
8
Page 43

Restraining Your Child
WARNING
NEVER allow the shoulder straps to be loose around your
child. If the shoulder straps are not snug against your child,
your child will not be properly restrained.
Futura 20/60™ Car Seat
41
Page 44

Removing Your Child
Lower the chest clip to its
1
lowest position.
Press the button on the crotch
2
strap buckle.
Lift the overhead shield and remove
3
your child from the car seat.
Note: Always buckle the overhead
shield tongue to the crotch strap
buckle after removing your child.
Futura 20/60™ Car Seat
42
1
3
2
Page 45

Aircraft Use
You can install this car seat in aircraft seats that face forward. Before bringing
the car seat on board:
•Notify the airline of your intent to bring this car seat on board. The airline may
have restrictions regarding its use.
•The width of the overhead shield is 18". You may need to lift an armrest out of
the way to provide added room for the car seat. Check with the airline to be
sure this car seat will fit in the aircraft seat.
Install the car seat in aircraft seats that face forward and follow the instructions
of the flight attendant regarding placement of the car seat. For specific instructions, please see pages 24-42.
Futura 20/60™ Car Seat
43
Page 46

Cleaning and Washing
•Machine wash the seat and overhead shield pads in cold water and mild
detergent. Do not use bleach. Tumble dry on low heat.
•To clean the shell, harness and cupholder, use a mild cleaning agent and
damp cloth. Rinse with clean water to remove soap residue.
To remove the pads:
•Unfasten all three pads on the overhead shield and remove.
•Fit the end of a blunt object, such as a screwdriver, into the end of the metal
tube on the back of the car seat. Pry the metal tube from the groove in the shell.
•Remove the metal tube from the shoulder straps. Set the metal tube aside.
•Remove the plastic grommets and set aside.
•Remove the elastic loops from the clips on each side of the car seat.
•Remove the top and bottom of the pad from the edge of the shell.
•Feed the crotch strap down through the slot in the pad.
To replace the pads:
•Please see the assembly instructions beginning on page 17.
Futura 20/60™ Car Seat
44
Page 47

Registering Your Car Seat
N
O
P
O
S
T
A
G
E
N
E
C
E
S
S
A
R
Y
IF
M
A
IL
E
D
I
N
T
H
E
U
N
IT
E
D
S
T
A
T
E
S
P
O
S
T
A
G
E
W
I
L
L
B
E
P
A
I
D
B
Y
A
D
D
R
E
S
S
E
E
B
U
S
IN
E
S
S
R
E
P
L
Y
M
A
IL
F
I
R
S
T
C
L
A
S
S
M
A
I
L
P
E
R
M
I
T
N
O
.
1
0
6
W
E
B
S
T
E
R
,
N
Y
Child restraints could be recalled for safety reasons. You must
register this restraint to be reached in a recall. Send your name,
address, the restraint’s model number and manufacturing date
(located on the back side of the seat) to: Fisher-Price, Inc., 636 Girard
Avenue, East Aurora, New York 14052, or call 1-800-432-5437. For recall
information, call the U.S. Government’s Auto Safety Hotline at 1-800-424-9393
(202-366-0123 in the Washington D.C. area).
Consumer Information
If you have any questions about proper use of your car seat or would like to
order replacement parts, please call Fisher-Price®Consumer Affairs, toll-free
at 1-800-432-KIDS, between 8 AM and 5 PM EST, Monday through Friday.
Hearing impaired consumers using TTY/TDD equipment, please call
1-800-382-7470. Or, write to: Fisher-Price®Consumer Affairs, 636 Girard
Avenue, East Aurora, New York 14052.
45
Futura 20/60™ Car Seat
Page 48

®
Safe Check
✔
HOULDER HEIGHT
S
✔
A
FTER
✔
require a locking clip (for lap and shoulder belts with sliding latch plates).
F
✔
E
✔
Printed in U.S.A. 79013pr-0920
buckling and tightening your vehicle belt system, check to see if you
ASTEN
VALUATE
the overhead shield and tighten shoulder straps against child.
your car seat installation and the shoulder strap fit against child.
Fisher-Price, Inc., a subsidiary of Mattel, Inc., East Aurora, New York 14052, U.S.A.
of child is at or below desired shoulder strap slots.
1-800-432-KIDS
©1999 Mattel, Inc. All Rights Reserved.
®
and ™ designate U.S. trademarks of Mattel, Inc.
 Loading...