

Page 1

Please save these instructions for future reference.
Adult assembly is required.
Tool required for assembly: Phillips Screwdriver.
®
Robin Hood’s
Forest
Product Number: 77040
Page 2
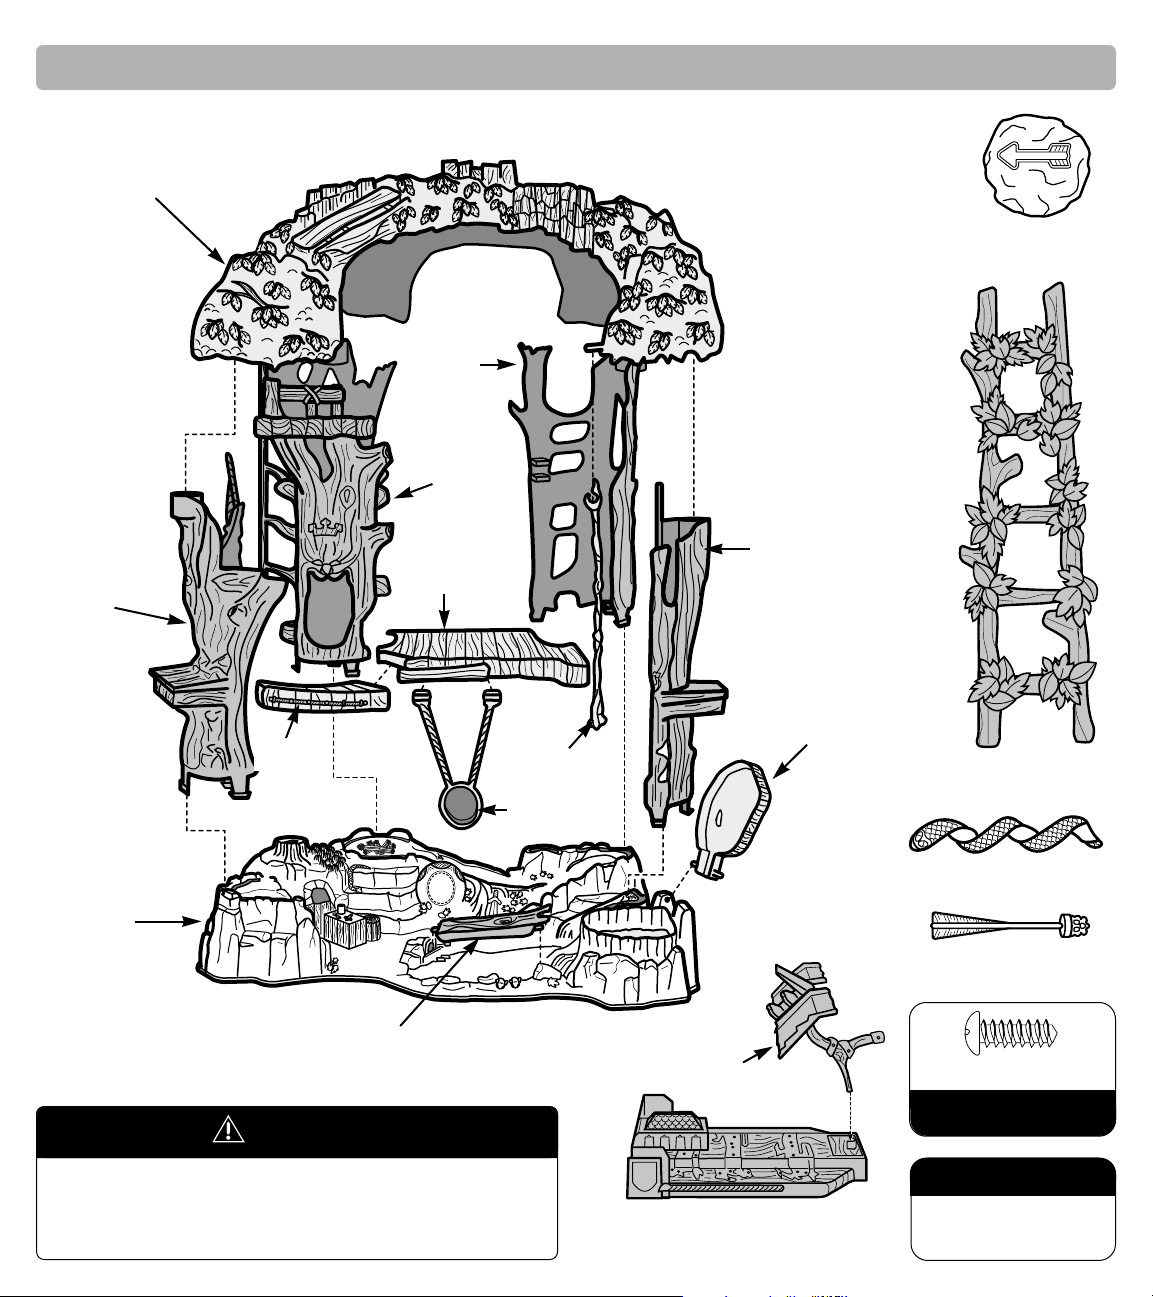
Parts
2
Arrow - 4
Snake - 2
Ladder
Boulder - 2
Launcher Base
Launcher
CAUTION
Please keep small parts, hardware and
plastic bags out of children’s reach.
Dispose of plastic bags properly.
Parts Not Shown
Figures - 5
Label Sheet
Tree Top
Front
Left Trunk
Stump Top
Base
Swing Log
Vine
Bridge
Front Right
Trunk
Rear
Right
Trunk
Rear
Left
Trunk
Floor
Log
1
/2" Screw - 4
Shown
Actual Size
Page 3

Label Decoration Assembly
• Position the base so that the pond or front end is toward you.
• Insert and snap the hooked tabs on the rear right trunk and
rear left trunk into the slots in the rear of the base.
• Pull up on the trunks to be sure they are secure.
1
• Insert and snap the hooked tabs on the front right trunk and
front left trunk into the slots in the front of the base.
• Pull up on the trunks to be sure they are secure.
Helpful Hint: Turn the base assembly over to make sure the
hooked tabs onthe trunks are snapped into the base (see inset).
2
3
Proper label application will help to keep the labels looking
their best!
• Wash your hands before applying the labels.
• Make sure the areas where the labels will be applied are
clean and dry. Wipe this product with a clean, soft, dry
cloth to remove any dust or oils.
• For best results, do not attempt to apply a label more
than once.
• Apply the labels as shown in the illustration.
Rear
Right
Trunk
Rear
Left
Trunk
Pond
Front
Right
Trunk
Front
Left
Trunk
Base
Base
3
2
4
1
5
6
7
8
Hooked Tab
Page 4

• Snap the cupped tabs on the swing log onto the large
pegs on the floor.
• Fit a hole on one of the sides of the bridge onto one of the
small pegs on the floor.
• Insert the small peg on the other side of the floor into the
hole on the other side of the bridge.
6
Swing Log
Cupped
Tabs
Bridge
Large Peg
Small Peg
Hole
Large Peg
Floor
Assembly
4
• Insert the pegs on the tree top into the plugs on the trunks.
• While holding the tree top in place, carefully turn the
assembly upside down.
• Insert four screws through the trunks and into the tree top.
• Tighten the screws with a Phillips screwdriver. Do not
over-tighten.
5
• Turn the base assembly upright.
• Bend the top of the rope ladder to fit it behind the tab on
the tree top.
3
4
Small Peg
Pegs
Pegs
Plug
Plug
Plugs
Rope
Ladder
Tab
Page 5

• Snap the cupped tab on the
vine to the peg on the tree top.
• At an angle insert one of the pegs on the stump top into
one of the holes in the stump.
• Insert and snap the other peg on the stump top into the
other hole in the stump.
• At an angle insert the longer peg on the log into the hole
in the base. Make sure the tab on the underside of the log
fits into the groove in the base (See inset).
• Insert and snap the shorter peg on the log into the other
hole in the base.
• Insert and snap the launcher into the launcher base.
Assembly
• With the bridge lowered and the
floor angled as shown, fit the
curved end of the floor onto
the ledge on the rear right trunk.
• Rotate the floor to fit it between
the grooves on the rear left trunk and front left trunk.
• Make sure the triangle tab on the floor fits behind the post
on the front left trunk (see top view inset).
• Raise the bridge.
7 9
5
Groove
Ledge
Stump Top
Hole
Tree Top
Rear Left Trunk
Short Ladder
Hole
• Insert and snap one end of the short ladder into the hole
in the base behind the rear left trunk.
• Insert the other end of the short ladder into the other hole
in the base.
8
Vine
Floor
Bridge
Curved
End of
Floor
Log
Launcher
Peg
Shorter
Peg
Groove
Longer
Peg
Tab
Triangle Tab
Post
Top View
Launcher
Base
10
Page 6

Snakes
Hole in
Tree Top
Tree Top
Let's Play!
You can launch a boulder and arrows together or singly!
• Fit one or more arrows into the grooves in the catapult.
• Place the boulder on the front of the catapult too!
1
• Place a boulder on the tree top and watch it roll through
the forest.
• Drop the boulder through the hole in the tree top and
watch it roll through the forest.
• Fit the snakes onto the poles and watch them slither down!
• Push the tab down and then release it to fire the arrows
and boulder.
2
6
Questions? We’d like to hear from you!
Call Fisher-Price®Consumer Affairs, toll-free at 1-800-432-KIDS, 8 AM - 6 PM EST Monday through Friday.
Hearing-impaired consumers using TTY/TDD equipment, please call 1-800-382-7470. Or, write to: Fisher-Price
®
Consumer Affairs, 636 Girard Avenue, East Aurora, New York 14052.
CAUTION
• Do not fire boulders or arrows at point
blank range.
• Only use the boulders and arrrows supplied
with this toy.
©1998 Fisher-Price, Inc., a subsidiary of Mattel, Inc., East Aurora, New York 14052 Printed in Mexico 77040 1 77040-0920
 Loading...