

Page 1

e Owner’s Manual with Assembly Instructions
• Please read this manual and save it with your original sales receipt. For Model 75598.
• Tools needed for assembly: Phillips Screwdriver, Hammer, and Safety Scissors (not included).
• Use only with a Power Wheels
®
12 Volt Battery with Built-in Thermal Fuse and Power Wheels®12 Volt Charger (both included).
• Requires three “AA” (LR6) alkaline batteries (not included) for sound box.
S Manual del usuario con instrucciones de montaje
• Leer este manual y guardarlo con el comprobante de venta original. Para el modelo 75598.
• Herramientas necesarias para el montaje: Desarmador de cruz, tijeras de punta redonda y martillo (no incluidas).
• Usar sólo con una batería recargable Power Wheels de 12V con recargable de plomo-ácido
un cargador Power Wheels de 12V con conector tipo “12V” (ambos incluidos).
• Funciona con cuatro pilas alcalinas tipo 3 x “AA” (LR6) x 1,5V (no incluidas) para la caja de resonancia.
• LEA LAS INSTRUCCIONES ANTES DE USAR ESTE PRODUCTO.
e Product features and decoration may vary from the picture above.
S Las características del producto pueden variar de las mostradas arriba.
e JEEP and the Jeep grille design are registered trademarks of DaimlerChrysler Corporation and are used under license.
©DaimlerChrysler Corporation.
Page 2

e Important Information
S Información importante
e • Your new vehicle requires adult assembly.
Please set aside at least 45 minutes
for assembly.
• You must charge your battery for 18 - 30
hours before you use your vehicle for the
first time. We recommend that you start
charging your battery before beginning assembly. Please see the Battery Charging section
beginning on page 8 for detailed instructions.
• This vehicle is designed for use on: grass,
asphalt or other hard surfaces; on generally
level terrain; by children 3 years of age
and older.
• Make sure children know and follow these
rules for safe driving and riding:
- always sit in the seat.
- always wear shoes.
- only two (2) riders at a time.
• This vehicle has adjustable play seat belts.
Please note that the adjustable seat belts
are designed to be a play feature only and
do not function as protective safety restraints.
• Use this vehicle ONLY outdoors. Most interior
flooring can be damaged by riding this vehicle
indoors. Fisher-Price®will not be responsible
for damage to the floor if the vehicle is
used indoors.
• To prevent damaging the motors and gears,
do not tow anything behind the vehicle or
overload it. Do not exceed the maximum
weight capacity of 59 kg (130 lb).
• For safety reasons, your vehicle has been
pre-set so that it will only operate at low
speed. You must remove the high speed
lock-out screw to allow operation of the
vehicle at high speed. Please see page 29
for detailed instructions.
• If you have any questions about your
Power Wheels®vehicle, please contact
Power Wheels®Consumer Relations:
Mattel de México, S.A. de C.V., Insurgentes
Sur # 3579, Torre 3, Oficina 601, Col. Tlalpan,
Delegación Tlalpan, C.P. 14020, México, D.F.
TEL. 54-49-41-00.
S • Este vehículo requiere montaje por un adulto.
El montaje se demora aproximadamente
45 minutos.
• Es necesario cargar la batería por 18 a 30
horas antes de usar el vehículo por primera
vez. Se recomienda empezar a cargar las
baterías antes de empezar el montaje.
Consultar Cargar la batería a partir de
la página 8 para obtener instrucciones
detalladas.
• Leer este manual detenidamente para
información importante de seguridad e
información de operación previo al uso
del vehículo. Conservar el manual para
futura referencia, dado que contiene
información importante.
• Este vehículo está diseñado para usarse
en pasto, asfalto u otras superficies duras,
en terreno nivelado, por niños de 3 años
en adelante.
• Cerciorarse de que los niños estén al tanto
de estas reglas y las sigan por motivos
de seguridad:
- siempre sentarse en el asiento
- siempre calzar zapatos
- Sólo dos (2) conductores a la vez.
• Este vehículo incluye cinturones de
seguridad de juguete ajustables. Observe
que los cinturones de seguridad ajustables
están diseñados para ser una característica
de juego y no tienen ninguna función
de protección.
• SÓLO usar este vehículo al aire libre.
La mayoría de pisos bajo techo se pueden
dañar si se usa el vehículo sobre ellos.
Fisher-Price no se hace responsable
de daños a pisos si el vehículo se usa
bajo techo.
• Para evitar daños al motor y a los cambios,
no remolcar nada con el vehículo ni
sobrecargarlo. No sobrepasar el peso
máximo de 59 kilos.
• Por motivos de seguridad, el vehículo fue
prestablecido para que sólo funcione a
velocidad lenta. Será necesario quitar el
tornillo bloqueador de velocidad rápida
para usar el vehículo a velocidad rápida.
Consultar la página 29 para instrucciones
detalladas.
• Si tiene alguna pregunta sobre su vehículo
Power Wheels, póngase en contacto con
el departamento de Atención al cliente de
Power Wheels: Mattel de México, S.A.
de C.V., Insurgentes Sur # 3579, Torre 3,
Oficina 601, Col. Tlalpan, Delegación
Tlalpan, C.P. 14020, México, D.F.
TEL. 54-49-41-00.
A
2
Page 3

e Warnings and Cautions
S Advertencias y precaución
e WARNING S ADVERTENCIA
• Battery can fall out and injure a child if vehicle tips over. Always use battery clamp.
• PREVENT FIRE
- Never modify the electrical system. Alterations could cause a fire resulting in serious
injury and could also ruin the electrical system.
- Use of the wrong type battery or charger could cause a fire or explosion resulting in
serious injury.
- Use of Power Wheels
®
components in products other than Power Wheels®vehicles
could cause overheating, fire or explosion.
• The battery must be handled by adults only. The battery is heavy and contains sulfuric
acid (electrolyte). Dropping the battery could result in serious injury.
• Never allow children to charge the battery. Battery charging must be done by adults only.
A child could be injured by the electricity involved in charging the battery.
• Read the safety instructions on the battery.
• Examine the battery, charger and their connectors for excessive wear or damage each time
you charge the battery. If damage or excessive wear is detected, do not use the charger or
the battery until you have replaced the worn or damaged part.
• HOT motors. Handle carefully.
S • Las baterías se pueden caer y lastimar a un niño si el vehículo se voltea. Siempre usar el
sujetador de la batería.
• EVITAR INCENDIOS
- Nunca modificar el sistema eléctrico. Las alteraciones pueden causar incendios que, a su
vez, pueden resultar en lesiones graves y arruinar el sistema eléctrico.
- El uso del tipo equivocado de batería o cargador puede causar un incendio o explosión,
dando como resultado graves lesiones.
- El uso de piezas Power Wheels en productos que no son Power Wheels puede resultar
en sobrecalentamiento, incendio o explosión.
• Se recomienda que sólo un adulto cargue la batería. La batería es pesada y contiene ácido
sulfúrico (electrolito). Si se llega a caer la batería podría causar lesiones graves.
• Nunca permitir que un niño cargue la batería. La carga de la batería debe ser realizada
por un adulto. Un niño puede salir lesionado por la electricidad involucrada en la carga
de la batería.
• Leer las instrucciones de seguridad en la batería.
• Cada vez que se cargue la batería, examinar la batería, cargador y conectores para verificar
que no tengan daños ni estén gastados en exceso. Si detecta daños o gasto en exceso, no
usar el cargador ni la batería sino hasta que haya reemplazado la pieza dañada.
• Motores CALIENTES. Tener precaución.
e ELECTRICAL HAZARD
S PELIGRO ELÉCTRICO
3
Page 4

4
e WARNING S ADVERTENCIA
e • Prevent Injuries and Deaths
• Direct Adult Supervision Required
• Keep Children Within Safe Riding Areas.
These areas must be:
- away from swimming pools and other bodies of water to prevent drownings
- generally level to prevent tipovers
- away from steps, driveways, cars, roads and alleys.
S• Evitar lesiones y la muerte
• Se requiere la supervisión directa de un adulto.
• Mantener a los niños en áreas de juego seguras.
Se recomienda que estas áreas estén:
- lejos de piscinas y otras áreas con agua para evitar accidentes
- niveladas para evitar que se voltee el vehículo
- lejos de escalones, paseos, vehículos, calles y callejones.
e RIDING HAZARD
S PELIGRO AL CONDUCIR
e Warnings and Cautions
S Advertencias y precaución
e CAUTION S PRECAUCIÓN
e • In the unassembled state, this package contains small parts. Adult assembly is required.
• Use the charger in dry locations only.
S• Este paquete incluye piezas pequeñas. Requiere montaje por un adulto.
• Utilizar el cargador en lugares secos únicamente.
Page 5

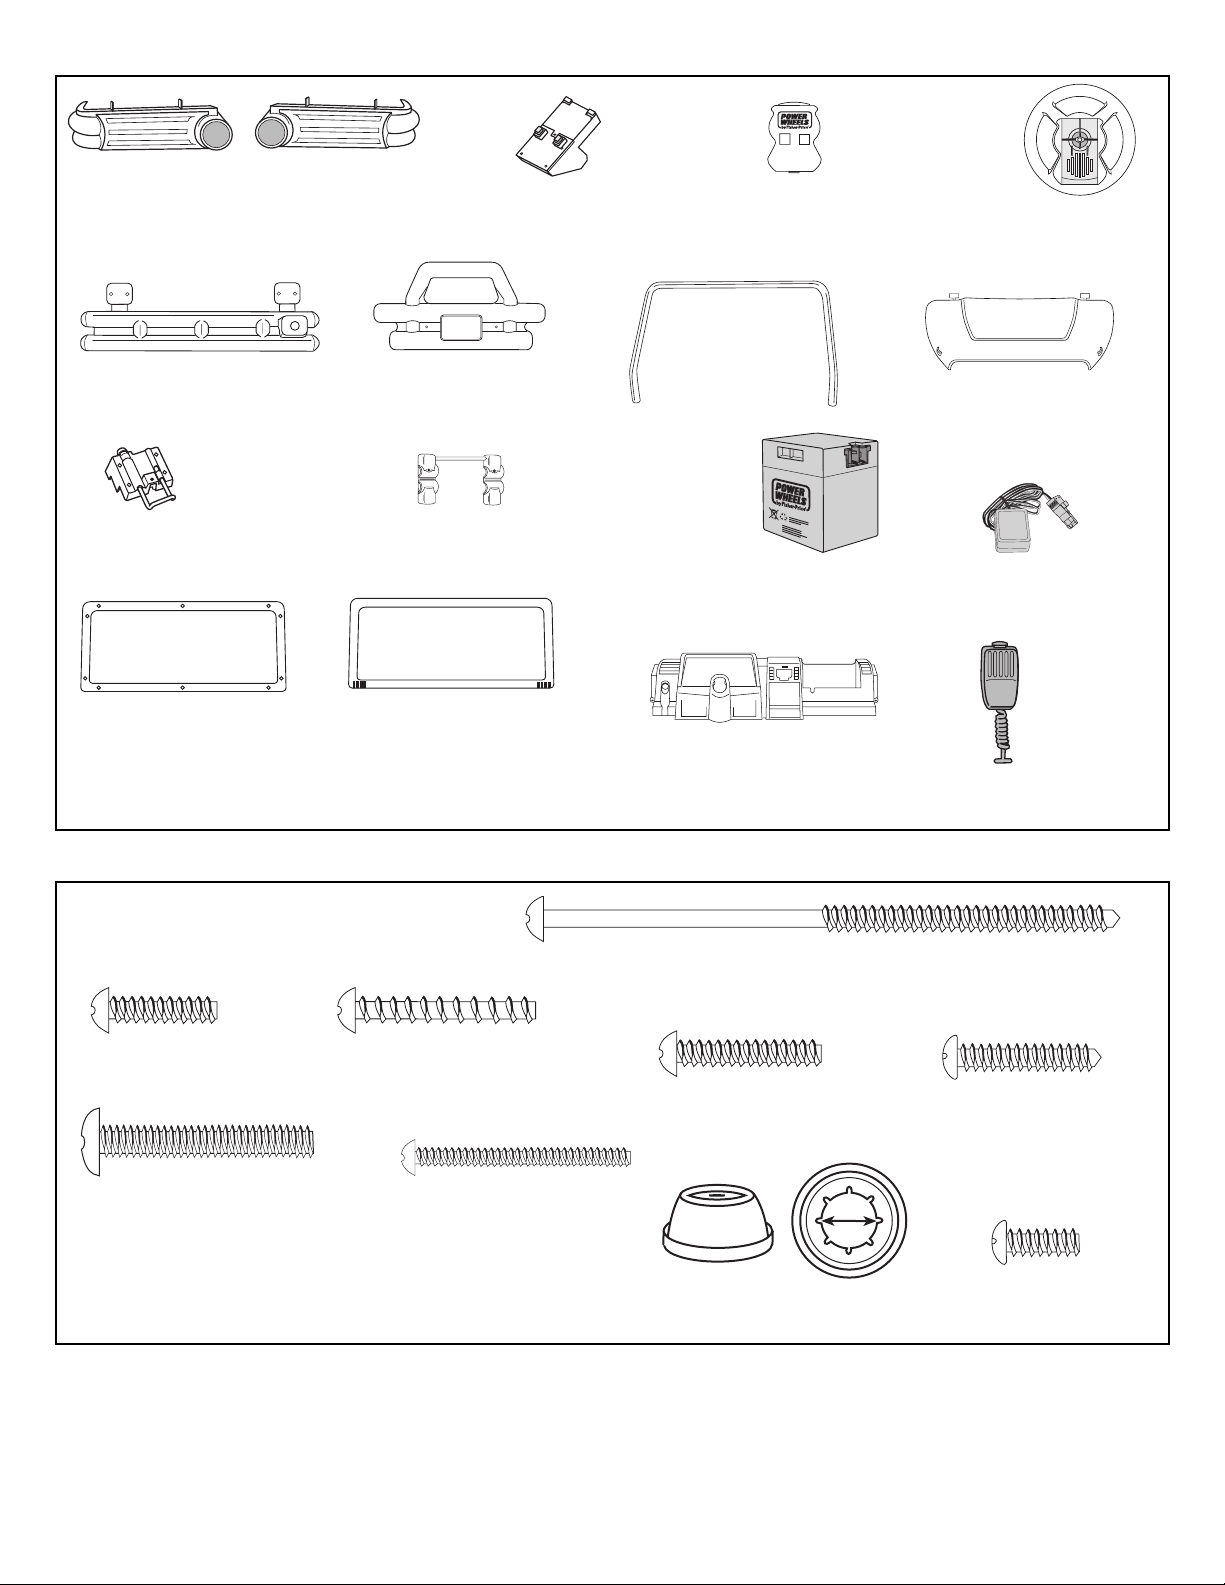
e Light Rack, Rear
S Parte trasera de la barra de luces
e Light Rack, Front
S Parte delantera de la barra de luces
e Hood Latch - 2
S Seguro del cofre - 2
e Cap
S Tapa
e Short Seat Belt Strap - 2
S Cinta corta del cinturón de seguridad - 2
e Taillight Housing Set
S Conjunto del compartimento
de luces traseras
e Taillight Lens Set
S Conjunto de lentes
de luces traseras
e Long Seat Belt Strap
S Cinta larga del cinturón de seguridad
e Lens Guard - 2
S Tapa del lente - 2
e Headlight Lens - 2
S Lente de luz delantera - 2
e Light Cover - 2
S Tapa de luz - 2
e Parts
S Piezas
e If you experience a problem with this product, or are missing a part, please contact Power Wheels®Consumer Relations, rather than return this product
to the store. Please identify all parts before assembly and save all packaging material until assembly is complete to ensure that no parts are discarded.
Metal parts have been coated with a lubricant to protect them during shipment. Wipe all metal parts with a paper towel to remove any excess lubricant.
S Si llega a tener algún problema con este producto, o si falta alguna pieza, póngase en contacto con el departamento de Atención al cliente de
Power Wheels, en lugar de regresar el producto a la tienda donde lo adquirió. Identifique todas las piezas antes del montaje y guarde todo el
material de embalaje hasta que el montaje esté completo, para asegurar que no se deseche ninguna pieza. Las piezas de metal fueron cubiertas
con un lubricante para protegerlas durante el envío. Limpiar todas las piezas de metal con un papel toalla para quitar el exceso de lubricante.
B
e Windshield Bracket - 2
S Abrazadera del parabrisas - 2
e Windshield Hinge Pin - 2
S Clavija de la bisagra
del parabrisas - 2
e Key Assembly
S Unidad de llave
e Vehicle Body
S Carrocería
e Canopy
S Cubierta
e Seat
S Asiento
e Sport Bar Support - 2
S Soporte de la barra
deportiva - 2
e Steering Column
S Columna de mando
e Cap Nut Assembly Tool
S Herramienta de ensamblaje
de la tuerca ciega
e Brush Guard Spacer Tube - 2
S Tubo espaciador del guardabarros - 2
5
e Knob Plate
S Placa de botones
Page 6
e All Shown Actual Size
S Se muestran a tamaño real
e #8 x 2.5 cm Screw - 11
S Tornillo No. 8 x 2,5 cm - 11
e #10 x 2.5 cm Screw - 7
S Tornillo No. 10 x 2,5 cm - 7
e #8 x 10.2 cm Screw - 2
S Tornillo No. 8 x 10,2 cm - 2
e #6 x 3.8 cm Screw - 4
S Tornillo No. 6 x 3,8 cm - 4
e 3.8 cm x 6.4 mm Machine Screw - 2
S Tornillo de 3,8 cm x 6,4 mm - 2
e #8 x 3.2 cm Screw - 10
S Tornillo No. 8 x 3,2 cm - 10
e Part Not Shown: Label Sheet
S No se muestra: Hoja de adhesivos
e 12 Volt Charger
S Cargador de 12V
e 12 Volt Battery
S Batería de 12V
Pb
12-VOLT
CHARGER
e #10 x 1.25 cm Screw - 2
S Tornillo No. 10 x 1,25 cm - 2
e #8 x 2 cm Screw - 6
S Tornillo No. 8 x 2 cm - 6
e Microphone
S Micrófono
e Battery Clamp Unit
S Unidad de abrazadera de la batería
e ** For your convenience, an extra .354 cap nut has been included.
S ** Para su conveniencia, se ha incluido una tuerca ciega de 0,354 adicional.
e Left Sidepipe
S Escape izquierdo
e Right Sidepipe
S Escape derecho
e Dash
S Tablero
e Sport Bar
S Barra deportiva
e Sport Bar Bracket Set
S Conjunto de abrazaderas de la barra deportiva
e Hood
S Cofre
e Windshield Frame - Back
S Marco del parabrisas - Trasero
e Rear Bumper
S Defensa trasera
e Steering Wheel Cover
S Tapa del manubrio
e Sound Box
S Caja de resonancia
e Brush Guard
S Guardabarros
e Windshield Frame - Front
S Marco del parabrisas - Delantero
e Steering Wheel
S Volante
e Cap Nut - 2**
S Tuerca ciega de 0,354 - 2**
6
Page 7
7
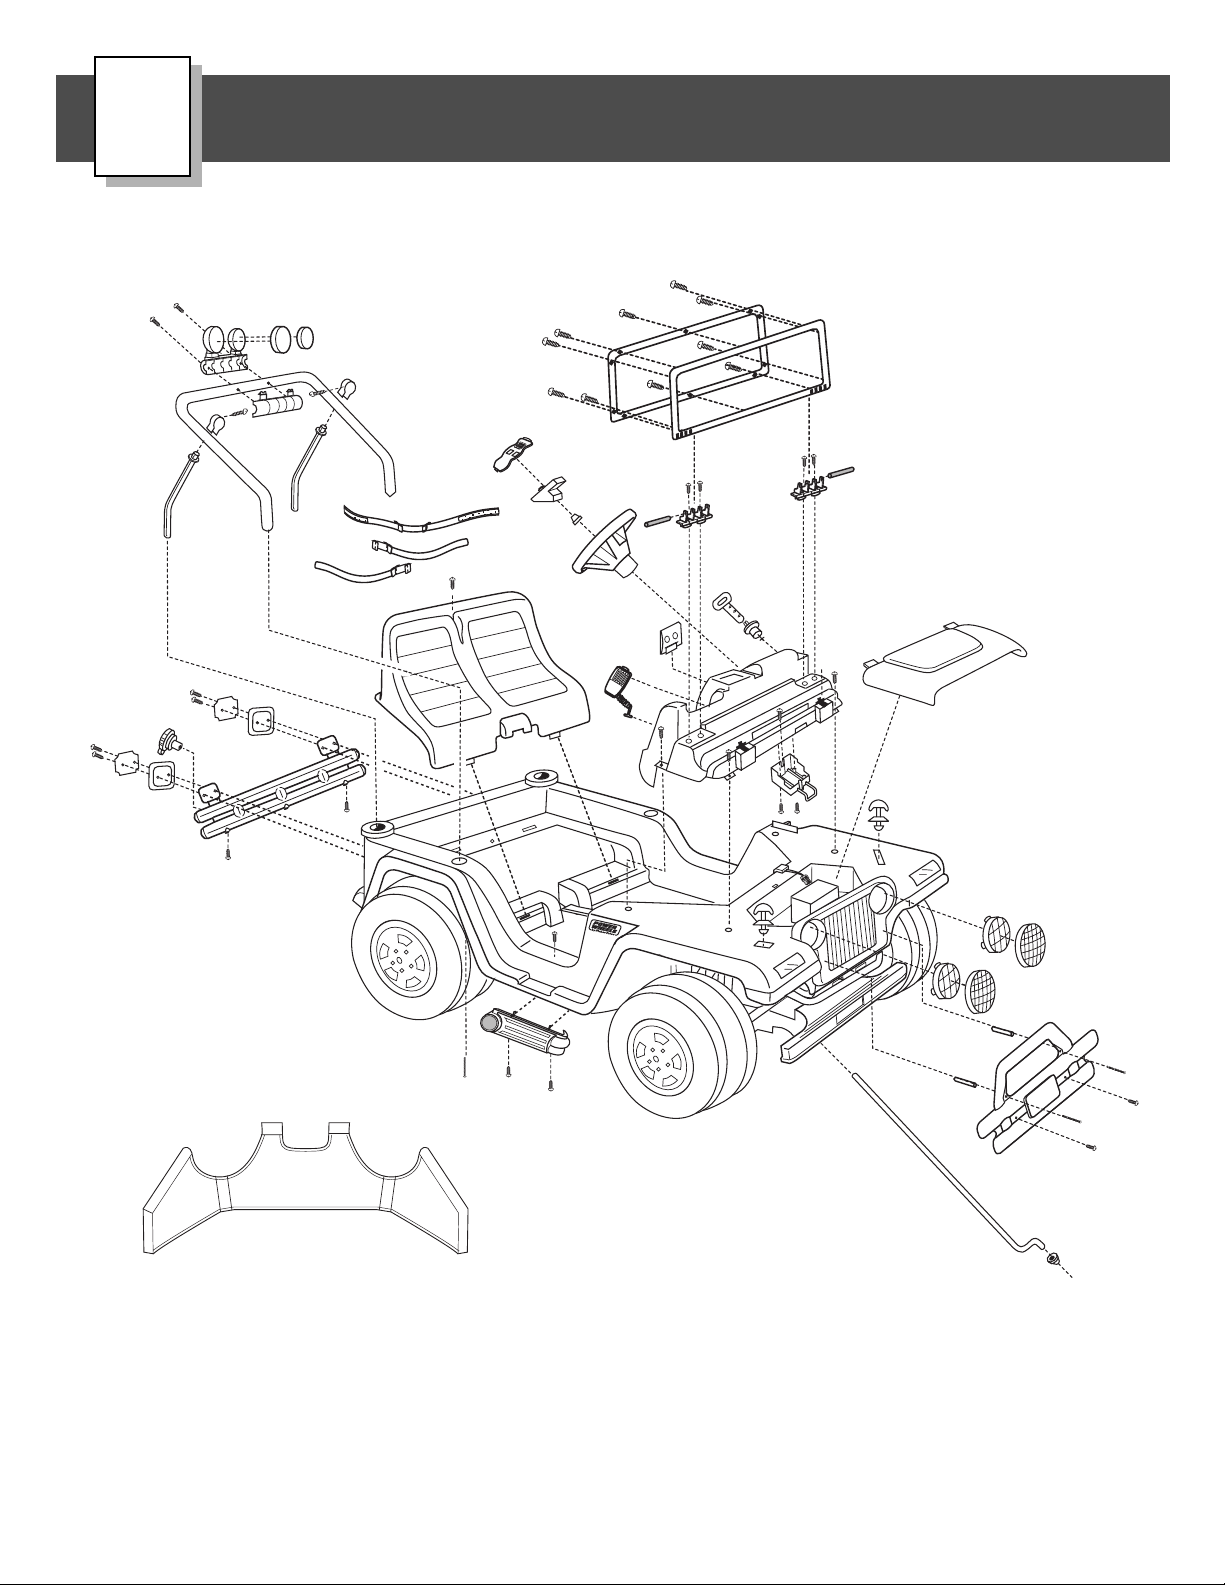
e Parts Diagram
S Diagrama de piezas
C
e Note: Some parts are assembled on both sides of the vehicle. The illustration shows assembly on right side only.
S Nota: Algunas de las piezas mostradas se montan en ambos costados del vehículo. La ilustración sólo muestra el montaje del lado derecho.
Page 8
8
e Battery Charging
S Cargar la batería
D
e ELECTRICAL HAZARD
S PELIGRO ELÉCTRICO
e • Battery can fall out and injure a child if vehicle tips over. Always use battery clamp.
• PREVENT FIRE
- Never modify the electrical system. Alterations could cause a fire resulting in serious injury and-
could also ruin the electrical system.
- Use of the wrong type battery or charger could cause a fire or explosion resulting in serious injury.
- Use of Power Wheels®components in products other than Power Wheels®vehicles could cause
overheating, fire or explosion.
• The battery must be handled by adults only. The battery is heavy and contains sulfuric acid
(electrolyte). Dropping the battery could result in serious injury.
• Never allow children to charge the battery. Battery charging must be done by adults only. A child
could be injured by the electricity involved in charging the battery.
• Read the safety instructions on the battery.
• Examine the battery, charger and their connectors for excessive wear or damage each time you
charge the battery. If damage or excessive wear is detected, do not use the charger or the battery
until you have replaced the worn or damaged part.
S • Las baterías se pueden caer y lastimar a un niño si el vehículo se voltea. Siempre usar el
sujetador de la batería.
• EVITAR INCENDIOS
- Nunca modificar el sistema eléctrico. Las alteraciones pueden causar incendios que, a su vez,
pueden resultar en lesiones graves y arruinar el sistema eléctrico.
- El uso del tipo equivocado de batería o cargador puede causar un incendio o explosión, dando
como resultado graves lesiones.
- El uso de piezas Power Wheels en productos que no son Power Wheels puede resultar en
sobrecalentamiento, incendio o explosión.
• Se recomienda que sólo un adulto cargue la batería. La batería es pesada y contiene ácido
sulfúrico (electrolito). Si se llega a caer la batería podría causar lesiones graves.
• Nunca permitir que un niño cargue la batería. La carga de la batería debe ser realizada por un
adulto. Un niño puede salir lesionado por la electricidad involucrada en la carga de la batería.
• Leer las instrucciones de seguridad en la batería.
• Cada vez que se cargue la batería, examinar la batería, cargador y conectores para verificar
que no tengan daños ni estén gastados en exceso. Si detecta daños o gasto en exceso, no
usar el cargador ni la batería sino hasta que haya reemplazado la pieza dañada.
e WARNING S ADVERTENCIA
Page 9
9
e CAUTION
S PRECAUCIÓN
e Use the charger in dry
locations only.
S Usar el cargador en
lugares secos únicamente.
eImportant Notes
• Your new battery must be charged for at
least 18 hours before you use it in your
vehicle for the first time.
• You do not need to remove the battery from
your vehicle to recharge it.
• The battery must be upright while charging.
• The charger is not a toy.
• Do not short circuit the battery.
• We recommend that you start charging your
battery before beginning assembly of your
new vehicle.
• Before charging the battery, examine the
battery case for cracks and other damage
which may cause sulfuric acid (electrolyte)
to leak during the charging process. If
damage is detected, do not charge the
battery or use it in your vehicle. Battery
acid is very corrosive and can cause severe
damage to surfaces it contacts.
• Do not charge the battery on a surface
which could be damaged by the acid
contained inside the battery. Take
precautions to protect the surface
on which you charge your battery.
• Use only a Power Wheels®12 volt charger
with type “12V” connector (120 VAC or
230/240 VAC, 60 Hz, 28W with an output
of 12 VDC, 1200mA) to charge your Power
Wheels®rechargeable 12 volt battery.
SNotas importantes
• La nueva batería debe ser cargada
durante un periodo de por lo menos
18 horas antes de usarla con el vehículo
por primera vez.
• Se recomienda empezar a cargar la
batería antes de empezar con el montaje
del vehículo.
• La batería debe estar en posición vertical
durante el proceso de carga.
• El cargador no es un juguete.
• No provocar cortocircuitos con la batería.
• No es necesario sacar la batería del vehículo para cargarla.
• Antes de cargar la batería, verificar que el
compartimento no tenga rajaduras o daños
que puedan causar que el ácido sulfúrico
(electrolitos) se derrame durante el proceso
de carga. Si se detecta algún daño, no cargar la batería ni usarla en el vehículo. El
ácido de la batería es muy corrosivo y
puede causar daños severos a las superficies con las que entra en contacto.
• No cargar la batería en una superficie que
se pueda dañar con el ácido contenido en
la batería. Tomar las debidas precauciones
para proteger la superficie en la que se
vaya a cargar la batería.
• Usar únicamente un cargador Power Wheels
de 12V con conector de 12V (120 V o 230/
240 V - 60 Hz 28W con una salida de
12 Vcc 1,2A) para cargar la batería
recargable Power Wheels de 12V.
e About Thermal Fuses
Your Power Wheels®12 volt battery is
equipped with a built-in thermal fuse.
The thermal fuse is a self-resetting safety
device which automatically “trips” and
shuts down operation of the vehicle if
the vehicle is overloaded or the driving
conditions too severe. Once a fuse has
“tripped”, it will automatically reset itself
after approximately 25 seconds and allow
the vehicle to resume normal operations.
To avoid repeated automatic shutdowns,
do not overload the vehicle by exceeding
the 59 kg (130 lb) maximum weight
capacity or by towing anything behind the
vehicle. Avoid severe driving conditions,
such as driving up very steep slopes or
running into fixed objects, which can cause
the wheels to stop spinning while power is
still being supplied to the motors. Make
sure your child stops the vehicle before
switching speeds or direction.
If a thermal fuse in a battery continually
trips under normal driving conditions,
please contact Power Wheels
®
Consumer Relations.
S Fusibles térmicos
La batería Power Wheels de 12V incluye
un fusible térmico integrado. Los fusibles
térmicos son dispositivos de seguridad que
se restablecen por sí solos; se “bloquean”
y automáticamente detienen la operación
del vehículo si éste está sobrecargado
o si las condiciones de manejo son muy
severas. Después de que un fusible se
“bloquea”, se restablece automáticamente
después de aproximadamente 25 segundos y el vehículo reanuda su operación
normal. Para evitar que se detenga
repetidamente el vehículo de manera
automática, no cargue el vehículo en
exceso del peso máximo de 59 kg ni
remolque nada con el mismo. Evite condiciones de manejo severas, tales como
manejar en subidas muy empinadas o
chocar con objetos estáticos, que pueden
causar que las ruedas dejen de girar
mientras se sigue transfiriendo energía
al motor. También cerciórese de que su
hijo detenga el vehículo antes de cambiar
de dirección o velocidad.
Si un fusible térmico se bloquea
continuamente bajo condiciones de
manejo normales, sírvase ponerse
en contacto con el departamento de
Atención al cliente de Power Wheels.
PbP
b
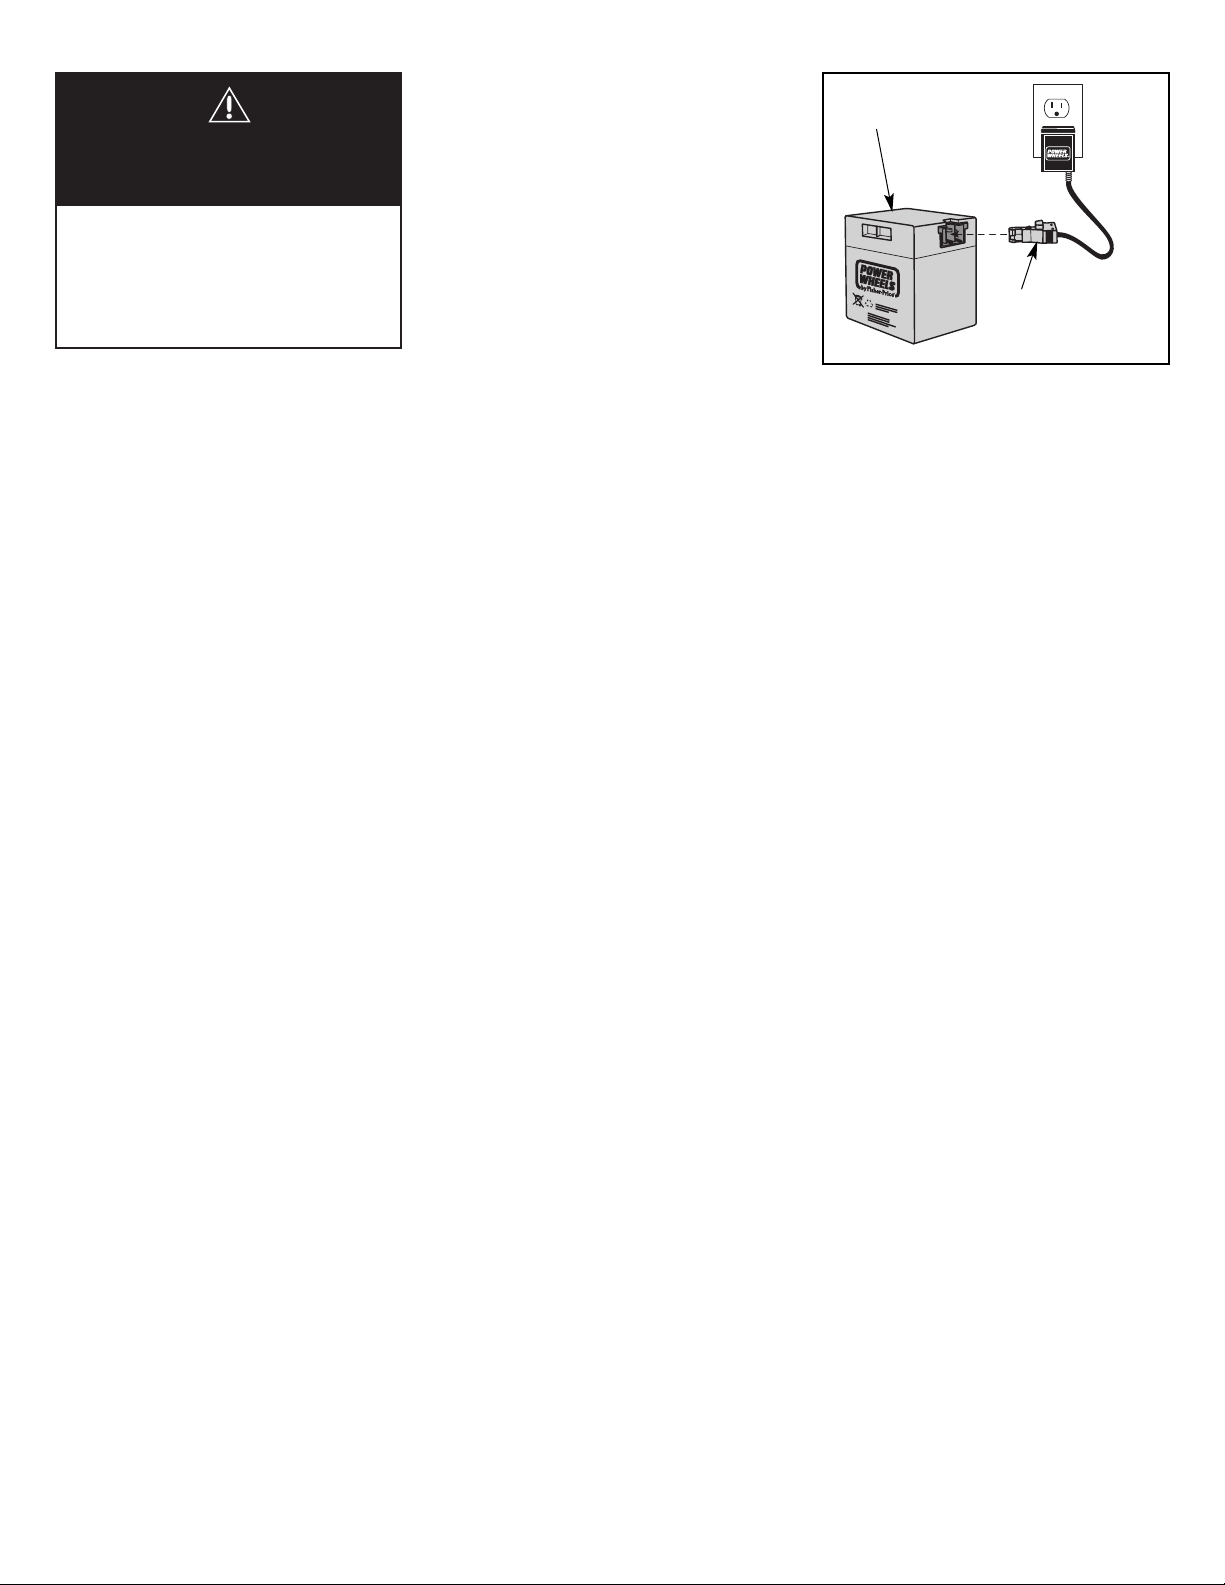
e • Plug the charger connector into the
battery .
• Plug the charger into a standard wall
outlet .
Note: If power flow to the wall outlet is
controlled by a switch, make sure the switch
is “ON”.
• Before first-time use, charge the battery
for at least 18 hours. Never charge the
battery longer than 30 hours.
• Recharge the battery for at least 14 hours
after each use of your vehicle. Do not
charge the battery longer than 30 hours.
• Once the battery is charged, pull firmly on
the charger connector to disconnect it from
the battery. Unplug the charger from the
wall outlet. The battery is now ready to be
installed in your vehicle. Please see the
Battery Installation section on page 23 for
detailed instructions on installing your
battery. If your battery is already installed in
your vehicle, simply re-connect the motor
harness connector to the battery and lower
and fasten the hood.
S • Enchufe el conector del cargador en la
batería .
• Enchufar el cargador en un tomacorriente
estándar de pared .
Nota: Si el flujo de corriente al tomacorriente
es controlado por un interruptor, verificar que
el interruptor esté “ACTIVADO”.
• Antes del primer uso, cargar la batería
durante un periodo de por lo menos 18
horas. Nunca cargar la batería por más de
30 horas.
• Recargar la batería por lo menos 14 horas
después de cada uso del vehículo. No
cargar la batería por más de 30 horas.
• Después de que la batería esté cargada,
desconectar el conector del cargador del
conector de la batería. Desenchufar el
cargador del tomacorriente. La batería
está cargada y lista para instalarse en el
vehículo. Leer la sección de Instalación
de la batería en la página 23 para obtener
instrucciones detalladas sobre cómo
instalar la batería. Si la batería ya se
encuentra en el vehículo, simplemente
enchufar el conector del arnés del motor
en la batería y cerrar y asegurar el cofre.
e Battery
S Batería
e Charger Connector
S Conector del
cargador
Page 10

10
e Assembly
S Montaje
E
e WARNING S ADVERTENCIA
e Children can be harmed by small parts, sharp edges and sharp points in the vehicle’s unassembled
state, or by electrical items. Care should be taken in unpacking and assembly of the vehicle.
Children should not handle parts, including the battery, or help in assembly of the vehicle.
SLos niños se pueden lastimar con las piezas pequeñas y con los bordes y puntas filosas de las
piezas individuales del vehículo desmontado, así como con elementos eléctricos. Cuidado al sacar
las piezas del vehículo y al montar el mismo. No permitir que los niños toquen ninguna pieza,
incluyendo la batería, ni que ayuden en el montaje del vehículo.
e Screw Pegs
S Clavijas de tornillo
e Left Sidepipe
S Escape izquierdo
e Vehicle Body
S Carrocería
1
e Rear of Vehicle
S Dorso del vehículo
e Rear of Vehicle
S Dorso del vehículo
e • Turn the vehicle body upside down.
• Fit the left sidepipe under the left (driver)
side of the vehicle body.
• Insert two #8 x 2 cm screws through the
top of the left sidepipe and into the screw
pegs on the underside of the vehicle body.
• Tighten the screws with a Phillips screwdriver. Do not over-tighten.
• Repeat this procedure to assemble the
right sidepipe to the right side of the
vehicle body.
S • Colocar la carrocería al revés.
• Ajustar el escape izquierdo debajo del
lado izquierdo (lado del conductor) de
la carrocería.
• Introducir dos tornillos No. 8 x 2 cm en la
parte superior del escape izquierdo y en
las clavijas de tornillo en la parte de abajo
de la carrocería.
• Ajustar los tornillos con un destornillador
de cruz, sin apretar en exceso.
• Repetir este procedimiento para ensamblar el escape derecho en el lado derecho
de la carrocería.
2
e Ta b
S Lengüeta
e • Turn the vehicle body upright.
• Gently bend the tab on one of the sidepipes
under the vehicle body.
• Insert a #8 x 2 cm screw through the hole in
the vehicle body floor and into the tab.
• Tighten the screw with a Phillips screwdriver. Do not over-tighten.
• Repeat this procedure on the other side of
the vehicle body.
S • Colocar la carrocería al derecho.
• Doblar cuidadosamente la lengüeta de uno
de los escapes debajo de la carrocería.
• Introducir un tornillo No. 8 x 2 cm en el
orificio del piso de la carrocería y en
la lengüeta.
• Ajustar el tornillo con un destornillador de
cruz, sin apretar en exceso.
• Repetir este procedimiento en el otro lado
de la carrocería.
e Battery Clamp Unit
S Unidad de la
abrazadera
de la batería
e Dash
S Tablero
e Clamp
S Abrazadera
e Grooves
S Ranuras
e • Position the dash upside down.
• Fit the battery clamp unit into the underside
of the dash so that the clamp fits into the
grooves in the dash. Make sure the battery
clamp unit is flush against the surface of
the dash.
S • Colocar el tablero al revés.
• Ajustar la unidad de la abrazadera de la
batería en la parte de abajo del tablero, de
tal manera que la abrazadera se ajuste en
las ranuras del tablero. Cerciorarse de que
la unidad de la abrazadera de la batería
quede plana contra la superficie del tablero.
3
Page 11
11
4
e Battery Clamp Unit
S Unidad de la abrazadera
de la batería
e • Insert two #10 x 2.5 cm screws through the
holes in the battery clamp unit and into the
pegs in the dash.
S • Introducir dos tornillos No. 10 x 2,5 cm en
los orificios en la unidad de la abrazadera
de la batería y en las clavijas del tablero.
e Dash
S Tablero
e Battery
Compartment
S Compartimento
de la batería
e Motor Harness
Connector Wires
S Cables del
conector del
arnés del motor
5
e • Position the dash on the vehicle body.
• Make sure the motor harness connector
wire is through the grooves in the dash.
• Insert a #10 x 1.25 cm screw through each
of the two corner dash tabs nearest to the
passenger compartment .
• Insert a #10 x 2.5 cm screw through the
two dash tabs nearest to the battery
compartment .
• Insert a #10 x 2.5 cm screw into the hole
in the center of the dash, near the battery
clamp .
• Tighten the screws with a Phillips screwdriver. Do not over-tighten.
S • Colocar el tablero en la carrocería.
• Cerciorarse de que los cables del conector
del arnés del motor aparezcan por las
ranuras del tablero.
• Introducir un tornillo No. 10 x 1,25 cm
en cada una de las dos lengüetas en
las esquinas del tablero cerca del
compartimento del pasajero .
• Introducir un tornillo No. 10 x 2,5 cm en
las dos lengüetas del tablero cerca del
compartimento de la batería .
• Introducir un tornillo No. 10 x 2,5 cm en el
orificio del centro del tablero, cerca la
abrazadera de la batería .
• Ajustar los tornillos con un destornillador
de cruz, sin apretar en exceso.
e Battery Clamp
S Abrazadera
de la batería
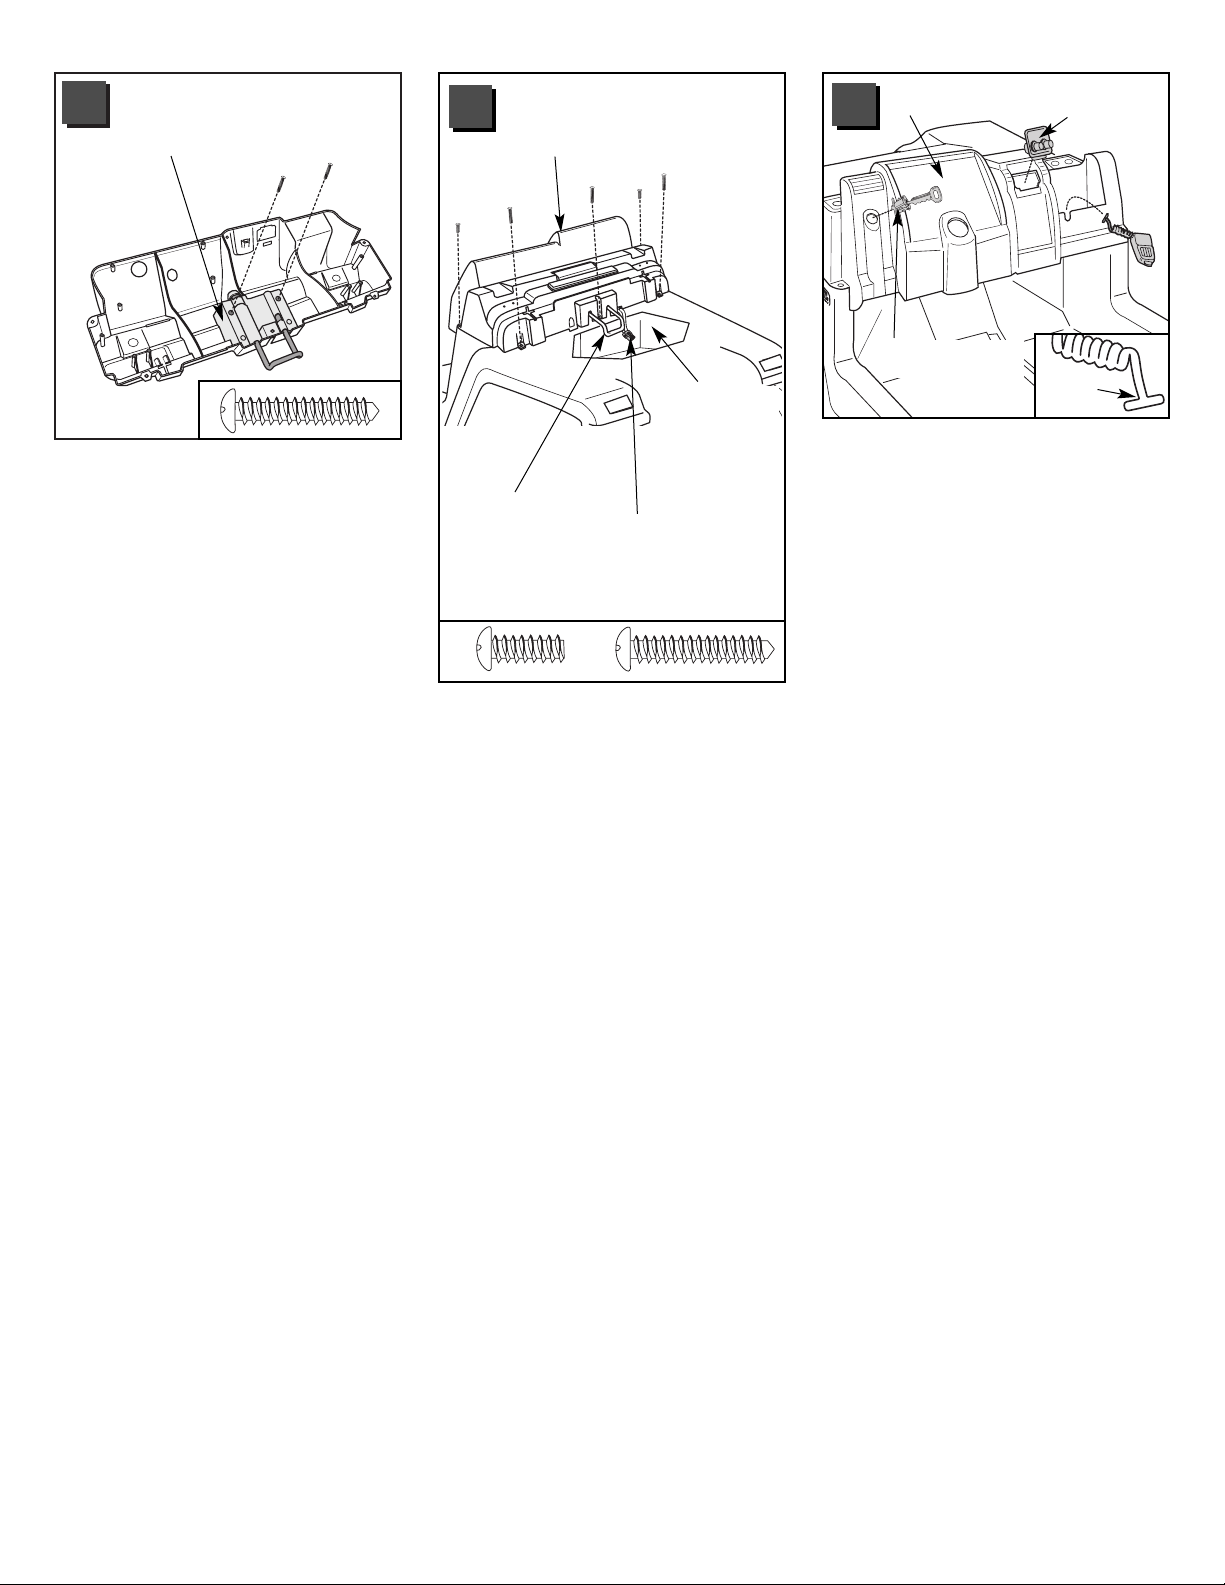
e • Bend the plastic tip at the end of the micro-
phone cord to form a “T”.
• Insert the plastic tip into the opening in the
dash. Pull gently on the cord to make sure
it is secure.
• Fit the tab on the back of the microphone
into the slot in the dash.
• Position the bottom edge of the knob plate
in the opening in the dash.
• “Snap” the top of the knob plate into
the dash.
• Insert and “snap” the key assembly into
the dash.
S • Doblar la punta de plástico del extremo del
cable del micrófono para formar una “T”.
• Introducir la punta de plástico en el
orificio del tablero. Tirar ligeramente del
cable para verificar que está seguro.
• Encajar la lengüeta del dorso del
micrófono en la ranura del tablero.
• Colocar el borde inferior de la placa de
botones en la apertura en el tablero.
• Encajar la parte superior de la placa de
botones en el tablero.
• Introducir y ajustar la unidad de la llave
en el tablero.
6
e Key Assembly
S Unidad de la llave
e Dash
S Tablero
e Knob Plate
S Placa de botones
e “T”
S “T”
Page 12

12
7
e • Apply labels to the dash as indicated in
the illustration.
• For best results, make sure your hands are
clean and dry and that the areas of the
dash to which labels will be applied are
free of dirt and oils. Avoid repositioning a
label once it has been applied.
S • Pegar etiquetas en el tablero tal como se
muestra en la ilustración.
• Para óptimos resultados, cerciorarse de
tener las manos limpias y secas y de
que las áreas del tablero donde van a ir
pegadas las etiquetas estén libres de
polvo y aceite. Evitar despegar y volver
a pegar una etiqueta.
9
e • Wipe the steering column with a paper towel
to remove any excess lubricant.
• Turn the vehicle body on its side.
• Insert the straight end of the steering column
up through the two holes in the vehicle body
and out through the hole in the dash.
S • Limpiar la columna de mando con papel
toalla para eliminar el exceso de lubricante.
• Colocar la carrocería sobre un costado.
• Introducir el extremo recto de la columna de
mando en los dos orificios de la carrocería,
saliendo por el orificio del tablero.
e Steering
Column
S Columna
de mando
e Holes
S Orificios
e Bottom View
S Vista inferior
21
26
22
28
27
23
25
24
13
20
12
8
e Shown Actual Size
S Todo se muestra en tamaño real
1.5V x 3
“AA” (LR6)
e Battery Compartment Door
S Tapa del compartimento de pilas
e Battery Compartment
S Compartimento
de pilas
e Sound Box
S Caja de resonancia
e Battery Safety Information
Batteries may leak fluids that can cause a
chemical burn injury or ruin your toy. To avoid
battery leakage:
• Do not mix old and new batteries or
batteries of different types: alkaline,
standard (carbon-zinc) or rechargeable
(nickel-cadmium).
• Insert batteries as indicated inside the
battery compartment.
• Remove batteries during long periods
of non-use. Always remove exhausted
batteries from the toy. Dispose of
batteries safely.
• Never short-circuit the battery terminals.
• Use only batteries of the same or equivalent type, as recommended.
• Do not charge non-rechargeable batteries.
• Remove rechargeable batteries from the
toy before charging.
• If removable, rechargeable batteries are
used, they are only to be charged under
adult supervision.
S Información de seguridad sobre las pilas
Las pilas pueden desprender líquido
corrosivo, que puede provocar quemaduras
o estropear el juguete. Para evitar el
derrame de líquido corrosivo de las pilas:
• No mezclar nunca pilas nuevas con
gastadas (cambiarlas todas al mismo
tiempo) ni mezclar nunca pilas alcalinas,
estándar (carbono-cinc) y recargables
(níquel-cadmio).
• Asegurarse de colocar correctamente
las pilas, según la polaridad indicada.
• Retirar las pilas del juguete si no se va
a utilizar durante un largo período de
tiempo. No dejar nunca pilas gastadas
en el juguete. Desechar las pilas gastadas
en un contenedor especial para pilas.
• No provocar cortocircuitos en los polos
de las pilas.
• Utilizar únicamente pilas del tipo recomendado o equivalente.
• No intentar recargar las pilas
no-recargables.
• Si se utilizan pilas recargables, retirarlas
del juguete para cargarlas.
• Cargar las pilas recargables siempre bajo
la vigilancia de un adulto.
e • Loosen the screw in the sound box battery
compartment door using a Phillips screwdriver, and open the battery compartment.
• Insert three “AA” (LR6) alkaline batteries
into the sound box.
Hint: For longest battery life, use only
alkaline batteries.
• Replace the battery compartment door and
tighten the screw with a Phillips screwdriver.
S • Desajustar el tornillo de la tapa del compar-
timento de pilas de la caja de resonancia
con un desarmador de cruz y abrir el
compartimento.
• Introducir tres pilas alcalinas tipo 3 x “AA”
(LR6) x 1,5V en la caja de resonancia.
Consejo: Para una mayor duración, usar
únicamente pilas alcalinas.
• Cerrar la tapa del compartimento de pilas
y apretar el tornillo.
HEAT
TREB
BASS
COMPACT DISC
PLAY
PAUSE
STOP REV FWD
COOL
LO KC
HI
Page 13

13
e Steering Rod
S Barra de viraje
e Cap Nut
S Tuerca ciega
e End of Steering Column
S Extremo de la columna
de mando
e • Insert the end of the steering column
through the hole in the steering rod.
• Fit a cap nut onto the end of the cap nut
assembly tool.
• While supporting the steering column, tap
the cap nut assembly tool with a hammer to
secure the cap nut on the steering column.
Hint: You may want the help of another
person to support the steering column
while you tap the cap nut assembly tool
with the hammer.
S • Introducir el extremo de la columna de
mando en el orificio en la barra de viraje.
• Ajustar una tuerca ciega en el extremo
de la herramienta de ensamblage de la
tuerca ciega.
• Mientras sujeta la columna de mando,
ajustar una tuerca ciega en el extremo
de la columna de mando. Golpear la
herramienta de ensamblage de la tuerca
ciega con un martillo para asegurarla en
la columna de mando.
Consejo: Pídale a otra persona que le
ayude a detener la columna de mando
mientras Ud. golpea la herramienta de
ensamblage de la tuerca ciega con
el martillo.
e Steering Wheel
S Volante
e Cap Nut
S Tuerca ciega
e Steering
Column
S Columna
de mando
e “UP”
S “ARRIBA”
e • Turn the vehicle body upright.
• Position the steering wheel upright.
• Fit the steering wheel onto the
steering column.
• Fit a cap nut onto the end of the cap nut
assembly tool.
• Hold the cap nut against the steering
column. Tap the cap nut assembly tool
with a hammer to secure the cap nut on
the steering column.
Hint: You may want the help of another
adult to support the steering column while
you tap the cap nut assembly tool with
the hammer.
S • Colocar la carrocería al derecho.
• Colocar el volante de modo al derecho.
• Ajustar el volante en la columna de mando.
• Ajustar una tuerca ciega en el extremo
de la herramienta de ensamblage de la
tuerca ciega.
• Ajustar una tuerca ciega en el extremo
de la columna de mando. Golpear la
herramienta de ensamblage de la tuerca
ciega con un martillo para asegurarla en
la columna de mando.
Consejo: Pídale a otra persona que le
ayude a detener la columna de mando
mientras Ud. golpea la herramienta
de ensamblage de la tuerca ciega con
el martillo.
e • Place the sound box, speaker side down,
into the center of the steering wheel.
• Fit the tab at the top of the steering wheel
cover under the top edge of sound box
compartment.
• Fit the steering wheel cover over the sound
box buttons and press near the bottom of
the steering wheel cover to snap it into the
steering wheel.
Hint: When it’s time to change the batteries
in the sound box, use a slotted screwdriver to
press the bottom tab in and lift the steering
wheel cover.
S • Poner la caja de resonancia en el centro
del manubrio, con el lado del altavoz
para abajo.
• Ajustar la lengüeta de la parte superior de la
tapa del manubrio debajo del borde superior
del compartimento de la caja de resonancia.
• Ajustar la tapa del manubrio sobre los
botones de la caja de resonancia y presionar cerca de la parte de abajo de la tapa
del manubrio para ajustarla en el manubrio.
Consejo: cuando sea hora de sustituir
las pilas de la caja de resonancia, usar
un destornillador de cabeza plana para
presionar la lengüeta y levantar la tapa
del manubrio.
10
11
12
e Bottom View
S Vista inferior
e Steering Wheel Cover
S Tapa del manubrio
e Steering Wheel
S Manubrio
e Ta b
S Lengüeta
e Sound Box
S Caja de
resonancia
e Sound Box
Compartment
S Compartimento
de la caja de
resonancia
e Cap Nut
Assembly Tool
S Herramienta
de ensamblaje
de la tuerca ciega
e Cap Nut
Assembly Tool
S Herramienta
de ensamblaje
de la tuerca ciega
Page 14

e • Fit a spacer tube between the
grille and the back of the brush
guard, as shown.
• Insert a #8 x 10.2 cm screw
through the brush guard and
spacer tube and into the hole in
the grille.
• Tighten the screw with a Phillips
screwdriver. Do not over-tighten.
• Repeat this procedure to assemble
the other spacer tube on the other
side of the grille.
S • Ajustar un tubo espaciador entre la rejilla
y el dorso del guardabarros, como
se muestra.
• Introducir un tornillo No. 8 x 10,2 cm en el
guardabarros y el tubo espaciador y en el
orificio en la rejilla.
• Ajustar el tornillo con un destornillador de
cruz, sin apretar en exceso.
• Repetir este procedimiento para ensamblar
el otro tubo espaciador en el otro lado de
la rejilla.
14
e • Fit the lens tabs on the back of a lens
assembly into the headlight slots in the grille.
• Press firmly to snap the lens assembly into
the grille.
• Repeat this procedure to “snap” the other
lens assembly into the grille.
S • Ajustar las lengüetas del lente del dorso de
una unidad del lente en las ranuras de las
luces en la rejilla.
• Presionar con firmeza para ajustar la unidad
del lente en la rejilla.
• Repetir este procedimiento para ajustar la
otra unidad del lente en la rejilla.
e Grille
S Rejilla
e Ta b
S Lengüeta
e Slot
S Ranura
e Headlight Lens
S Lente de la
luz delantera
e Wide Notch
S Muesca ancha
e Wide Tab
S Lengüeta
ancha
e Lens Guard
S Tapa del
lente
e • Fit the wide notch in the side of a headlight
lens under the wide tab on a lens guard.
• Press firmly on the inside of the headlight
lens to snap it into the lens guard.
• Repeat this procedure to assemble the
other headlight lens to the remaining
lens guard.
S • Ajustar la muesca ancha del lado de un
lente de luz debajo de la lengüeta ancha
de la tapa de un lente.
• Presionar con firmeza en el interior del
lente de la luz para ajustarlo en la tapa
del lente.
• Repetir este procedimiento para
ensamblar el otro lente de luz en
la tapa de lente restante.
13
14
15
e Brush Guard
S Guardabarros
e Bumper
S Defensa
e • Fit and hold the brush guard against the
front bumper.
• Insert two #10 x 2.5 cm screws through the
front of the brush guard and into the bumper.
• Tighten the screws with a Phillips screwdriver. Do not over-tighten.
S • Ajustar y sujetar el guardabarros contra la
defensa delantera.
• Introducir dos tornillos No. 10 x 2,5 cm
en la parte delantera del guardabarros
y en la defensa.
• Ajustar los tornillos con un destornillador
de cruz, sin apretar en exceso.
16
e Spacer Tube
S Tubo espaciador
Page 15

15
e Hood Latch
S Seguro del cofre
e • Insert a hood latch into one of the holes in
the vehicle body, near the hood area.
• Twist the base of the hood latch
1
/
4 turn to
secure it in the vehicle body.
• Repeat this procedure on the other side of
the hood area to attach the other hood
latch to the vehicle body.
S • Introducir un seguro del cofre en uno de
los orificios de la carrocería, cerca del
área del cofre.
• Girar la base del seguro del cofre
1
/
4 de
vuelta para asegurarlo en la carrocería.
• Repetir este procedimiento en el otro
lado del área del cofre para ajustar el
otro seguro del cofre en la carrocería.
e Hood Latch
S Seguro del cofre
e Hole
S Orificio
e Lip of Bracket
S Punta de la abrazadera
e Windshield Brackets
S Abrazaderas del parabrisas
e • Fit the screw pegs on the windshield
brackets into the holes in the top surface
of the dash. Press firmly to fit the lip on
each windshield bracket into the slot in
the top of the dash.
• Insert two #8 x 2.5 cm screws into each
windshield bracket.
• Tighten the screws with a Phillips screwdriver. Do not over-tighten.
S • Ajustar las clavijas de tornillo de las
abrazaderas del parabrisas en los orificios
en la superficie del tablero. Presionar con
firmeza para ajustar la punta de cada
abrazadera del parabrisas en la ranura
de la parte superior del tablero.
• Introducir dos tornillos No. 8 x 2,5 cm en
cada abrazadera del parabrisas.
• Ajustar los tornillos con un destornillador
de cruz, sin apretar en exceso.
e Slot
S Ranura
e • Align the slots in the front half of the
windshield frame with the tabs on the
windshield brackets.
• Fit the front half of the windshield frame
onto the windshield brackets as shown.
S • Alinear las ranuras de la parte delantera del
marco del parabrisas con las lengüetas en
las abrazaderas del parabrisas.
• Ajustar la parte delantera del marco del
parabrisas en las abrazaderas del
parabrisas, como se muestra.
e Windshield Frame - Front Half
S Marco del parabrisas - Delantero
e Tabs
S Lengüetas
e Slots
S Ranuras
17
18
19
Page 16

16
e • Fit the back half of the windshield frame
onto the front half of the windshield frame.
Make sure the slots at the bottom of the
two windshield frame halves are aligned.
• Insert 10 #8 x 3.2 cm screws into the back
half of the windshield frame.
• Tighten the screws with a Phillips screwdriver. Do not over-tighten.
Hint: Squeeze the two windshield halves
together while tightening the screws.
• Lift the assembled windshield to the
raised position.
S • Ajustar la parte trasera del marco del
parabrisas en la parte delantera del marco
del parabrisas. Cerciorarse de que las
ranuras de la parte inferior de las dos partes
del marco del parabrisas estén alineadas.
• Introducir diez tornillos No. 8 x 3,2 cm en
la parte trasera del marco del parabrisas.
• Ajustar los tornillos con un destornillador
de cruz, sin apretar en exceso.
Consejo: Apretar las dos partes del
parabrisas mientras ajusta los tornillos.
• Levantar el parabrisas ensamblado a la
posición vertical.
e Slots
S Ranuras
e Windshield Frame – Front Half
S Marco del parabrisas – Delantero
e Windshield Frame – Back Half
S Marco del parabrisas – Trasero
e Hinge Pin
S Clavija de
bisagra
e Windshield
Bracket
S Abrazadera
del parabrisas
e • Rotate the front half of the windshield frame
down so it lays flat on the vehicle body.
• Working from the centre of the vehicle,
insert a hinge pin through the holes in
the windshield frame and the holes in a
windshield bracket, as shown.
• Repeat this procedure to secure the front
half of the windshield frame to the other
windshield bracket.
S • Girar la parte delantera del marco del
parabrisas para abajo, de manera que
quede plana sobre la carrocería.
• Empezando desde el centro del vehículo,
insertar una clavija de bisagra en los
orificios del marco del parabrisas y en los
orificios de la abrazadera del parabrisas,
como se muestra.
• Repetir este procedimiento para asegurar la
parte delantera del marco del parabrisas en
la otra abrazadera del parabrisas.
20
e Windshield Frame –
Front Half
S Marco del parabrisas –
Delantero
21
22
e • Position the hood over the front of the
vehicle body.
• Insert the tabs on the hood into the slots
in the vehicle body.
S • Colocar el cofre sobre la parte delantera de
la carrocería.
• Introducir las lengüetas del cofre en las
ranuras de la carrocería.
e Slot
S Ranura
e Tabs
S Lengüetas
e Slot
S Ranuras
e Hood
S Lengüetas
Page 17

17
e • Turn the seat upside down.
• Insert the fastener end of a short seat belt
strap through the slot near the outer edge
of the seat. Make sure the side of the seat
belt with the fastener faces the outer edge
of the seat.
• Pull the short seat belt strap completely
through the slot until the last T-loop at the
opposite end of the belt catches against
the slot. You will pull one T-loop through
the slot.
• Repeat this procedure to assemble the
other short seat belt strap.
S • Colocar el asiento al revés.
• Introducir el extremo del sujetador de una
cinta corta de cinturón de seguridad en la
ranura cerca del borde exterior del asiento.
Cerciorarse de que el lado del cinturón de
seguridad con el sujetador apunte hacia el
borde exterior del asiento.
• Jalar la cinta corta del cinturón de
seguridad completamente por la ranura
hasta que el último extremo en T del
extremo opuesto del cinturón se encaje
en la ranura. Jalará un extremo en T
por la ranura.
• Repetir este procedimiento para ensamblar
la otra cinta corta del cinturón de seguridad.
e Short Seat
Belt Strap
S Cinta corta
del cinturón
de seguridad
e Seat
S Asiento
e End T-Loops
S Extremo en T
e Slot
S Ranura
e T-Loop (Pull
through slot)
S Extremo en T
(jalar por ranura)
23
e Fastener
End
S Extremo
del
sujetador
e • Insert each end of the long seat belt strap
through a slot in the centre of the seat.
Make sure the fasteners face the outer
edge of the seat.
• Pull each side of the long seat belt strap
evenly through the slots. Make sure to
pull each T-loop through a slot.
• Turn the seat upright.
S • Introducir cada extremo de la cinta larga del
cinturón de seguridad en una ranura en el
centro del asiento. Cerciorarse de que los
sujetadores apunten hacia el borde exterior
del asiento.
• Jalar por igual cada lado de la cinta larga
del cinturón de seguridad por las ranuras.
Cerciorarse de jalar cada extremo en T por
una ranura.
• Colocar el asiento al derecho.
e T-Loop
S Onda T
e Fastener
S Sujetador
e Long Seat
Belt Strap
S Cinta larga del
cinturón de
seguridad
24
e • With the seat at an angle, insert the tabs on
the front edge of the seat into the slots in
the foot-well wall .
• Push down firmly on the edge of the seat
above each tab to snap the tabs into the
slots .
• Rotate the back of the seat down to
“snap” the seat back tabs into the slots
in the vehicle body. Push down firmly
on the seat back .
S • Con el asiento en ángulo, introducir las
lengüetas del borde delantero del asiento
en las ranuras en la pared del hueco para
los pies .
• Empujar para abajo con firmeza en el borde
del asiento, arriba de cada lengüeta, para
ajustar las lengüetas en las ranuras .
• Girar el dorso del asiento para abajo para
ajustar las lengüetas del respaldo en las
ranuras de la carrocería. Empujar el
respaldo para abajo con firmeza .
e Tabs
S Lengüetas
e Seat Back Tabs
S Lengüetas
del respaldo
e Seat
S Asiento
e Slot
S Ranura
e Push Here
S Empujar aquí
25
e #8 x 2.5 cm Screw
S Tornillo No. 8 x 2,5 cm
e • Insert a #8 x 2.5 cm screw into the rear of
seat as shown.
• Tighten the screw with a Phillips screwdriver.
Do not over-tighten.
S • Introducir un tornillo No. 8 x 2,5 cm en la
parte de atrás del asiento, como se muestra.
• Ajustar el tornillo con un destornillador de
cruz, sin apretar en exceso.
26
Page 18

18
27
e Sport Bar
S Barra deportiva
e • Position the sport bar on its side so that the
sport bar ends curve away from you.
• Position the canopy opposite the sport bar
with the netting facing away from you.
• Slide the four canopy sleeves onto the
sport bar.
S • Colocar la barra deportiva sobre un costa-
do, de tal manera que los extremos de la
barra curveen en dirección opuesta a Ud.
• Colocar la cubierta en dirección opuesta a
la barra deportiva con la red apuntando en
dirección opuesta a Ud.
• Introducir las cuatro fundas de la cubierta
en la barra deportiva.
e Canopy Sleeves
S Fundas de
la cubierta
e Canopy Sleeves
S Fundas de
la cubierta
e Canopy
S Cubierta
e • Extend the canopy completely around the
sport bar.
S • Extender la cubierta por completo alrededor
de la barra deportiva.
e Sport Bar
S Barra deportiva
e Canopy
S Toldo
28
e Sport Bar Bracket
S Abrazadera de la barra deportiva
e Tunnel
S Túnel
e Sport Bar Support
S Soporte de la barra deportiva
e Ring
S Aro
e Side Leg
S Pata lateral
e • Using safety scissors, remove the sport bar
brackets from the plastic connector.
Dispose of the plastic connector.
• Position the sport bar upright.
• Fit a sport bar support through a tunnel in
a rear corner of the canopy. Make sure
the ring end of the sport bar support is
positioned toward the sport bar.
• Position a sport bar bracket above one of
the sport bar side legs, as shown.
• Fit the ring on the sport bar support against
the end of the sport bar bracket.
• Fold the sport bar bracket over the sport
bar to close it around the sport bar and
sport bar support.
S • Con unas tijeras de punta redonda,
desprender las abrazaderas de la barra
deportiva del conector de plástico.
Depositar el conector de plástico en
la basura.
• Colocar la barra deportiva en
posición vertical.
• Ajustar un soporte de barra deportiva por
un túnel en una esquina posterior de la
cubierta. Cerciorarse de que el extremo
del aro del soporte de la barra deportiva
esté colocada hacia la barra deportiva.
• Colocar una abrazadera de barra deportiva
arriba de una de las patas laterales de la
barra deportiva, como se muestra.
• Ajustar el aro del soporte de la barra
deportiva contra el extremo de la
abrazadera de la barra deportiva.
• Doblar la abrazadera de la barra deportiva
sobre la barra deportiva para cerrarla
alrededor de la barra deportiva y el
soporte de ésta.
29
e • Insert a #6 x 3.8 cm screw into the sport
bar bracket.
• Tighten the screw with a Phillips screwdriver.
Do not over-tighten.
• Repeat steps 29 and 30 to attach the other
sport bar support to the other sport bar
side leg.
S • Introducir un tornillo No. 6 x 3,8 cm en la
abrazadera de la barra deportiva.
• Ajustar el tornillo con un destornillador de
cruz, sin apretar en exceso.
• Repetir los pasos 29 y 30 para ajustar el
otro soporte de la barra deportiva en la
otra pata lateral de la barra deportiva.
e Sport Bar Bracket
S Abrazadera de la barra deportiva
30
Page 19

19
e Sport Bar
S Barra deportiva
e Light Rack -
Front Half
S Barra de luces -
Parte delantera
e Light Rack - Back Half
S Barra de luces - Parte trasera
e Tabs
S Lengüetas
e • Position the sport bar upright, as shown.
• Fit and hold the front and back halves of the
light rack against the sport bar. Make sure
the two light rack halves are aligned, and
that the screw holes in the light rack are
aligned with the screw holes in the canopy
and the sport bar.
• “Snap” the tabs on the front half of the light
rack into the slots below the light housings
on the rear half of the light rack.
• Insert two #6 x 3.8 cm screws through the
holes in the back of the light rack, through
the sport bar, and into the front half of the
light rack.
• Tighten the screws with a Phillips screwdriver. Do not over-tighten.
S • Colocar la barra deportiva en posición
vertical, como se muestra.
• Ajustar y sujetar la parte delantera y
trasera de la barra de luces contra la barra
deportiva. Cerciorarse de que ambas partes
de la barra de luces estén alineadas, y que
los orificios de tornillo de la barra de luces
estén alineados con los orificios de tornillo
de la cubierta y de la barra deportiva.
• Encajar las lengüetas de la parte delantera
de la barra de luces en las ranuras debajo
de los compartimentos de las luces en la
parte trasera de la barra de luces.
• Introducir dos tornillos No. 6 x 3,8 cm en los
orificios en el dorso de la barra de luces,
atravesando la barra deportiva y entrando
en la parte delantera de la barra de luces.
• Ajustar los tornillos con un destornillador
de cruz, sin apretar en exceso.
31
e Light Covers
S Tapas de luces
e • Align the tabs on the inside of a light cover
with the slots in one of the light housings
on the light rack. Make sure the light covers
are positioned with the wide spaced tabs at
the top.
• Push firmly on the light cover to snap it to
the light housing.
• Repeat this procedure on the other side of
the light rack to assemble the other light.
S • Alinear las lengüetas del interior de una
tapa de luz con las ranuras en uno de los
compartimentos de luz en la barra de luces.
Cerciorarse de que las tapas de las luces
estén colocadas con las lengüetas de
espacio ancho en la parte de arriba.
• Presionar con firmeza en la tapa de la luz
para encajarla en el compartimento de
la luz.
• Repetir este procedimiento en el otro lado
de la barra de luces para ensamblar la
otra luz.
32
e Side Fender
S Guardabarros lateral
e Push Here
S Empujar aquí
e Pull Here
S Jalar aquí
e • Fit the sport bar and sport bar support legs
into the holes in the vehicle body.
• Push down firmly on a sport bar side leg
while pulling up on the side fender to fit the
sport bar into the vehicle body.
• Repeat this procedure on the other side of
the vehicle body.
S • Ajustar la barra deportiva y las patas de
soporte de la misma en los orificios de
la carrocería.
• Empujar para abajo con firmeza en una
pata lateral de la barra deportiva mientras
jala para arriba el guardabarros lateral para
ajustar la barra deportiva en la carrocería.
• Repetir este procedimiento en el otro lado
de la carrocería.
33
e Sport Bar
S Barra deportiva
Page 20

20
e Sport Bar
S Barra deportiva
e • Insert a 3.8 cm x 6.4 mm machine screw
into the hole closest to the front of the
vehicle in the underside of the rear wheel
well, through the vehicle body and into the
end of the sport bar.
• Tighten the screw with a Phillips screwdriver. Do not over-tighten.
• Repeat this procedure on the other side of
the vehicle body.
S • Introducir un tornillo de 3,8 cm x 6,4 mm
en el orificio más cercano a la parte de
adelante del vehículo en la parte de abajo
del hueco de la rueda trasera, atravesando
la carrocería y entrando en el extremo de
la barra deportiva.
• Ajustar el tornillo con un destornillador de
cruz, sin apretar en exceso.
• Repetir este procedimiento en el otro lado
de la carrocería.
e 3.8 cm x 6.4 mm Screw
S Tornillo de 3,8 cm x 6,4 mm
e Rear
Wheel Well
S Hueco de
la rueda
trasera
34
e • Face the rear of the vehicle.
• Fit the lower rail on the rear bumper over
the rear bumper support.
• Gently bend the tabs at the bottom of the
rear bumper under the vehicle.
35
e Rear Bumper
S Defensa trasera
e Tabs
S Lengüetas
e Lower Rail
S Riel inferior
e Rear Bumper
Support
S Soporte de la
defensa trasera
e • Using safety scissors, remove the taillight
lenses and the taillight housings from the
plastic connectors. Dispose of the
plastic connectors.
• Face the rear of the vehicle.
• Fit a taillight lens inside a taillight housing.
• Position the taillight housing with lens
against a rear bumper light plate with the
screw holes aligned.
• Insert two #8 x 2.5 cm screws through the
taillight lens, rear bumper light plate housing
and into the vehicle body.
• Tighten the screws with a Phillips screwdriver. Do not over-tighten.
• Repeat this procedure to attach the
other taillight.
S • Con unas tijeras de punta redonda,
desprender los lentes de las luces traseras
y los compartimentos de éstas de los
conectores de plástico. Depositar los
conectores de plástico en la basura.
• Pararse viendo la parte de atrás del vehículo.
• Ajustar un lente de luz trasera dentro de un
compartimento de luz trasera.
• Colocar el compartimento de la luz trasera
con el lente contra una placa de luz de
la defensa trasera con los orificios de
tornillo alineados.
• Introducir dos tornillos No. 8 x 2,5 cm en el
lente de la luz trasera, en el compartimento
de la placa de luz de la defensa trasera y
en la carrocería.
• Ajustar los tornillos con un destornillador de
cruz, sin apretar en exceso.
• Repetir este procedimiento para ajustar la
otra luz trasera
36
e Taillight
Lens
S Lente de la
luz trasera
e Rear Bumper
Light Plate
S Placa de luz de la
defensa trasera
e Taillight Housing
S Compartimento
de la luz trasera
S • Pararse viendo la parte trasera del vehículo.
• Ajustar el riel inferior de la defensa trasera
sobre el soporte de la defensa trasera.
• Doblar cuidadosamente las lengüetas en la
parte de abajo de la defensa trasera debajo
del vehículo.
e • Lift the rear of the vehicle.
• Align the holes in the bumper tabs with
the screw pegs on the underside of the
vehicle body.
• Insert two #8 x 2.5 cm screws through the
bumper tabs and into the vehicle body.
• Tighten the screws with a Phillips screwdriver. Do not over-tighten.
• Lower the rear of the vehicle.
S • Levantar la parte trasera del vehículo.
• Alinear los orificios de las lengüetas de la
defensa con las clavijas de tornillo de la
parte de abajo de la carrocería.
• Introducir dos tornillos No. 8 x 2,5 cm
en las lengüetas de la defensa y en
la carrocería.
• Ajustar los tornillos con un destornillador
de cruz, sin apretar en exceso.
• Bajar la parte trasera del vehículo.
e Bumper Tabs
S Lengüetas de
la defensa
e Bumper
S Defensa
37
38
e Cap Tether
S Cadena de la tapa
e • Position the cap so that its tether
points down.
• Snap the cap into the opening on the
rear bumper.
S • Colocar la tapa de modo que la cadenita
apunte para abajo.
• Ajustar la tapa en el orificio de la
defensa trasera.
Page 21

21
e Label Decoration
S Decoración de las etiquetas
F
e Right Side View
S Vista lateral derecha
e Please Note:Your vehicle comes with replacement warning labels which you can apply over the factory applied warning label if English
is not your primary language. Select the warning label with the appropriate laguage for you.
Proper label application will help to keep the labels looking their best! When applying labels, keep the following guidelines in mind:
• Wash your hands before applying the labels.
• Before applying the labels, wipe the surface of the vehicle with a clean, dry cloth to remove any dust or oils.
• Place the labels exactly as shown in the illustrations.
• For best results, avoid repositioning a label once it has been applied to the vehicle.
• After applying a label, rub the label firmly with a clean, dry cloth to make sure the label is adhered to your vehicle. Start at the centre of a label,
and smooth towards the outer edges to remove air bubbles.
S Nota: Este vehículo incluye etiquetas adhesivas de advertencia en español que podrá colocar sobre las etiquetas en inglés. Seleccione la
etiqueta de advertencia en el idioma de su elección.
La colocación correcta de las etiquetas ayudará a que luzcan de manera óptima. Tener lo siguiente en mente al pegar las etiquetas:
• Lavarse las manos antes de pegar las etiquetas.
• Antes de pegar las etiquetas, limpiar la superficie del vehículo con un paño limpio y seco para eliminar cualquier suciedad o aceite.
• Colocar las etiquetas exactamente como se muestra en las ilustraciones.
• Para óptimos resultados, evitar despegar y volver a pegar una etiqueta.
• Después de pegar una etiqueta, frotar la misma con firmeza con un paño limpio y seco para cerciorarse que la etiqueta se pegue al vehículo.
Empezar en el centro de la etiqueta y frotar hacia los bordes exteriores para eliminar cualquier burbuja de aire.
™
®
18
19
19
15
16
17
18
2
8
11
18
19
1
11
9
3
10
5
18
19
10
7
6
e Left Side View
S Vista lateral izquierda
Page 22

22
e One time assembly is now complete.
S El ensamble está completo.
e IMPORTANT !
• Please carefully read the owner’s information in this manual and teach
your child about proper vehicle operation and rules for safe driving
before allowing operation of this vehicle.
• For safety reasons, your vehicle has been pre-set so that it will only
operate at low speed (4 km/h, maximum). Make sure that your child
can safely operate this vehicle at low speed before adjusting the vehicle
to run at high speed (8 km/h, maximum).
• To disconnect high speed lock-out, please see page 29.
S ¡IMPORTANTE!
• Leer cuidadosamente la información del usuario en este manual y
enseñarle a su hijo sobre el uso correcto del vehículo, así como las
reglas para conducir de manera segura antes de permitirle usar el
vehículo por primera vez.
• Por razones de seguridad, el vehículo fue prestablecido para que sólo
funcione a velocidad lenta (4 km/h, máxima). Cerciorarse de que el
niño pueda usar el vehículo de manera segura a velocidad lenta antes
de ajustarlo para uso a velocidad rápida (8 km/h, máxima).
• Para desconectar el seguro de velocidad rápida, consultar
la página 29.
4
14
29
30
e Right Side View
S Vista lateral derecha
e Back View
S Vista posterior
Page 23

e Battery Installation
S Instalación de la batería
G
e IMPORTANT! Use only a Power Wheels
®
12 volt battery. Use of any other battery will
damage your vehicle. Make sure that you
charge the battery for at least 18 hours using
the enclosed Power Wheels
®
12 volt charger
before operating your vehicle for the first time.
Charge the battery for at least 14 hours after
each use of the vehicle. Never charge the
battery longer than 30 hours. Failure to follow
these instructions may damage your battery
and will void your warranty. It is easier to install
the battery before assembling the hood to
your vehicle. If you have already assembled
the hood to your vehicle, you may want to
remove it to install the battery.
S ¡IMPORTANTE! Usar únicamente una batería
Power Wheels de 12V. El uso de cualquier
otra batería dañará el vehículo. Antes del
primer uso, cargar la batería durante un periodo de por lo menos 18 horas usando el cargador Power Wheels de 12V incluido.
Recargar la batería por lo menos
14 horas después de cada uso del vehículo.
No cargar la batería por más de 30 horas.
El incumplimiento de estas instrucciones
puede dañar la batería y anulará la garantía.
Es más fácil instalar la batería antes de
montar el cofre en el vehículo. Si ya montó
el cofre en el vehículo, recomendamos
que lo quite para instalar la batería.
e • Lift the hood to access the
battery compartment.
S • Abrir el cofre para lograr acceso al
compartimento de la batería.
e Battery Compartment
S Compartimento de la batería
e Hood
S Cofre
P Cap
23
2
1
e • Press the battery clamp to slide it into the
dash .
• While holding the battery clamp against
the dash, place the battery in the battery
compartment . Make sure the battery is
upright and positioned between the locator
ribs at the bottom of the battery compartment.
S • Presionar la abrazadera de la batería para
deslizarlo en el tablero .
• Mientras sujeta la abrazadera de la batería
contra el tablero, colocar la batería en el
compartimento de la misma . Cerciorarse
de que la batería esté en posición vertical y
colocada entre las salientes localizadoras en
la parte inferior del compartimento.
e Battery
Clamp
S Abrazadera de
la batería
e Locator Ribs
S Salientes
localizadoras
e Battery
S Batería
PbP
b
e Battery
Clamp
S Abrazadera
de la batería
e Battery
S Batería
e • Release the battery clamp. Make sure the
battery clamp slides over the top of the battery. If the battery clamp does not slide over
the top of the battery, reposition the battery
in the battery compartment (see step 2).
S • Soltar la abrazadera de la batería.
Cerciorarse de que el clip de la abrazadera
de la batería se deslice sobre la parte
superior de la batería. Si la abrazadera de la
batería no se desliza sobre la parte superior
de la batería, reposicionar la batería en el
compartimento (ver el paso 2).
e Battery
Compartment
S Compartimento
de la batería
3
Pb
Page 24

e Battery
S Batería
e • Plug the motor harness connector into the
battery. Push firmly to make sure the
connectors are completely joined.
Hint: To remove a battery from the battery
compartment, disconnect the motor harness
connector from the battery. Press and hold
the battery clamp clip against the dash and
lift the battery from the battery compartment.
S • Enchufar el conector del arnés del motor
en la batería. Empujar con firmeza para
cerciorarse de que los conectores estén
completamente unidos.
Consejo: Para sacar la batería del
compartimento, desconectar el conector
del arnés del motor de la batería. Presionar
y sujetar el clip de la abrazadera de la
batería contra el tablero y sacar la batería
del compartimento.
e • Lower the hood and secure the hood latches.
S • Cerrar el cofre y fijar los seguros.
e Hood
S Cofre
e Hood Latch
S Seguro del cofre
e Hood Latch
S Seguro del cofre
e Motor Harness Connector
S Conector del arnés del motor
24
5
4
Pb
™
Page 25

25
e Battery Care and Disposal
S Mantenimiento y eliminación de la batería
H
e Care
If a battery leak develops, avoid contact
with the leaking acid and place the
damaged battery in a plastic bag. See
information below for proper disposal.
If acid comes in contact with skin or
eyes, flush with cool water for at least
15 minutes and call a physician.
If acid is internally ingested, give water,
milk of magnesia or egg whites immediately.
Never give emetics or induce vomiting.
Call a physician.
• Charge a new battery for at least 18 hours
before first use. Never charge the battery
longer than 30 hours. Overcharging or
undercharging the battery may shorten
battery life and decrease vehicle
running time.
• After the first charge, recharge the battery
for at least 14 hours after each use. Never
charge the battery longer than 30 hours.
Charge the battery after each use, regardless of how long the vehicle was used.
• The battery must be upright while charging.
• Do not allow the battery to run down
completely before charging.
• Charge the battery before storing the vehicle.
• Charge the battery at least once per month,
even if the vehicle has not been used.
• Leaving the battery in a discharged
condition will ruin it.
• Do not store the battery in temperatures
above 24° C (75° F) or below -23° C (-10 ° F).
• Prevent the battery from moving freely inside
the battery compartment. Always use the
battery retainer to secure the battery in the
battery compartment.
• Examine the battery, charger and its
connector for excessive wear or damage
each time you charge the battery. If damage
is detected, do not use the charger or the
battery until you have replaced the worn or
damaged part.
S Cuidado
Si ocurre un derrame de la batería, evitar
el contacto con el ácido que se derramó y
colocar la batería dañada en una bolsa de
plástico. Consultar la información de abajo
sobre la eliminación de la batería.
Si el ácido entra en contacto con la
piel o los ojos, enjuagar con agua fría
durante por lo menos 15 minutos y llamar
a un médico.
Si se ingiere el ácido, beber de
inmediato agua, leche de magnesia o
claras de huevo. Nunca tomar vomitivos
ni provocar vómito. Llamar a un médico.
• Cargar una batería nueva durante por
lo menos 18 horas antes del primer uso.
Nunca cargar la batería por más de 30
horas. Sobrecargar la batería o no cargarla
lo suficiente puede reducir la duración
de la batería y reducir el rendimiento
del vehículo.
• Después de la primera carga, cargar la
batería durante por lo menos 14 horas
después de cada uso. Nunca cargar la
batería por más de 30 horas. Cargar la
batería después de cada uso, sin importar
cuánto se haya usado el vehículo.
• La batería debe estar en posición vertical
mientras se carga.
• No permitir que la batería se desgaste
completamente antes de volver a cargarla.
• Cargar la batería antes de almacenar
el vehículo.
• Cargar la batería por lo menos una vez
al mes, incluso si no se ha utilizado
el vehículo.
• Si deja la batería descargada, ésta
se arruinará.
• No almacenar la batería en temperaturas
sobre 24°C o debajo de -23°C.
• Evitar que la batería se mueva dentro del
compartimento. Siempre usar el retenedor
de la batería para asegurarla en posición.
• Examinar la batería, el cargador y el
conector, cada vez que se cargue la
batería, para verificar que no estén gastados ni
dañados. Si detecta algún daño, no utilizar
la batería ni el cargador sino hasta que
haya sido repuesta la parte dañada.
e Disposal
• Your Power Wheels®battery is a sealed
lead-acid battery. It must be recycled or
disposed of in an environmentally
sound manner.
•
Do not dispose of a lead-acid battery
in your regular, household rubbish. The
incineration, landfilling or mixing of sealed
lead-acid batteries with household rubbish
is prohibited by law.
• Return exhausted batteries to an approved
lead-acid battery recycler. Contact your
local waste management officials for other
information regarding the environmentally
sound collection, recycling and disposal of
lead-acid batteries.
S Eliminación
• La batería Power Wheels es una batería de
ácido plomo precintada. Debe ser reciclada
o eliminada de manera que no afecte al
medio ambiente.
• No tirar la batería de ácido plomo en
la basura en su casa. La incineración,
entierro de residuos o mezcla de baterías
precintadas de ácido plomo con basura
del hogar está prohibido en la mayoría
de áreas.
• Llevar la batería gastada a un centro de
reciclaje de baterías de ácido plomo
aprobado. Ponerse en contacto con la
agencia local pertinente para obtener más
información sobre la colección, reciclaje y
eliminación de baterías de ácido plomo.
Page 26

e Rules for Safe Driving
S Normas de seguridad para conducir
I
e WARNING S ADVERTENCIA
e • Prevent Injuries and Deaths
• Direct Adult Supervision Required
• Keep Children Within Safe Riding Areas
These areas must be:
– away from swimming pools and other bodies of water to prevent drownings
– generally level to prevent tipovers
– away from steps, driveways, cars, roads and alleys.
S• Evitar lesiones y la muerte
• Se requiere la supervisión directa de un adulto
• Mantener a los niños en áreas de juego seguras.
Se recomienda que estas áreas estén:
– lejos de piscinas y otras áreas con agua para evitar accidentes
– niveladas para evitar que se voltee el vehículo
– lejos de escalones, paseos, vehículos, calles y callejones.
e RIDING HAZARD
S PELIGRO AL CONDUCIR
26
Page 27

e Teach Safety Rules
to Children
S Enseñe a los niños las
reglas de seguridad
e Use vehicle on generally level ground ONLY!
S ÚNICAMENTE usar el vehículo en
superficies niveladas.
27
e While children can quickly develop the skill
necessary to drive this vehicle, it is important
to remember that their judgment skills are still
very immature. Unsupervised driving by
children can lead to serious injury. Before
children use this vehicle, an adult should
carefully evaluate the driving area as well as
the children’s skill level and ability to drive
this vehicle safely. Children are not always
able to recognize or anticipate hazards, even
when they have been taught about them.
THERE IS NO ACCEPTABLE SUBSTITUTE
FOR DIRECT ADULT SUPERVISION.
Teach appropriate safety rules to your child
before allowing operation of this vehicle.
These rules should also be reviewed with
neighborhood children or other playmates
who want to drive this vehicle.
Riding Rules
Make sure children know and follow these
rules for safe driving:
1. Always sit on the seat.
2. Always wear shoes.
3. Only 2 (two) riders at a time. Children who
are not sitting on the seat or are standing
on the vehicle could fall off, cause a
tip-over or block the driver’s view. Children
could be seriously injured.
4. Do not allow any child to drive the
vehicle in the street or near moving
(motorized) vehicles.
5. Do not allow any child to drive near bodies
of water (such as pools or creeks),
obstructions (such as furniture, low tree
limbs or play equipment), or drop-offs
(such as stairs or decks).
6. Do not allow any child to drive the vehicle
in the dark. A child could encounter
unexpected obstacles and have an
accident. Operate the vehicle only
in the daytime or a well-lit area.
7. Do not allow your child to drive on sloped
or inclined surfaces. Restrict your child’s
driving to generally level ground ONLY!
8. Do not allow your child to drive down or
across a steep slope.
• The vehicle may gain unsafe speed,
even if the pedal is released to stop.
• The vehicle may tilt and tip over.
• The wheels could lose traction,
causing the vehicle to slip.
9. Do not allow your child to drive up steep
inclines. The motor may stop and the
vehicle could roll backwards at an
unsafe speed.
10. Never put anything near any moving parts.
Rotating parts such as motors, gear boxes
and wheels can snag fingers, hair, etc.,
causing serious injury. Do not allow
operation of the vehicle when it is on
its side or in an upside-down position.
11. Do not operate the vehicle near flammable
vapors (gasoline, paint thinner, acetone,
liquid wax, etc.). The vehicle’s electrical
switches, like most electrical switches,
emit an internal spark when first turned
on or turned off. The presence of flammable
liquids or vapors could cause an explosion
or a fire. Keep all flammable products in
tightly sealed containers and away from
the vehicle.
12. Do not allow a child to operate the
vehicle without direct adult supervision.
To prevent unsupervised use of the vehicle,
disconnect the motor harness from the
battery when the vehicle is not in use.
To disconnect the motor harness
connector and battery connector:
• Open the hood to access the battery
• Pull firmly to unplug the motor harness
connector from the battery.
• Lower the hood and fasten the
hood latches.
S Los niños pueden desarrollar rápidamente
la habilidad necesaria para conducir este
vehículo, y es por lo mismo que es
importante recordar que sus habilidades
para hacer decisiones son muy inmaduras. Un
niño no supervisado podría sufrir graves
lesiones. Se recomienda que antes de que los
niños utilicen el vehículo, un adulto evalúe
cuidadosamente el área de juego así como
el nivel de habilidad y manejo del niño. Los
niños no siempre pueden reconocer o
anticipar peligros, incluso si se les enseña
sobre los mismos. NO HAY SUSTITUTO
ACEPTABLE PARA LA SUPERVISIÓN
DE UN ADULTO.
Enséñele a su hijo normas de seguridad antes
de permitirle utilizar este vehículo. Repase
estas normas con los niños del
vecindario o con otros compañeros de
juego que quieran utilizar este vehículo.
Normas para conducir
Cerciorarse de que los niños sepan y sigan
estas normas para conducir de
manera segura:
1. Siempre sentarse en el asiento.
2. Siempre calzar zapatos.
3. No usar el vehículo con más de dos niños,
sentados en el asiento. Un niño que no
esté sentado en el asiento o que esté
parado en el vehículo podría caerse,
causar que el vehículo se voltee o bloquear
la vista del conductor. Esto puede causar
graves lesiones.
4. No permitir que ningún niño maneje el
vehículo en la calle o cerca de vehículos
movibles (motorizados).
5. No permitir que ningún niño maneje
el vehículo cerca de zonas de agua
(tales como piscinas o arroyuelos),
obstrucciones (tales como muebles,
ramas de árboles bajas o equipo de
juego) o áreas elevadas (tales como
escaleras o terrazas).
6. No permitir que ningún niño maneje el
vehículo en la oscuridad. Los obstáculos
inesperados podrían causar un accidente.
Se recomienda utilizar el vehículo sólo
durante el día o en áreas bien iluminadas.
7. No permitir que ningún niño maneje
el vehículo en bajadas o subidas
empinadas. Restringir las áreas de
manejo de su hijo a áreas planas.
8. No permitir que ningún niño maneje el
vehículo en una superficie muy inclinada,
ni que la atraviese.
• El vehículo quizá se acelere demasiado,
incluso si el pedal está suelto para
hacer alto.
• El vehículo quizá se voltee.
• Las llantas pueden perder tracción,
causando que el vehículo se patine.
9. No permitir que ningún niño maneje en
subidas o bajadas empinadas. El motor
se puede detener causando que el
vehículo ruede en reversa a una
velocidad peligrosa.
10. Nunca colocar nada cerca de cualquier
parte movible. Las partes que giran, tales
como los motores, cajas de velocidades y
las ruedas, pueden causar que se atoren
dedos, cabello, etc., causando una grave
lesión. No permitir que se utilice el
vehículo cuando esté sobre un costado
o en posición al revés.
11. No deberá utilizarse el vehículo cerca
de vapores inflamables (gasolina,
tíner, acetona, cera líquida, etc.) Los
interruptores eléctricos del vehículo,
tal como es el caso de la mayoría de
interruptores eléctricos, emiten una
chispa interna la primera vez que se
encienden o apagan. La presencia de
líquidos o vapores inflamables puede
causar una explosión o incendio.
Mantenga todos los productos
inflamables en recipientes bien
sellados y lejos del vehículo.
12. No permitir que ningún niño maneje el
vehículo sin la supervisión de un adulto.
Para evitar el uso no supervisado del
vehículo, desconectar el arnés del motor
de las baterías cuando el vehículo no
esté en uso.
Para desconectar el conector del arnés
del motor y el conector de la batería:
• Abrir el cofre para lograr acceso a
la batería.
• Jalar con firmeza para desenchufar
el conector del arnés del motor de
la batería.
• Cerrar el cofre y ajustar los seguros
del cofre.
Page 28

e
How to Operate your Vehicle
S Instrucciones de operación del vehículo
e To Stop
S Para hacer alto
J
28
e • Make sure the shifter is in the low speed
position .
• Press down on the foot pedal . The
vehicle goes forward at a maximum of
4 km/h .
• Help your child practice steering to learn
how far and how quickly to turn the steering
wheel when driving forward in low speed.
S • Cerciorarse de que la palanca esté en la
posición de velocidad lenta .
• Presionar el pedal . El vehículo avanzará
hacia adelante a una velocidad máxima de
4 km/h .
• Ayúdele a su hijo a practicar el viraje para
que aprenda cuánto y cuán rápido virar
el volante al avanzar hacia adelante a
velocidad lenta.
e • Your vehicle has a patented, electronic
braking system that automatically stops
the vehicle when your child's foot is lifted
from the pedal.
• Make sure your child is comfortable with
steering the vehicle and automatically
knows how to stop.
S • El vehículo incluye un sistema electrónico
de frenos patentado que detiene el vehículo
automáticamente cuando el niño quita su
pie del pedal.
• Cerciorarse de que su hijo se sienta seguro
de cómo virar el vehículo y que sepa cómo
frenar automáticamente.
e As assembled, your vehicle is ready to roll in
low speed (4 km/h, maximum). It has been
pre-set so it will only operate in low speed.
After your child has mastered the basic skills
of driving and understands the rules for safe
driving, it’s time to disconnect the high speed
lock-out to allow the vehicle to operate in low
or high speed. See the instructions on page
29 to remove the high speed lock-out.
S El vehículo está listo para usarse a velocidad
lenta (4 km/h, máxima). Fue prestablecido
para que sólo funcione a velocidad lenta.
Después de que su hijo domine las
habilidades básicas de conducir y comprenda
las reglas para conducir de manera segura,
desconecte el tornillo de velocidad rápida
para que el vehículo funcione a velocidad
rápida o lenta. Ver las instrucciones para
desconectar el tornillo de velocidad
rápida en la página 29.
e Beginner Use - Low Speed Drive
S Principiantes - Velocidad lenta
Page 29

e Shifter
S Palanca
e Lock-Out
Screw
S Tornillo de
velocidad
rápida
e Storage Position
S Posición de
almacenamiento
e Lock-Out Position
S Posición del tornillo
29
e To Back Up
S Para avanzar en reversa
e IMPORTANT! To avoid damaging the
motors and gears, stop the vehicle
before shifting from forward to
reverse .
• Once your child is completely comfortable
with operating the vehicle in the forward
mode, introduce reverse .
To Back Up
• Make sure the shifter is in the reverse
position
.
• Press down on the foot pedal . The
vehicle will go in reverse at a maximum
of 4 km/h . The vehicle is designed to
operate in low speed only in reverse.
• Help your child practice steering to learn
how far and how quickly to turn the
steering wheel when driving in reverse.
S ¡IMPORTANTE! Para evitar daños a los
motores y velocidades, enséñele a su hijo
a detener el vehículo antes de cambiar de
dirección .
• Después de que su hijo se sienta cómodo
manejando el vehículo marcha adelante,
enséñele la marcha en reversa .
Para avanzar en reversa
• Cerciorarse de que la palanca esté en la
posición de reversa .
• Presionar el pedal . El vehículo
avanzará en reversa a una velocidad
máxima de 4 km/h . En reversa, el
vehículo sólo funciona a velocidad lenta.
• Ayúdele a su hijo a practicar el viraje para
que aprenda cuánto y cuán rápido virar el
volante al avanzar en reversa.
e Disconnecting the High Speed
S Desconectar el tornillo de
velocidad rápida
e Before you disconnect the high speed lock-
out, make sure your child knows how to steer,
how to start and stop the vehicle and knows
the rules for safe driving. When the high
speed lock-out is disconnected, the vehicle
can be driven forward in low speed (4 km/h,
maximum) or high speed (8 km/h, maximum).•
Make sure the shifter is in the reverse
position.
• Loosen the screw in the shifter box using a
Phillips screwdriver.
• Remove the screw.
• Insert the lock-out screw into the hole in the
shifter handle to keep it for future use. It can
be re-inserted into the shifter box to lock-out
high speed.
S Antes de desconectar el tornillo de velocidad
rápida, cerciorarse de que su hijo sepa cómo
virar, cómo echar a andar y detener el vehículo y que sepa las reglas para conducir de
manera segura. Después de desconectar el
tornillo de velocidad rápida, podrá
conducirse el vehículo marcha adelante a
velocidad lenta (4 km/h, máxima) o velocidad
rápida (8 km/h, máxima).
• Cerciorarse de que la palanca esté en la
posición de reversa .
• Desajustar el tornillo en la caja de la
palanca con un destornillador de cruz.
• Retirar el tornillo.
• Introducir el tornillo en el orificio del asa de
la palanca para guardarlo para uso futuro.
Se puede volver a meter en la caja de la
palanca para bloquear la velocidad rápida.
e Advanced Use - High Speed Drive
S Avanzados - Velocidad rápida
e To Drive
S Para avanzar
• Make sure the shifter is in the high speed
position .
• Press down on the foot pedal . The
vehicle goes forward at a maximum of
8 km/h .
• Help your child practice steering to learn
how far and how quickly to turn the
steering wheel when driving forward in
high speed.
• Make sure your child is comfortable with
steering the vehicle and automatically
knows how to stop.
• Stopping in high speed is the same
as stopping in low speed. The vehicle
automatically stops when your child’s
foot is lifted from the pedal.
e IMPORTANT! To avoid damaging the
motors and gears, stop the vehicle
before shifting between low and
high speed.
S ¡IMPORTANTE! Para evitar daños a los
motores y velocidades, enséñele a su
hijo a detener el vehículo antes de
cambiar de dirección.
• Cerciorarse de que la palanca esté en la
posición de velocidad rápida .
• Presionar el pedal . El vehículo avanzará
hacia adelante a una velocidad máxima de
8 km/h .
• Ayúdele a su hijo a practicar el viraje para
que aprenda cuánto y cuán rápido tiene
que virar el volante al conducir hacia
adelante a velocidad rápida.
• Cerciórese de que su hijo se sienta
cómodo virando el vehículo y que sepa
cómo frenar automáticamente.
• Hacer alto es igual en velocidad rápida que
en velocidad lenta. El vehículo se detiene
automáticamente después de que el niño
quita el pie del pedal.
Page 30

30
e Caring for Your Vehicle
S Mantenimiento
K
e • Check all screws, cap nuts, and their
protective coverings regularly and tighten as
required. Check plastic parts on a regular
basis for cracks or broken pieces.
• During snowy or rainy weather, the vehicle
should be stored inside or under a protective
cover. Remember to charge the battery at
least once per month while your vehicle is
not in regular use.
• Avoid operating the vehicle in wet or snowy
conditions, and do not spray the vehicle
with a hose. Do not wash the vehicle with
soap and water. Water or moisture in the
motors or electrical switches can cause
them to corrode, and could cause switch
or motor failure.
• Avoid operating the vehicle on sand, loose
dirt or gravel. Sand, loose dirt or gravel in
the motors or electrical switches can cause
them to jam, and could cause switch or
motor failure.
• The vehicle can be wiped down with a soft,
dry cloth. For a shiny finish, you can wipe
plastic parts with a non-wax furniture polish
applied to a soft-cloth. Do not use automotive wax. Do not use soap and water or
spray the vehicle with a hose.
S • Revisar periódicamente todos los tornillos,
sujetadores y cubiertas protectoras y
ajustarlas según sea necesario. Verificar
que las piezas de plástico no tengan
rajaduras ni estén rotas.
• En condiciones de lluvia o nieve, guardar
el vehículo bajo techo o cubrirlo totalmente.
Cargar la batería por lo menos una vez
al mes mientras el vehículo no esté en
uso normal.
• Evitar usar el vehículo en condiciones
mojadas o de nieve y no rociar el vehículo
con una manguera. No lavar el vehículo
con agua y jabón. El agua o humedad en
los motores o interruptores eléctricos puede
causar corrosión y falla de los mismos.
• Evitar usar el vehículo en arena, tierra
suelta o grava. La arena, tierra suelta
o grava en los motores o interruptores
eléctricos puede causar que se atoren
y que éstos fallen.
• Limpiar el vehículo con un paño suave y
seco. Para un acabado brillante, pasar un
paño suave humedecido con un producto
de limpieza de muebles, sin cera, a las
partes de plástico. No usar cera para autos.
No usar agua ni jabón, ni rociar el vehículo
con una manguera.
S Garantía limitada
S Garantía limitada por un periodo de
12 meses para el vehículo Power Wheels.
Se incluye una garantía por 6 meses
que cubre solamente aquella batería
Power Wheels de 12 voltios incluida con
el vehículo Power Wheels cuando éste
fue adquirido.
Esta garantía limitada cubre el vehículo
Power Wheels y la batería de 12 voltios
adquirida de Power Wheels por el
comprador original, contra defectos
en material o mano de obra.
L
Esta garantía cubre uso normal, sin embargo
no cubre el vehículo Power Wheels o la(s)
batería(s) de 12 voltios si éstos fueron
dañados por uso excesivo, negligencia,
accidentes, maltrato, mal uso, servicio
inapropiado u otras razones no causadas
por defectos en material o mano de obra.
La garantía se invalida si hay señas de que
el consumidor intentó efectuar reparaciones.
Esta garantía no cubre, y tiene como finalidad excluir, cualquier responsabilidad por
parte de Power Wheels, ya sea bajo esta
garantía o implícita bajo ley, u otro daño
indirecto causado por incumplimiento de
la garantía.
Algunos países no permiten tal exclusión
o limitación de modo que dicha limitación
quizás no sea válida en su caso. Esta
garantía le otorga derechos específicos y
es posible que usted tenga otros derechos
que varían de país en país.
POR FAVOR GUARDE SU RECIBO
DE COMPRA.
Page 31

Vehicle does not run Undercharged battery Charge the battery. A new battery should have been charged
for at least 18 hours before using the vehicle for the first time.
After first-time use, recharge the battery for at least 14 hours
after each use. Never charge the battery longer than 30 hours.
Check all connectors. Make sure the charger connector is
plugged into the battery, and that the charger is plugged into
the wall.
Make sure power flow to the wall outlet is “ON”.
Charger is not working There is no sure way to tell if your charger is working unless you
have a volt meter. If you suspect there is a problem with your
charger, contact Power Wheels
®
Consumer Relations.
Tripped thermal fuse Each Power Wheels®12 volt battery has a built-in thermal fuse.
A thermal fuse may “trip” and shut down operation of the vehicle
if the vehicle is overloaded or the driving conditions too severe.
The fuse will automatically reset itself after approximately 25
seconds, allowing the vehicle to resume normal operation. To
avoid repeated automatic shutdowns, do not overload the
vehicle by exceeding the 59 kg (130 lb) maximum weight
capacity or by towing anything behind the vehicle. Do not drive
up hills or run into fixed objects, which can cause the wheels to
stop spinning while power is still being supplied to the motors.
If a thermal fuse continually trips, contact Power Wheels
®
Consumer Relations.
Loose wire or loose connectors Check all wires and connectors. Make sure the motor harness
connector is plugged into the battery, and that there are no
loose wires around the motors.
Dead battery If your battery is old or if you have not followed Battery Care
instructions, your battery may be dead. If you are unsure
whether or not the battery is dead, contact Power Wheels
®
Consumer Relations.
Electrical switch damage The electrical switches can become corroded due to exposure
to water or moisture, or can jam due to loose dirt, sand or
gravel. Contact Power Wheels®Consumer Relations.
Motor damage Contact Power Wheels®Consumer Relations.
Vehicle was running but Loose wire or loose connectors Check all wires and connectors. Make sure the motor harness
suddenly stopped connector is plugged into the battery, and that there are no
loose wires around the motors.
Tripped thermal fuse Each Power Wheels®12 volt battery has a built-in thermal fuse.
A thermal fuse may “trip” and shut down operation of the vehicle
if the vehicle is overloaded or the driving conditions too severe.
The fuse will automatically reset itself after approximately 25
seconds, allowing the vehicle to resume normal operation. To
avoid repeated automatic shutdowns, do not overload the
vehicle by exceeding the 59 kg (130 lb) maximum weight
capacity or by towing anything behind the vehicle. Do not drive
up hills or run into fixed objects, which can cause the wheels to
stop spinning while power is still being supplied to the motors.
If a thermal fuse continually trips, contact Power Wheels
®
Consumer Relations.
Problem Possible Cause Solution
e Problems and Solutions Guide
IMPORTANT! If you experience a problem with your vehicle, please contact Power Wheels®Consumer Relations.
M
31
Page 32

Problem Possible Cause Solution
Short run time (Less than Undercharged battery Charge the battery. A new battery should have been
1 - 3 hours per charge) charged for at least 18 hours before using the vehicle for
the first time. After first-time use, recharge the battery for
at least 14 hours after each use. Never charge the
battery longer than 30 hours.
Check all wires and connectors. Make sure the charger
connector is plugged into the battery, and that the charger is
plugged into the wall.
Make sure power flow to the wall outlet is “ON”.
Overcharged battery Do not charge the battery longer than 30 hours. If you
suspect that your battery is damaged as a result of
overcharging, contact Power Wheels®Consumer Relations.
Battery is old and will not Even with proper care, a rechargeable battery does not
accept full charge last forever. Average battery life is 1 to 3 years depending
on the vehicle use and use conditions. Replace the battery
with a new Power Wheels
®
12 volt rechargeable battery.
Do not substitute parts.
Tripped thermal fuse Each Power Wheels®12 volt battery has a built-in thermal fuse.
A thermal fuse may “trip” and shut down operation of the
vehicle if the vehicle is overloaded or the driving conditions
too severe. The fuse will automatically reset itself after approximately 25 seconds, allowing the vehicle to resume normal
operation. To avoid repeated automatic shutdowns, do not
over load the vehicle by exceeding the 59 kg (130 lb) maximum
weight capacity or by towing anything behind the vehicle. Do
not drive up hills or run into fixed objects, which can cause the
wheels to stop spinning while power is still being supplied to
the motors. If a thermal fuse continually trips, contact
Power Wheels®Consumer Relations.
Vehicle runs sluggishly Undercharged battery Charge the battery. A new battery should have been
charged for at least 18 hours before using the vehicle for
the first time. After first-time use, recharge the battery for at
least 14 hours after each use. Never charge the battery
longer than 30 hours.
Check all connectors. Make sure the charger connector is
plugged into the battery, and that the charger is plugged into
the wall.
Make sure power flow to the wall outlet is “ON”.
Battery needs charging After approximately 3 hours of constant use, the battery
needs charging.
Battery is old and will not accept Even with proper care, a rechargeable battery does not last
full charge forever. Average battery life is 1 to 3 years depending on
the vehicle use and use conditions. Replace the battery with a
new Power Wheels®12 volt rechargeable battery. Do not
substitute parts.
Vehicle is overloaded Make sure you do not overload the vehicle by allowing more
than 2 riders at one time, by exceeding the 59 kg (130 lb)
maximum weight capacity, or by towing objects behind
the vehicle.
Driving conditions are too stressful Use only on generally level ground.
e Problems and Solutions Guide
32
Page 33

Problem Possible Cause Solution
Vehicle runs in low speed, but does High speed lock-out not disconnected The vehicle was pre-set to run only in low speed. To allow the
not run in high speed (Please Note: vehicle to run in low and high speed, you must disconnect the
The vehicle is designed to operate High Speed Lock-Out. Follow the instructions on page 29 to
in low speed only in reverse ). remove the High Speed Lock-Out screw.
When the foot pedal is pressed Operation of vehicle in low speed It is possible that only one rear wheel may spin when both rear
only one rear wheel spins wheels are raised off the ground and the vehicle is in low speed.
This does not necessarily indicate a problem. Check for proper
operation of the drive system by raising the rear wheels off the
ground and pressing the foot pedal. If only one rear wheel spins,
carefully press your hand on the spinning wheel to slow it down.
The other rear wheel should begin to spin. If the other rear wheel
does not begin to spin, there may be a problem with the vehicle.
Contact Power Wheels
®
Consumer Relations.
Sometimes the vehicle doesn’t Loose wire or connector Check all wires around the motors and all connectors to
run, but other times it does make sure they are tight.
Motor or electrical switch damage Contact Power Wheels
®
Consumer Relations.
When the foot pedal is pressed, Loose wire or connector Check all wires around the motors and all connectors to make
the vehicle won’t run without sure they are tight.
a push
“Dead Spot” on motor Contact Power Wheels®Consumer Relations.
Loud clacking or grinding Broken gears Contact Power Wheels®Consumer Relations.
noise from a motor-gearbox
Sound box not working Improperly installed batteries The sound box requires 3 “AA” (LR6) alkaline batteries for
operation. Make sure the batteries are properly installed in the
sound box.
Dead batteries Replace the sound box batteries with 3, new “AA” (LR6)
alkaline batteries.
Charger gets warm during use It is normal for some chargers to get warm No action required. If your charger does not get warm during
during use and is not reason for concern. use, it does not mean that it is not working properly.
Battery makes a sizzling or It is normal for some batteries to make No action required. If your battery does not make noise or
gurgling noise when charging noise and swell slightly while charging swell slightly during charging, it does not mean that it is not
and is not reason for concern. accepting the charge.
e Problems and Solutions Guide
If, after reviewing the Problems and Solutions Guide, the vehicle still fails to operate, please contact Power Wheels Consumer Relations.
33
Page 34

El vehículo no avanza Batería con poca carga Cargar la batería. Una batería nueva se debe cargar durante
por lo menos 18 horas antes de usar el vehículo por primera
vez. Después de usar el vehículo por primera vez, cargar la
batería durante por lo menos 14 horas después de cada uso.
Nunca cargar la batería por más de 30 horas.
Revisar todos los conectores. Verificar que el conector del
cargador esté enchufado en la batería, y que el cargador esté
conectado en la pared.
Verificar que esté activada la corriente eléctrica al
tomacorriente de pared.
El cargador no funciona No hay una manera certera de saber si el cargador está
funcionando a menos que disponga de un voltímetro. Si piensa
que el cargador no funciona, póngase en contacto con el
departamento de atención al cliente de Power Wheels.
Fusible térmico bloqueado Cada batería Power Wheels de 12V incluye un fusible térmico
integrado. Los fusibles térmicos se pueden “bloquear” y
automáticamente detener la operación del vehículo si éste está
sobrecargado o si las condiciones de manejo son muy severas.
Después de que un fusible se “bloquea”, se restablece
automáticamente después de aproximadamente 25 segundos
y el vehículo reanuda su operación normal. Para evitar que se
detenga repetidamente el vehículo de manera automática, no
cargue el vehículo en exceso del peso máximo de 59 kg ni
remolque nada con el mismo. Evite condiciones de manejo
severas, tales como manejar en subidas muy empinadas o
chocar con objetos estáticos, que pueden causar que las
ruedas dejen de girar mientras se sigue transfiriendo energía
al motor. Si un fusible térmico se bloquea continuamente,
póngase en contacto con el departamento de atención al
cliente de Power Wheels.
Cable o conectores sueltos Revisar todos los cables y conectores. Verificar que el
conector del arnés del motor esté conectado en la batería,
y que no haya cables sueltos alrededor de los motores.
Batería gastada Si la batería es antigua o si no ha seguido las instrucciones
sobre el cuidado de la batería, quizá la batería esté gastada. Si
no está seguro si la batería está gastada, póngase en contacto
con el departamento de atención al cliente de Power Wheels.
Daño al interruptor eléctrico Los interruptores eléctricos se pueden corroer con el contacto
al agua o humedad, o se pueden atorar con tierra suelta, arena
o grava. Póngase en contacto con el departamento de
Atención al cliente de Power Wheels.
Daño al motor Póngase en contacto con el departamento de Atención al
cliente de Power Wheels.
El vehículo estaba funcionando, Cable o conectores sueltos Revisar todos los cables y conectores. Verificar que el
pero de repente se detuvo conector del arnés del motor esté conectado en la batería,
y que no haya cables sueltos alrededor de los motores.
Fusible térmico bloqueado Cada batería Power Wheels de 12V incluye un fusible térmico
integrado. Los fusibles térmicos se pueden “bloquear” y
automáticamente detener la operación del vehículo si éste está
sobrecargado o si las condiciones de manejo son muy severas.
Después de que un fusible se “bloquea”, se restablece
automáticamente después de aproximadamente 25 segundos
y el vehículo reanuda su operación normal. Para evitar que se
detenga repetidamente el vehículo de manera automática, no
cargue el vehículo en exceso del peso máximo de 59 kg ni
remolque nada con el mismo. Evite condiciones de manejo
severas, tales como manejar en subidas muy empinadas o
chocar con objetos estáticos, que pueden causar que las
ruedas dejen de girar mientras se sigue transfiriendo energía
al motor. Si un fusible térmico se bloquea continuamente,
póngase en contacto con el departamento de atención al
cliente de Power Wheels.
Problema Causa probable Solución
¡IMPORTANTE! Si llega a tener algún problema con su vehículo, póngase en contacto con el Departamento de Atención al Cliente de Power Wheels.
S Guía de problemas y soluciones
M
34
Page 35

Problema Causa probable Solución
Duración corta (menos de Batería con poca carga Cargue la batería. Una batería nueva se debe cargar
1 a 3 horas por carga) durante por lo menos 18 horas antes de usar el vehículo
por primera vez. Después de usar el vehículo por primera
vez, cargar la batería durante por lo menos 14 horas después
de cada uso. Nunca cargar la batería por más de 30 horas.
Revisar todos los cables y conectores. Verificar que el conector
del cargador esté conectado en la batería, y que el cargador
esté conectado en la pared.
Verificar que esté activada la corriente eléctrica al tomacorriente
de pared.
Batería sobrecargada No cargar la batería por más de 30 horas. Si piensa que la
batería está dañada como resultado de una sobrecarga,
póngase en contacto con el departamento de Atención
al cliente de Power Wheels.
La batería está gastada y no Incluso con el cuidado apropiado, una batería recargable no
acepta una carga completa dura para siempre. La duración promedio de una batería es
de 1 a 3 años, según el uso del vehículo y las condiciones de
uso. Sustituir la batería por una nueva batería recargable
Power Wheels de 12 voltios. Para óptimos resultados, no usar
piezas de otras marcas.
Fusible térmico bloqueado Cada batería Power Wheels de 12V incluye un fusible térmico
integrado. Los fusibles térmicos se pueden “bloquear” y
automáticamente detener la operación del vehículo si éste está
sobrecargado o si las condiciones de manejo son muy severas.
Después de que un fusible se “bloquea”, se restablece
automáticamente después de aproximadamente 25 segundos y
el vehículo reanuda su operación normal. Para evitar que se
detenga repetidamente el vehículo de manera automática, no
cargue el vehículo en exceso del peso máximo de 59 kg ni
remolque nada con el mismo. Evite condiciones de manejo
severas, tales como manejar en subidas muy empinadas o
chocar con objetos estáticos, que pueden causar que las ruedas
dejen de girar mientras se sigue transfiriendo energía al motor.
Si un fusible térmico se bloquea continuamente, póngase en
contacto con el departamento de atención al cliente de
Power Wheels.
El vehículo no funciona bien Batería poco cargada Cargar la batería. Una batería nueva se debe cargar durante por
lo menos 18 horas antes de usar el vehículo por primera vez.
Después de usar el vehículo por primera vez, cargar la batería
durante por lo menos 14 horas después de cada uso. Nunca
cargar la batería por más de 30 horas.
Revisar todos los conectores. Verificar que el conector del
cargador esté conectado en la batería, y que el cargador esté
conectado en la pared.
Verificar que esté activada la corriente eléctrica al tomacorriente
de pared.
La batería necesita ser cargada Después de aproximadamente 3 horas de uso continuo es
necesario cargar la batería.
La batería no es nueva y no Incluso con el cuidado apropiado, una batería recargable no
acepta una carga completa dura para siempre. La duración promedio de una batería es
de 1 a 3 años, según el uso del vehículo y las condiciones
de uso. Sustituir la batería por una nueva batería recargable
Power Wheels de 12 voltios. No usar piezas de otras marcas.
El vehículo está sobrecargado Cerciorarse de no sobrecargar el vehículo. No permitir que se
suban al vehículo más de dos niños a la vez; no exceder el peso
máximo de 59 kg ni remolcar nada con el vehículo.
Las condiciones de manejo Usar únicamente en superficies niveladas.
son muy severas
S Guía de problemas y soluciones
35
Page 36

Problema Causa probable Solución
El vehículo sólo avanza El tornillo de velocidad rápida El vehículo fue prestablecido para funcionar únicamente en
en velocidad lenta. no está desconectado velocidad lenta. Para que también funcione en velocidad
(Nota: En marcha atrás, el vehículo rápida, deberá desconectar el seguro de velocidad rápida.
está diseñado para avanzar Seguir las instrucciones en la página 29 para quitar el
únicamente a velocidad lenta ). tornillo de seguro de velocidad rápida.
Cuando se presiona el pedal, El vehículo se está usando Es posible que sólo una rueda trasera gire cuando se levanta
sólo gira una rueda trasera. en velocidad lenta del suelo la parte trasera del vehículo y éste se encuentra en
velocidad lenta. Esto no necesariamente significa que hay
un problema. Revisar el funcionamiento correcto del sistema
de manejo, levantando las ruedas traseras del piso y
presionando el pedal. Si sólo gira una rueda trasera, presionar
cuidadosamente la rueda giratoria con la mano para que ésta
gire más despacio. La otra rueda trasera debe empezar a girar.
Si la otra rueda trasera no empieza a girar, quizá haya un
problema con el vehículo. Póngase en contacto con el
departamento de Atención al cliente de Power Wheels.
A veces el vehículo funciona Quizá esté suelto un cable Revisar todos los cables y conectores alrededor de los motores
y otras veces no o conector para verificar que están bien conectados.
Hay daño al motor o interruptor eléctrico Póngase en contacto con el departamento de Atención al
cliente de Power Wheels.
Cuando se presiona el pedal, Quizá esté suelto un cable o conector Revisar todos los cables y conectores alrededor de los motores
el vehículo no avanza sin antes para verificar que están bien conectados.
darle un empujón
Hay una falla en el motor Póngase en contacto con el departamento de Atención al
cliente de Power Wheels.
Se oye un sonido fuerte de una Las velocidades están dañadas Póngase en contacto con el departamento de Atención al
caja de velocidades del motor cliente de Power Wheels.
La caja de resonancia Las pilas están mal colocadas La caja de resonancia funciona con pilas alcalinas tipo
no funcionan 3 x “AA” (LR6) x 1,5V. Revisar que las pilas de la
unidad de la caja de resonancia estén bien colocadas.
Pilas gastadas Sustituir las pilas de la caja resonancia por 3
nuevas pilas alcalinas tipo 3 x “AA” (LR6) x 1,5V.
El cargador se calienta Es normal que algunos cargadores se No es necesario tomar ninguna acción.
durante el uso calienten durante el uso
Si el cargador no se calienta durante el uso, no significa que no
esté funcionando correctamente.
La batería emite un sonido Es normal que algunas baterías No es necesario tomar ninguna acción.
chisporroteante mientras se carga emitan sonidos y que se ensanchen
ligeramente al ser cargadas Si la batería no emite ningún sonido o no se ensancha
ligeramente mientras se está cargando, no significa
que no se esté cargando.
S Guía de problemas y soluciones
Si después de consultar la Guía de problemas y soluciones no llega a resolver el problema del vehículo, póngase en contacto con el departamento de
Atención al cliente de Power Wheels.
©2004 Mattel, Inc. All Rights Reserved.
® and ™ designate U.S. trademarks of Mattel, Inc.
Fisher Price, Inc., a subsidiary of Mattel, Inc., East Aurora, NY 14052 U.S.A.
Fisher-Price, Power Wheels by Fisher-Price, Power Lock, and Power Stick are U.S. trademarks of Mattel, Inc.
PRINTED IN MEXICO/IMPRIMÉ AU MEXIQUE 75598pr-0821
 Loading...