

Page 1

Model Number 74924
D
i
s
c
o
v
e
r
w
h
a
t
’
s
p
o
s
s
i
b
l
e
™
…
w
w
w
.
f
i
s
h
e
r
-
p
r
i
c
e
.
c
o
m
Please keep this instruction sheet for future reference,
as it contains important information.
Adult assembly is required.
Tool required for assembly:
Phillips screwdriver (not included).
Page 2
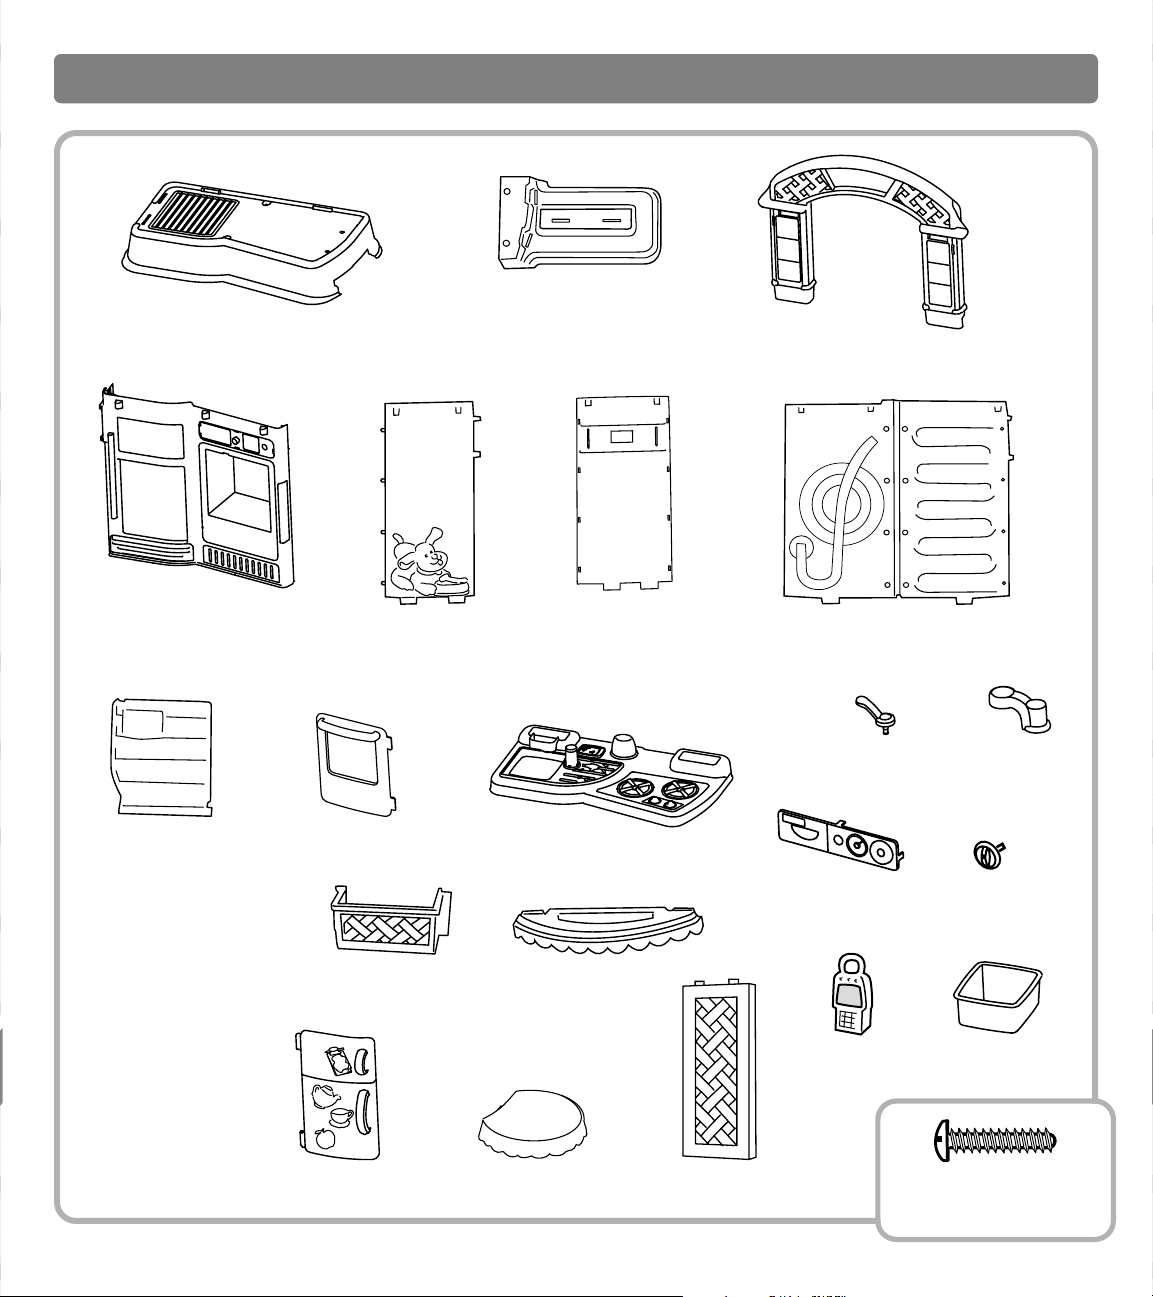
Parts
Base
Base Extension
Basket
Oven Panel Oven Dial
Arch
Shelf
FaucetFaucet Handle
Front Panel
Freezer Shelf
Side Panel
with Molded
Puppy
Side Panel
Back Panel
Countertop
Oven Door
Refrigerator Door
Side Table
Sink
Phone
#8 x 3/4" Screw - 34
Shown Actual Size
Parts Not Shown:
Label Sheet
Spatula
Frying Pan
4 Cookies
Teapot with Lid
Sugar Bowl
Creamer
Serving Tray
4 Saucers
4 Spoons
4 Tea Cups
2
Side Table Support
Page 3
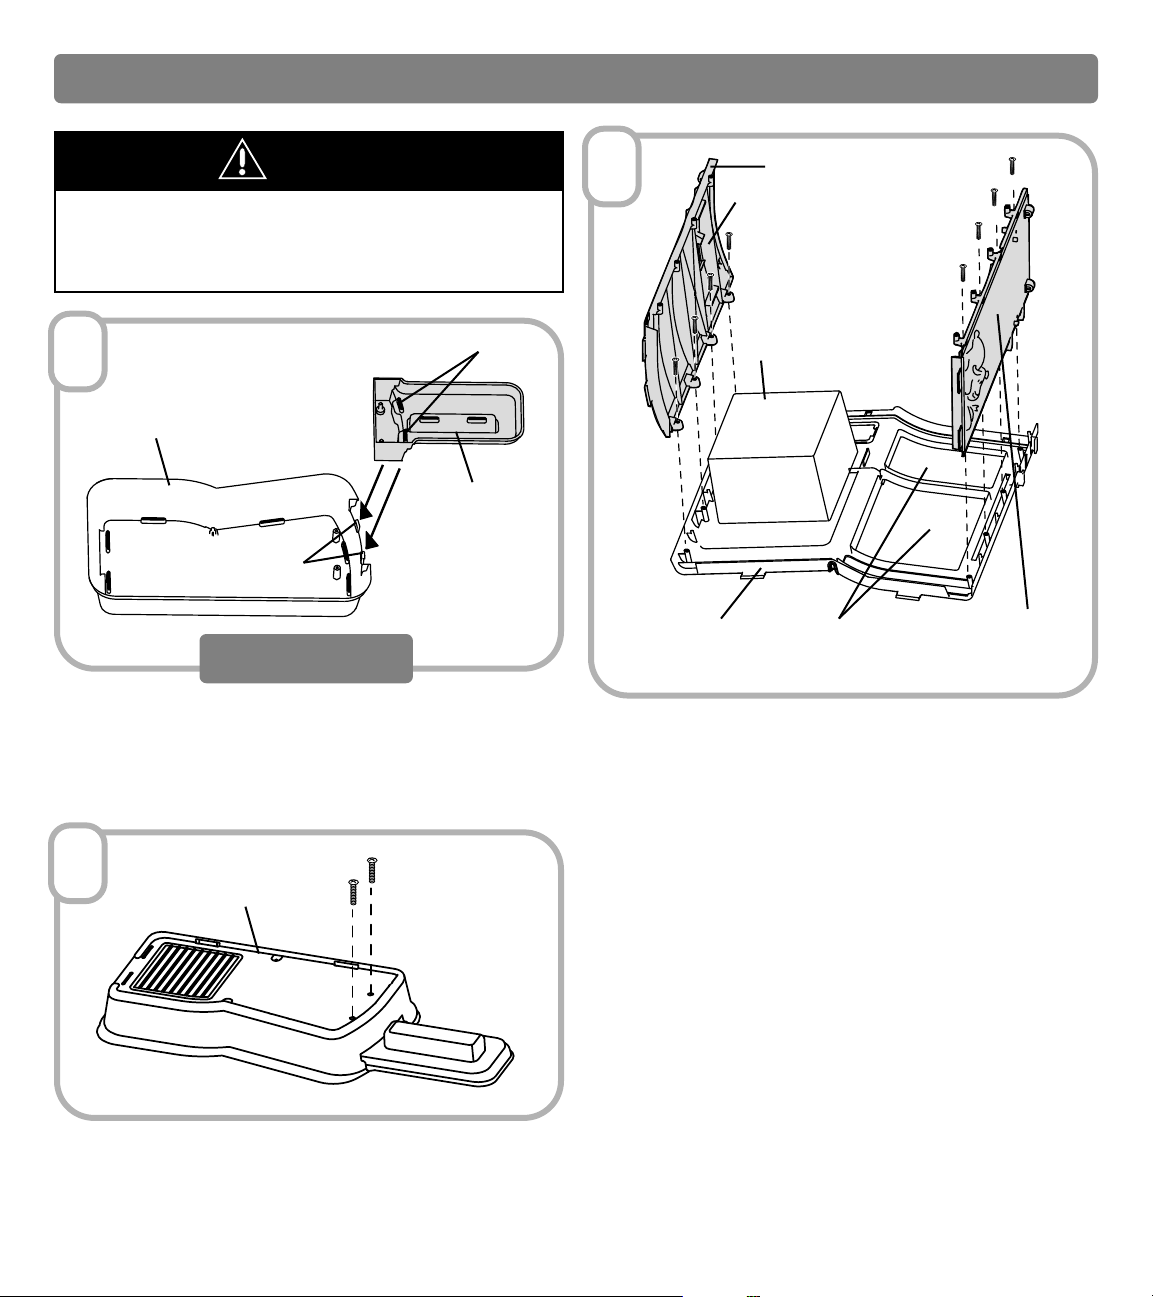
CAUTION
This product contains small parts
in its unassembled state.
Adult assembly is required.
Assembly
Bottom View
Base
Base
Extension
Tabs
Slots
• Place the base upside down on a flat surface.
• Place the base extension on the base so that the tabs
on the base fit into the slots in the base extension.
• Push down on the base extension to “snap” it in place.
1
1
3
3
Side Panel
Oven
Ribs
Refrigerator
Openings
Side Panel with
Molded Puppy
Front Panel
3
• Turn the base upright.
• Insert two screws through the holes in the base and into
the base extension. Tighten the screws with a Phillips
screwdriver. Do not over-tighten.
2
2
• Place the front panel face down on a flat surface.
• Position the side panel with the molded puppy with
the decoration facing outward. Fit the side panel
with the molded puppy to the front panel near the
refrigerator openings.
• Insert four screws through the holes in the side
panel with the molded puppy and into the front
panel. Tighten the screws with a Phillips screwdriver.
Do not over-tighten.
• Position the other side panel so that the ribs face
inward. Fit the side panel to the front panel near
the oven.
• Insert four screws through the holes in the side panel
and into the front panel. Tighten the screws with a
Phillips screwdriver. Do not over-tighten.
Base
Page 4

4
4
Assembly
Front Panel
Groove
Freezer
Shelf
Side Panel
with Molded
Puppy
5
5
Refrigerator Opening
Refrigerator
Coils
Side Panel
Back Panel
• Position the back panel with the molded detail
upright. Make sure the refrigerator coils are over
the refrigerator openings.
• Fit the back panel onto the side panels.
6
6
Side Panel
Back Panel
• Insert eight screws through the back panel and into
the side panels. Tighten the screws with a Phillips
screwdriver. Do not over-tighten.
7
7
Base
• Position the assembly over the base, as shown.
• Insert and “snap” the tabs on the bottom of the
assembly into the slots in the base.
• Slide the freezer shelf into the grooves in the side
panel with the molded puppy and the front panel.
4
Groove
Side Panel
Page 5

8
8
Assembly
Countertop
Refrigerator
Openings
Sink
Opening
• Position the countertop so that the sink opening is
above the refrigerator openings. Fit the countertop
to the assembly.
9
9
• Insert ten screws up through the front, back and side
panels and into the countertop. Tighten the screws
with a Phillips screwdriver. Do not over-tighten.
Hint: You may find it easier if you tip the assembly
first backward and then forward to tighten the screws.
Side Table
Support
Side Table
Groove
Peg
• Place the side table down on a flat surface.
• Fit the grooves in side table support onto the pegs
on the side table.
• Insert two screws into the pegs in the side table.
Tighten the screws with a Phillips screwdriver.
Do not over-tighten.
11
11
Side Table
Assembly
Base
Extension
• Position the side table assembly at an angle, as shown.
• Insert and “snap” the tabs on the bottom of the side
table assembly into the slots in the base extension.
• Insert and “snap” the remaining tabs on the side table
assembly into the slots in the side panel.
Groove
Peg
5
10
10
Page 6

12
12
Arch
Assembly
Slot
Countertop
Slot
• Position the arch over the countertop.
• Fit the arch into the matching slots in the countertop,
as shown.
13
13
Arch
Countertop
• Insert four screws through the arch and into the
countertop. Tighten the screws with a Phillips
screwdriver. Do not over-tighten.
14
14
Shelf
• Insert and “snap” the tabs on the shelf into the slots
in the arch.
Arch
15
15
Basket
Side Panel
with Molded
Puppy
Tab
Groove
• Insert the tabs on one end of the basket into the
matching grooves in the side panel.
• Gently squeeze the basket to fit the tabs on the other
end into the remaining grooves in the side panel.
6
Page 7

Assembly
16
16
Hinge Hole
Refrigerator Door
Peg
• Position the refrigerator door with the handles
facing you.
• At an angle, fit the refrigerator door lower peg into the
lower hole in the hinge on the front panel.
• Then, “snap” the refrigerator upper peg into the upper
hole in the hinge.
17
17
Hinge Hole
Oven Door
Peg
• Position the oven door with the handle facing you.
• At an angle, fit the oven door lower peg into the
lower hole in the hinge on the front panel.
• Then, “snap” the oven upper peg into the upper
hole in the hinge.
18
18
Sink
• Place the sink into the sink opening in the countertop.
• Fit the hole in the faucet over the post on the
countertop, as shown.
• Insert and “snap” the peg on the bottom of the faucet
handle into the faucet, as shown.
Faucet Handle
Faucet
Countertop
Post
Sink
Opening
19
19
Oven Panel
Oven Dial
• Insert and “snap” the tabs on oven panel into the
matching openings above the oven door.
• Insert and “snap” the oven dial into the hole in the
oven panel, as shown.
7
Page 8

Label Decoration
1
3
2
Proper label application will help keep labels looking
their best! When applying labels, keep the following
guidelines in mind:
• Wash hands before applying labels.
• Before applying labels, wipe the surface of the toy with
a clean, dry cloth to remove dust or oils.
• For best results, avoid repositioning a label once it has
been applied.
• Apply labels as shown in the illustration.
One-time assembly is now complete.
Care
• Before using the cooking and eating utensils, hand
wash them in hot, soapy water.
• Check the plastic parts regularly and if broken or
cracked, dispose of them properly.
• Check all screws regularly to be sure they are tight.
If the screws are not tight, tighten them as necessary.
• To clean, wipe the surface of this toy with a mild soap
and water solution and clean cloth. Rinse clean with
water to remove soap residue. Do not immerse the toy.
Consumer Information
Questions? We'd like to hear from you!
Call Fisher-Price
®
Consumer Relations, toll-free
at 1-800-432-KIDS, 8 AM - 6 PM EST Monday through
Friday. Hearing-impaired consumers using TTY/TDD
equipment, please call 1-800-382-7470. Or, write to:
Fisher-Price®Consumer Relations, 636 Girard Avenue,
East Aurora, New York 14052.
For other countries, outside the United States:
Canada: call 1-800-567-7724, or write to: Mattel Canada Inc, 6155 Freemont Blvd., Mississauga, Ontario L5R 3W2.
Great Britain:
telephone 01628 500302.
Australia: Mattel Australia Pty. Ltd., 658 Church Street, Locked Bag #870, Richmond, Victoria 3121 Australia.
Consumer Advisory Service 1300 135 312.
New Zealand: 16-18 William Pickering Drive, Albany 1331, Auckland.
Fisher-Price, Inc., a subsidiary of Mattel, Inc., East Aurora, NY 14052 U.S.A.
©2002 Mattel, Inc. All Rights Reserved. ® and ™ designate U.S. trademarks of Mattel, Inc.
Printed in Mexico 74924pr-0920
 Loading...