

Fisher Price 71636 User Manual

Prenatal Sounds
Monitor
Model Number: 71591
s
i
f
.
w
w
w
c
i
r
p
-
r
e
h
m
o
c
.
e

For proper setup and use, please read these instructions and keep for
future reference.
Includes two AC adaptors to power transmitter and receiver (plugs into
standard household outlets –120V AC). Receiver also runs on battery power
(9V alkaline battery – not included).
Adult assembly is required to install the battery (if used).
Note
Consumer Information
Occasionally a consumer may experience a problem with one of our products. If this
should happen, please call us toll-free, rather than return this product to the store.
Usually,we can solve the problem over the telephone or send you replacement parts.
Please call Fisher-Price® Consumer Relations, toll-free at 1-800-432-KIDS, between
8 AM - 6 PM EST,Monday through Friday. Hearing-impaired consumers using
TTY/TDD equipment, please call 1-800-382-7470.
Or write to:
Fisher-Price® Consumer Relations
636 Girard Avenue
East Aurora, New York 14052
2

Important!
This product cannot replace
responsible adult supervision.
CAUTION
• This product is not intended to be used as a medical monitor and its use should not
replace adult supervision.
• Test sound reception of receiver before first-time use and whenever you change
location of transmitter.
• To prevent entanglement:
- Never place transmitter in a crib or playpen. Keep transmitter and receiver
out of baby’s reach.
- Never use extension cords with the AC adaptors.
• Never use transmitter or receiver near water (ie.:bathtub, sink, laundry tub or wet
basement, etc.).
• Always use transmitter and receiver where there is adequate ventilation.
To prevent overheating, keep transmitter and receiver away from heat sources
such as radiators, heat registers, direct sunlight, stoves, amplifiers, or other
appliances which produce heat.
3

Receiver Battery Installation (Optional)
Battery
Compartment Door
9V (6LR61)
SHOWN ACTUAL SIZE
4

Receiver Battery Installation (Optional)
Battery Tips
• Remove the battery during long periods of non-use. Always remove an exhausted
battery from the product. Battery leakage and corrosion can damage this product.
Dispose of battery safely.
• Do not dispose of batteries in a fire.The batteries may explode or leak.
• Never short circuit the battery terminals.
• A non-rechargeable battery is not to be recharged.
• Only a battery of the same or equivalent type as recommended in the “Battery
Installation”instructions is to be used.
• If a removable rechargeable battery is used, it is only to be charged under
adult supervision.
•
A rechargeable battery is to be removed from the product before it is charged.
• If you use a battery charger,it should be examined regularly for damage to the cord,
plug, enclosure and other parts. Do not use a damaged battery charger until it has
been properly repaired.
• Locate battery compartment door on bottom of receiver.
• Push finger tab on battery compartment door to open battery compartment door.
• Snap terminals of a fresh, 9V alkaline battery into receiver connectors.
• Close battery compartment door.
5

Testing Sound Reception
Test transmitter transmission and receiver reception.
Place transmitter in room in which you
intend to use it. Slide transmitter power
switch to turn power on.Turn on a radio.
If you experience interference (buzzing
or static, etc.) while using one channel
setting, switch both units to other
channel. Selecting a channel is usually
a one time adjustment.
6

Testing Sound Reception
Place receiver in room in which you
intend to use it. Rotate on/off/volume
dial to turn power on. Adjust receiver
location.
Notes:
• Variable light display lights when sound
is received by receiver.
• If all five bars in variable light display
light:
- Receiver power is on and transmitter
power is off.
- Receiver is too far away from
transmitter.
- Receiver and transmitter are not on
same channel.
- Loud sounds are transmitting.
Hint: If you turn receiver power on before transmitter power, you will hear a static
noise and all five bars in variable light display light.Simply turn volume down and turn
transmitter power on.
7
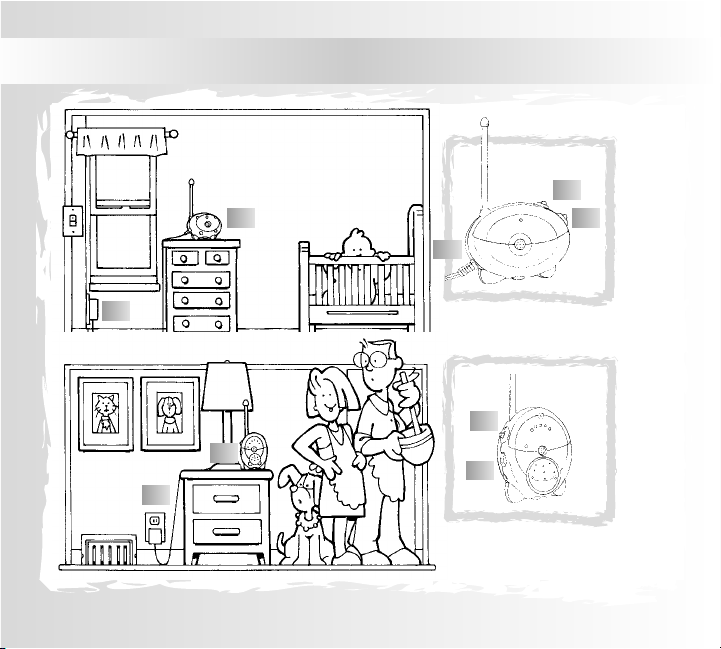
Setup and Use
8
1
4
3
1
7
3
2
6
5

Setup and Use
IMPORTANT! Test sound reception of this monitor before first time use and
whenever you change location of transmitter (see page X).
Set transmitter channel switch to same channel as receiver.
Place transmitter in same room with child. Point microphone directly toward
crib or play area.
Unwrap and fully extend AC adaptor cord for best transmission.
Insert AC adaptor jack into transmitter socket and plug into wall outlet.
Slide transmitter on/off switch to turn power on. Power indicator lights.
Place receiver where you will see or hear it.
Unwrap and fully extend AC adaptor cord for best reception.Insert AC adaptor
jack into receiver socket and plug into wall outlet.
Note: To use a 9V alkaline battery for power source, refer to “Receiver Battery
Installation”instructions on this page.
Rotate receiver on/off/volume dial to turn power on.Power indicator lights.
Rotate on/off/volume dial to adjust volume
.
1
2
3
4
5
6
7
9

Problems and Solutions
1
Circuit Breaker
10
2
6
2
1
2
3
5
4
“Ma, Mah,
Da, Da…”
BUZZZZ
BUZZZZZ
BUZZZZZ
 Loading...