

Page 1
PIIWER EXPRESS
ffi WARNING:
CHOKINGHAZARD-Smallparts.
.iI TRill. SETTM
Notforchildrenunder3years.
PLEASE KEEP THESE INSTRUCTIONS FOR FUTURE REFERENCE AS THEY CONTAIN IMPORTANT INFORMATION.
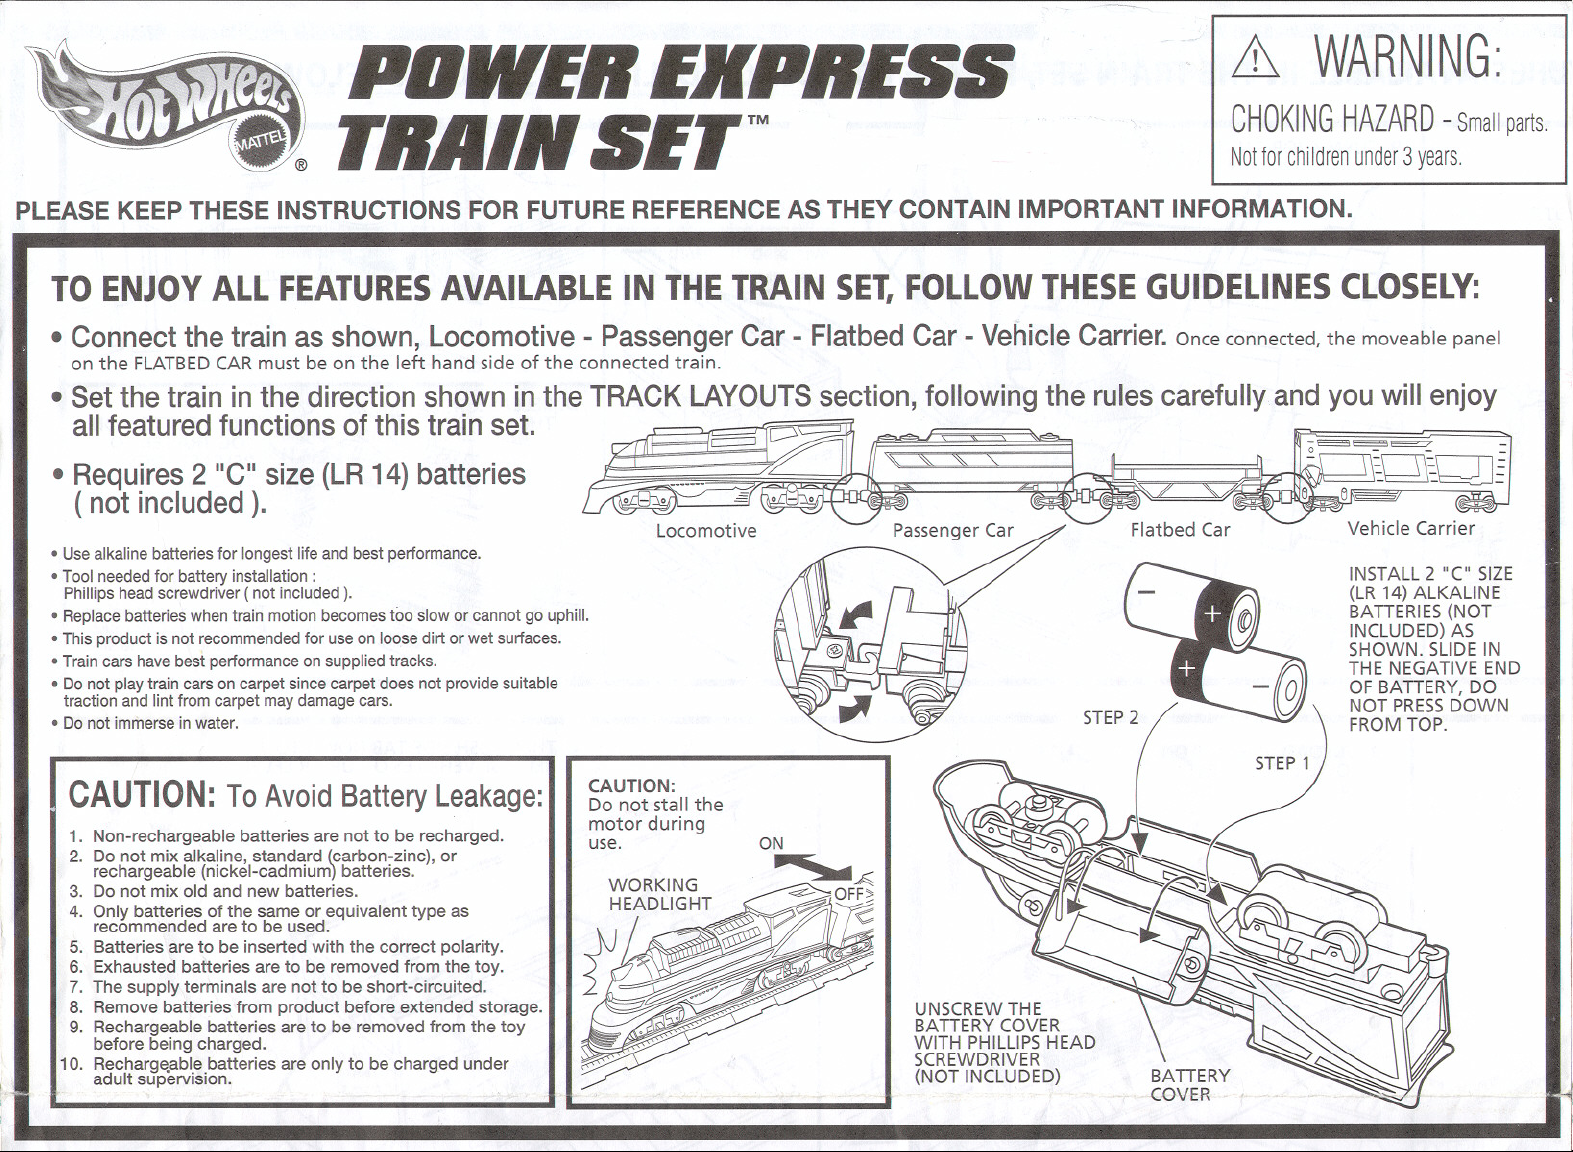
TOENJOYALLFEATURESAVAILABLEIN THETRAINSET,FOLLOWTHESEGUIDELINESCLOSELY:
. Connectthetrainas shown,Locomotive- PassengerCar- FlatbedCar - VehicleCarrier.Once connected, the moveable panel
on the FLATBEDCARmust be on the left hand side of the connected train.
.SetthetraininthedirectionshownintheTRACKLAYOUTSsection,followingtherulescarefullyandyouwillenjoy
( notincluded). 0 - 0 ~ 0 - 0 '"/ ,,~ e e =
. Requires2 "C"size (LR14)battenes - = ~ ~ ~ \l=kJiJ
allfe~turedfunC~ionsofthis train ~et. ~~ ' "' ,,' ~~~~ =
0 Usealkaline batteries for longest lifeand best performance.
0 Tool neededfor battery installation:
Phillips head screwdriver ( not included ).
0 Replace batteries when train motion becomes too slow or cannot go uphill.
0 This product is not recommended for use on loose dirt or wet surfaces.
0 Train cars have best performance on supplied tracks.
0 Do not play train cars on carpet since carpet does not provide suitable
traction and lint from carpet may damage cars.
0 Donot immerse inwater.
Locomotive Passenger Car ~ Flatbed Car Vehicle Carrier
INSTALL2 "(" SIZE
(LR 14) ALKALINE
BATTERIES(NOT
INCLUDED)AS
SHOWN. SLIDE IN
THE NEGATIVE END
OF BATTERY, DO
NOT PRESS DOWN
FROM TOP.
CAUTION:ToAvoidBatteryLeakage:
1. Non-rechargeable batteries are not to be recharged.
2. Do not mix alkaline, standard (carbon-zinc), or
rechargeable (nickel-cadmium) batteries.
3. Do not mix old and new batteries.
4. Only batteries of the same or equivalent type as
recommended are to be used.
5. Batteries are to be inserted with the correct polarity.
6. Exhausted batteries are to be removed from the toy.
7. The supply terminals are not to be short-circuited.
8. Remove batteries from product before extended storage.
9. Rechargeable batteries are to be removed from the toy
before being charged.
10. Recharg~abl.e.batteries are only to be charged under
adult supervision.
CAUTION:
Do not stall the
motor during
use.
Page 2
@D' ~
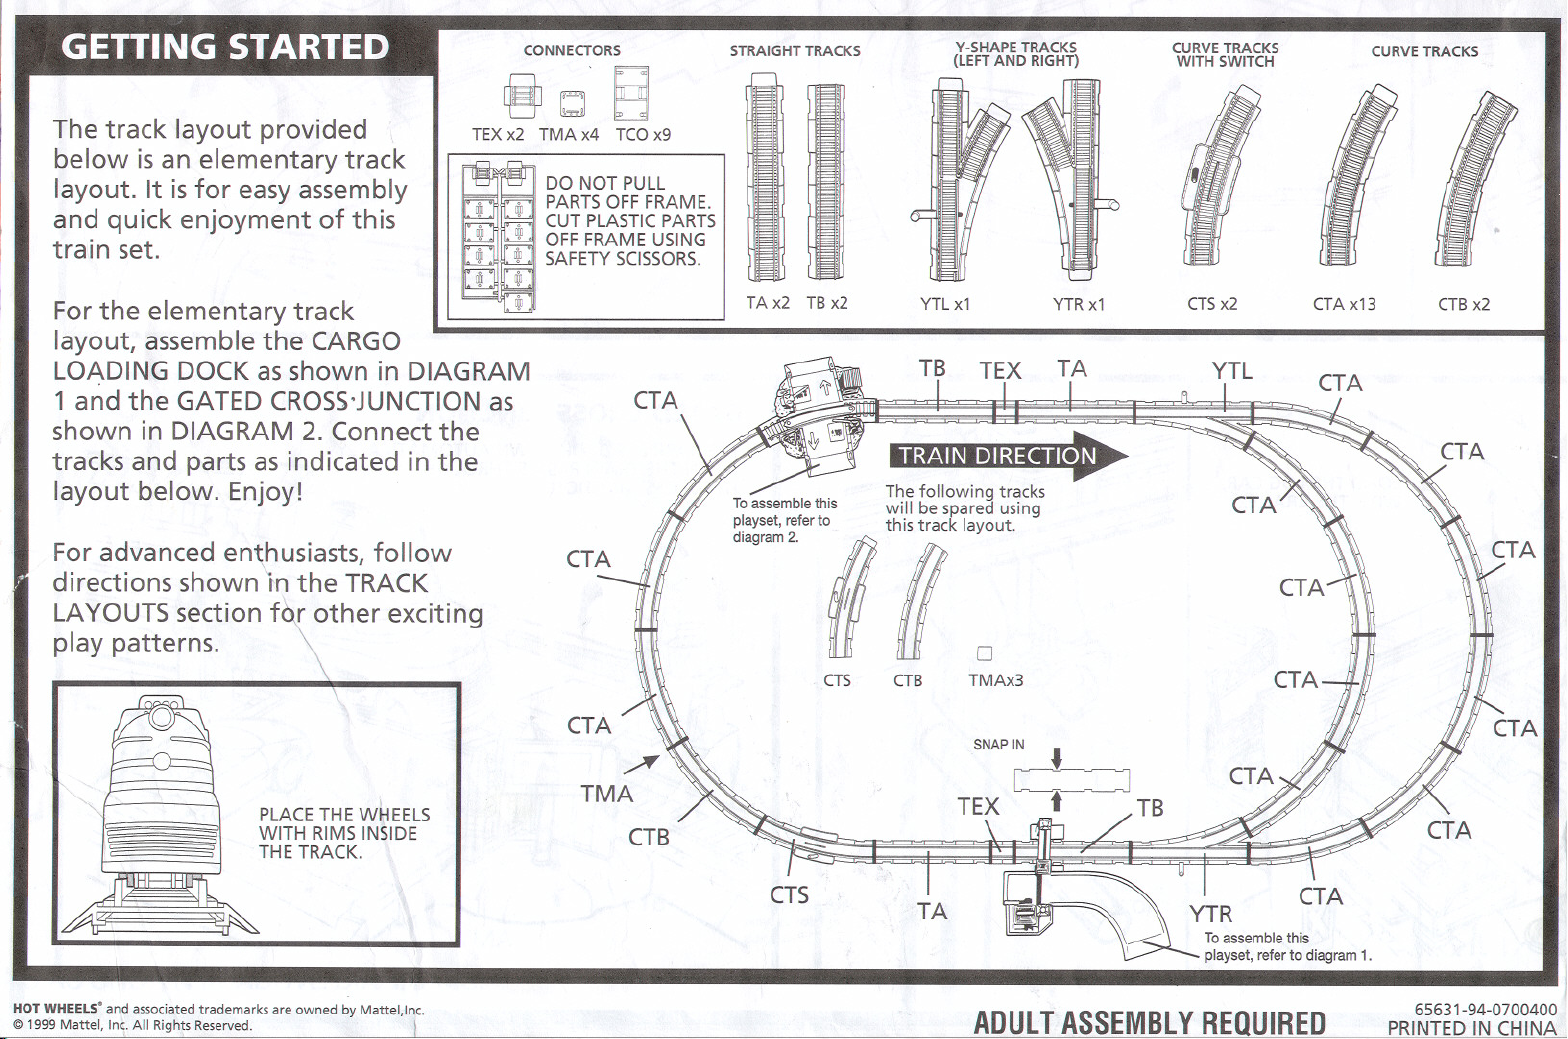
The track layout provided \
below is an elementary track
layout. It isfor easy assembly
and quick enjoyment of this
train set.
For the elementary track
layout, assemble the CARGO
LOADINGDOCKas shown in DIAGRAM
1 and the GATEDCROSS'JUNCTIONas
shown in DIAGRAM2. Connect the
TEXx2 TMAx4 TeD x9
'
@'PARTSOFFFRAME.
: . CUTPLASTICPARTS
IIJI IIJI OFFFRAMEUSING
@ .@ SAFETY SCISSORS.
11
ffi
@--
CONNECTORS
DO NOT PULL
STRAIGHT TRACKS
TA x2 TBx2
V-SHAPE TRACKS
(LEFTAND RIGHT)
YTL x1 YTR x1
CURVETRACKS
WITH SWITCH
eTSx2
YTL
CURVETRACKS
CTA x13 CTBx2
tracks and parts as indicated in the
layout below. Enjoy!
For advanced enthusiasts, follow
directions shown 1n the TRACK
LAYOUTSsection f~ other exciting
play patterns.
I
PLACE THE WIjiEELS
WITH RIMS INSIDE
THE TRACK.
HOTWHEELS.and associated trademarks are owned by Mattel,lnc.
@ 1999 Mattei, In~.All Righ!s Reserved.!
CTS
CTS
~
The following tracks
will be spared using
this track layout.
0
TMAx3eTB
.,.
ADULTASSEMBLYREQUIRED
Toassemble this
playset, refer to diagram 1.
j
65631-94-0700400
PRINTED IN CHINA
Page 3
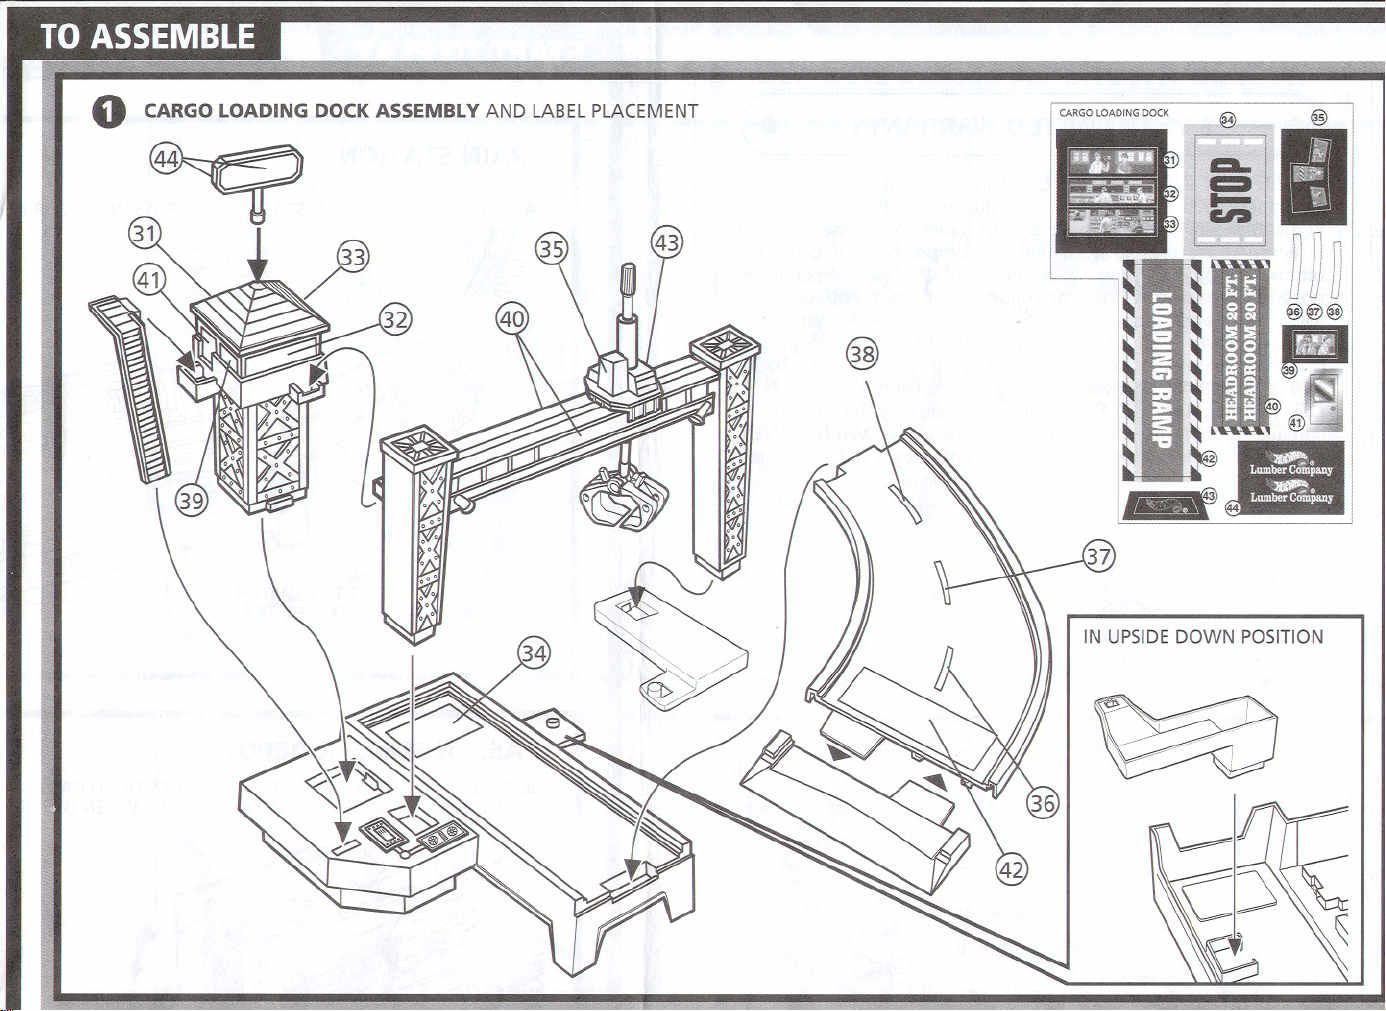
0 CARGOLOADINGDOCKASSEMBLY AND LABELPLACEMENT
IN UPSIDEDOWN POSITION
Page 4
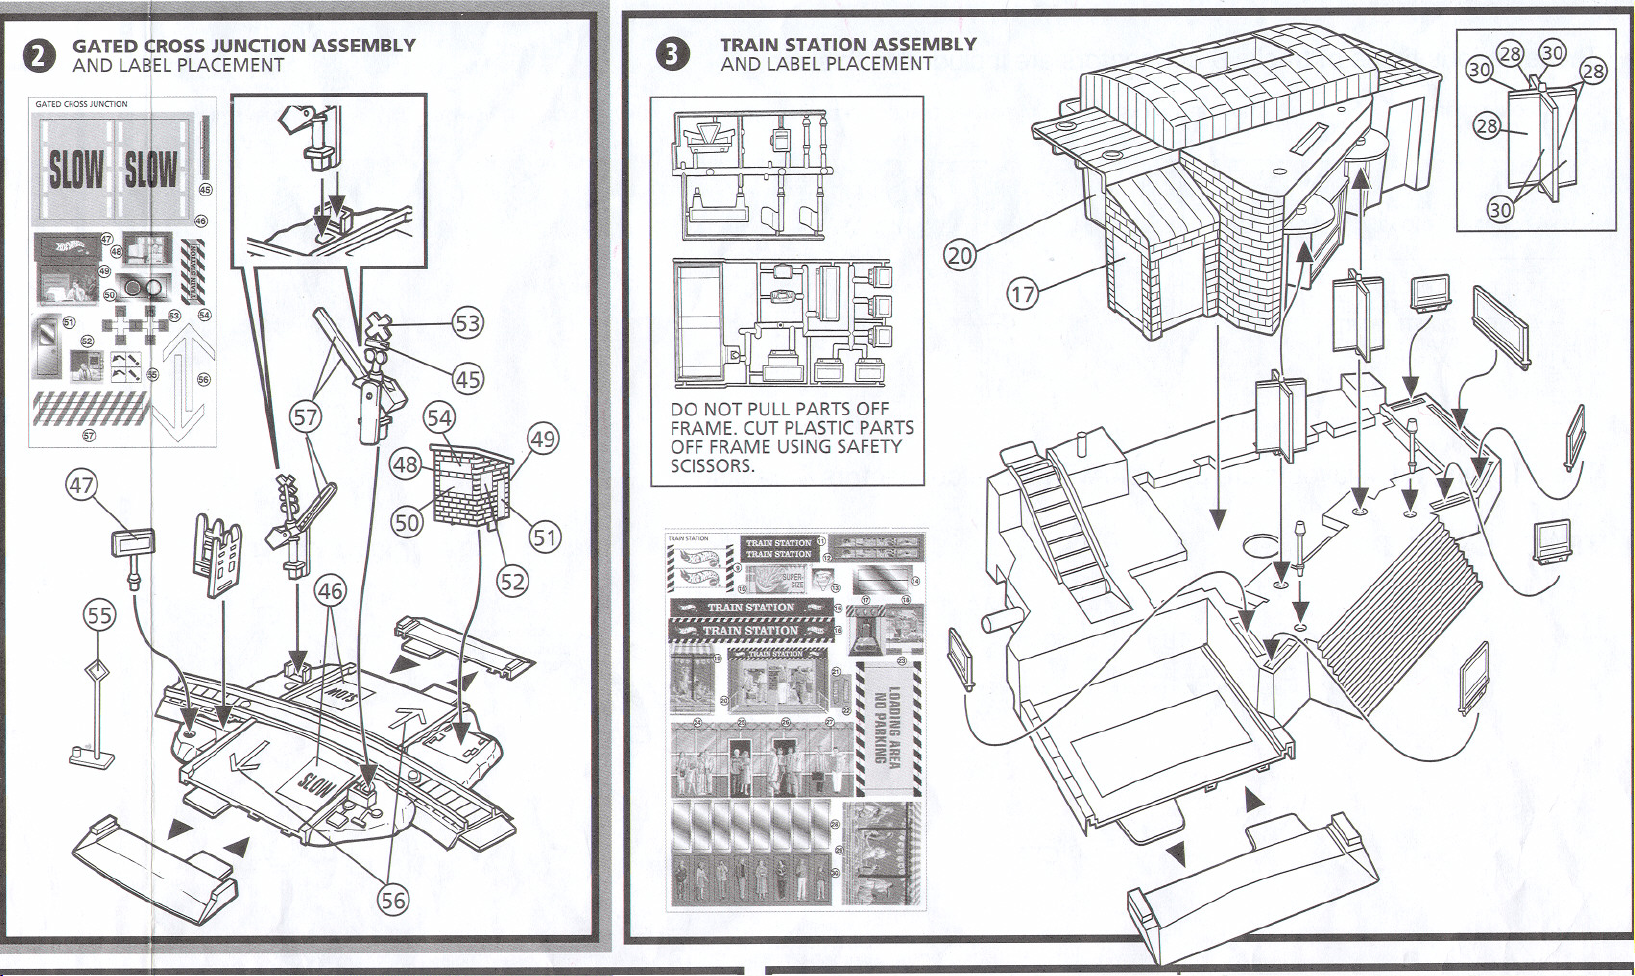
GATED <tROSS JUNCTION ASSEMBLY
AND LABELPLACEMENT
0
~
~
~
0
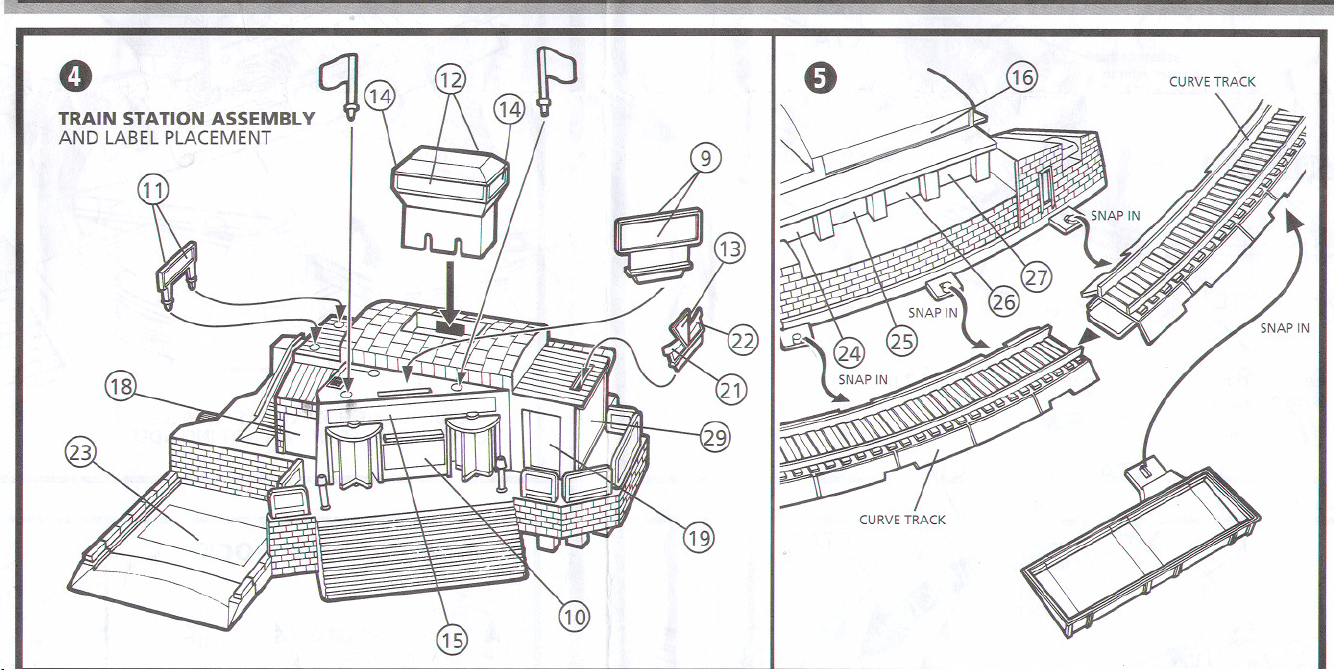
TRAINSTATIONASSEMBLY
AND LABELPLACEMENT
DO NOT PULLPARTS OFF
FRAME. CUT PLASTICPARTS
OFF FRAME USING SAFETY
SCISSORS.
.~ ~ '-'-~'-'-~--' "-"'--' '-'--'-' - -- ---
,~"''''''''
Page 5
-
V&.,,-',--'~""V&"""- . .,
~,-,.'~.. ..., , --,~,-
0 (](14
TRAIN STATION ASSEMBLY -~
AND LABELPLACEMENT
iiiP '-""-''"'~"k'"---'''''"-'~''''' ,.' ---"--"''''-'''-''rtTI/ff-'~-'-''.'''''''''-'' '" ""---'_111",..,.,,-
19
-., """""'-~-'--"""'" .,
Page 6
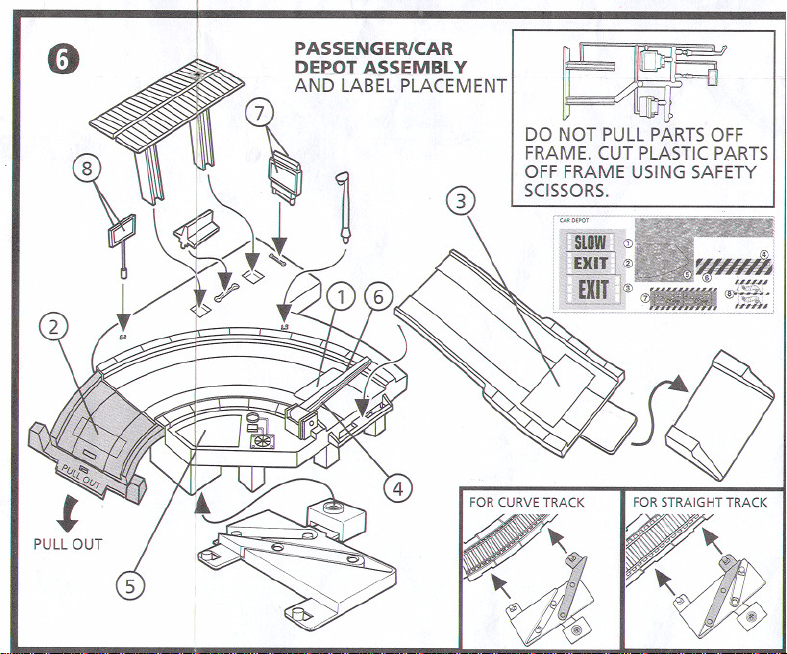
0
PULLOUT
~
DO NOT PULLPARTSOFF
FRAME. CUT PLASTICPARTS
OFFFRAME USINGSAFETY
SCISSORS.
Page 7
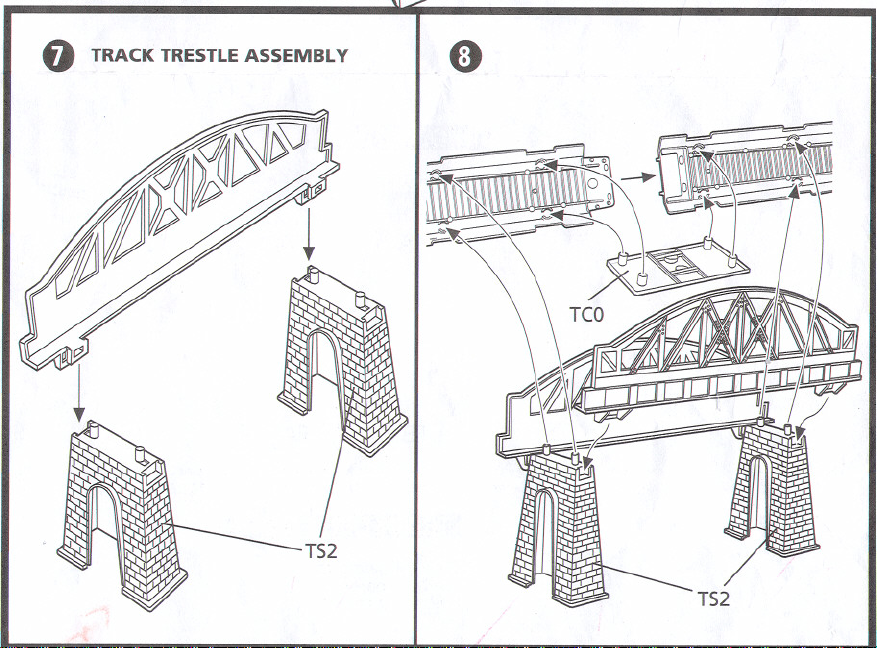
0 TRACK TRESTLEASSEMBLY
TS2
0-
Page 8

A TRACK SUPPORT
U ASSEMBLY
TEX
"1...
Page 9

~
~
nnn
T52x2
.T53x2
T(O+ T56 TCO+T55
-TCO+ T54
TCO+T53
Page 10

nn.
T54x2T55x2 T56x2
o,
@
TEXx2 TMAx4 Teax9
D
-
Page 11

a:\ ACCESSORIES
'" ASSEMBLY
~
~
Page 12

TRACKLAYOUTS
Thesevarious types of tracks & connectors are included inthis set.
CONNECTORS STRAIGHTTRACKS
V-SHAPE TRACKS(LEFTAND RIGHn
@~
TEX x2 TMA x4 TCa x9
DO NOT PULL
iID PARTS OFFFRAME.
~ :. CUT PLASTICPARTS
IIJI. IIJI. OFF FRAME USING
@ .dp SAFETY SCISSORS.
~m
$-
TAx2
The following track layouts are possible with these connectors ~tracks.
TB x2 VTL x1 VTR x1
CURVETRACKSWITH SWITCH
CTSx2
CTA x13
CURVE TRACKS
CTBx2
Page 13

TRACK LAYOUT 1
eTS
TB
TMA
+ TB
,
To assemble this
playset, refer to
diagram6.
To assemble this
playset, refer to
diagram 2.
SNAP IN
fl
The following tracks
will be spared
this track layout.
using
0 0
CTBx2TEXx2 TMAx2
TA
YTL
To assemble this
playset, refer to
diagram 3-5.
eTA
SNAPIN
Page 14

TRACK LAYOUT 2
To assemble this
playset, refer to
diagram6.
t
eTA
eTS
To assemble this
playset, refer to
diagram 3-5.
T8
The following tracks
will be spared using
this track layout.
YTL
T
P
deTA
0
CT8x2
TMAx4
SNAPIN
TEX~
+ -fl.
eTS
To assemble this
playset, refer to diagram 1.
NOTE:TOMAXIMIZETHEPERFORMANCEOFTHETRAINSET,PLEASEFOllOW GUID
Page 15

TRACK LAYOUT 3
this
to
~~~
51"
eTA
I
TA
The following tracks
will be spared using
this track layout.
- 0
CTBx2
CTAx4 TMAx4
YTR
CTA
SNAP IN
To assemble this
playset, refer to
diagram 1.
!
Wassemble this
playset, refer to
diagram2.
1
f
TA
YTL
To assemble this
playset, refer to
diagram 3.5.
CTS
CTS
""'"
Page 16

TRACK LAYOUT 4
(This laylt involves Track Supporters and Bridge Fences, please refer to DIAGRAMS7 through 1~
from As
MBLE <ed;on 10' deta;1 a«embly.)
CA
. YTL CTA CTA
r
,,, / playset, refer to
Toassemble this
diagram 2.
~
CT1\ IC
~
"~\
~f
CTA
DELINESANDTRAINDIRECTIONSASSHOWNINABOVEDIAGRAMS.
~
~~ CTS
SNAPIN
1
TMA
To assemble this
playset, refer to
diagram 6.
Page 17

STARTTO PLAY.. TO ENJOY ALL FEATURES AVAILABLE IN THE TRAIN SET, PLEASE FOLLOW GUIDELINE
TRAIN STATION
A. TRAIN STOP FOR TRAIN STATION AND PASSENGER/CAR DEPOT.
SLIDETHE SWITCH
TO STOP THE TRAIN.
B. TURN KNOB ON TRAIN STATION TO DRIVECONVEYOR BELT.
--"""
Page 18

IESASSHOWNBELOW.
c. TURNTHESWIVELDOOR.
J
PRESSBUTTON ON
LOGTRAILERTO
'" RELEASELOGS
TO LOG CONTAINER.
(The
moveable panel on
the FLATBEDCAR must
be on the left hand side
of the connected train.)
Page 19

PASSENGER/CAR DEPOT
A. PULLDEPOTARM OUT UNTIL IT REACHESTRAIN CAR GATE.
THE BARRIERRAISESUP AUTOMATICALLY WHEN DEPOT
ARM PULLSOUT.
B. UNLOAD VEHICLES ON
LOWER LEVEL FIRST.
---
INCLUDES ONE HOT WHEELS@VEHICLE.
OTHER VEHICLES SHOWN NOT INCLUDED.
"\ "I
Page 20

c. THENPUSHSIDETAB DOWN TO
RELEASEVEHICLESON UPPERLEVEL.
Page 21

CARGO LOADING DOCK.
A. TRAIN STOP FOR CARGO
LOADING DOCK.
SLIDETHE SWITCH
TO STOP THE TRAIN.
c. PRESSTO RELEASECRANE.
, ..
B. LOADTHELOGCAR
WITH THE CRANE.
Page 22

GATI;D CROSS JUNCTION
THEBARRIERSDROP DOWN AUTOMATICALLY
WHEN THE TRAIN PASSESTHROUGH
THE CROSS JUNCTION.
Page 23

2 YEAR LIMITEDWARRANTY
~
ARCOTOYS, INC., A MatteI Company, warrants to the original
consumer purchaser that this toy product will be free from defects
in material or workmanship for 2 years (unless otherwise specified
in alternate warranties) from the date of purchase. If defective,
return the product along with proof of the date-of-purchase,
postage prepaid, to Consumer Adjustment Center, ARCOTOYS,
INC., A MatteI Company, C.S. #9008, Crossways Park West,
Woodbury, New York 11797 for replacement or refund at our
option, or you may phone us toll-free at 1 (800) 442-2664,
Monday thru Friday between the hours of 10:00 A.M. - 5:00 P.M.
EST (7:00 A.M. - 2:00 P.M. PST). This warranty does not cover
damage resulting from accident, misuse or abuse. VALID ONLY
IN U.S.A. This warranty gives you specific legal rights and you
may also have other rights which vary from state to state. 03
~
 Loading...