

Page 1
CAR WASH
Move vehicle through car wash.
This product is not recommended for use on loose dirt or wet surfaces.
•
ALKALINE BATTERIES RECOMMENDED:
For longer life use only alkaline batteries.
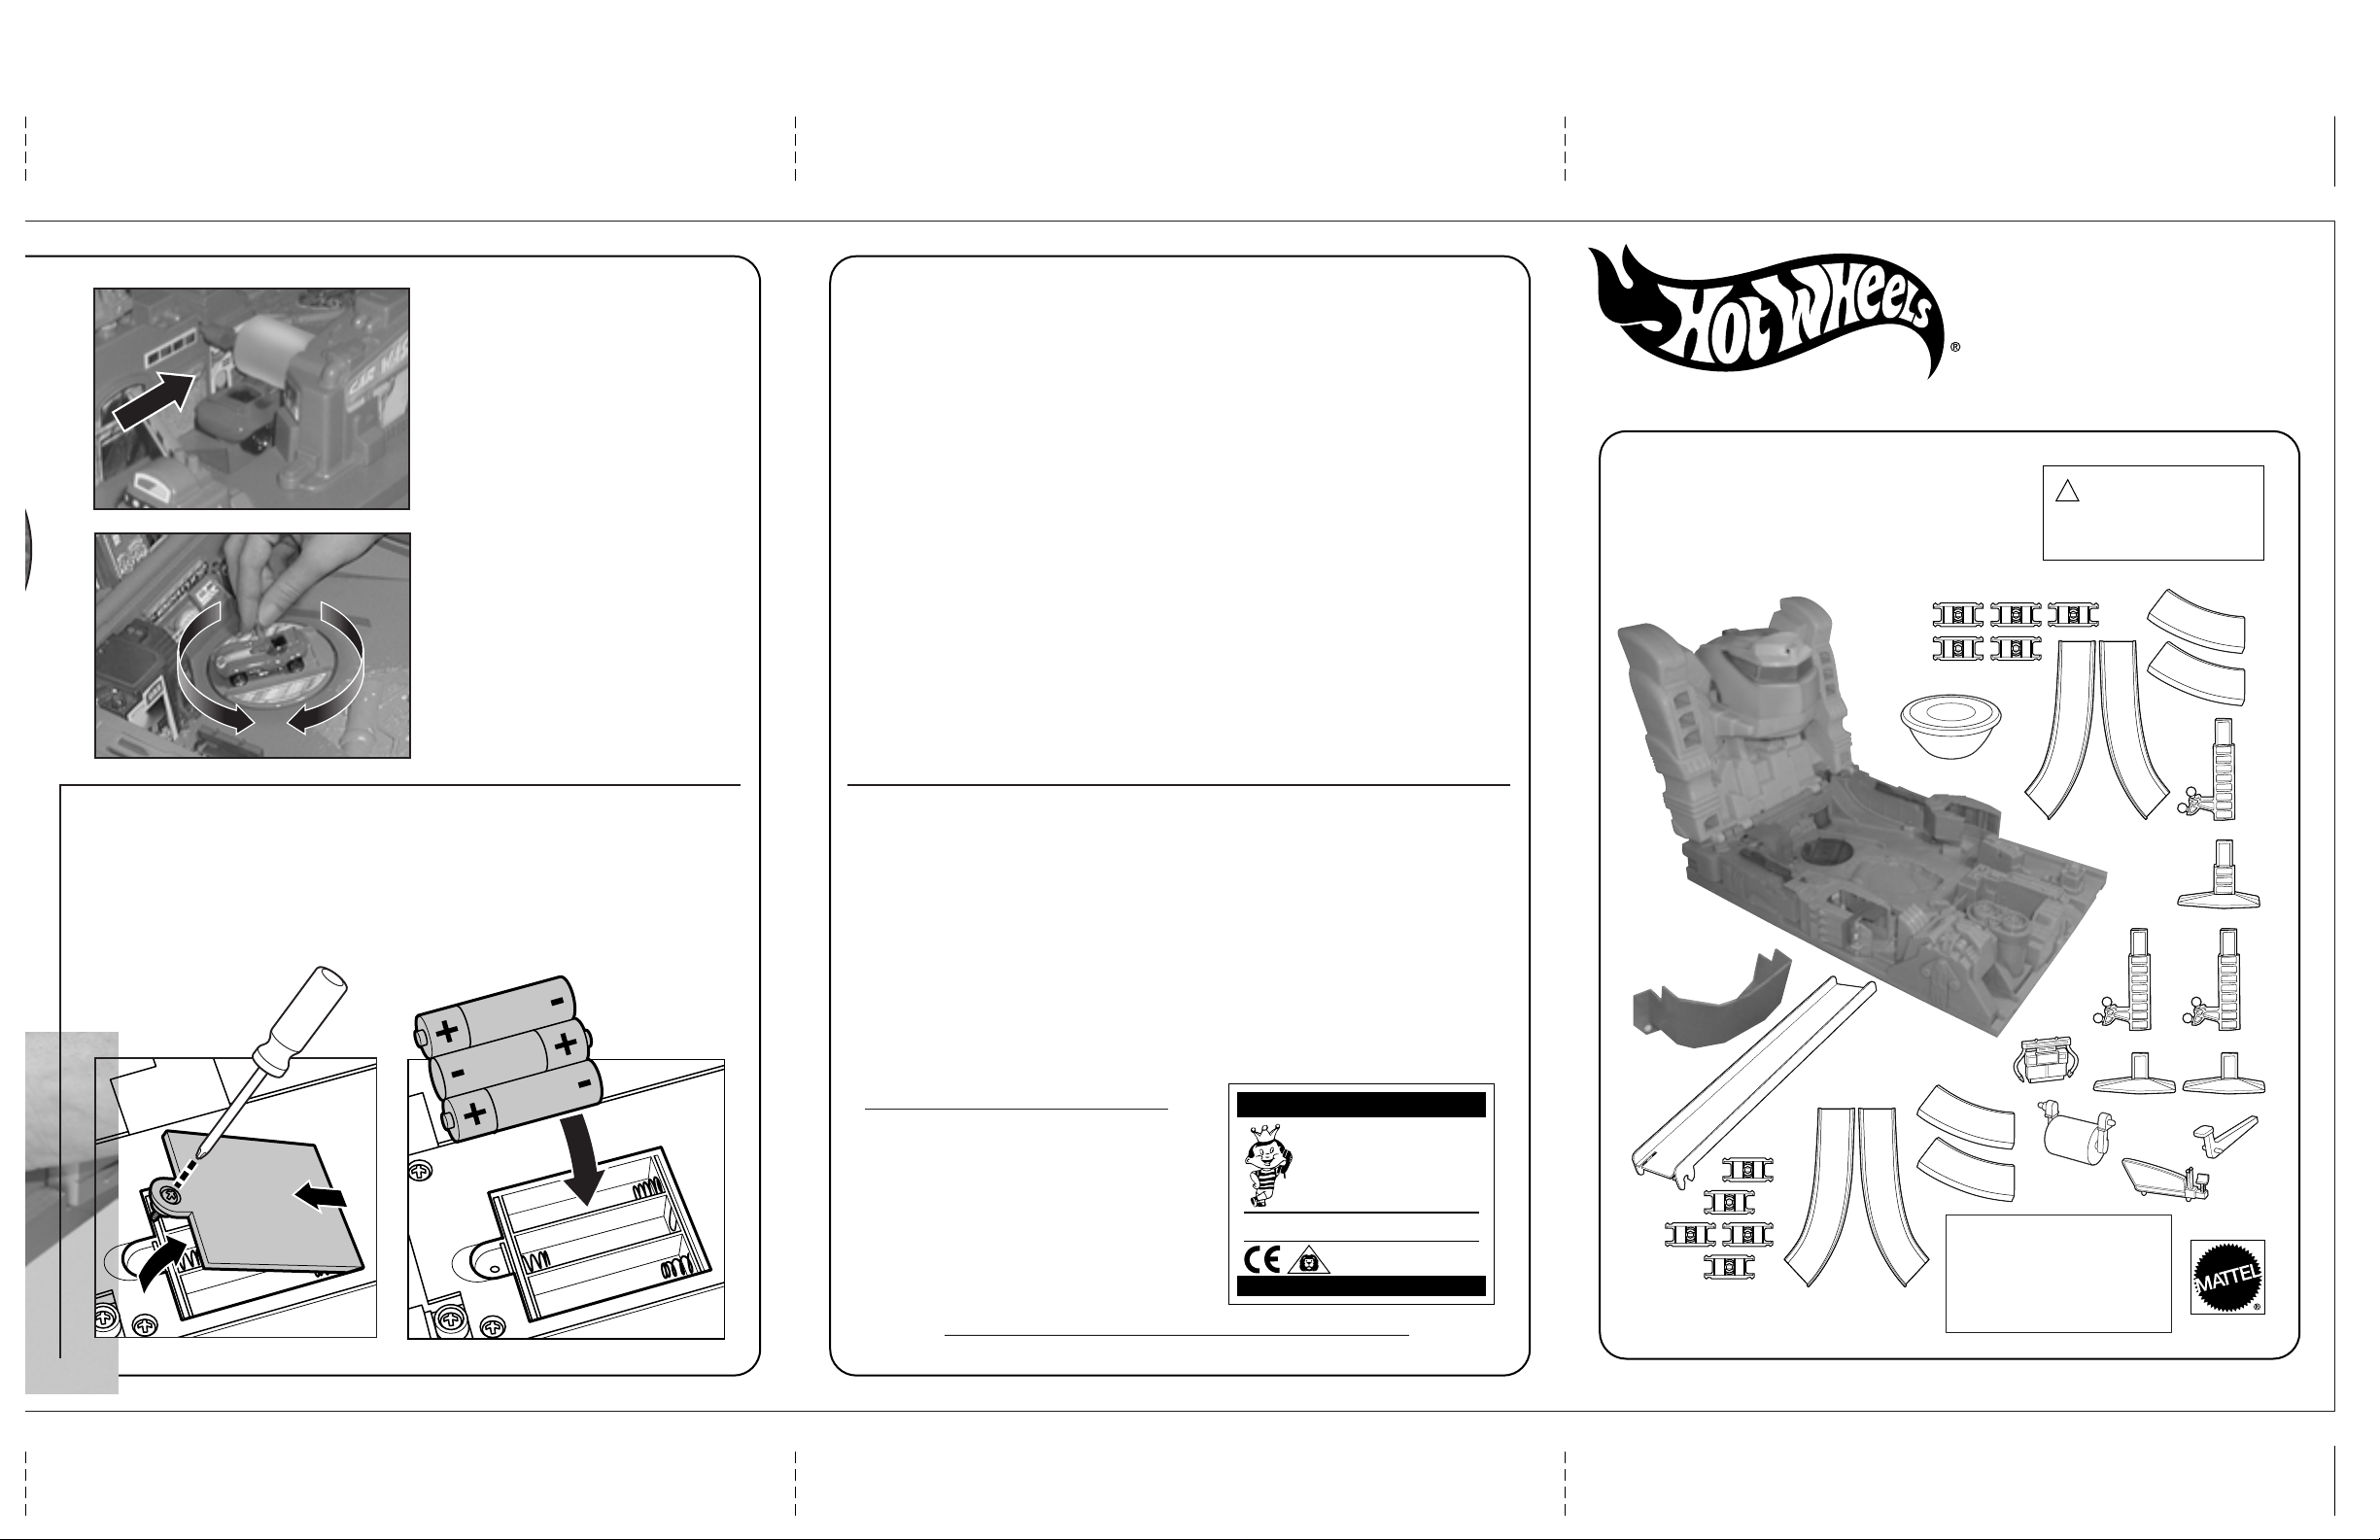
CYBORG
TM
CITY
Playset
REPLACE BATTERIES
Batteries should be changed
when the robot voice sounds
scratchy or intermittent and
cannot be understood.
Remove screw and
battery cover (located
underneath base of
playset).
TURNTABLE
Turn vehicle around in tune-up center.
Install three “AA” size batteries
as shown. Replace battery
cover and screw.
BATTERY SAFETY INFORMATION:
1. Non-rechargeable batteries are not to be recharged.
2. Rechargeable batteries are to be removed from the toy before being
recharged.
3. Rechargeable batteries are only to be charged under adult supervision.
4. Do not mix alkaline, standard (carbon-zinc), or rechargeable (nickel-cadmium)
batteries.
5. Do not mix old and new batteries.
6. Only batteries of the same or equivalent type as recommended are to be used.
7. Batteries are to be inserted with the correct polarity.
8. Exhausted batteries are to be removed from the toy.
9. The supply terminals are not to be short-circuited.
10. Dispose of batteries safely. Do not dispose of in a fire as the batteries may
explode or leak.
11. Products with non-replaceable batteries are not to be disposed of in a fire as
the batteries inside may explode or leak.
2-YEAR LIMITED WARRANTY
Mattel, Inc. warrants to the original consumer purchaser that this product will be
free of defects in material or workmanship for two years (unless specified in
alternate warranties) from the date of purchase. If defective, return the product
along with proof of the date of purchase, postage prepaid, to Consumer
Relations, 636 Girard Avenue, East Aurora, New York 14052 for replacement or
refund at our option. This warranty does not cover damage resulting from
unauthorized modification, accident, misuse, or abuse. In no event shall we be
responsible for incidental, consequential, or contingent damages (except in those
states that do not allow this exclusion or limitation). Valid only in U.S.A. This
warranty gives you specific legal rights and you may also have other rights which
vary from state to state. Some states do not allow the exclusion of incidental or
consequential damages, so the above
limitations may not apply to you.
CONSUMER INFORMATION
Send only the product to the address
above. Send all correspondence to
Consumer Relations, Mattel, Inc., 333
Continental Blvd., El Segundo, California
90245-5012, U.S.A.
Or you may phone us toll-free at
1-800-524-TOYS, Monday–
Friday, 8:00 a.m.–6:00 p.m. Eastern Time.
Outside U.S.A., see telephone directory
for Mattel listing.
Mattel U.K. Ltd., Vanwall Business Park, Maidenhead SL6 4UB. Helpline 01628500303.
Mattel Australia Pty. Ltd., Richmond, Victoria 3121.
Consumer Advisory Service 1800 800 812 (valid only in Australia).
YOU CAN TELL IT’S MATTEL!™ Call us toll-free
or write with any comments or questions about
our products or service. Monday–Friday, 8:00
a.m–6:00 p.m. Eastern Time. Outside U.S.A., see
telephone directory for Mattel listing. Consumer
Relations, Mattel, Inc., 333 Continental Blvd., El
Segundo, CA 90245 U.S.A.
MATTY MATTEL™ toys
1 (800) 524-TOYS
CONFORMS TO THE SAFETY
REQUIREMENTS OF ASTM F963.
We are dedicated to quality products.
INSTRUCTIONS
CONTENTS:
Batteries included are for demonstration
purposes only. Includes 3 “AA” size batteries.
Requires 2 “D” batteries, not included.
Vehicles shown not included.
Keep these instructions for future reference
as they contain important information.
© 2001 Mattel, Inc. El Segundo, CA 90245 U.S.A. All Rights Reserved.
!
WARNING:WARNING:
CHOKING HAZARD – Small parts.
Not for children under 3 years.
29423-0920
LABELS
Ages 4 and Up
Page 2
1.
0
2.
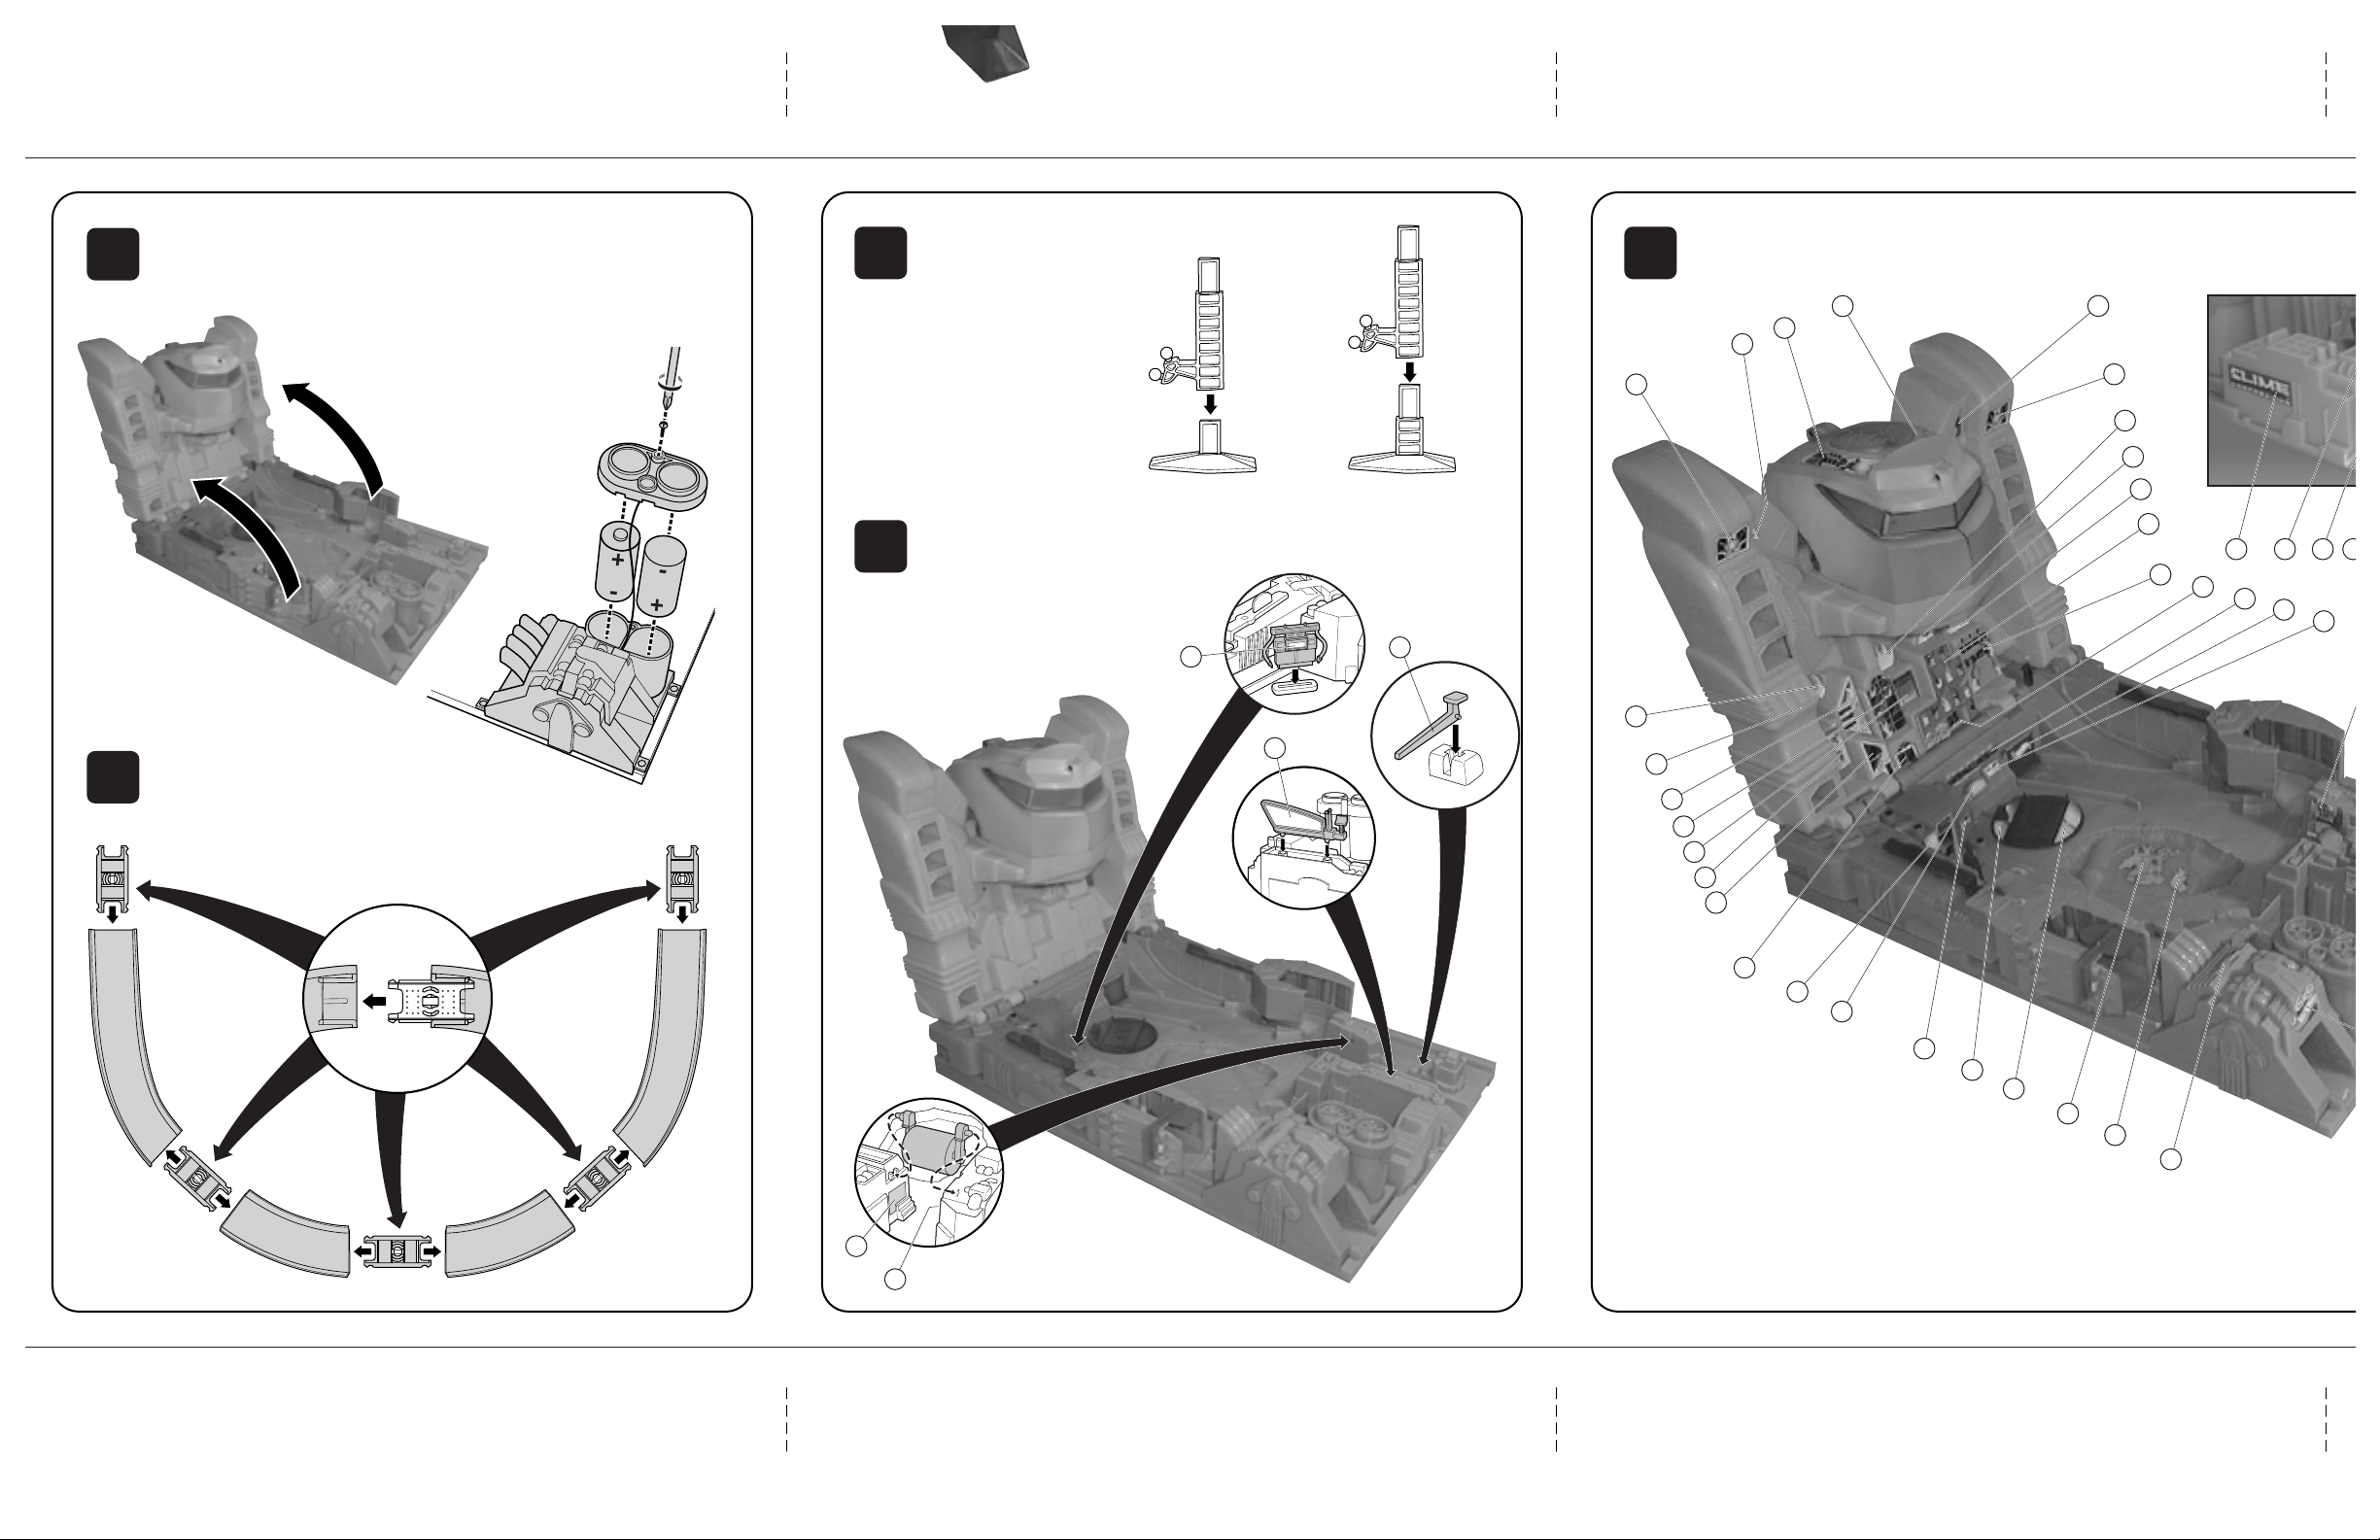
OPEN SET & INSTALL BATTERIES
Remove screw and battery cover. Install two
“D” size batteries (not included) as shown.
Replace battery cover and screw.
Batteries should be
changed when the power
booster cannot propel
cars through the set.
ASSEMBLE CURVES
Assemble
sections of track as shown.
2 of these curve
3.
4.
ASSEMBLE
TRESTLES
Assemble trestles as shown.
2 SMALL TRESTLES
(FRONT CURVE SECTION)
ASSEMBLE PARTS
Install labels before assembling parts.
See diagram #5 for more details.
7
1 LARGE TRESTLE
(REAR CURVE SECTION)
5
5.
15
32
50
APPLY LABELS
45
9
23
8
16
19
1
49
46
9
31
14
21
22
35
2
34
48
4
30
4
375
39
BOTTOM
VIEW
17
33
6
47
43
43
13
11
20
41
27
Page 3

7.
ASSEMBLE REAR OF PLAYSET
Attach one large trestle to assembled curve section as shown.
Connect curve section to rear of playset.
Snap vehicle ramp into place as shown below. Load up to three vehicles (not included) onto ramp.
Snap vehicle catcher into place as shown.
Turn power switch to "ON" position.
Store additional vehicles (not
included) in rear
compartments.
8.
ADD COMPOUND
TO PLAYSET
Remove wrapping from
container. Remove lid
and pour compound
into playset as shown.
When finished playing,
return compound to
original container and
close lid tightly.
40
36
36
27
24
26
4137
3
44
6.
12
29
INSTALL FRONT
38
1825
VEHICLE STORAGE
COMPARTMENTS
VEHICLE
CATCHER
CURVE
Attach two small trestles as shown.
Connect one assembled curve section
to front of playset.
42
TRESTLE
TO TRACK
10
CONNECTION
VEHICLE RAMP
TRESTLE
TO TRACK
CONNECTION
The compound may stain or stick to some surfaces.
•
Protect play area before use.
To remove stains, hand-wash with laundry detergent
•
and warm water.
SAFETY TESTED.
•
GENTLE.
•
OPTIONAL LOW WALL
TRACK CONNECTION
(TRACK NOT INCLUDED)
TRY ME
BUTTON
POWER SWITCH
MODES: ON / OFF / TRY ME
Page 4

LAUNCH VEHICLETO PLAY:
C
CAPTURE VEHICLE
TRY ME
BUTTON
POWER SWITCH
MODES: ON / OFF / TRY ME
PLACE
VEHICLE HERE
Turn both power switches to ON position. One is on the
back of playset and the other is on the power booster.
Place vehicle (not included)
in front of booster.
Push vehicle through
power booster in
direction shown.
POWER BOOSTER
ON/OFF SWITCH
DIVERT VEHICLE INTO SLIMETM PIT
Move lever on right arm to divert vehicle into Slime pit.
A. Close small gate at end of right arm to “capture” vehicle.
B. Lift right arm by pushing down on lever as shown. Cyborg’s
mouth opens to “swallow” vehicle. If Cyborg’s mouth does not
open to “swallow” vehicle when right arm is
raised, lift open mouth manually and let it
close. Then try again.
C. Retrieve vehicle from back of set.
C
AA
B
SLIME PIT
LEFT DIVERTER ARM
Add more vehicles to the launch ramp at
rear of playset. Move lever as shown to
divert vehicle through door. As vehicle
disappears through door a new vehicle is
launched from the ramp.
TOLL GATE
Lift toll gate to pass vehicle through.
 Loading...