

Page 1
INTEGRATED
REFRIGERATOR & FREEZER
INTEGRATED REFRIGERATOR
RS2484S, RS2484SH, RS084SH & RS084S
INTEGRATED FREEZER
RS1884F, RS2484F & RS084F
USER GUIDE
US CA
Page 2

Page 3

CONTENTS
Safety and warnings 4
Integrated refrigerator & freezer 9
Before you begin 10
Control panel — Refrigerator 11
Control panel — Freezer 12
Food modes 13
Storage features 15
Special features 16
WIFI connection 17
Using your appliance 18
Care and cleaning 23
Food care 26
User warnings and sounds 27
Troubleshooting 28
Service & warranty 31
Registration
To register your product visit our website: fisherpaykel.com/register
3
Page 4
SAFETY AND WARNINGS
!
WARNING!
Electric Shock Hazard
Failure to do so can result in death, electric
shock, fire or injury to persons.
• Read and follow the safety and warnings
outlined in this user guide before operating this
appliance.
!
WARNING!
This appliance contains flammable
refrigerant isobutane (R600a).
4
Page 5

SAFETY AND WARNINGS
READ AND SAVE THIS GUIDE
WARNING!
Read entire manual. Failure to follow all guides and rules could cause personal injury or
property damage. When using this appliance, always exercise basic safety precautions
including thefollowing:
General Use
z
This product has been designed for use in a normal domestic (residential) environment.
z
Children should be supervised to ensure that they do not play with the appliance.
z
Cleaning and user maintenance shall not be undertaken by children without supervision.
z
This appliance can be used by children aged from 8years and above and persons
withreduced physical, sensory or mental capabilities or lack of experience and
knowledge if they have been given supervision or instruction concerning use of
theappliance in a safe way and understand the hazards involved.
z
The manufacturer’s installation instructions for product and cabinetry ventilation
mustbe followed when installing the appliance.
z
To avoid hazard due to instability of the appliance, it must be fixed in accordance
withinstallation instructions.
z
Keep ventilation openings, in the appliance enclosure or the built-in structure,
clearofobstruction.
z
Do not use mechanical devices or other means to accelerate the defrosting process,
other than those recommended by the manufacturer.
z
Do not damage the refrigerant circuit.
z
In case of damage to the refrigerant circuit, ventilate the area by opening all windows.
z
Do not operate electrical equipment or any other equipment that may produce arcs,
sparks or flames in the area. Contact your Fisher & Paykel trained and supported
service technician immediately to arrange for the appliance to be repaired.
z
It is hazardous for anyone other than an fisher & paykel trained and supported service
technician to service thisappliance.
z
Connect to potable water supply only
z
This refrigerating appliance is intended to be used at ambient temperatures ranging
from 61 °F (16 °C) to 109 °F (43 °C).
Electrical
z
This appliance must be installed in accordance with the installation instructions before
use.
z
To allow disconnection of the appliance from the supply after installation, incorporate a
switch in the fixed wiring in accordance with the wiring rules.
z
Never unplug your refrigerator by pulling on the power cord. Always grip the plug
firmly and pull straight out from the outlet.
z
Do not plug in any other appliance at the same power point as your refrigerator or use
extension cords or double adapters.
z
Repair or replace immediately all electric service cords that have become frayed or
otherwise damaged. Do not use a cord that shows cracks or abrasion along its length or
at either the plug or appliance end.
z
If the power supply cord is damaged, it must only be replaced by your Fisher & Paykel
trained and supported service technician because special purpose tools are required.
z
When moving your appliance away from the wall, be careful not to roll over or damage
the power cord.
5
Page 6

SAFETY AND WARNINGS
z
WARNING: Do not use electrical appliances inside the food storage compartments of
the appliance, unless they are of the type recommended by the manufacturer.
z
When positioning the appliance, ensure the power cord is not trapped or damaged.
z
Do not locate multiple portable socket-outlets or portable power supplies at the rear of
the appliance.
Food safety
z
Regularly clean accessible draining systems and surfaces that come in contact with
food.
z
Ensure any raw meat or fish is stored in sealed containers to prevent crosscontamination.
z
Immediately clean any drips or spills on surfaces.
z
If the appliance will be left empty for long periods, switch off, defrost, clean, dry, and
leave the door open to prevent mould developing within the appliance.
z
Opening the door for long periods can cause a significant increase of the temperature
in the compartments of the appliance.
Storing food and drinks/wine
z
Do not store explosive substances such as aerosol cans with a flammable propellant
inthis appliance.
z
Never store volatile or flammable materials in your appliance as they may explode.
z
Never freeze liquids in glass containers. Liquid expands during freezing, which may
cause the container to explode.
z
Never freeze carbonated drinks. They may explode.
Servicing
z
Your refrigerator is designed to operate for many years without the need for service
checks. However, if your refrigerator is malfunctioning, have it attended to by your
Fisher & Paykel trained and supported service technician as soon as possible. All
electrical repairs must be carried out by an adequately trained service technician or
qualified electrician.
z
The LED light cannot be serviced by the user. Contact your Fisher & Paykel Dealer or
Fisher & Paykel trained and supported service technician.
z
If you suspect that the product is not getting cold — items such as ice cream are
melting— remove all perishable food and store in another appliance or cooler to prevent
spoilage. Immediately call for a service technician.
Cleaning
z
Use mild dish-washing liquid with warm water and a lint-free cloth to clean the product.
z
Avoid using anti-bacterial cleaning products on either the interior or exterior
of the cabinet as they may cause rusting of metal components and cracking of
plasticcomponents.
Disposal
z
Extreme care must be taken when disposing of your old appliance to avoid hazards:
z
The flammable refrigerant gas must be safely removed by a qualified servicetechnician.
z
The thermal insulation foam in this appliance may contain flammable insulationblowing
gases, any exposed foam may be highly flammable andmustbe carefully treated
during disposal.
6
Page 7

SAFETY AND WARNINGS
z
WARNING: Risk of child entrapment. Before you throw away your old refrigerator or
freezer, the doors and panels should be removed and the racks left in place so that
children may not easily climb inside.
z
Consult your local energy authority or local codes as to the best way to dispose ofyour
old appliance.
Water connection
z
The water connection to your Ice & Water refrigerator must be installed by an
authorised plumber or Fisher & Paykel trained and supported service technician and
comply with all state and local laws.
z
Installation and use MUST comply with all state and local plumbing codes. Check
with your local public works department for plumbing codes. You must follow their
guidelines as you install the water filtration system.
z
If the water tank has not been used for an extended period of time, or has developed
an unpleasant taste or odour, flush the water system. If the problem persists, replace
the water filter cartridge and refer to the flushing instructions detailed in section
‘Flushing through the water dispenser.
z
To avoid serious illness or death, only connect your water filter to safe drinking water.
z
The water filter cartridge needs to be changed when the replacement indicator icon
illuminates. This will happen every 6 months.
z
If the water filtration system has been allowed to freeze, replace filter cartridge. Failure
to replace the disposable filter at recommended intervals may lead to reduced filter
performance and failure of the filter, causing property damage from water leakage or
flooding.
z
In cases of excessively reduced filter life — we recommend that you consult a local
plumber or your water supplier for advice on suitable filtration requirements for the
water supplied to your home.
z
Filter replacement is the consumer’s responsibility and will not be covered by the
warranty except in the case of faulty parts or materials within the filter cartridge.
z
If the water has not created ice for some time or ice has an unpleasant taste or odour
dispose of ice and refer to ‘Automatic ice maker (Freezer only)’ for flushing instructions.
If unpleasant taste or odour persists, you may wish to fit a new filter cartridge.
z
Use new tubing supplied with the refrigerator. DO NOT reuse old tubing from old water
and ice connections.
z
Your water filtration system can withstand up to 120psi (827kPa) of water pressure.
z
Ensure the supplied pressure limiting valve is installed before installing the water
filtration system. DO NOT install if water pressure exceeds 120psi (827kPa).
z
To reduce the risk associated with property damage due to water leakage or flooding:
z
DO NOT install systems in areas where ambient temperatures may go above 100°F
(38°C) or drop below 33°F (0.6°C).
z
DO NOT install on hot water supply lines. The maximum operating water temperature of
this filter system is 100°F (38°C).
z
DO NOT install where water hammer conditions may occur. If water hammer conditions
exist, you must install a water hammer arrester.
WARNING!
To reduce the risk associated with choking:
z
DO NOT allow children under 3 years of age to have access to small parts during the
installation of the water filter.
7
Page 8

SAFETY AND WARNINGS
Ice making
z
Avoid contact with the moving parts of the ice maker ejector mechanism, and do not
place your fingers on the automatic ice- making mechanism while the appliance is
inoperation.
z
At first use or after water filter has been replaced, there may be discolouration in the
first bin of ice cubes. Discard the discoloured ice cubes. If discolouration continues in
succeeding bins, contact your Fisher & Paykel trained and supported service technician.
Power failure
z
In the event of a power interruption, the appliance will automatically save the current
temperature settings. When power is recovered, the appliance will revert to the current
temperature settings only.
z
Most power failures are corrected within a short period of time. 1 – 2 hours loss of
power will not affect the appliance’s temperatures.
z
To avoid sudden change of temperature while the power is off, you should avoid
opening the door. A refrigerator will keep food safe for up to 4 hours during a power
outage. Keep the door closed as much as possible. Discard refrigerated perishable food
such as meat, poultry, fish, eggs, and leftovers after 4 hours without power.
IMPORTANT!
This device complies with part 15 of the FCC Rules. Operation is subject to the
following conditions:
z
This device may not cause harmful interference.
z
This device must accept any interference received, including interference that may
cause undesired operation.
z
Do not change or modify the wireless communication device in any way. Changes or
modifications not expressly approved by Fisher & Paykel could void the user’s authority
to operate the equipment.
WARNING: The incorporated Wi-Fi module in this appliance is to operate only from
channel 1 to channel 11 as per FCC rules.
This device contains licence-exempt transmitter /receiver that comply with Innovation,
Science and Economic Development Canada’s licence-exempt RSS(s). Operation is
subject to the following two conditions:
z
This device may not cause interference.
z
This device must accept any interference, including interference that may cause
undesired operation of the device.
8
Page 9
INTEGRATED REFRIGERATOR & FREEZER
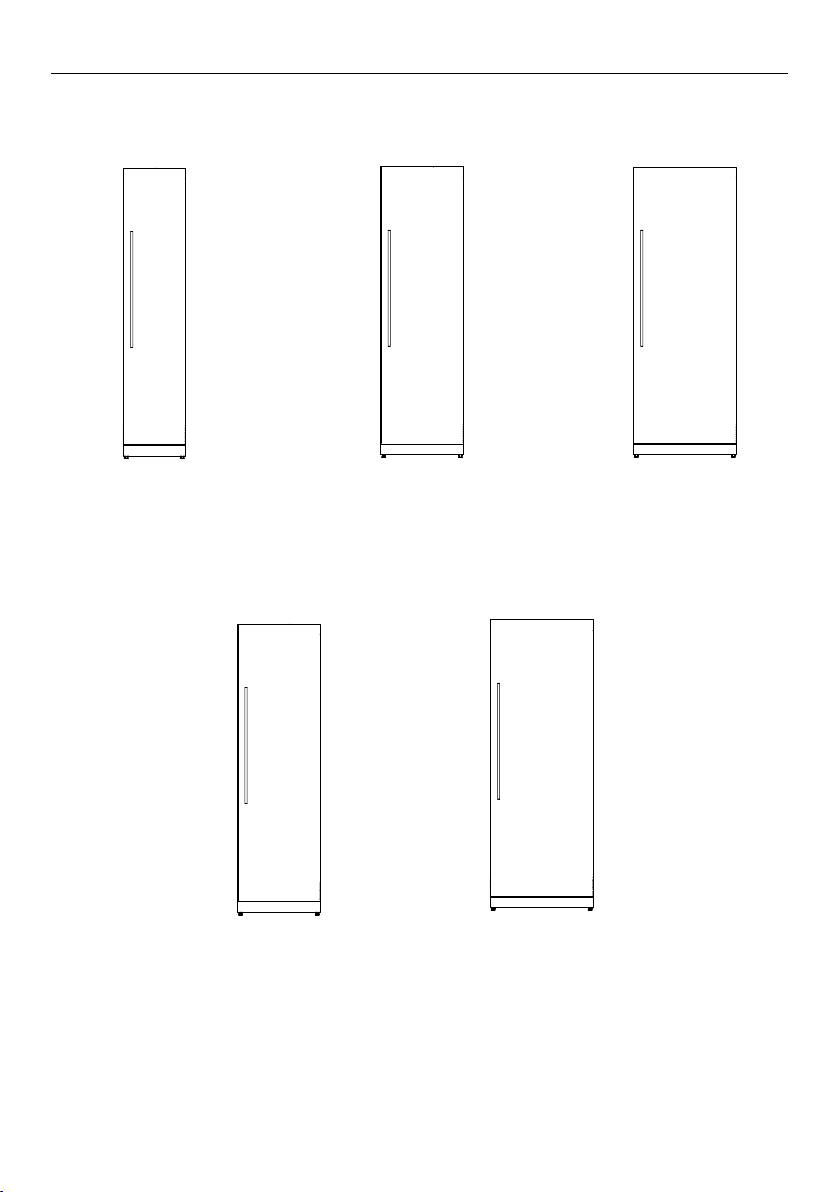
18" Freezer
RS1884F
24" Refrigerator
RS2484S & RS2484SH
24" Freezer
RS2484F
RS3084S & RS3084SH
30" Freezer
RS3084F
30" Refrigerator
All models available in Left and Right door hinges
9
Page 10

BEFORE YOU BEGIN
z
Ensure the installer has completed the final checklist in the installation instructions.
z
Read this guide, taking special note of the Safety and Warnings section.
z
Remove all packaging and dispose of it responsibly. Recycle items that you can.
Refrigerator features
1 Dairy compartment
2
3
4
1
2
1
3
4
5
6
8
9
2 Door shelves
3 Internal water dispenser
4 Gallon shelf
5 Bottle racks
6 Shelving
7 Humidity control bins
8 Water filter (not shown)
Freezer features
1 Door shelves
2 Ice maker
3 Shelving
4 Freezer bins
5 Water filter (not shown)
10
5
Page 11

CONTROL PANEL — REFRIGERATOR
1 2 3 4 5 86 97
Allows you to unlock the control panel and enable compartment selection. Press
1
4seconds to activate your appliance for the first time.
The control panel will automatically lock when inactive for more than 10seconds
or when the door is closed. To unlock, press for 2seconds.
Lights illuminate to show which compartment is selected.
2
Allows you to select the food mode for the selected compartment.
3
Lights illuminate to show which food mode is selected.
4
5
6
7
8
9
WiFi illuminates when functionality is activated.
Illuminates when the water filter needs replacement.
IIluminates to indicate that Sabbath mode is activated.
Illuminates to indicate that the keys on the control panel are locked. When the
door is closed the display is automatically locked.
Displays the set temperature of the compartments.
To change between Celsius and Fahrenheit on the display:
●
Press and together for 4seconds.
Allows you to adjust the temperature of the selected compartment.
Boosts the cooling speed of your refrigerator by dropping the compartment to its
coldest temperature for a set time, dependent on the food mode in use.
This button has a dual function—it allows you to deactivate door alarms for
20minutes and/or mute key tones on the control panel.
11
Page 12
CONTROL PANEL — FREEZER
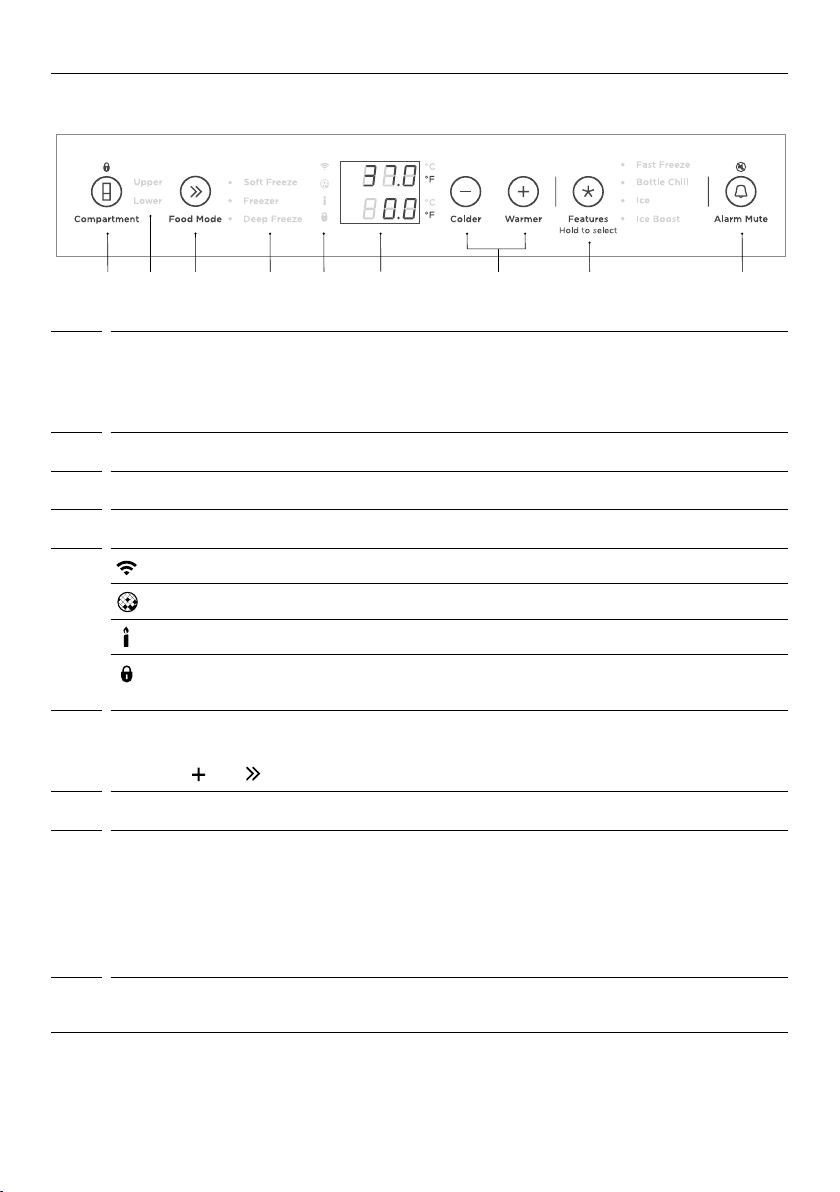
1 2 3 4 5 86 97
Allows you to unlock the control panel and enable compartment selection. Press 4
1
seconds to activate your appliance for the first time.
The control panel will automatically lock when inactive for more than 10seconds or
when the door is closed. To unlock, press for 2seconds.
Lights illuminate to show which compartment is selected.
2
Allows you to select the food mode for the selected compartment.
3
Lights illuminate to show which food mode is selected.
4
5
WiFi illuminates when functionality is activated.
Illuminates to indicate that water filter replacement is required.
IIluminates to indicate that Sabbath mode is activated.
Illuminates to indicate that the keys on the control panel are locked.
Whenthedoor is closed the display is automatically locked.
Displays the set temperature of the compartments.
6
To change between Celsius and Fahrenheit on the display:
●
Press and together for 4seconds.
Allows you to adjust the temperature of the selected compartment.
7
Allows you to scroll and select features:
8
●
Fast Freeze
●
Bottle Chill
●
Ice
●
Ice Boost
Refer to ‘Special features’ for details on these features.
This button has a dual function—it allows you to deactivate door alarms for
9
20minutes and/or mute key tones on the control panel.
12
Page 13
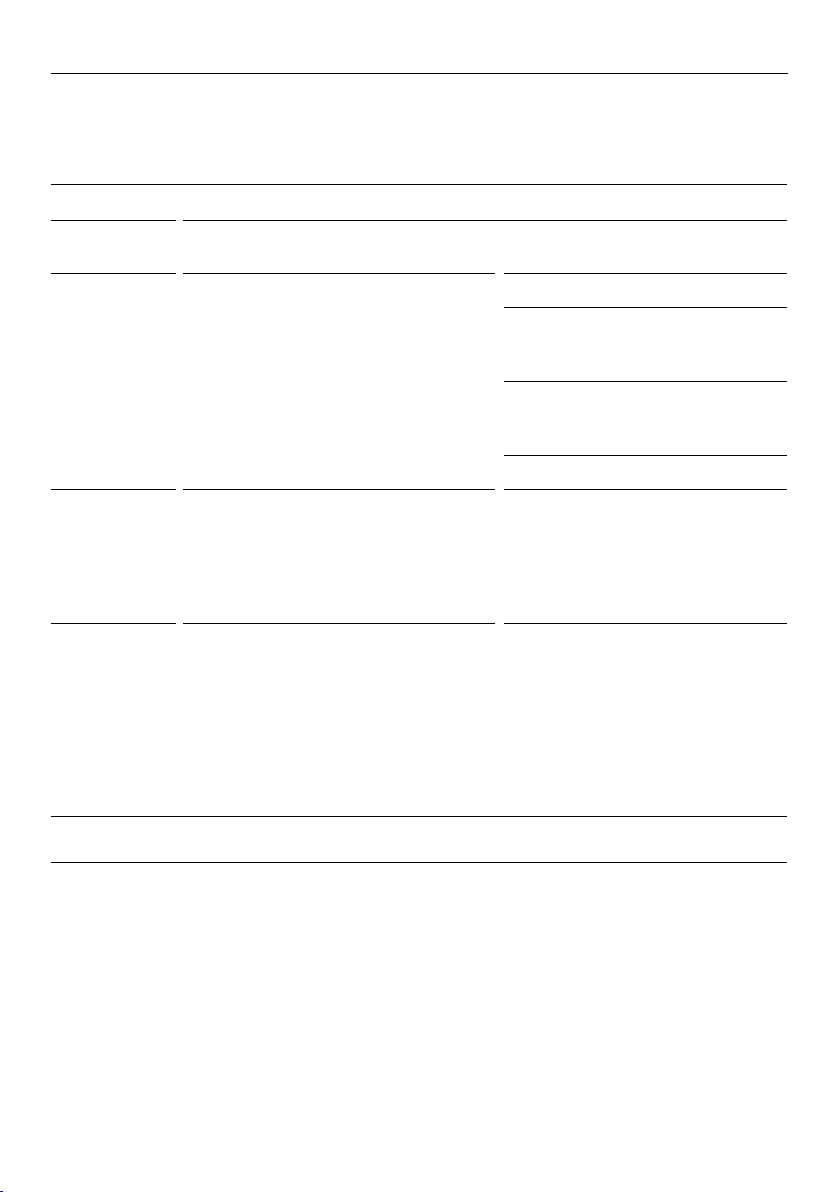
FOOD MODES
Variable temperature zones
Separate food modes, in both fridge and freezer, allow you adjust the temperature
independently for optimal storage.
Refrigerator
FOOD
MODES
Pantry
(12°C/54°F)
Fridge
(3°C/37°F)
Chill
(-0.5°C/31°F)
Note: Not all combinations of food modes are available in all compartments. Ifafoodmode is not available, itwill be
disabled on the control panel.
DESCRIPTION TYPES OF FOOD TO STORE
Pantry mode provides a cool, dark place
for a wide variety of foods that perish
quickly or mayspoil at room temperature,
but are too sensitive to be stored at normal
refrigerator temperatures.
The ideal mode for fresh, everyday foods.
This mode offers a higher relative humidity
than many other refrigerators allowing
fresh foods such as fruits and vegetables,
meats and cheeses to stay fresher for
longer.
Chill mode is an extension of Fridge mode,
providing the perfect storage zone for
highly perishable food to ensure they
retain their vital freshness and quality.
These items will last slightly longer here
compared with storage at ‘Fridge’ mode.
Note: Ensure these highly perishable items
are consumed within their recommended
storage times.
Bananas, avocados, tomatoes.
Dry food items such as grains, flours,
sugars, crackers, cereal, baked goods,
tortillas, wraps and breads.
Spreads, preserves, honey, tropical
fruits, nuts and seeds, chocolate and
fresh herbs.
Wine
Fruit and vegetables, dairy products,
jams and chutneys/preserves, meats
and drinks.
Highly perishable meats, poultryand
seafood.
Alcoholic beverages such asbeer.
13
Page 14
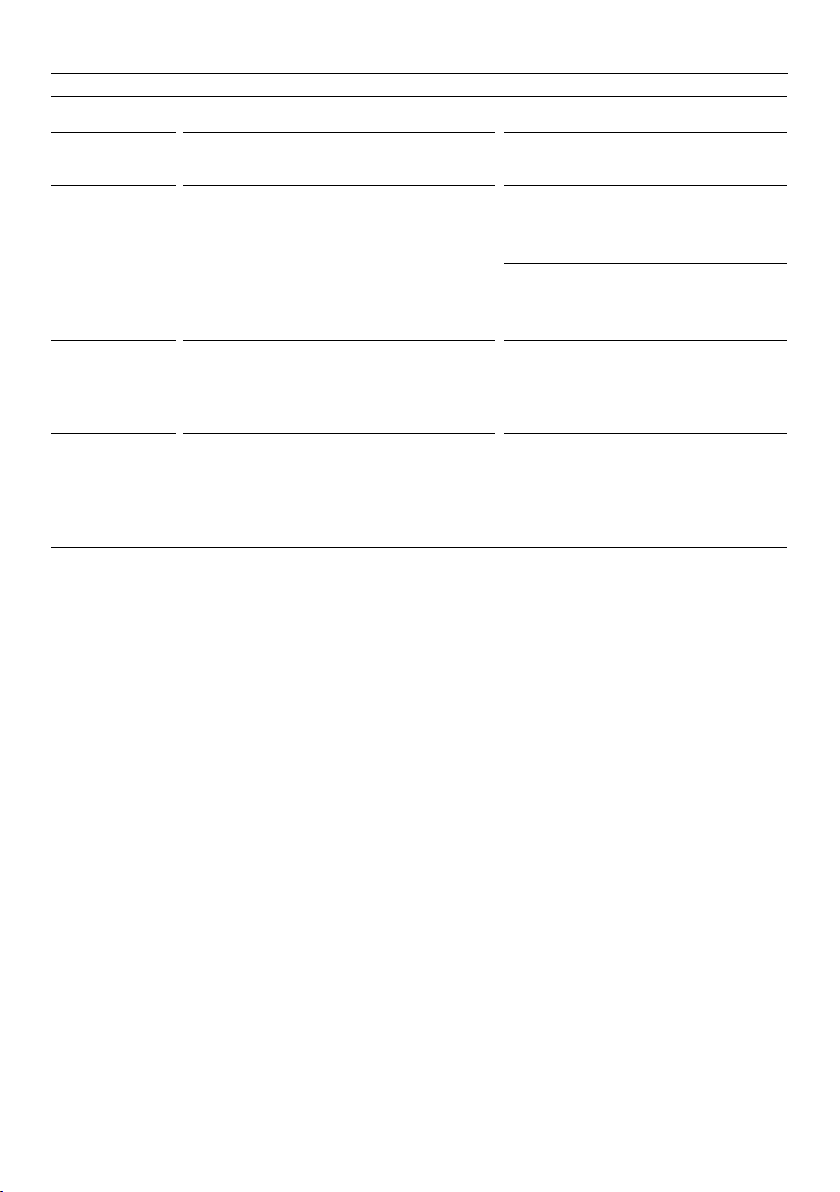
Freezer
FOOD MODES
FOOD
MODES
Soft Freeze
(-9°C/16°F)
Freezer
(-18°C/0°F)
Deep Freeze
(-25°C/-13°F)
Note: Not all combinations of food modes are available in all compartments. Ifafoodmode is not available, itwill be
disabled on the control panel.
DESCRIPTION TYPES OF FOOD TO STORE
Soft Freeze mode is an extension of your
refrigerator, extending the shelf life of
perishable items while maintaining the
quality. ‘SoftFreeze’ mode allows easy
portioning of food and the ability to heat,
cook or serve foods straight from the
compartment without waiting for it to thaw.
Freezer mode is for general frozen food
items that require storage between 1–12
months.
Deep Freeze mode is for frozen food items
that may need to be stored for longer
periods. ‘Deep Freeze’ extends the shelf life
of general frozen items by up to 6months
longer than that of Freezer mode.
Meats, seafood, soups, sauces, pureed
foods, bread, desserts and pastries.
Note: Soft Freeze mode is not
recommended for storage of creamy
desserts such as ice cream.
Meat, poultry, seafood, pre-cooked
foods and leftovers, some fruits and
vegetable, ice cream, and other frozen
desserts.
General frozen food that is required
to be stored for extended times—eg
larger cuts ofmeat.
14
Page 15
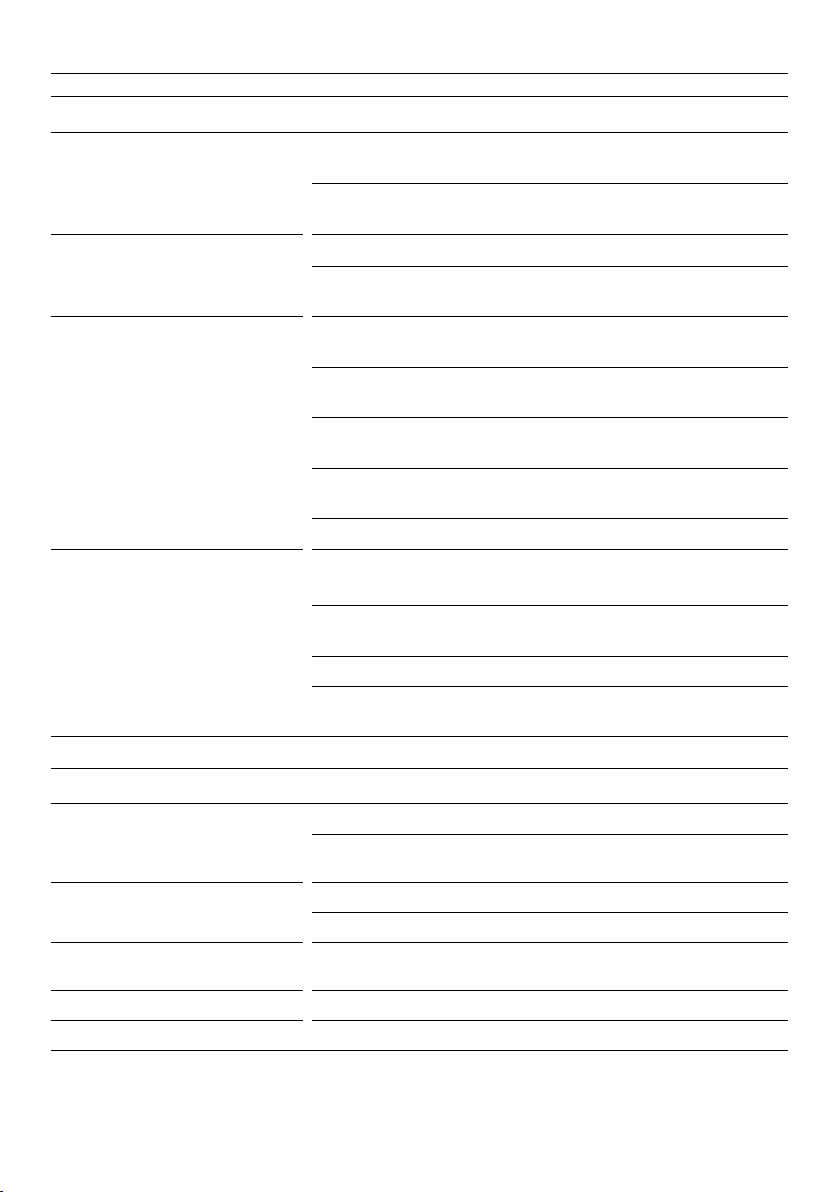
STORAGE FEATURES
REFRIGERATOR
Fruit and vegetable bins/Slim bin
with humidity control lids
Cantilever glass shelving Heat-treated safety glass
Dairy shelf and door shelves The top door shelf is a dairy compartment for storing butter and
Single bottle holders Can be placed along the length of any shelf (except half-depth
Half-depth cantilever shelf bottle
holders
Separate fruits and vegetables to prevent the ethylene-sensitive
produce from ripening too quickly-helps to extend their storage life.
Also used for storing deli items and beverages, or fordefrosting
foods.
Can be removed and positioned at heights to suit your storage
requirements.
cheeses.
The middle shelves are designed for general items, condiments and
drinks.
The bottom shelves are designed to store large drinks or those
drinks you require frequent access to.
Clear windows give ultimate visibility to what is being stored in the
door shelves.
Adjustable door shelves with dividers.
cantilever shelves) to store a varietyof bottles.
Can be placed only on half depth cantilever shelves to store a
variety of bottles.
Store bottles with the neck facing the front of therefrigerator.
Unused bottle holders can be stacked on top ofone another to
maximize shelf space.
FREEZER
Cantilever glass shelving Heat-treated safety glass
Can be removed and positioned at heights to suit your storage
requirements.
Door shelves
Top bin with removable ice
container and hygienic ice scoop
Mid tray For storing smaller food items.
Large bottom steel bin For storing multiple frozen food items or large food items.
Designed for general items, condiments and drinks.
Adjustable door shelves with dividers.
For storing large or small frozen food items.
15
Page 16

SPECIAL FEATURES
Max Cool
Boosts the cooling speed of your refrigerator by dropping the refrigerator to its coldest
temperature for a set time (Pantry - 6 hours, Fridge - 6 hours, Chill - 4 hours) dependent on
the food mode in use.
Fast Freeze
Boosts the freezing speed by dropping the freezer to its coldest temperature for a set
time dependent on the food mode in use. Offered on ‘Soft Freeze’ and ‘Freezer’ modes
(Soft Freeze - 12 hours, Freezer - 12 hours).
We recommend using ‘Max Cool’ or ‘Fast Freeze’ when you are adding food items toyour
appliance, such as after grocery shopping. This feature will ensure the food ischilled/frozen
within the shortest period of time, locking in the freshness andextending the shelf life of
your food.
Bottle Chill
This feature allows you to rapidly chill your beverages in the freezer for 15 minutes.
Depending on the size of your beverage, the default time may not be enough to chill
your beverage. If your beverage is notcold enough after the set time, return it to the
compartment and reset the ‘Bottle Chill’ feature.
Ice*
Turns on your automatic ice. This feature is only available in the lower compartment.
Ice Boost*
Increases ice production by up to 30%, and deactivates automatically after 24hours.
* This feature is not available if the compartment is set to ‘Soft Freeze’. If ice making is turned on and the foodmode is
changed to ‘Soft Freeze’ any ice that is already in the ice bin may melt and form clumps.
To avoid this either remove the ice or use a different compartment for ‘Soft Freeze’.
16
Page 17

WIFI CONNECTION
Your appliance can be connected to your home wireless network and operated remotely
using the FISHER & PAYKEL app.
Getting started
z
Ensure your home WiFi network is turned on.
z
You will be given step by step guidance on both your appliance and mobile device.
z
It may take up to 10 minutes to connect your appliance.
On your mobile device:
1 Download the FISHER & PAYKEL app from www.fisherpaykel.com/connect
2 Register and create an account.
3 Add your appliance and set up the WiFi connection.
17
Page 18
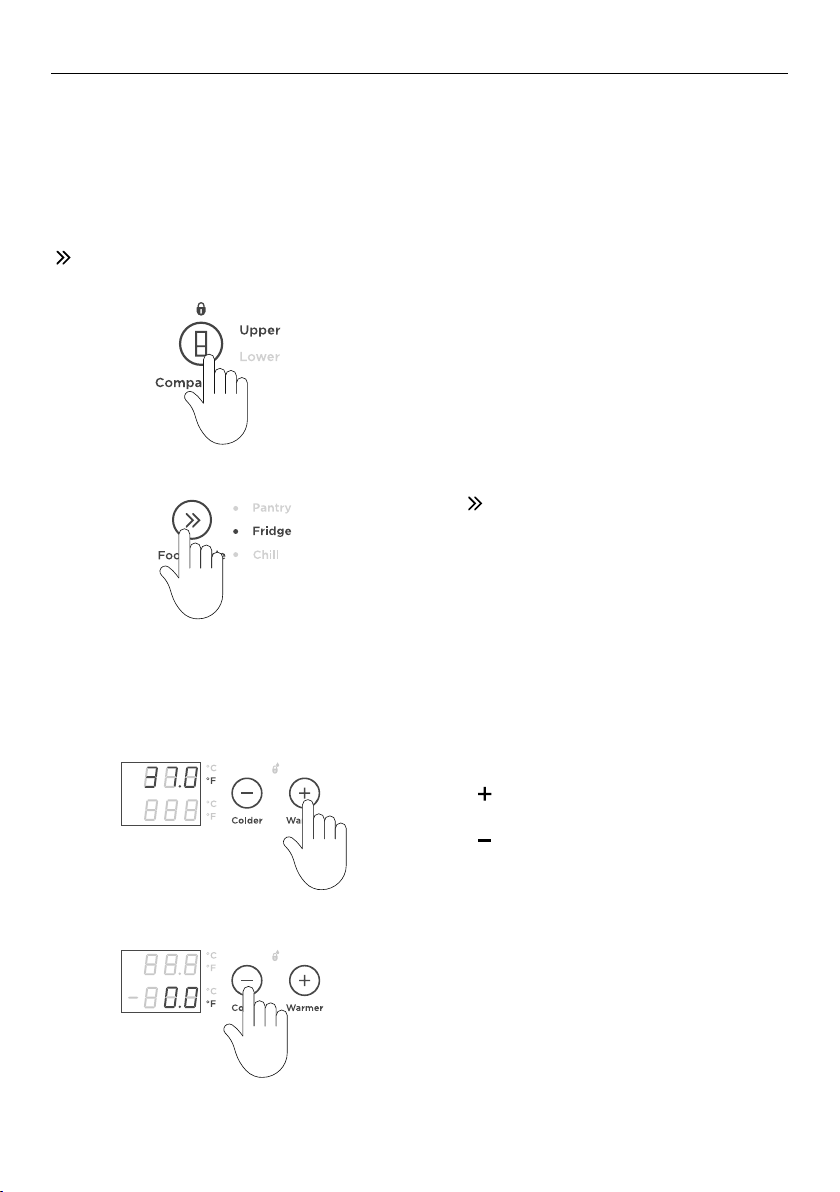
USING YOUR APPLIANCE
Once you turn on your refrigerator for the first time, the compartments will automatically
default to the recommended temperature setting. The control panel enables you to change
and control the temperature of all compartments accurately and independently.
For best storage of general household food items, we recommend to use the appliance
at its factory default temperature and configuration settings. Adjusting temperature and
moving the shelves and bins will have minimal impact on efficiency.
Selecting the Food Mode
Select the desired compartment.
Adjusting the temperature
Press
MODE
to scroll through the available FOOD
.
A light illuminates to indicate the matching
FOOD MODE as you scroll down the list.
Press to increase the temperature of the
selected food mode.
Press
to decrease the temperature of the
selected food mode.
18
Page 19
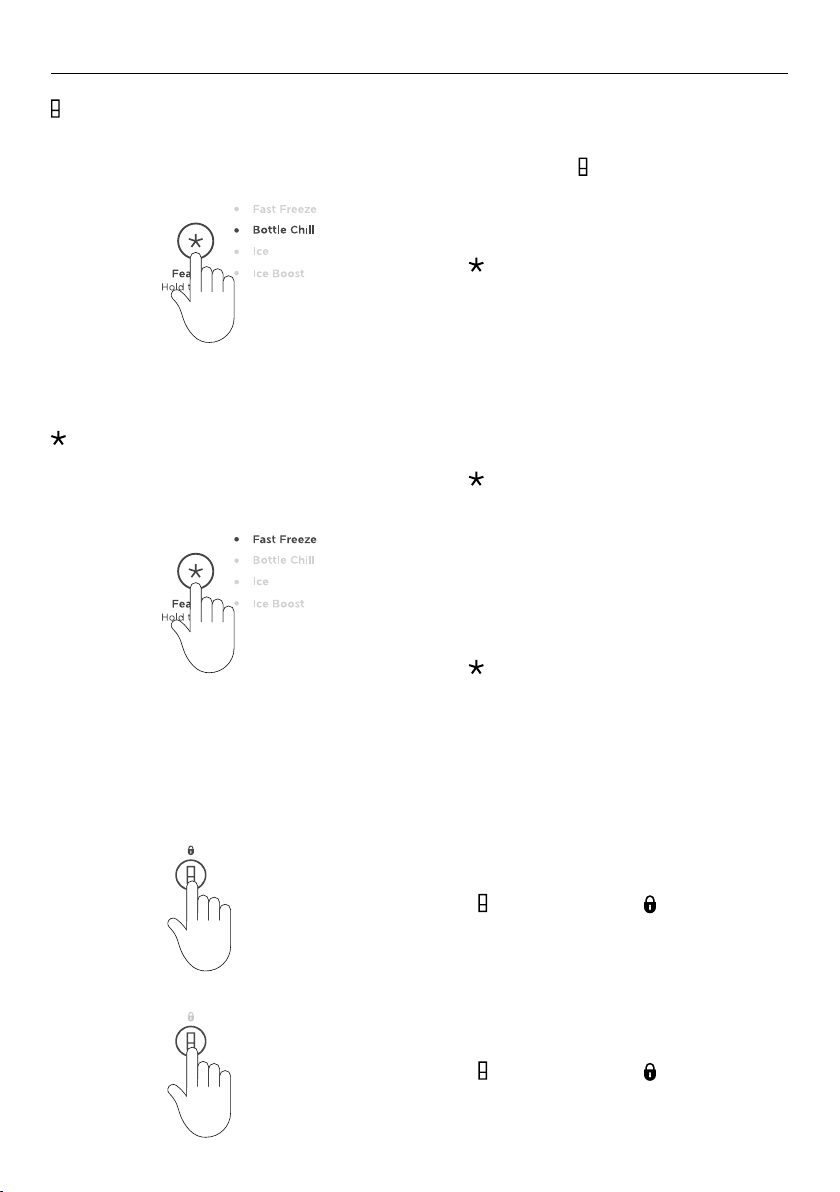
Bottle Chill (Freezer only)
USING YOUR APPLIANCE
Selecting Features
When activated, an alarm will sound,
will flash and will illuminate after the
CHILL
BOTTLE
elapsed time toremind you to remove your
beverage.
To silence the alarm::
Press once.
The time taken to chill depends on the size
of your beverage. If your beverage is notcold
enough after the set time, return it to the
compartment and reset the
BOTTLE CHILL
feature.
Press
FEATURES for the compartment and food
to scroll through the available
mode you have selected.
To activate:
Select from the list by scrolling through and
stopping at your preferred feature.
A blinking light indicates the current feature
when scrolling through the list.
Press
for 2 seconds to activate.
Key lock
Allows you to disable the buttons on the control panel. This is useful when cleaning your
appliance.
To activate:
Press
for 2seconds. The icon on the
control panel will illuminate.
To deactivate:
for 2seconds. The icon will not
Press
illuminate.
19
Page 20
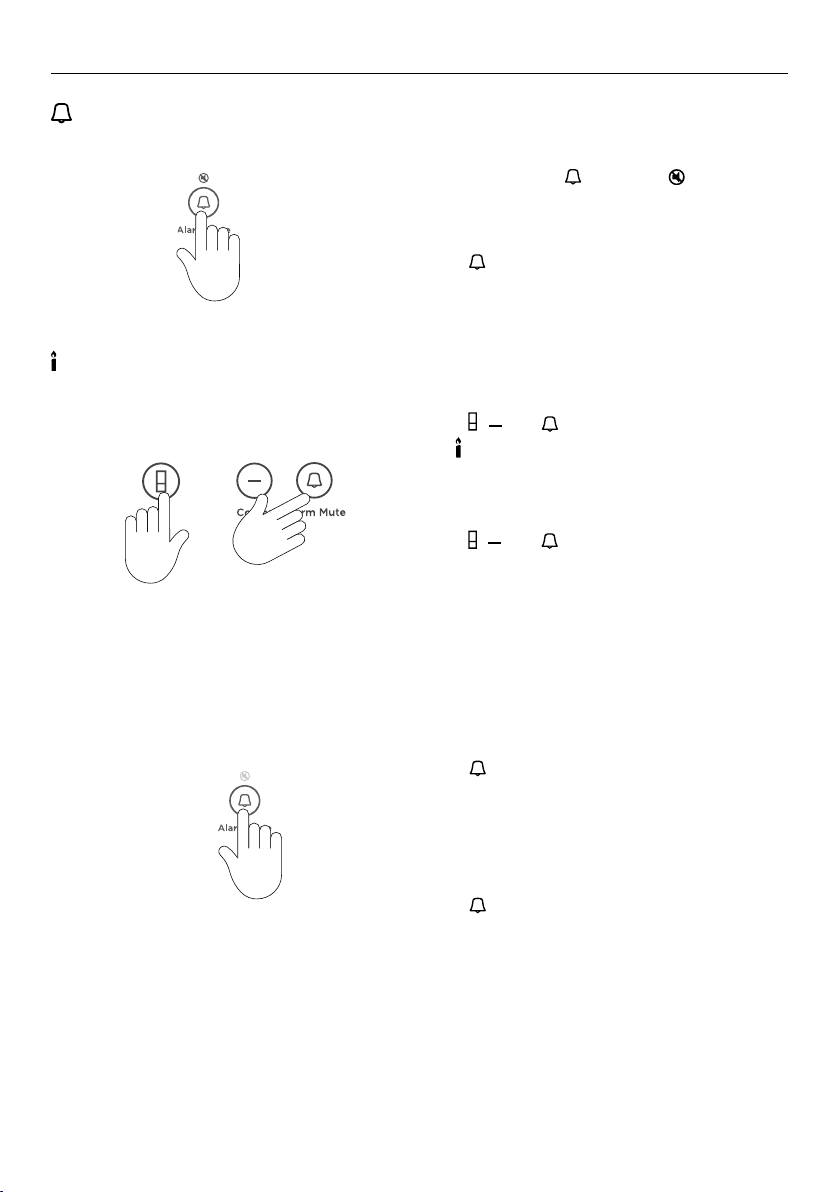
Alarm mute
Sabbath mode
USING YOUR APPLIANCE
To activate:
To activate, press
illuminate to indicate the refrigerator is
muted.
ALARM MUTE will deactivate after 20minutes.
Press To deactivate manually,
Closing the door also deactivates the
ALARM MUTE.
To activate:
Press
, and together for 4 seconds.
The
icon on the control panel will illuminate.
+
When activated, the display, all alarms and
lights are deactivated for 80 hours.
To deactivate manually:
Press
, and together for 4seconds.
Note: If you turn off your appliance
while in Sabbath mode, it will resume
automaticallyonce the appliance is switched
on again.
once. The will
Key mute
To activate:
Press
for 2seconds, a single confirmation
beep will be heard. Once key mute is
activated, all key sounds are silenced.
Door alarms and the
BOTTLE CHILL alarm are
still operational.
To deactivate:
Press
for 2seconds, a single confirmation
beep will beheard.
Door alarms
z
If the refrigerator door is left open, the alarm will beep after 90seconds.
z
If the freezer door is left open, the alarm will beep after 60 seconds.
z
If the door remains open, subsequent beeps will sound every 30seconds for 5minutes.
z
If the door remains open for 5minutes or longer, an alarm will sound continuously
andthe interior compartment light(s) will turn off.
20
Page 21
USING YOUR APPLIANCE
Water filter
The water supplied to your appliance is filtered to remove impurities through a filter located
the bottom front of your appliance. Replace your filter cartridgeevery 6months.
z
A replacement indicator icon on the control panel illuminates to indicate the filter
needs to be replaced.
z
Replacement filter cartridges can be purchased online from fisherpaykel.com or by
calling Fisher & Paykel Customer Care. Details of the replacement filter cartridge are
labelled on the cartridge. Instructions on how to install your replacement water filter are
provided with the filter.
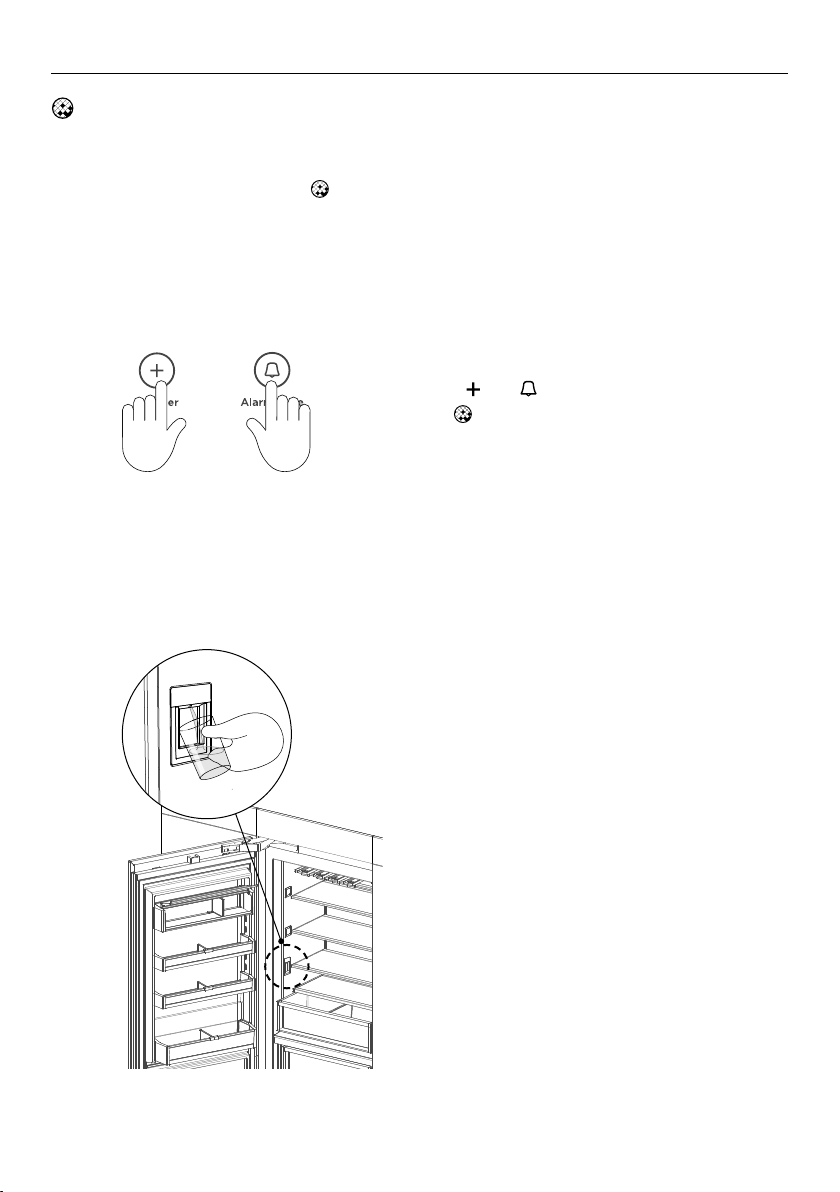
To reset the filter indicator:
Press
and together for 4seconds.
The
on the control panel will turn off when
reset.
Internal water dispenser (Refrigerator only)
The water dispenser is located inside on the left side wall of the refrigerator compartment.
To dispense water, gently press the
dispensing pad with a glass or container.
To stop the flow of water, simply pull your
glass or container away from the dispensing
pad.
Pressing hard against the dispensing pad will
not increase the flow or dispense more water.
Flushing through the water dispenser
Press the water dispenser pad to dispense
one gallon (4L) of water.
z
The dispensed water may contain harmless
carbon residue during the flushing process.
Wait for 4 minutes before dispensing again.
Dispense one gallon (4L) of water then wait
another four minutes.
Dispense another one gallon (4L) of water.
Your water dispenser is ready for use.
21
Page 22
USING YOUR APPLIANCE
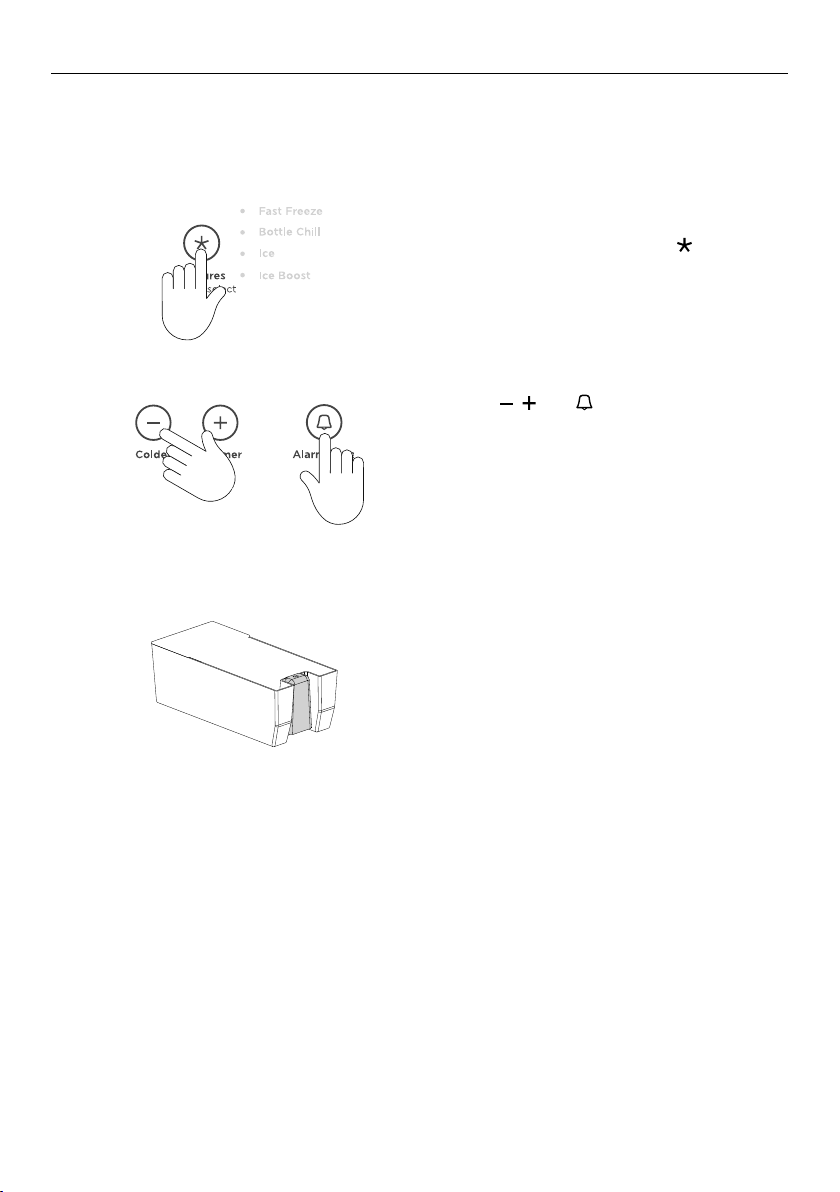
Automatic ice maker (Freezer only)
Before turning on your automatic ice maker, the water filter must be installed (refertoyour
installation guide) and flushed to remove any impurities or trappedair inthe filter system.
1
2
3
To activate the ice maker, press
and select ICE from the list.
Flushing through the ice maker
Press the
then close the doors.
The ice tray will empty the water into the bin
below. The ice tray will only empty after the
doors are closed.
Repeat to remove dust in the ice tray
collected during manufacture and transport.
Empty the water, dry the bin and return it
correctly.
Once your ice maker is turned on the first bin
of ice may be discolored, this is not harmful
and normal during the flushing process.
Discard the first full bin of ice made. Your ice
maker is now ready for use.
, and together for 4seconds
to scroll
Turn the ice maker off if:
z
There is no water supply for several hours.
z
You are removing the ice storage bin for a period of time.
z
You are going on holiday/vacation.
22
Page 23
CARE AND CLEANING
Exterior cleaning
The condenser coils of your Integrated Column require periodic cleaning by a
Fisher&Paykel trained service technician.
Toe kick grilles and filter
Your Integrated Column is fitted with a toe kick grille to protect the internal working
components. We recommend cleaning the grille and filter in conjunction with changing your
water filter cartridge (every 6months).
1 To maximize operating efficiency, keep ventilation openings clear of obstructions by
regularly vacuuming the flooring in front of your appliance.
2 More frequent cleaning may be necessary for dusty homes or those with pets sheddinghair.
Interior cleaning
Do not use harsh chemicals, abrasives, ammonia, chlorine, bleach, concentrated detergents,
solvents or abrasive scouring pads on any part of your appliance. Someofthese chemicals
may damage your appliance.
Clean all surfaces with a mild liquid detergent dissolved in warm water and a soft cloth.
Rinse with clean water and dry with a clean, lint-free cloth.
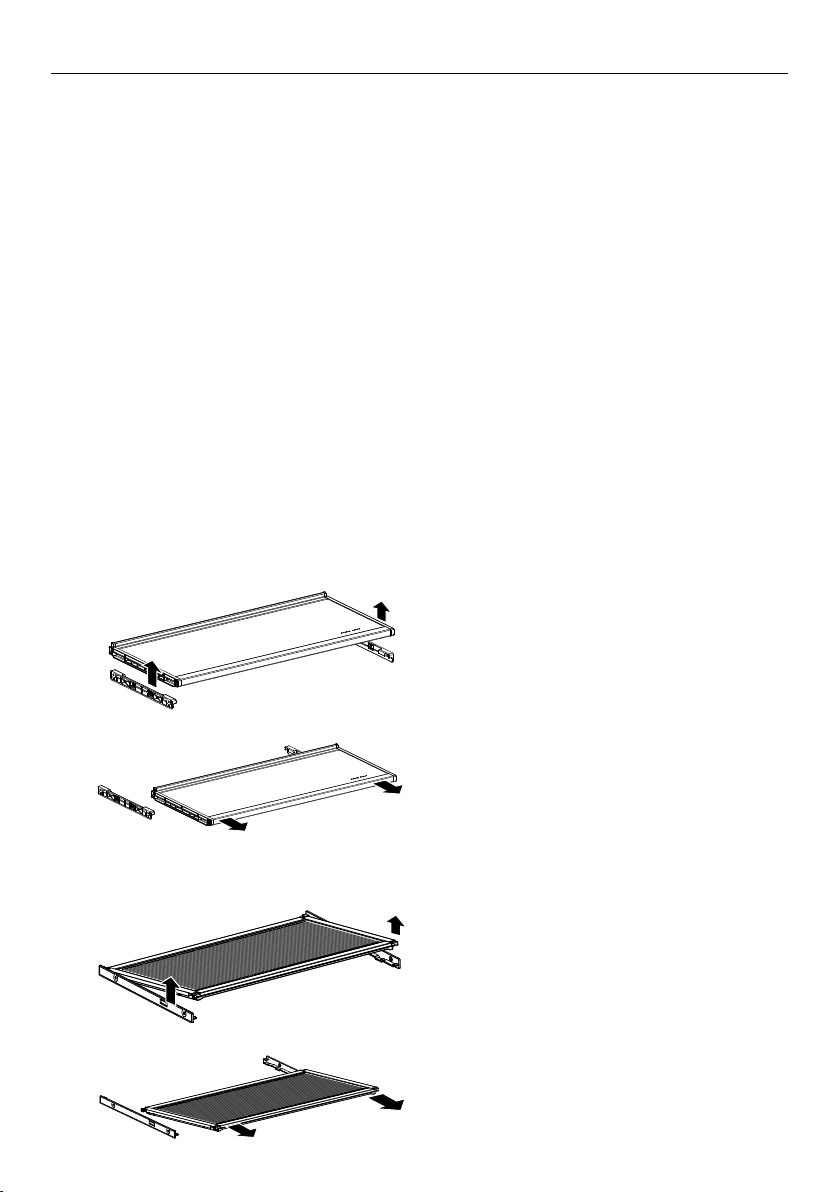
Cantilevered glass shelves
To remove, hold the front and back edge
1
of the shelf firmly.
Push the shelf up vertically to dislodge
from back support lugs.
2
Humidity control lids — Fixed shelf
1
2
Pull the shelf towards you.
To remove, lift the front edge of the shelf
up.
Pull the shelf towards you to unclip from
the runners.
23
Page 24
CARE AND CLEANING
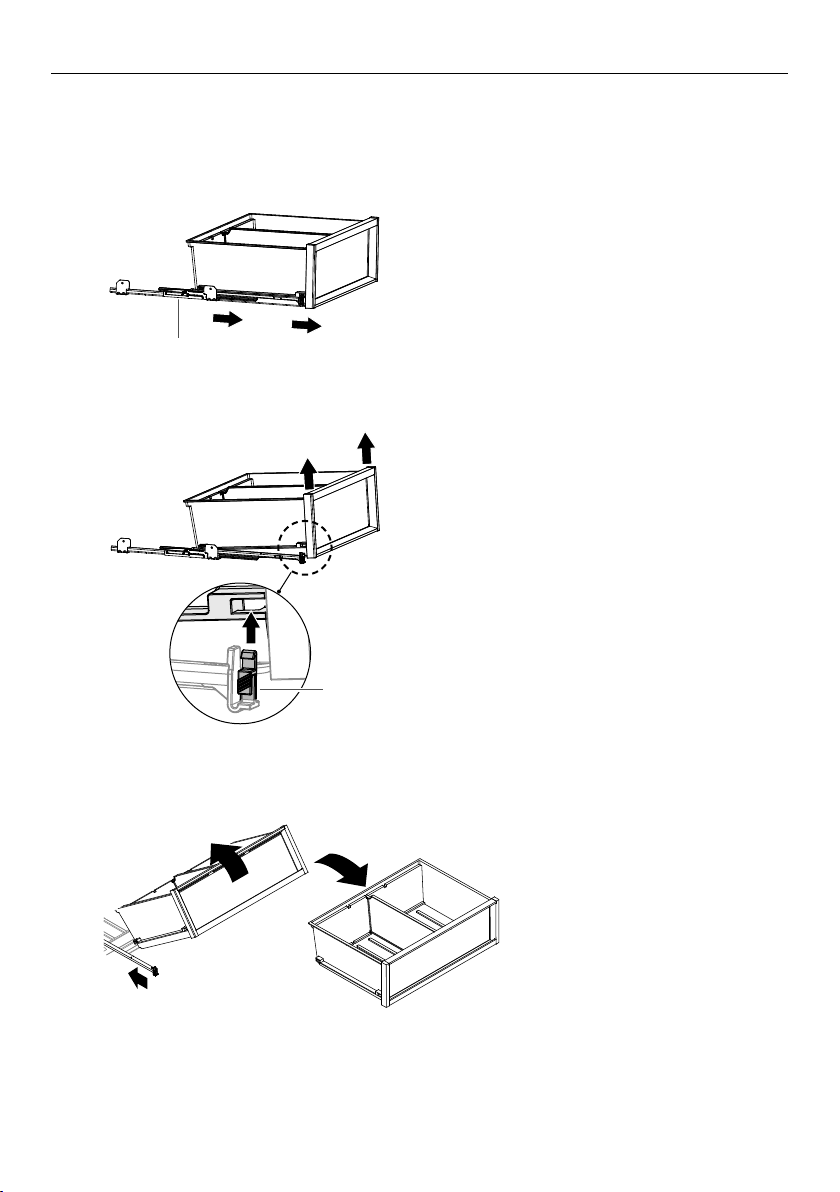
Removing the top bin
The runners are pre-lubricated to help open and close the bins. Do not remove the grease
from the runners to maintain its smooth function.
1
2
To remove a bin, extend the bin on its
runners, and empty the bin.
runners
Push the securing tabs on both sides of
the bin corners, then push the bin firmly
upwards to dislodge from the runners.
securing tab
24
3
Pull the bin towards you to
remove. Push both runners
back into the appliance.
Page 25
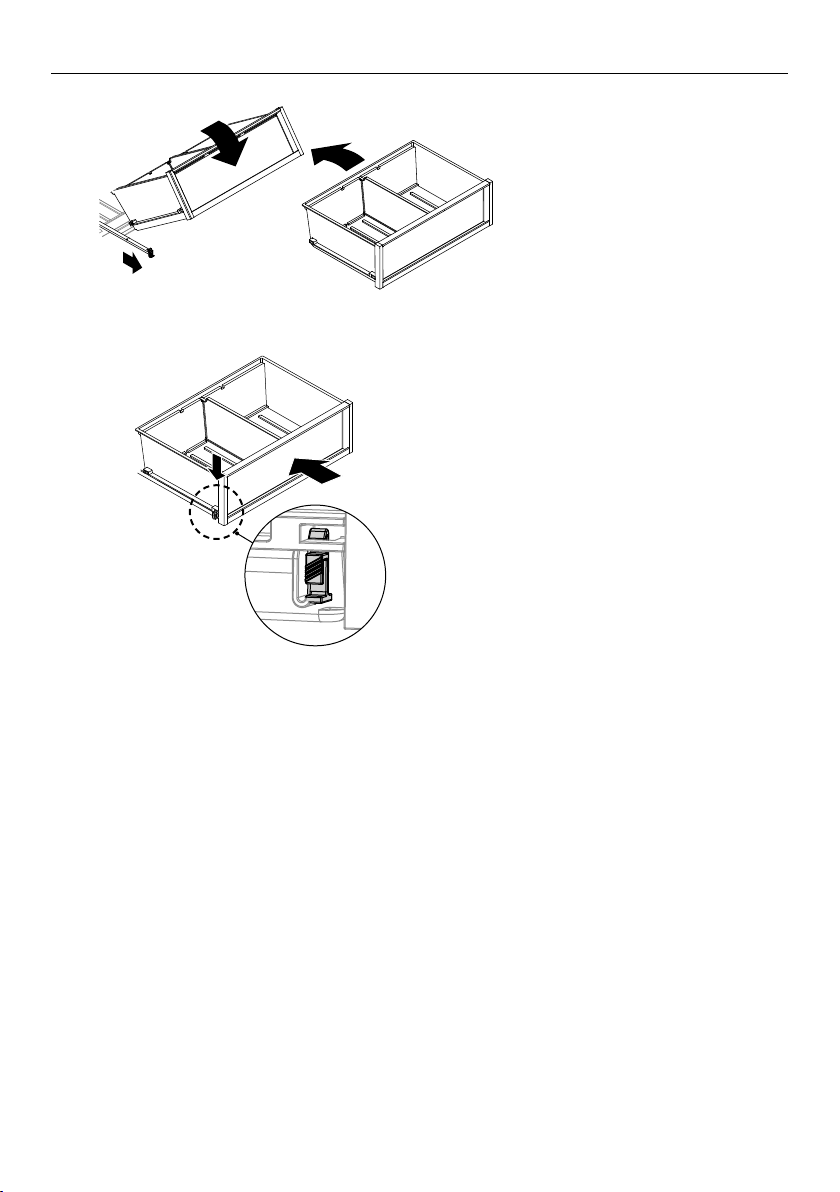
4
5
CARE AND CLEANING
To return the bin, extend the
runners and place the bin on
top of the runners.
Push the bin slowly onto the securing
tabs until you feel it clip onto the runners.
Ensurethe bin tabs are clipped securely onto
the runners before use.
Holiday/vacation (Freezer only)
Before leaving:
Turn the ice maker to OFF on the control panel.
Shut off the water supply to the appliance.
On return:
Turn on the ice maker. Discard the first full bin of ice.
25
Page 26

FOOD CARE
For best food care
z
Store only high-quality, fresh food in your appliance.
z
Store perishable foods in the appliance immediately after purchase. Storingatroom
temperature increases the rate of deterioration and can allow harmfulmicrobialgrowth.
z
Foods such as meat, poultry and seafood should be well wrapped or sealed in
suitablepackaging to prevent dehydration, color deterioration, loss of flavor, and transfer
ofodor.
Note: We recommend storing these foods on the bottom shelf of your appliance
orinone of the bins to prevent potential spills and cross-contamination with
otherfoods.
z
Ensure hot foods and beverages are cooled sufficiently before placing them into
theappliance. Hot items may cause other foods to warm to unsafe temperatures.
Itmayalso cause sealed items to sweat/condensate—which is undesirable.
z
Beverages are best stored standing upright in the door shelves or on the bottle
racksprovided.
z
Ensure raw and cooked foods are stored separately to avoid cross-contamination.
z
Consume food items within the recommended storage times. Discard foods that
showsign of spoilage.
z
Keep door openings to a minimum to maintain optimum storage temperatures inside
your appliance.
z
We recommend using MAX COOL or FAST FREEZE when you are adding food items toyour
appliance, such as after grocery shopping. This feature will ensure the food ischilled/
frozen within the shortest period of time, locking in the freshness andextending the shelf
life of your food.
z
Storing at temperatures other than the recommended settings may impact the storage
life.
z
For common foodstuffs, factory default setting provides the optimum setting for
foodcare.
Items stored in your refrigerator
z
Dairy items such as butter and cheeses should be stored in the covered door shelf
tominimize any transfer of odor or odor absorption from other foods.
z
Eggs should be stored in their carton to avoid absorption of strong odors through
theirporous shell structure.
Items stored in your freezer
We recommended cooling carbonated beverages only when the
BOTTLE CHILL function
isactive.
Note: Do not store carbonated drinks without this function in the freezer.
Failure toremove beverages could lead to freezing liquid and the likelihood ofbottle/
canexplosion.
z
Ensure air is removed from packaging to avoid large formation of ice crystals and
prevent freezer burn.
z
To maintain freshness and quality, we recommend defrosting foods in the refrigerator.
Ensure partially or fully defrosted foods are never re-frozen—cook immediately.
26
Page 27
USER WARNINGS AND SOUNDS
Faults
z
In the unlikely event a fault occurs, 4rapid beeps will be heard and the fault
will be displayed on the control panel.
z
Record the fault code displayed on the control panel and contact a
Fisher&Paykeltrained and supported service technician in order to repair thefault. You
can do this by going online to fisherpaykel.com or bycontactingourCustomer Care
Center.
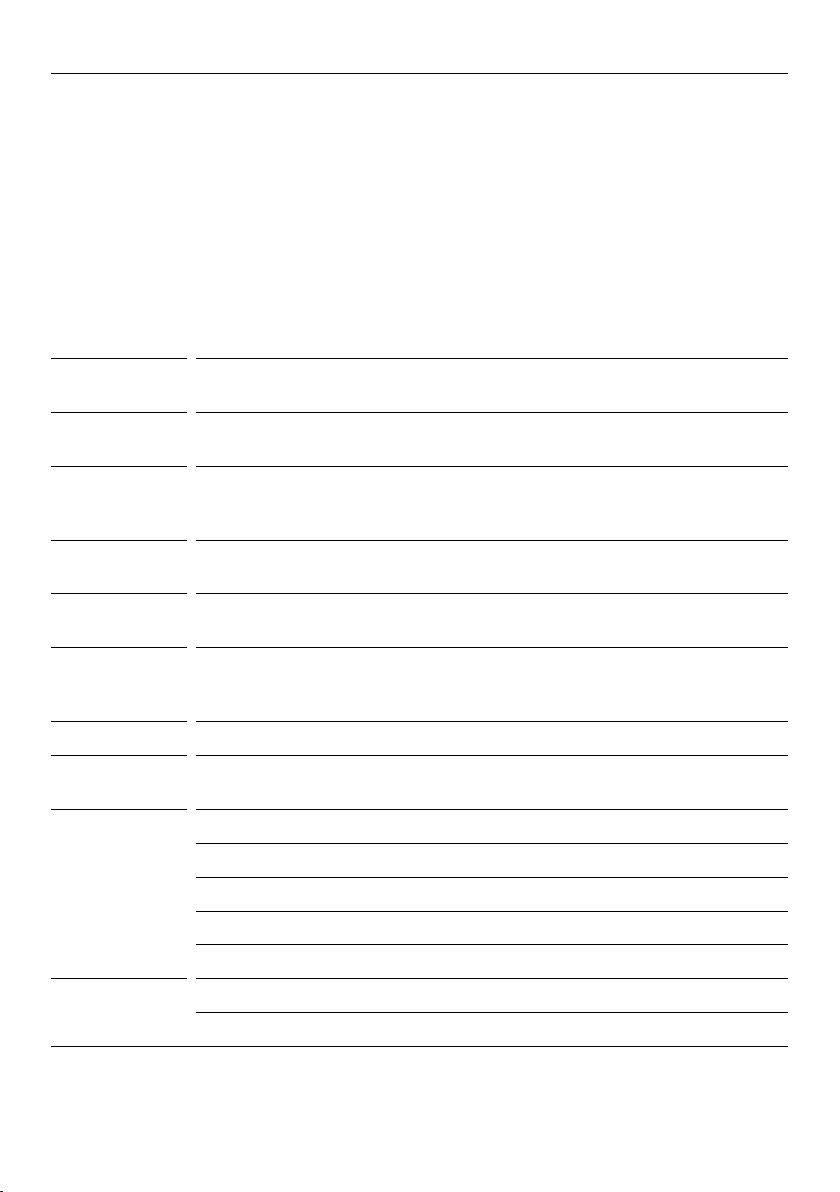
Normal appliance sounds
Integrated Columns has been designed to have excellent energy ratings and cooling
performance. As a result, it can produce sounds somewhat different to your oldappliance.
WARNING/
SOUND
Low frequency
ticking
Fan air flow Integrated Columns has fans which change speed depending on demand. During
Cracking or
popping
Running water This is the liquid refrigerant in the system and can be heard
Hissing sound
after closing the
freezer door
Humming This is the compressor running and is quite normal.
Gasket Normally occur over time due to a build up of dirt and/or grime. See ‘Exterior
Ice maker Motor operation (low humming).
Other sounds Cabinet not stable or level.
DESCRIPTION
This is the valve that controls cooling to each compartment. This noise will only last
for a few seconds at a time.
cooling periods, such as after frequent door openings, fans circulate thecoldair in
the appliance producing some air flow sound. This is quite normal.
This may occur when the automatic defrost function is operating.
as a boiling or gurgling noise.
This is due to the pressure difference between the warm air that has entered the
cabinet and suddenly cooled, and the outside airpressure.
cleaning’ section.
Running water as the ice maker and/or water tank fills.
Water valve opening and closing (hissing sound).
Loosened from the ice molding tray (cracking).
Ice dropping into bin (clunking).
Bottles or jars rattling on shelves.
27
Page 28
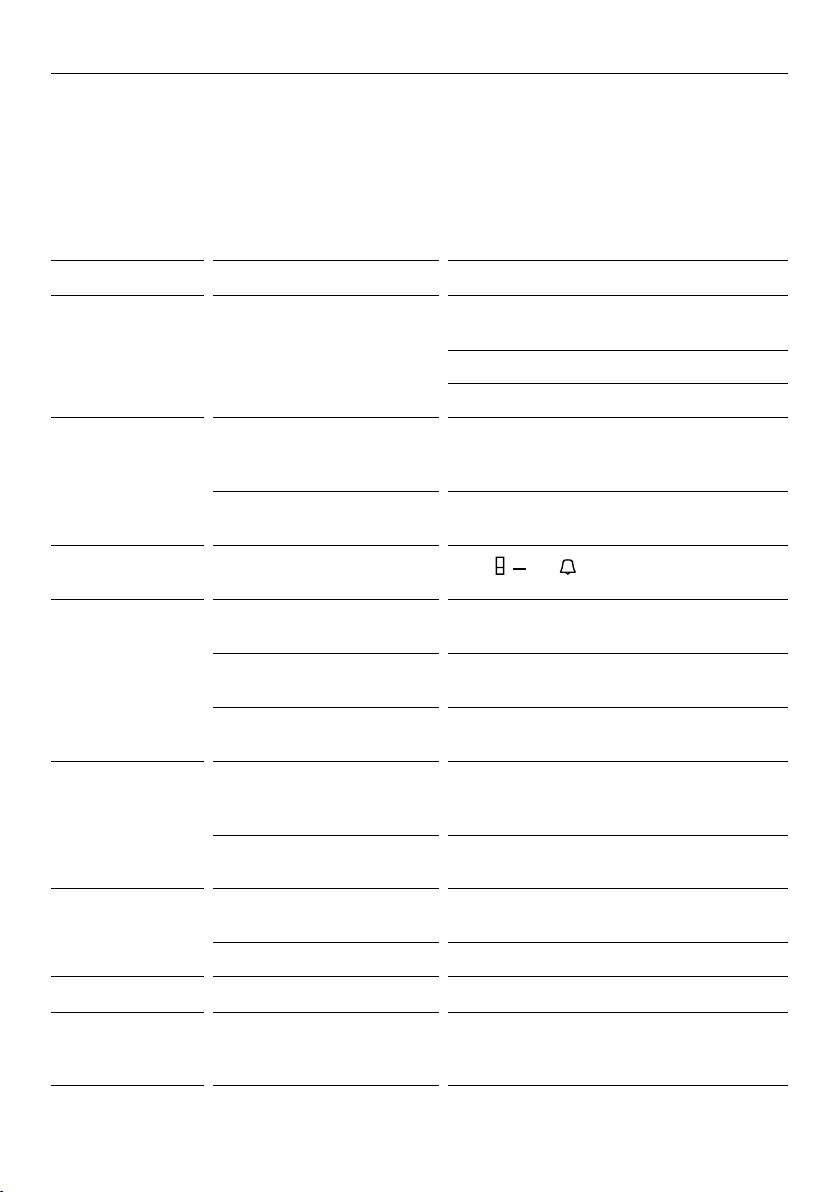
TROUBLESHOOTING
If there is a problem with your appliance, please check the following points before
contacting your local Fisher & Paykel trained and supported service technician or
theCustomer Care Center.
Product parts and accessories can be purchased through the Fisher & Paykel CustomerCare
Center, or online at fisherpaykel.com (this service is available to selectedmarkets only).
PROBLEM POSSIBLE CAUSES WHAT TO DO
Appliance does not
operate
Light not working Light not functioning. The lighting cannot be serviced by the user.
Light and display
not working
Storage
compartments too
warm
Food freezing in
the refrigerator
Unfamiliar noises Cabinet not stable orlevel. See Installation guide supplied with
Ice maker sounds Normal ice maker operation. See ‘User warnings and sounds’ section.
No electricity at poweroutlet. Check that the plug is correctly connected and
power switched on.
Check another appliance at the sameoutlet.
Check house breaker.
Contact your Fisher & Paykel dealer or trained
and supported servicetechnician.
Appliance not working. Check appliance is turned on at the wall or at
the isolating switch.
Product in Sabbath mode.
Temperature setting
notcorrect.
Frequent door openings. Minimize door openings to allow temperature
Large amount of food
has been recentlyadded.
Temperature setting is too
cold.
Food placed directly infront of
air outlets.
Freezer is defrosting. This is normal.
, and together for 4seconds.
Press
See ‘Special features’ section of this User guide.
to stabilize.
MAX COOL or FAST FREEZE features to
Select
assist in lowering the temperature quickly.
Increase the temperature setting.
See ‘Special features’ section of your user
guide.
Move chill sensitive foods away from theair
outlets.
thisappliance.
Food Mode is not
available
28
Not all combinations of food
modes are available in all
compartments.
Try to select the desired Food Mode
inadifferent compartment.
Page 29
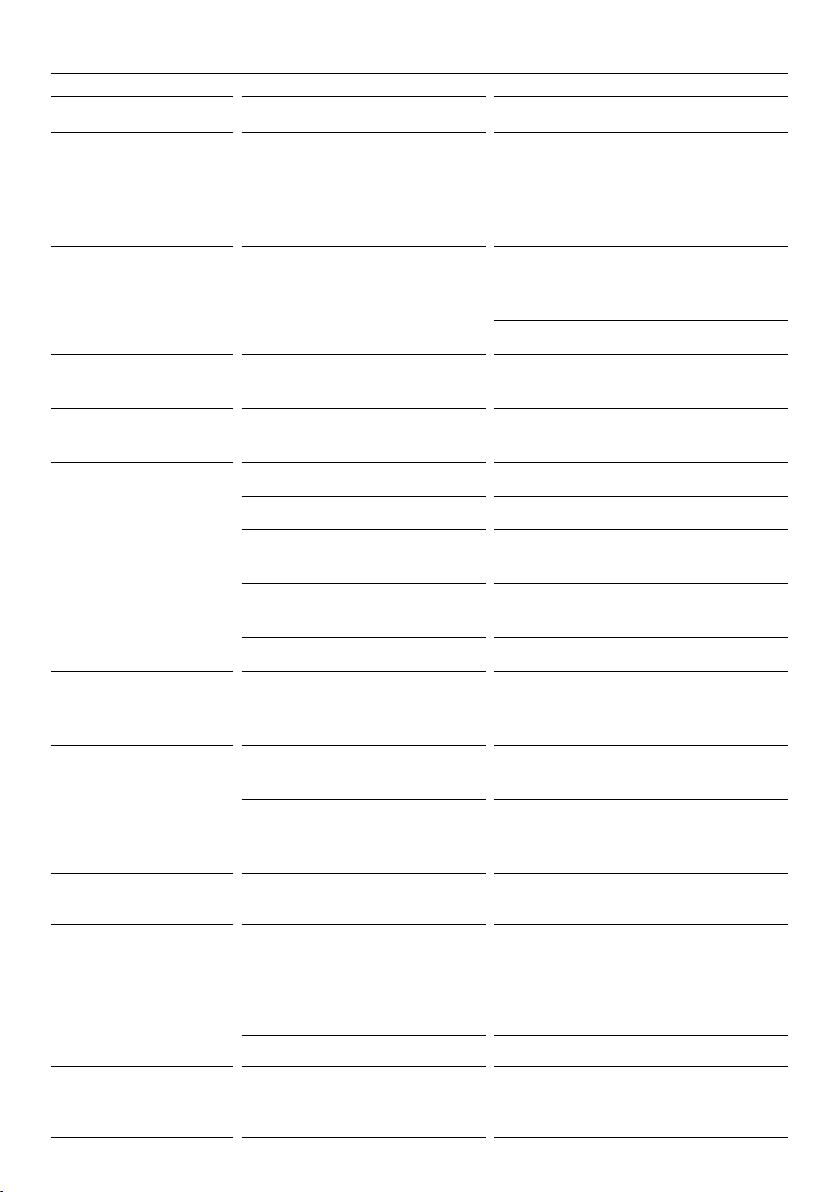
TROUBLESHOOTING
PROBLEM POSSIBLE CAUSES WHAT TO DO
When the appliance
door is opened 4rapid
beeps sound and a
code is displayed on the
control panel
Water in the vegetable
bins
Exterior of cabinet is
warm
Condensation on
outside of appliance
Condensation/ice inside
compartment
Bin does not slide
inand out evenly
Door not closing An obstruction is blocking door
Freezer door will not
open
Small or large ice cubes Water line is kinked/squashed. Check the external water line is
Frozen food items are
soft or melting
Condensation is formed by the
water produced by fruitand
vegetables.
Note: This is normal.
Not unusual during periods of
high humidity.
Frequent or long door openings. Minimize door openings.
Door gasket leaking. Check and clean door gasket seal.
Not unusual during periods of
high humidity.
Door not closing tightly. Arrange items in the compartment so
Doors not aligned. Call a service technician.
Packaging trapped. Check to ensure no food or packaging is
closing.
Appliance not installed correctly. Refer to your Installation guide supplied
The door has been recently
opened.
Blocked water filter. Change filter before calling technicians.
Record the code on the control panel
and contact Customer CareCenter.
A small amount of condensation
is beneficial for fruit and vegetable
storage.
Wipe out water with a cloth.
Wipe dry.
Wipe dry.
door can close tightly.
trapped behind
the tray/bin.
Move obstruction.
with this appliance to ensure your
appliance has been installed correctly.
Wait 30seconds and try again.
notkinked/squashed. If it is not kinked/
squashed contact Customer Care to
arrange a technician to check the
internal water line.
Remove items and place in another
freezer or cooler and callCustomer Care
immediately.
29
Page 30
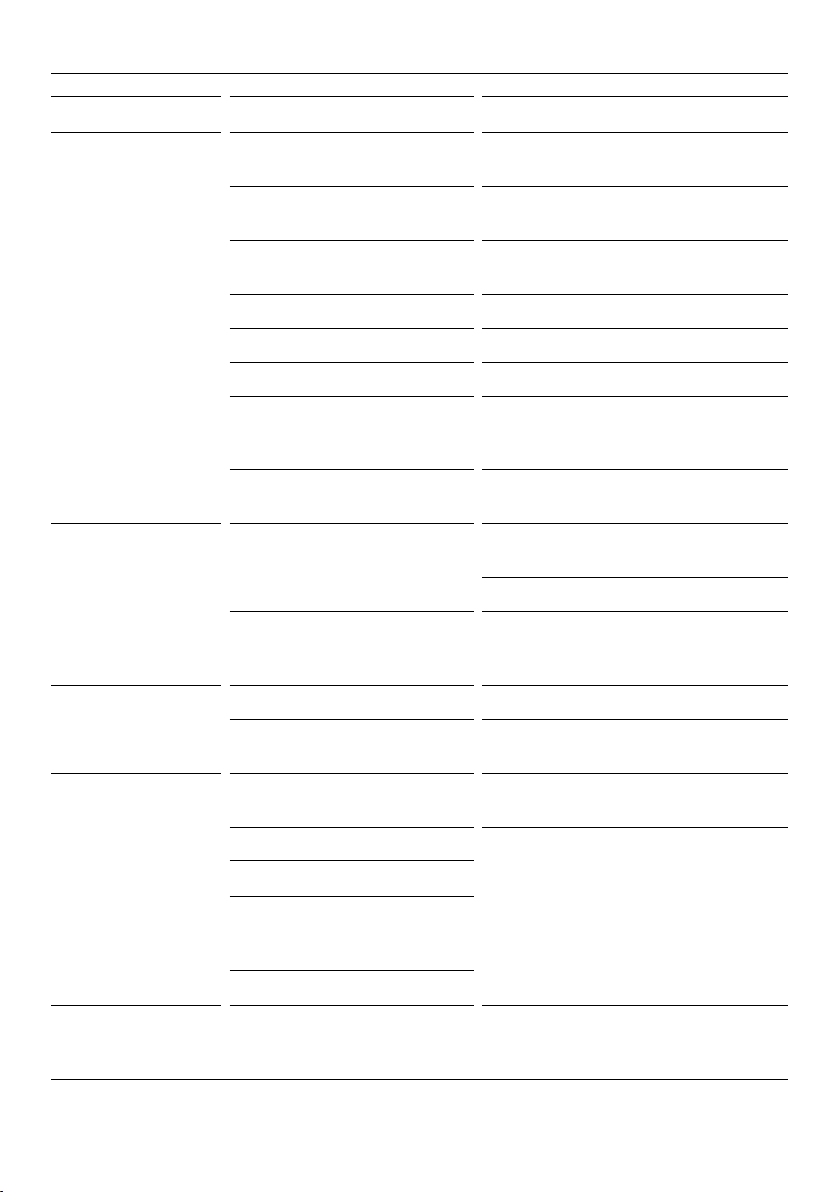
TROUBLESHOOTING
PROBLEM POSSIBLE CAUSES WHAT TO DO
Automatic ice maker
does notwork
Ice cubes taste
tainted
Slow ice cube freezing Door may have been leftajar. Close door.
Wet ice/ iceclumping Filter is blocked. Replace filter cartridge, see ‘Water filter’
Ice maker has not been turned
on.
Water supply turned off or not
connected.
Freezer compartment
notworking.
Water pressure too low. Check water pressure.
Water line kinked/squashed. Check water line for kinks/squashing.
Filter is clogged. Water filter may need replacing.
Ice cubes sticking in ice bin. Remove ice storage bin, loosen cubes and
The food mode is set to
‘SoftFreeze’.
Unsealed packages may be
transmitting odor/taste.
Poor taste from incoming water. Replace filter cartridge product parts and
Freezer compartment settoo
warm.
Long freezer door openings. Gently tap ice to unstick or, if large clumps
High ambient temperature.
Switch on ice maker, see ‘Automatic ice
maker (Freezer only)’ section.
Connect the water supply.
Contact Customer Care Center.
remove clumped ice. Replace ice storage
bin.
Change the food mode from
Discard ice cubes and clean ice storage
bin. See ‘Interior cleaning’ section.
Wrap or cover strong smelling foods.
accessories can be purchased through our
Customer Care Center.
Turn temperature to a colder setting. See
‘Using your appliance’ section.
section.
occur, empty ice bin and make new ice.
SOFT FREEZE.
Ice bin left out of freezer
compartment for a length of
time.
Ice will stick together overtime.
Ice is discolored Water filter has not been flushed. Refer to your installation guide supplied
with your appliance fordetails on how to
flush your water filter.
30
Page 31

SERVICE & WARRANTY
For details of your manufacturer’s warranty and contacts for servicing, refer to your
separate service and warranty book provided with your appliance.
This product has been designed for use in a normal domestic (residential environment). This
product is not designed for any commercial use. Any commercial use by the customer will
affect this products manufacturer’s warranty.
For spare parts, please contact Fisher & Paykel Customer Care. Spare parts are available
for all Fisher & Paykel refrigerators for a minimum period of 10 years from the date of
manufacture.
Complete and keep for safe reference:
Model
Serial No.
Purchase Date
Purchaser
Dealer
City
State
Zip
Country
31
Page 32

FISHERPAYKEL.COM
© Fisher & Paykel Appliances 2020. All rights reserved.
The models shown in this guide may not be available in all markets
The product specifications in this guide apply to the specific products and
models described at the date of issue. Under our policy of continuous product
improvement, these specifications may change at any time.
For current details about model and specification availability in your country,
please go to our website or contact your local Fisher&Paykel dealer.
and are subject to change at any time.
866276A 10.20
Page 33

Page 34

Page 35

Page 36

 Loading...