


CONVECTION SPEED OVEN
CONTEMPORARY OM24NDB1
MINIMAL OM24NDBB1
USER GUIDE
US CA


CONTENTS
Safety and warnings 5
Before you begin 9
Control panel 10
accessories 11
First use 12
Using the oven light 16
Using the timer 17
cooking guide 18
Automatic cooking 21
Microwave cooking 23
Recipes 24
Event logs 27
Troubleshooting 28
Warranty and service 30
Registration
To register your product visit our website: fisherpaykel.com/register
3

SAFETY AND WARNINGS
!
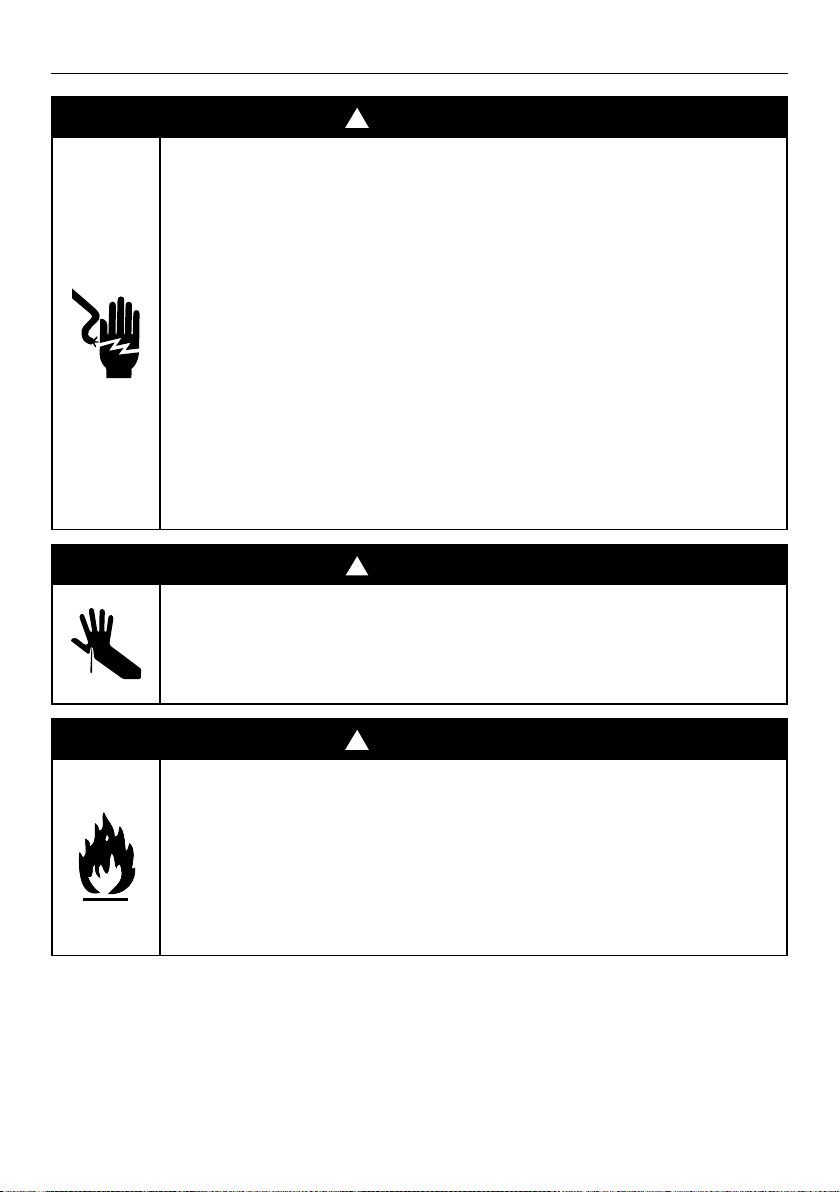
WARNING!
Electric Shock Hazard
Failure to follow this advice may result in
electric shock or death.
• Before carrying out any work on the
electrical section of the appliance, it must be
disconnected from the mains electricity supply.
• Connection to a good ground wiring system is
absolutely essential and mandatory.
• Alterations to the domestic wiring system must
only be made by a qualified electrician.
• Turn the oven off at the wall before replacing
the oven lamp.
!
WARNING!
Cut Hazard
Failure to use caution could result in injury.
• Take care – some edges are sharp.
!
WARNING!
Fire Hazard
Failure to follow this advice may result in
overheating, burning, and injury.
• Do not use adapters, reducers, or branching
devices to connect this appliance to the mains
power supply.
5

SAFETY AND WARNINGS
READ AND SAVE THIS GUIDE
PRECAUTIONS TO AVOID POSSIBLE EXPOSURE TO EXCESSIVE
MICROWAVE ENERGY
z
Do not attempt to operate this microwave with the door open. This can result in
harmful exposure to microwave energy.
z
Do not place any object between the microwave oven and the door or allow soil or
cleaner residue to accumulate.
z
Do not operate the microwave oven if it is damaged.
z
Do not repair or replace any part of the appliance unless specifically recommended
in this guide. All other servicing should be done by a Fisher & Paykel trained and
supported service technician.
WARNING!
To reduce the risk of fire, electrical shock, injury to persons or damage when using the
appliance, follow the important safety instructions listed below. Read all the instructions
before use. Use only for its intended purpose as described in these instructions.
Electrical
z
Make this information available to the person installing the appliance.
z
This oven is to be installed and connected to the electricity supply only by a
Fisher & Paykel trained and supported service technician or Customer Care.
z
If the installation requires alterations to the domestic electrical system, call a qualified
electrician. The electrician should also check that the socket cable section is suitable
for the electricity drawn by the oven.
z
The oven must be grounded.
z
Installation must comply with your local building and electricity regulations.
z
This appliance must be installed and connected to the mains power supply only by a
suitably qualified person according to these installation instructions and in compliance
with any applicable local building and electricity regulations. Failure to install the
appliance correctly could invalidate any warranty or liability claims.
z
If the power supply cable is damaged, it must be replaced by the manufacturer, its
service agent or similarly qualified person in order to avoid a hazard.
z
A circuit breaker is recommended.
z
Isolating switch: make sure this oven is connected to a circuit which incorporates an
isolating switch providing full disconnection from the power supply.
Installation
z
Make sure the cavity is completely sealed with no gaps. This is to ensure the oven
cooling system functions correctly.
General
z
Read all the instructions before using the oven. Use the oven only for its intended
purpose as described in these instructions.
z
Household appliances are not intended to be played with by children.
z
Do not leave children alone. Children should not be left alone or unattended in the area
where the appliance is in use. They should never be allowed to sit or stand on any part
of the appliance.
6

SAFETY AND WARNINGS
z
Children of less than 8 years old must be kept away from the appliance unless
continuously supervised. This appliance can be used by children aged from 8 years
and above, and persons with reduced physical, sensory or mental capabilities
or lack of experience and knowledge, if they have been given supervision or
instruction concerning the use of the appliance in a safe way and they understand
the hazards involved. Cleaning and user maintenance shall not be done by children
without supervision.
z
Do not place heavy objects on the oven door.
z
Do not let aluminium foils and food probes touch the heating elements.
z
Do not store flammable materials in or near the oven.
z
Do not wear loose fitting or hanging garments when using the appliance. They could
ignite or melt if they touch an element or hot surface and you could be burned.
z
Avoid using products containing chlorine, acids or abrasives, especially for cleaning
painted parts. In addition, avoid using acid or alkaline substances.
z
User servicing: do not repair or replace any part of the appliance unless specifically
recommended in this guide. All other servicing should be done by a Fisher & Paykel
trained and supported service technician.
z
In case of fire, smother the flame or use a dry chemical or foam type extinguisher.
z
Use only dry oven mitts or potholders. Moist or damp potholders on hot surfaces could
result in burns from steam. Do not let potholders touch hot areas or heating elements.
Do not use a towel or a bulky cloth for a potholder. It could catch fire.
z
Do not heat unopened food containers. They can build up pressure that may cause the
container to burst and result in injury.
z
Safe food handling: leave food in the oven for as short a time as possible before and
after cooking. This is to avoid contamination by organisms which may cause food
poisoning. Take particular care during warm weather.
z
Always keep oven vents unobstructed.
z
Do not operate your appliance by means of an external timer or separate remote
control system.
z
Caution: Hot air can blow from the vent at the base of the oven as part of the oven’s
cooling system.
z
Placement of oven shelves: always position shelves in the desired location while the
oven is cool (before preheating). If a shelf must be removed while the oven is hot, do
not let the oven mitts or potholder contact hot heating elements in the oven or the
base of the oven.
z
Do not clean the oven seal or use any oven-cleaning products on it. It is essential for a
good seal, which ensures that the oven operates efficiently. Care should be taken not to
rub, damage or move it.
z
Before cleaning the over, always disconnect the plug from the outlet.
z
Incorrect maintenance can cause corrosion of the steel cooking cavity.
z
The oven must be cleaned periodically and all food residues must be removed.
z
Do not clean the oven immediately after use as the residual steam will still be very hot.
z
Do not use oven cleaners, harsh/abrasive cleaning agents, waxes, or polishes. No
commercial oven cleaner, oven liner, or protective coating of any kind should be used in
or around any part of the oven. Do not use harsh/abrasive cleaners, scourers or sharp
metal scrapers to clean the oven door glass since they scratch the surface, which may
result in the glass shattering.
z
Clean only the parts listed in this manual.
z
Do not spray water or use a steam cleaner to clean any part of the oven. Use only
slightly damp cloths.
z
Do not store things children might want above the oven. Children could be burned or
injured while climbing on the oven to retrieve items.
7

SAFETY AND WARNINGS
z
Use only bakeware approved for oven use. Follow the bakeware
manufacturer’s instructions.
z
Eggs in their shells and whole hard-boiled eggs should not be heated in microwave
ovens since they may explode, even after microwave heating has ended.
z
Do not install or operate the appliance if it is damaged or not working properly. If you
receive a damaged product, contact your dealer or installer immediately.
z
Do not operate microwave oven while empty.
z
Do not overcook food. Carefully attend appliance when paper, plastic or other
combustible materials are placed inside the microwave oven to facilitate cooking.
z
Remove wire twist-ties from paper or plastic bags before placing in microwave.
z
If materials inside the microwave oven should ignite, keep microwave oven door closed,
turn microwave oven off and disconnect the power cord or shut off power at the fuse or
circuit breaker panel.
z
Do not use the cavity for storage purposes. Do not leave paper products, cooking
utensils or food in the cavity when not in use.
z
Liquids, such as water, coffee or tea are able to be overheated beyond the boiling
point without appearing to be boiling. Visible bubbling or boiling when the container is
removed from the microwave oven is not always present. THIS COULD RESULT IN VERY HOT
LIQUIDS SUDDENLY BOILING OVER WHEN A SPOON OR OTHER UTENSIL IS INSERTED INTO THE LIQUID.
z
Do not overheat liquid. To avoid delayed boiling when heating liquids, always put a
spoon in the container.
z
Beverages containing spoons should be placed in the centre of the glass turntable.
Metal components must stay at least 2 cm from the walls of the oven and the inside of
the door Sparks could damage the inside of the glass door.
z
Stir the liquid both before and halfway through heating it.
z
Do not use straight-sided containers with narrow necks. Use a wide-mouthed container.
z
After heating, allow the container to stand in the microwave oven for at least 20
seconds before removing the container.
z
Use extreme care when inserting a spoon or other utensil into the container.
z
If the microwave oven is installed as a built-in, observe the following instructions:
z
Do not mount over a sink.
z
If the microwave oven light fails, contact a Fisher & Paykel trained and supported
service technician or Customer Care.
Unsuitable dishware
z
The flat grill must be removed when using the microwave and combined modes. It can
only be used with convection functions.
z
Never turn on the microwave oven before you have put in the food. The only exception
allowed is testing dishware.
z
Only use plates and crockery that are microwave safe.
z
Never heat food covered in tin foil.
8
BEFORE YOU BEGIN
z
Ensure the installer has completed the ‘Final checklist’ in the Installation instructions.
z
Read this guide, taking special note of the 'Safety and warnings' section.
z
Remove all internal and external packaging and dispose of it responsibly. Recycle items
that you can.
z
Condition the oven, using the instructions under 'First use'.
1
6
2
3
4
5
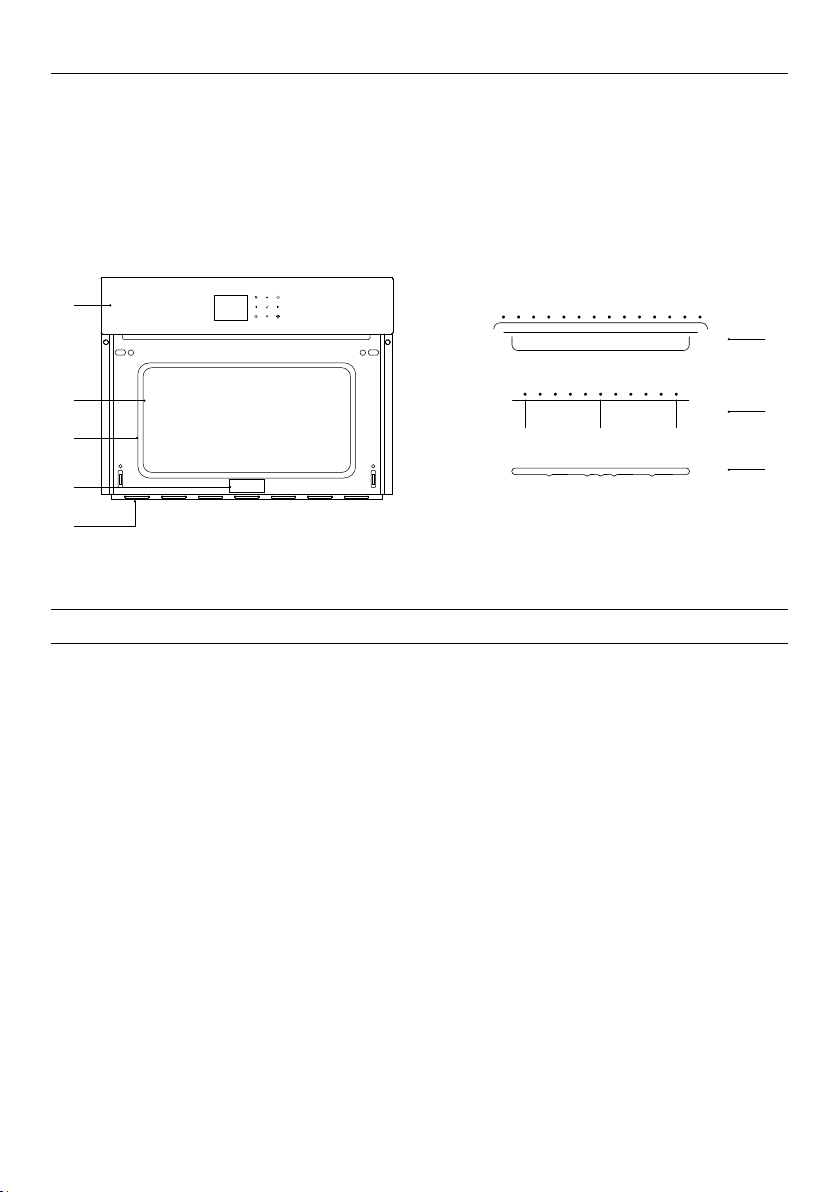
Oven features and accessories
1 Control panel
2 Oven light location
3 Oven seal
4 Identification plate
Not shown: oven door and handle.
7
8
5 Oven vent louvres
6 Baking pan and wire shelf
7 Turntable wire stand
8 Glass turntable
9
CONTROL PANEL
1 2
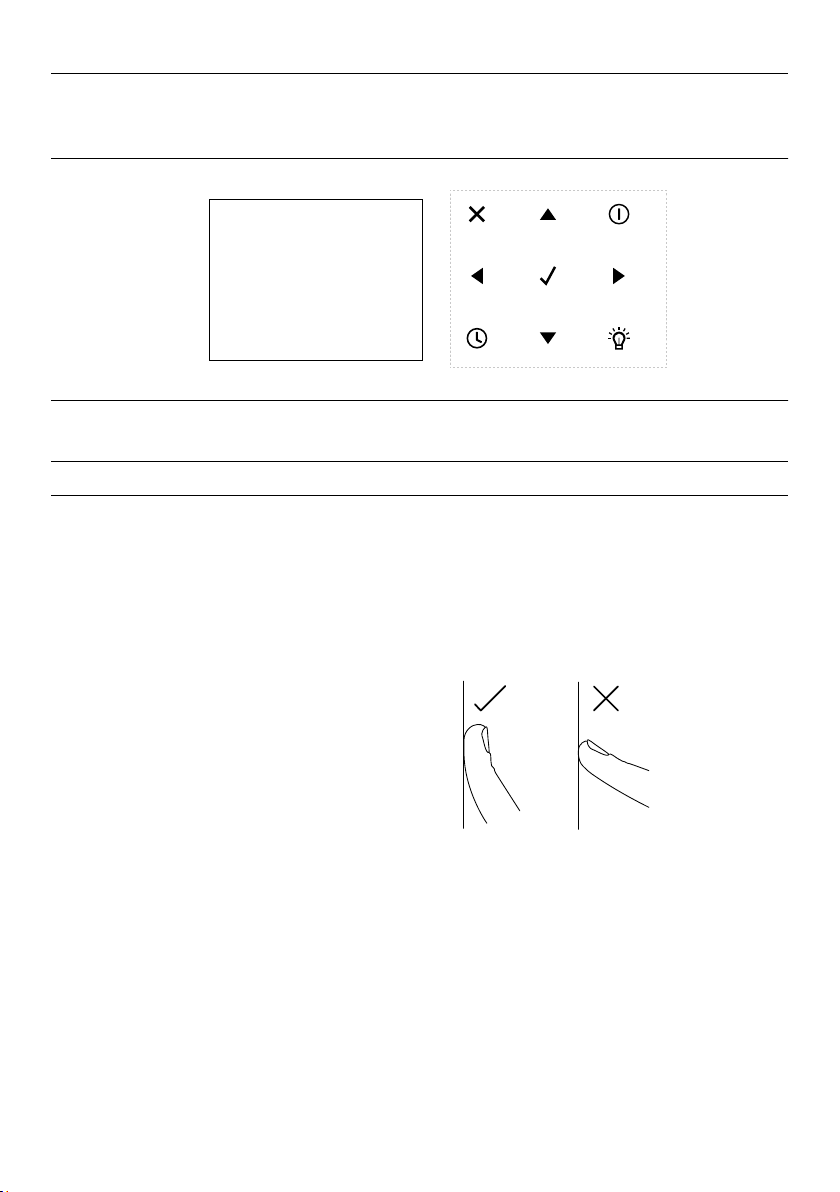
Control panel features
1 Display
2 Keypad
3 Cancel
4 Navigation arrow
Using the touch controls
Your oven is operated using a touch
keypad and display. To use the keypad to
navigate between functions and settings,
use the ball of your finger, not its tip. The
controls respond to touch, so pressure is
not needed.
3
4
7
5 Power
6 Confirm
7 Timer
8 Cavity light
4
6
4
5
4
8
10

ACCESSORIES
Wire shelf
To remove, pull towards you and then lift.
To insert, slide the shelf at a 45° angle until
it locks. Then lower and push the shelf all
the way to the end of the broil track.
Turntable wire stand
Slide the broil rack into the oven at a 45°
angle ensuring it locks into place. Gently
lower and push into the notches in the oven
cavity.
Glass turntable
Position the glass turntable into the oven
cavity ensuring all three notches are secure.
11

FIRST USE
SETTINGS
SETUP
SETTINGS
SETUP
LANGUAGE
When using your oven for the first time, you will be prompted to:
z
change the time
z
change the clock format (12 hours or 24 hours)
z
change the units for temperature and weight
z
adjust the volume of audio feedback
z
change the language of the display
These settings can be modified at any time in the settings menu.
1
2
3
11:00 am
Locate the
arrow keys. Press
Press
SETTINGS menu using the
to confirm.
to enter the sub-menu.
Select the setting you want to change,
adjust as needed then press
to confirm.
12

FIRST USE
COOKING
Conditioning the oven
It is important that you condition the oven before using it for cooking. Conditioning will
burn off any manufacturing residue and ensure you get the best results from the start.
Ensure the kitchen is well ventilated before beginning.
1
2
3
11:00 am
TRADITIONAL COOKING
MICROWAVE COOKING
11:00 am
TRUE CONVECTION
445°F
11:00 am
Enter the
and pressing
Press
Set the temperature to 445°F (230°C)
for 30 minutes.
COOKING menu by locating
to select.
to select TRUE CONVECTION.
After conditioning
There will be a distinctive smell and a small amount of smoke during the conditioning
process as manufacturing residue is burnt off. This is normal. Once cooled, wipe out the
oven with a damp cloth and mild detergent, and dry thoroughly.
Conditioning accessories
Before using the accessories for the first time, clean carefully with hot water, dishwashing
liquid and a soft cloth.
13

Selecting and using a function
COOKING
PM
FRIDAY 20/11/2018
PM
FRIDAY 20/11/2018
FIRST USE
1
11:00 am
TRADITIONAL COOKING
2
3
MICROWAVE COOKING
11:00 am
TRUE CONVECTION
325°F
11:00 am
Enter the function menu by locating
and pressing
Navigate to the desired cooking mode and
press
Use the
before pressing
If no temperature is selected after 10 seconds,
the default temperature will be used.
To pause cooking, press
Press
to select.
to select.
to adjust the temperature
to begin cooking.
at any point.
to resume.
4
14
TRUE CONVECTION
77°F
11:00 am
325°F
When preheating, the current temperature
will be shown in the display alongside the
preheat icon. When the set temperature
is reached a tone will sound and the
temperature value disappears from
the display.

Editing or cancelling cooking
TRADITIONAL COOKING
MICROWAVE COOKING
11:00 am
MICROWAVE AND BROIL
FIRST USE
Changing the temperature
Press
the temperature by pressing
Press
then
. Select and change
to confirm.
.
300W
11:00 am
TRADITIONAL COOKING
MICROWAVE COOKING
11:00 am
DEFROST BY WEIGHT
1lb
11:00 am
Changing the power
Time
Press
power by pressing
then
. Select and change the
. Press
to confirm.
Changing the function
Press
new function and press
then
. Use
to navigate to a
to confirm.
Changing the weight*
Press
*Only available when using
then change the weight by using
. Press
to confirm.
DEFROST BY WEIGHT.
Cancelling cooking
To cancel cooking, press
any time.
then
at
15

USING THE OVEN LIGHT
The oven lights will turn on automatically when the door is opened or a cooking mode has
started. During cooking, the lights will automatically dim after 3 minutes.
Turning the oven light ON or OFF
1
Press
at any time, or open the door.
16

USING THE TIMER
The timer does not turn the appliance on or off. If you want to turn the oven off
automatically, refer to the 'Automatic cooking' section.
The timer can be set for up to 12 hours and 59 minutes and is shown in the status bar
as HR:MIN, before switching to MIN:SEC for the last minute.
When the time is complete, 00:00 will show in the status bar and a tone will sound.
1
MINUTE MINDER
00 : 00
2
11:00 am
Editing or cancelling the timer
1
Press
using
To switch between hours and minutes
use
To confirm, press
Press and hold
and set the desired time
.
.
.
.
17

COOKING GUIDE
All oven functions default to the recommended temperature, these can be altered at any
time.
CONVECTION FUNCTION
TRUE CONVECTION 330 165 120 – 445 50 – 230
RING AND BROIL 410 210 120 – 445 50 – 230
CONVECTION BROIL 330 165 120 – 445 50 – 230
BROIL 445 230 120 – 445 50 – 230
MICROWAVE FUNCTION
MICROWAVE COOKING 900 150-900
MICROWAVE AND BROIL 300 200 400 150-450
MICROWAVE AND RING 300 100 210 150-450 50-200 120-450
DEFROST BY TIME 150
DEFAULT TEMPERATURE TEMPERATURE RANGE
°F °C °F °C
DEFAULT TEMPERATURE TEMPERATURE RANGE
WATT °C °F WATT °C °F
DEFROST BY WEIGHT 150
18

COOKING GUIDE
UTENSILS &
COVERINGS
Aluminum foil Yes
Aluminum
containers
Browning dish Yes
Glass ceramic
(Pyroceram®)
Glass,
heat-resistant
Glass, non-heatresistant
Lids, glass Ye s Yes
Lids, metal
Metal cookware
Metal, misc: dishes
with metallic trim,
screws, bands,
handles.
Metal twist ties
Oven cooking
bags
Paper plates Ye s
MICROWAVE
Keep foil at least 1" (25mm) from
walls of oven.
Yes.
Can be used if ¾ filled with food.
Keep 1" (25mm) away from walls
and do not cover with foil.
Do not exceed recommended
preheating time. Follow
manufacturer’s directions.
Yes
Yes Yes Yes
No No No
No
No Yes
No No No
Yes
Good for large meats or foods that
need tenderising. Do not use metal
twist ties.
For reheating.
CONVECTION
BROIL, SLOW COOK
No No
Yes.
Broil-no cover
No No
Yes
Broil with no cover
Yes
Broil with no cover
Yes
Broil with no cover
No No
HIGH MIX/ROAST
LOW MIX/BAKE
Yes.
Can be used if ¾
filled with food.
Keep 1" (25mm)
away from walls
and do not cover
with foil.
Yes
Yes
No
Yes
Do not use metal
covering.
Yes
Do not use metal
twist ties.
19

COOKING GUIDE
UTENSILS &
COVERINGS
Paper towels Yes
Paper, ovenable Yes Yes
Microwave safe
plastic containers
Plastic, thermoset® Yes Yes
Plastic wrap Yes
Pottery, porcelain
stoneware
Styrofoam Yes
Wax paper Yes
Wicker, wood,
straw
MICROWAVE
To cover for reheating and
cooking. Do not use recycled
paper towels which may contain
metal filings.
Yes
Use for reheating and defrosting.
Some microwave-safe plastics are
not suitable for cooking foods
with high fat and sugar content.
Follow manufacturer’s directions.
Use brands specially marked for
microwave use. DO NOT allow
plastic wrap to touch food. Vent
so steam can escape.
Yes
Check manufacturer’s
recommendation for being
microwave safe.
For reheating.
Good covering for cooking and
reheating.
Yes
May be used for short periods of
time. Do not use with high fat or
high sugar content foods. Could
char.
CONVECTION
BROIL, SLOW COOK
No No
For temperatures up
to 400°F (205°C). Do
not use for broiling.
No NO
Are heat resistant up
to 425°F (218°C). Do
not use for broiling.
No NO
Yes Yes
No No
No No
No No
HIGH MIX/ROAST
LOW MIX/BAKE
Yes
For temperatures up
to 400°F (205°C).
Yes
Must be microwave
and oven safe
20

AUTOMATIC COOKING
To use automatic cooking modes ensure the clock is displaying the correct time. Refer to
'First use' for setting the time. Use the automatic cooking function to set the oven to turn
off after a set length of time.
Setting automatic cooking
TRUE CONVECTION
1
2
3
11:00 am
11:00 am
11:00 am
325°F
Cooking time
00 : 50
STOP TIME
11 : 50
Select the cooking mode and temperature
you wish to use and press
by pressing
Set the desired cook time by using
Press
The maximum cooking time is 12 hours.
Select and set the desired stop time by
using
to confirm.
. Press
.
to confirm.
, then select
.
4
a
B
TRUE CONVECTION
275°F
11:00 am
325°F
END
11:50 am
TIME
00:50
During cooking, the following will
be displayed:
A function
C
B current
D
E
temperature
When the end time is reached
The oven will automatically turn off and
a tone will sound.
C target temperature
D end time
E time elapsed
21

AUTOMATIC COOKING
Editing or cancelling automatic cooking
Cooking time
11:00 am
11:00 am
00 : 50
STOP TIME
11 : 50
Changing the cook time
Press
using
and change the desired cook time
. Press
to confirm.
Changing the end time
Press
, then select and change
the desired cook time using
Press
to confirm.
.
22

Setting defrost by time
TRADITIONAL COOKING
MICROWAVE COOKING
1
2
3
MICROWAVE COOKING
11:00 am
DEFROST BY TIME
00' 20"
11:00 am
DEFROST BY TIME
00' 06"
11:00 am
Using
Set the defrost time by using
Press
During defrosting, a countdown will be shown
on the display. The remaining time can be
changed at anytime by pressing
When the end time is reached
A message will appear on the display.
, select . Press
to confirm.
to confirm.
.
.
23

RECIPES
RECIPES
MEAT
The recipe function has been designed to help achieve optimal oven conditions for
cooking a particular food type. When in use, the function, temperature and time are set
automatically and any additional details are displayed on screen.
Recipes can be added to a personal recipe list for quick access, refer to 'Saving a recipe' for
details.
Using recipes
1
2
3
11:00 am
RECIPES
PRESET
PERSONAL
PRESET RECIPES
Press
Press
PERSONAL. Press
Select the desired food type by pressing
then press
to choose from PRESET or
and
. Press
.
to confirm.
to confirm.
24

MEAT
RECIPES
4
5
6
WHOLE
PIECES
MEAT
STUFFED ROAST VEAL
BRAISED COOKING
STUFFED PORK ROAST
PORK SHANK
LEG OF LAMB
STUFFED PORK ROAST
Rectangular grid
Level 2
Weight 2.6lb
Cooking time 01:35
Preheat NO
Start
Save
Press
Press
to refine food selection.
to confirm.
Select a recipe by pressing
Press
Press
to confirm.
to start cooking.
.
7
STUFFED PORK ROAST
Insert food
11:00 am
Weight
2.6lb
TIME
01:35
Follow the onscreen guidance.
When recipe is complete
The oven will automatically turn off and
a tone will sound.
25

RECIPES
2.8
lb
Saving a recipe
Commonly used recipes can be adjusted and saved for quick access. These can be found
under
PERSONAL recipes.
STUFFED PORK ROAST
Rectangular grid
Level 2
1
2
Weight 2.6lb
Cooking time 01:35
Preheat NO
Start Save
MEAT
Weight
Use
to navigate to weight or cook time.
Press
to confirm.
Set the desired weight and cook time
before pressing
to confirm.
STUFFED PORK ROAST
Rectangular grid
Level 2
3
Weight 2.8lb
Cooking time 01:35
Preheat NO
Start
Removing a personalized recipe
STUFFED PORK ROAST
Do you want to remove recipe?
1
26
NO YES
Save
Use
to navigate to SAVE.
Press
to confirm.
Select the recipe you want to remove
and press
and
to confirm.
. Press
to select YES

EVENT LOGS
SETUP
SERVICE
SYSTEM
OM 24
SETUP
SETTINGS
The system menu allows access to event logs. This section displays any recorded errors,
faults and all voltage information. These codes can be communicated to Customer Care in
the event of a product fault.
1
2
3
EVENT LOGS
MAIN VOLTAGE
DEMO
Select and press
Select
Press
Press
and press
choose from the available options.
to confirm.
to confirm.
to confirm.
27

TROUBLESHOOTING
If there is a problem with your oven, please check the following, before contacting a
Fisher & Paykel trained and supported service technician or Customer Care Centre.
PROBLEM POSSIBLE CAUSES / SOLUTION
Food browns unevenly. Oven is not preheated.
Aluminum foil on oven rack or oven bottom.
Baking pan is too large for recipe.
Baking pans are touching each other or oven walls.
Food too brown
on bottom.
Food is dry or has shrunk
excessively.
Food is baking or
roasting too slowly.
Pie crusts do not brown
on bottom or have
soggy crust.
Cakes pale, flat and may
not be cooked inside.
Oven is not preheated.
Using glass, dull or darkened metal pans.
Incorrect rack position.
Baking pans are touching each other or oven walls.
Oven temperature too low.
Oven not preheated.
Oven door opened frequently during cooking.
Food is tightly sealed with aluminum foil.
Pan size too small.
Baking time is not long enough.
Using shiny steel pans.
Rack position is incorrect.
Oven temperature is too low.
Oven is temperature too low.
Baking time is not long enough.
The cake has been tested too soon.
The oven door has been opened too often during baking.
28
Baking pan size may be too large.

TROUBLESHOOTING
PROBLEM POSSIBLE CAUSES / SOLUTION
Cakes high in middle with
crack on top.
Pie crust edges
too brown.
Other F__ Error appears
in the display window.
The oven display won’t
turn on.
The cooling fan
continues to run after
the oven is turned off.
Oven is not heating. Check the circuit breaker or fuse box to your house.
Baking temperature is too high.
Baking time is too long.
Baking pans are touching each other or oven walls.
Rack position is incorrect.
Baking pan size may be too small.
Batter is over-mixed
Oven temperature too high.
Edges of crust is too thin.
Remove power and turn it back on again after a few seconds.
If condition persists, note the code number (refer to 'Event
logs') and contact Customer care or Fisher & Paykel trained
and supported service technician.
Turn off power at the main power supply, then turn the power
back on.
If this does not resolve the issue, call Customer care or
Fisher & Paykel trained and supported service technician.
The fan will turn off automatically when the electronic
components have cooled sufficiently.
Check that power is being supplied to the oven.
Make sure the oven temperature has been selected.
Oven is not cooking
evenly.
Oven light is not
working properly.
Clock and timer are not
working properly.
Excessive moisture. Using the convection mode will eliminate any moisture in
Turning off demo mode.
Refer to
position.
Always reduce recipe temperature by 25°F (15°C) when
baking with True Convection mode.
Check that power is being supplied to the oven.
Refer to the 'First use' section of this user guide.
Make sure there is proper electrical power to the oven.
the oven.
To disable the function, press the arrows
DEMO display page and select off. Confirm your selection by
pressing
'MICROWAVE COOKING' for recommended rack
to enter the
.
29

WARRANTY AND SERVICE
Before you call for service or assistance
Check the things you can do yourself. Refer to the installation instructions and your user
guide and check that:
z
Your product is correctly installed.
z
You are familiar with its normal operation.
z
Model number
z
Serial number
z
Date of installation
If after checking these points you still need assistance or parts, please refer to the
Service & Warranty book for warranty details and your nearest Service Centre,
Customer Care, or contact us through our website www.fisherpaykel.com or email:
customer.care@fisherpaykel.com.
Complete and keep for safe reference:
Mode
Serial No.
Purchase Date
Purchaser
Dealer
Suburb
Town
Country
30


FISHERPAYKEL.COM
© Fisher & Paykel Appliances 2020. All rights reserved.
The models shown in this guide may not be available in all markets
The product specifications in this guide apply to the specific products and
models described at the date of issue. Under our policy of continuous product
improvement, these specifications may change at any time.
For current details about model and specification availability in your country,
please go to our website or contact your local Fisher&Paykel dealer.
and are subject to change at any time.
592244A 08.20
 Loading...