

Page 1
NZ AU
User guide
Built-in oven
OB90 models
Page 2

Page 3

1
Contents
Safety and warnings
2
Oven controls and setting the clock
3
First use
5
Using your oven
6
Oven functions
7
Baking charts
8
Using the timer
9
Automatic cooking
10
Care and cleaning
11
Troubleshooting
21
Warranty and service
22
Important!
SAVE THESE INSTRUCTIONS
The models shown in this user guide may not be available in all markets and are
subject to change at any time. For current details about model and specification
availability in your country, please visit our local website listed on the back cover
or contact your local Fisher & Paykel dealer.
Page 4
2
Safety and warnings
Your built-in oven has been carefully designed to operate safely during normal cooking
procedures. Please keep the following guidelines in mind when you are using your oven:
WARNING!
Hot Surface Hazard
Accessible parts may become hot when this oven is in use.
To avoid burns and scalds, keep children away.
Do not touch hot surfaces inside the oven.
Use oven mitts or other protection when handling hot surfaces such as oven
shelves or dishes.
Take care when opening the oven door.
Let hot air or steam escape before removing or replacing food.
Failure to follow this advice could result in burns and scalds.
WARNING!
Electrical Shock Hazard
Disconnect the oven from the power supply before any cleaning or
maintenance.
Failure to do so may result in death or electrical shock.
Important safety instructions
Isolating switch: make sure this oven is connected to a circuit which incorporates an isolating
switch providing full disconnection from the power supply.
Household appliances are not intended to be played with by children.
Children, or persons with a disability which limits their ability to use the appliance, should have a
responsible person to instruct them in its use. The instructor should be satisfied that they can use
the appliance without danger to themselves or their surroundings.
Safe food handling: leave food in the oven for as short a time as possible before and after
cooking. This is to avoid contamination by organisms which may cause food poisoning. Take
particular care during warmer weather.
Do not place aluminium foil, dishes, trays, water or ice on the oven floor during cooking as this
will irreversibly damage the enamel.
Do not stand on the door, or place heavy objects on it.
Do not use harsh abrasive cleaners or sharp metal scrapers to clean the oven door glass since
they scratch the surface, which may result in shattering of the glass.
Do not use a steam cleaner to clean any part of the oven.
Caution. Hot air can blow from under and above the oven door as part of the oven’s cooling
system.
Do not keep flammable substances in the oven.
Do not operate your appliance by means of an external timer or separate remote-control system.
If the power supply cable is damaged, it must be replaced by the manufacturer, its service agent
or similarly qualified person in order to avoid a hazard.
Under unfavourable electrical supply conditions, the appliance may cause temporary voltage
drops.
Page 5
3
Oven controls and setting the clock
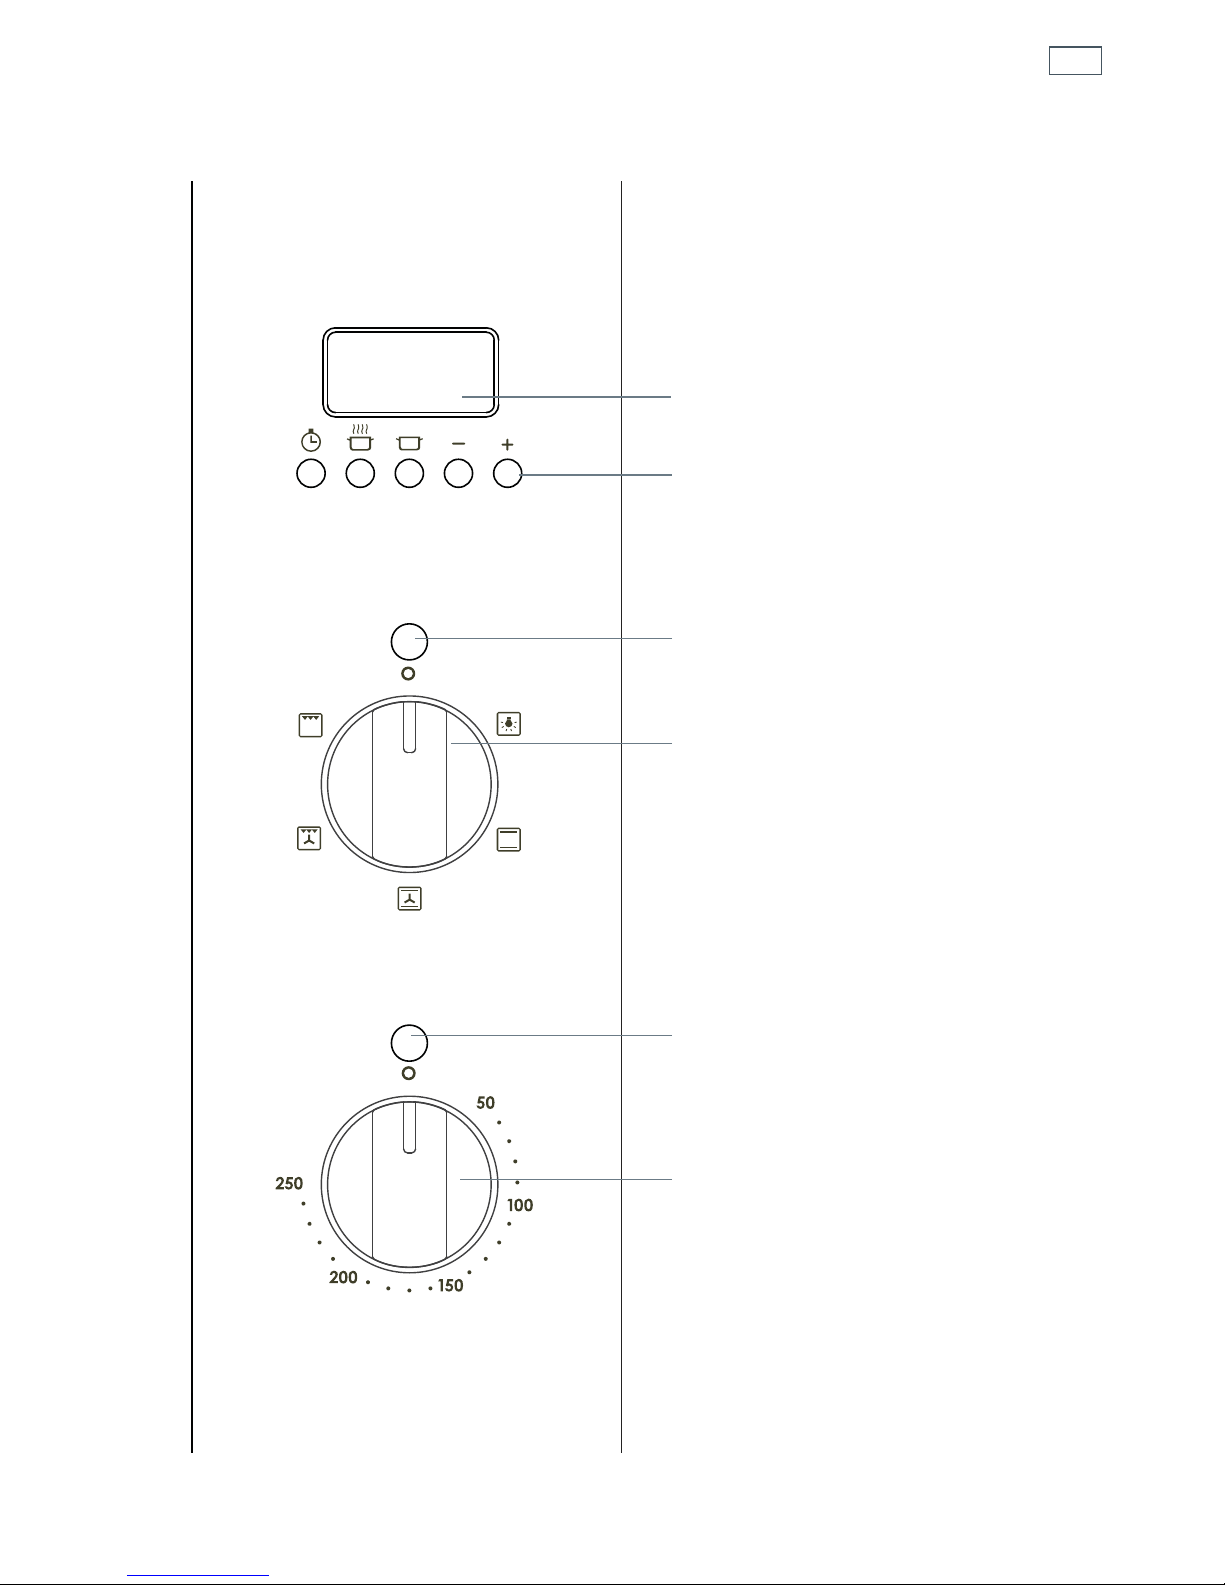
TEMPERATURE
STOP
FUNCTION
Clock display
Control buttons
Function indicator light
Temperature indicator light
Function knob
Temperature knob
Page 6
4
Oven controls and setting the clock
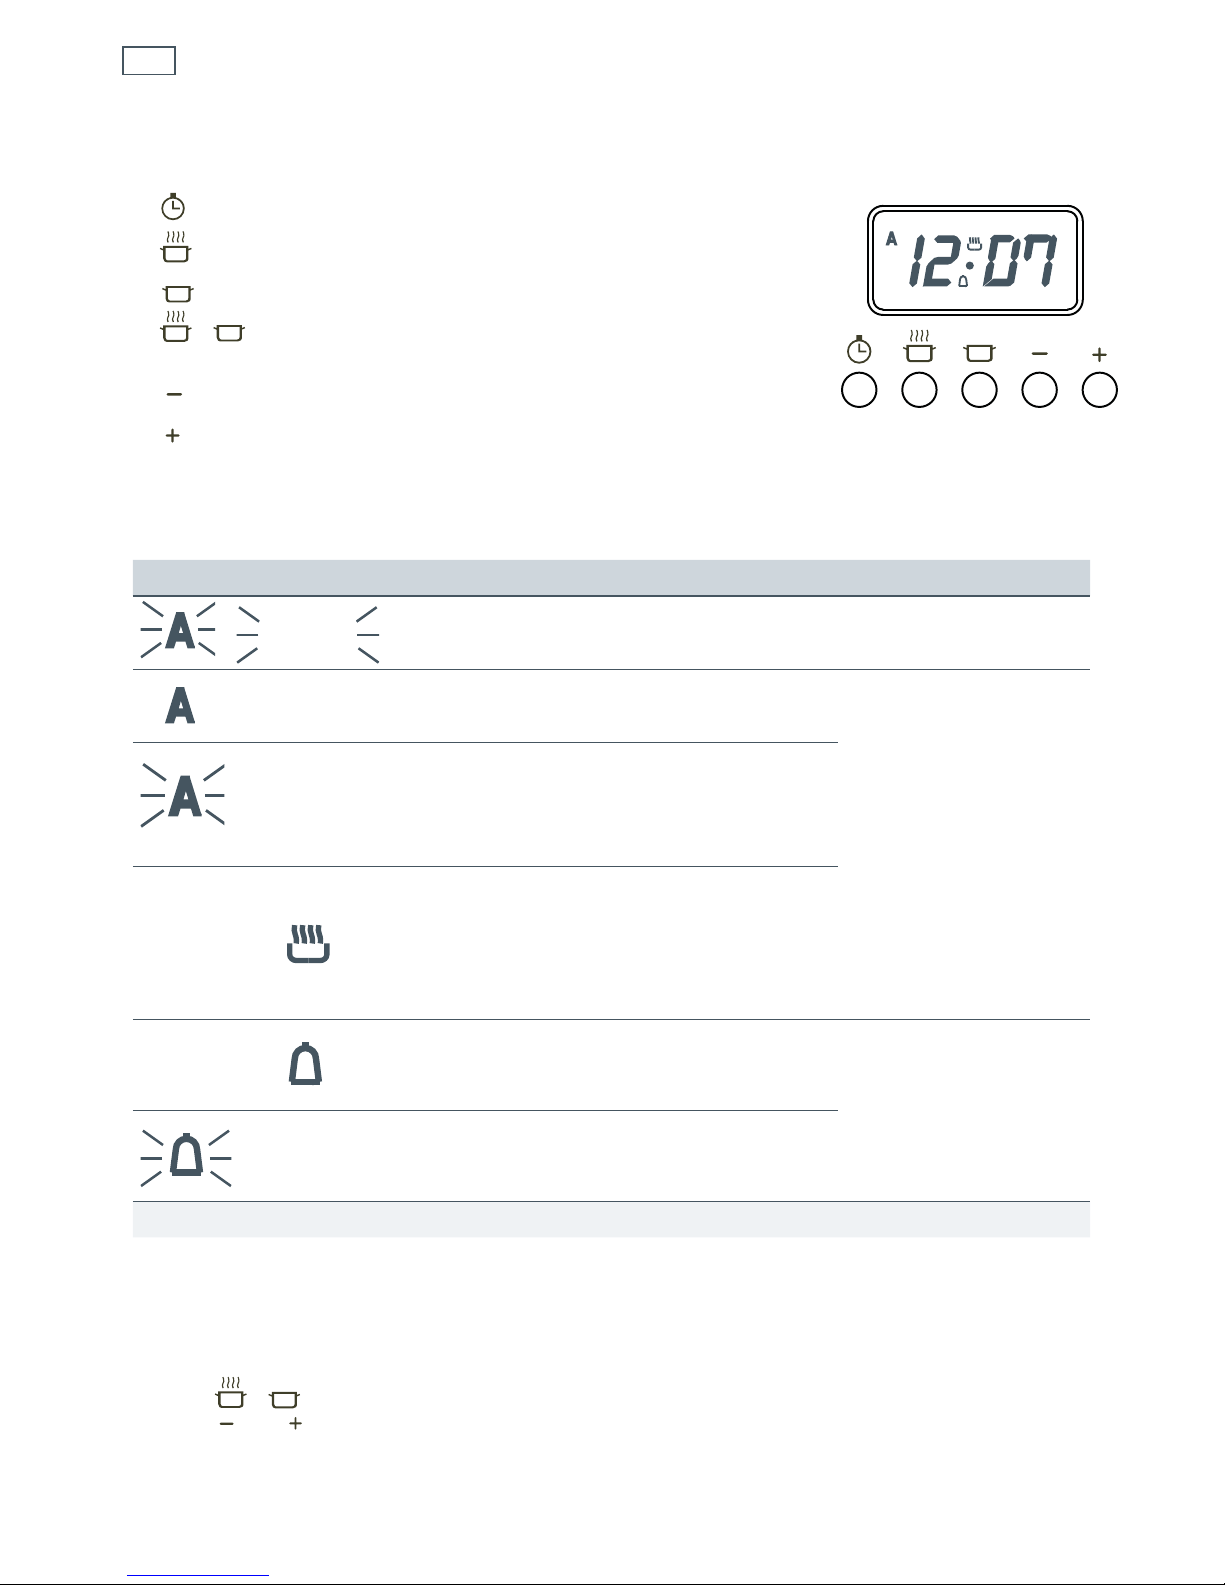
Buttons
sets the timer
sets the cooking time for automatic cooking
STOP
sets the stop time for automatic cooking
+
STOP
sets the clock, returns oven to manual mode,
cancels automatic cooking
decreases time and beep volume
increases time
Illuminated symbols
To set the clock
When the power to the oven is turned on or restored after a power failure, 0
.
00 and A
will
flash in the display.
1
Press
+
STOP
together .
2
Press and until you have the correct time of day.
If the display shows It means that... For more information
0.00
The clock needs to be set. See instructions below.
and the time of day
The oven is set for automatic
cooking.
See section ‘Automatic
cooking’.
and beeping
Automatic cooking has finished
or has been set incorrectly (the
stop time is before the time of
day).
The oven is in manual mode or
cooking is taking place (lit except
when the oven is in stand-by
before and after automatic
cooking).
The timer is set.
See section ‘Using the
timer’
and beeping
The set time is up.
STOP
Page 7

5
First use
Before using your new oven for cooking or baking, please:
1
Read this user guide, taking special note of the ‘Safety and warnings’ section.
2
Remove all accessories and packaging. Make sure you peel any protective film off the surfaces.
Discard the film immediately, keeping it out of reach of children.
3
Set the clock. The oven will not work until the clock has been set. See ‘Oven controls and setting
the clock’ for instructions.
4
Slide in the shelf and grill tray as shown in ‘Using your oven’.
5
Condition the oven. Heat it at 225oC for the times below:
60 mintues using
Fan Bake
15 minutes using
Grill
There will be a distinctive smell during the conditioning. This is normal, but make sure your
kitchen is well ventilated.
6
Once cooled, wipe out the oven with a damp cloth and mild detergent, and dry thoroughly.
1
Oven vent louvres
2
Control panel
3
Side racks
4
Grill tray
5
Oven door and handle
6
Rubber seal
7
Oven door frame
8
Plastic corner clips
Not illustrated:
Baking tray
Step-down oven shelf
Grill rack
2
8
8
3
4
6
7
5
1
Page 8

6
Using your oven
1
Slide in the shelf, making sure that:
it is between the two wires of a shelf position
the stop notches point down
the guard rail is at the back.
Note: the grill tray should be positioned between the two
wires of a shelf position, and orientated as shown.
2
Select a function.
The oven lights will come on.
The function indicator light will also come on.
3
Set the temperature.
The temperature indicator light will come on.
It will go out when the oven has reached the set
temperature.
During cooking
The temperature indicator light may come on and go out
again as the oven maintains the temperature.
A cooling fan may automatically come on at different times
and blow out warm air above the oven door. It may continue to
run even after the oven has been turned off. This is normal.
Set the temperature back to off (
O) before changing functions.
When you have finished cooking
Turn both the function and temperature knobs to the off (O) position.
FUNCTION
TEMPERATURE
Shelf positions
Stop notch
Stop notch
3
4
2
1
Page 9

7
Oven functions
OVEN LAMP
Only the oven light comes on. It remains on in all the cooking functions.
BAKE
This is the traditional method of baking. It is best to bake on only one shelf at a time in this
function. Ideal for large cakes and dishes that bake for several hours.
FAN BAKE
Ideal for dishes like lasagne that need to brown on top and also single trays of small cakes or
biscuits that bake in less than an hour.
FAN GRILL
Use with the oven door closed and the temperature set no higher than 225°C. Ideal for roasting
tender cuts of meat and poultry. Use the lower shelf positions for larger items eg a whole
chicken.
GRILL
Use with the oven door closed and the temperature set no higher than 225°C. For best results,
use the shelf position 4 when you want quick browning (eg toast).
Important!
Safe food handling: leave food in the oven for as short a time as possible before and after cooking or
defrosting. This is to avoid contamination by organisms which may cause food poisoning. Take particular
care during warmer weather.
Notes on baking:
Preheat the oven before baking.
Do not place anything, including water, ice or aluminium foil on the oven floor.
Page 10

8
Baking charts
Please note:
The settings in the following chart are guidelines only. Follow the instructions in your recipe or
on food packaging and be prepared to adjust the oven settings and baking times to achieve the
best possible results for you.
Shelf positions are counted from the base up (1 is the lowest, 4 the highest).
Position the shelf before you turn the oven on, then preheat the oven to the required
temperature. Place items in the oven only when temperature indicator light has gone out.
Due to the width of the oven, a single shelf can usually accommodate double the standard
recipe.
Food Note on
arrangement
Shelf
position(s)
Best
function
Temperature (OC) Time
Small cakes
single shelf
2
Bake
180-190 13-17 mins
Scones
single shelf
2
Fan Bake
210-230 8-12 mins
Sponge
two small pans (20
cm),on single shelf
2
Bake
170-190 25-35 mins
one large pan
(26 cm)
2
Bake
175 30-40 mins
Light fruit cake
two pans (21 cm)
on single shelf
2
Bake
155-165 1 hr 30 mins
Rich fruit cake
exact baking time
will depend on size
2
Bake
130-150 3-6 hrs
Apple pie single shelf 1
Bake
185 35-45 mins
Custard tart single shelf 1
Bake
220, then 180*
10, then
20-30* mins
Quiche single shelf 1
Bake
180-200 30-40 mins
Meringues single shelf 1
Bake
100-120 1 hr
Bread rolls single shelf 1
Bake
210-230 15-20 mins
Muffins
2 x 12 muffin trays
on single shelf
3
Fan Bake
190-200 10-15 mins
Pastry case
(baked ‘blind’)
one 21 cm flan tin 1
Fan Bake
200
10 mins with
beans, then 10
mins without
* This is a two-stage baking process: adjust the temperature after the first stage.
Page 11
9
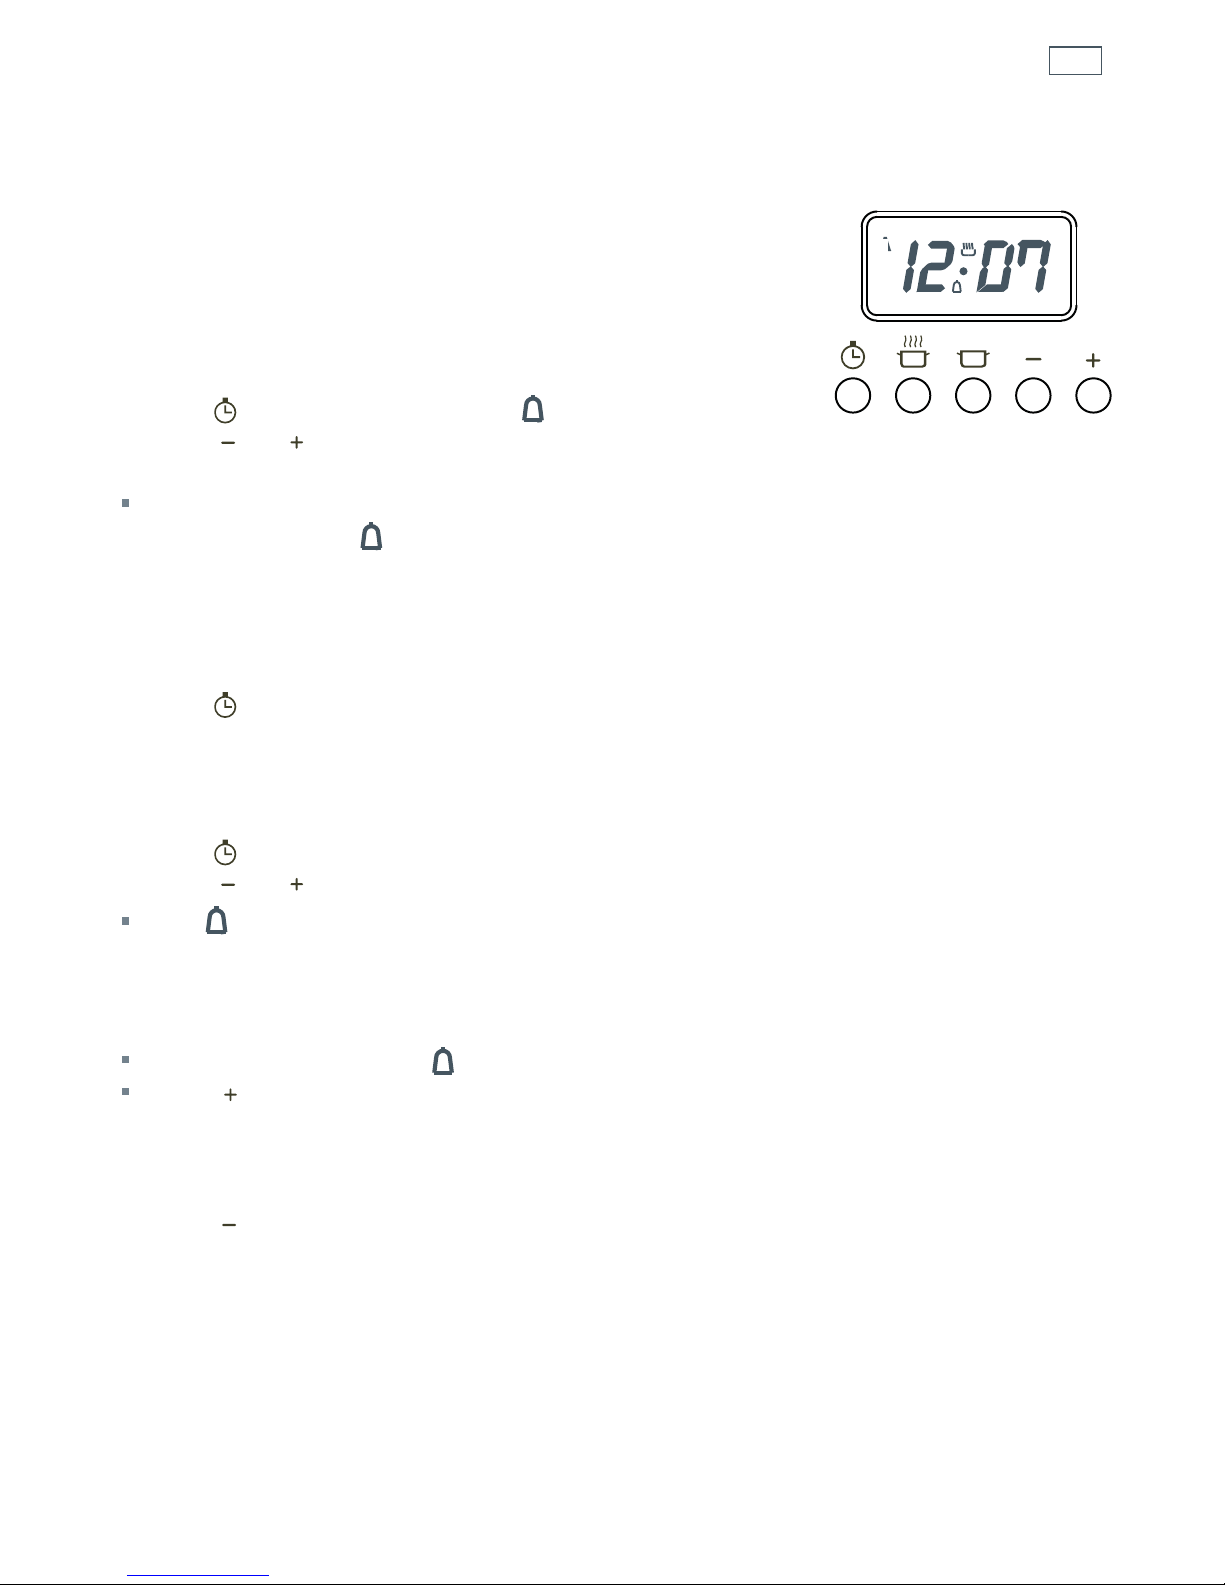
Using the timer
You can use the timer at any time, even when
the oven is not in use.
Important!
The timer does NOT turn the oven off.
To set the timer
1
Press . 0
.
00 will show with the symbol flashing.
2
Press and to set the time you want (up to 23 hours
and 59 minutes, in 1-minute steps).
After a few seconds, the clock will show the
time of day with the
symbol steadily lit.
The timer is now counting down.
To check the remaining time
Press
.
To cancel the timer
1
Press .
2
Press and together.
The
symbol will go out and the clock will show the time of day.
When the set time is up
The timer will beep and the
symbol will flash.
Press
to stop the beeping and turn the timer off.
To adjust the beep volume
Press
to hear the next volume level. The last one selected will be stored.
STOP
Page 12
10
Automatic cooking
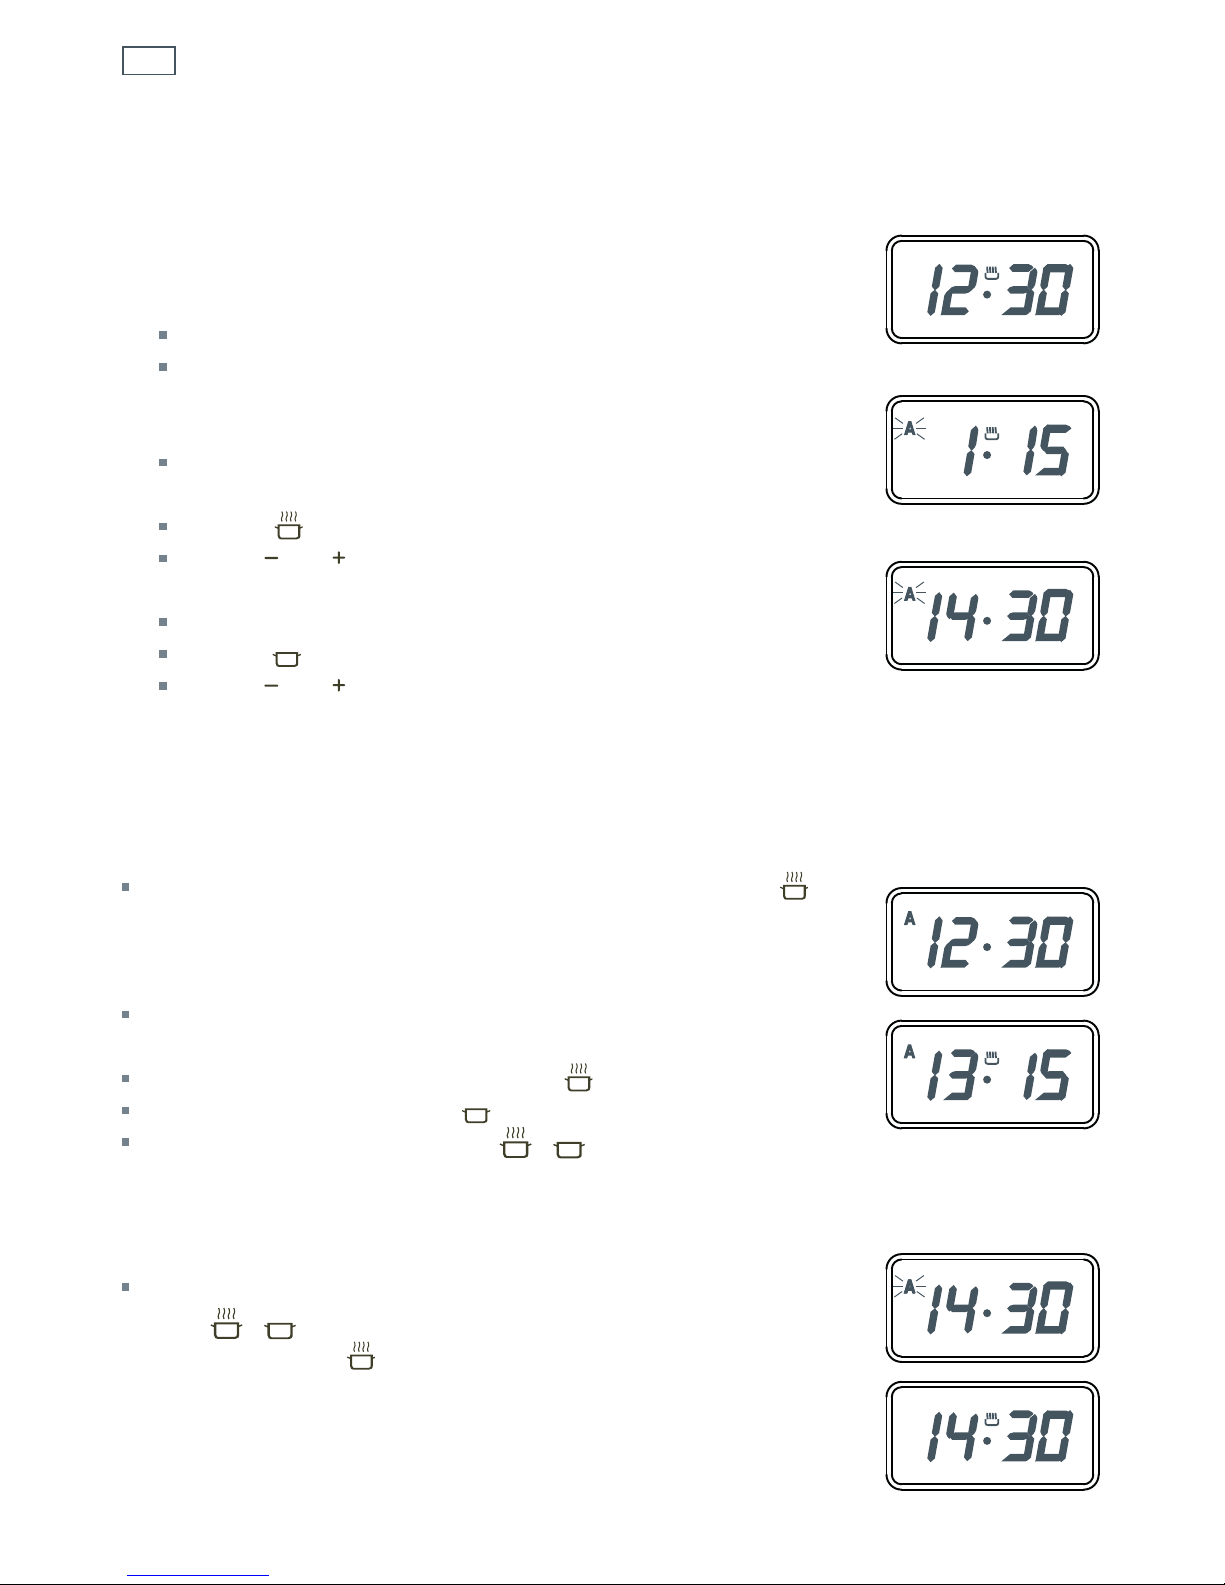
Use automatic cooking to automatically turn the oven on, cook, then
turn the oven off.
To set the oven for automatic cooking
1
Set the oven:
Check the clock shows the correct time (eg 12:30).
Select the function and set the temperature.
The oven will turn on.
2
Set the cooking time:
Decide how long the food will take to cook, allowing time for
preheating if necessary (eg 1 hour 15 minutes).
Press
. A will flash in the display.
Use
and to set the cooking time.
3
Set the stop time:
Decide when you want your food to be ready by (eg 14.30).
Press
STOP
. A will flash in the display.
Use
and to set the stop time.
You can turn the oven on manually and set it to turn off automatically
by setting the stop time (step 3 above).
When automatic cooking is set
If there is time before cooking starts, the oven will turn off , the
symbol will go out, and the current time of day will show in the clock
display with A steadily lit, indicating that the oven is set for automatic
cooking. Note: the cooling fan may stay on.
The oven will automatically turn on at the required time (eg 13.15)
and turn off at the set stop time (eg 14.30).
To see the remaining cooking time, press
.
To see the set stop time, press
STOP
.
To cancel automatic cooking, press
+
STOP
together and turn the
function and temperature knobs to
O
(off).
When the stop time is reached
The oven will turn off, the timer will beep and A will flash.
1
Press
+
STOP
together to stop the beeping and return the oven to
manual mode. The
symbol will show in the display.
2
Turn the function and temperature knobs to O (off).
Page 13

11
Important!
Always disconnect the oven from the power supply before any cleaning or maintenance.
When you turn the power back on after cleaning, you will have to set the clock.
Before cleaning, make sure that all parts of the oven have cooled to a safe temperature to touch.
Do not use abrasive cleaners, cloths or pads to clean any part of your oven. Some nylon scourers
may also scratch. Check the label.
See the following pages for instructions on removing and refitting different parts of the oven for
cleaning.
Do not use a steam cleaner.
What? How? Important!
General advice
Wipe out the oven after every
use.
Wipe up spills as soon as the
oven is a safe temperature to
touch.
Avoid leaving alkaline or acidic
substances (such as lemon juice,
vinegar or salty spills) on the oven
surfaces.
Do not use cleaning products with
a chlorine or acidic base.
Control panel 1 Wipe the soiling off with a cloth
using a mild household detergent
or stainless steel cleaner.
2 Wipe the surface dry.
3 Use a suitable stainless steel
polish.
Take care to avoid any stainless
steel cleaner getting on the knobs.
If it does, wipe off immediately,
as the stainless steel cleaner may
damage the coating of the knobs.
When cleaning the control panel,
make sure that both knobs are
turned OFF and that the cloth is
not too wet.
Oven door glass 1 Clean using a soft cloth with a
solution of mild detergent or
baking soda and hot water, then
wipe dry.
2 Wipe with a glass cleaner and dry
with a soft, lint-free cloth.
Do not use harsh abrasive cleaners
or sharp metal scrapers since they
scratch the surface and may result
in the glass shattering.
To make cleaning the oven door
glass easier, the inner pane can
be removed. See instructions after
this cleaning chart.
Care and cleaning
Page 14

12
Care and cleaning
What? How? Important!
Oven cavity
(enamel)
1 Remove the oven door and side
racks for easier access to the
cavity. See instructions after this
cleaning chart.
2 Wipe the inside of the oven
using a household detergent
or an ammonia-based cleaner.
Alternatively, and especially if the
cavity is heavily soiled, use an
oven cleaner.
3 Wipe with a clean damp cloth
and allow to dry completely.
4 Refit the oven door and side
racks.
To prevent soiling from becoming
‘baked on’ and stubborn, we
recommend removing any spills,
food or grease stains from the
enamelled surfaces after each use.
To make cleaning the oven ceiling
easier, the grill element can be
lowered. See illustrations and
instructions after this cleaning
chart.
if using ‘off the shelf’ oven
cleaners, always follow the
manufacturer’s instructions.
Side racks, oven
shelf, trays
Clean these using a solution of
detergent and hot water. They are
also dishwasher safe.
If badly soiled, soak in a solution
of hot water and biological
clothes washing powder to make
cleaning easier.
Oven vent
louvres
Wipe with a damp cloth.
Take care not to let any liquid run
down the louvres of the oven vent.
Oven door frame
and plastic
corner clips
Clean with a solution of mild
detergent and hot water, then wipe
dry.
Rubber seal
framing the
oven cavity
Wipe very gently with a damp cloth
and mild detergent.
Take care not to unhook and
displace the rubber seal while
cleaning it.
Take care not to spray any oven
cleaner or other caustic cleaner on
the rubber seal, as doing so may
damage the rubber.
Knobs and door
handle
1 Wipe with a damp cloth and mild
detergent.
2 Dry thoroughly with a soft cloth.
Do not use stainless steel or oven
cleaner on the knobs and door handle,
as doing so may damage their coating.
Page 15
13
Care and cleaning
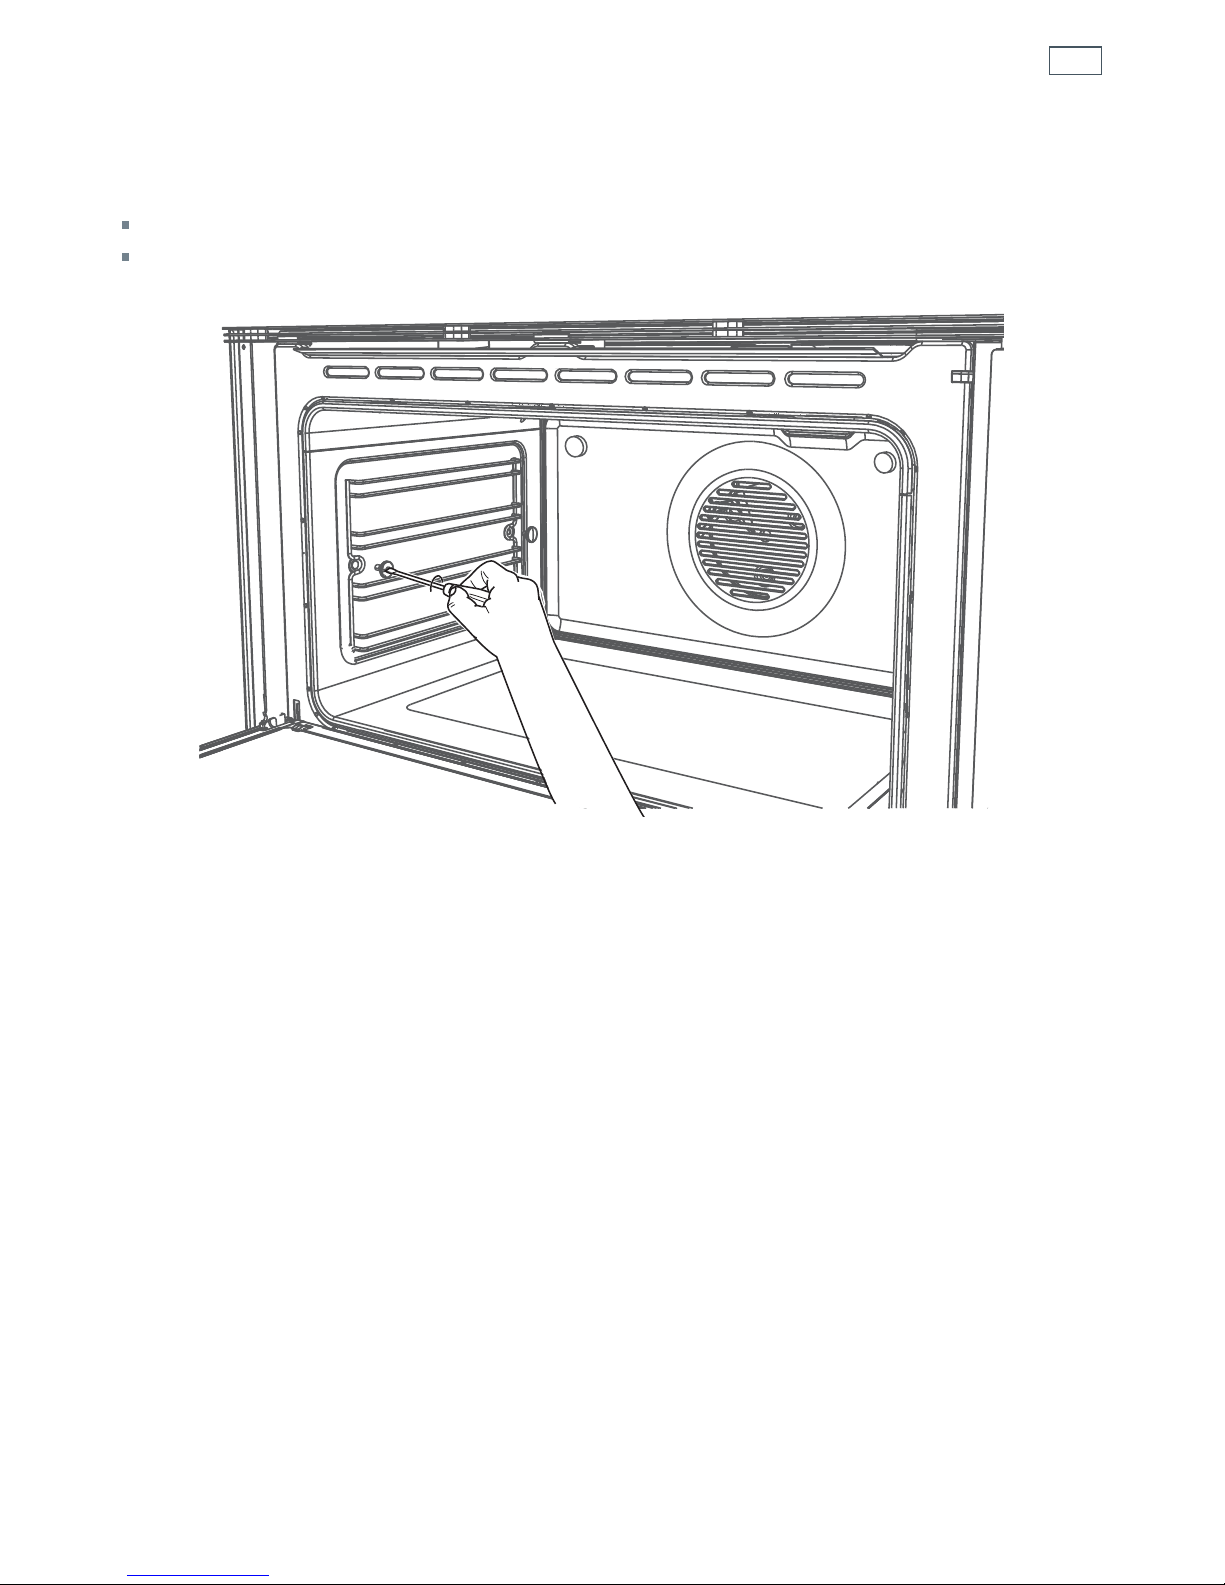
Removing and replacing the side racks
Use a flat-head screwdriver or a small coin to loosen the fixing screws.
When replacing the side racks, make sure that you tighten the fixing screws.
Page 16
14
Care and cleaning
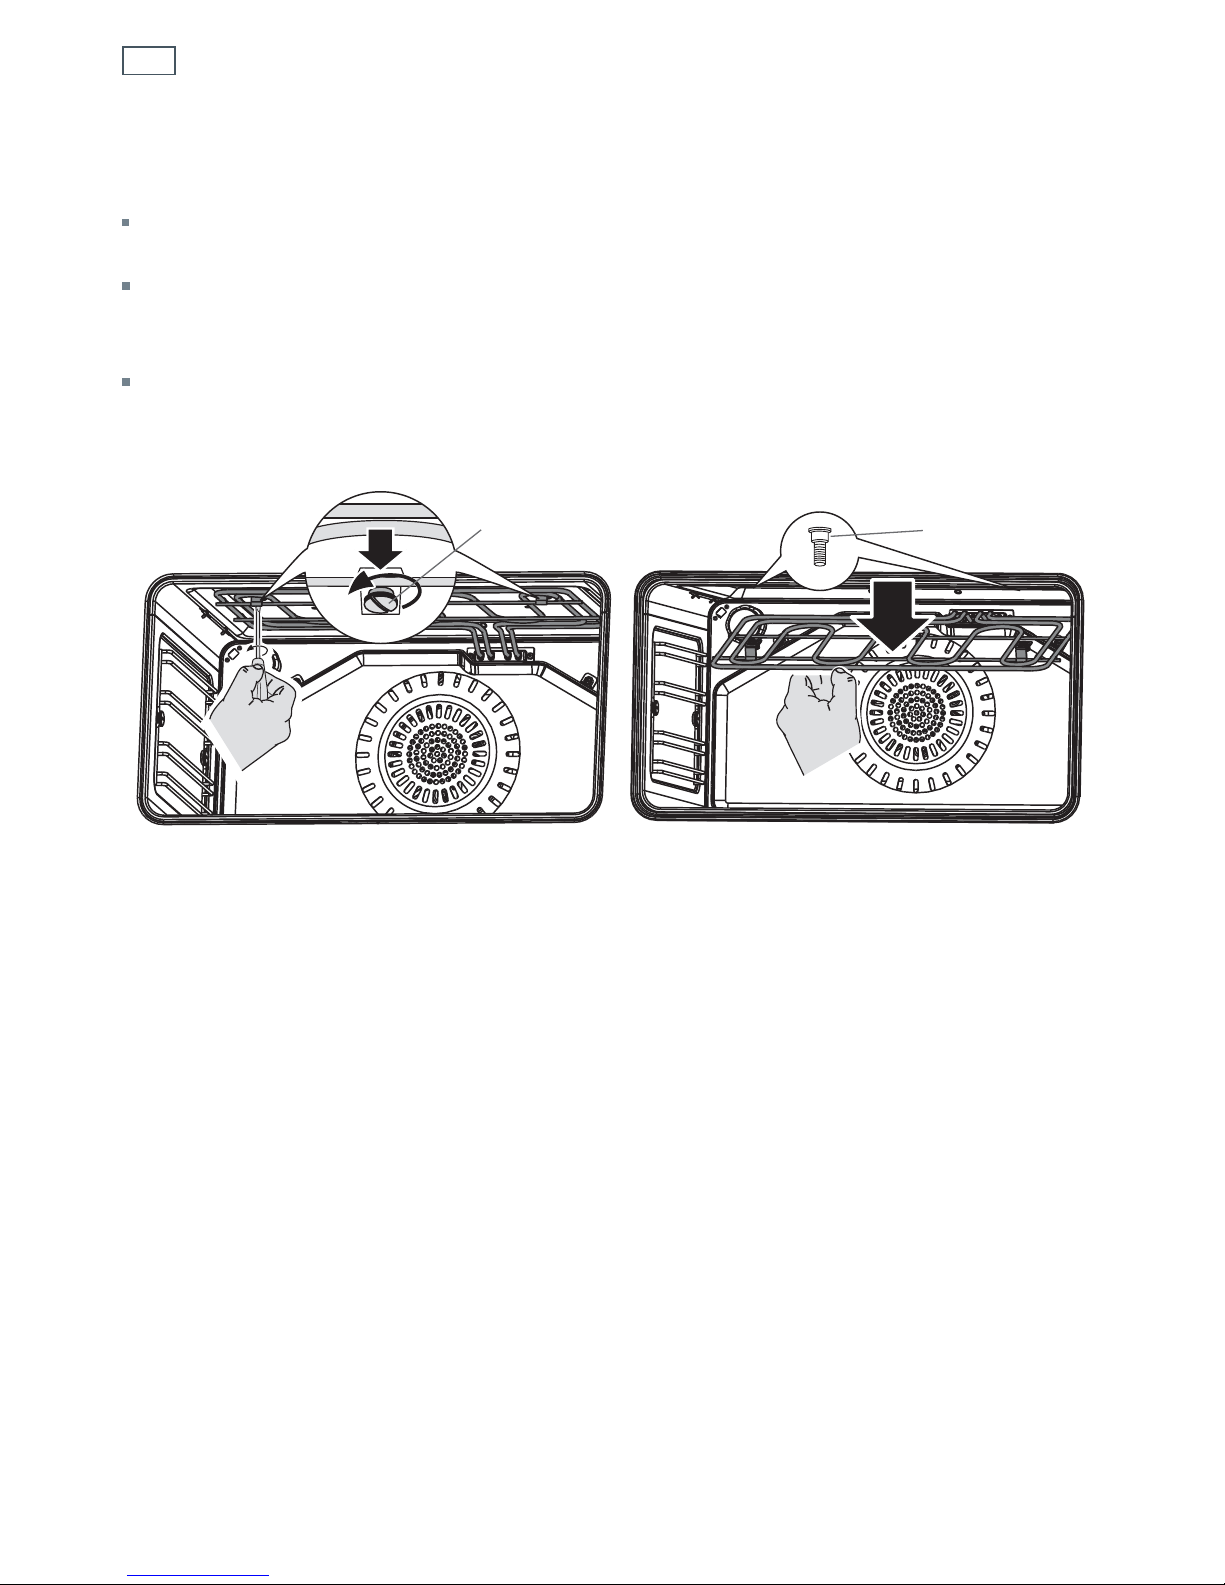
Drop-down grill element
To lower the grill element: use a flat-head screwdriver or a small coin to loosen the element
fixing screws.
When you have finished cleaning the oven ceiling, raise the grill element and screw the element
fixing screws back onto the studs. Make sure that the fixing screws are tightened and the
element is held securely in place.
The grill element itself is self-cleaning.
Fixing screw
Stud
Page 17
15
Care and cleaning
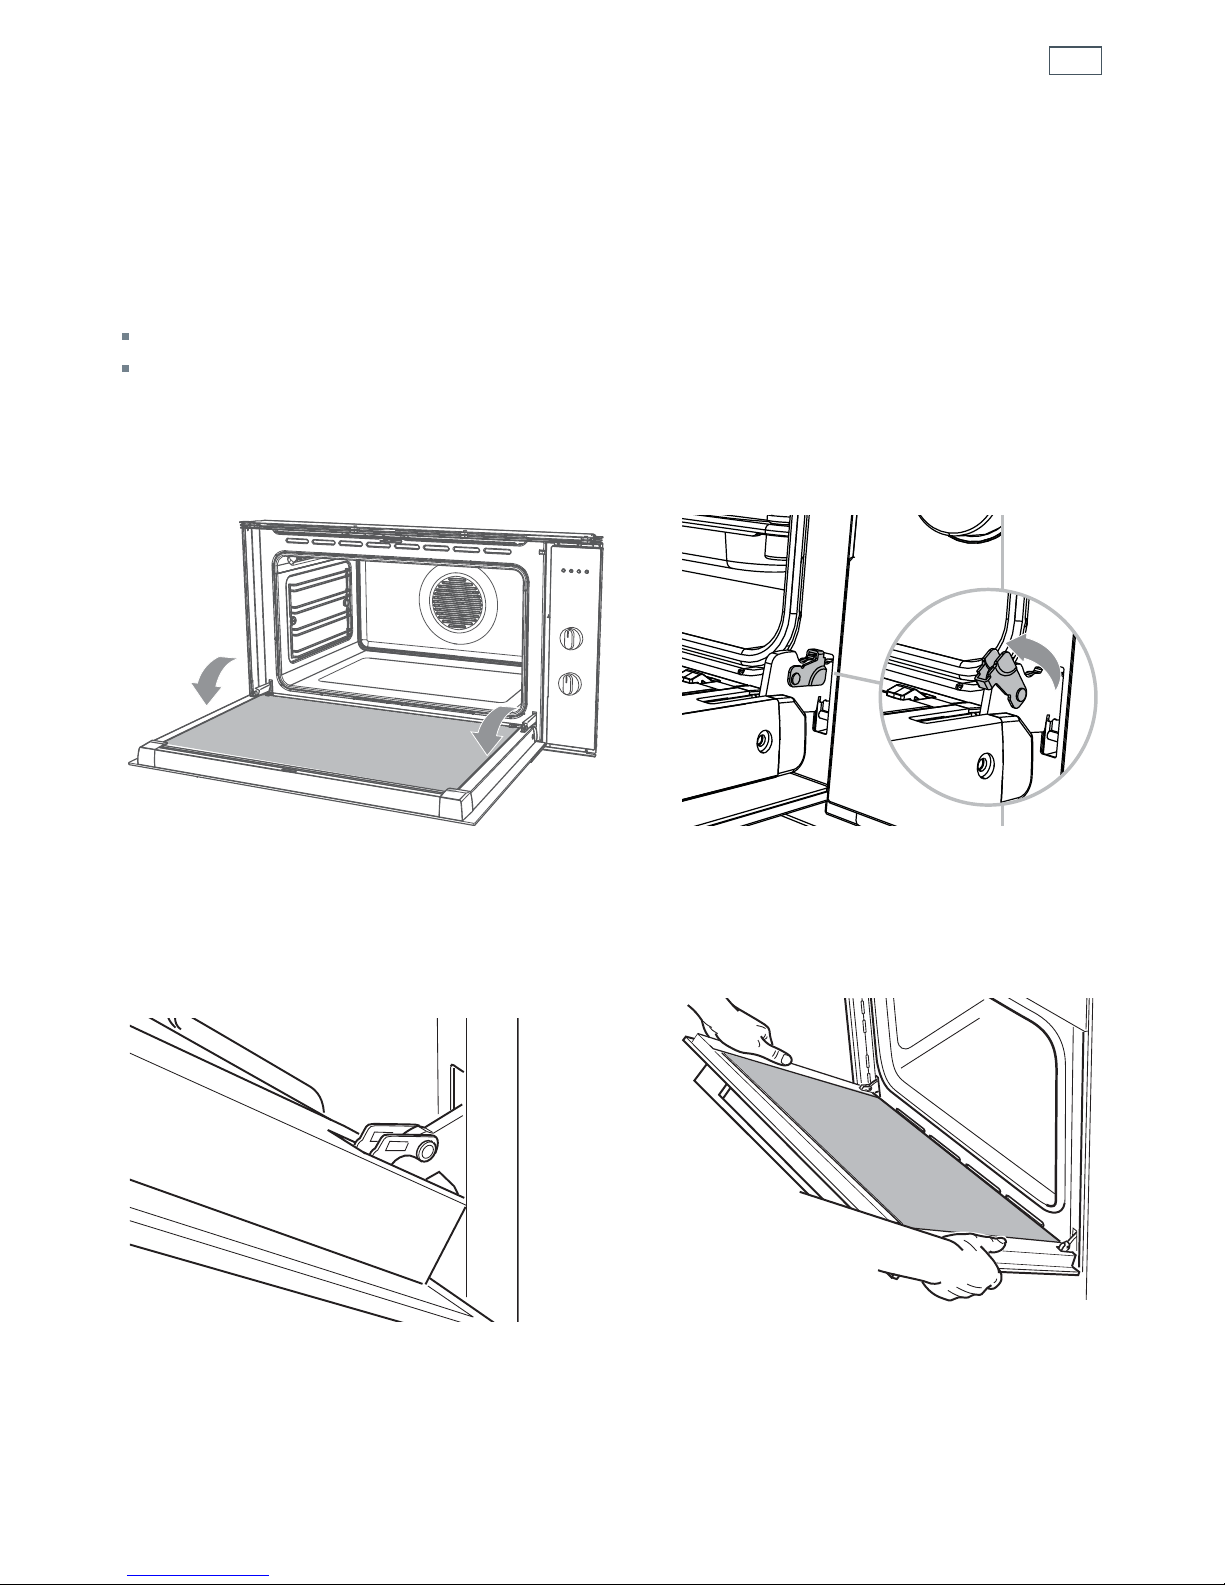
Removing and refitting the oven door
We recommend removing the door to make cleaning the interior parts of the oven
or replacing the light bulb(s) easier.
Important!
Take care, the oven door is heavy. If you have any doubts, do not attempt to remove the door.
Make sure the oven and all its parts have cooled down. Do not attempt to handle the parts of a
hot oven.
To remove the door
1
Open the door to its full extent.
2
Open the levers on the left and right
hinges to their full extent, as shown.
3
Gently close the door until the left and
right hinge levers are hooked to the door.
4
Hold the door firmly, as shown.
Page 18
16
Care and cleaning
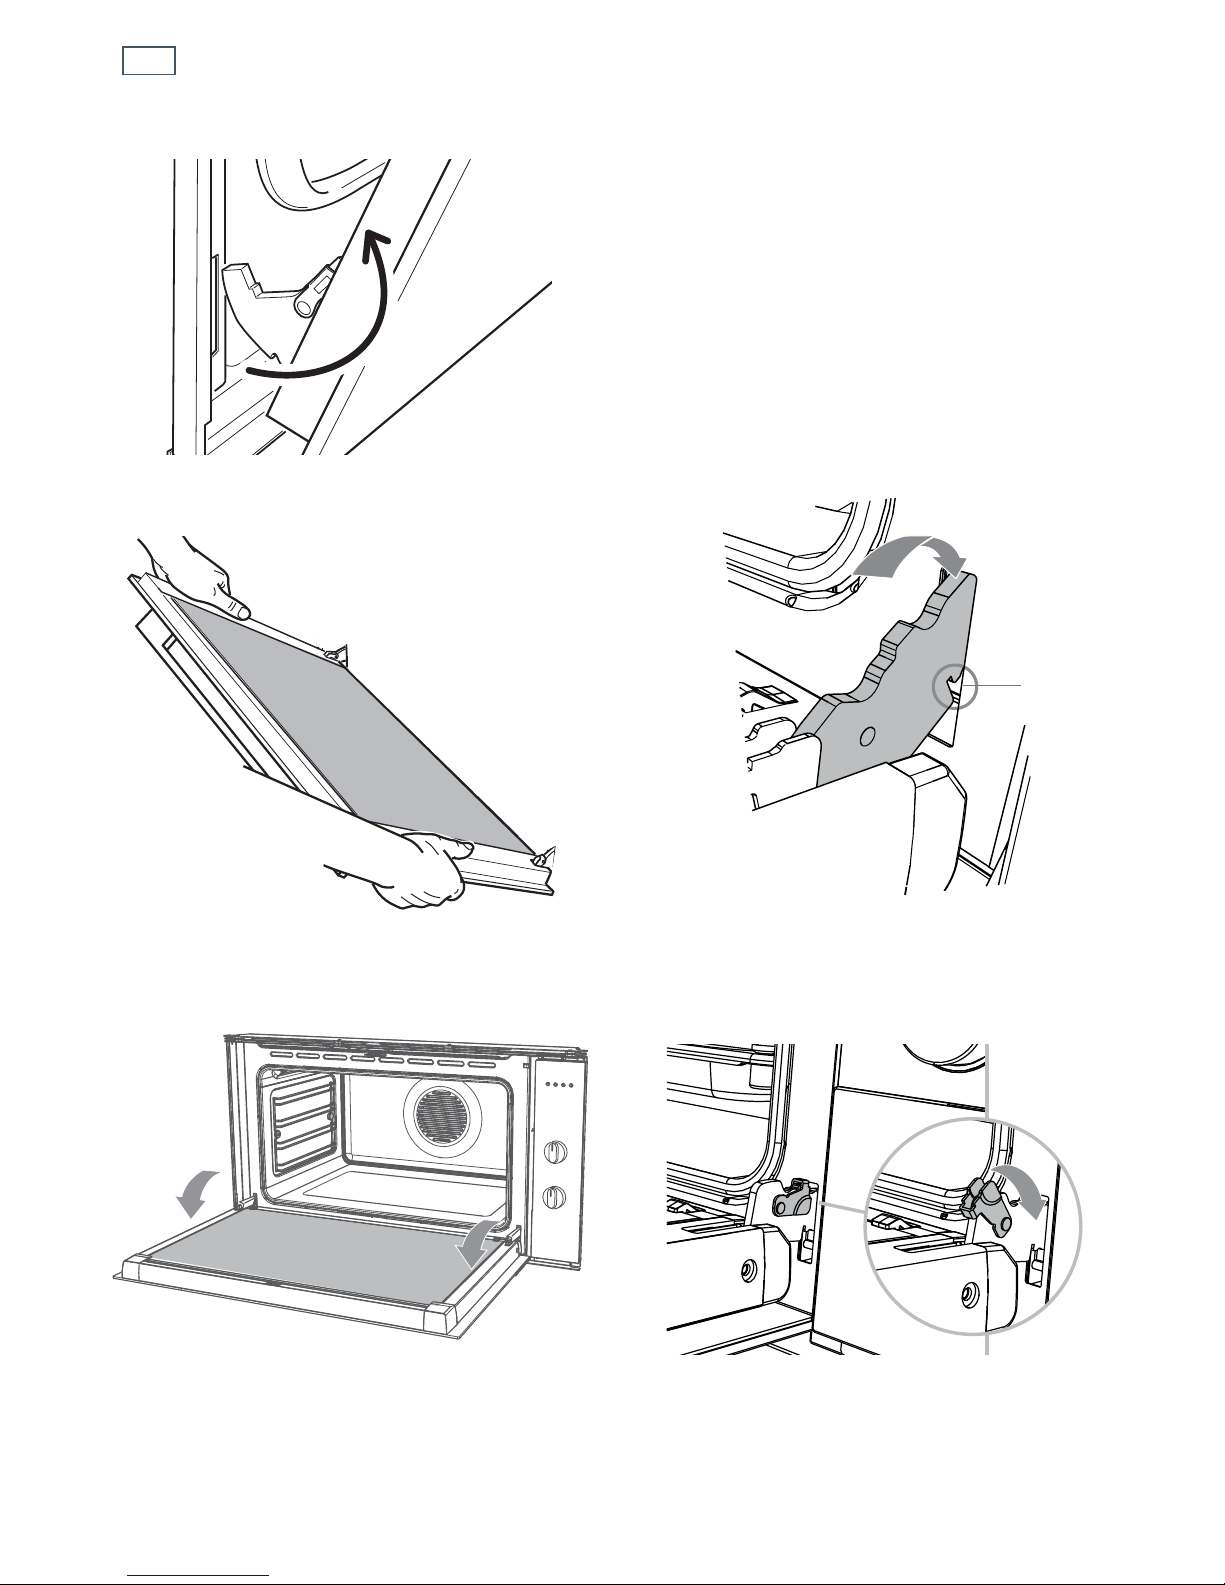
To refit the door
5a
Lift the door and disengage the hinges.
5b
Rest the door on a soft surface. Ensure you
lay it with the handle side down.
1
Hold the door firmly.
3
Open the door to its full extent.
2
Insert the hinge tongues into the slots,
making sure that the notches on both
sides drop into place as shown.
4a
Fully close the levers on the left and right
hinges, as shown.
4b
Close the door and check that it is properly
in place: it should sit square to the oven
vent louvres and the control panel.
Notch
C
Page 19
17
Care and cleaning
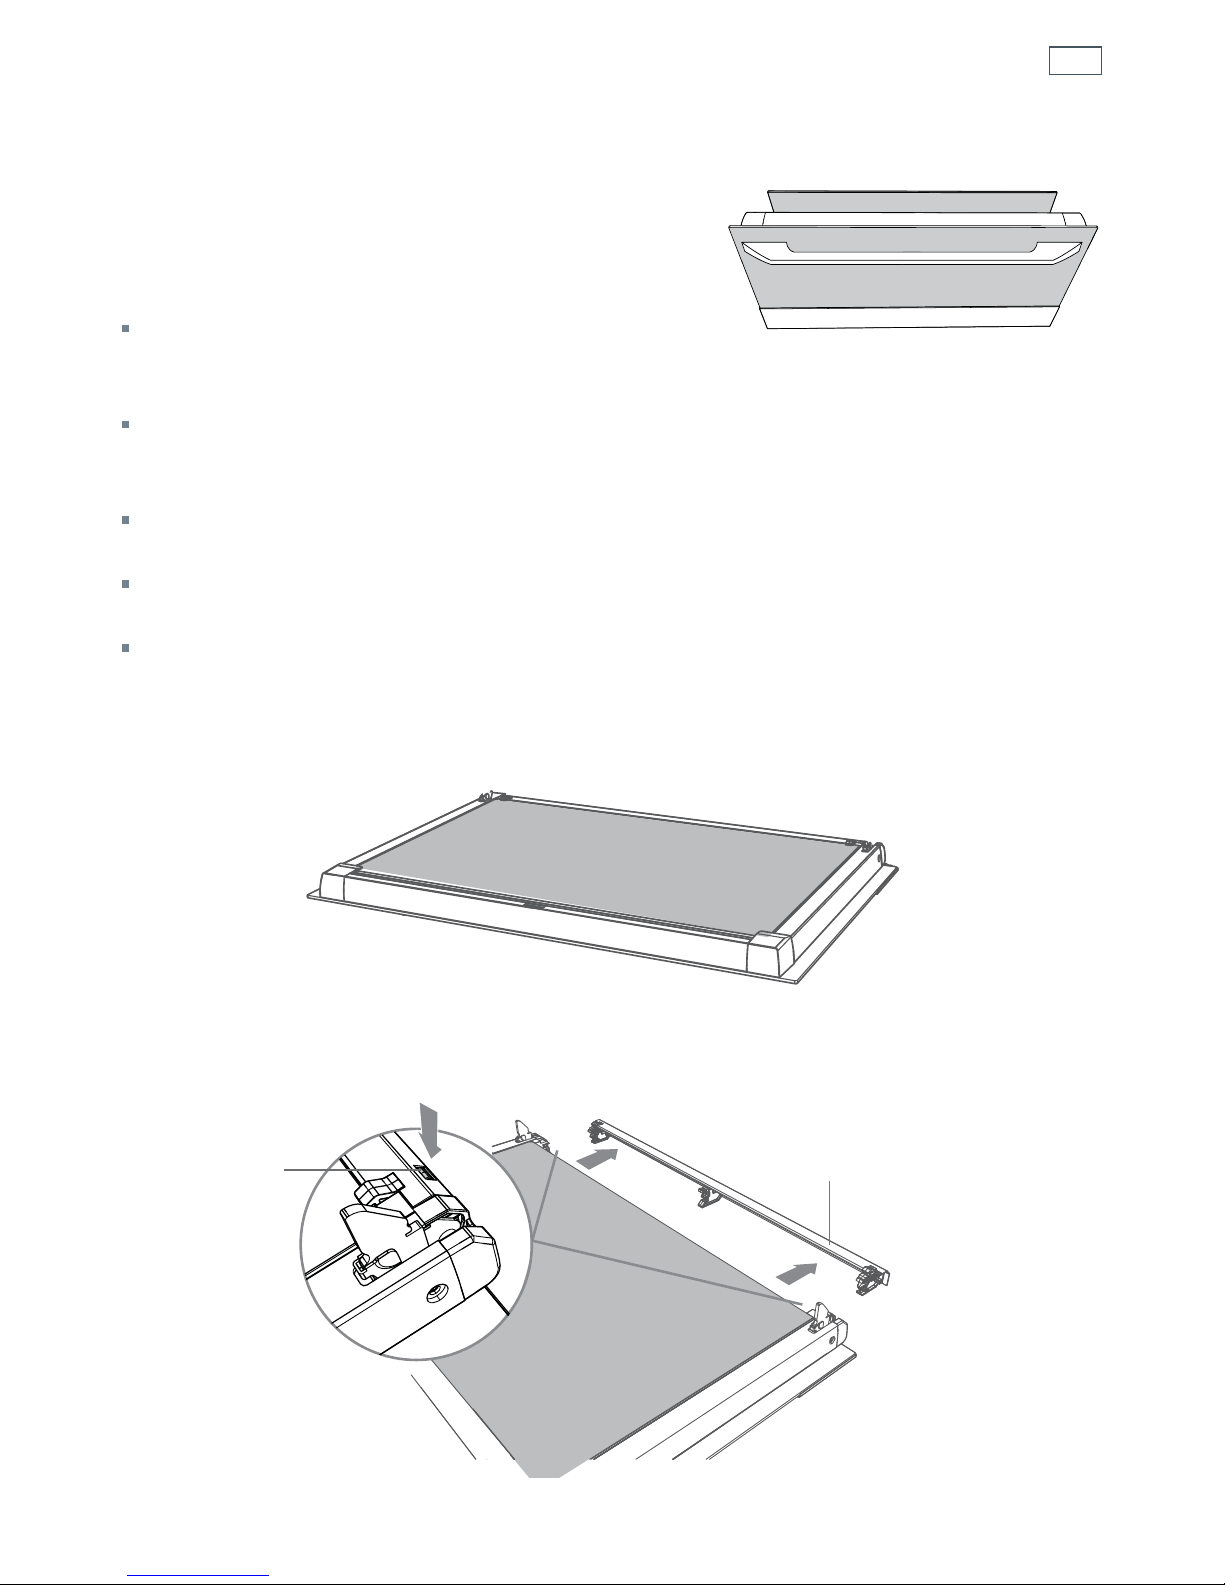
Removing and replacing the inner glass pane
The oven door has two panes of glass. The inner pane
can be removed to make cleaning the glass easier.
Important!
Take extreme care when handling the glass pane.
Avoid the edges of the glass bumping against any surface.
This may result in the glass shattering.
Don’t use oven cleaners or any other harsh/abrasive cleaners, cloths, scouring pads, steel wool
or sharp metal scrapers to clean the glass surfaces. These scratch the glass which in turn could
result in the glass cracking or shattering.
If you notice any sign of damage on any of the glass panes (such as chipping or cracks), do not
use the oven. Call your Authorised Repairer or Customer Care.
Make sure you replace the inner glass pane correctly. Do not use the oven without the inner
glass pane correctly in place.
If the inner glass pane feels difficult to remove or replace, do not force it. Call your Authorised
Repairer or Customer Care for help. Note: service visits providing assistance with using or
maintaining the oven are not covered by your warranty.
To remove the inner glass pane
1
Remove the oven door following the instructions in ‘Removing and refitting the oven door’.
Lay it on a protected surface with the handle down.
2
Press down on both tabs (a) to release the glass retainer (b).
inner
outer
1
2
Glass retainer
Tab
a
b
Page 20
18
Care and cleaning
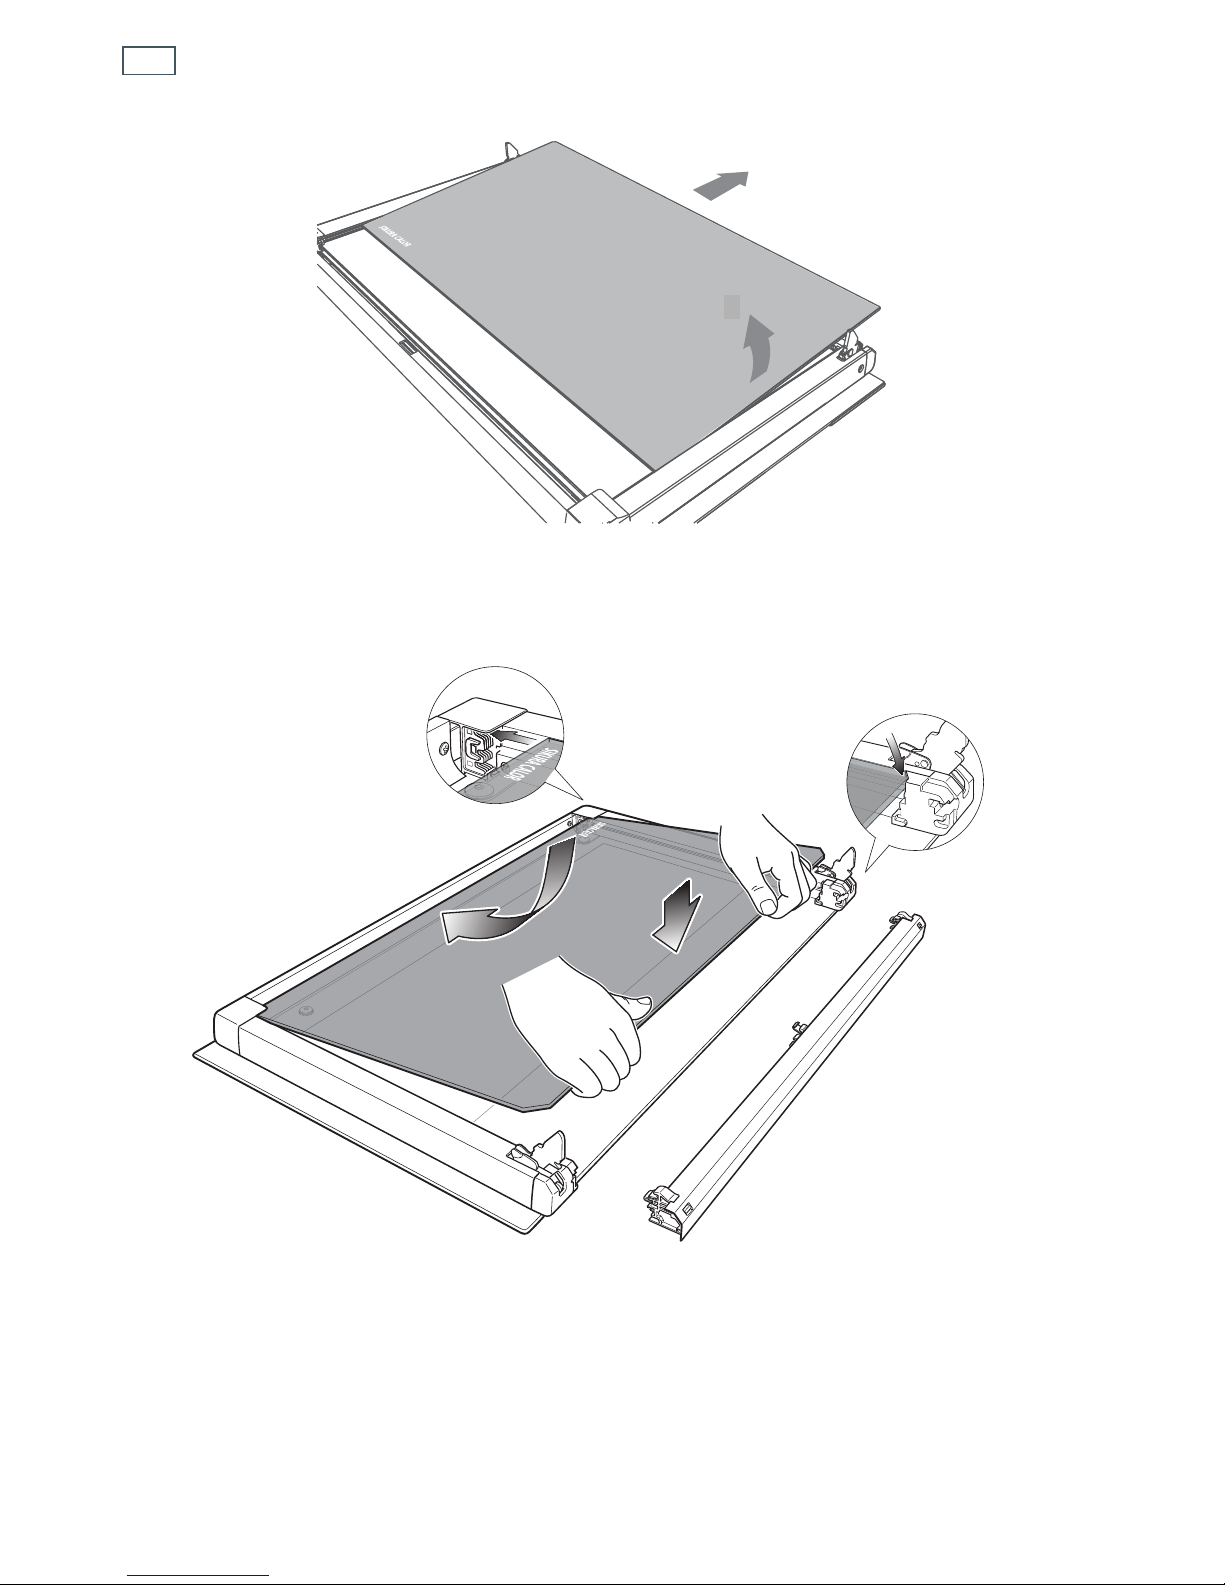
3
Lift the inner pane slightly (a), then gently slide out (b). Place the glass pane on a soft, protected
surface.
To replace the inner glass pane
1
Orientate the inner pane so that the wording on it (a) is in the position shown above and you
can read it as it faces you. Insert the inner pane in the uppermost pair of grooves (b), then push
it slightly towards yourself (c) and gently lower into place (d).
1
2
a
b
a
c
d
b
b
Page 21
19
Care and cleaning
2
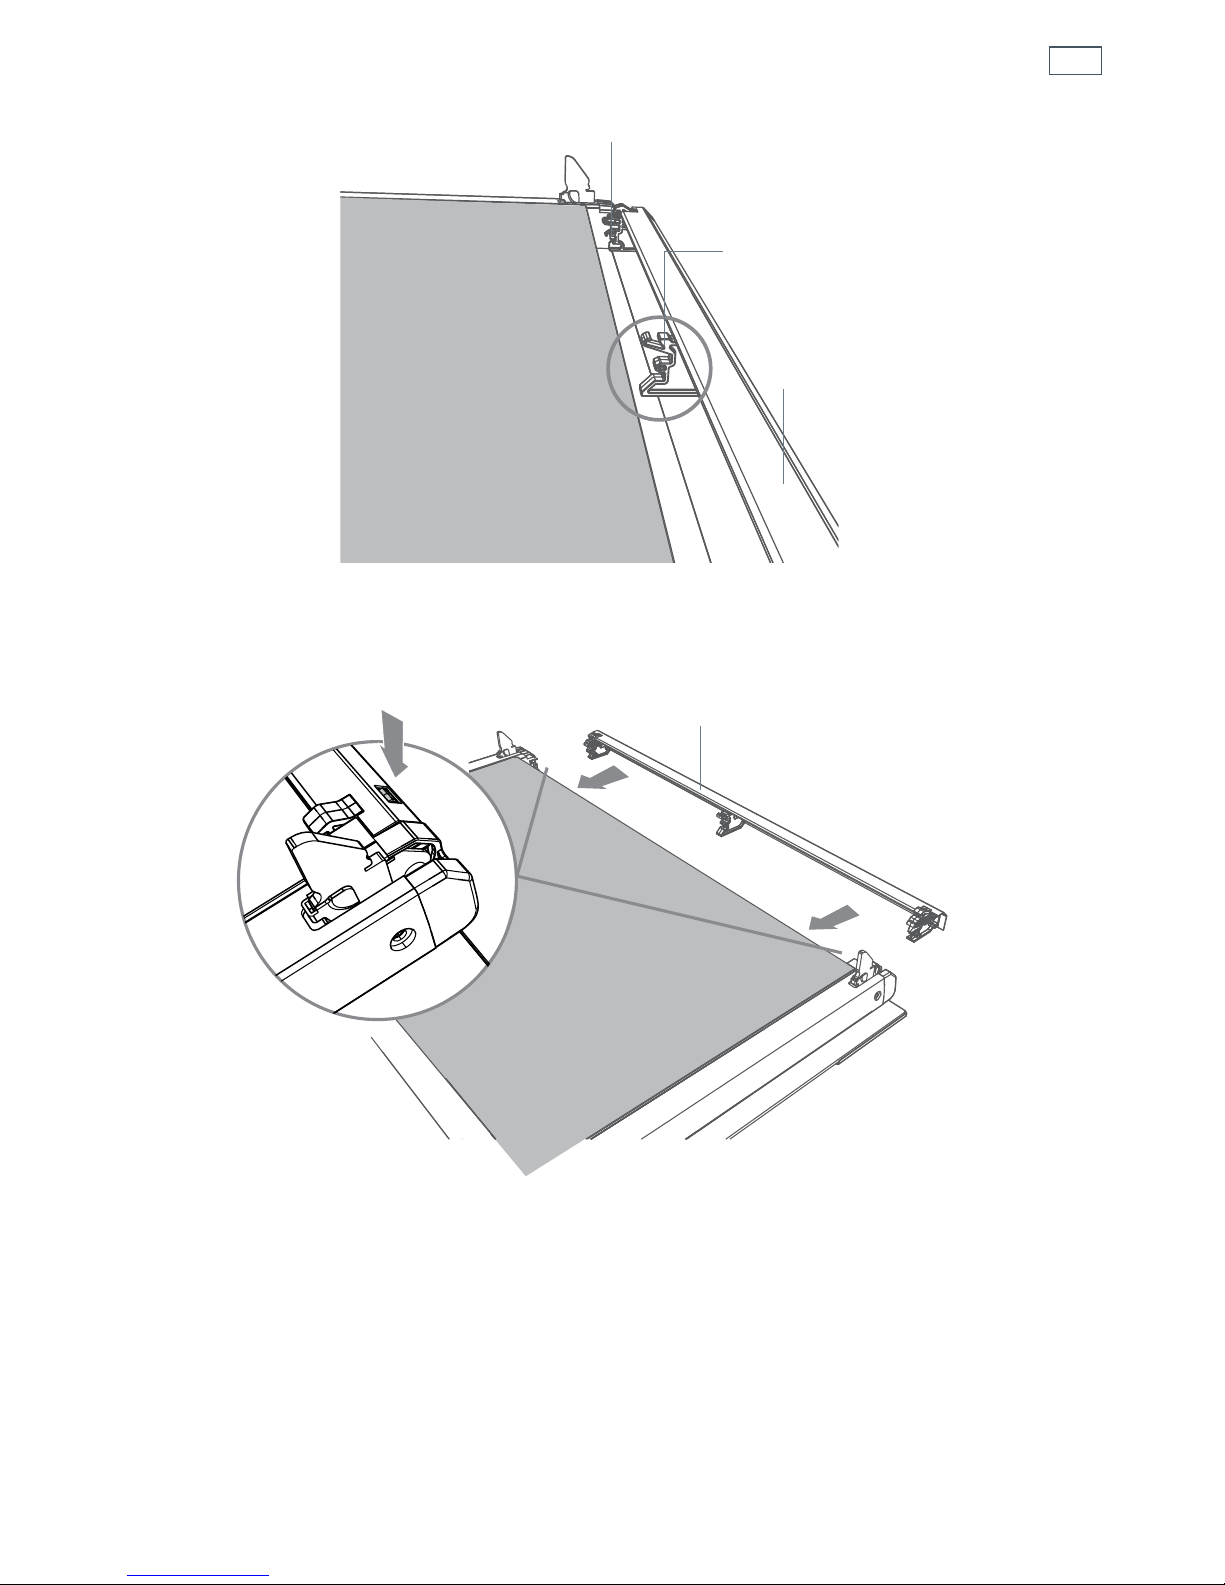
Position the glass retainer, as shown. It should sit on the bottom edge of the outer glass. Check
that the clamps of the glass retainer are not deformed or damaged.
3
Gently push the glass retainer back into place. You should be able to hear the tabs on both sides
click as they lock the glass retainer in.
Important!
Make sure the glass retainer is correctly and firmly in place and that the glass panes are secure.
4
Refit the oven door following the instructions in ‘Removing and refitting the oven door’.
Glass retainer
Clamp
Clamp
Glass retainer“Click”
Page 22
20
Replacing the oven light bulb(s)
Note: oven bulb replacement is not covered by your warranty.
1
Let the oven cavity and the grill element cool down.
2 Important!
Disconnect the oven from the power supply before continuing.
3
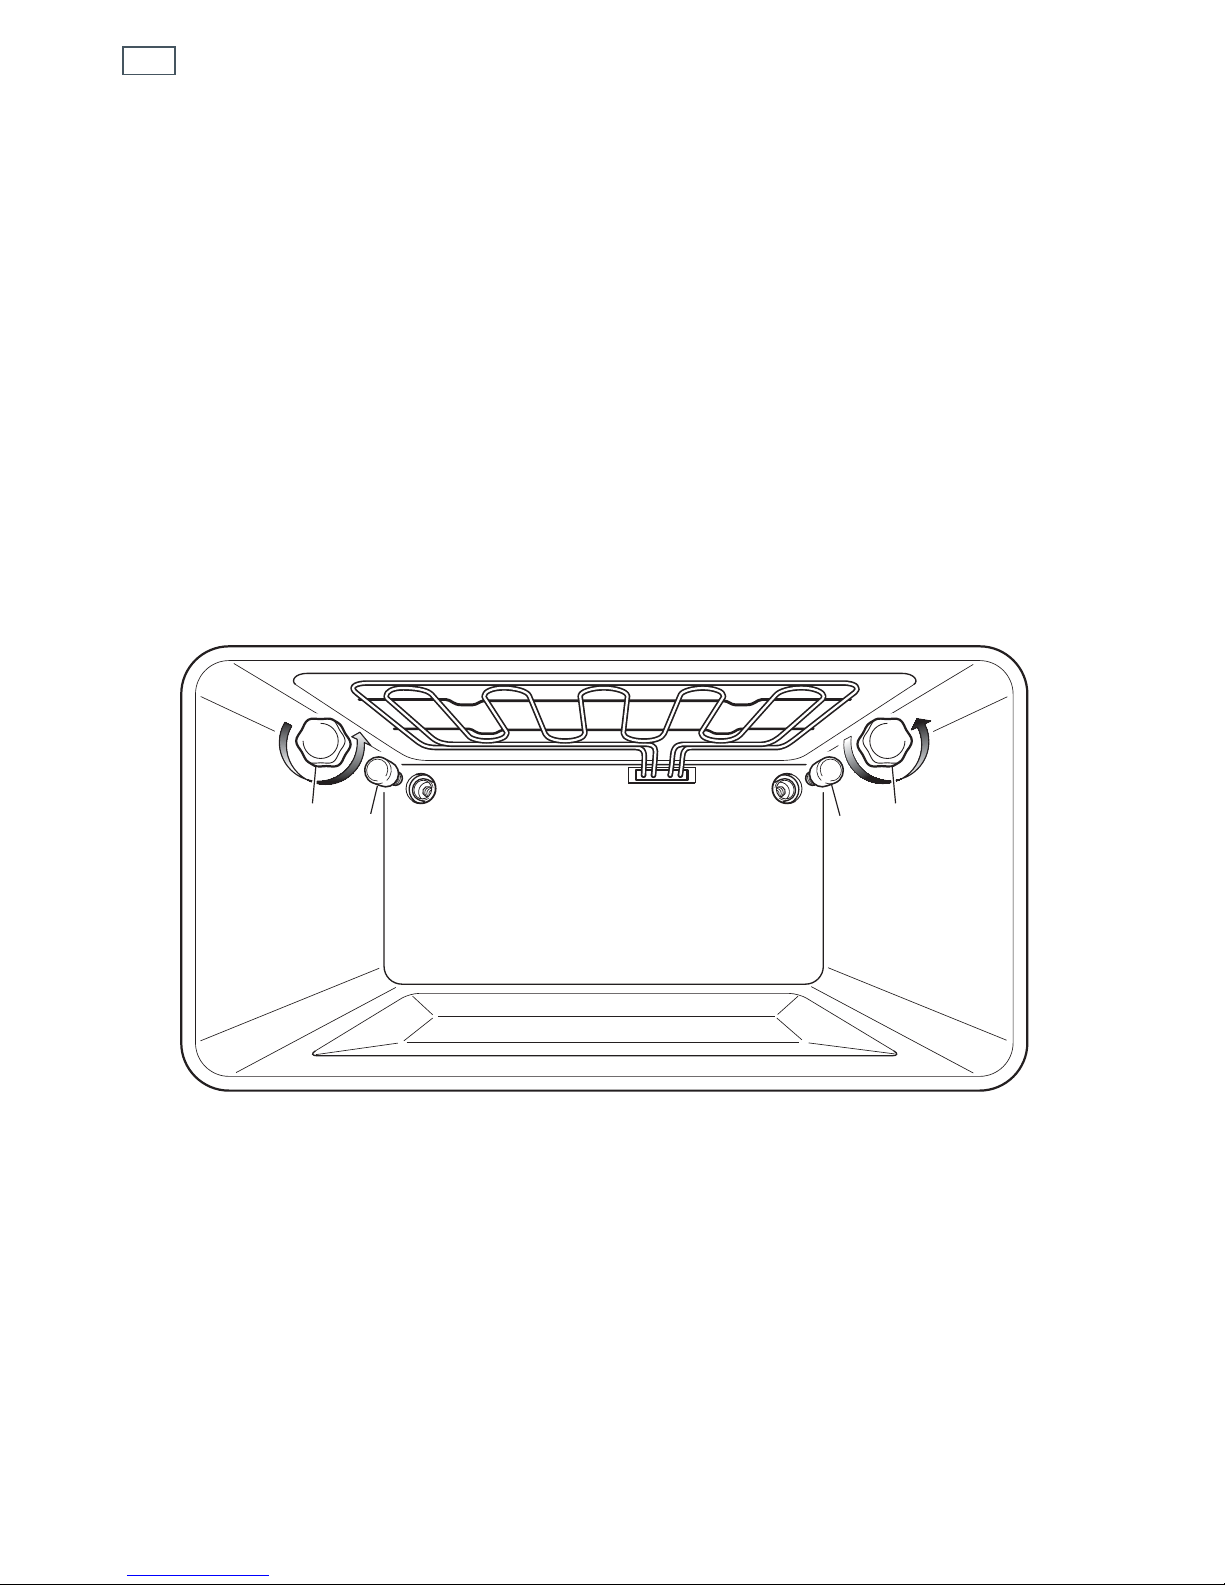
Twist the lamp cover off.
4
Unscrew and replace the bulb with a new one suitable for high temperatures (300oC) with the
following specifications: 220-240V, E14 and same wattage as the bulb being replaced (check
wattage stamped on the bulb).
5
Twist the lamp cover back on.
6
Turn the power to the oven back on and set the clock.
Lamp cover Lamp cover
Bulb
Bulb
Care and cleaning
Page 23

21
Troubleshooting
If you can’t find an answer to your problem in the chart below, or if the problem cannot be fixed,
you will need technical help. Contact your Authorised Service Centre or Customer Care.
Problem Possible cause What to do
The oven is not
heating and the
oven light is off.
No power supply to the
oven.
Check that the oven is connected to the power
supply and the power is turned on. If it is and
the oven still doesn’t work, there may be a
power failure in your home or area.
The clock has not been
set.
Set the clock. See ‘Oven controls and setting
the clock’ for instructions.
The oven is set for
automatic cooking.
See section ‘Automatic cooking’ for
information.
A and 0
.
00 are
flashing in the clock
display and the
oven will not work.
The power to the oven
has been turned on or
restored after a power
failure.
Set the clock. See ‘Oven controls and setting
the clock’ for instructions.
A is steadily lit or
flashing, clock
display shows the
time of day.
Automatic cooking is set
or finished, oven is in
automatic mode.
If you want to cancel automatic cooking or use
the oven in manual mode, press
the
+
STOP
buttons together. For more
information, see ‘Automatic cooking’.
The oven light does
not come on, but
the oven is heating.
The light bulb has blown. Replace the bulb. See instructions in ‘Care and
cleaning’.
Condensation:
droplets of water in
or around oven (e.g.
on control panel,
oven door, rubber
seal framing the
cavity, surrounding
cabinetry).
Food has high moisture
content or local climate
(temperature, humidity) is
contributing to
condensation.
Some condensation is normal. You can wipe
the droplets off with a soft cloth.
Fan noise and
ventilation air are
coming from the
oven both during
and after use.
A cooling fan in the oven
runs to keep the oven
door and control panel
cool at all times. It may
continue to run after the
oven has been turned off.
This is normal and requires no action.
Uneven baking
results.
Oven not properly
preheated.
Put the food in the oven only when the
temperature indicator light has gone out.
Incorrect function,
bakeware, cooking time,
or shelf position.
See ‘Baking charts’ for recommendations.
Page 24

22
Warranty and service
Before you call for service or assistance ...
Check the things you can do yourself. Refer to the installation instructions and your user guide
and check that:
1
your product is correctly installed.
2
you are familiar with its normal operation.
If after checking these points you still need assistance or parts, please refer to the Service &
Warranty book for warranty details and your nearest Authorised Repairer, or contact us through
our local website listed on the back cover.
This oven has been designed and constructed in accordance with the following
codes and specifications:
In New Zealand and Australia:
AS/NZS 60335-1 General Requirements for Domestic electrical appliances
AS/NZS 60335-2-6 Particular Requirements for Domestic electrical cooking appliances
AS/NZS CISPR 14.1 2010 Electromagnetic Compatibility Requirements.
Page 25

Page 26

Page 27

Page 28
Copyright © Fisher & Paykel 2014. All rights reserved.
The product specifications in this booklet apply to the specific products
and models described at the date of issue. Under our policy of continuous
product improvement, these specifications may change at any time. You
should therefore check with your Dealer to ensure this booklet correctly
describes the product currently available.
www.elba.co.nz
www.elba.com.au
NZ AU 02.2014F&P PN - 590127 C F&P ITALY PN - 1104556-ß1
 Loading...