

Fisher & Paykel DD*C Series, DD*D Series, DD*I Series, DishDrawer DD60DI9 Operating Instructions Manual
Page 1
Operating Instructions
https://producthelp.fisherpaykel.com/au/Clean/DishDrawer%E2%84%A2/Integrated_Double/DD60DI9/User_Guide_DD60DI9/03_Operating_Instructions
Updated: Wed, 13 Mar 2019 03:46:11 GMT
Powered by
Wash Modifiers (Some Models Only)
Along with setting the wash program, you may select one of the following the additional options:
Extra Dry
Increases the final rinse temperature and the length of the drying phase for improved drying performance.
Quick
Uses additional water and energy for a faster wash time, while maintaining wash performance.
Sanitize
Raises the water temperature during the rinse phase to sanitize dishes. Ideal for washing items such as baby bottles
and preserving jars.
• Only one modifier can be set at a time.
• Not all modifiers are available for every wash program. If a wash modifier is not available for the
chosen wash program, then that modifier cannot be selected.
1
Page 2

DD*C and DD*I Models
https://producthelp.fisherpaykel.com/au/Clean/DishDrawer%E2%84%A2/Integrated_Double/DD60DI9/User_Guide_DD60DI9/03_Operating_Instructions
Updated: Wed, 13 Mar 2019 03:46:11 GMT
Powered by
Wash Program Modifier Available
Heavy Extra Dry Quick Sanitize
Normal Extra Dry Quick Sanitize
Normal Eco - - -
Fast Extra Dry - -
Delicate Extra Dry Quick -
Rinse - - -
DD*D and DD*I Models
Wash Program Modifier Available
Heavy Extra Dry Quick Sanitize
Medium Extra Dry Quick Sanitize
Eco - - -
Fast Extra Dry - -
Delicate Extra Dry - -
Rinse - - -
DD*C Models
To set a Wash Modifier:
• Make sure the dishwasher is on and detergent (and rinse aid if necessary) has been added.
• Double models only: Check the correct drawer is selected, or press to change.
• Press to select a wash program.
• Press to scroll through the wash modifier options.
◦ The selected wash modifier indicator will light up on the display.
◦ Press to start the wash
2
Page 3
DD*D and DD*I Models
https://producthelp.fisherpaykel.com/au/Clean/DishDrawer%E2%84%A2/Integrated_Double/DD60DI9/User_Guide_DD60DI9/03_Operating_Instructions
Updated: Wed, 13 Mar 2019 03:46:11 GMT
Powered by
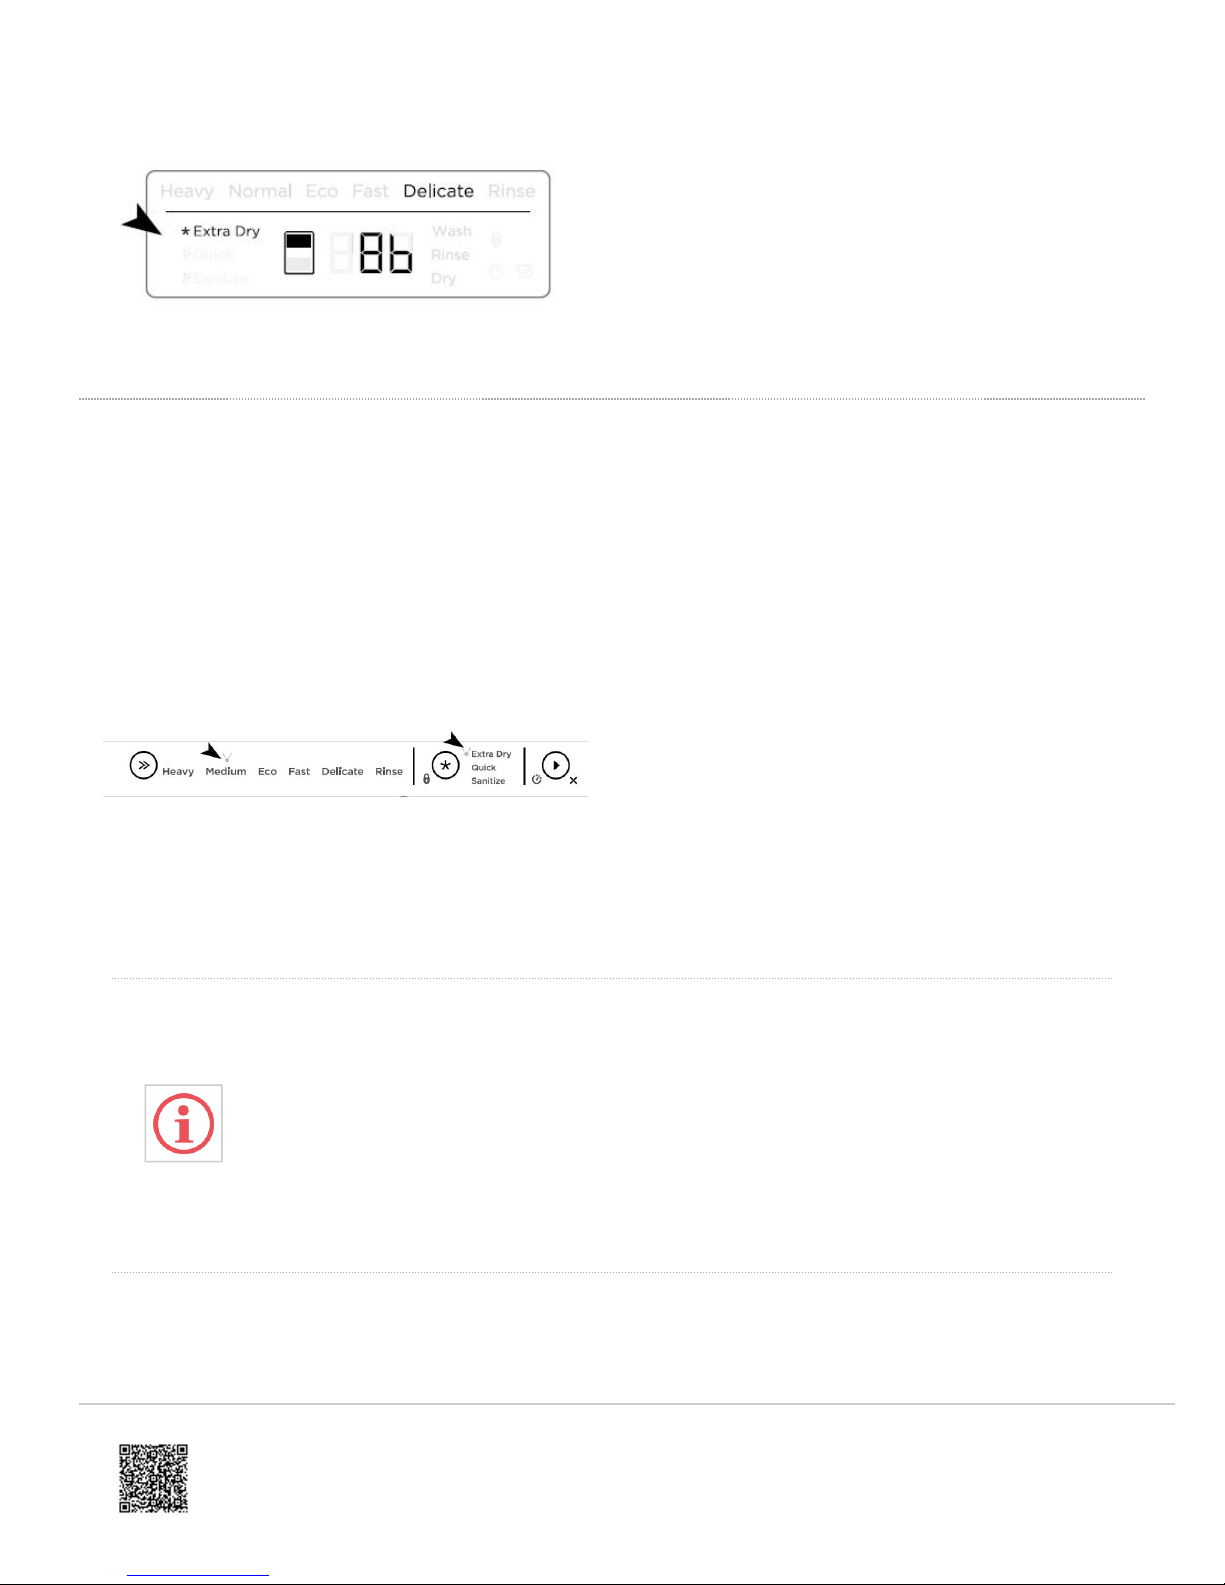
To set a Wash Modifier
• Make sure the dishwasher is on and detergent (and rinse aid if necessary) has been added.
• Press to select a wash program.
• Press to scroll through the wash modifier options.
◦ The selected wash modifier indicator will light up on the display.
◦ Press to start the wash and close the drawer.
Using Sanitise
The sanitize wash modifier adjusts the wash program to meet the conditions required by Section 6, NSF 184 for
sanitization to occur. While sanitize is running, the wash program is monitored to ensure that these conditions are met.
• Only programs utilising the sanitize wash modifier are certified to meet the conditions required by
Section 6, NSF 184. Other wash programs may not reach the temperatures required for
sanitization to occur. See table on previous page for wash programs that have sanitize available
• For sanitization to occur, the temperature of the water needs to reach 700C/1580F. Check that
all items are ‘dishwasher safe’ before running the sanitize modifier.
• If the wash is interrupted or the water supply is turned off during the program, then the heating
conditions for sanitization may not be met. You may need to run the program again to ensure
sanitization of your dishes.
At the end of a wash program with sanitize, always check to make sure that sanitization has been successful.
3
Page 4
DD*C Models
https://producthelp.fisherpaykel.com/au/Clean/DishDrawer%E2%84%A2/Integrated_Double/DD60DI9/User_Guide_DD60DI9/03_Operating_Instructions
Updated: Wed, 13 Mar 2019 03:46:11 GMT
Powered by
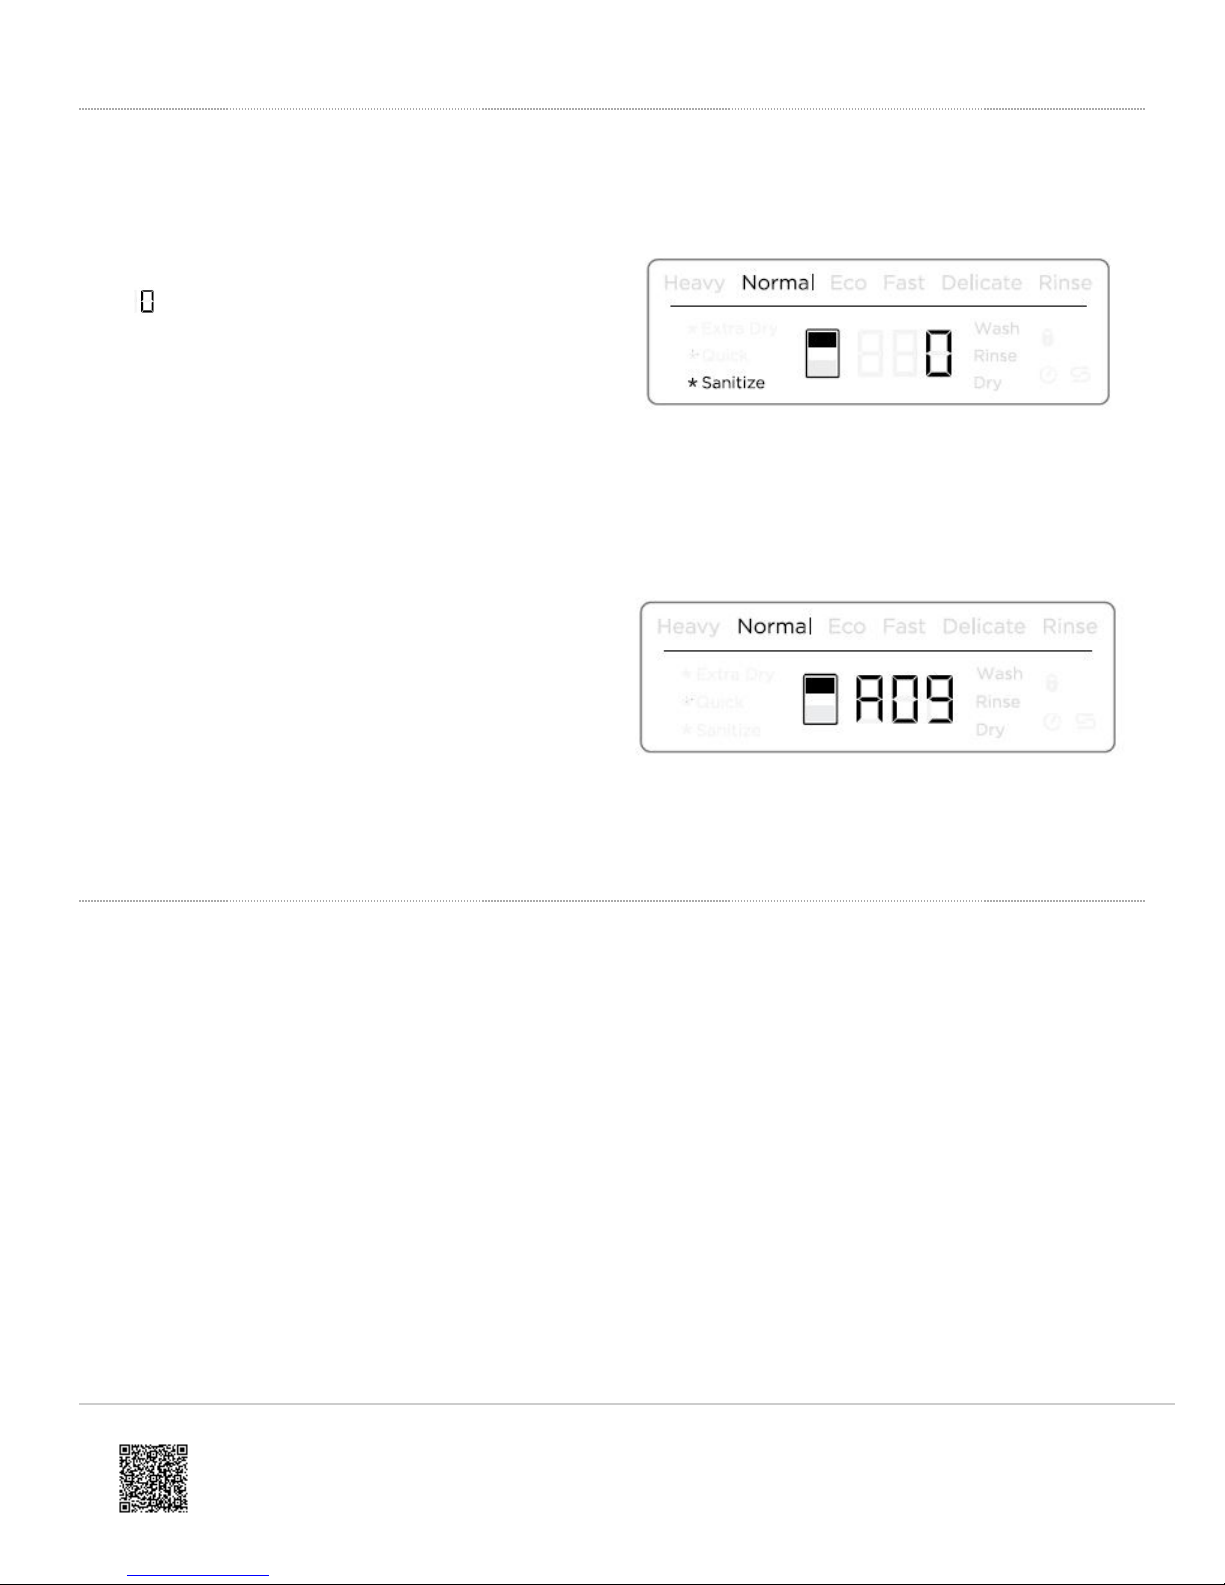
If Sanitization has been successful:
• The dishwasher will beep.
• will show in the display.
• The sanitize indicator will remain lit.
• After 30 seconds the display will turn off.
If Sanitization has not been successful:
• An alert will sound.
• An alert code will show in the display.
• The sanitize indicator will not be lit.
• Check if the water supply has been turned off or the
wash program interrupted.
• Press once to stop the beeping and then again to
clear the alert code, then run the sanitize cycle
again. See also section ‘How to attend to a fault’.
DD*D and DD*I Models
If Sanitization has been successful:
• The wash will finish as normal.
If Sanitization has not been successful:
• An alert will sound.
• When the drawer is opened the sanitize indicator will flash.
• Check if the water supply has been turned off or the wash program interrupted.
• Press and hold once to stop the beeping and a second time to clear the flashing alert code.
• Reset sanitize and then run the cycle again.
• See also section ‘How to attend to a fault’
4
Page 5
Racking Features - Cutlery Basket
https://producthelp.fisherpaykel.com/au/Clean/DishDrawer%E2%84%A2/Integrated_Double/DD60DI9/User_Guide_DD60DI9/03_Operating_Instructions
Updated: Wed, 13 Mar 2019 03:46:11 GMT
Powered by
• To reduce the risk of injury, we recommend loading
knives and sharp utensils with handles facing up.
• Mix spoons, knives and forks within each section to
stop cutlery nesting together and to ensure the
water circulates freely.
• Keep stainless steel from touching silver cutlery to
avoid staining.
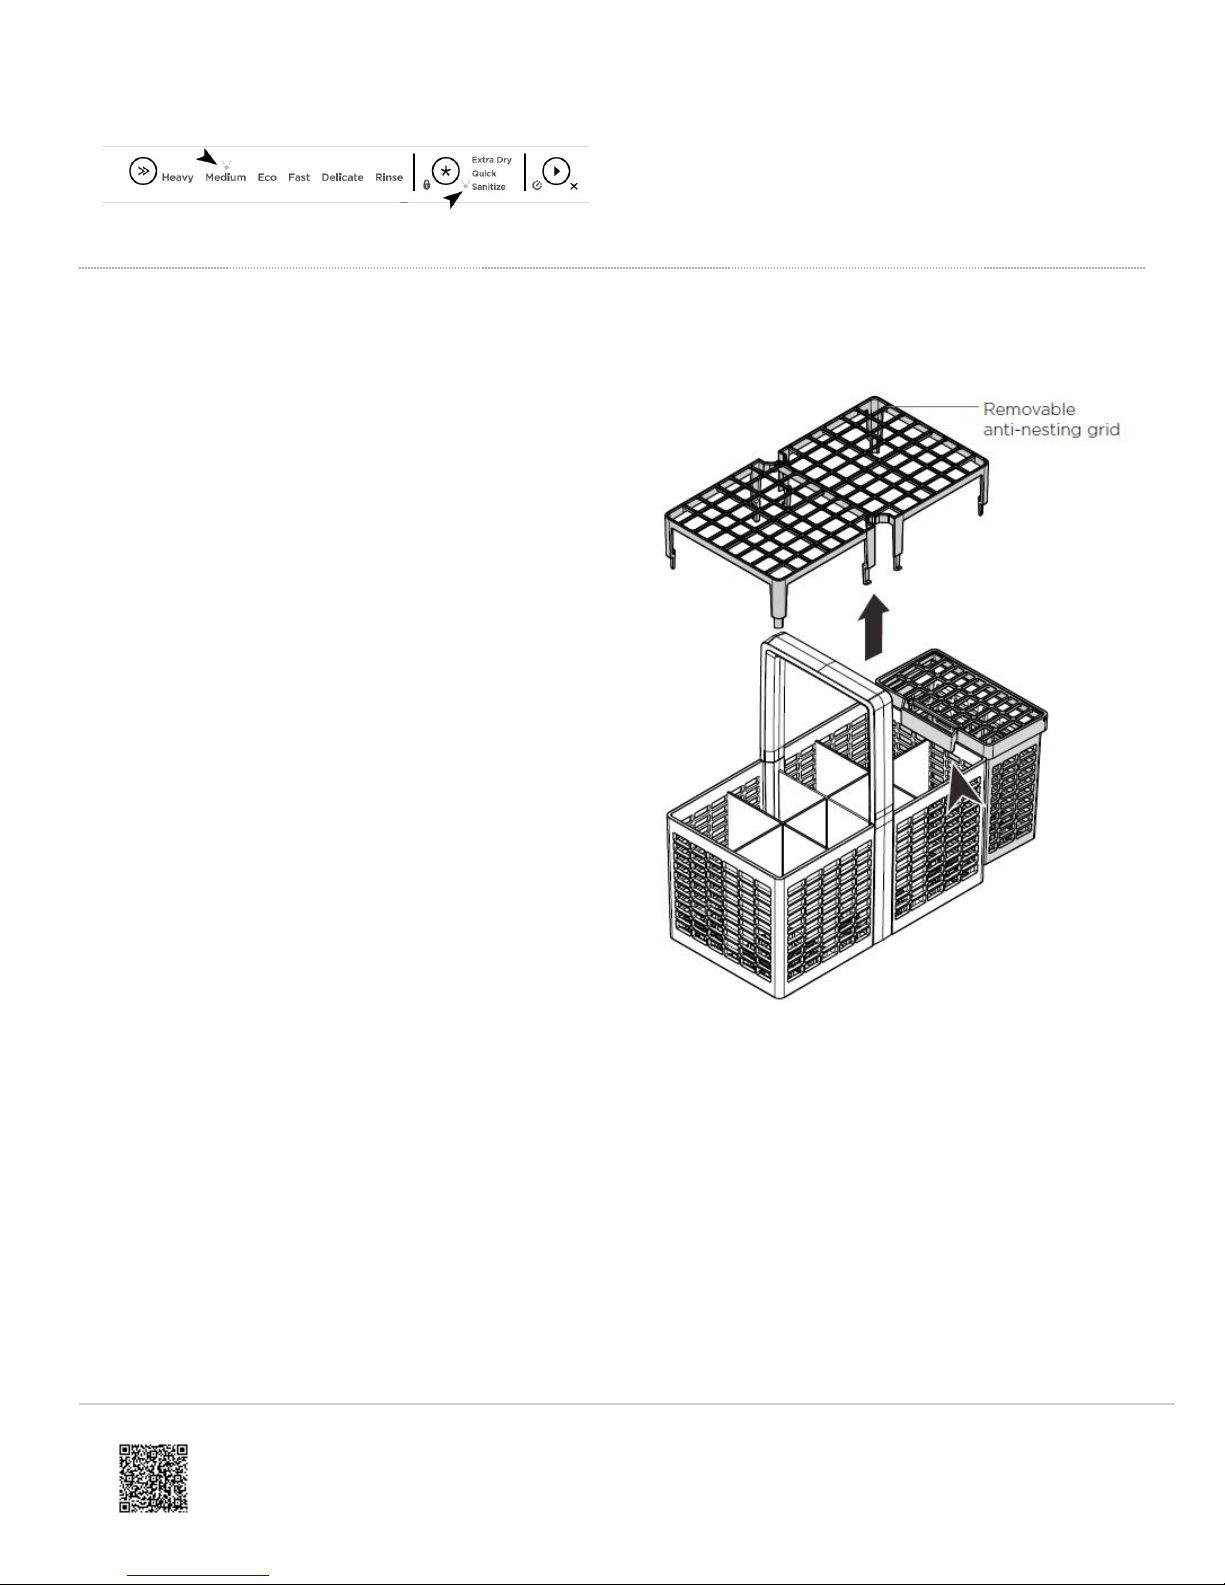
Removable Anti-Nesting Grid
• The anti-nesting grid clips onto the top of the cutlery
basket.
• Use the grid to separate cutlery items and stop them
from nesting together.
5
Page 6

Removable Tablet Tray
https://producthelp.fisherpaykel.com/au/Clean/DishDrawer%E2%84%A2/Integrated_Double/DD60DI9/User_Guide_DD60DI9/03_Operating_Instructions
Updated: Wed, 13 Mar 2019 03:46:11 GMT
Powered by
If you are using dishwasher tablets or gel packs, place
them on the removable tablet tray, as shown. See also
‘Adding detergent’ for more information.
Dishwasher tablets should not
be in direct contact with dishes
or cutlery or placed on the
bottom of the drawer.
Removable Small Items Container
(Some Models Only)
• Small, light items like baby bottle teats are best
placed into the small items container to prevent
them from being displaced during the wash.
• You can extend your cutlery basket by clipping the
container on its side.
• To optimize the cutlery space within the basket, the
small items container can be placed elsewhere in
the drawer.
If you lay the container flat, make sure that the solid
plastic side is facing up.
If you place a fully laden container under the cup
racks, it is best to leave the rack space directly
above the container empty - there may not be
enough water reaching items that are placed above.
6
Page 7
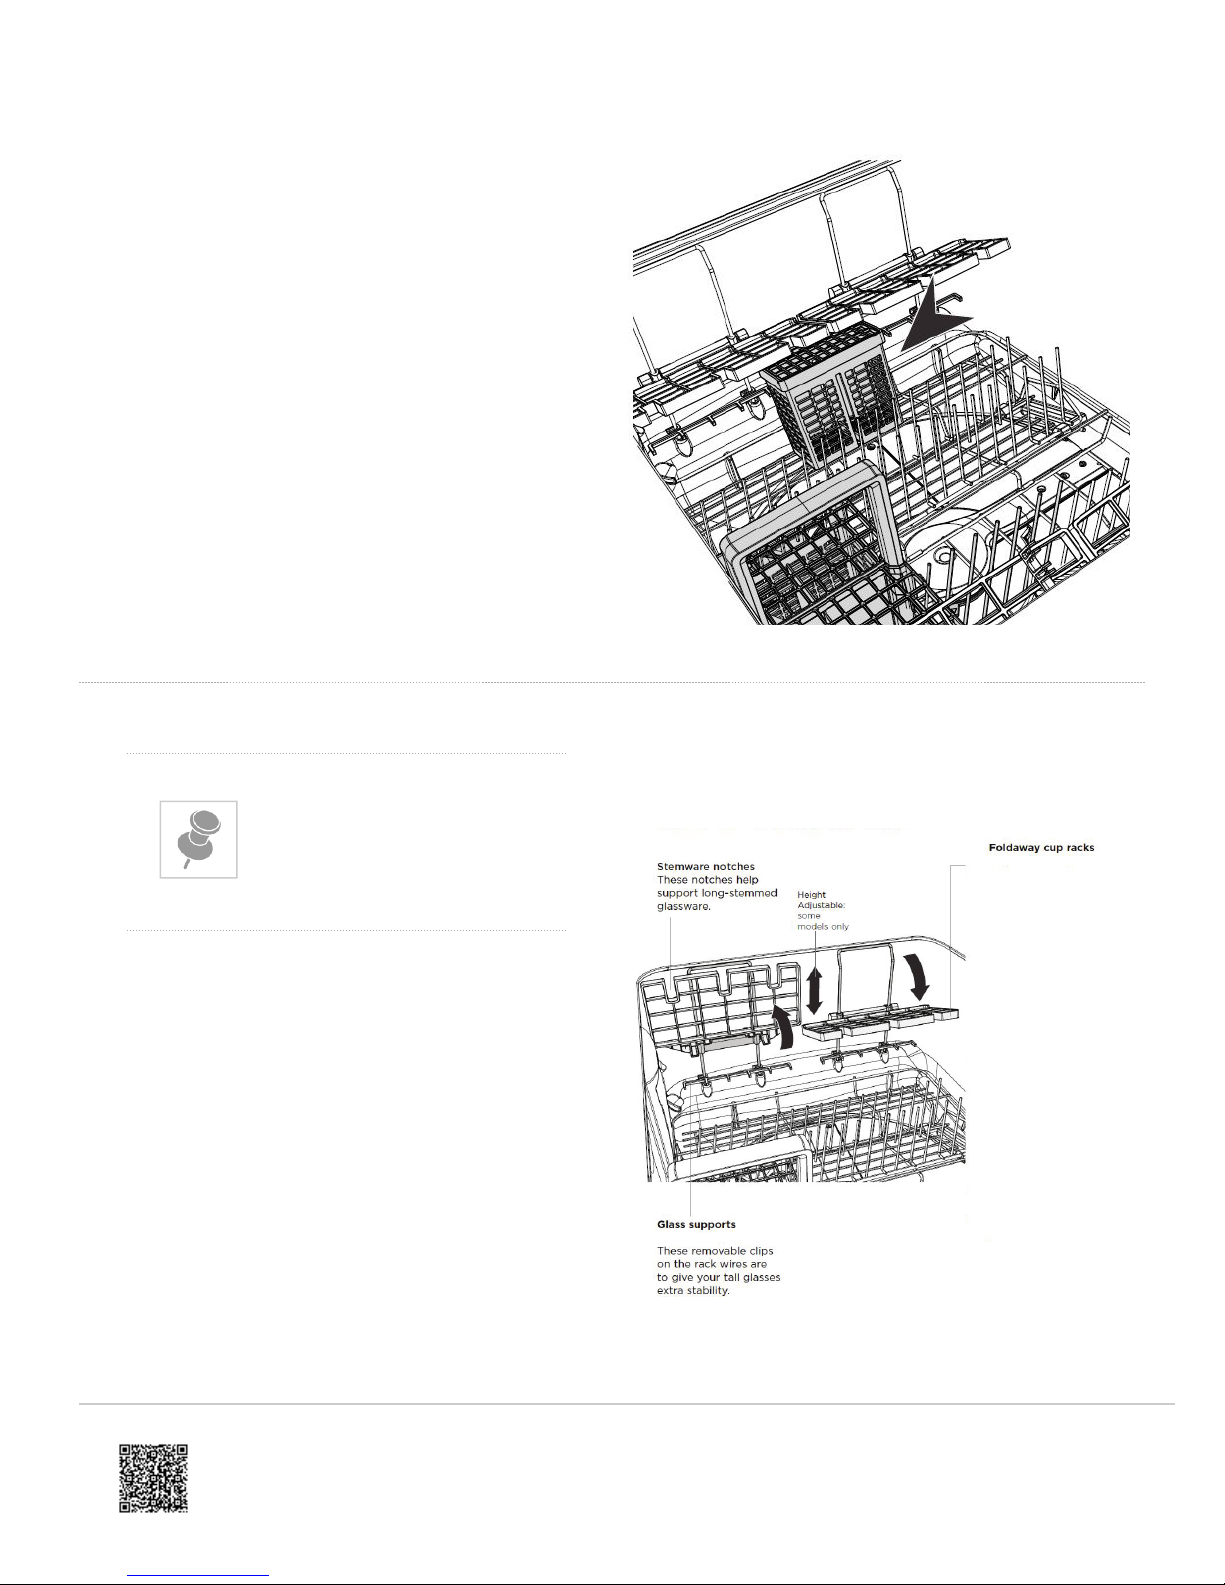
Racking Features - Foldaway Cup Racks
https://producthelp.fisherpaykel.com/au/Clean/DishDrawer%E2%84%A2/Integrated_Double/DD60DI9/User_Guide_DD60DI9/03_Operating_Instructions
Updated: Wed, 13 Mar 2019 03:46:11 GMT
Powered by
Racking Features will vary
depending on Model
Foldaway Cup Racks
• You can fold these independently of each other.
• Fold the racks away if you need the space.
• Fixed height: DD*A Models only. The racks are a
fixed height, designed for best wash performance.
• Height adjustable: All other Models. The racks
are height adjustable to accommodate
glassware and cups of varying heights.
• You can adjust these independently of each other to
any height:
1. Fold up to unlock the rack.
2. Adjust the height to suit by sliding up or down.
3. Fold down to lock in position.
7
Page 8
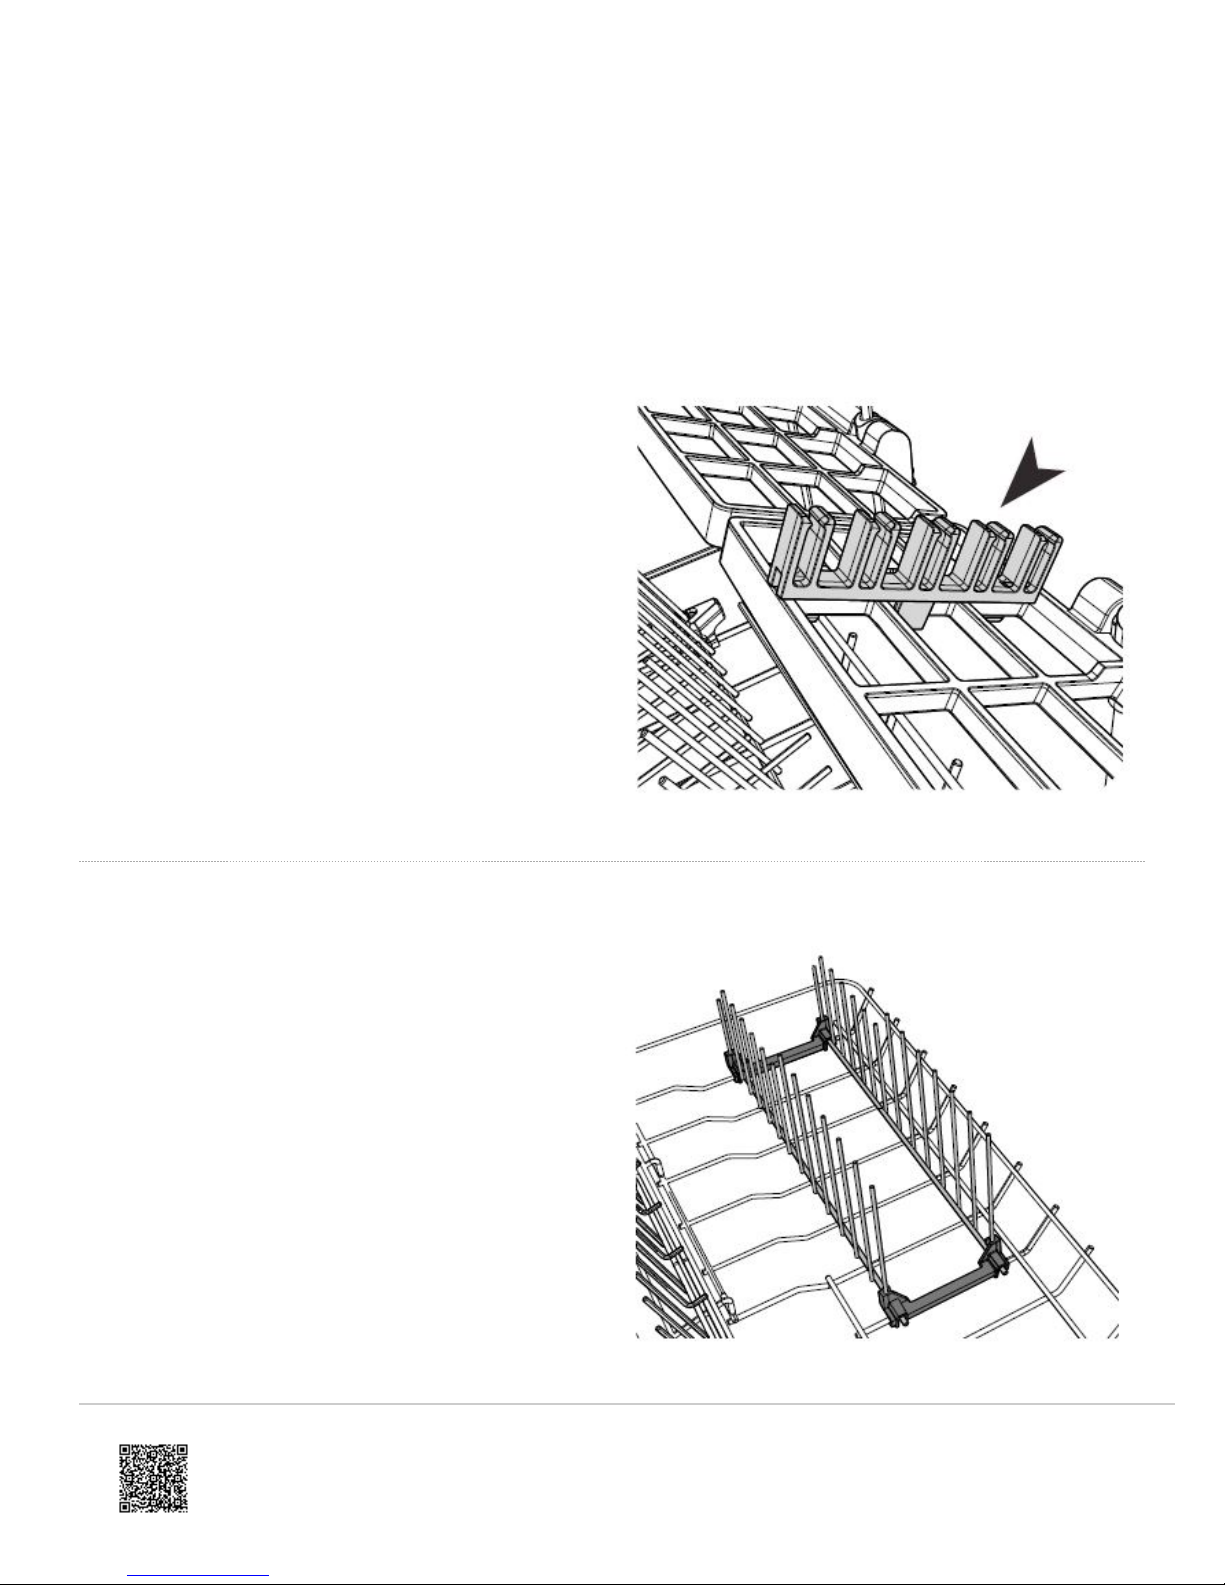
Glass Supports
https://producthelp.fisherpaykel.com/au/Clean/DishDrawer%E2%84%A2/Integrated_Double/DD60DI9/User_Guide_DD60DI9/03_Operating_Instructions
Updated: Wed, 13 Mar 2019 03:46:11 GMT
Powered by
• These removable clips on the rack wires are to give
your tall glasses extra stability.
Knife Clip
(Some Models Only)
• This clips onto the adjustable racks and supports
knives and other utensils during the wash.
• Always ensure that knife blades are facing down.
Racking Features - Folding Tine Rack
Folding Tines
• For optimum stability, place larger plates between
the longer tines in the front.
• Fold the tines down if you need the space for pots
or other large items.
• Release by folding tines down towards each other to
detach them from the clips at the rear of the unit.
8
Page 9
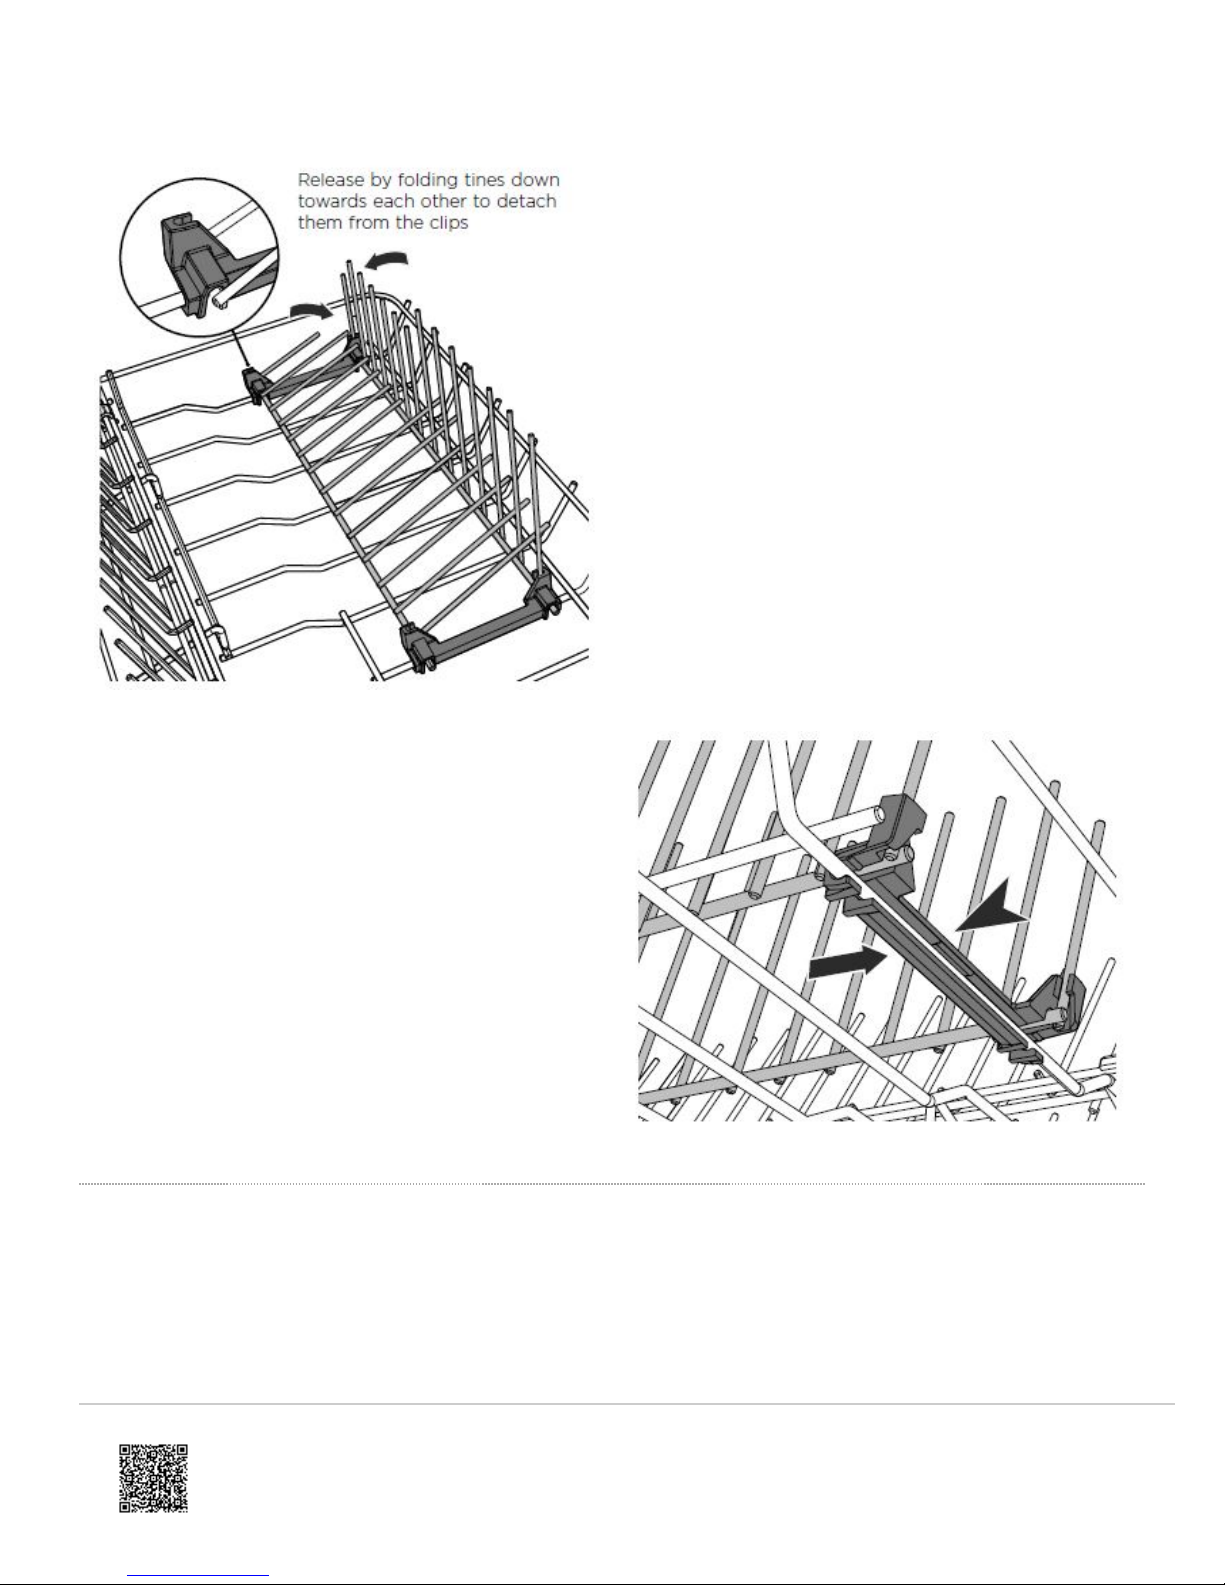
Removing the Folding Tines
https://producthelp.fisherpaykel.com/au/Clean/DishDrawer%E2%84%A2/Integrated_Double/DD60DI9/User_Guide_DD60DI9/03_Operating_Instructions
Updated: Wed, 13 Mar 2019 03:46:11 GMT
Powered by
• The folding tines can be removed if so desired.
However it is recommended you fold the tines down
rather than remove the whole rack if more space is
needed in the dishwasher.
To Remove:
Unclip the folding tine rack at each end by pulling firmly
towards you.
To Replace:
Line up the clips with the base rack and push firmly to
click into place.
Racking Features - Fixed Tine Rack
(DD*A Models Only)
9
Page 10
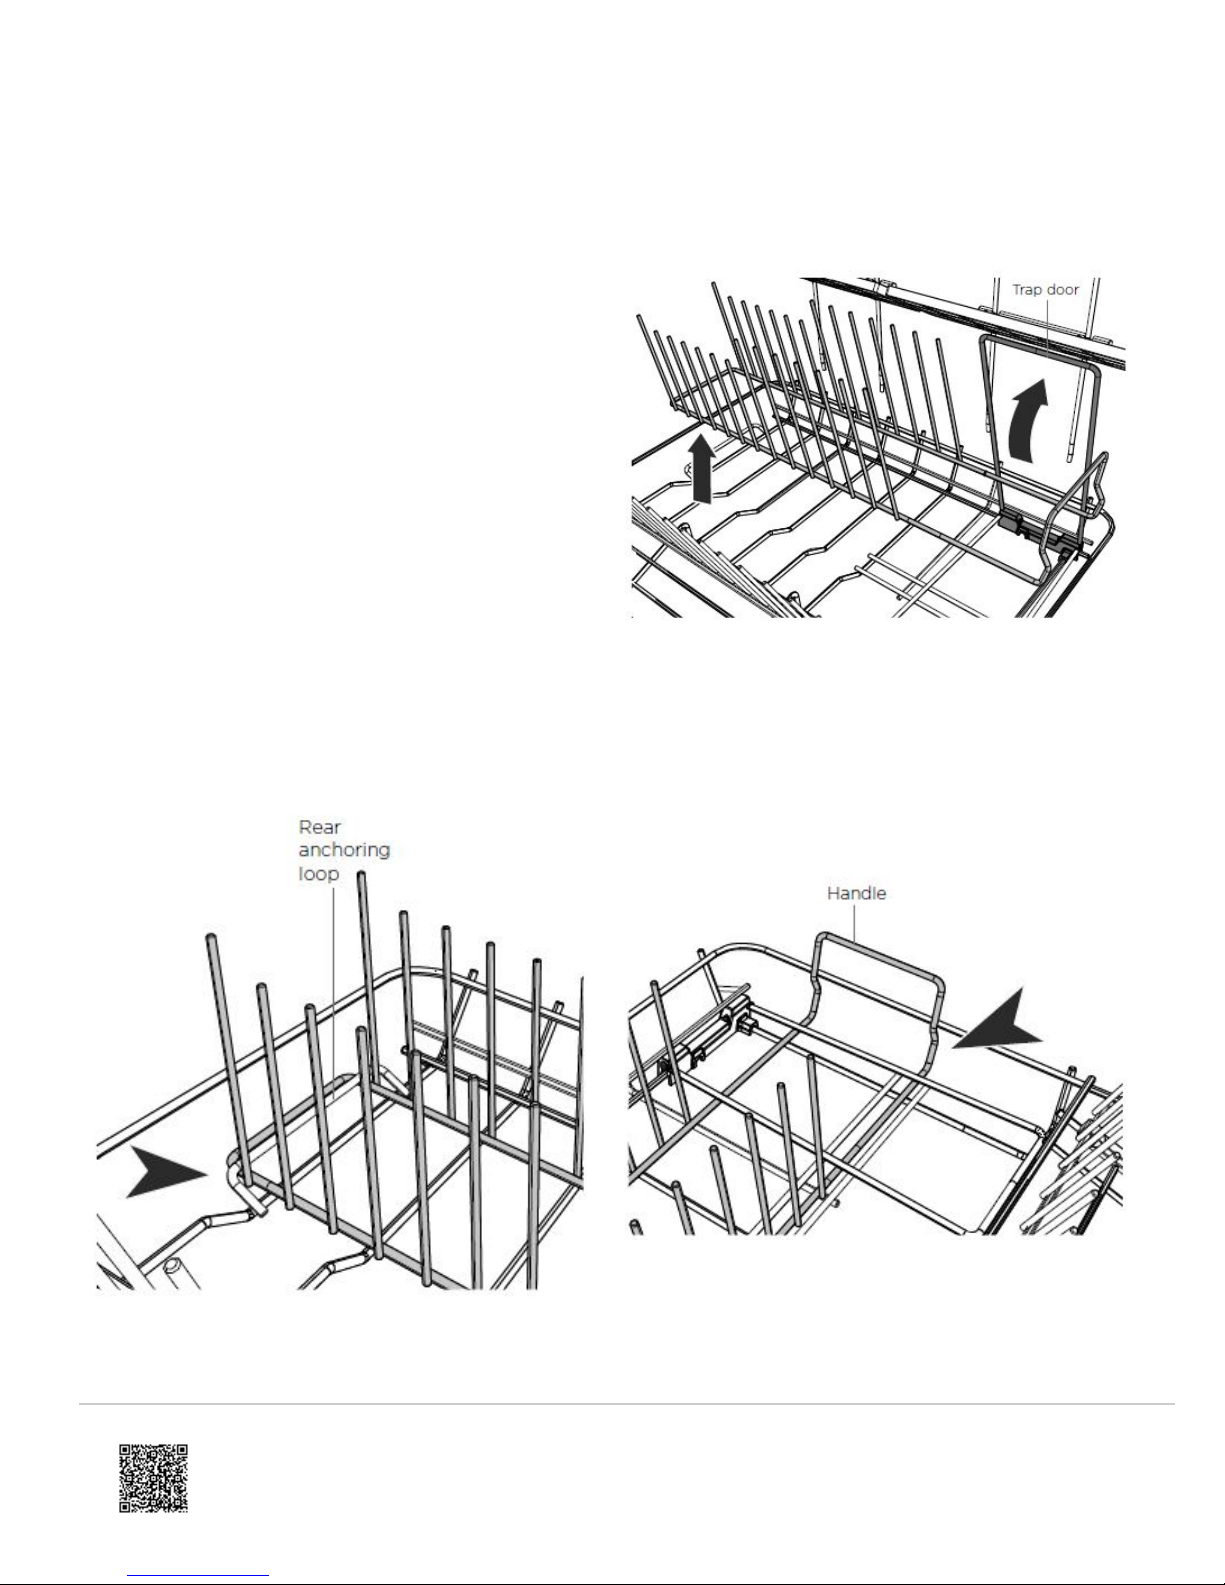
Removable Fixed Tine Rack
https://producthelp.fisherpaykel.com/au/Clean/DishDrawer%E2%84%A2/Integrated_Double/DD60DI9/User_Guide_DD60DI9/03_Operating_Instructions
Updated: Wed, 13 Mar 2019 03:46:11 GMT
Powered by
• This rack is your main dish rack. The tine spacing
has been optimized for maximum wash
performance of plates and bowls.
Remove the rack to make space for larger items.
To Remove
• Lift the trap door up.
• Lift the front of the fixed tine rack up from the
base rack.
• Slide the fixed tine rack forward clear of the
rear anchoring loop and lift out.
To Replace
• Lift the trap door up.
• Hook the rear anchoring loop onto the base rack.
• Lower the fixed tine rack into place.
• Close the trap door to secure.
Fixed Tine Plate Rack - Front
Fixed Tine Rack - Rear
10
Page 11
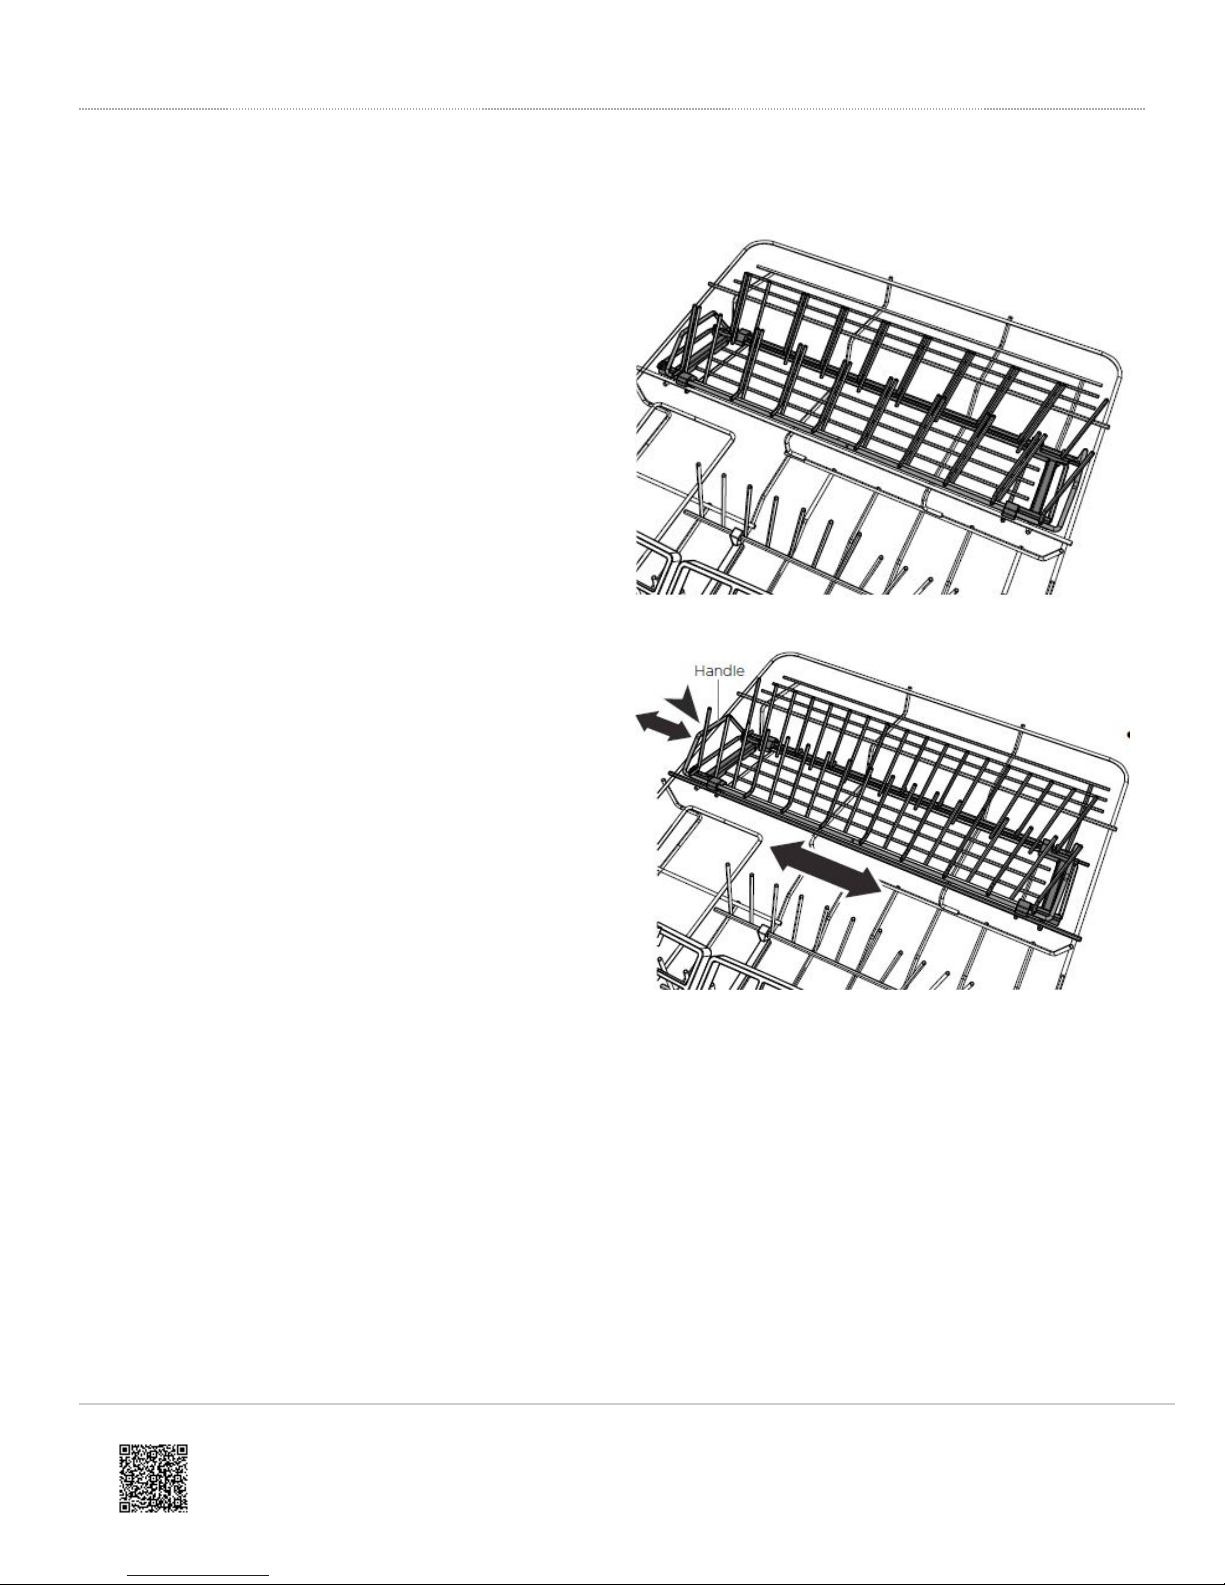
Racking Features - Spacing Adjustable Tine Rack
https://producthelp.fisherpaykel.com/au/Clean/DishDrawer%E2%84%A2/Integrated_Double/DD60DI9/User_Guide_DD60DI9/03_Operating_Instructions
Updated: Wed, 13 Mar 2019 03:46:11 GMT
Powered by
(ALL Other Models)
Removable Spacing Adjustable Tine Rack
• Designed to fit deep bowls (wide spacing) or small
plates (narrow spacing), depending on adjustment.
To Adjust the Tine Spacing
• To adjust between wide and narrow spacings, slide
the tines backward or forward by pushing or pulling
the handle at the front.
11
Page 12
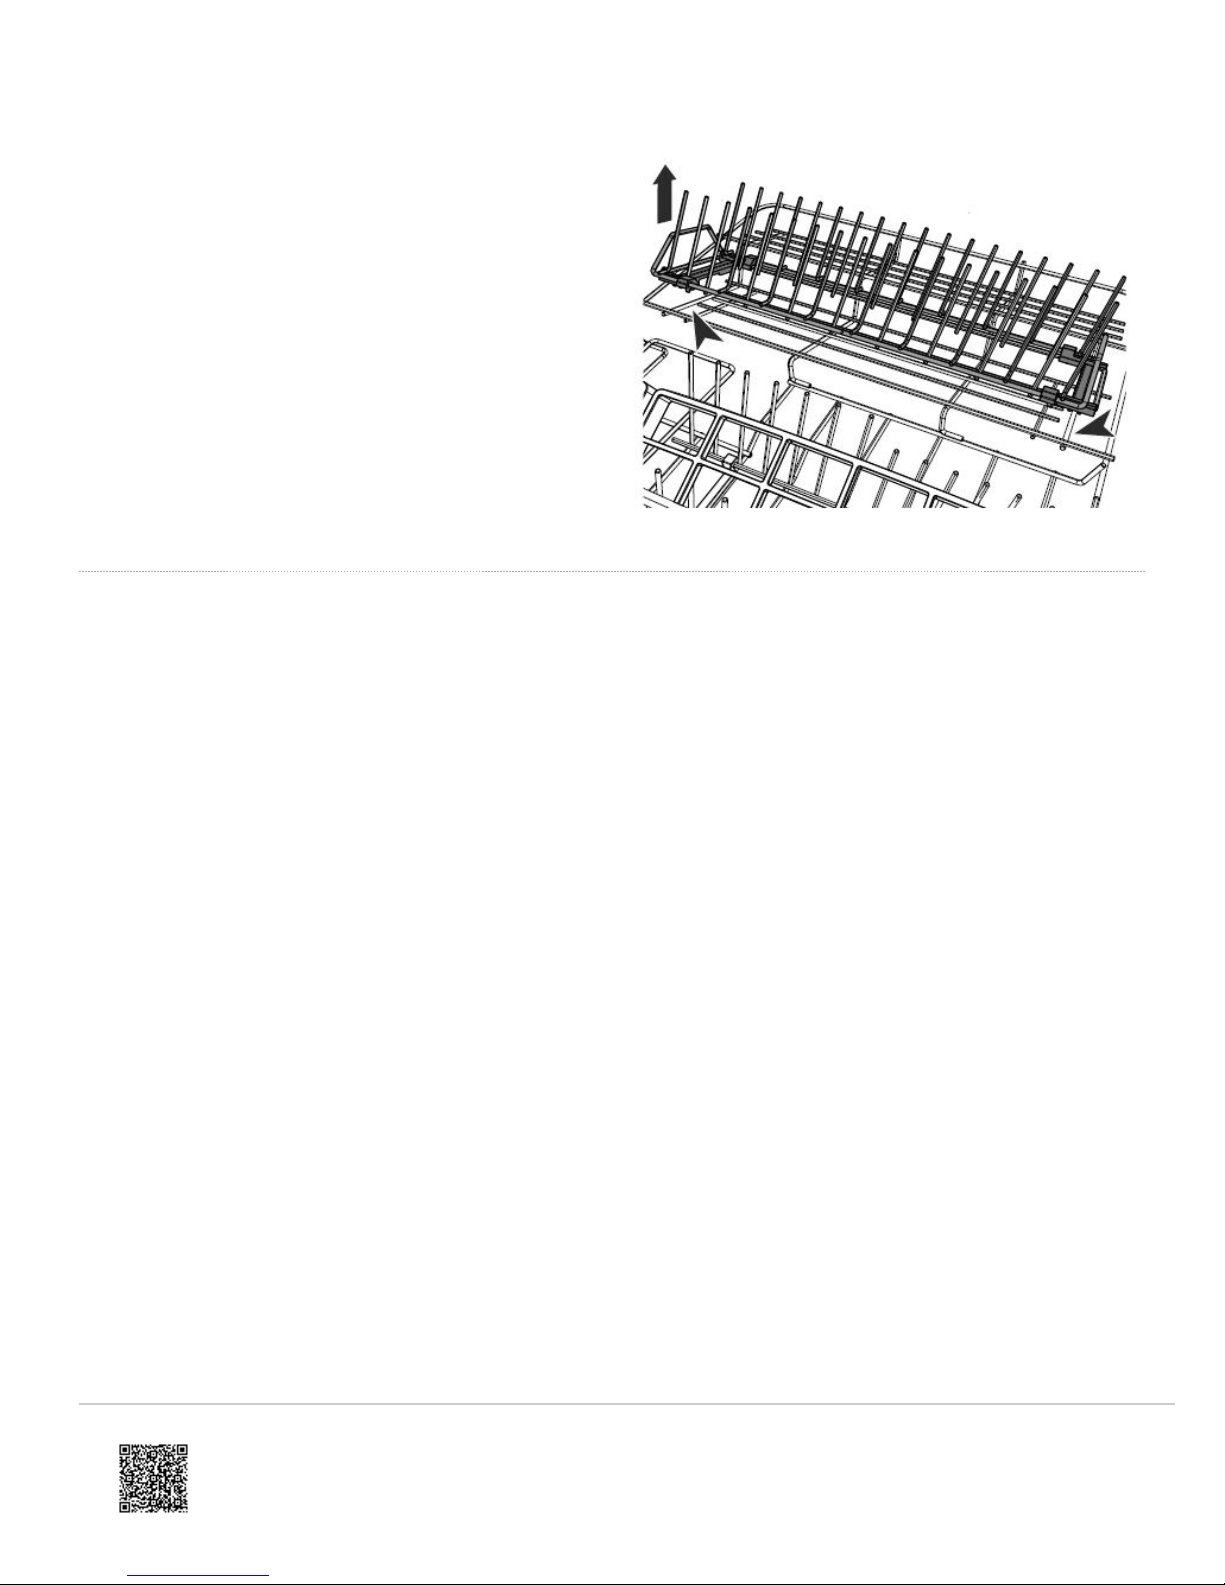
Remove the rack to make space for larger items.
https://producthelp.fisherpaykel.com/au/Clean/DishDrawer%E2%84%A2/Integrated_Double/DD60DI9/User_Guide_DD60DI9/03_Operating_Instructions
Updated: Wed, 13 Mar 2019 03:46:11 GMT
Powered by
To Remove the rack
Grip handles at the front and rear of the rack and pull
up to unclip.
To Replace the rack
Align front and rear clips with the base of the basket and
click into place.
Loading Suggestions
When loading your drawer, make sure that
• You place items so that water coming from the rotating spray arms below can reach all areas (wash
performance will be reduced if it can’t).
• Nothing blocks the water from getting to items on the foldaway cup racks.
• Glass and other fragile items are stable, so that they do not accidentally topple and break during the wash.
How NOT to load your drawer
12
Page 13
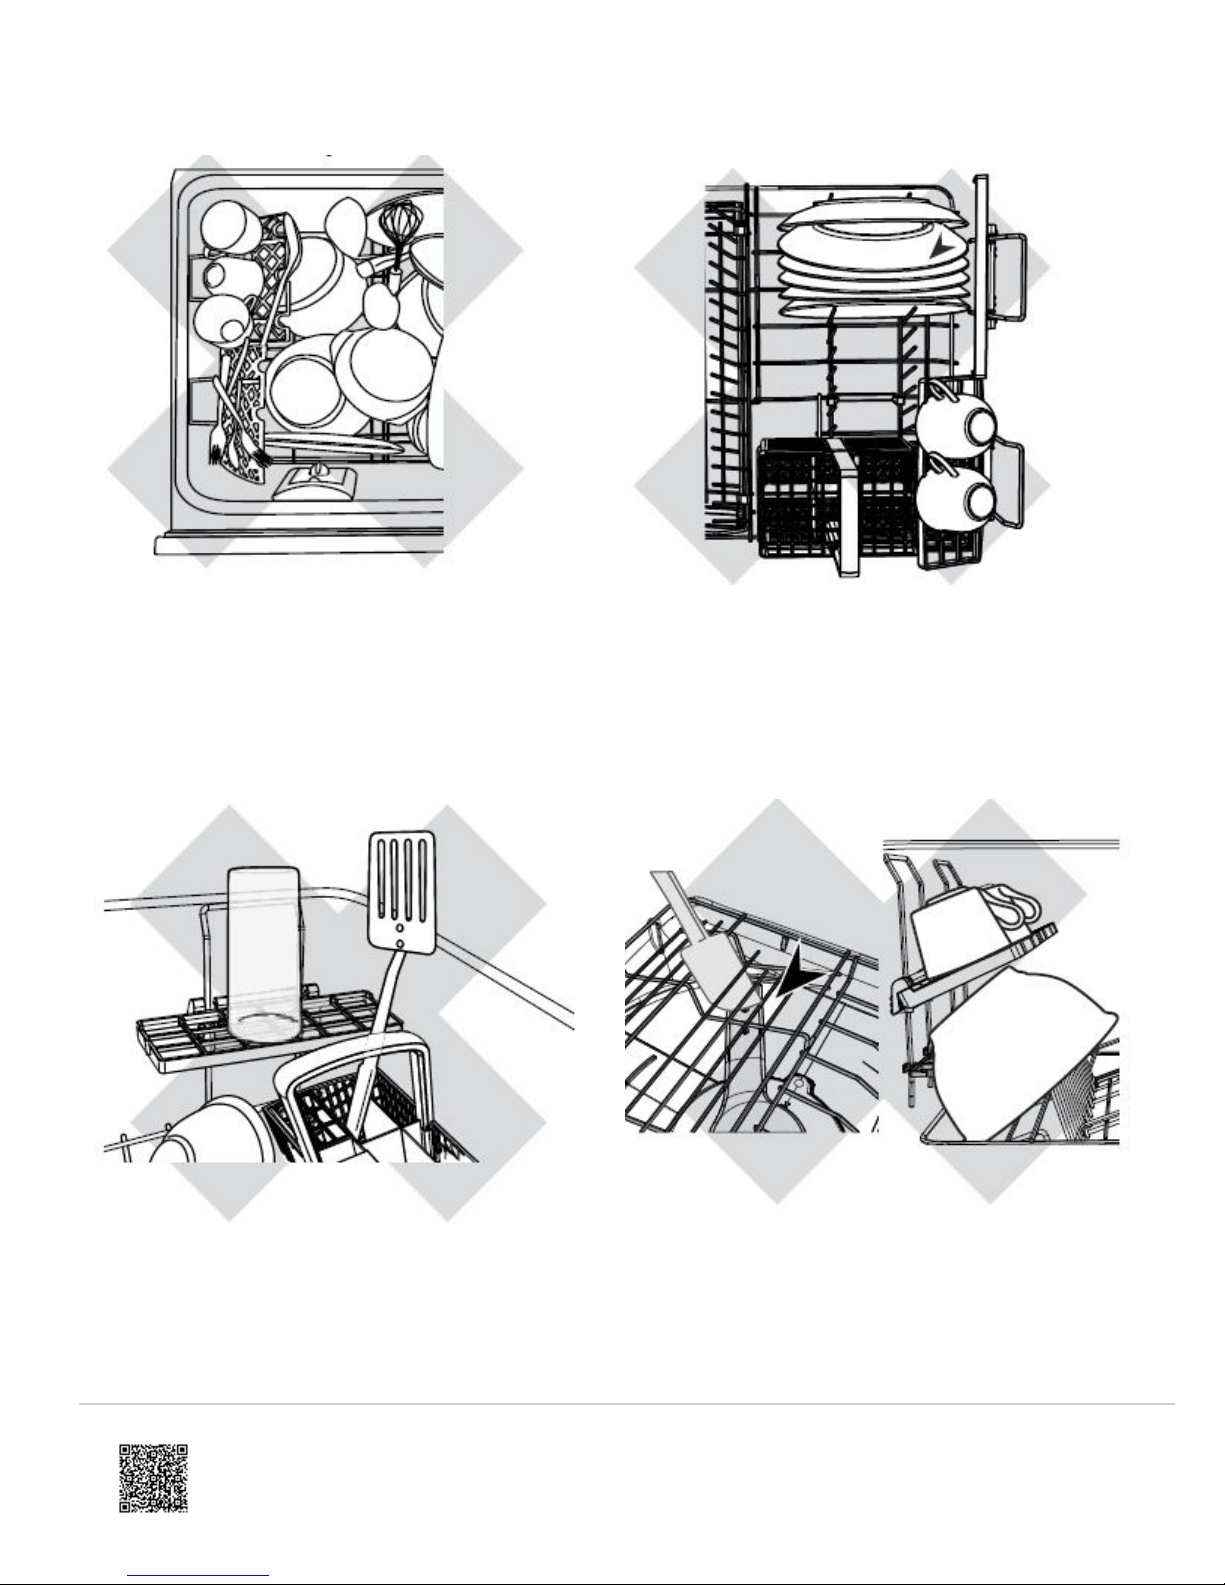
• By overcrowding, wash water will not reach some of
https://producthelp.fisherpaykel.com/au/Clean/DishDrawer%E2%84%A2/Integrated_Double/DD60DI9/User_Guide_DD60DI9/03_Operating_Instructions
Updated: Wed, 13 Mar 2019 03:46:11 GMT
Powered by
the dinnerware.
• Cups, glasses and bowls must have their openings
facing down.
• The plates are nesting together and wash water
may not get through.
• Ensure cutlery are not nesting or stuck together.
They need to be evenly spread out.
• Ensure dishware items are not forced into or
protrude out of the drawer, as this may prevent the
internal lid of the drawer from properly sealing which
could result in a service call.
• Ensure cutlery has not fallen through the base rack
and stopped the spray arms from rotating.
• The large bowl is blocking wash water reaching
items on the foldaway cup racks.
13
Page 14

• Locate sharp items safely to prevent injuring the
https://producthelp.fisherpaykel.com/au/Clean/DishDrawer%E2%84%A2/Integrated_Double/DD60DI9/User_Guide_DD60DI9/03_Operating_Instructions
Updated: Wed, 13 Mar 2019 03:46:11 GMT
Powered by
user and damage the lid assembly.
• Check the bottom of the cutlery basket to ensure
sharp or slim pointed items have not come through
too far as they may stop spray arm rotation.
• Large utensils should be placed on the foldaway
cup racks so they do not become dislodged and
stop the spray arms from rotating.
• Sharp or pointed items must be placed horizontally
or with sharp edges/pointsfacing down to avoid risk
of injury.
Water Hardness and Dishwashing
What is Water Hardness?
Hard water is water with a high concentration of minerals such as calcium and magnesium. In soft water, this
concentration is low. Water hardness varies by geographical location.
How does Water Hardness Affect Dishwashing?
Hard water can be detrimental to the performance of your dishwasher. Over time, glassware washed in hard water will
become cloudy and dishes will become spotted or covered in a white film. Using very hard water can cause dishwasher
parts to fail over time.
Naturally soft or softened water has no detrimental effects if used with the correct amount of detergent. However, excess
detergent combined with hot, soft water may cause irreversible etching on glassware. Etching first appears as a
rainbow-coloured film and — if allowed to continue — can make glassware permanently opaque.
What Can I do to Minimise any Detrimental Effects?
Contact your local water company to find out about water hardness in your area.
• Some models (those with a letter ‘H’ in the model name) have a built-in water softener.
• Models with water softener are not currently available in New Zealand and Australia.
If your Home has Hard Water and your Dishwasher has no Built-In Water Softener:
• Follow the detergent quantity recommendations on the following pages.
• If available, use a detergent with high phosphate content. Phosphate softens the water and this improves wash
results. If detergent with phosphate is not available, we recommend using multi-purpose tablets.
• Use rinse aid. We recommend you raise the rinse aid setting to 5 to help improve wash performance. See
'Quickstart guide' for instructions.
• Use a dishwasher cleaner/descaler regularly, or whenever you notice a build-up of limescale deposits in your
dishwasher.
14
Page 15

If your dishwasher has no built-in water softener and you live in a hard water area, we recommend
https://producthelp.fisherpaykel.com/au/Clean/DishDrawer%E2%84%A2/Integrated_Double/DD60DI9/User_Guide_DD60DI9/03_Operating_Instructions
Updated: Wed, 13 Mar 2019 03:46:11 GMT
Powered by
fitting a water softener to the household water supply. If the water hardness in your home is above
250 ppm/14.6 gpg (US), a water softener has to be fitted to maintain the performance of your
dishwasher.
If your Home has Naturally Soft or Softened Water:
• Avoid using too much detergent. Follow the quantity recommendations on the following pages.
• Ensure the drawer is not overloaded and water can reach all the dishes.
Wash Programs and Powdered Detergent Quanitities
• Find out about water hardness in your home, then use the table below to determine how much powdered detergent
to use for each wash program. See also section ‘Waterhardness and dishwashing’.
• For information on which program to use for your load, see your ‘Quick start guide’.
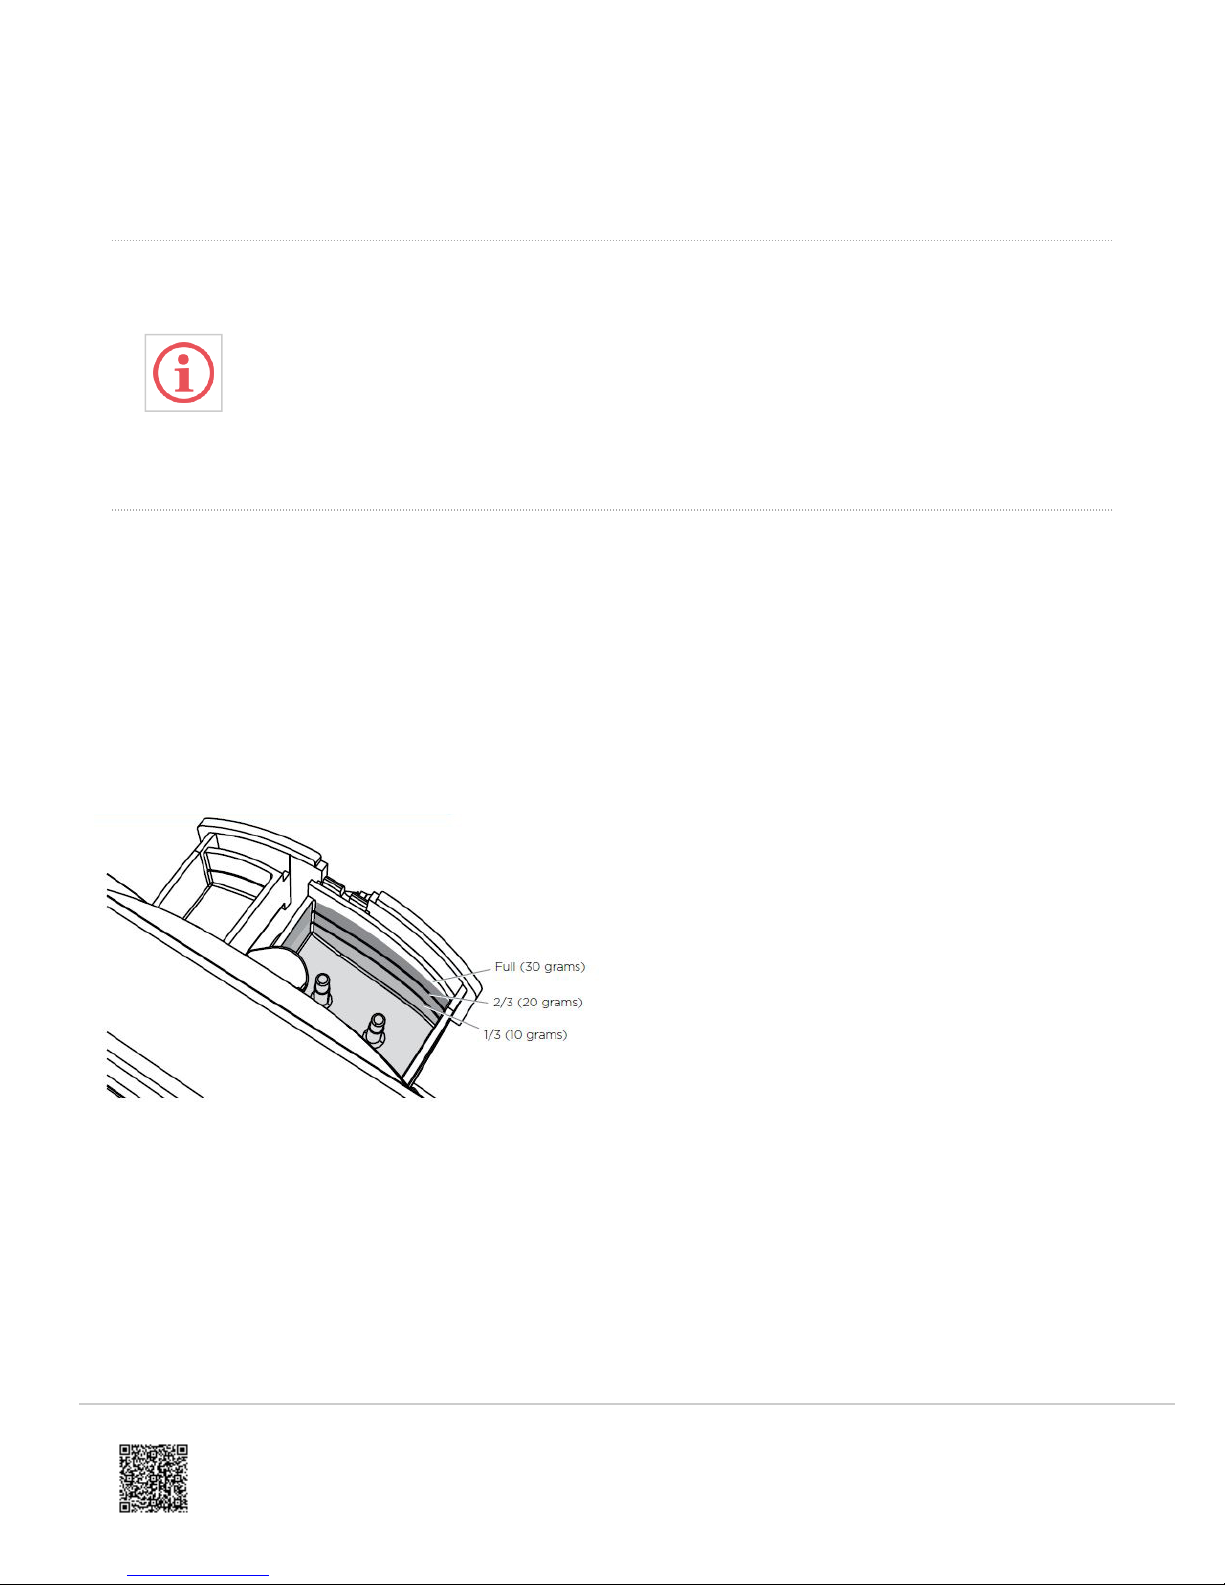
• The main powdered detergent dispenser has markings to help you measure the correct quantities. See following
section ‘Adding detergent’.
Powdered Detergent Quantities (per drawer)
Water Hardness
US / CA NZ / AU GB / IE
Wash Programs
parts per million (ppm)
grains per US gallon (gpg)
main detergent
dispenser
grams grams
marking
SOFTER Heavy 2/3 20 20
Normal /Medium 2/3 20 20
<100 ppm or
< 6 gpg*
Eco 2/3 20 20
Fast 1/3 10 10
Delicate 1/3 10 10
Rinse - - -
Heavy Full 30 -
100 -150 ppm or
6 - 9 gpg
Normal /Medium Full 30 -
Eco Full 30 -
15
Page 16
Fast Full 30 -
https://producthelp.fisherpaykel.com/au/Clean/DishDrawer%E2%84%A2/Integrated_Double/DD60DI9/User_Guide_DD60DI9/03_Operating_Instructions
Updated: Wed, 13 Mar 2019 03:46:11 GMT
Powered by
Delicate Full 30 -
Rinse - - -
Heavy Full 30 -
Normal /Medium Full 30 -
>150 ppm or
>9 gpg
Eco Full 30 -
Fast Full 30 -
Delicate Full 30 -
HARDER
Rinse - - -
* If you have a household water softener installed or for models with built-in water softeners, use the quantities
recommended for water with a hardness under 100 ppm/6 gpg, irrespective of the water hardness in your area. See also
section ‘Water softener’.
• If your water hardness is above 625ppm/36 gpg, we highly recommend you completely fill the
main detergent dispenser for all programs except Rinse) and the secondary dispenser for
heavily soiled loads. The rinse aid setting should be at 5.
• If your water hardness is above 625ppm/36 gpg, the wash performance of your dishwasher will
decline.
Adding Detergent
Powdered Dishwasher Detergent
You may see multiple, equally suitable types of dishwasher detergent on the shelves of your
supermarket. Read and follow the detergent manufacturer’s recommendations.
16
Page 17
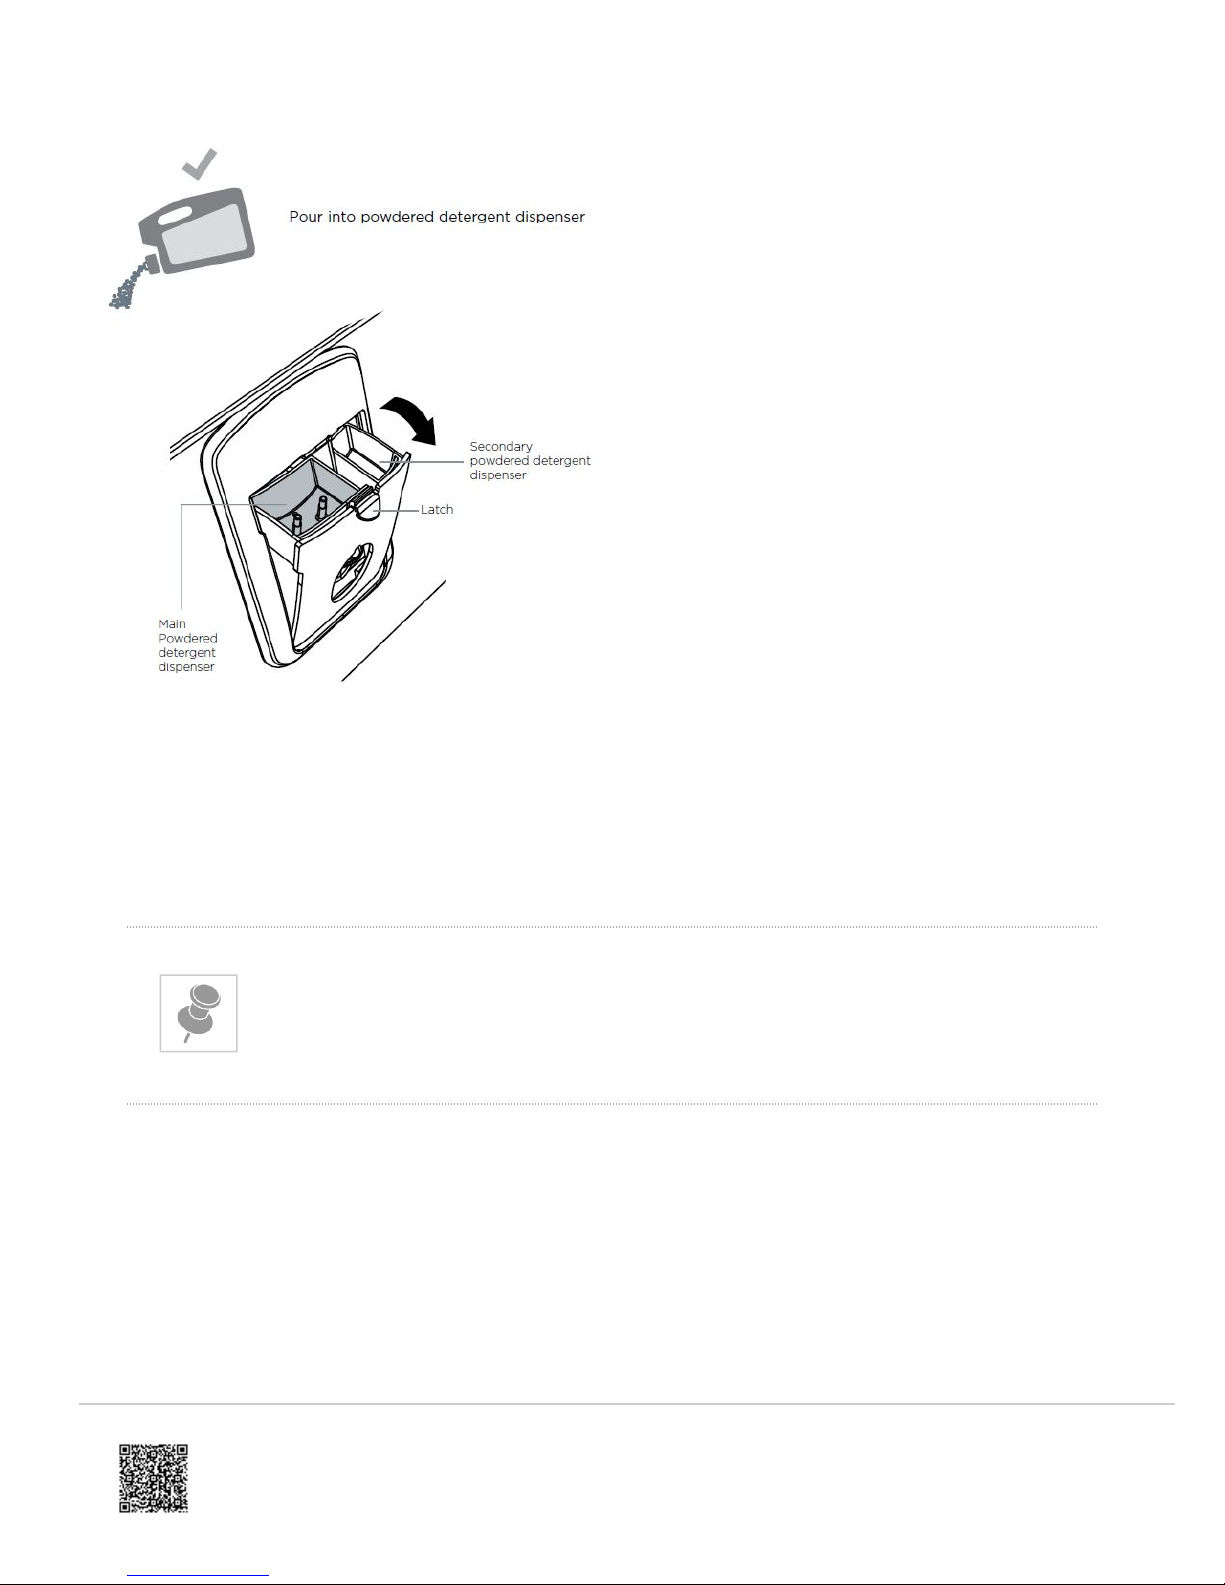
Filling the powdered detergent dispenser
https://producthelp.fisherpaykel.com/au/Clean/DishDrawer%E2%84%A2/Integrated_Double/DD60DI9/User_Guide_DD60DI9/03_Operating_Instructions
Updated: Wed, 13 Mar 2019 03:46:11 GMT
Powered by
1. Press the latch down to open the dispenser.
2. Check that the dispenser is empty and dry, then add detergent (do not place solid or liquid tablets in the
dispenser). No detergent is needed for the Rinse program.
3. Close the dispenser until it clicks shut. The detergent will automatically be released into the drawer during the
wash program.
When washing heavily soiled dishes and in very hard water you may also fill the secondary
dispenser with detergent to aid dishwasher performance.
17
Page 18
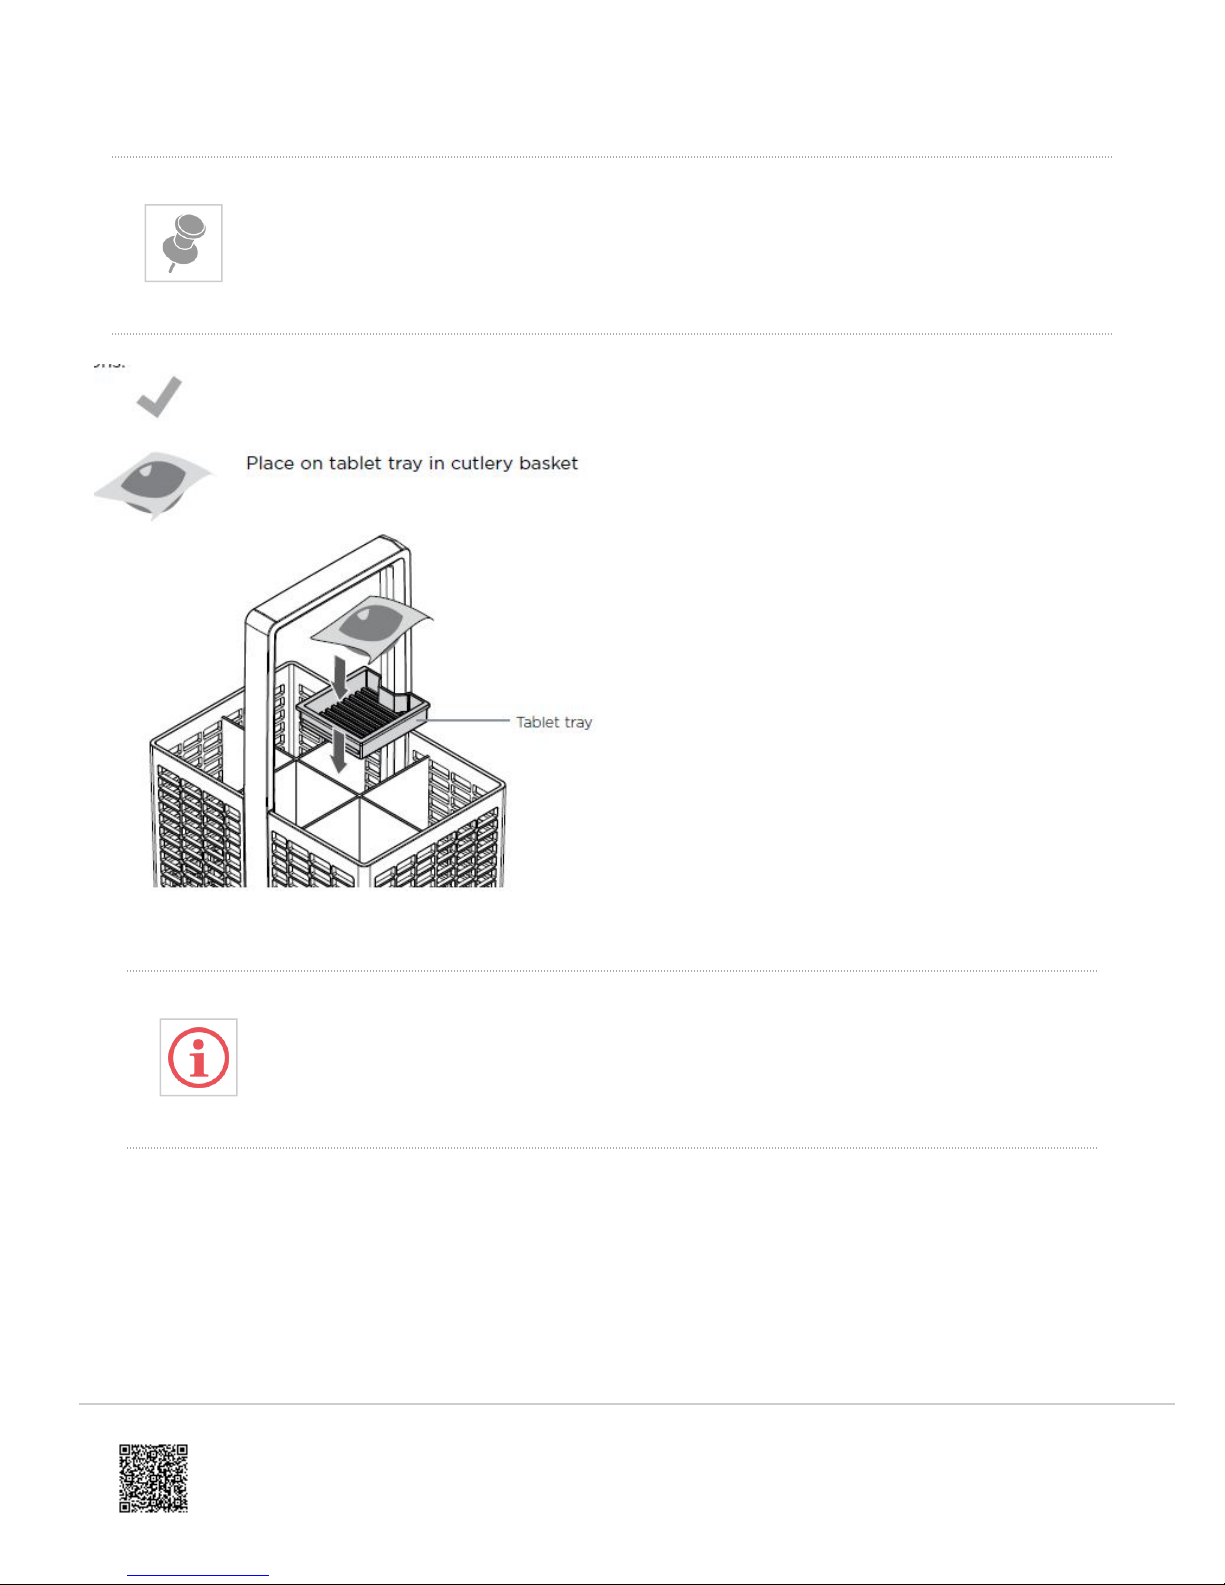
Pouch Packs of Gel or Powder
https://producthelp.fisherpaykel.com/au/Clean/DishDrawer%E2%84%A2/Integrated_Double/DD60DI9/User_Guide_DD60DI9/03_Operating_Instructions
Updated: Wed, 13 Mar 2019 03:46:11 GMT
Powered by
You may see multiple, equally suitable types of dishwasher detergent on the shelves of your
supermarket. Read and follow the detergent manufacturer’s recommendations.
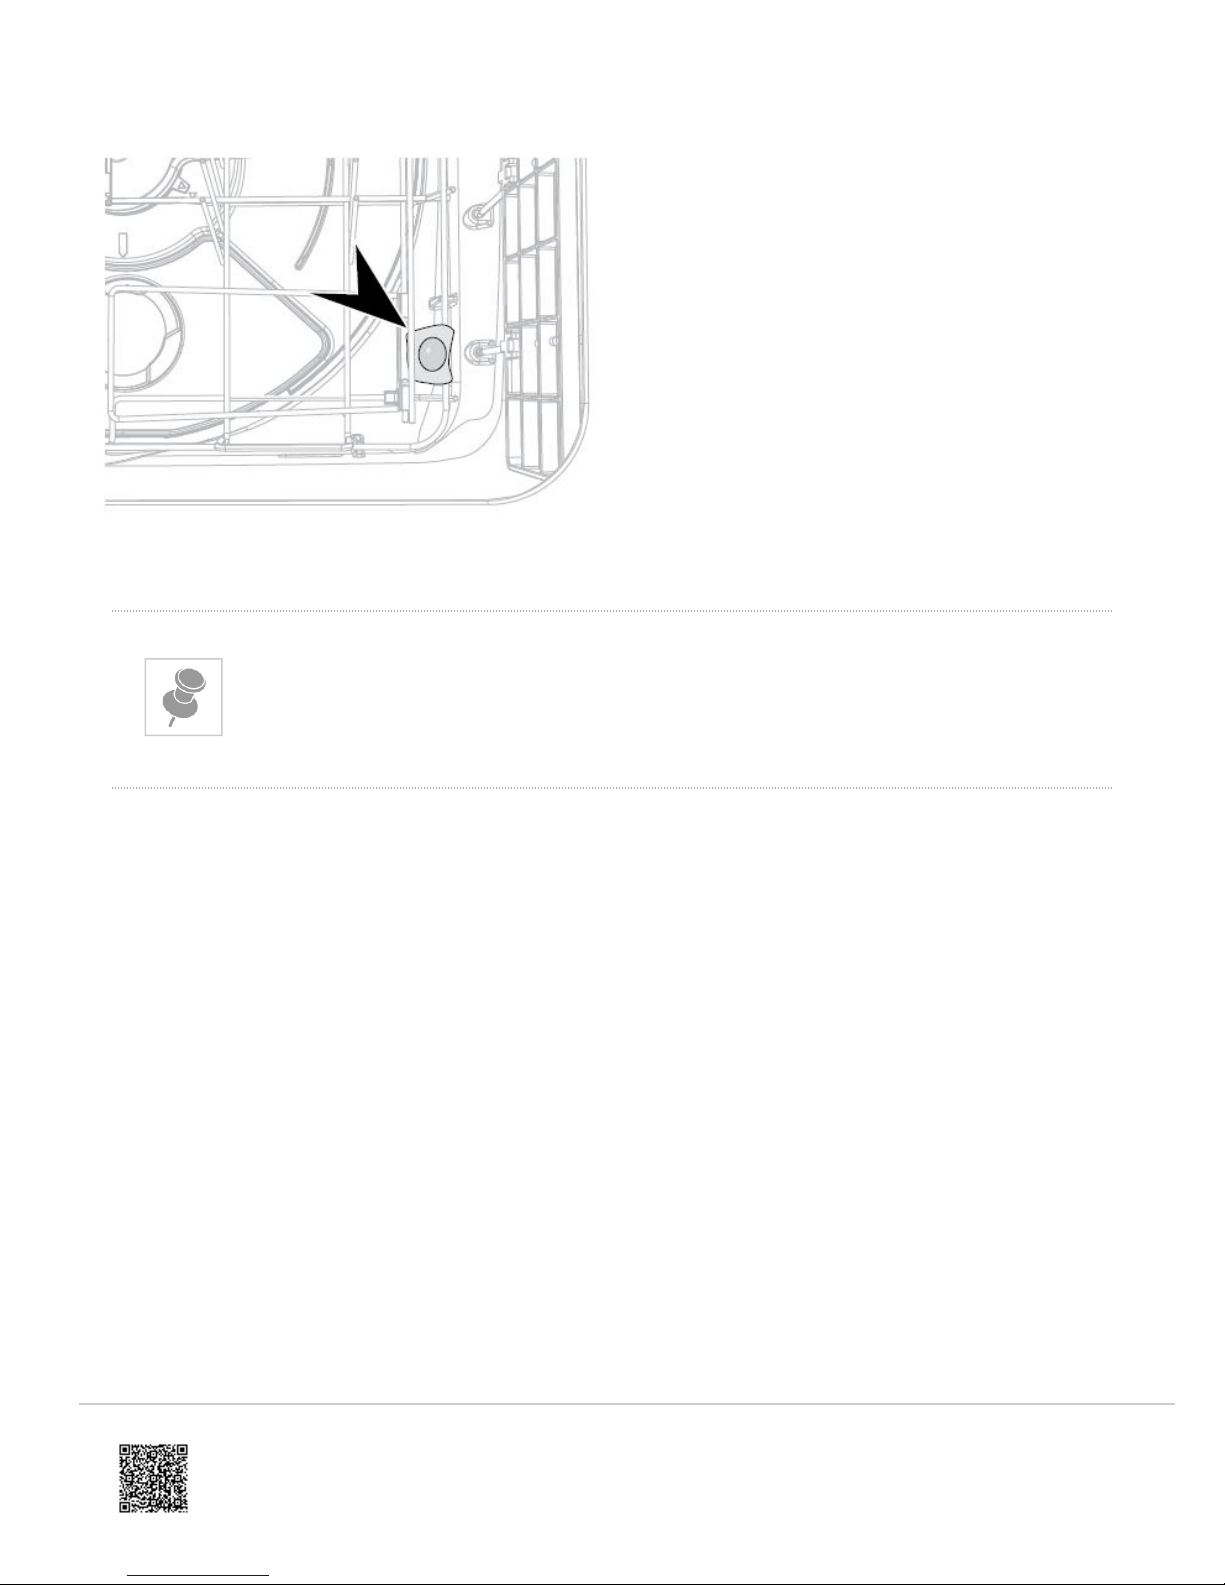
If the cutlery basket is not being used for a particular load, wedge pack between the racking on the side as shown.
Don’t place the pack on the floor of the drawer, as it may interfere with the spray
arm rotation and affect wash performance.
18
Page 19
Solid Dishwasher Tablets
https://producthelp.fisherpaykel.com/au/Clean/DishDrawer%E2%84%A2/Integrated_Double/DD60DI9/User_Guide_DD60DI9/03_Operating_Instructions
Updated: Wed, 13 Mar 2019 03:46:11 GMT
Powered by
You may see multiple, equally suitable types of dishwasher detergent on the shelves of your
supermarket. Read and follow the detergent manufacturer’s recommendations.
19
Page 20
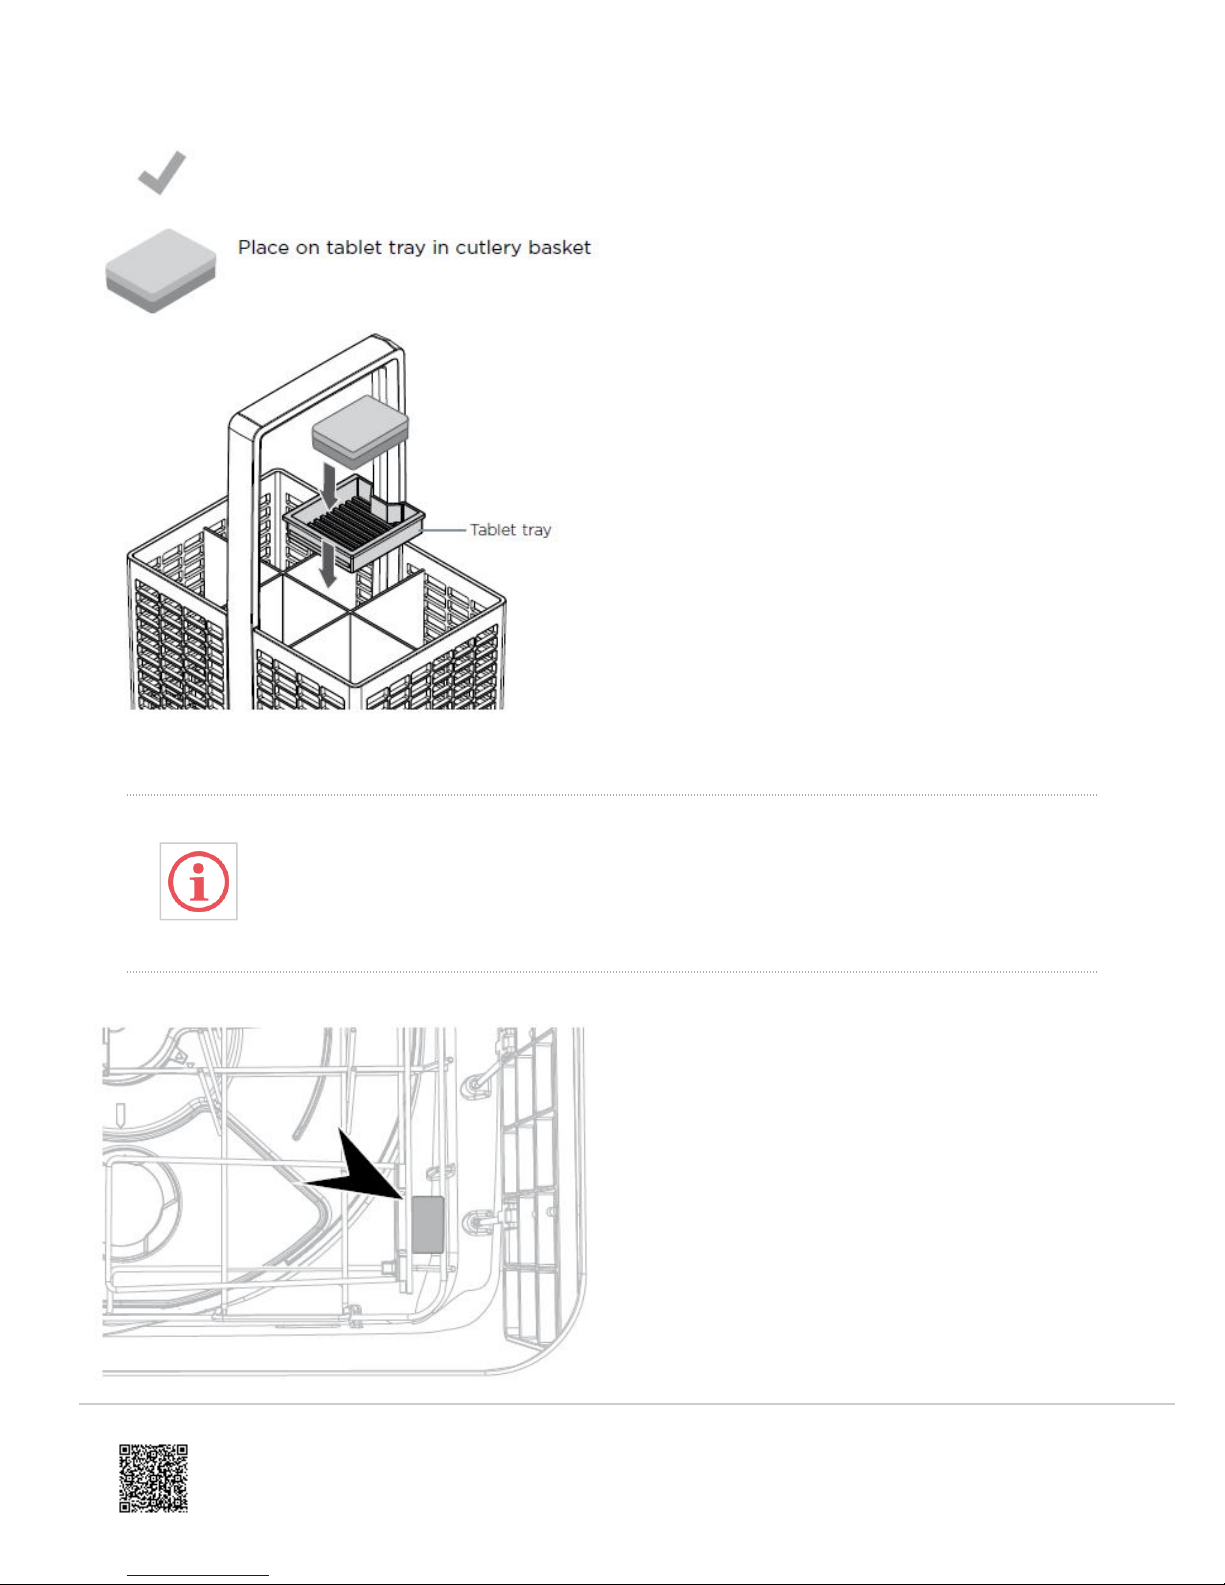
If the cutlery basket is not being used for a particular load, wedge tablet between the racking on the side as shown.
https://producthelp.fisherpaykel.com/au/Clean/DishDrawer%E2%84%A2/Integrated_Double/DD60DI9/User_Guide_DD60DI9/03_Operating_Instructions
Updated: Wed, 13 Mar 2019 03:46:11 GMT
Powered by
Don’t place the tablet on the floor of the drawer, as it may interfere with the spray arm rotation
and affect wash performance.
20
Page 21
Unsuitable Detergents
https://producthelp.fisherpaykel.com/au/Clean/DishDrawer%E2%84%A2/Integrated_Double/DD60DI9/User_Guide_DD60DI9/03_Operating_Instructions
Updated: Wed, 13 Mar 2019 03:46:11 GMT
Powered by
These types of detergent are not suitable and may damage your dishwasher and lead to a service call that is not
covered by warranty.
Do not use these in your dishwasher!
• Liquid detergents
• Laundry detergents
• Hand washing liquids
• Soaps
• Disinfectants
How Much Detergent to Use
For powdered detergent, refer to previous section ‘Wash programs and detergent quantities’ and follow the quantities
relevant to your location and water hardness level. Use the markings to help you measure the correct quantities. For
other types of detergent, follow the manufacturer’s recommendations.
Notes on Using Tablets
• If you are using tablets, follow manufacturer instructions on the packet. Some tablets may not be suitable for all
wash programs.
• Using tablets could improve wash performance in hard water areas.
• Make sure that tablets never get in direct contact with dishes or cutlery.
• If you are using dishwasher tablets with a built-in rinse aid component, we recommend turning off the rinse aid.
See your ‘Quick start guide’ for instructions.
21
Page 22
Dishwasher detergents are strongly alkaline. They can be extremely dangerous
https://producthelp.fisherpaykel.com/au/Clean/DishDrawer%E2%84%A2/Integrated_Double/DD60DI9/User_Guide_DD60DI9/03_Operating_Instructions
Updated: Wed, 13 Mar 2019 03:46:11 GMT
Powered by
if swallowed. Avoid contact with the skin and eyes and keep children and infirm
persons away from the dishwasher when it is open. Check that the powdered
detergent dispenser is empty after completion of the wash program.
Using Rinse Aid
• We recommend using liquid rinse aid regularly to give the best drying results.
• Rinse aid gives a streak-free, sparkling clean look to glass and chinaware. It also prevents metal from tarnishing.
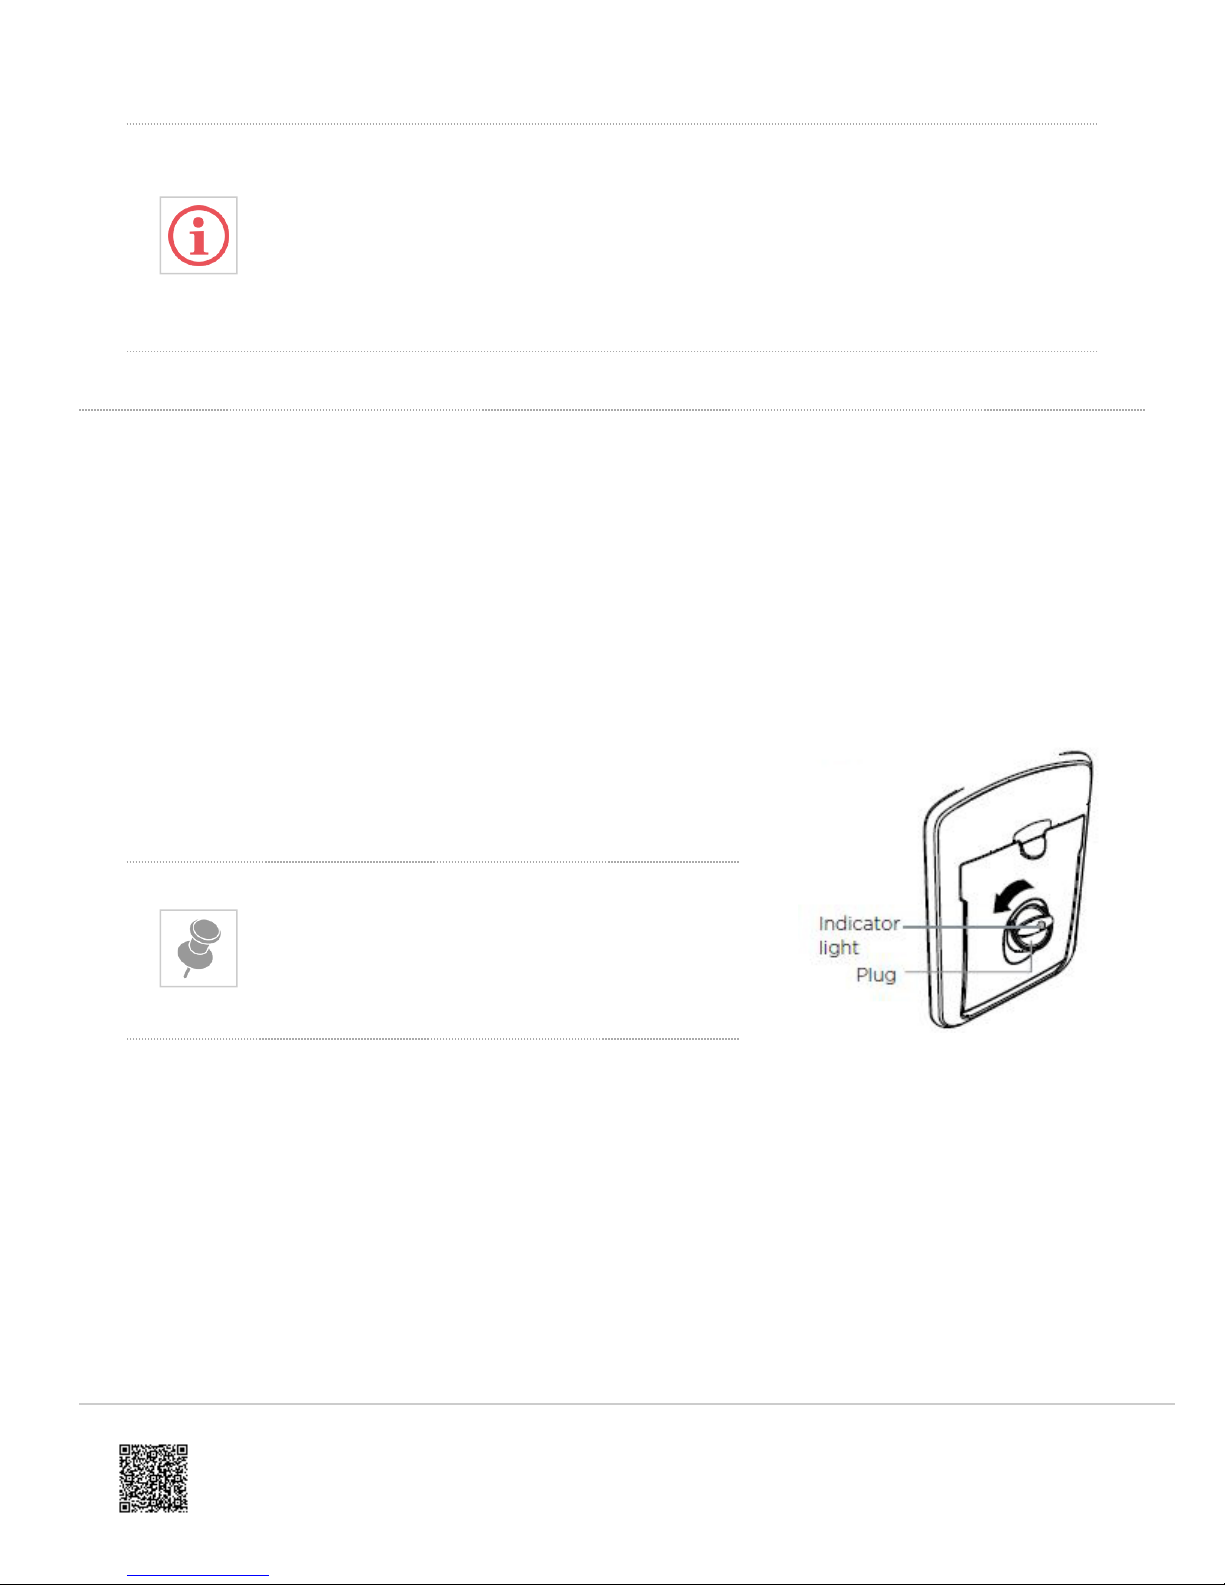
• The rinse aid dispenser is on the inside of the drawer, underneath the detergent dispenser.
• It holds approximately 50 ml / 1.7 fl oz of rinse aid.
• You may hear some unusual, high-pitched beeping when rinse aid is being dispensed. This is normal.
When to Refill Rinse Aid
• If the indicator glows or flashes bright red, refill rinse aid.
• If the indicator glows or flashes dimly or not at all, you do not need to
refill: there is enough rinse aid for the wash.
Lighter coloured rinse aids will not dim the indicator
as effectively as darker ones.
Turn the plug Anti Clockwise
22
Page 23
How to Refill Rinse Aid
https://producthelp.fisherpaykel.com/au/Clean/DishDrawer%E2%84%A2/Integrated_Double/DD60DI9/User_Guide_DD60DI9/03_Operating_Instructions
Updated: Wed, 13 Mar 2019 03:46:11 GMT
Powered by
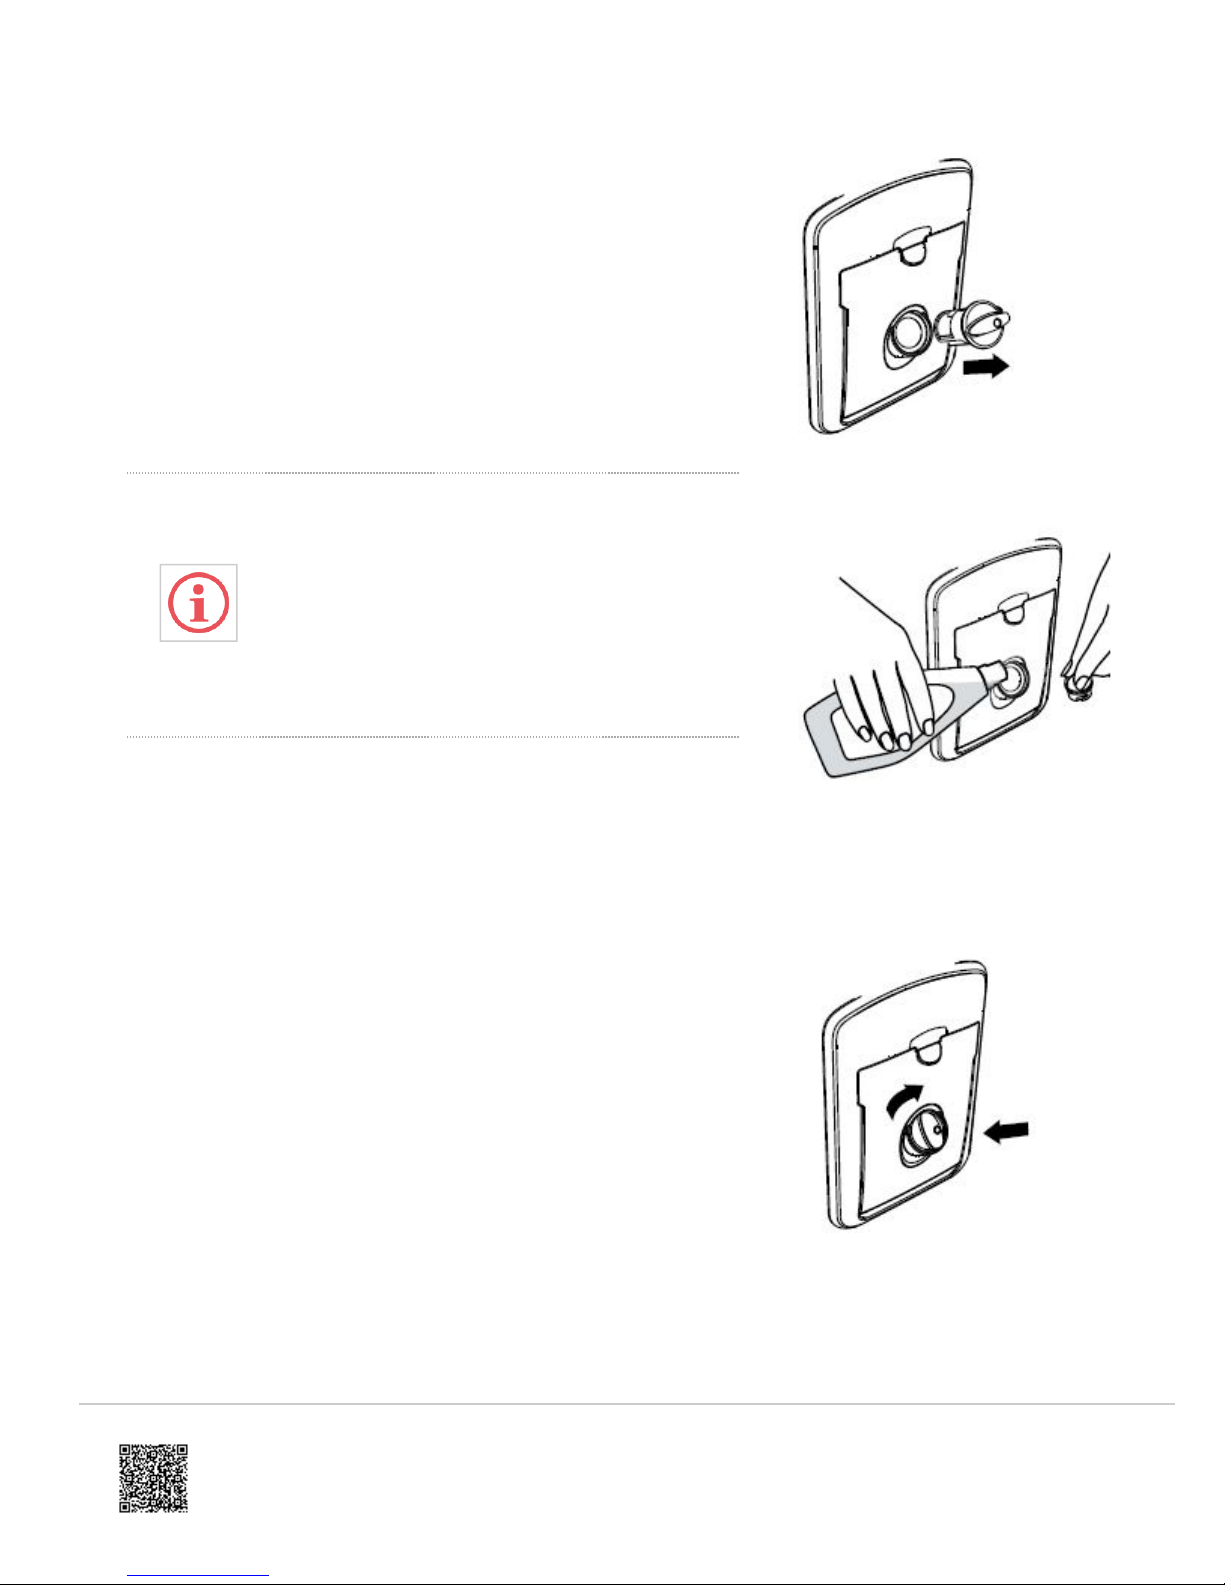
1. Turn the plug anticlockwise and remove.
2. Pour rinse aid into the circular opening, taking care not to spill any into
the drawer.
3. Refit the plug, then turn it clockwise back to its original position.
• Any accidental spillages of rinse aid must be
wiped up. If not wiped up, spilt rinse aid will
cause excessive foaming, which may result in
a service call that will not be covered by
warranty.
• Make sure that the plug is closed tight, with its
hand grip in a vertical position.
Remove the Plug
Pour Rinse Aid into the Circular
opening
How Much Rinse Aid to Use
You may need to adjust the amount of rinse aid dispensed in each wash to
suit your water conditions. The lowest setting is ‘0 (off)’, the highest is ‘5’.
See the ‘Preference options’ for instructions on how to change the rinse aid
setting.
• If there is excessive foam at the end of the wash, reduce the setting.
• If dishes are wet or streaky after drying, increase the setting.
• If you live in a hard water area and you have no water softener installed
in your water supply or built into your dishwasher, we recommend
adjusting the rinse aid setting to 5.
Refit the plug by turning it
clockwise. Ensure it is closed
tight.
23
Page 24

Water Softener
https://producthelp.fisherpaykel.com/au/Clean/DishDrawer%E2%84%A2/Integrated_Double/DD60DI9/User_Guide_DD60DI9/03_Operating_Instructions
Updated: Wed, 13 Mar 2019 03:46:11 GMT
Powered by
(Some Models Only)
• Only models with a letter ‘H’ in the model name have a built-in water softener.
• Models with water softener are not currently available in New Zealand and Australia.
• Models without built-in water softener:
◦ If living in an area with very hard water, consult a plumber on installing a household water
softener.
Setting up the Water Softener
Determine the water hardness in your local area
Your local water company will be able to provide you with information. Identify the setting you require for your
dishwasher from the water hardness table below. For example, if your water hardness is 500ppm, then the water
softener setting on your dishwasher should be 4. Refer to the ‘Preference options’ section of your ‘Quick start guide’ for
instructions on adjusting the water softener setting.
Water Hardness Scales
Dishwasher
Setting
Parts per million
(ppm)
Grains per US Gallon
(gpg)
°DH °FH
°E /
°Clark
MMOL /
L
0 0 - 100 0 - 6 0 - 5.6 0 - 10 0 - 7 0 - 0.1
1 100 - 250 6 - 14 5.6 - 14
2 250 - 350 14 - 20 14 - 19.6
3 350 - 450 20 - 26
4 450 - 550 26 - 32
19.6 -
25.2
25.2 -
30.8
5 550 - 625 32 - 36 30.8 - 35
10 -
25
25 -
35
35 -
45
45 -
55
55 -
62
7 - 17.5 0.1 - 2.5
17.5 -
24.5
24.5 -
31.5
31.5 -
38.5
38.5 -
43.8
2.5 - 3.5
3.5 - 4.5
4.5 - 5.5
5.5 - 6.2
24
Page 25
• If your water hardness is above 625ppm/36 gpg, we highly recommend you completely fill the
https://producthelp.fisherpaykel.com/au/Clean/DishDrawer%E2%84%A2/Integrated_Double/DD60DI9/User_Guide_DD60DI9/03_Operating_Instructions
Updated: Wed, 13 Mar 2019 03:46:11 GMT
Powered by
detergent dispenser for all programs except Rinse, and the rinse aid setting should be at 5. If
your water hardness is above 625ppm/36 gpg, the wash performance of your dishwasher will
decline.
• You may hear some unusual noises when the water softener is in operation, this is normal.
How to Fill the Salt Reservoir
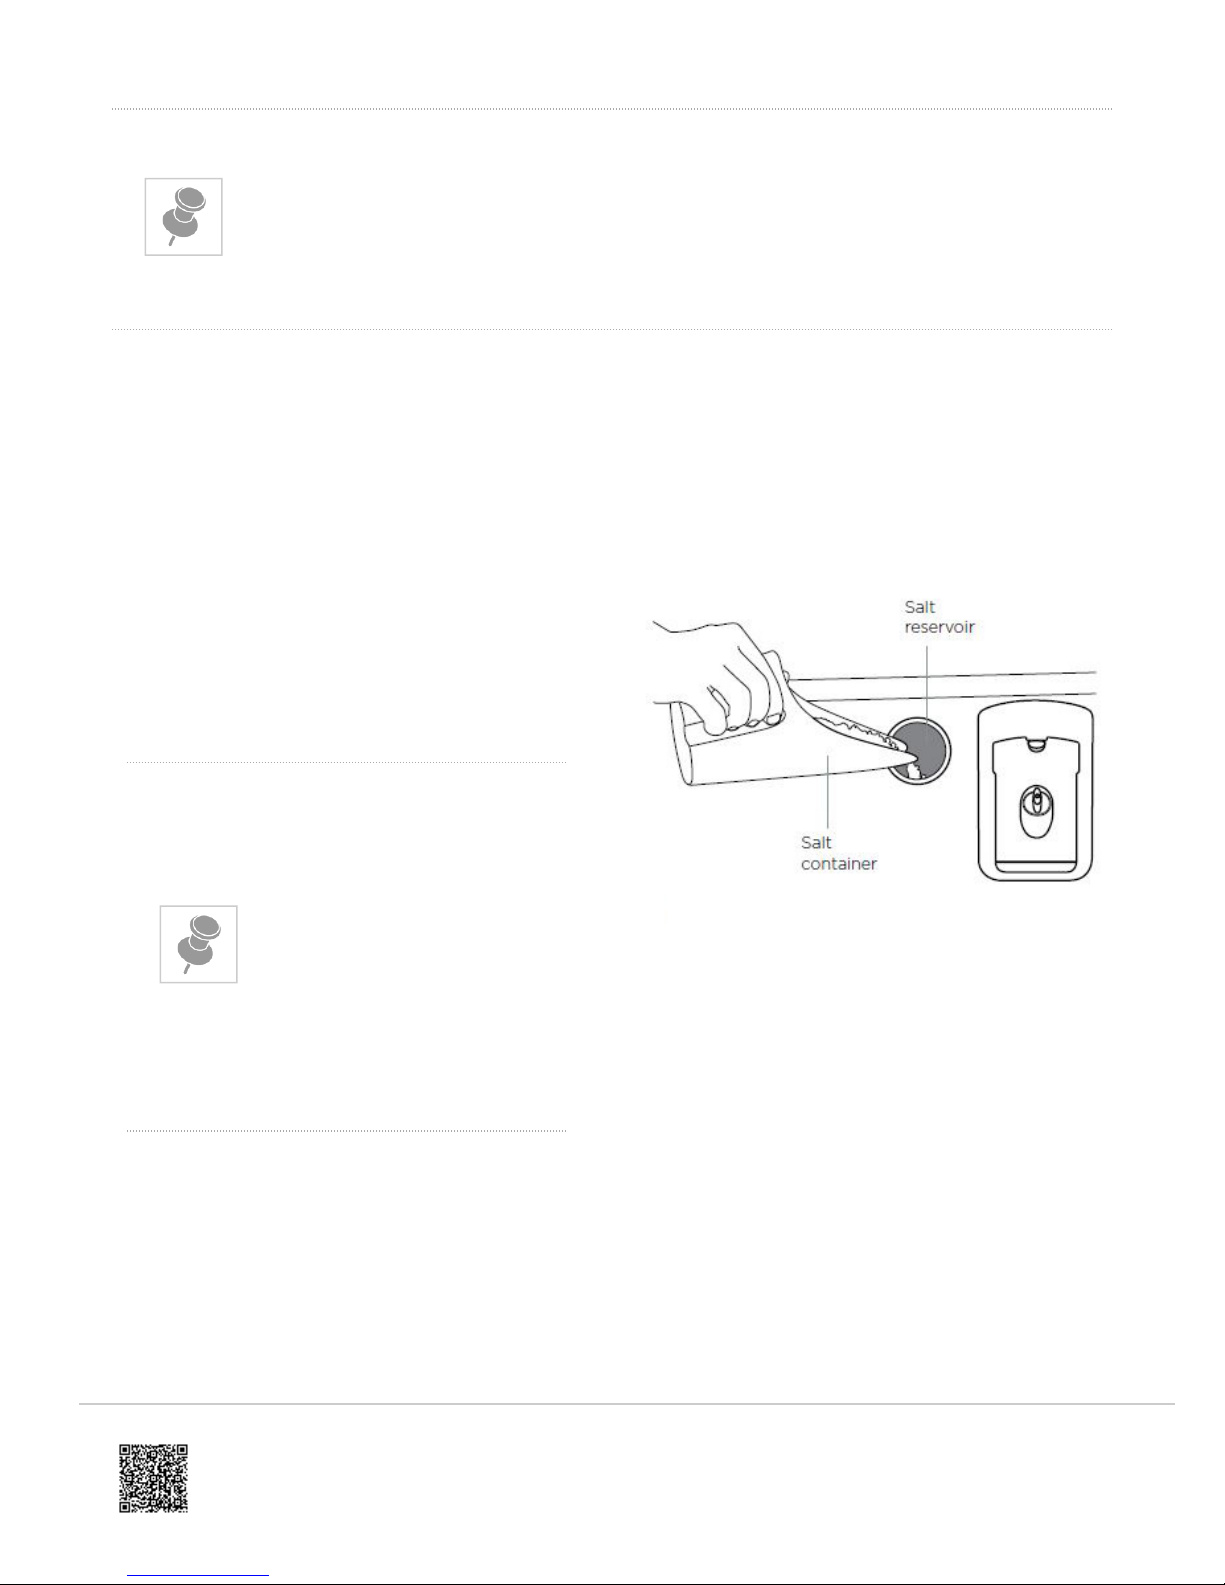
Open the drawer.
Unscrew the salt reservoir cap by turning anticlockwise.
Place the salt into the salt container and pour the
contents into the salt reservoir.
The salt reservoir can hold up to approximately 1 lb/0.5
kg of salt.
Fit the cap clockwise, tightly, back into its original
position.
If you do not wash your dishes immediately after filling
the salt reservoir, run a Rinse program to remove any
salt water or spilt granules.
• When filling the salt
reservoir, you may notice
water being displaced
from the water softener
overflow.
• Double models only:
◦ Each drawer has a
separate salt
reservoir.
◦ Refill each as
needed.
25
Page 26
The water softener must
https://producthelp.fisherpaykel.com/au/Clean/DishDrawer%E2%84%A2/Integrated_Double/DD60DI9/User_Guide_DD60DI9/03_Operating_Instructions
Updated: Wed, 13 Mar 2019 03:46:11 GMT
Powered by
always be filled with granular
salt made especially
for dishwasher water softening
systems.
We do not recommend the use
of cooking salt like table salt,
rock salt or pellets as they
may contain impurities that will
impair or diminish the life of
the water softener.
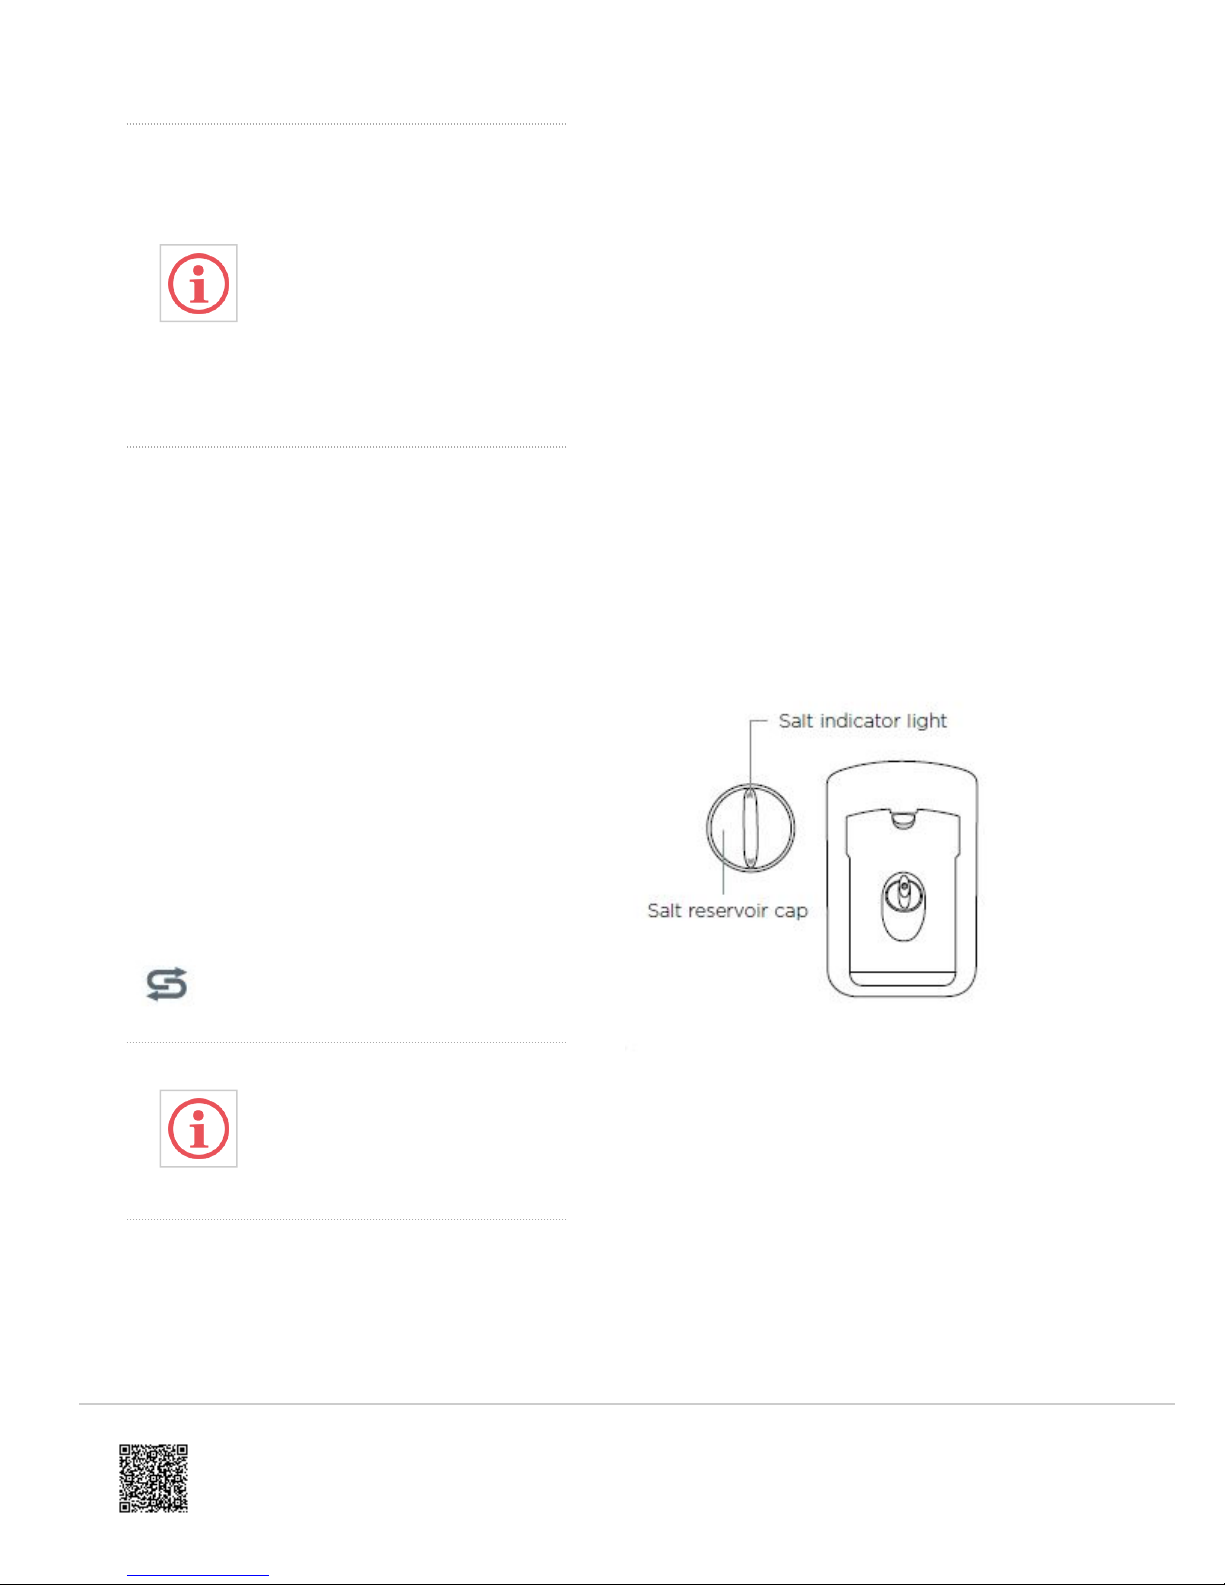
The Salt Reservoir
Water softening can only take place when there is salt in
the reservoir. The salt reservoir must be filled prior to
using the dishwasher and whenever the salt indicator
light is red.
Salt Indicator Light
• If the salt indicator light is red, the salt reservoir is
empty.
• If the salt indicator light is black, there is enough salt
in the reservoir for the wash program that has been
selected.
• DD*A & DD*C models only: The display will also
indicate when the salt reservoir is empty by
displaying the salt
symbol.
Do not pour detergent or rinse
aid into the salt reservoir.
Detergent and rinse aid
will destroy the water softener.
26
Page 27
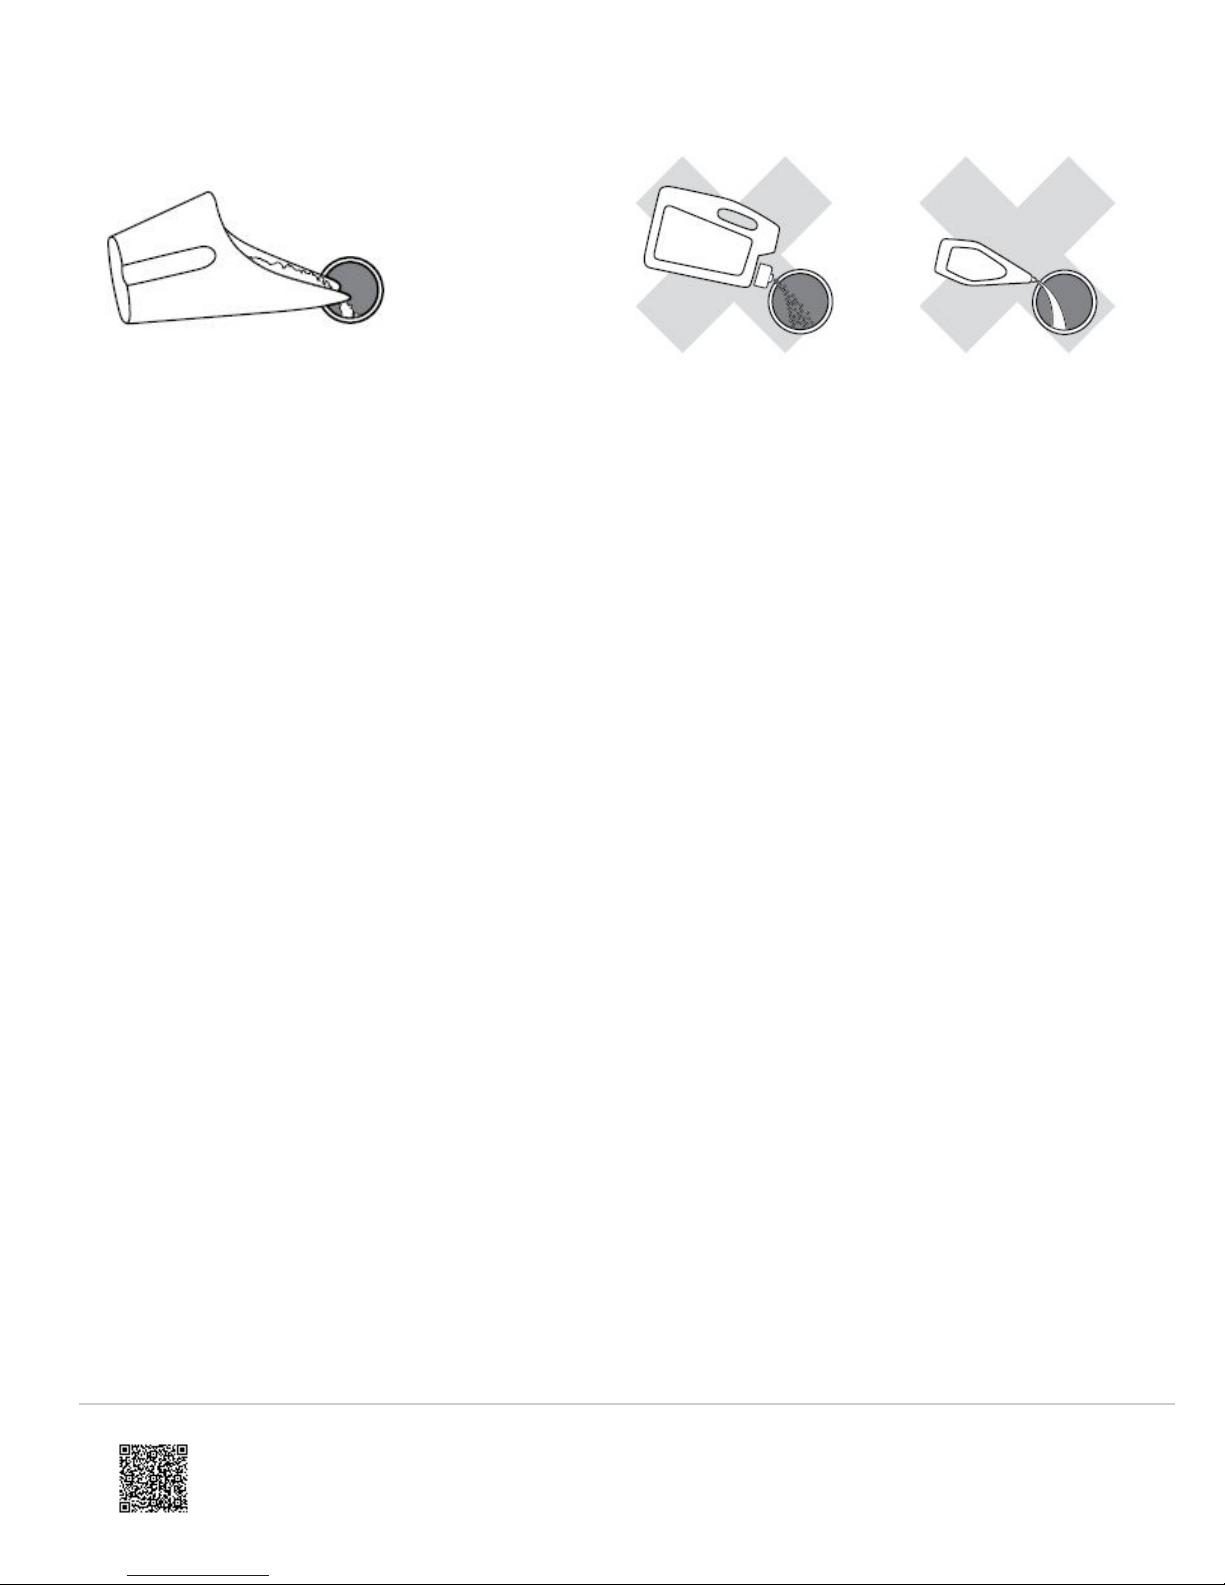
Salt Only
https://producthelp.fisherpaykel.com/au/Clean/DishDrawer%E2%84%A2/Integrated_Double/DD60DI9/User_Guide_DD60DI9/03_Operating_Instructions
Updated: Wed, 13 Mar 2019 03:46:11 GMT
Powered by
NO Detergent NO Rinse Aid
27
 Loading...