

Page 1
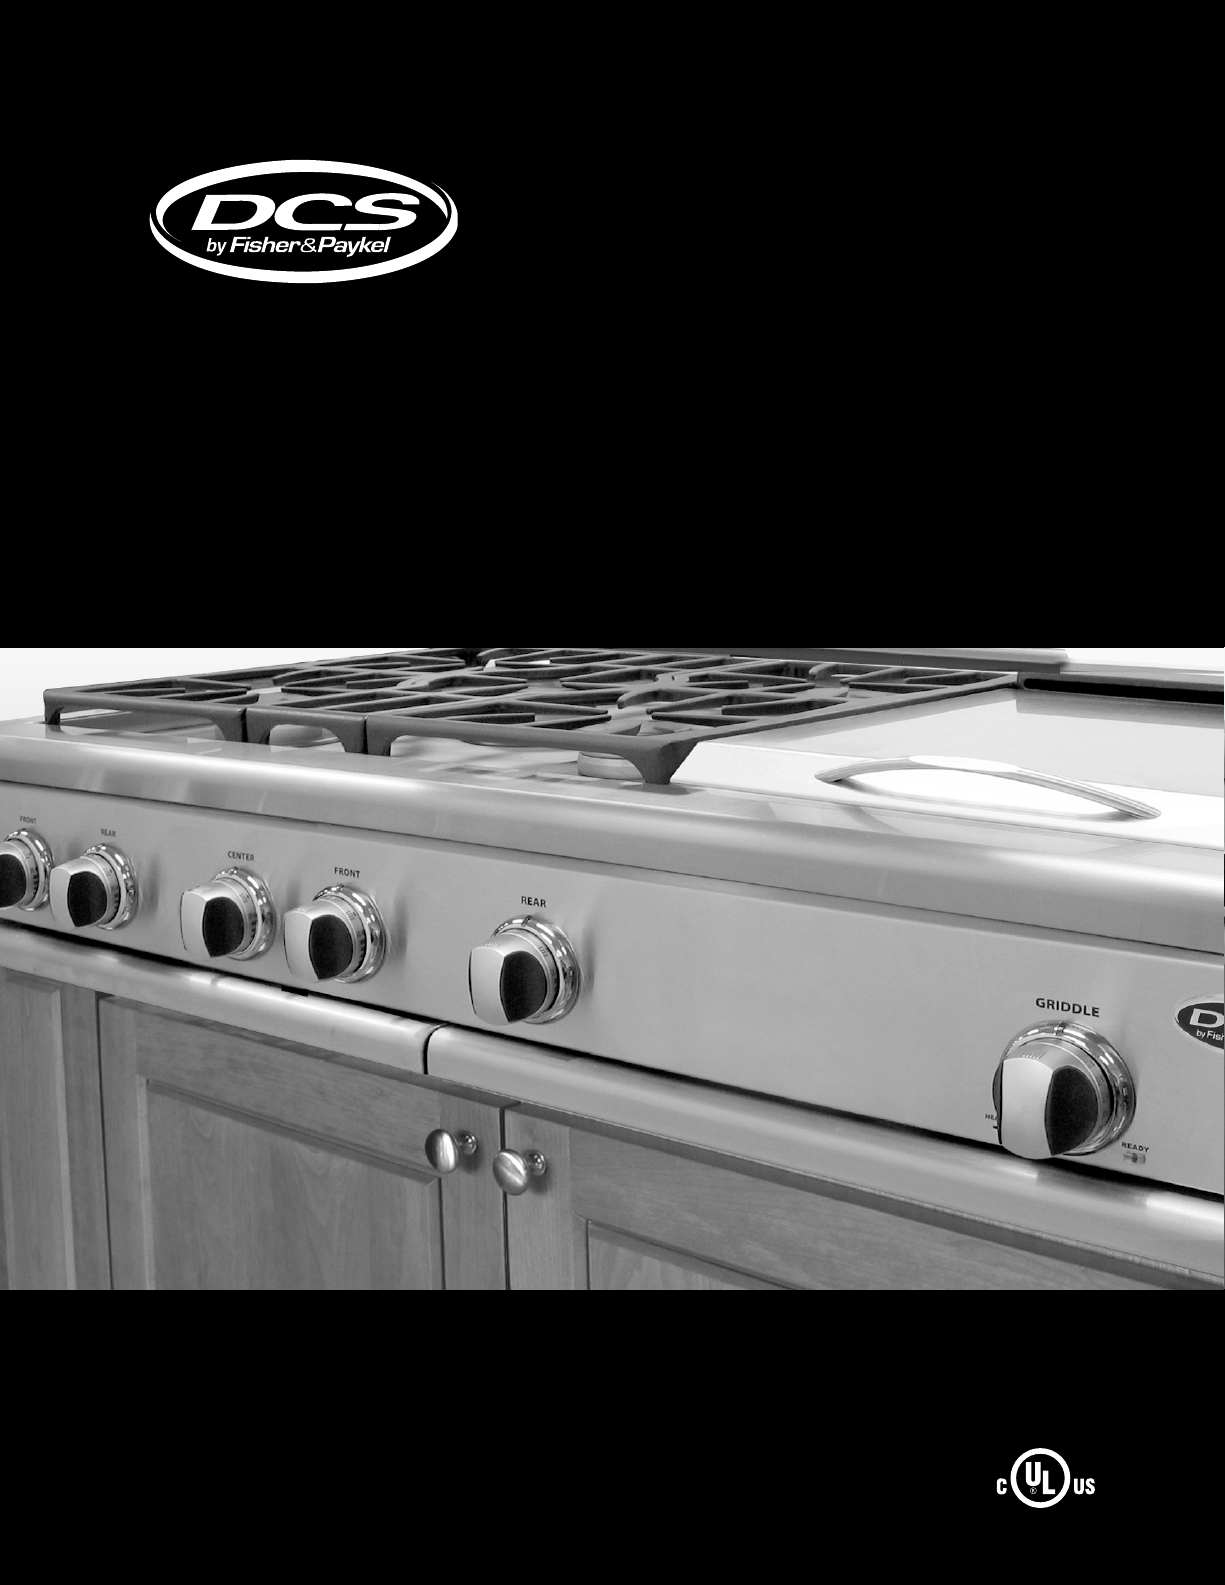
THE PROFESSIONAL GAS COOKTOP
Use and Care Guide
MODELS:
CP-366
CP-364GL
CP-364GD
CP-484GG
CP-485GD
CP-486GL
CP-486GD
Page 2
A MESSAGE TO OUR CUSTOMERS
Thank you for selecting this DCS Professional Cooktop. Because of this appliance’s unique features we have
eveloped this Use and Care Guide. It contains valuable information on how to properly operate and maintain
d
your new appliance for years of safe and enjoyable cooking.
o help serve you better, please fill out and submit your Product Registration by visiting our website at
T
www.dcsappliances.com and selecting “Customer Care” on the home page and then select “Product Registration”.
In addition, keep this guide handy, as it will help answer questions that may arise as you use your new
appliance.
For your convenience, product questions can be answered by a DCS Customer Care Representative by phone:
1-888-936-7872, or email:
NOTE: Please write the Model and Serial Numbers on this page for references (located on rating plate on the
right side of the unit).
MODEL NUMBER SERIAL NUMBER
NOTE: Inspect the product to verify that there is no shipping damage. If any damage is detected, call the shipper
and initiate a damage claim. DCS by Fisher & Paykel is not responsible for shipping damage.
DO NOT discard any packing material (box, pallet, straps) until the unit has been inspected.
.
WARNING!
Improper installation, adjustment, alteration, service or maintenance can cause property damage, injury or death.
Read the installation, operating and maintenance instructions thoroughly before installing, using or servicing this
equipment.
WARNING!
If the information in this manual is not followed exactly, a fire or explosion may result causing property damage,
personal injury or death.
Do not store or use gasoline or other flammable vapors and liquids in the vicinity of this or any other appliance.
DANGER
ou Smell G
Y
f
I
1. Do not try to light any appliance.
Do not touch any electrical switch; do not use any phone in your building.
2.
mmedia
I
3.
4. If you cannot reach your gas supplier, call the fire department.
Installation and service must be performed by a qualified installer, service agency or the gas supplier.
5.
as:
ely call y
t
our gas supplier from a neighbor’s phone. Follow the gas supplier’s instructions.
WARNING!
e the risk of injur
educ
o r
T
. Smother flames with a close
first
type fire extinguisher. Be careful to prevent burns. If the flames do not go out immediately evacuate and call the
. Never pick up a flaming pan - You may be burned. DO NOT USE WATER ON GREASE FIRES,
t
e depar
fir
including wet dishcloths or t
1. You know you have a Class ABC extinguisher, and you already know how to operate it.
2. The fire is small and c
3. The fire depar
4. You can fight the fire with your back to an exit.
tmen
tmen
y to persons in the event of a cooktop grease fire, observe the following: Turn burner off
y, baking soda or use a dry chemical or foam-
ie sheet
ook
-fitting lid
els - a violen
w
o
ontained in the area where it started.
t is being called
, c
eam e
t st
.
, metal tr
xplosion will r
a
esult. Use an extinguisher ONLY if:
PLEASE RETAIN THIS MANUAL FOR FUTURE REFERENCE.
1
Page 3

TABLE OF CONTENTS
SAFETY PRACTICES 3-5
MODEL IDENTIFICATION 6
BEFORE USING YOUR APPLIANCE 7
COOKTOP USE
Burner and Simmer Use 8
Burner Efficiency and Flame Characteristics 9
Burner Grates 10
Wok Ring (Purchase Separately) 10
GRILL USE 11-12
GRIDDLE USE 12-13
CARE AND MAINTENANCE
Cleaning Range or Cooktop, Burners Grates 14
Burners and Igniters 15
Drip Trays and Drain Tubes, Griddle, Grill, Control Knobs 16
Backguard 17
Power Failure 17
PARTS IDENTIFICATION
18
TROUBLESHOOTING 19
HOW TO OBTAIN SERVICE 20
WARRANTY 21-22
2
Page 4

SAFETY PRACTICES AND PRECAUTIONS
When properly cared for, your new DCS Appliance is designed to be a safe, reliable cooking appliance. When
using this restaurant caliber appliance, use it with extreme care, as this type of appliance provides intense heat
and can increase the accident potential. Basic safety precautions must be followed when using kitchen
appliances, including the following:
■ Read this Use and Care Manual thoroughly before using your new appliance. This will help to reduce the risk of
fire, electric shock, or injury to persons.
■ Begin by insuring proper installation and servicing. Follow the installation instructions which came with this
appliance. Be sure to have a qualified technician install and ground this appliance before using.
■ Have the installer show you where the gas supply shut-off valve is located so you will know how and where to
turn off the gas to the appliance.
■ If you smell gas, the installer may not have done a proper job of checking for leaks. You can have a small leak
and therefore a faint gas smell if the connections are not completely tight. Finding a gas leak is not a “do-ityourself” procedure. Some leaks can only be found with the burner control in the ON position; for your
protection it must be done by a qualified service technician.
■ If by some chance a burner goes out and gas escapes, open a window or a door to let the room air out. Do not
attempt to use the appliance or turn any electrical switch on or off until the gas has had time to dissipate.
Follow the instructions on page 1, “For Your Safety– if You Smell Gas”.
■ This appliance has been factory assembled for natural or LP gas. It should be correctly adjusted from the
factory.
■ Do not repair or replace any part of this appliance unless it is specifically recommended in this manual. All
other servicing should be referred to a qualified technician.
■ Children should not be left alone or unattended in an area where appliances are in use. They should never be
allowed to turn knobs, push buttons, sit or stand on, and/or touch on any part of an appliance while in
operation.
WARNING!
Do not stor
if they should climb on
■ Nev
■ Do not hang articles from any part of the appliance. Some fabrics are quite flammable and may catch on fire.
■ If the appliance is near a window be certain the curtains do not blow over or near the cooktop burners; they
■ Do not use water on grease fires. Turn all burners OFF, then smother fire with a metal lid, baking soda or use a
■ Never let clothing, pot holders, or other flammable materials come in contact with, or get too close to, any
■ B
er st
other types of items could be ruined.
could catch on fire.
y chemical or foam-type fire extinguisher.
dr
burner or burner grate until it has cooled. Fabric may ignite and result in personal injury.
ertain to use only dr
e c
Do not use a towel or other bulky or frayed cloth in place of pot holders. Do not let pot holders touch hot
ners
bur
e items of interest to children above or at the back of any appliance. Children could be seriously injured
to the appliance to reach these items.
ore anything on the cooktop. Flammable materials can catch fire, plastic items may melt or ignite and
y pot holders: moist or damp pot holders on hot sur
, or burner grates.
faces may cause burns from steam.
3
Page 5
SAFETY PRACTICE AND PRECAUTIONS
■ For personal safety, wear proper apparel. Loose fitting garments or hanging sleeves should never be worn while
using this appliance. Some synthetic fabrics are highly flammable and should not be worn while cooking.
■ Do not use aluminum foil to line any part of the cooktop. This will cause heat to be trapped underneath it. This
rapped heat can upset the cooking performance and can damage the finish of the cooktop parts.
t
■ This appliance is for cooking. Never use the cooktop to warm or heat a room. This could damage the cooktop
parts.
WARNING! NEVER use this appliance as a space heater to heat or warm the room.
Doing so may result in carbon monoxide poisoning and overheating of the appliance.
■ When using the cooktop: Do not touch the burner grates or the immediate surrounding area. Areas adjacent to
the burners may become hot enough to cause burns.
■ Never leave the cooktop unattended when using high flame settings. When cooking with high flame settings,
boil overs may cause smoking and greasy spill overs may ignite. More importantly, if the burner flames are
smothered by a severe boil over which effects the igniter, unburned gas will escape into the room.
■ Only certain types of glass, heat-proof glass-ceramic, ceramic, earthen ware, or other glazed utensils are suitable
for cooktop use. This type of utensil may break with sudden temperature changes. Use only on low or medium
flames settings according to the manufacturer’s directions. The use of professional utensils is recommended.
■ Do not heat sealed food containers; a build up of pressure may cause the container to burst.
■ During cooking, set the burner control so that the flame heats only the bottom of the pan and does not extend
beyond the bottom of the pan. This could heat and/or melt the handles, and may increase cooking time.
■ Always use utensils that have flat bottoms large enough to cover the burner. The use of undersized utensils will
expose a portion of the flame to direct contact with the sides and may result in ignition of clothing.
■ To minimize burns, ignition of flammable materials and unintentional spill overs, position handles of utensils
inward so they do not extend over adjacent work areas, cooking areas, or the edge of the cooktop.
■ Hold the handle of the pan to prevent movement of the utensil when stirring or turning food.
■ Grease is flammable. Let hot grease cool before attempting to handle it. Avoid letting grease deposits collect
around the cooktop burners. Clean after each use or boil over.
■ For proper lighting and performance of the cooktop burners, keep the burner ports clean. It may be necessary to
clean these when there is a boil spill or when the burner does not light, even though the electronic igniters
click.
■ Do not use the grill for cooking excessively fatty meats or products which promote flare-ups. Do not use
cooking utensils on the grill.
■ Clean the cooktop with caution. Avoid steam burns; do not use a wet sponge or cloth to clean the cooktop while
it is hot. Some cleaners produce noxious fumes if applied to a hot surface. Follow directions provided by the
cleaner manufacturer.
■ Be sure all the cooktop controls are turned off and the appliance is cool before using any type of aerosol cleaner
on or around the appliance. The chemical that produces the spraying action could, in the presence of heat,
e or cause metal parts to corrode.
ignit
4
Page 6
SAFETY PRACTICES AND PRECAUTIONS
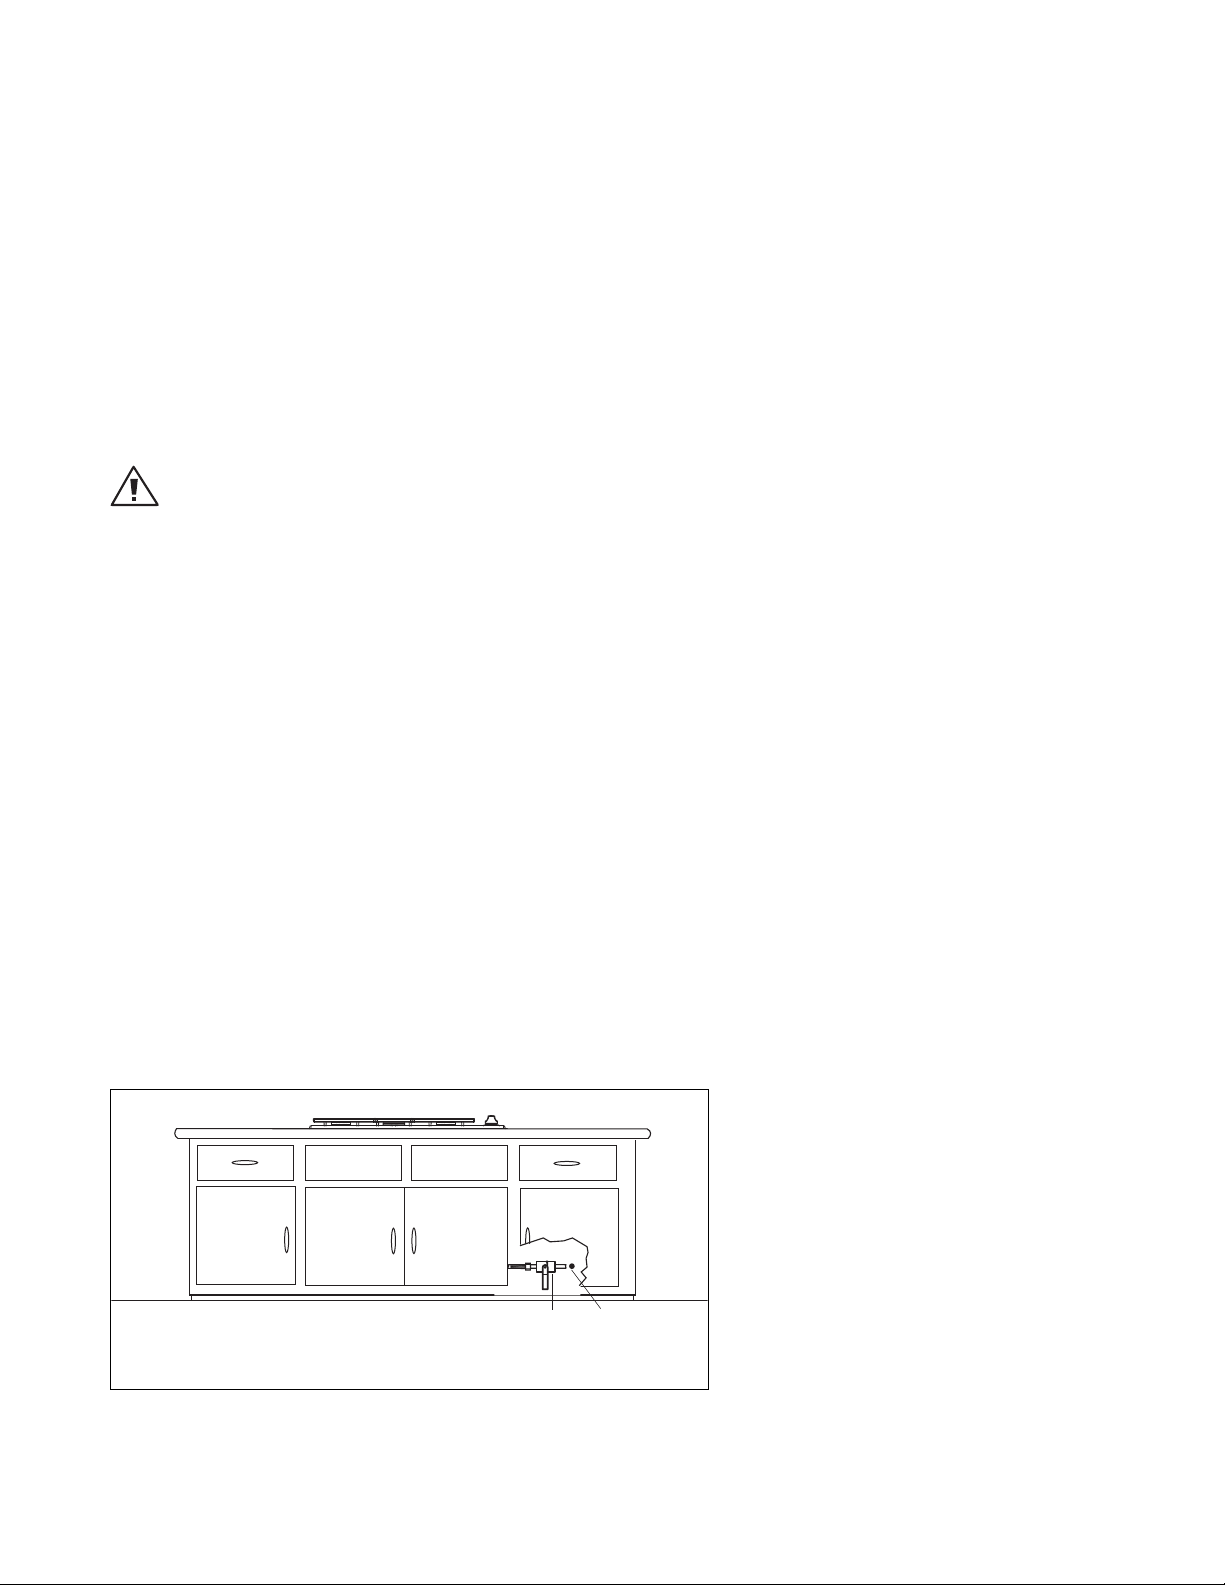
Installer supplied
shut-off valve
must be easily
accessible inside
cabinetry.
Gas Supply
■ Clean the ventilator hood and filters above the range or cooktop frequently so grease from cooking vapors does
ot accumulate on them.
n
urn the ventilator OFF in case of fire or when intentionally “flaming” liquor or other spirits on the cooktop. The
■ T
blower, if in operation, could unsafely spread the flames.
■ DO NOT obstruct the flow of combustion or ventilation air to the appliance. Be sure a fresh air supply is
available.
■ For safety reasons and to avoid damage to the appliance, never sit, stand, or lean on the cooking surface.
■ Service should only be done by authorized technicians. Technicians must disconnect the power supply before
servicing this appliance.
WARNING!
California Proposition 65 - The burning of gas cooking fuel generates some by-products which are known by the
State of California to cause cancer or reproductive harm. California law requires businesses to warn customers of
potential exposure to such substances. To minimize exposure to these substances, always operate this unit
according to the instructions contained in this booklet and provide good ventilation to the room when cooking
with gas.
RECOMMENDATIONS ON HOOK-UP TO GAS SUPPLY:
A manual valve must be installed external to the appliance, in an accessible location from the front for the
purpose of shutting off the gas supply. The supply line must not protrude beyond the back of the unit. Make
sure the gas supply is turned off at the wall valve before connecting the appliance.
The gas supply connections should be made by a qualified technician and in accordance with local codes or
ordinances. In the absence of a local code, the installation must conform to the latest edition of the National
Fuel Gas Code ANSI Z223.1.
NOTE:
This product must be installed by a licensed plumber or gas fitter when installed within the Commonwealth of
Massachusetts.
NOTE: (mandatory for the State of Massachusetts)
ernate method of supplying gas must be installed into the unit.
Alt
5
Page 7
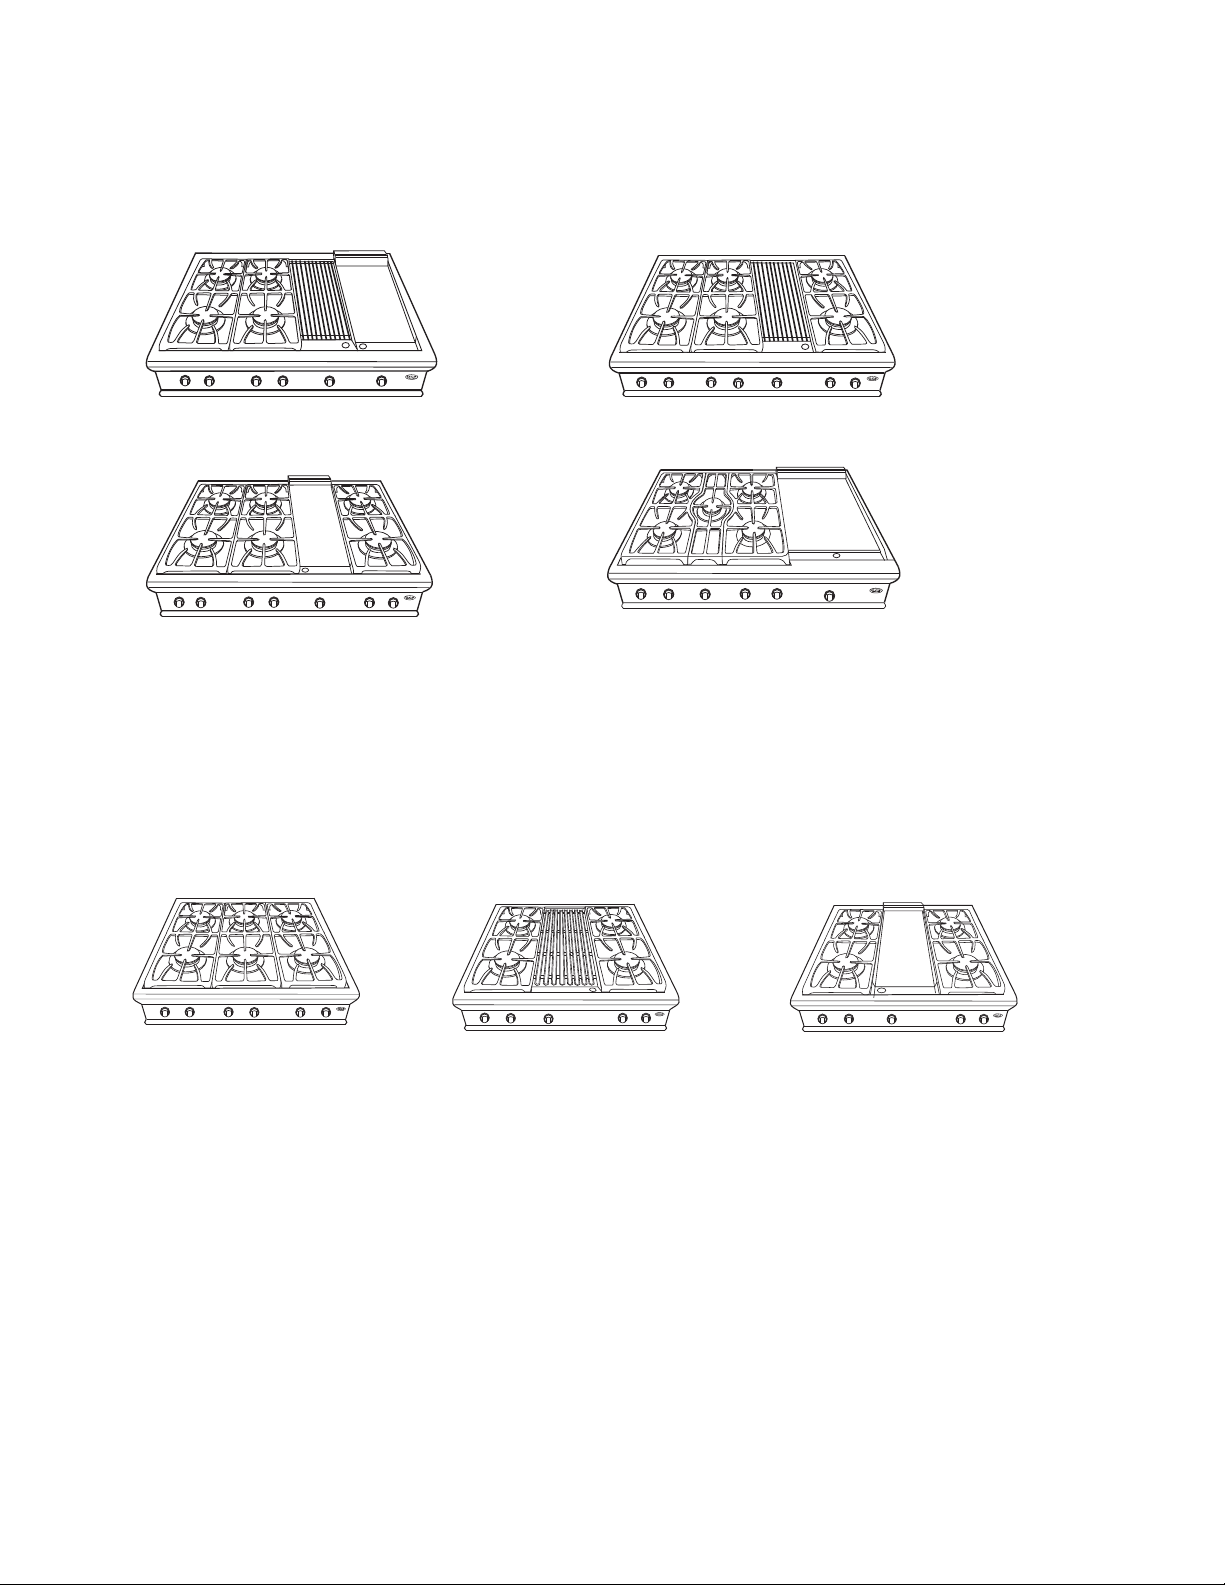
MODEL IDENTIFICATION
48” CP COOKTOP MODELS
CP-484GG
CP-486GD
36” CP COOKTOP MODELS
CP-486GL
CP-485GD
-366
CP
6
CP-364GL
CP-364GD
Page 8

BEFORE USING YOUR APPLIANCE
1. Remove all packaging materials and labels from your appliance. If the installer has not set up your appliance,
do it now. Check that you have the following items:
riddle cover - (CP-364GD, CP-486GD, CP-485GD, and CP-484GG Models Only)
■ G
rill cover - (CP-364GL, CP-484GG, and CP-485GL)
■ G
■ Grill grates, 2 pieces - (CP-364GL, CP-486GL & CP-484GG Models Only)
■ 6 burner head assemblies, burner caps and grates (number of grates depends on the unit), (5 burner heads on
CP-485GD Models Only, 4 burner heads on CP-484GG, CP-364GD and CP-364GL)
■ Radiant tray - to hold ceramic rods for grill - (CP-364GL, CP-486GL & CP-484GG Models Only)
■ One removable drip tray (griddle and grill models have drip tray liners, for catching grease)
NOTE:
If any of the listed accompanying items are missing, contact DCS at (888) 936-7872. Please be prepared with your
Model #, Serial # and description of product you have purchased.
7
Page 9
COOKTOP USE
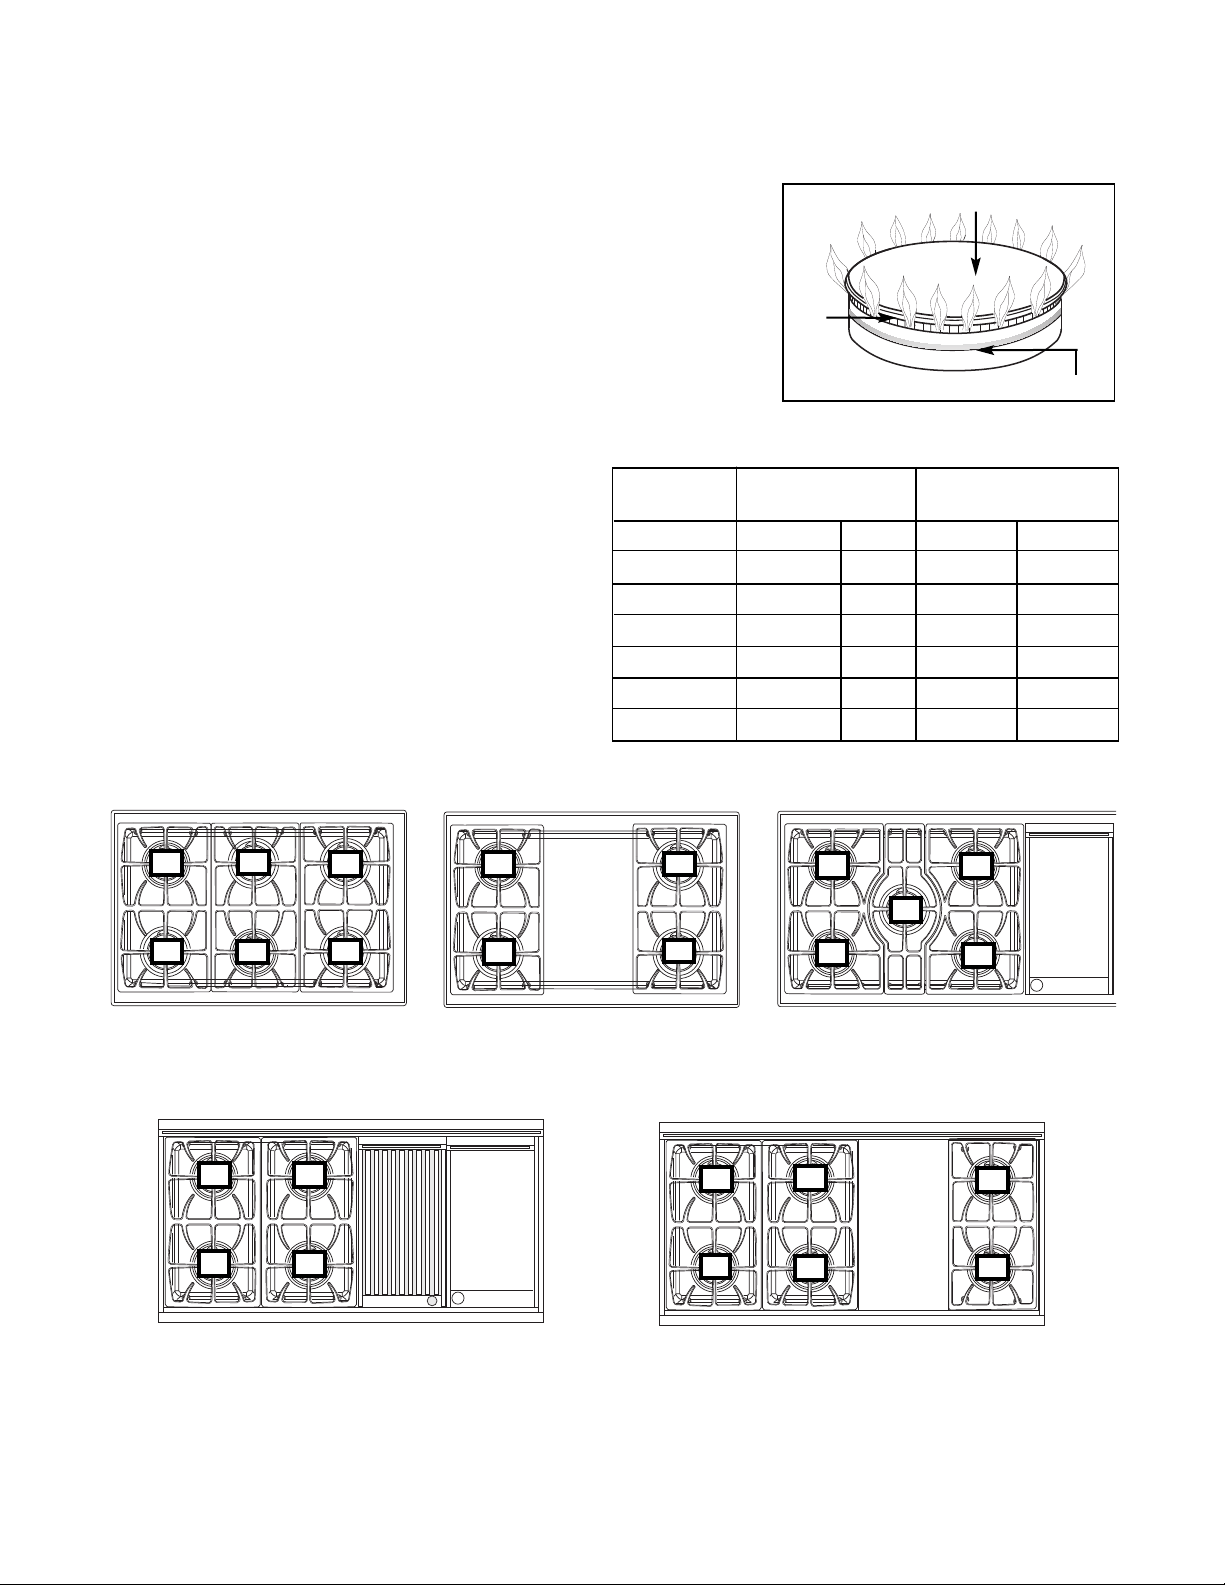
BURNERS
our new professional cooktop is equipped with burners typical of those
Y
used in restaurants. These burners are designed for maximum
leanability and controllability. The large cap spreads the simmer heat
c
out to avoid too much heat being concentrated on the center of the pan.
The simmer flame is always “on” when the burner is in use. The burner
should never be operated if the cap is not in place. All the cooktop
burners have electronic spark ignition to eliminate continuously burning
pilots; when the burner is on and the flame is blown out, it will relight.
SIMMERING
Your new professional cooktop has exceptionally
low simmering capabilities. The large cap serves as
a heat diffuser to spread out the heat to avoid
having a center hotspot. Keep in mind that because
of the high heat capacity of the retention flame, and
the mass of the cast iron burner grates (they retain
heat longer than lighter, conventional grates) some
foods may continue to cook by retained heat after
the burner has been turned off. Should a strong
draft or boil over extinguish the simmer flame it will
relight automatically as the main burner would.
Burner Max. Simmer/Low
Location Btu/hr Btu/hr
1 17,500 15,000 500-1,200 500-1,200
2 12,500
3 12,500 12,500 500-1,200 500-1,200
4 17,500 15,000 500-1,200 500-1,200
5 17,500 15,000 500-1,200 500-1,200
6 17,500 15,000 500-1,200
CAP
BRASS
PORT
RING
SIMMER FLAME
Fig. 01
Nat LP Nat LP
12,500 500-1,200 500-1,200
500-1,200
2
1
CP-366 COOKTOP SECTION SHOWN
4
3
2
1
-484 C
CP
6
5
4
3
OOKTOP SECTION SHOWN
2
1
CP-364 COOKTOP SECTION SHOWN
4
3
2
1
OOKTOP SECTION SHOWN
-485 C
CP
2
1
CP-486 COOKTOP SECTION SHOWN
4
3
4
5
3
6
5
8
Page 10
COOKTOP USE
ELECTRONIC IGNITERS
If a burner does not ignite, listen for the clicking sound. If the igniter is not
licking, TURN OFF THE BURNER. Check the circuit breaker for a blown fuse or
c
a tripped circuit breaker. If the igniter still fails to operate, see page 20,
Before Calling For Service”. To light the burner manually, see page 17,
“
“Power Failure”.
NOTE:
If you are using propane gas, a slight pop or flash may occur at the burner
ports a few seconds after the burner has been turned “0FF”. This “extinction
pop” is normal for propane gas.
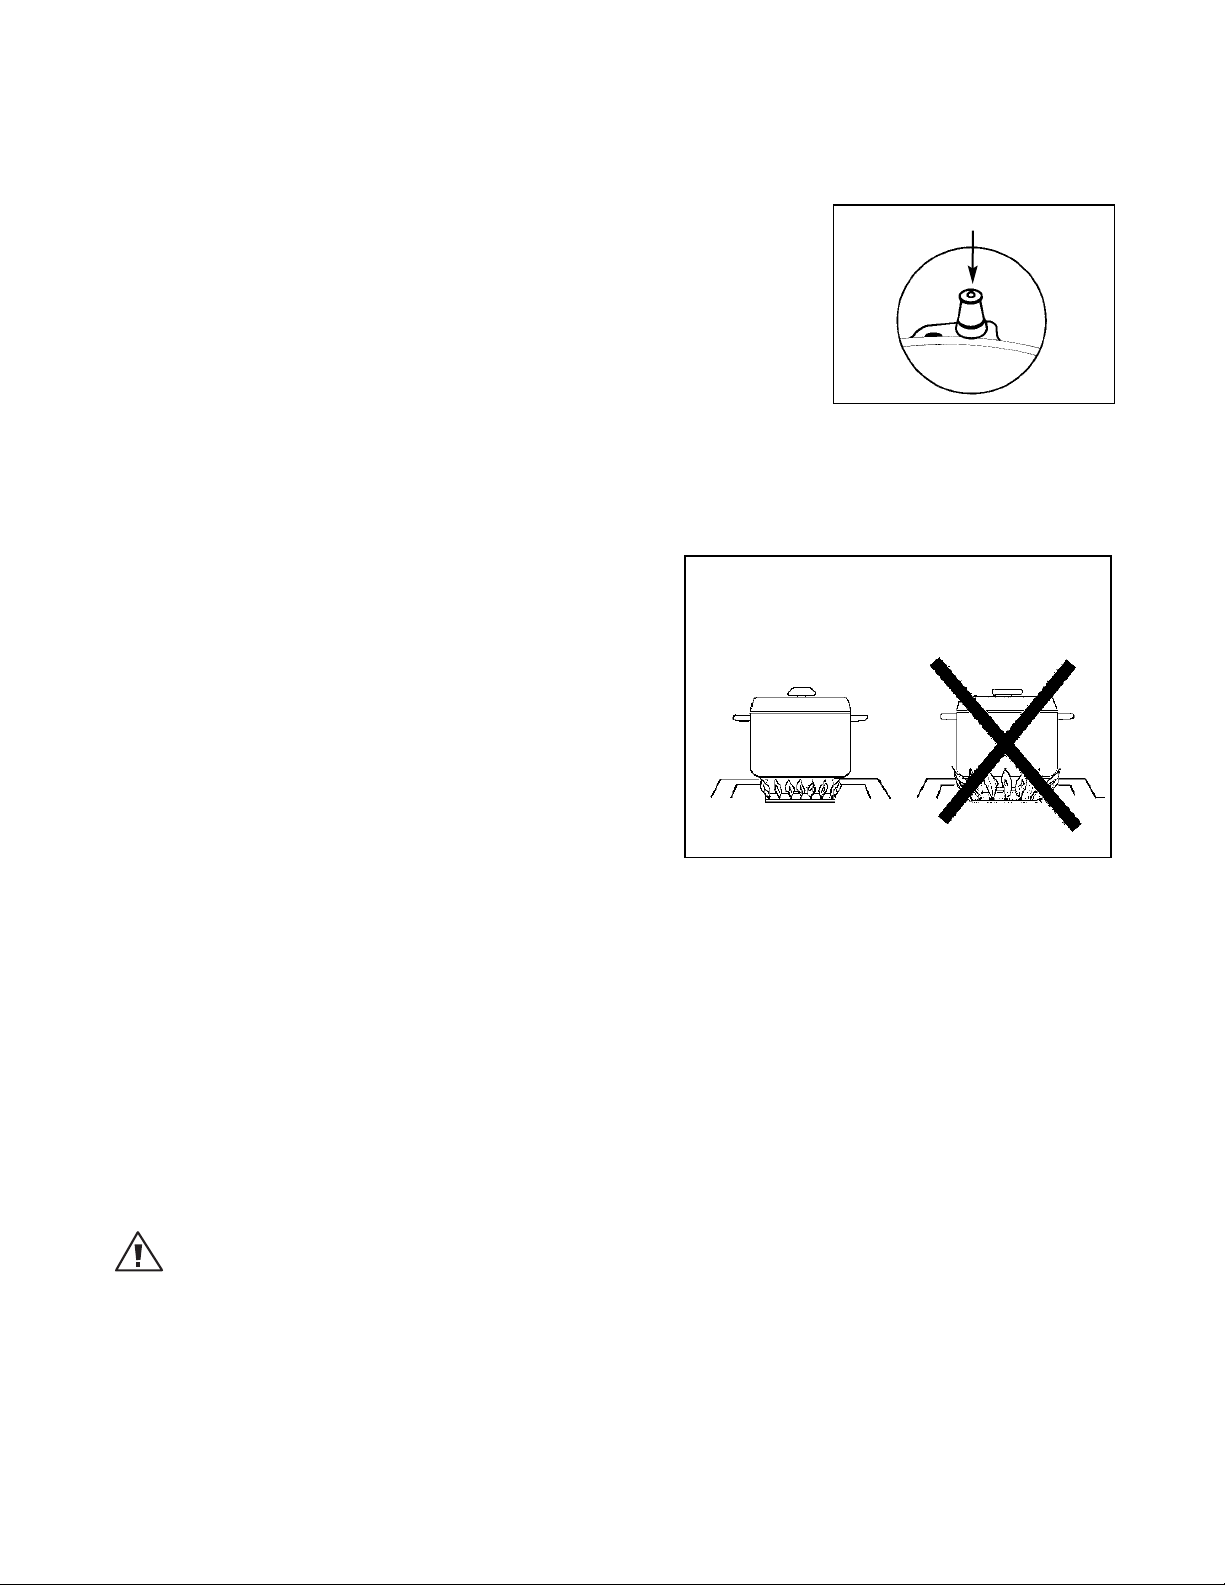
BURNER EFFICIENCY AND FLAME CHARACTERISTICS
It is necessary to keep the burner ports and the igniters clean
for proper lighting and efficient performance of the cooktop
burners (Fig. 02). The burner flame should burn completely
around the burner with no excessive noise or lifting. The
flame should be blue in color and stable with no yellow tips.
An improper air-gas mixture may cause either a burner flutter
or a yellow tipped flame. During initial use, foreign particles
in the gas line, or dust in the air around the appliance may
cause an orange flame. This will disappear with use.
IGNITER (KEEP CLEAN)
Fig. 02
PROPER FLAME HEIGHT
FLAME HEIGHT
The correct height of the flame mainly depends on the size of
the bottom of the cooking utensil, the material of the cooking
utensil, the amount and type of food and the amount of
liquid in the utensil. Following are some basic rules for
selecting flame height.
■ For safety reasons the flame must never extend beyond the
bottom of the cooking utensil. Never allow flames to curl up the side of the pan (see Fig. 03). This will discolor
or damage the utensil.
■ Utensils which conduct heat slowly (such as glass-ceramic) should be used with medium to low flame. If you
are cooking with a large amount of liquid, a slightly larger flame can be used.
Fig. 03
COOKTOP BURNERS
The cooktop burners must be kept clean. Cleaning of the cooktop burners should include the igniter. The
ners have an infinite number of heat settings and there are no fixed positions on the control knobs
op bur
ookt
c
between “HI” and “LO”. To turn the cooktop burner on, push in on the control knob and turn it counterclockwise
to the “LITE” position. An audible clicking sound will be heard. When the gas has been ignited by the electronic
er, turn the knob to the desired setting. (The clicking sound should stop as soon as the burner is lit).
nit
k ig
spar
WARNING!
hen turning on an
W
y c
op burner
ookt
setting for cooking. If the burner is not lit and it is turned beyond the “LITE” position, to HI, MEDIUM, or LO, there
ould be a burst of flame when the burner does light.
c
, be sure to stop at the “LITE” position before turning the burner to a flame
9
Page 11
COOKTOP USE
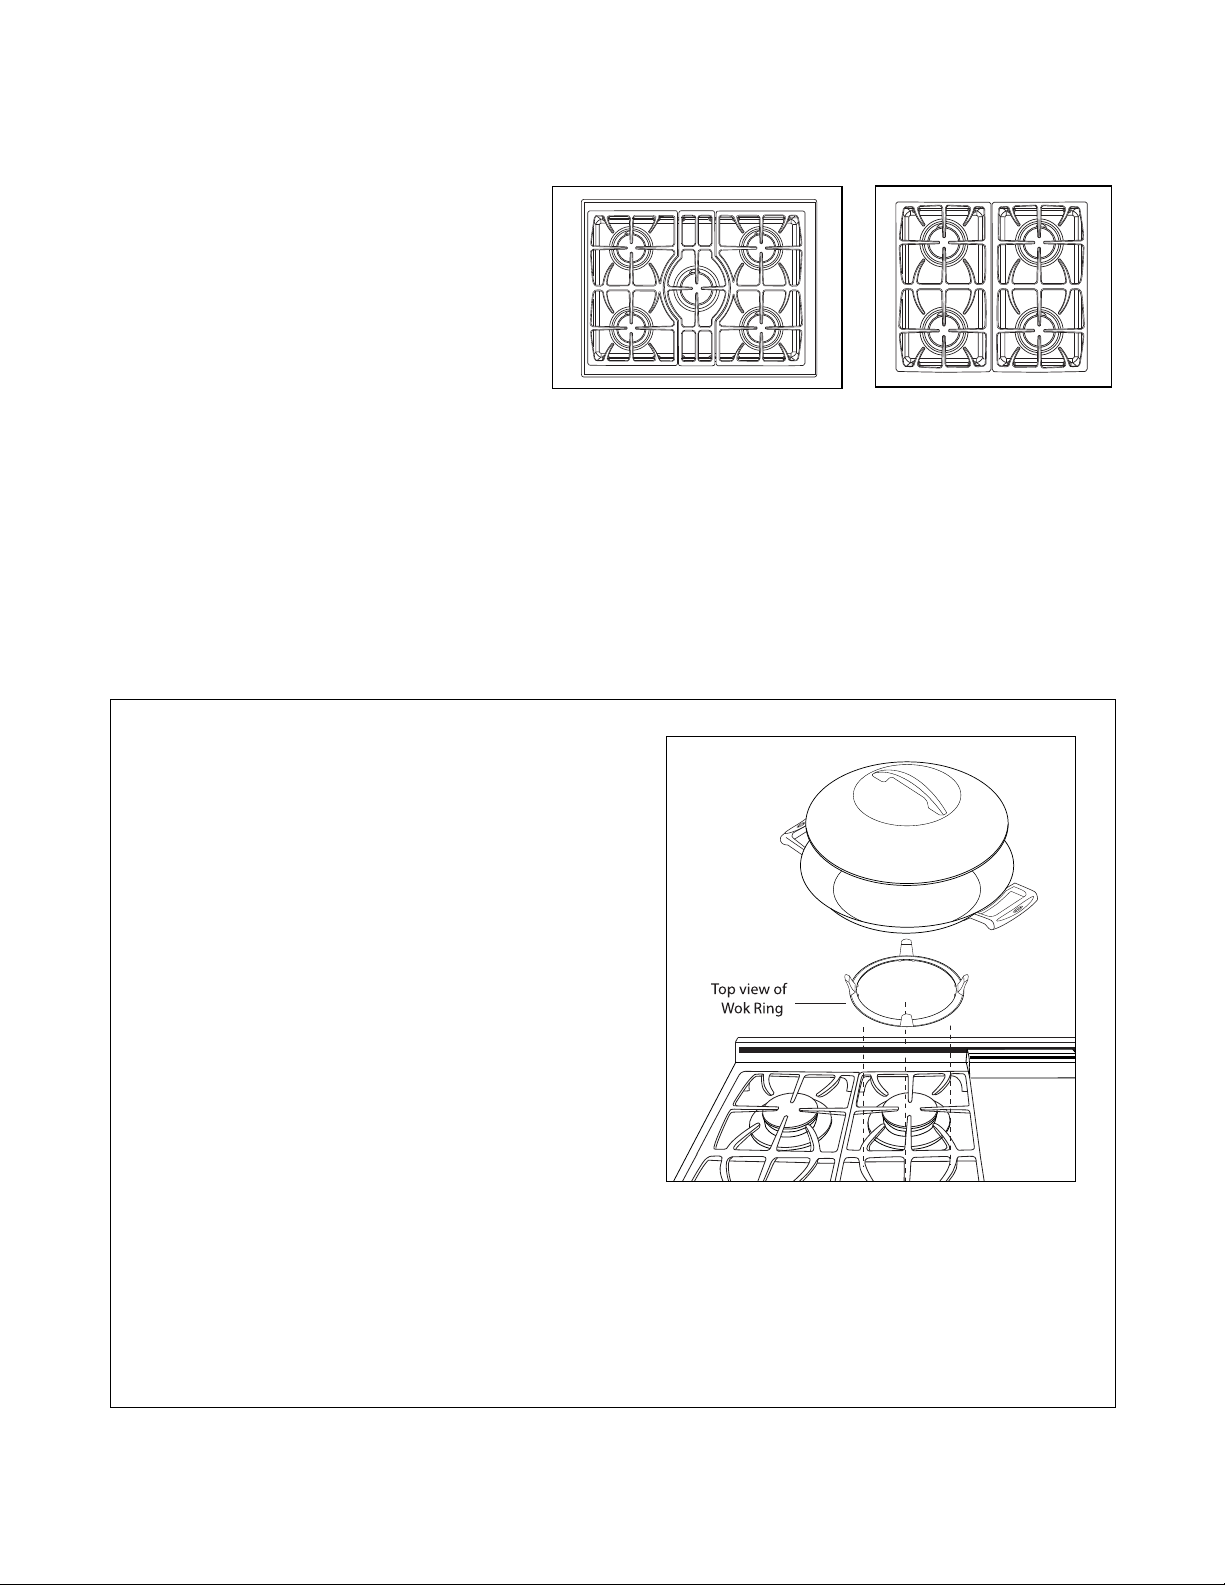
BURNER GRATES
The burner grates are heavy cast iron. They
ave a flat surface making it easy to move
h
large pans from one burner to another. They
were designed in sections to make them easier
to remove and clean. (See Fig. 04 & 05)
COOKWARE
For best results we recommend using professional cookware. This type of utensil can be
found at your finer department stores, specialty
cooking shops, or restaurant supply stores. If
using regular cookware, be very careful if the pans have plastic handles, as these large professional size burners
can flame up on the outside of the pan and melt or bubble the handles.
Fig. 04 (485 models)
CONTROL KNOBS
The control knobs are readily associated with the burners they control. The cooktop control knobs are labeled
and are in front of the burners. The griddle controller is placed slightly lower than the other control knobs. This
is due to the physical size of the commercial type thermostats used on the product.
Fig. 05 (36”& 48” models)
WOK RING [Purchase separately]
A Wok ring is available as an accessory for your new
DCS appliance. To purchase a wok ring accessory
(model # WRS) for use on your range or cooktop
please contact an authorized DCS Dealer. The ring is
cast iron, and has a porcelain enamel finish. It can
be used with the DCS model CW wok and most
commercially available woks. To use the ring, place
it on the grate over the desired burner. The vertical
tabs on the ring should be aligned with the main
fingers of the grate. The small protrusions on the
om surface of the ring should straddle the grate
bott
fingers to prevent the ring from rotating during
cooking. See Fig. 06. The bottom of the wok should
ed and r
be suppor
the ring.
or best performance on 36” and 48” models, the
F
ing and w
r
in positions 1,4,5, and 6 (see page 9) as they have
the highest output on the t
ok ring, place it in the dish
w
Stubborn food deposits may be removed by soaking
o loosen the soil, then washing as usual.
t
t
ok should be used on the burners that are
etained by the vertical tabs of
op section. To clean the
washer after use.
Fig. 06
10
Page 12
GRILL USE
GRILL
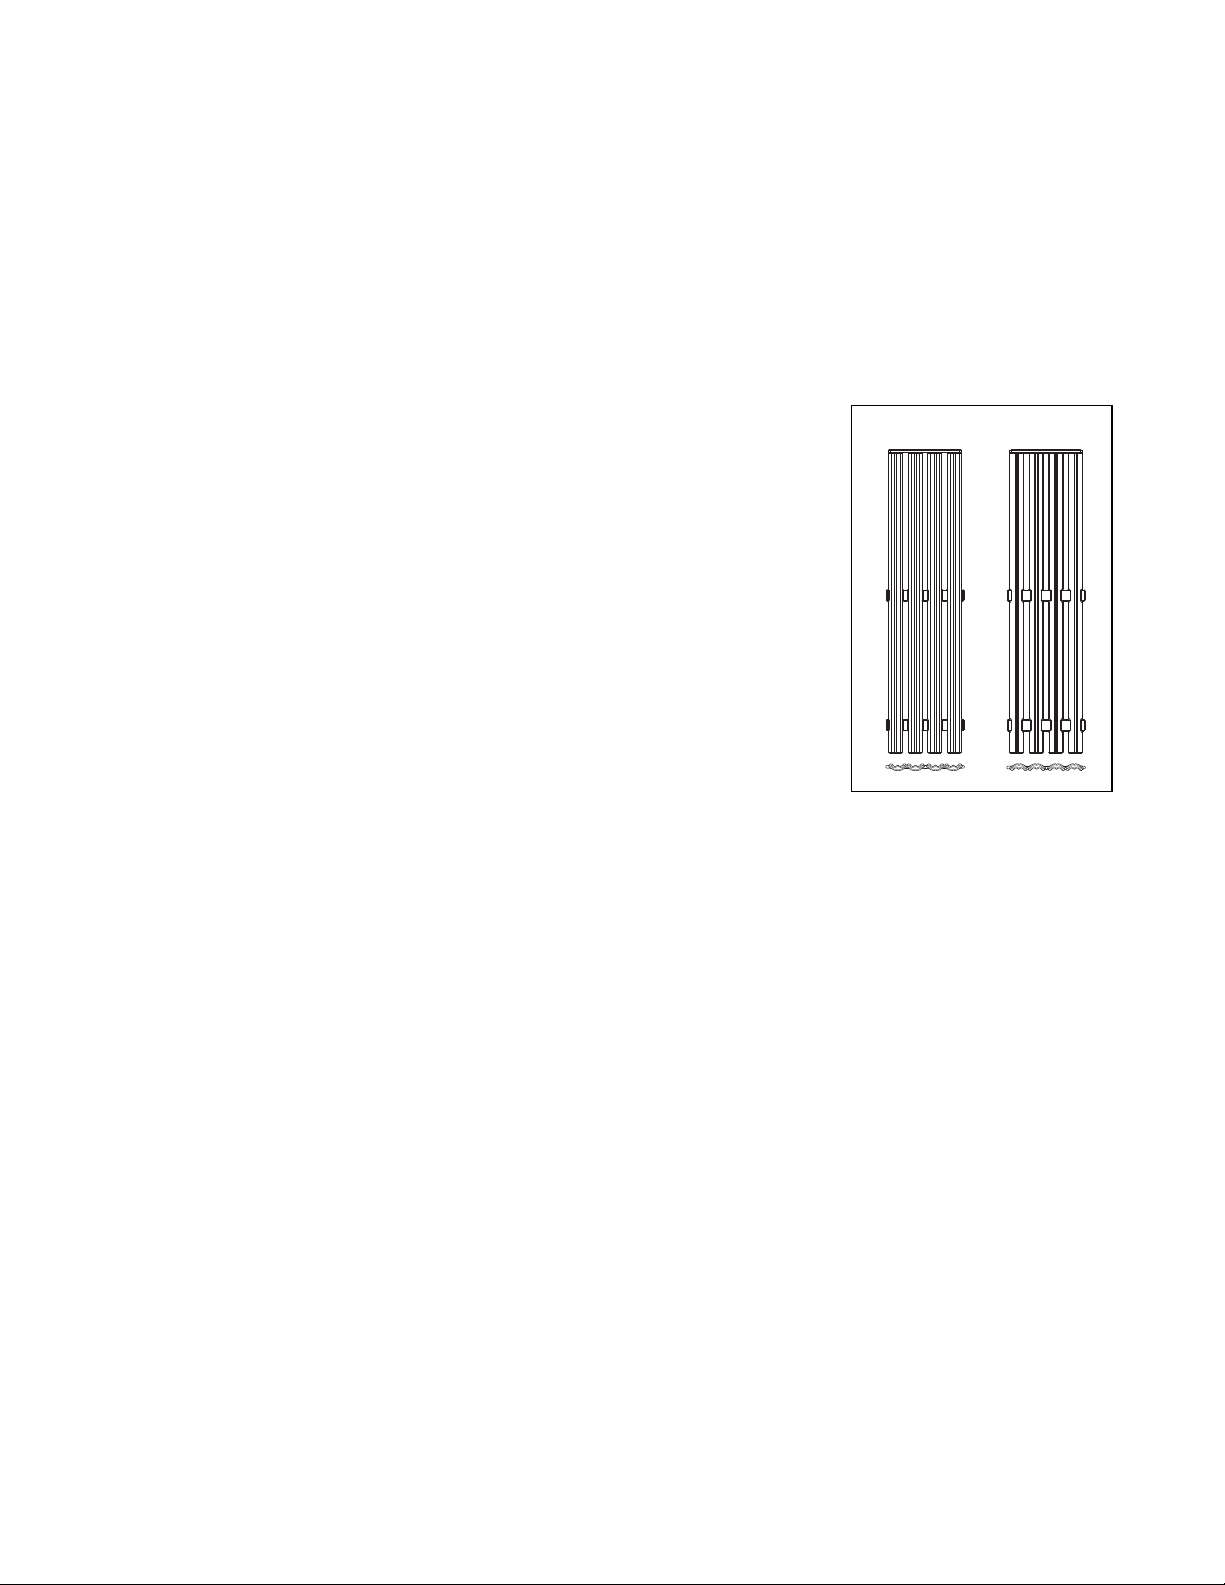
The two grill grates are reversible (see Fig. 07). The grill grates are made of durable stainless steel. One side of
the grate is ridged (side A) and should be used for foods where you want the fat to run off, such as steak or
hamburger patties. The ridges are slopped so the fat runs toward the front of the grill and can easily run down
o the cooler area of the drip tray and away from the intense heat of the burner. The other side of the grate
t
(side B) is designed for foods that need more support while cooking, such as fish and vegetables. Food cooked
on the grill section achieves the same flavor as food cooked on an outdoor grill. The intense radiant heat from
the ceramic rods caramelizes the fats and juices that are brought to the surface of the food, giving it the
barbecued flavor.
SIDE A
SIDE B
ELECTRIC GLOW IGNITER
The grill burners are equipped with an electric glow igniter and safety valve
system which lights the gas. There will be a delay of 30 to 90 seconds after the
control knob has been turned on to when you actually hear the burner come on.
The burner will ignite within 4 seconds after the gas reaches the burner.
NOTE:
This gas grill may cook slightly faster than you are used to, thus preheat and
grilling times should b
e adjusted accor
dingly.
CERAMIC RODS
The layer of ceramic rods, under the grill grates, will last for many years with
proper care. They are shipped from the factory pre-assembled on the radiant
tray, ready to be set in place into the fire box, under the grill grates. Be sure to
remove any packaging material from the radiant tray and rods before using the
grill. Burned food particles and ash can be emptied off the radiant tray when
cool by shaking over a waste receptacle. Chipping or cracking of the ceramic
rods may occur as they may get brittle with age, depending on frequency of use.
This is normal and does not affect the cooking performance. Do not replace the
radiant tray/ceramic rods with alternates. Contact DCS for genuine factory-direct replacement parts,
1-888-936-7872 or see page 1 for contact information.
Fig. 07
USE OF THE GRILL
Before starting to cook on the grill, be sure the drip tray and liners are in place and that you have the grill
grates turned to the side you want for grilling. Preheat the grill for 15 minutes with the control knob set on HI.
P
lace the food on the grill. Grill it to the doneness desired. The control knob may be set to any position
between “HI’ and “LO”. For proper searing and browning, the grill requires high heat. With large pieces of meat
or poultry, you may need to turn the heat to medium to low setting after the food has been seared. This lower
heat setting will allow the food to cook through without burning the outside. When using a sugary marinade or
barbecue sauce, it may be necessary to turn the heat setting down near the end of the grilling time. Do not
leave the grill unattended while it is turned on. When you are finished grilling, allow the drip trays to cool
before cleaning them. They should be cleaned each time they are used.
NOTE:
The longer y
eheat the grill
ou pr
, the darker the grill marks will appear.
EXCESSIVE FLARE UPS AND FLAMING
Occasionally grease drippings ignite. These drippings will create minor puffs of flame for a second or two. This
is normal when cooking on a grill. You may find it handy to have a spray bottle filled with water to lightly spray
the flare-up. If the flame becomes excessive, remove the food from the grill. Lower the heat setting. Replace
the food when the flare-up subsides. To prevent flare-ups from happening, trim the fat from around the edges
of steaks and chops, use hamburger that is lean, remove the fat that is on poultry, etc. When turning any kind
of meat or poultry, the melted fat will drop onto the ceramic rods and it may create a flare-up. If this happens,
use a long handled spatula to move the food to another area.
11
Page 13
GRILL USE
GRILLING HINTS
hen grilling, the ventilation fan must be set on “HI” to remove smoke and odors. The fan can be turned to “LO”
W
after cooking is complete to remove any leftover smoke.
The doneness of meat is affected by the thickness of the cut. It is impossible to cook a thin piece of meat to a
rare doneness. A steak should be at least 1-inch thick to have it turn out rare and juicy. The cooking time is
affected by the temperature of the meat when you start to cook it, the size and shape of the cut and the kind of
meat you are cooking. The degree of doneness desired also affects the time.
When turning the meat over, always use a spatula or tongs as it will not puncture the meat allowing the juices to
run out. This will help to keep the meat juicy. Turn the meat only once, as juices are lost when the meat is
repeatedly turned. Be sure to trim any excess fat from meat or poultry. To prevent steaks or chops from curling
while they are being cooked, slit the fat around the edges at about 2-inch intervals. To test for doneness, make
a small cut in the center of the meat.
GRIDDLE USE
The built-in griddle on your cooktop is made from Type 304
stainless steel, highly polished to provide a smooth cooking
surface. It is normal for it to darken with use as oils cook onto
the surface to provide a stick resistant base or “seasoning”.
Since the griddle is made from stainless steel, the surface will
not rust. The griddle burner is thermostatically controlled and
cycles on and off to maintain the set temperature. The HEATING
light indicates that the burner is “ON”. The READY light
indicates that the griddle is at the set temperature. The griddle
assembly is not to be removed for cleaning and is held in place
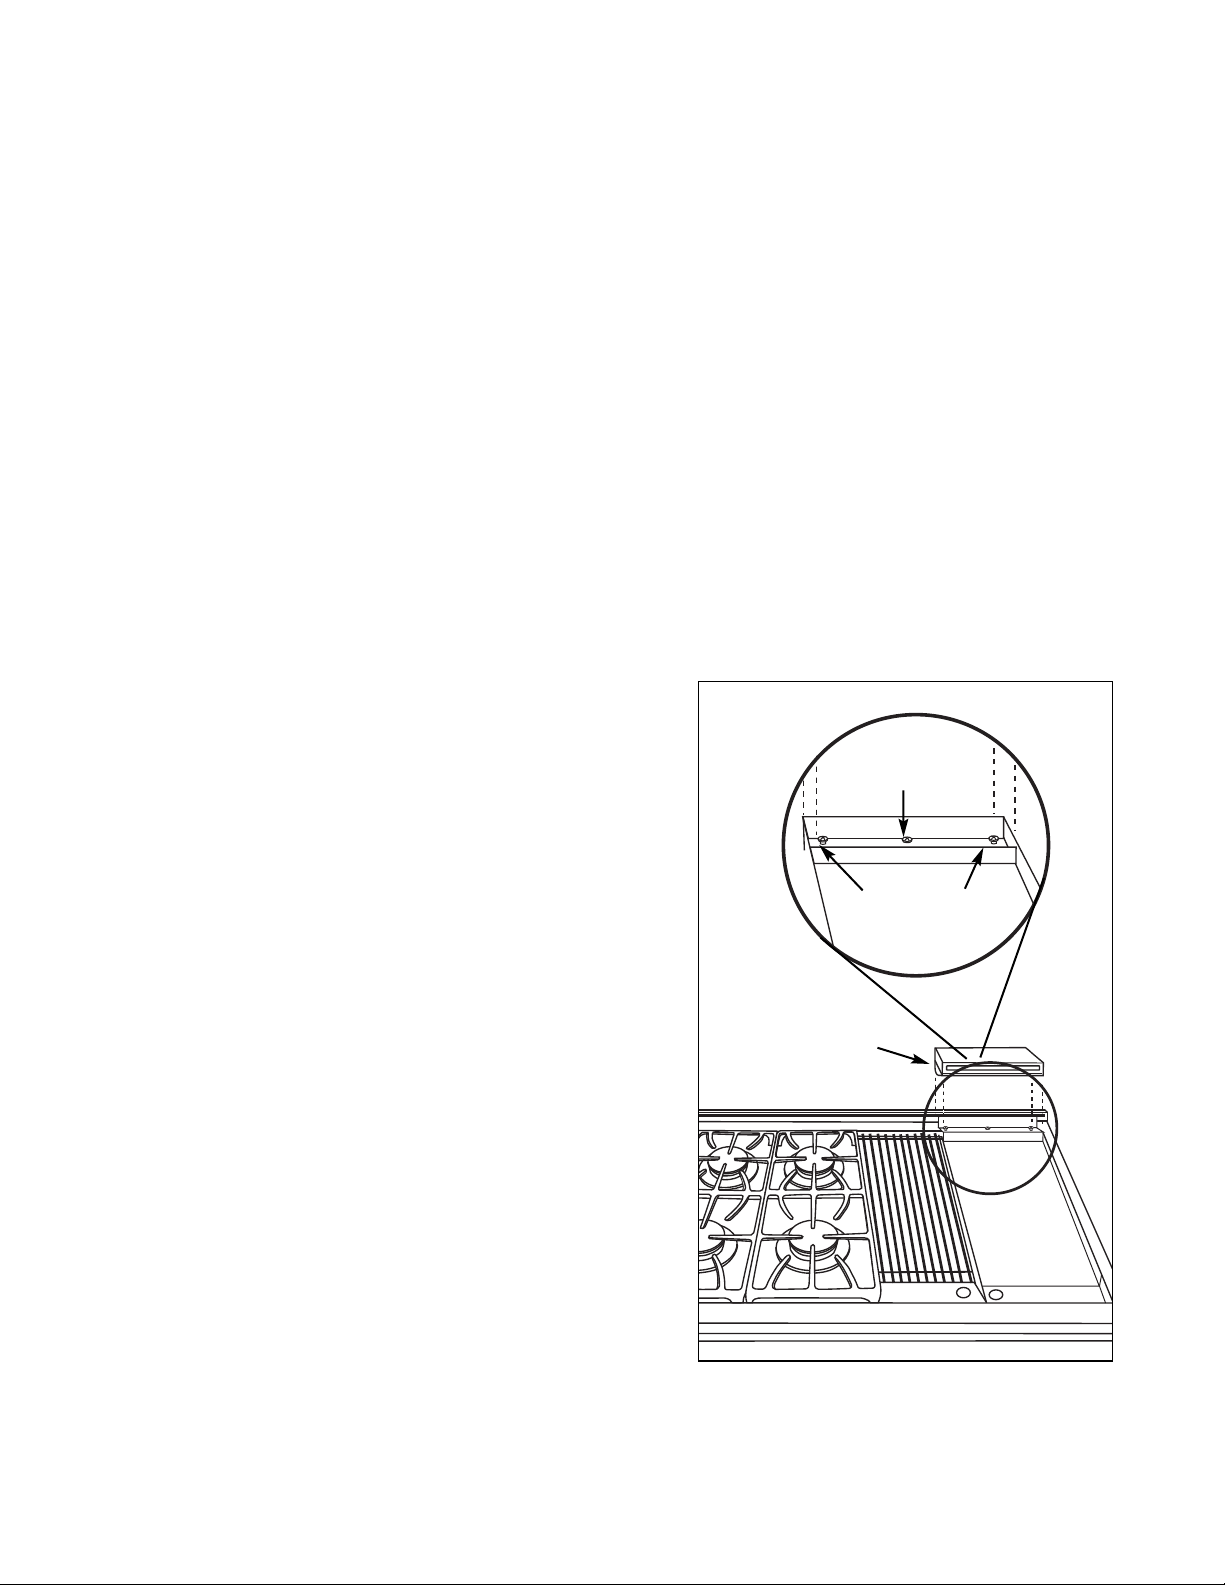
o front screws and one rear screw. These are mainly there
w
y t
b
to keep the griddle from shifting in transit, thus avoiding
breakage of any ignition components. Once the unit is
installed, the rear shipping screw can be removed. It is located
beneath the griddle flue cover which is removed by lifting off
(be careful not to scratch your backguard during removal of the
cover). Remove the center shipping screw. The two outer
screws are leveling screws (Fig. 08). They can be turned to level
the griddle or to provide a forward slope to help grease and
oils drain away from the food being cooked. After using the
griddle a few times, you will be able to judge the slope best for
the foods you are cooking and your personal preference.
ELECTRIC GLOW IGNITER
iddle burners are equipped with an electric glow igniter
r
he g
T
and safety valve system which lights the gas. There will be a
y of 30 to 90 seconds after the control knob has been
dela
tually hear the bur
turned on to when y
burner will ignite within 4 seconds after the gas reaches the
burner.
ou ac
ner come on. The
SHIPPING SCREW
(REMOVE)
OUTER LEVELING
SCREWS (2)
GRIDDLE FLUE
COVER
Fig. 08
12
Page 14

GRIDDLE USE
BEFORE USING THE GRIDDLE FOR THE FIRST TIME OR TO RE-SEASON
1. Clean the griddle thoroughly with hot, soapy water to remove any protective coating.
2. Rinse with a mixture of 1cup water and 1/4 cup white vinegar. Dry thoroughly.
3. Pour 1 teaspoon vegetable oil into the center of the griddle (do not use corn oil as it gets sticky). Rub the oil
over the entire surface of the griddle using a heavy soft cloth.
4. Turn the control knob to a Medium setting (350ºF). Turn the heat “Off” when the oil begins to smoke. Allow the
griddle to cool.
5. Repeat Step 3. Be sure to cover the entire surface with the oil.
6. Repeat Step 4. Allow the griddle to cool. Wipe the entire surface of the griddle using a heavy soft cloth. Apply a
very thin layer of vegetable oil. The griddle is now ready to use. If the griddle is not used for a period of time,
re-season it occasionally.
NOTE:
It is normal for the griddle to darken with use.
USE OF THE GRIDDLE
Before starting to cook on the griddle, be sure the drip tray and liners are in place. Preheat griddle for 15
minutes with the control knob set to the temperature suggested on the cooking chart. When the griddle is
preheated, the HEATING light will turn “Off” and the ready light will be “On”. Place the food on the griddle and
cook to desired doneness.
NOTE:
When the griddle is properly seasoned it can be used without any additional oil. However, it can be used for flavor.
A light mist of non-stick vegetable spray, applied before cooking to a cool griddle, makes delicate foods easier to
turn.
GRIDDLE COOKING CHART
FFOOOODD TTEEMMPPEERRAATTUURREE
Eggs
Bacon, Ham, Pork Chops
Sausage, Grilled Cheese Sandwiches
, French Toast
ancakes
P
Hash Brown Potatoes
225ºF to 250ºF
300ºF to 325ºF
o 350ºF
325ºF t
350ºF to 375ºF
400ºF to 425ºF
13
Page 15

CARE AND MAINTENANCE
WHEN CLEANING THE COOKTOP:
WARNING
Be careful cleaning any part of this appliance while hot.
All parts of the appliance can be cleaned with hot soapy water, rinsed, dried and buffed to a shine with a soft,
heavy pile cloth. Always try this first, as it is the mildest cleaning procedure.
1. Use the mildest cleaning procedure first. Some brands of cleaners of the same type are harsher than others, read
their directions. A scent or a propellant can make a difference in the product, read the ingredients. Try on a
small area first.
2. To avoid marring the surface always rub metal finishes in the direction of the polish lines. The cleaner will be
more effective when used in the direction of the polish lines.
3. Use only clean sponges, soft cloths, paper towels, plastic non-metal for cleaning or scouring as recommended in
this section. (Use only soap pads with soap still in them. An empty pad can scratch.)
4. Be sure to rinse all parts thoroughly and to wipe dry to avoid water marks.
BRAND NAME CLEANERS
In this section on cleaning, the use of name brands is intended only to indicate a type of cleaner. This does not
constitute an endorsement. The omission of any name brand cleaner does not imply its adequacy or inadequacy.
Many products are regional in distribution and can be found in local markets and department stores.
COOKTOP
Turn off all the burners and allow the grates to cool, before starting to clean the cooktop. If you wipe off any
part of the cooktop while it is hot do so carefully as using a wet sponge or cloth can result in steam burns.
BURNER GRATES
When lifting the grates be careful as they are heavy. Place them on a protected surface, so they won’t scratch the
surface they are laid on. The burner grates are matte porcelain enamel over cast iron. When cool they may be
placed in the dishwasher, or wiped clean using hot soapy water, then rinsed and wiped dry. The burner grates
will not rust as they are matte porcelain enamel on both sides for durability. The occasional use of mild abrasive
cleansers such as Fantastik®, Simple Green® or Formula 409® is okay. Abrasive cleansers, used vigorously or too
often, can eventually harm the enamel. Apply with a damp sponge, rinse thoroughly and dry. The porcelain may
pop off the edge of the grates due to rapid temperature change when the burners are turned on. Do not be
concerned as this does not result in the deterioration of the grates. The cast iron soon darkens to blend with the
por
celain enamel. Be careful when wiping an area where the porcelain has popped off, as the edges may be
sharp.
14
Page 16
CARE AND MAINTENANCE
BURNERS
For proper lighting and performance keep the burners
clean. It is necessary to clean the burners if they do
not light even though the igniter clicks, if there has
een a severe boil over, or when the flame does not
b
burn blue. Be certain all burner knobs are in the off
position before attempting to clean the burners. The
burners have been designed for ease in cleaning.
When the grates and burners are cool, remove the
grate. The burner cap and the brass port ring can
easily be lifted off. Wash these parts in hot soapy
water, rinse and dry thoroughly. The burner caps are
porcelain enamel, follow the directions on the
previous page that were given for the burner grates.
A bristle brush can be used to clean out the toothed
burner ports, if necessary. Disassembly of the simmer
ring is not recommended, however, it may become
necessary to do so if the ports remain clogged after
normal cleaning. If it is necessary to disassemble the
simmer ring from the base, remove the hex nut at the
top of the simmer ring. Clean the simmer ring with
hot soapy water using a soft wire or plastic bristle
brush then dry thoroughly. Re-assemble the parts
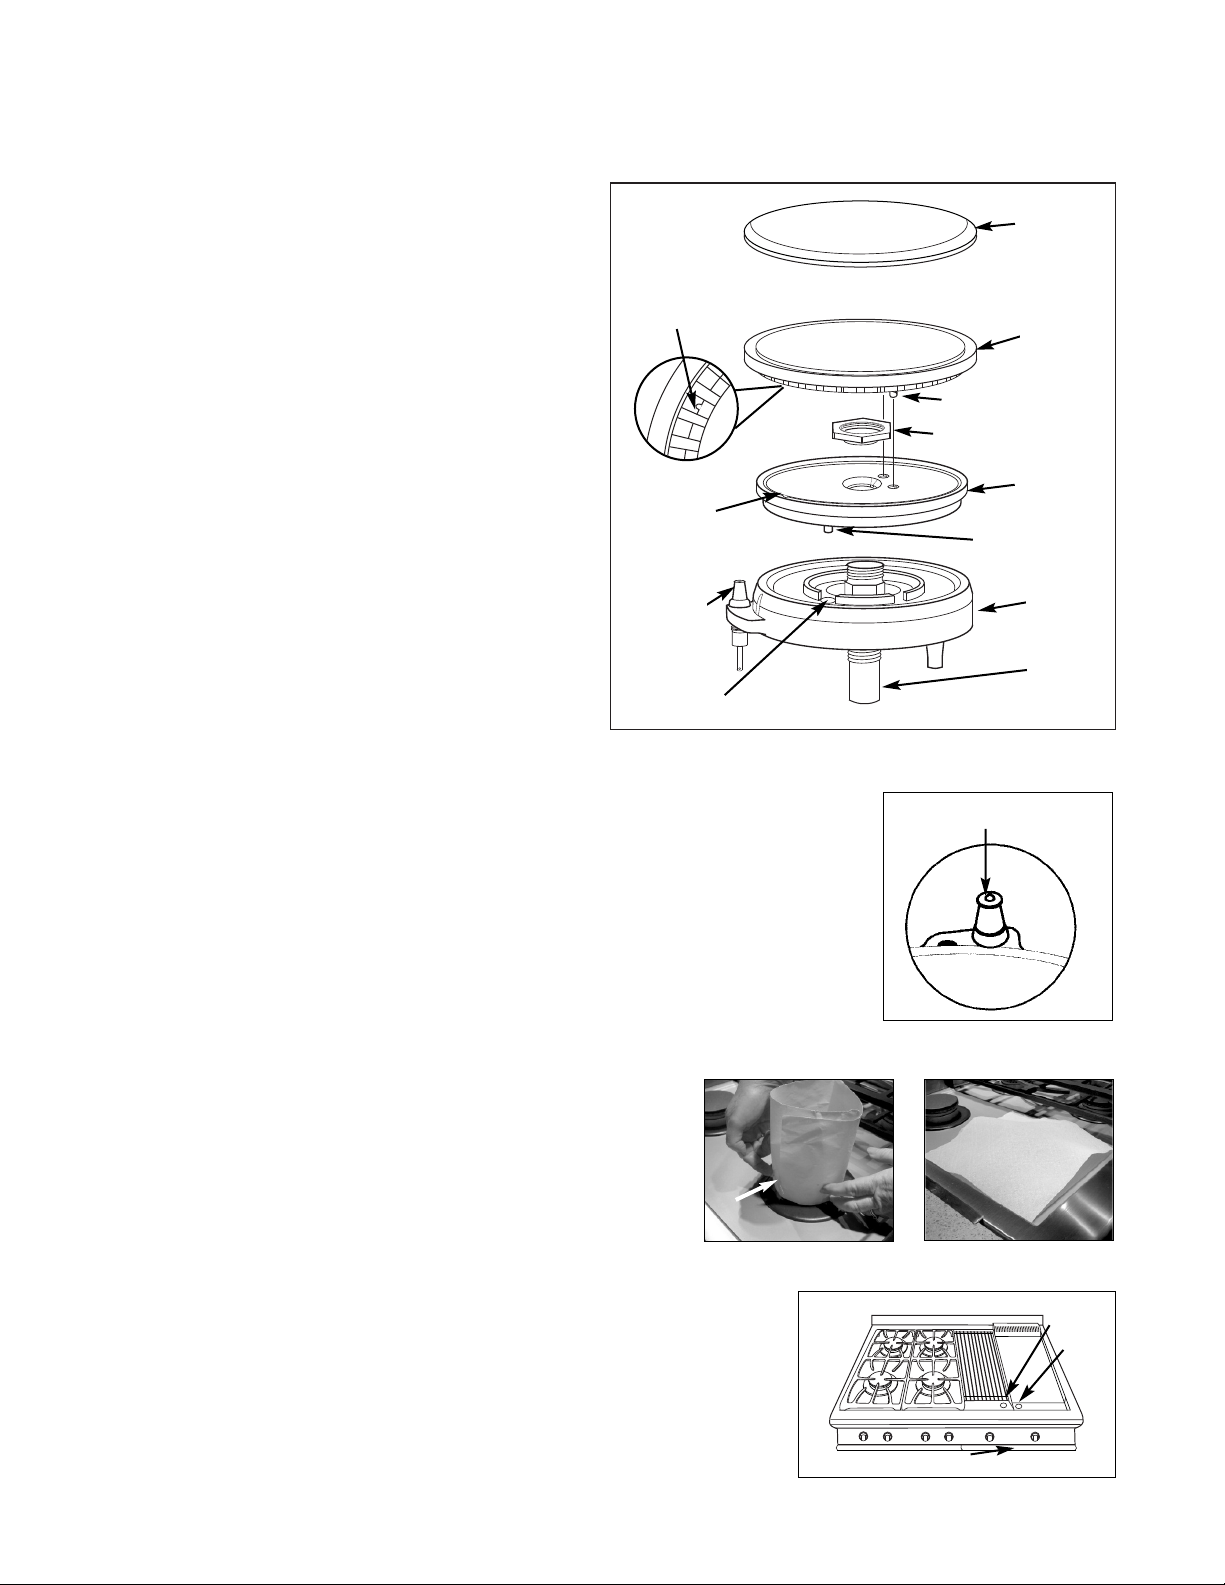
using the hex nut. After cleaning, it is important to
make sure the locating pin on the bottom side of the
simmer ring is properly aligned with the
corresponding hole in the base and that the two
locating pins (see insert-Fig.09) in the bottom side of the brass port ring are
properly aligned with the locating notch and center holes on the top side of the
simmer ring. Incorrect alignment will produce a potentially dangerous flame and
poor burner performance (see Fig. 09).
BRASS RING
LOCATING PIN
OCATING
L
NOTCH
ELECTRODE
LOCATING PIN
HOLE INSIDE
CAP
MAIN
BURNER
PORT RING
LOCATING PIN
HEX NUT
SIMMER
RING
LOCATING PIN
BURNER
BASE
VENTURI
Fig. 09
IGNITER (KEEP CLEAN)
IGNITERS
Wipe with a rubbing alcohol dampened cotton swab. Be careful not to damage the
igniter (see Fig. 10).
SUMP AREA AROUND BURNERS AND IGNITERS
ates. With a warm wet sponge, apply a soap that will
r
e g
v
emo
R
release (like Dawn). Clean up soiled area around the sump.
FOR HARD TO CLEAN SOIL, USE THIS EMTHOD:
If residue is still left, make a paper collar around the burner
and igniter and tape it together (Fig. 11). Spray “Easy Off or
SOS” oven spray using the cool method on soiled area. Cover it
TAPE
with a paper towel and leave it on the area at least 4 hours or
ig. 11
overnight (Fig. 12). With a warm moist sponge, remove the oven
F
spray and soil. Dry with a soft cloth.
DRIP TRAYS AND DRAIN TUBES
If you have a griddle or a grill there will be a tray liner located inside of the
drip tray (Fig. 13).
are on rollers so they are easy to remove and replace.
The drip trays are made of stainless steel. The drip trays
DRIP TRAY AND LINER
ig. 13
F
Fig. 10
Fig. 12
AIN
DR
TUBES
15
Page 17
CARE AND MAINTENANCE
To remove tray liner:
■ Pull tray out until it stops.
■ Remove inner trays for cleaning.
To remove drip tray: (if needed)
■ Pull tray out until it stops.
■ Remove inner trays.
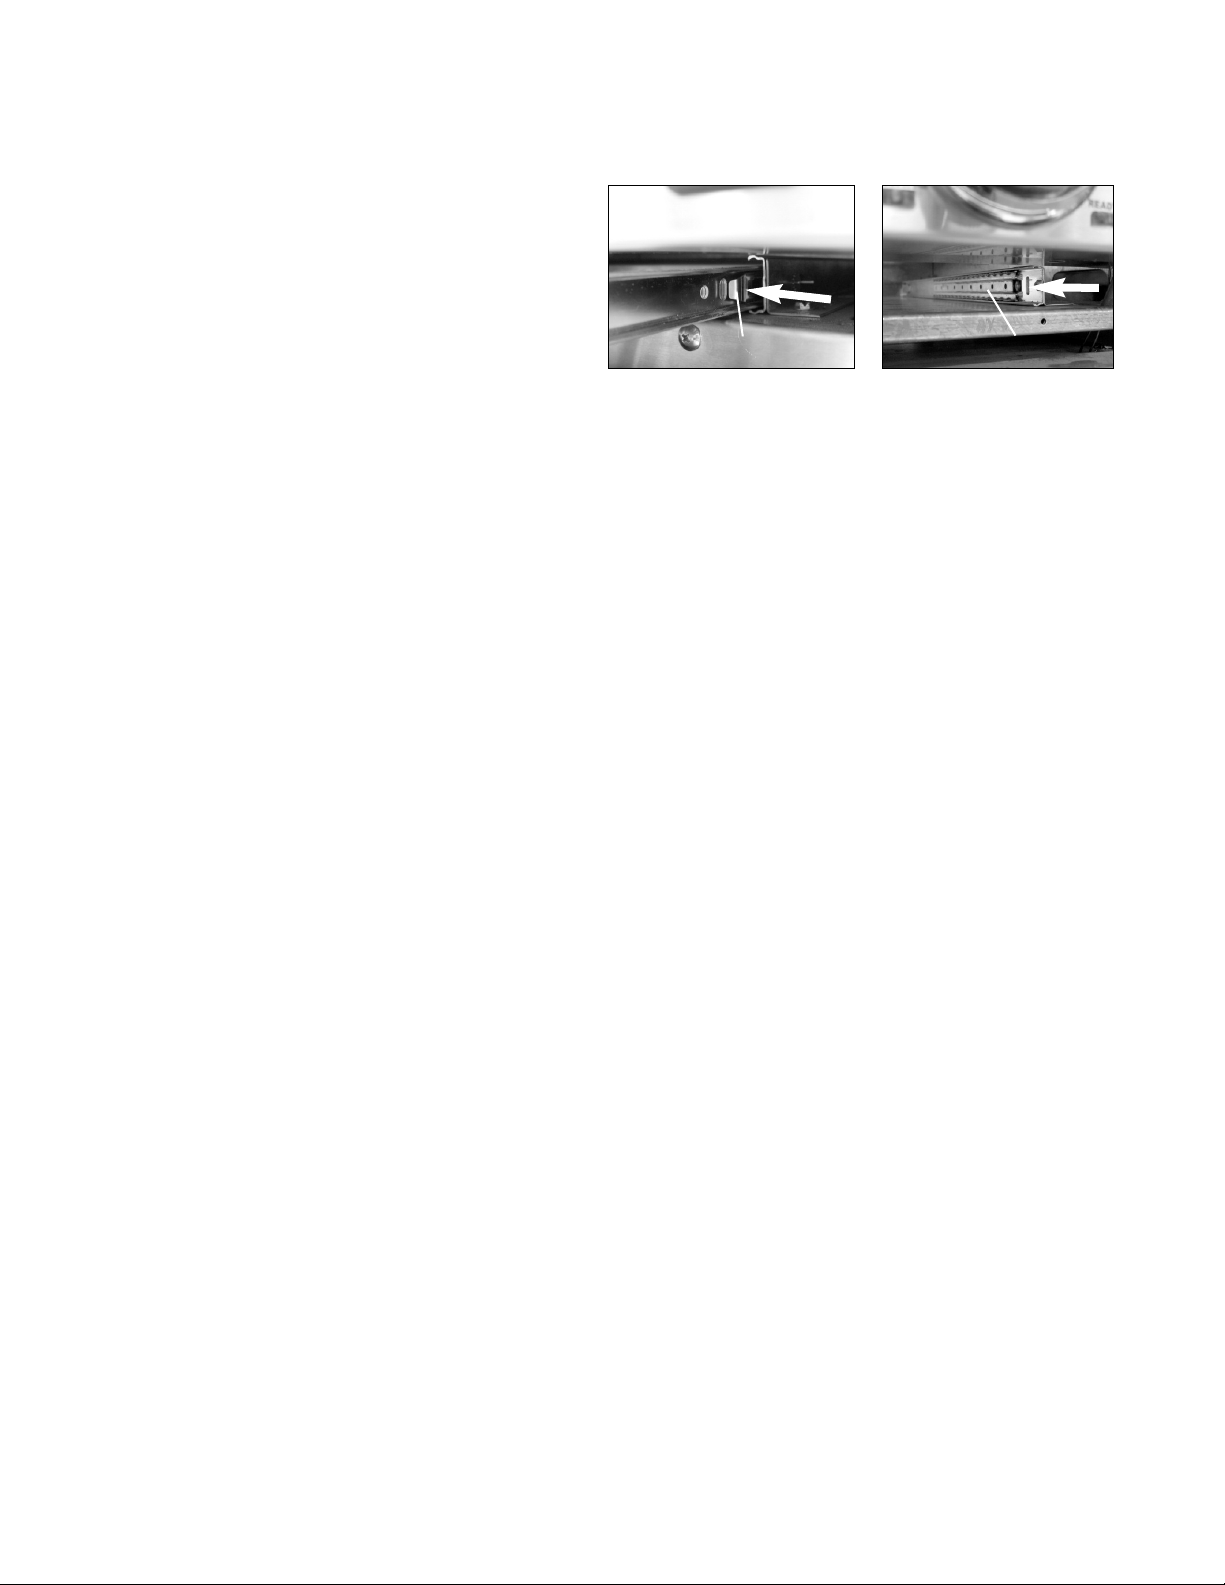
■ Push in latches on the sides of the slides while
pulling out the drip tray (Fig.14).
■ Continue pulling the tray out.
To install drip tray:
■ Align the side of the drip tray with the slide guides (Fig. 15).
■ Push the tray in until it stops.
■ Pull the tray forward and push in and out several times to engage rollers.
To remove, pull the tray forward. If something has spilled into the trays it should be cleaned up as soon as
possible to prevent “baked on” food soil. Grease from the griddle or the grill drains through the drain tube into
the tray and liner below.
the tube and tray as soon as they are cool. Clean with hot soapy water. For the tube use a soapy bottle brush.
Ensure the drip tray is in place when cleaning the drain tube. A mild abrasive cleaner such as Fantastik®, Simple
Green® or Formula 409® can be used. (Do not use steel wool pad, or a harsh abrasive such as: Comet® or Ajax®.)
Rinse and dry all parts thoroughly.
Do not allow the grease to accumulate in the tray as it can be a fire hazard. Clean
LATCH
Fig. 14 Fig. 15
PUSH IN
SLIDE GUIDE
GRIDDLE
Thoroughly clean the griddle of grease and food particles while it is still hot, taking care not to scratch the
griddle, using a square edged spatula or brass brush. Once the griddle has cooled to a lukewarm temperature,
rub the surface lightly with vegetable oil (do not use corn oil, it gets sticky). Thoroughly wipe the griddle with a
heavy coarse cloth or burlap to remove any remaining residue and food particles. If you have a grease build-up,
use one tablespoon of vinegar in a 1/2 cup of water, clean with a scouring cloth such as a Chore Boy® Scouring
Cloth. For heat discoloration use a stainless steel cleaner for heat stains such as Revere Ware® Stainless Steel
Cleaner.
griddle stone (fine grained pumice), or a griddle pan and screen cleaner (these are both available at restaurant
supply st
t
a
w
on page 13 to reseason the griddle.
Wash with hot soapy water, rinse and dry. If food soil or residue is cooked onto the griddle, use a
ore), following the manufacturers’ directions. Wash with hot soapy water, rinse and dry. If hot soapy
, vinegar, or scouring powder are used to clean the griddle, it must be re-seasoned. Follow the directions
er
A
LIGN
OOD THE HOT GRIDDLE WITH COLD WATER. This could cause the griddle to crack or warp.
VER FL
NE
GRILL
ill immedia
Clean the g
a barbecue mitt. Scrub the grill by dipping a brass bristle barbecue brush frequently into a bowl of warm water.
The steam created softens the food particles and assists the cleaning process. The food particles will drop into
the dr
after they have cooled. Follow directions above. The radiant tray and radiants should be removed periodically
(when cool) and shaken gently over a layer of newspaper, which can be thrown away.
r
y or into the radiant tray holding the radiants. Be sure to clean the drain tube, drip tray and liner
a
ip tr
tely after cooking. Turn off the burner. To protect your hand from steam and heat, wear
CONTROL KNOBS
These are die-cast metal with plastic grips and can be cleaned in hot, soapy water. To remove the knobs from
asp the k
r
the control panel
soak. Rinse and dry thoroughly. It is important to replace these knobs on the correct gas valve, on the control
panel. The cooktop and grill control knobs are similar, the cooktop knobs have a setting for “Simmer”, the grill
does not. The g
16
, g
iddle c
r
nob and pull str
ol knob has temperatures on it.
tr
on
aight back towards you and away from the cooktop. Wash, do not
Page 18

CARE AND MAINTENANCE
BACKGUARD (if installed)
his is made of stainless steel. Use the mildest cleaning procedure first. Hot soapy water, rinse and dry. If the
T
panel has food soil remaining, try a general kitchen cleaner, such as Fantastik®, Simple Green® or Formula 409®.
Apply cleaner with a damp sponge, rinse thoroughly and dry. Always scrub lightly in the direction of the grain.
Do not use a steel wool pad, it will scratch the surface. To touch up noticeable scratches in the stainless steel,
sand very lightly with dry 100 grit emery paper, rubbing in the direction of the grain. After cleaning use a
stainless steel polish, such as Stainless Steel Magic®. If the rear top burners are used extensively on high it is
possible for the vertical stainless steel panel to discolor from the burner heat. This discoloration can be
removed by using Revere Ware Stainless Steel Cleaner.
POWER FAILURE
To light the cooktop burners, turn the control knob to “LITE”, hold a lighted match to the port ring. After the
flame is burning all the way around the burner, adjust the flame. It is necessary to light each burner separately,
each time you want to use it. Do not attempt to match light the griddle, grill, broil, or oven burners; they will
not function without any electrical power. Make sure knobs are in the “OFF” position should power be restored
and you are away from the unit. Do not leave the burner unattended. The burner will not relight if blown out.
17
Page 19
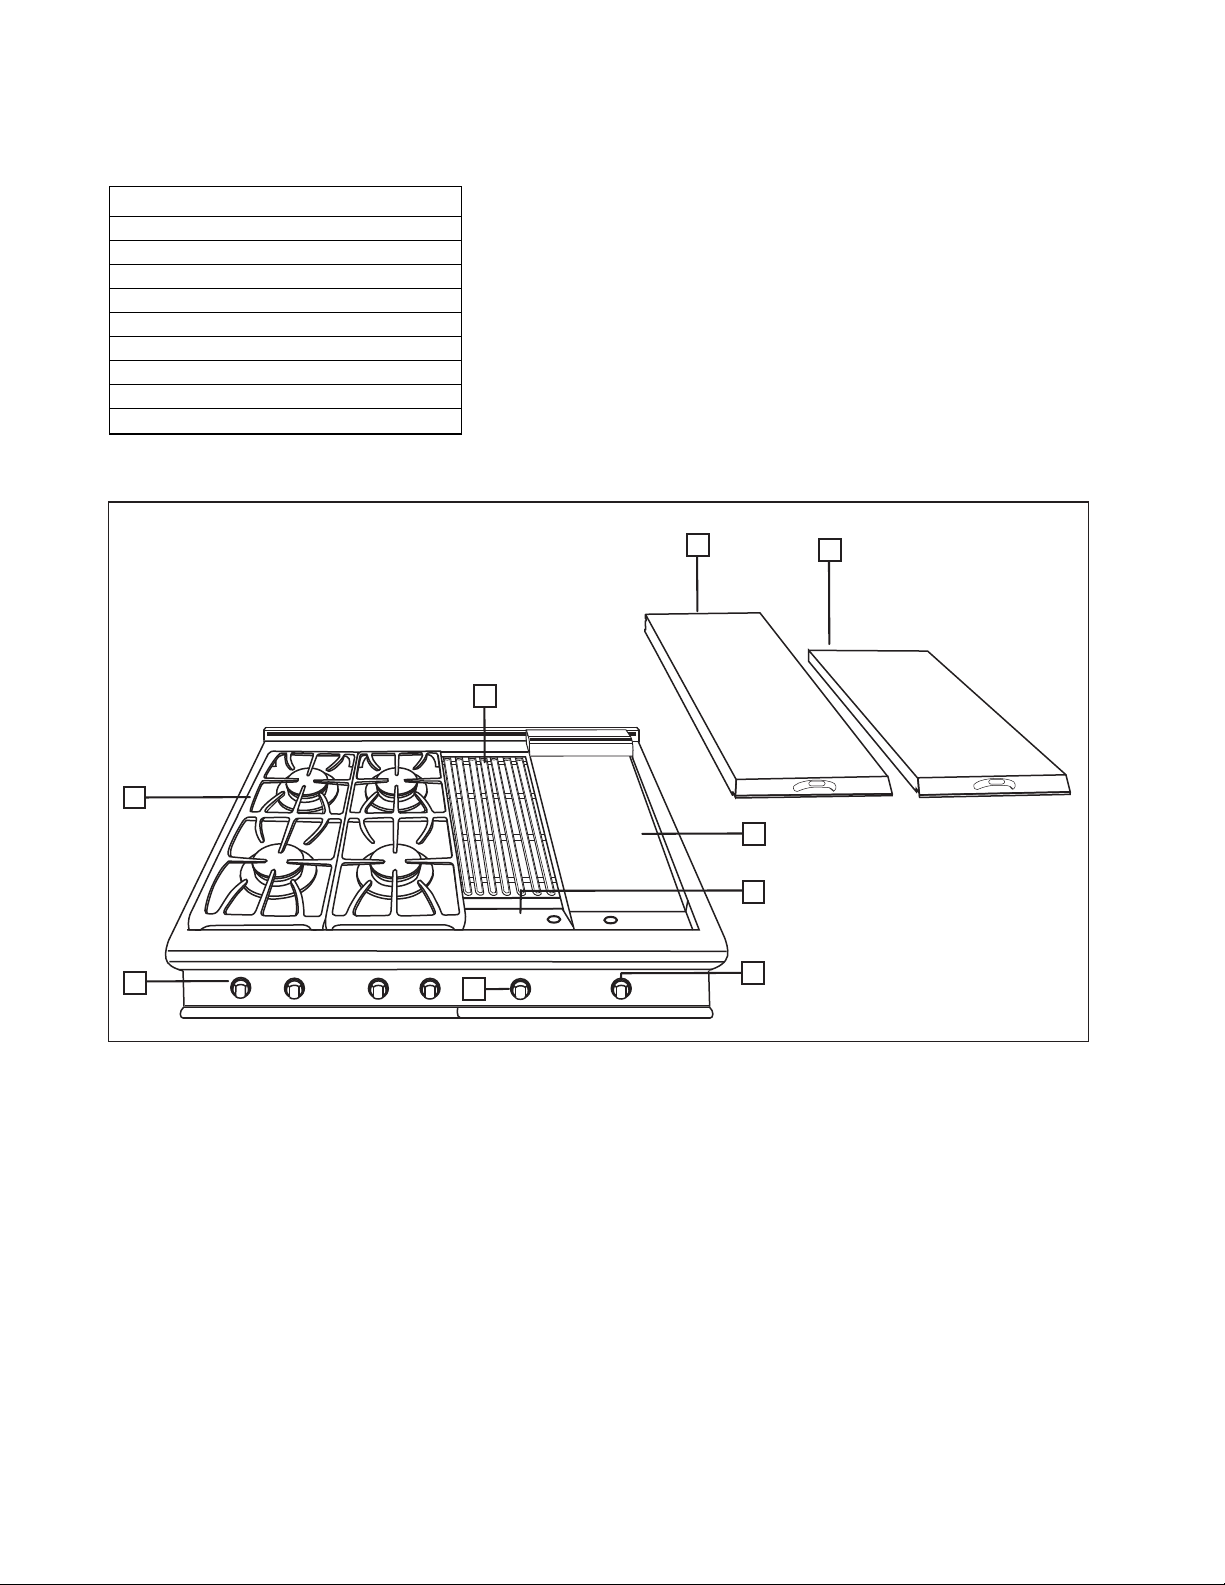
PARTS IDENTIFICATION
4
3
1
5
7
6
2
8
9
TEM DESCRIPTION
I
1 Grill
2 Burner Grates
Griddle
3
4 Grill Grates
5 Griddle Control Knob
6 Grill Control Knob
7 Cooktop Control Knob
8 Grill Cover
9 Griddle Cover
MODEL CP
NOTE: RATING PLATE LOCATED ON THE BACK OF THE UNIT
18
-484GG SHOWN
Page 20
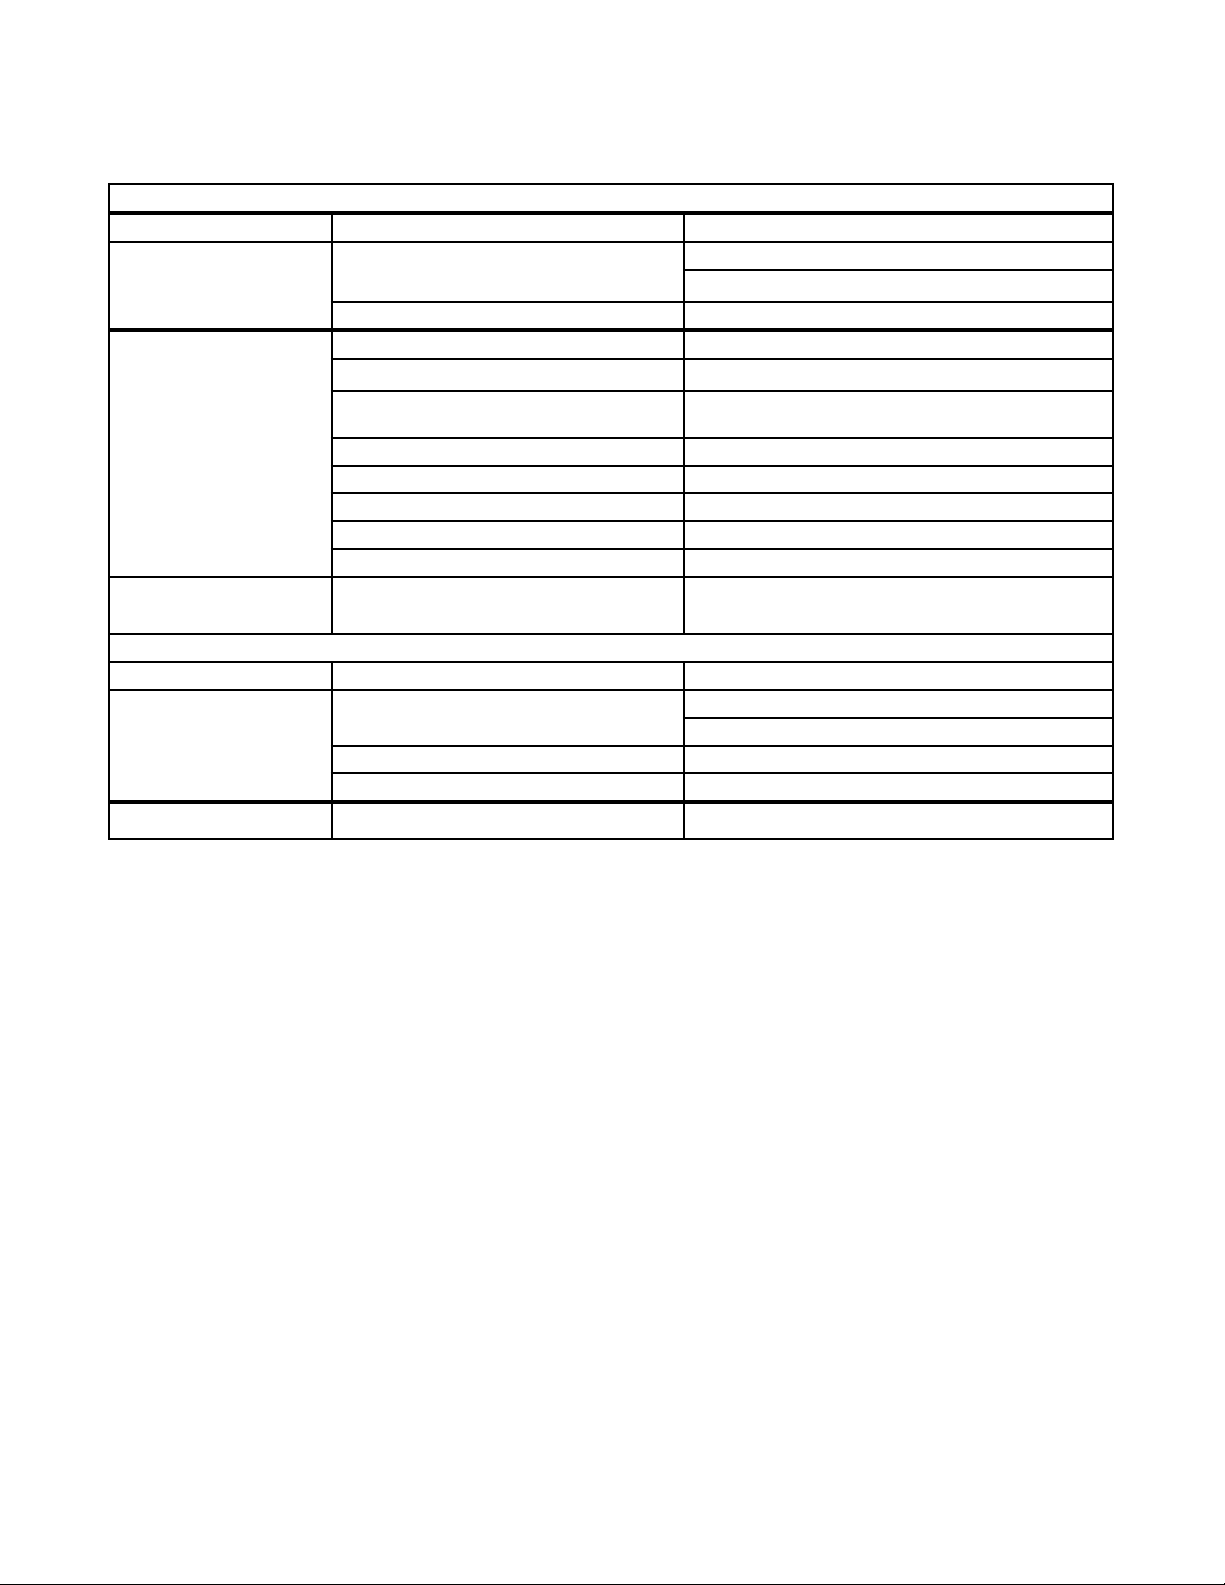
TROUBLESHOOTING
PROBLEM POSSIBLE CAUSE SOLUTION
NO ELECTRICITY OR
AS SUPPLY
NON FUNCTIONAL
ONE OR MORE BURNERS
WILL NOT LIGHT
INCORRECT FLAME
SOOTY BURNER FLAME
PROBLEM POSSIBLE CAUSE SOLUTION
NON FUNCTIONAL
LOW HEAT
G
TECHNICAL CALL AUTHORIZED SERVICE
O ELECTRICITY
N
NO GAS CHECK GAS SUPPLY AT WALL
WRONG GAS
DIRTY BURNERS CLEAN BURNERS
BURNERS MIS-ALIGNED ALIGN & REASSEMBLE BURNERS
WATER IN BURNER(S) DIS-ASSEMBLE & DRY BURNER(S)
DIRTY ELECTRODE CLEAN BURNER ELECTRODE
TECHNICAL CALL AUTHORIZED SERVICE
TOO LARGE OR SMALL
MIS-ALIGNED BURNER ASSY
RANGE GRIDDLE & GRILL
NO ELECTRICITY OR GAS SUPPLY
RADIANT TRAY IMPROPERLY INSTALLED RE-INSTALL RADIANT TRAY CORRECTLY
TECHNIC
PLUGGED BURNER PORTS
AL
RANGES & COOKTOPS
URN ON GAS SUPPLY VALVE
T
CHECK CIRCUIT BREAKERS
HECK CIRCUIT BREAKERS
C
VERIFY GAS TYPE (SEE PAGE 20 FOR LOCATION OF
ABEL
L
VERIFY GAS TYPE (SEE LABEL ON BACK)
REALIGN AND RE-ASSEMBLE BURNER ASSY (PAGE 15)
TURN ON GAS SUPPLY VALVE
CHECK CIRCUIT BREAKERS
CALL AUTHORIZED SERVICE
SEE PAGE 15 FOR BURNER CLEANING PROCEDURE
19
Page 21

HOW TO OBTAIN SERVICE
BEFORE YOU CALL FOR SERVICE
■ Is the circuit breaker tripped or the fuse blown?
■ Is there a power outage in the area?
■ See Troubleshooting on page 19.
IF THE COOKTOP BURNERS DO NOT LIGHT
■ Is the two piece burner assembled correctly? (See page 15, Fig. 09)
■ Is the burner head assembly aligned correctly? (See page 15, Fig. 09)
■ Is the manual shut-off valve open? This is usually located where the gas comes out of the wall.
For warranty service, please contact DCS Customer Care Representative at (888) 936-7872. Before you call,
please have the following information ready:
■ Model Number (located on rating plate on the right side of the unit).
■ Serial Number (located on rating plate on the right side of the unit).
■ Date of installation
■ A brief description of the problem
Your satisfaction is of the utmost importance to us. If a problem cannot be resolved to your satisfaction, please
call, write or email us at:
Fisher & Paykel Appliances, Inc.
Attention: DCS Customer Care
5900 Skylab Road
Huntington Beach, CA 92647
email:
20
Page 22

WARRANTY
LIMITED WARRANTY
When you purchase a new DCS Professional Cooktop, you automatically receive a One Year Limited Warranty
covering parts and labor for the entire product, a Five Year Limited Warranty on surface burners, griddle burner
and grill burner (parts only), for servicing within the 48 mainland United States, Hawaii, Washington D.C. and
anada. In Alaska the Limited Warranty is the same except that you must pay to ship the Product to the service
C
shop or the service technician’s travel to your home. Products for use in Canada must be purchased through the
Canadian distribution channel to ensure regulatory compliance.
FISHER & PAYKEL UNDERTAKES TO:
Repair without cost to the owner either for material or labor any part of the Product, the serial number of which
appears on the Product, which is found to be defective. In Alaska, you must pay to ship the Product to the
service shop or for the service technician’s travel to your home.
If we are unable to repair a defective part of the Product after a reasonable number of attempts, at our option
we may replace the part or the Product, or we may provide you a full refund of the purchase price of the Product
(not including installation or other charges).
This warranty extends to the original purchaser and any succeeding owner of the Product for products
purchased for ordinary single-family home use. All service under this Limited Warranty shall be provided by
Fisher & Paykel Appliances Inc. or its Authorized DCS Service Agent during normal business hours.
HOW LONG DOES THIS LIMITED WARRANTY LAST?
Our liability under this Limited Warranty for the entire product expires One Year from the date of purchase of the
Product by the first consumer. Our liability under this Limited Warranty for surface burners, griddle burners and
grill burner (parts only) expires Five Years from the date of the purchase of the Product by the first customer.
Our liability under any implied warranties, including the implied warranty of merchantability (an unwritten
warranty that the Product is fit for ordinary use) also expires One Year (or such longer period as required by
applicable law) from the date of purchase of the Product by the first consumer. Some states do not allow
limitations on how long an implied warranty lasts, so this limit on implied warranties may not apply to you.
THIS WARRANTY DOES NOT COVER:
A. Service calls that are not related to any defect in the Product. The cost of a service call will be charged if the
problem is not found to be a defect of the Product. For example:
1. Correct faulty installation of the Product.
2. Instruct you how to use the Product.
3. Replace house fuses, reset circuit breakers, correct house wiring or plumbing, or replace light bulbs.
rect fault(s) caused by the user.
or
4. C
5. Change the set-up of the Product.
6. Unauthorized modifications of the Product.
7. Noise or vibration that is considered normal, for example, drain/fan sounds, regeneration noises or user
arning beeps.
w
8. Correcting damage caused by pests, for example, rats, cockroaches etc.
21
Page 23

WARRANTY
B. Defects caused by factors other than:
1. Normal domestic use or
2. Use in accordance with the Product’s Use and Care Guide.
C. Defects to the Product caused by accident, neglect, misuse, fire, flood or Act of God.
D. The cost of repairs carried out by non-authorized repairers or the cost of correcting such unauthorized repairs.
E. Travel Fees and associated charges incurred when the product is installed in a location with limited or restricted
access. (i.e. airplane flights, ferry charges, isolated geographic areas).
F. Normal recommended maintenance as set forth in the Product’s Use and Care Guide.
f you have an installation problem contact your dealer or installer. You are responsible for providing adequate
I
electrical, exhausting and other connection facilities.
We are not responsible for consequential or incidental damages (the cost of repairing or replacing other
property damaged if the Product is defective or any of your expenses caused if the Product is defective). Some
states do not allow the exclusion or limitation of incidental or consequential damages, so the above limitation or
exclusion may not apply to you.
HOW TO GET SERVICE
Please read your Use and Care Guide. If you then have any questions about operating the Product, need the
name of your local DCS Authorized Service Agent, or believe the Product is defective and wish service under this
Limited Warranty, please contact your dealer or call us at:
TOLL FREE 1-888-936-7872 or contact us through our web site: www.dcsappliances.com
You may be required to provide reasonable proof of the date of purchase of the Product before the Product will
be serviced under this Limited Warranty.
COMMERCIAL USE
This warranty applies to appliances used in residential applications; it does not cover their use in commercial
situations.
NO OTHER WARRANTIES
This Limited Warranty is the complete and exclusive agreement between you and Fisher & Paykel Appliances Inc.
regarding any defect in the Product. None of our employees (or our Authorized Service Agents) are authorized to
make any addition or modification to this Limited Warranty.
Warrantor: Fisher & Paykel Appliances, Inc.
If you need further help concerning this Limited Warranty, please call us at the above number, or write to:
Fisher & Paykel Appliances, Inc.
5900 Skylab Road, Huntington Beach, CA 92647
This Limited Warranty gives you specific legal rights, and you may also have other rights which vary from state to
state.
ykel Appliances Inc. is a leading manufacturer of premium quality cooking and specialty appliances
isher & P
F
under the F
a
isher & P
ykel and DCS br
a
ands
.
22
Page 24

isher & P
F
aykel Appliances, Inc.
5900 Skylab Road, Huntington Beach, CA 92647
Customer Care: 888.936.7872
ax: 714.372.7003
F
w.dcsappliances.com
w
w
oduits et se
onstammen
Nous amélior
éser
r
eption de ses pr
onc
c
s pr
A
eser
r
without notic
P/N 238635 Rev. B
Litho in USA 08/2008
ons c
oit de modifier les spécifica
e le dr
v
oduc
e the r
v
t impr
oduits sans aucun pr
emen
v
o
o change specifica
t t
igh
.
e
t ses pr
t is an ongoing process, we
tions ou la
vis.
éa
tions or design
 Loading...