

Page 1

Washing machine
User Guide
AWF 60 MD
Page 2

Product Information
It is important to keep this manual in a safe place (for your record).
Date of purchase
____________________ Purchaser __________________________
Dealer/Retailer ______________________ Branch/Location _____________________
Suburb____________________________ Town/City __________________________
Country ______________________________________________________________
Model No. _________________________ Serial No. __________________________
N.B. To find information on model numbers and serial numbers, look behind the washing machine door.
AWF 60 MD
Page 3
Contents
1
Technical features
Page 3
2
General recommendations
Page 4
3
Installation instructions
Page 5
4
Before the first wash cycle
Page 9
5
Preparing the wash
Page 9
6
Detergent and additives
Page 10
7
Page 14
Program selection and washing
machine operation
8
Page 19
Care and maintenance
9
Page 21
Before calling for service
Page 4
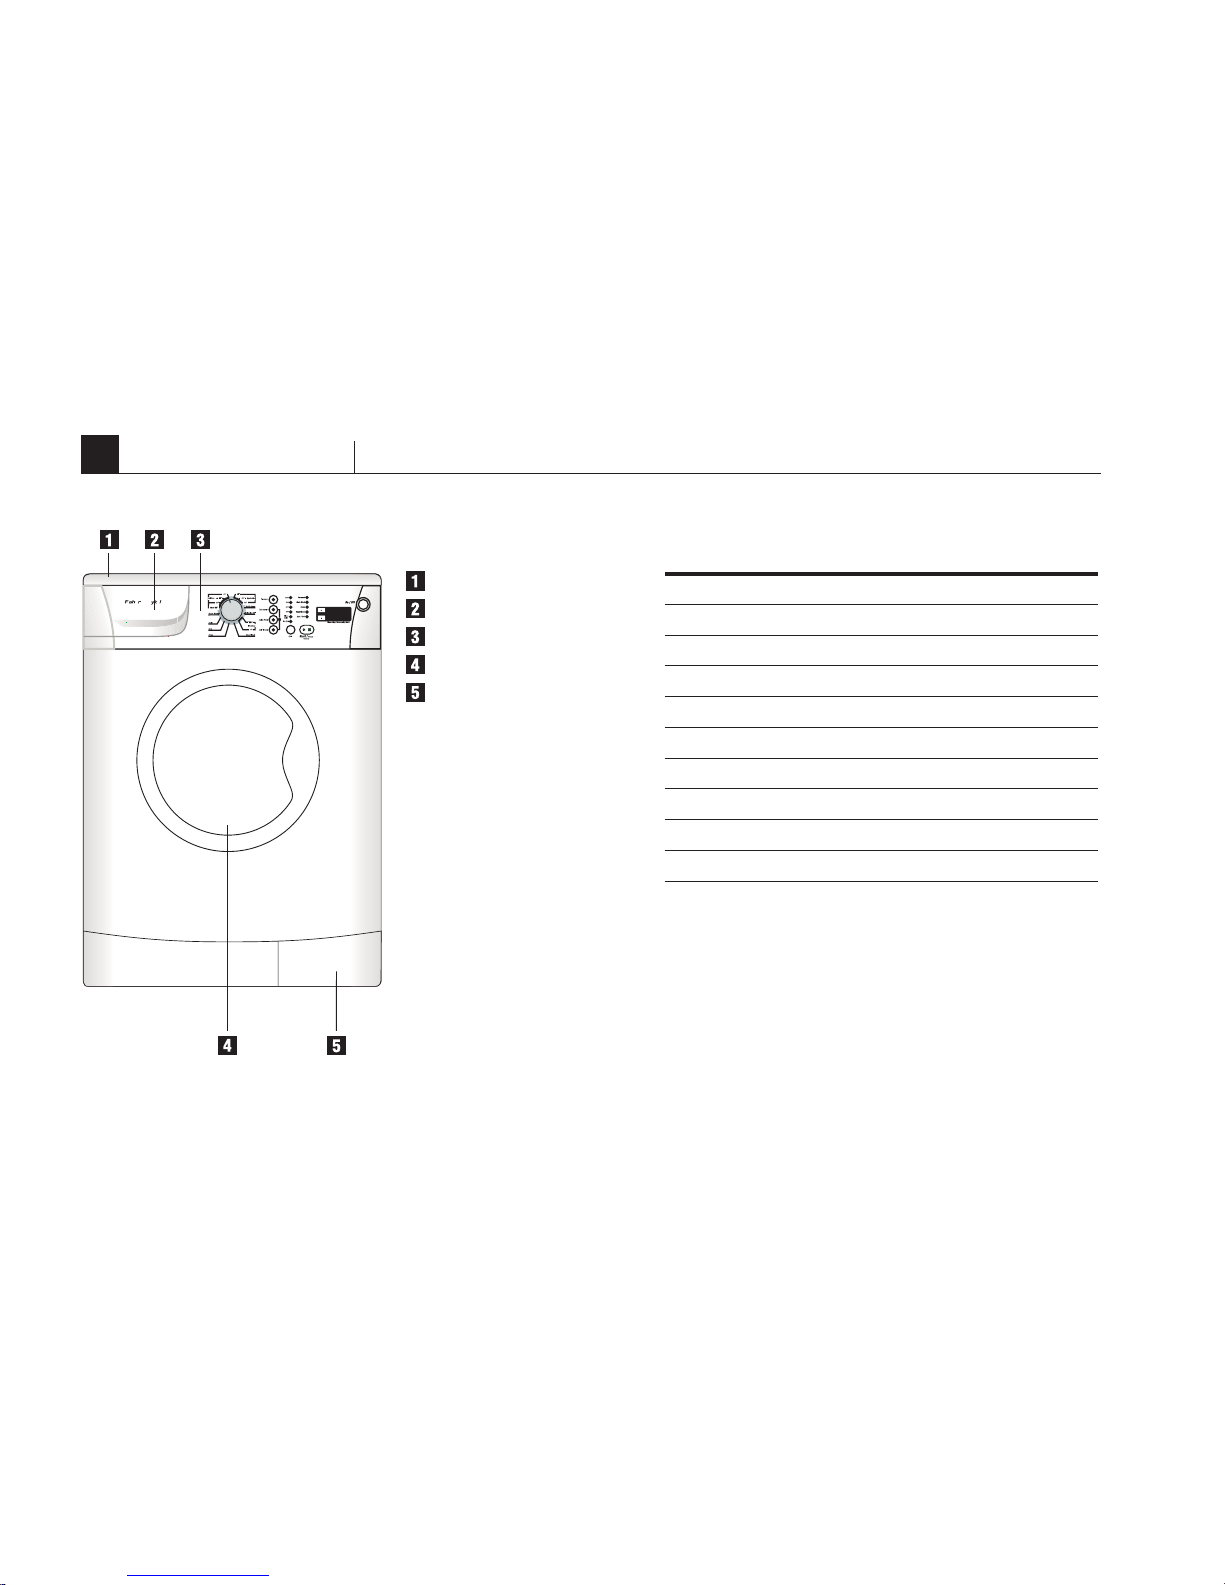
6
85
60
54
73
240/50
10
2400
52
1000
Maximum capacity (kg.)
Height (cm.)
Width (cm.)
Depth (cm.)
Net weight (kg.)
Power requirement (V/Hz)
Nominal current (A)
Power (W)
Washing speed (rpm)
Spin speed (rpm)
The appearance and specifications are subject to change
without notice.
The graphics shown in the manual are schematic and may
not conform exactly with your washing machine.
1
Technical features
Top lid
Detergent Dispenser
Control panel
Front door
Filter cover
3
Page 5

• The appliance is not intended for use by young children or infirmed persons without supervision
• Young children should be supervised to ensure that they do not play with the appliance or they do not climb into the drum
(see also the following page chapter “Child Safety”)
• Do not leave the washing turned on when not in use
• Before any cleaning and maintenance switch off the machine or disconnect it from the mains
• Clean the outside of the washing machine with a damp cloth. Do not use abrasive detergents
• Never open the door forcibly or use it as a step
• If necessary, the power cable may be replaced with an identical one obtained from an Authorised Service Center. The power
cable must only be replaced by a qualified technician
2
General recommendations
4
Page 6

3
Installation instructions
5
1. Remove the packaging
• After unpacking, make sure that the washing machine is undamaged. If in doubt, do not use the washing machine. Contact
an Authorised Service Centre or your local retailer
• Check that the accessories and supplied parts are all present
• Keep the packing material (plastic bags, polystyrene parts, etc.) out of reach of children, as they are
potentially dangerous
2. Remove the transit bolts
• The washing machine is fitted with a transit bolts to avoid any possible damage to the interior during transit. Before using
the washing machine, it is imperative that the transit bolts are removed
Page 7
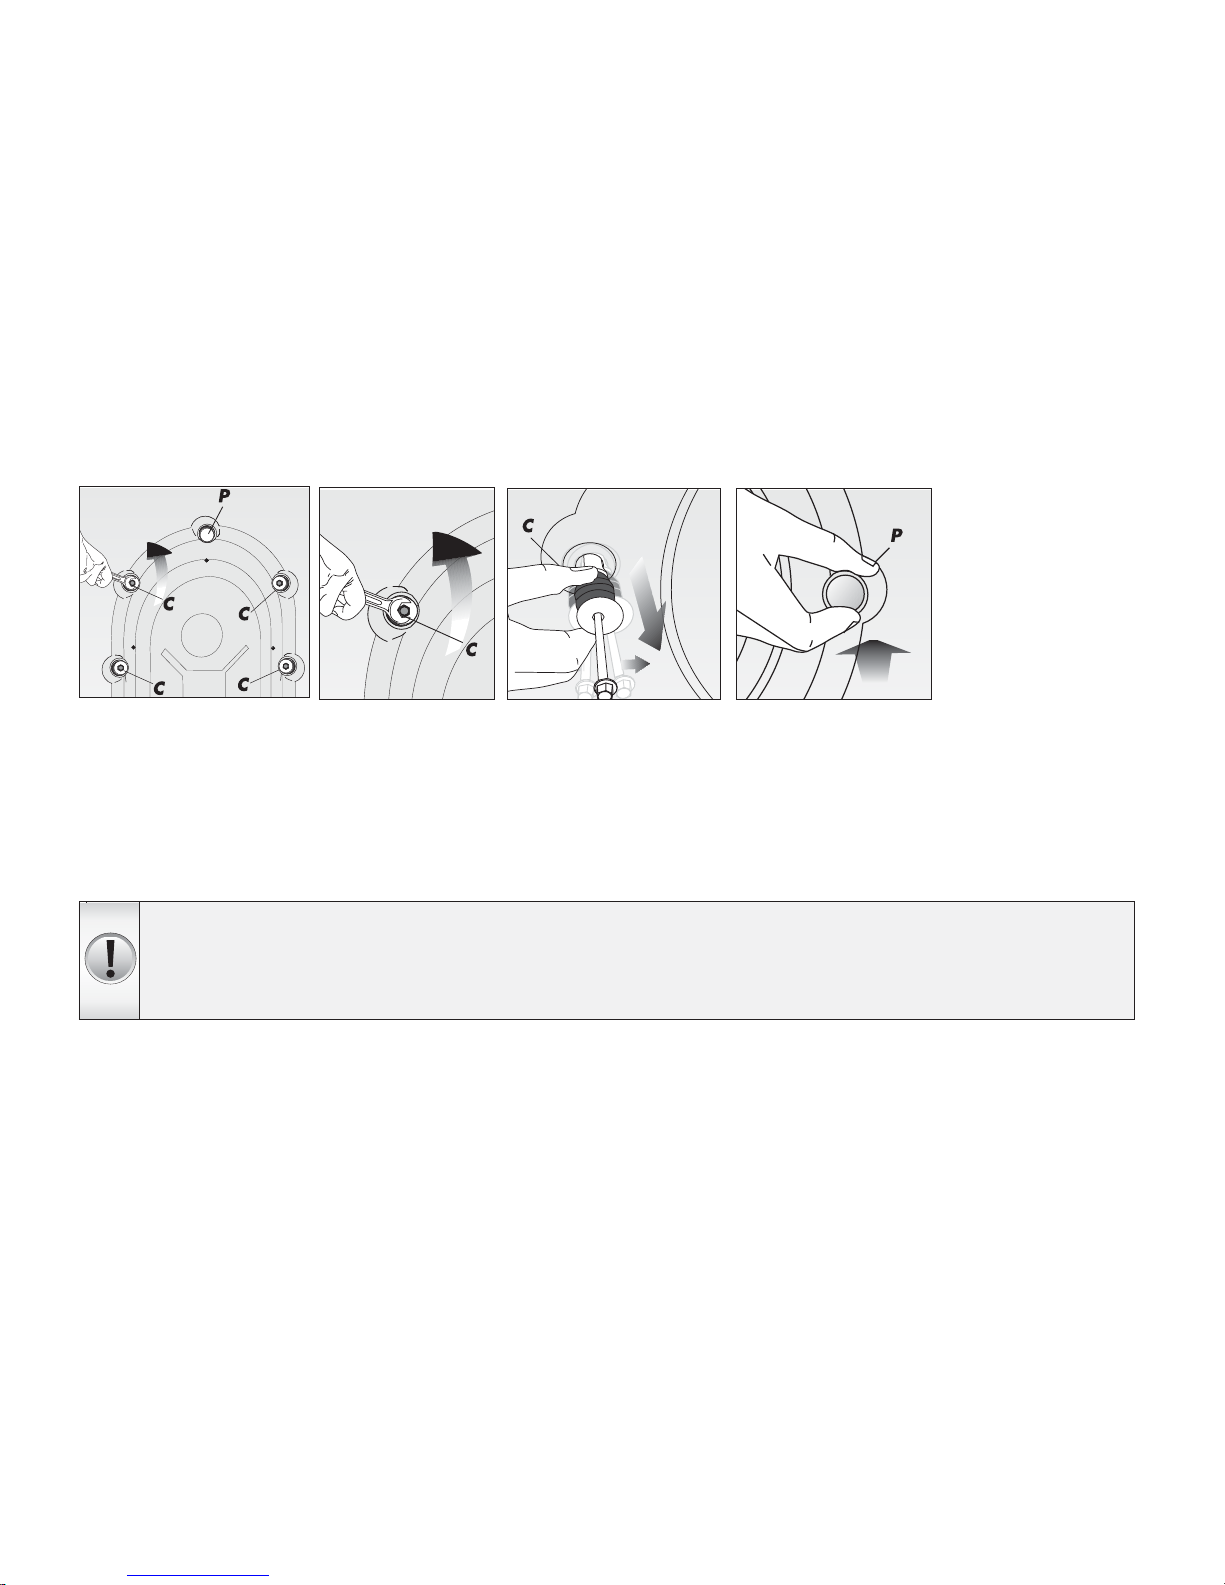
Removing transit safety bolts at the rear of the machine
Attention!
Please keep the safety bolts for future transportation and reinstate them before transporting your machine. Never
transit your machine without the transit bolts in position.
Never place your machine on a carpet. This prevents air circulation. The electrical components of the machine
may overheat and may cause damage.
The transit safety bolts must be removed before any operation of the machine. Bolt heads, marked “C” should be turned in a
anti clockwise direction until the bolt can be partially withdrawn.
Remove transit safety bolts and rubber bushes by pulling outwards. (an up/down action and a small squirt of washing up
liquid should ease removal.)
Plastic plugs, supplied inside the protective bag and designated as “P”, should be placed in the safety bolt holes according
to the direction shown.
6
Page 8
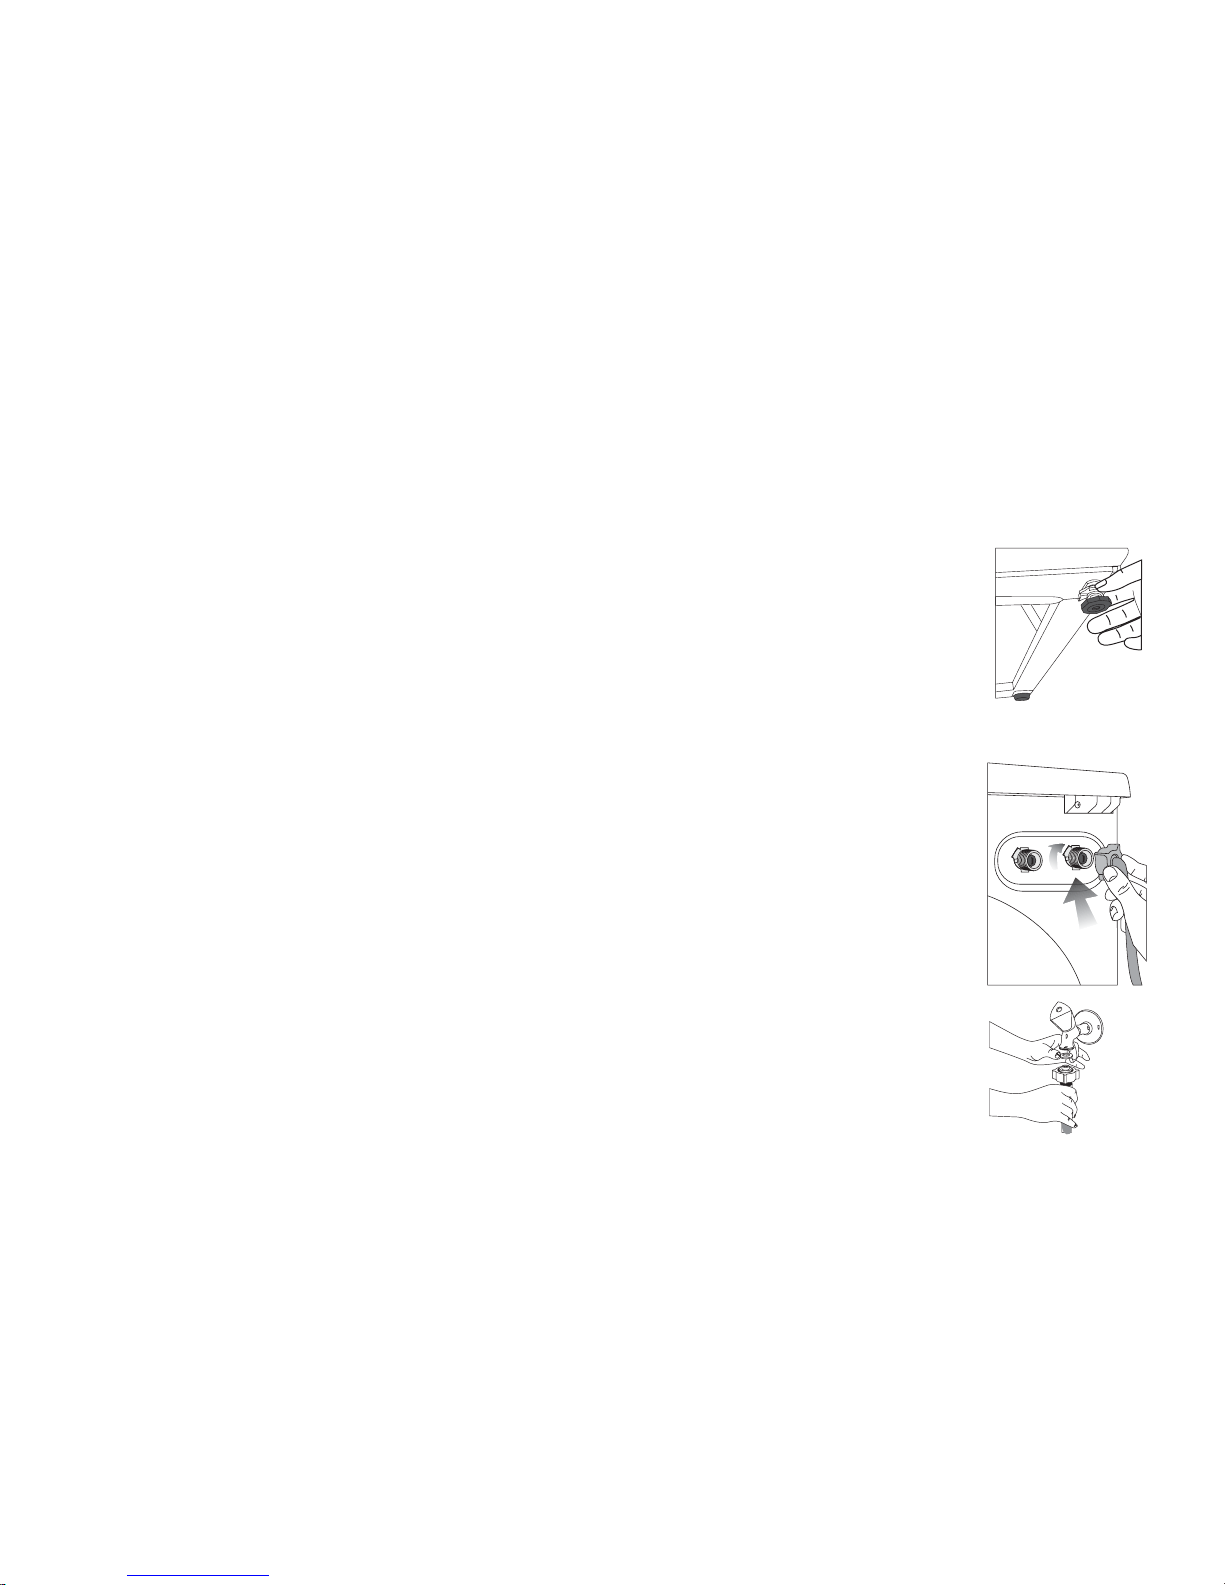
Water Supply
• Hot water temperature should not exceed 75˚C. Temperatures above this may the machine to fault or
cause damage to the machine
• If you have an uncontrolled water heating source (eg a wet-back or solar heating system) you should
fit a Safe Valve. This will ensure the hot water temperature remains within safe limits.
• Inlet water pressure: Maximum 1 MPa (150 psi), Minimum 34 Pa (5 psi)
• Inlet water flow rate: Minimum 3 litres/minute
Inlet Hoses
1) Connect the straight ends of the inlet hoses to the taps. There are washers fitted in both ends.
2) Connect the elbow ends of the inlet hoses to the inlet valves on the back of the machine. The cold inlet
valve is marked in blue, while the hot inlet valve is marked in red.
Cold Supply Only:
If you only have a cold water supply , an inlet valve cap (blanking cap) MUST be connected to the hot inlet
valve. The cap prevents water leaking out of the hot inlet valve. The cap is supplied in the same bag as
the inlet water hoses.
4. Adjust feet
In order for quiet and stable operation, the machine should be placed properly and levelled on its feet.
Your machine comes with two adjustable feet. If the machine is unstable, loosen the plastic counternut
and screw or unscrew the adjustable foot until the machine is levelled perfectly. After positioning, tighten
the counternut for stability.
7
3. Position the washing machine
• Move the appliance without lifting it by the worktop
• Install the appliance on a solid and level floor
surface, preferably in a corner of the room
5. Connecting water inlet hoses
• Connect the water supply inlet hose in accordance with regulations of your local water company
Page 9
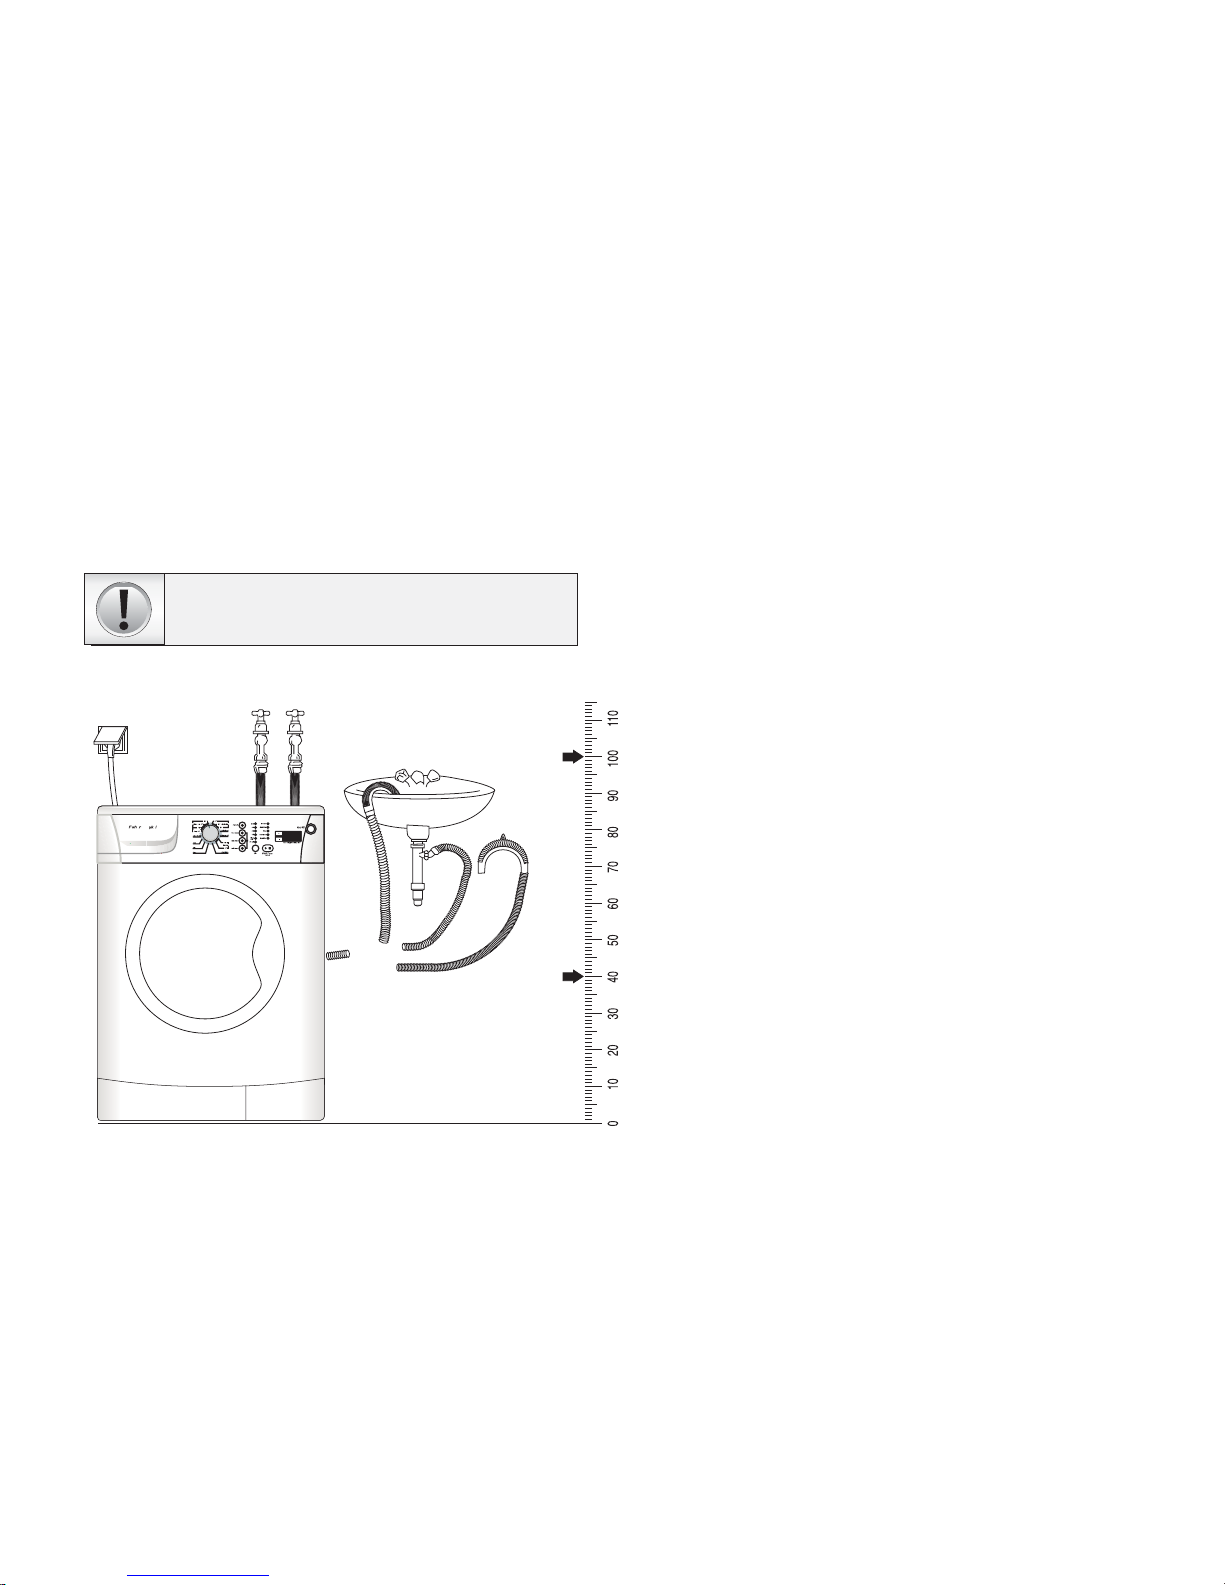
b) Drain hose
The water drain hose could be placed either at the side of a
basin, or connected directly to the drain. The hose should not be
sharply bent. The water drain hose should be secured with the
supplied elbow to prevent it falling to the ground.
6. Electrical connections
• Electrical connections must be carried out by a qualified
technician in compliance with the manufacturer’s instructions
and local safety regulations
• Data concerning voltage, consumption and fuses are
located behind the appliance door
• The appliance must be connected to the mains
exclusively by means of a socket with an earth connection in
accordance with established regulations. The washing machine
must be earthed by law. The manufacturer declines all liability
for damage to property or injury to persons or animals
due to non-compliance with the directions given above
• Do not use extension leads or multi sockets
• Before any maintenance on the washing machine disconnect
it from the mains supply
• Access to the mains plug or to disconnection from mains
supply via a double-pole switch must be ensured at all times
following the installation
• Do not operate the washing machine if it has been damaged
during transport. Inform an Authorised Service Centre or your
local retailer.
• Mains cable replacement is only to be carried out by an
Authorised Service Centre
• The washing machine must only be used in the household
for the prescribed uses
Minimum housing dimensions:
Width: 610 mm
Height: 860 mm
Depth: 550 mm
CAUTION: If this appliance is supplied from a cord extension
set or an electrical portable outlet device, the cord extension
set or electrical portable outlet device must be positioned so
that it is not subject to splashing or ingress of moisture.
The appliance is to be connected to the water mains using
new hose-sets. Old hose-sets should not be reused.
The hose should be placed between 40 and
100 cm. from the ground.
8
Page 10
To remove any residual water used in testing by the manufacturer , we recommend that you carry out a shortwash cycle without
laundry.
1. Turn on the tap.
2. Close the door.
3. Pour a small amount of detergent into the detergent compartment.
4. Select and start a short programme (Please see programme table)
9
1. Sort the laundry according to...
• Type of fabric / care label symbol
Cottons, mixed fibres, easy care/synthetics, wool, handwashed items
• Colours
Separate coloured and white items. Wash new coloured articles separately
• Size
Laundry items of different sizes distribute themselves better in the drum and optimise the washing and spinning action
• Delicates
Wash small items (e.g. nylon stockings, belts etc.) and items with hooks (e.g. bras) in a washbag or pillow case with a zip
fastener. Always remove curtain glides or wash curtains with the glides inside a cotton bag
2. Empty all pockets
Coins, safety pins etc. can damage the laundry, drum and tub
3. Closures
Close zips and hooks and eyes; Tie loose belts or straps together
5
Preparing the wash
4
Before the first wash cycle
Page 11

The choice of detergent depends on:
• type of fabric (cottons, easy care/synthetics, delicate items, wool).
Note: Use only specific detergents for washing wool
Remarks:
White residues on dark fabrics are caused by insoluble compounds used in modern phosphate-free powder detergents. If this
occurs, shake or brush out the fabric or use liquid detergents. Use only detergents and additives specifically produced for front
loading washing machines. When using descaling agents, dyes or bleaches for the pre-wash, make sure that they are suitable
for use in domestic washing machines. Descaler could contain components which can attack parts of your washing machine.
Do not use any solvents (e.g. turpentine, benzene). Do not wash fabrics in the machine which have been treated with solvents
or flammable liquids.
10
6
Detergent and additives
Stain removal
• Blood, milk, eggs etc. are generally removed by the automatic enzyme phase of the programme
• Pre-treat heavily-soiled areas with stain remover if necessary
Dyeing
• Only use dyes that are suitable for washing machines
• Follow the manufacturer’s instructions.
• Plastic and rubber parts of the washing machine can be stained by dyes
Loading the laundry
1. Open the door
2. Unfold the laundry and place it loosely in the drum. Observe the load sizes given in the Program Selection Table.
Note: Overloading the machine will result in unsatisfactory wash results and creased laundry
3. Close the door
Page 12
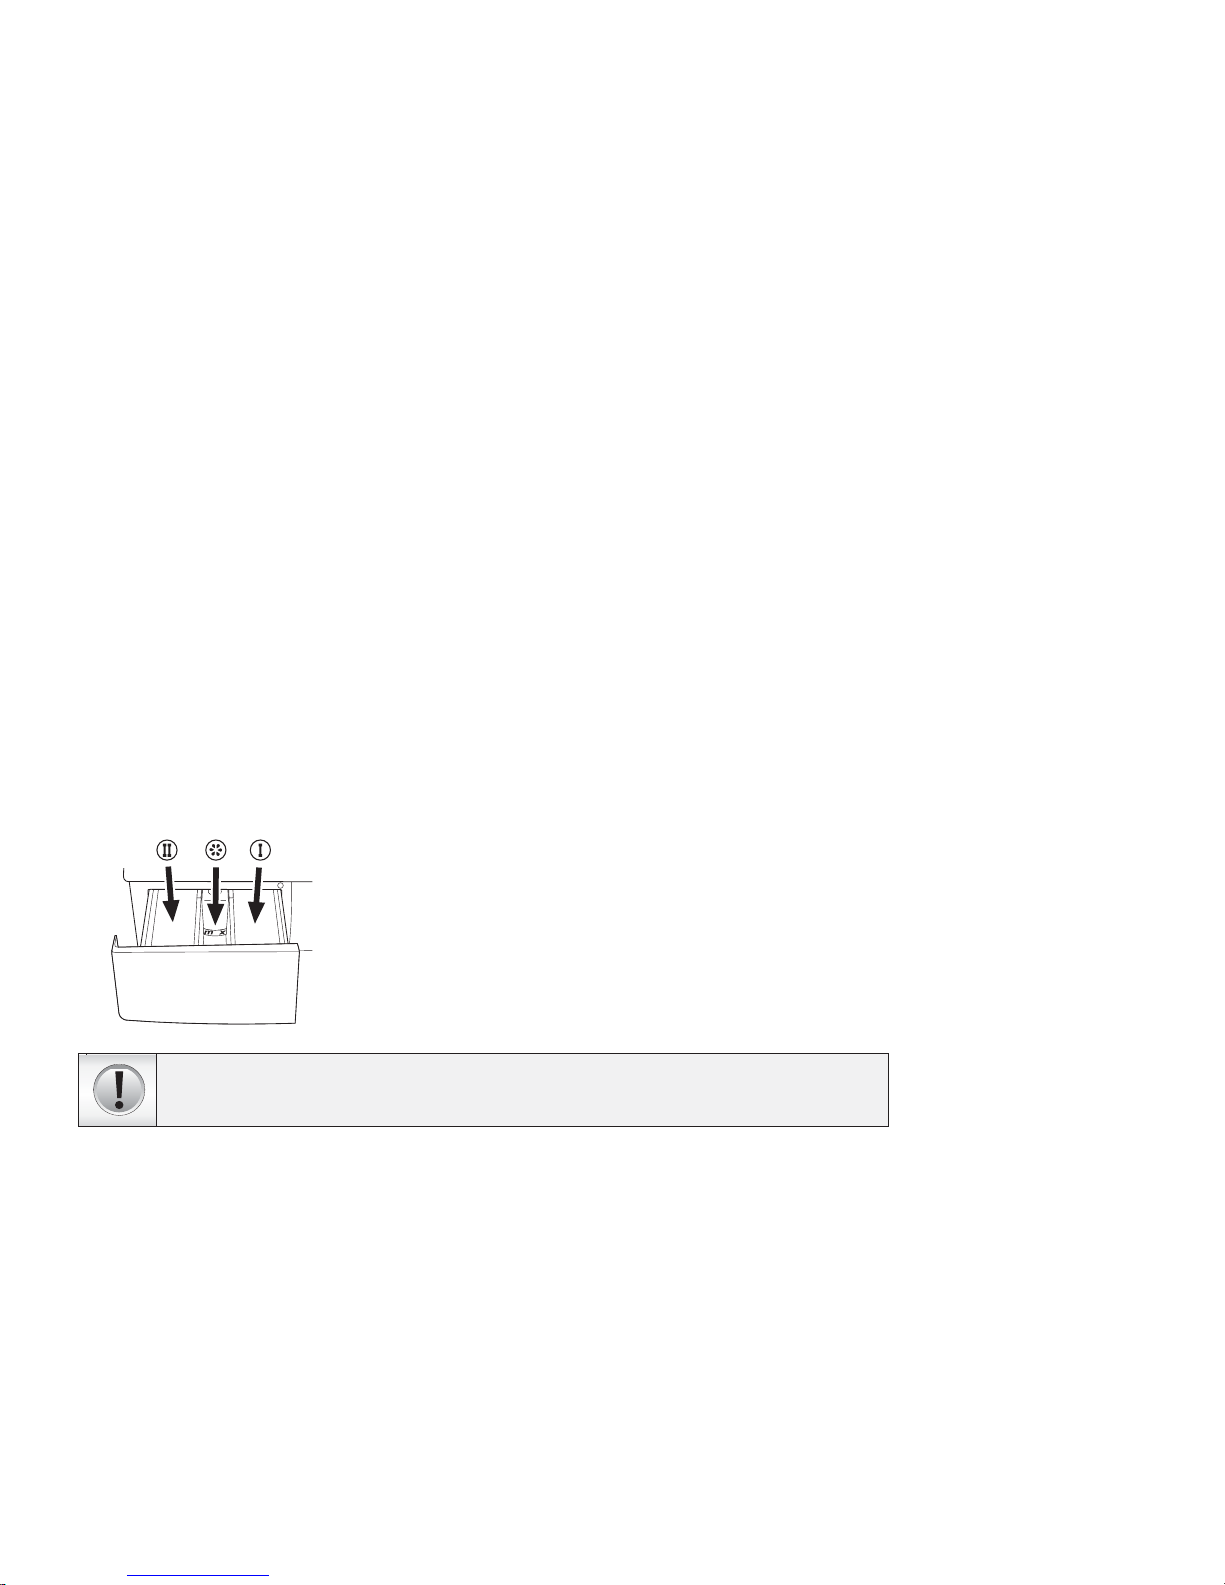
Detergent Dispenser
The detergent dispensing drawer comprises 3 compartments:
– left compartment ( II ) for main wash
– middle compartment for fabric softener
– right compartment ( I ) for pre-wash
Attention! Fill the softener according to the supplier recommendation (app.
<100 ml). Do not exceed the “MAX level” marked on the detergent dispenser.
Follow the dosage recommendations on the detergent pack. They depend on:
• degree and type of soiling
• size of wash
- full load follow the detergent manufacturer’s instructions;
- half load: 3/4 the amount used for a full load;
- Minimum load (about 1 kg):
1/2 the amount used for a full load
• water hardness in your area (request information from the water company). Soft water requires less detergent than hard
water.
Notes:
Too much detergent can result in excess foam formation.
If the washing machine detects too much foam, it may prevent spinning.
Insufficient detergent may result in grey laundry in time and also calcifies the heating system, drum and hoses.
11
Page 13
12
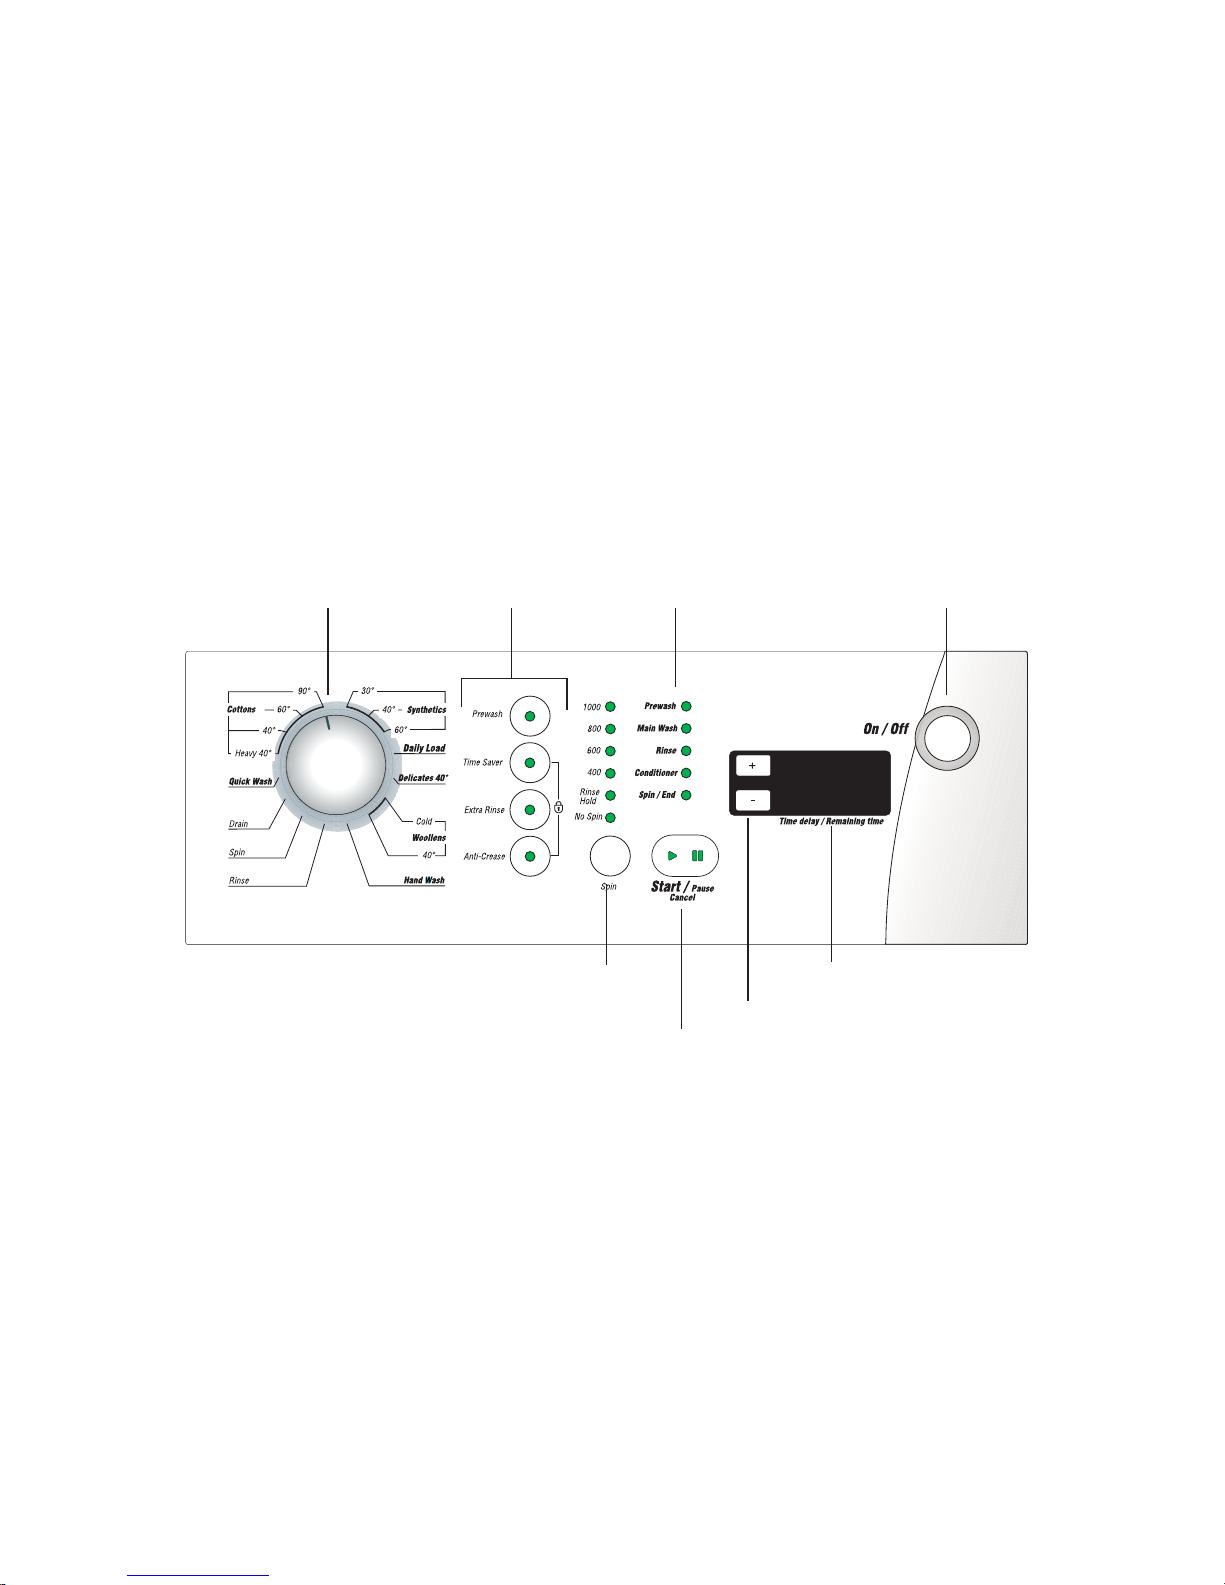
Control Panel
On/Off Button
Time delay adjustment button
Remaining time
Start/Pause/Cancel
button
Program follower
Spin speed selection
Program selection knob
Auxiliary Functions
Page 14

Auxiliary Functions
Prewash
A pre-wash should only be used for very heavily soiled laundry. Without prewash you save energy, water, washing powder and
time.
Time Saver
Shortens washing time for lightly soiled fabrics. This function can be used for cotton, synthetic and daily load programs.
Extra Rinse
By using this function your machine will add another rinse process to the three rinse processes that it has already done. This
additional rinse will reduce any affects on sensitive skin.
Anti-Crease
To avoid wrinkling of your clothes, select this function. When Anti-Crease is selected load size should be kept small.
Spin Speed Selection
Using this button, you can select final spin speed up to 1000 rpm. If you do not want to spin the load, select “No Spin” option.
Rinse Hold
If you desire to leave your synthetic and wool fabrics in the machine after the wash program you may select the Rinse hold
option to prevent them getting wrinkled. To cancel the “Rinse Hold” function, press the “Start/Pause/Cancel” button first, select
the desired spin speed and then repress the “Start/Pause/Cancel” button.
13
Page 15
7
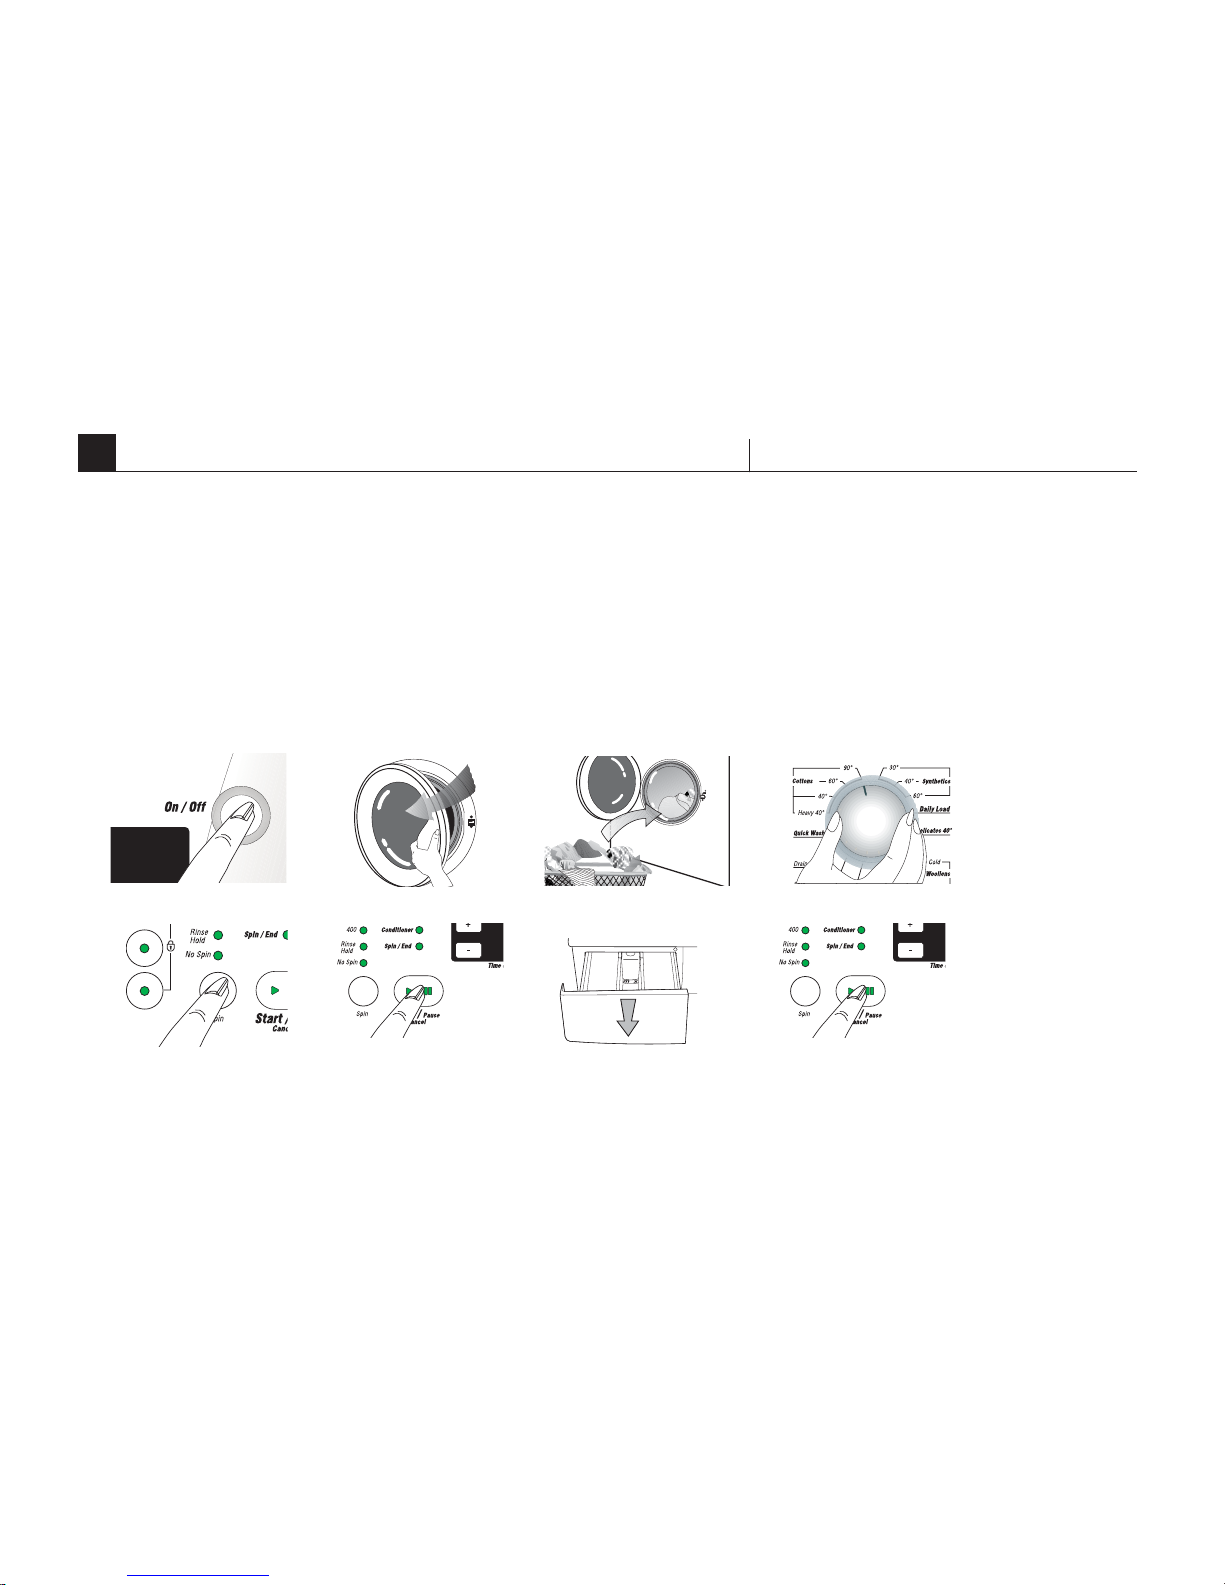
Program Selection and Washing Machine Operation
Ensure the machine is plugged in.
1) Press the On/Off button.
2) Open the door.
3) Place your laundry into the machine according to the recommended load capacity (please see Programme table) and close the
front door.
4)Turn the program selection knob and set the desired program.(See Programme Table)
5) Select the spin speed according to the desired program.
6) Select desired auxiliary functions.
7) Fill the fabric softener and the detergent into the related compartments, and close the detergent dispenser box.
8) Push the Start/Pause button to operate your machine. In the mean time the Start/Pause led will be on. You can follow the washing
steps by means of the program follower.
14
3
5
1
6
4
2
7
8
Page 16
15
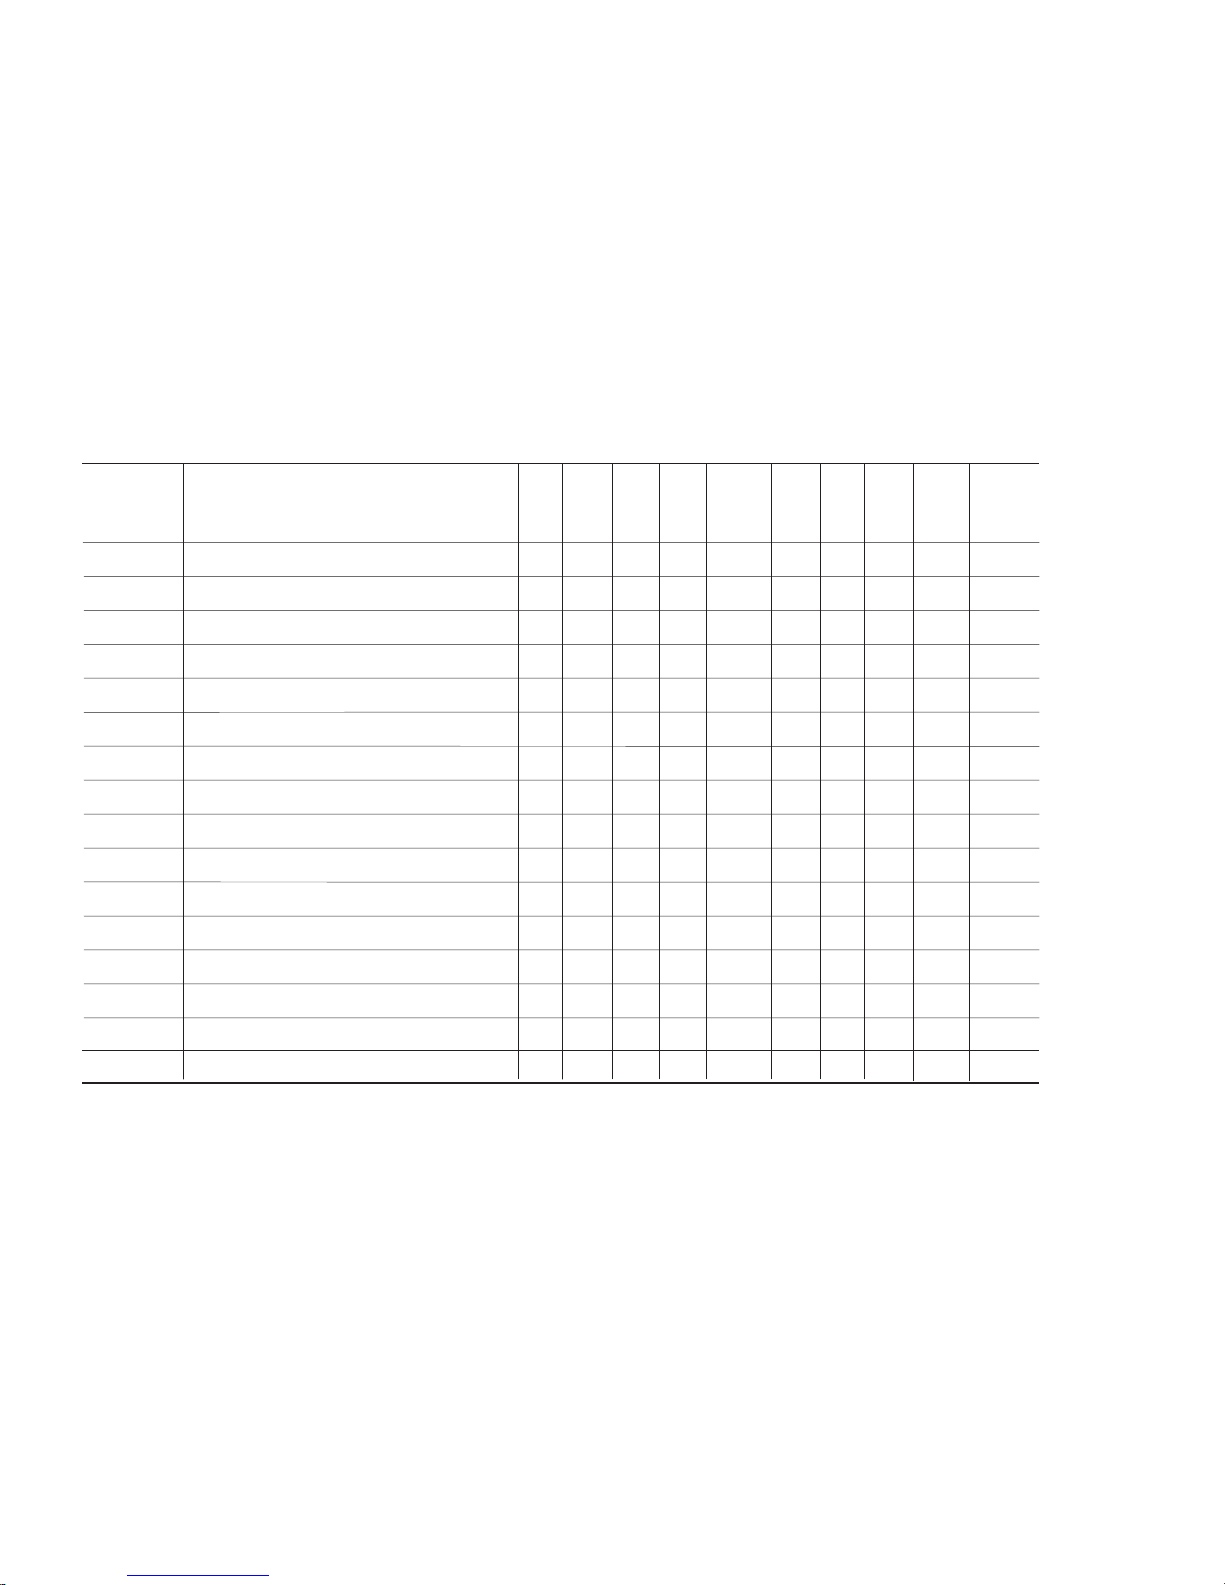
Program selection
*Energy Labelling program acc. to AS/NZS 2040
Depending on water, textile and ambient conditions the actual values given on or with the machine can deviate from the declared standard values,
as they are tested according to the laboratory conditions
Cotton 90
Cotton 60
Cotton 40*
Heavy 40
Synthetics 60
Synthetics 40
Synthetics 30
Daily Load 40
Delicates 40
Woollen 40
Woollen Cold
Handwash 30
Quick Wash
Rinse
Spin
Drain
Programme Fabric type
Time
Saver
Extra
Rinse
Rinse
Hold
Max
Load
(kg)
Energy
Consumption
(kWh)
Water
Consumption
(l)
Heavily soiled fabrics made from cotton or linen,
heat resistant
Heavily soiled fabrics made from cotton or linen,
heat resistant
Normally soiled fabrics made from cotton, noncolour fast
Heavily soiled fabrics made from cotton or linen,
heat resistant
Normal soiled fabrics made from cotton/synthetics
blended, heat resistant
Lightly Soiled Easy care fabrics made from cotton,
synthetics or blended fabrics (non-color fast)
Very Lightly Soiled Easy care fabrics made from
cotton, synthetics or blended fabrics (non-color fast)
Everyday clothes
Sensitive, easy care fabrics made from cotton,
synthetics or blended fabrics
Hand wash marked labelled clothes, blended
fabrics
Hand wash labeled wool and easy care, blended
fabrics
Special programme for Hand wash labelled wool
and silk
I+II
I+II
I+II
II
I+II
I+II
I+II
I+II
II
II
II
II
-
-
-
-
Program
Duration
(~min)
AntiCrease
6
6
6
6
3
3
3
3.5
2
1.5
1.5
1
2.5
6
6
_
•
•
•
•
•
•
•
•
•
•
•
•
•
•
•
•
•
•
•
•
•
•
•
•
•
•
•
•
•
•
•
•
•
•
•
•
•
•
•
•
•
•
Detergent
Dispenser
Prewash
Lightly Soiled less amount fabric
Rinsing
Spinning
Draining
139 57 2.30
140 57 1.14
142 57 0.84
177 57 0.75
103 58 0.95
100 58 0.55
85 58 0.20
60 58 0.40
62 55 0.35
55 50 0.30
48 50 0.04
40 35 0.15
30 50 0.17
23 15 0.15
19 _ 0.08
2__
Page 17
Child Lock
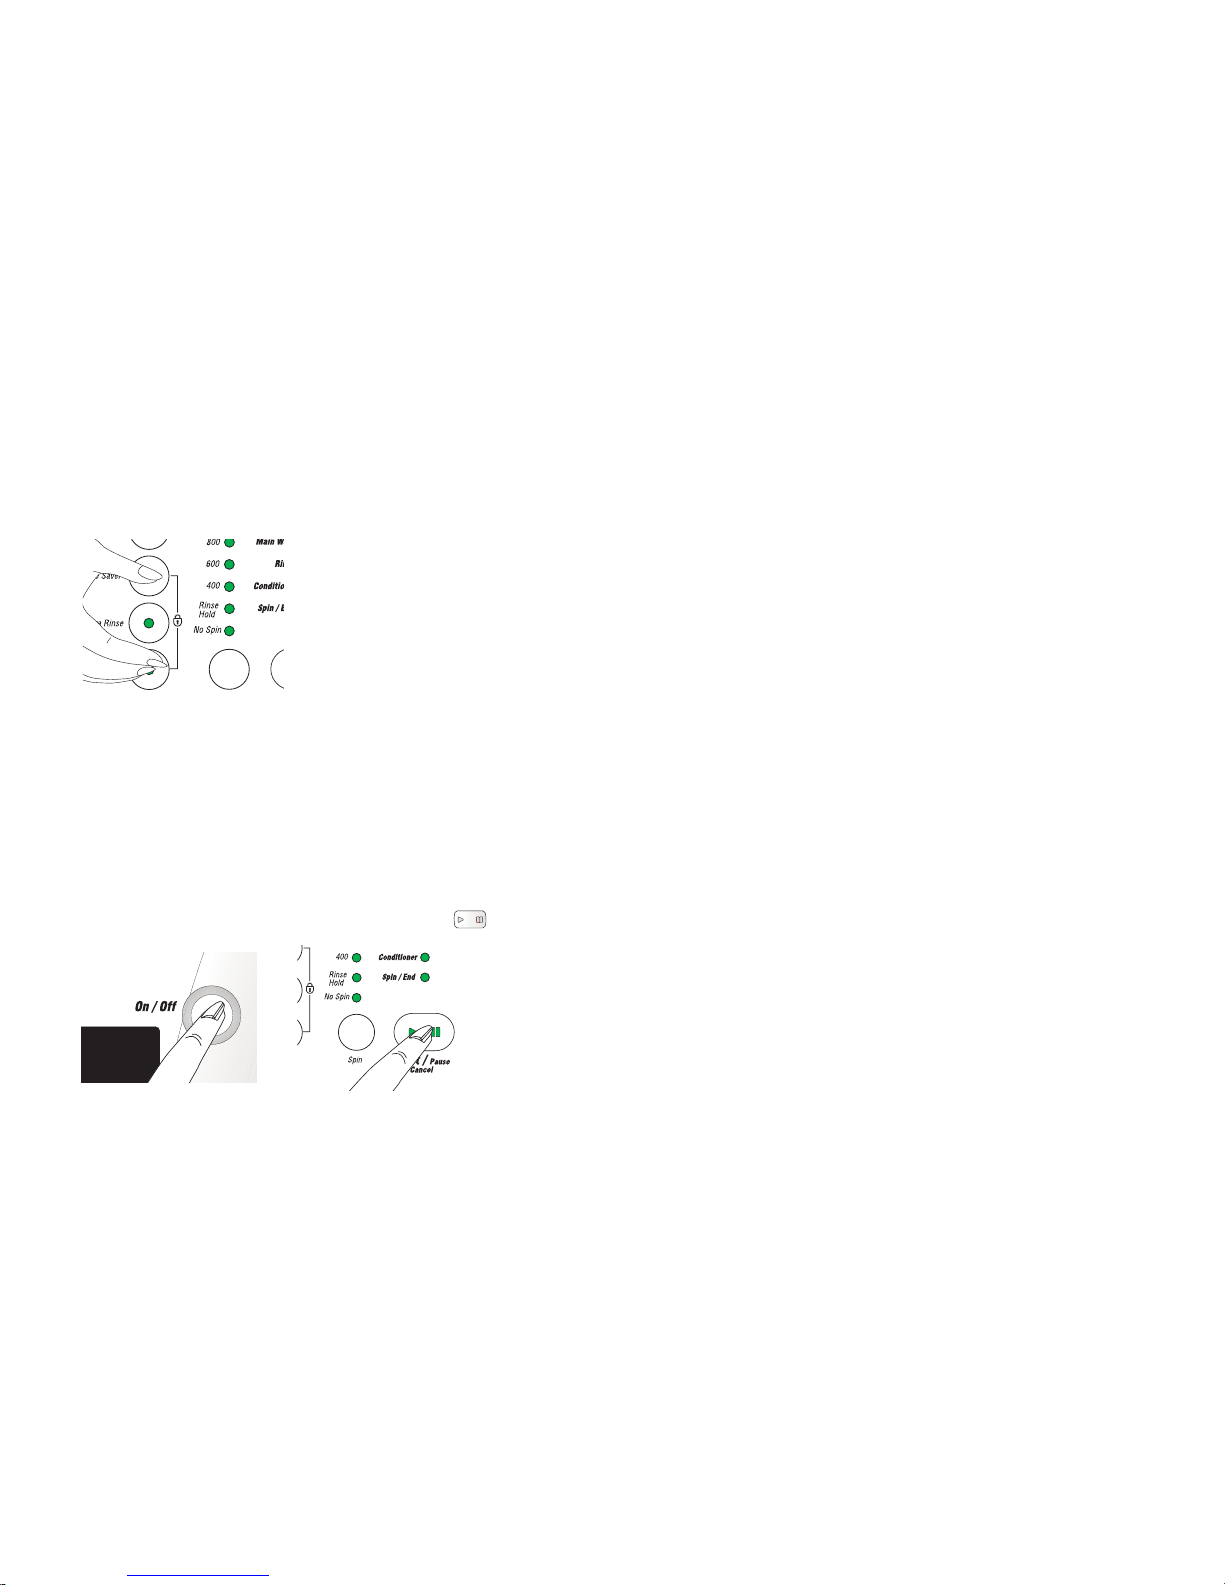
To prevent the knobs from being played with by children you may activate the “Child Lock” option. Activating the “Child Lock”
option prevents any change from being made to a set program.
To activate child lock, press both on the second and the fourth auxiliary function buttons together for 3 seconds after the
machine starts the washing operation.
Only On/Off button will be in operation when the child lock option is selected.
To deactivate child lock, re-press same auxiliary function buttons (second and fourth) for 3 seconds.
In order to open the door at the end of the washing program or to change program selection, child lock must be deactivated
if selected.
On/Off
When you press the On/Off button, your machine is ready to select the desired program. When the desired program is
selected, related spin speed can be adjusted and the duration of the program can be observed on the display. To switch the
machine off, repress the On/Off button.
Washing can only then be started when the
button is pressed.
Pressing the On/Off button does not mean that the washing operation is started! To start the washing, press the Start/Pause
button!
16
Page 18
End of the Program
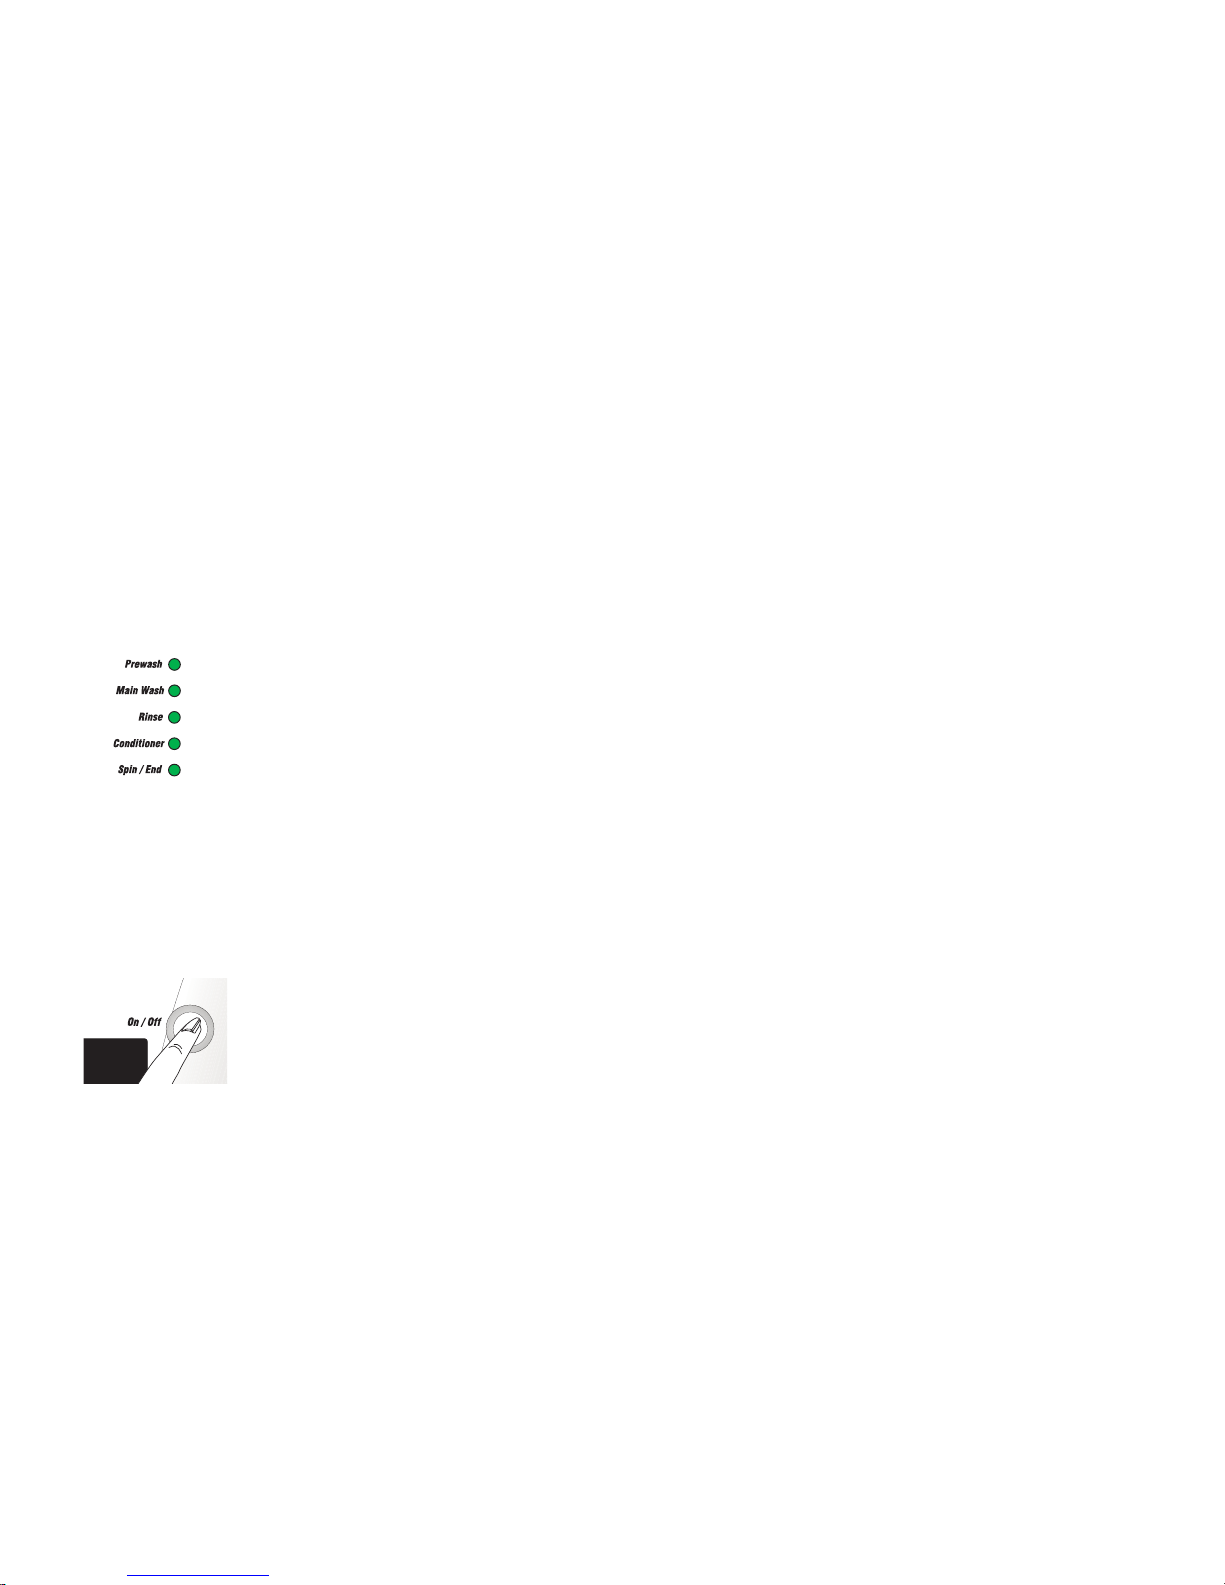
At the end of the washing, all related leds on the control panel will be on. Related duration time of the selected program is
displayed and the machine is ready to start again.
To switch off the machine, press the On/Off button.
Auxiliary Function Selection
It is not possible to activate all auxiliary functions in all wash programs. If any auxiliary function is selected, its led will be on.
For example, if the cotton program is selected, “Time Saver” and “Pre-wash” functions can not be selected at the same time.
If “Pre-wash” button is selected first and the “Time Saver” function next, the led of the pre-wash function will be off as it is
not active any more.
Program Follower
If the machine is on, a program can be followed by means of the program follower. If a washing step is over and the next
step is started, the led of the previous step will continue to light. It means if the washing operation is finished, all related
washing steps on the program follower will be on.
Pre-wash button led will be on, only if this auxiliary function is selected.
17
A d d i n g a dditional Laundry
Press the Start/Pause button. If the water level does not exceed the limitations, in 1 to 2 minutes door lock will deactivated.
It means the washing machine is ready to add laundry.
If after 2 minutes the door is unable to be opened, it means the water level inside the machine is too high to open the door
and add laundry. (Look at Program Cancelling).
Press Start/Pause button again to let the program continue.
Page 19
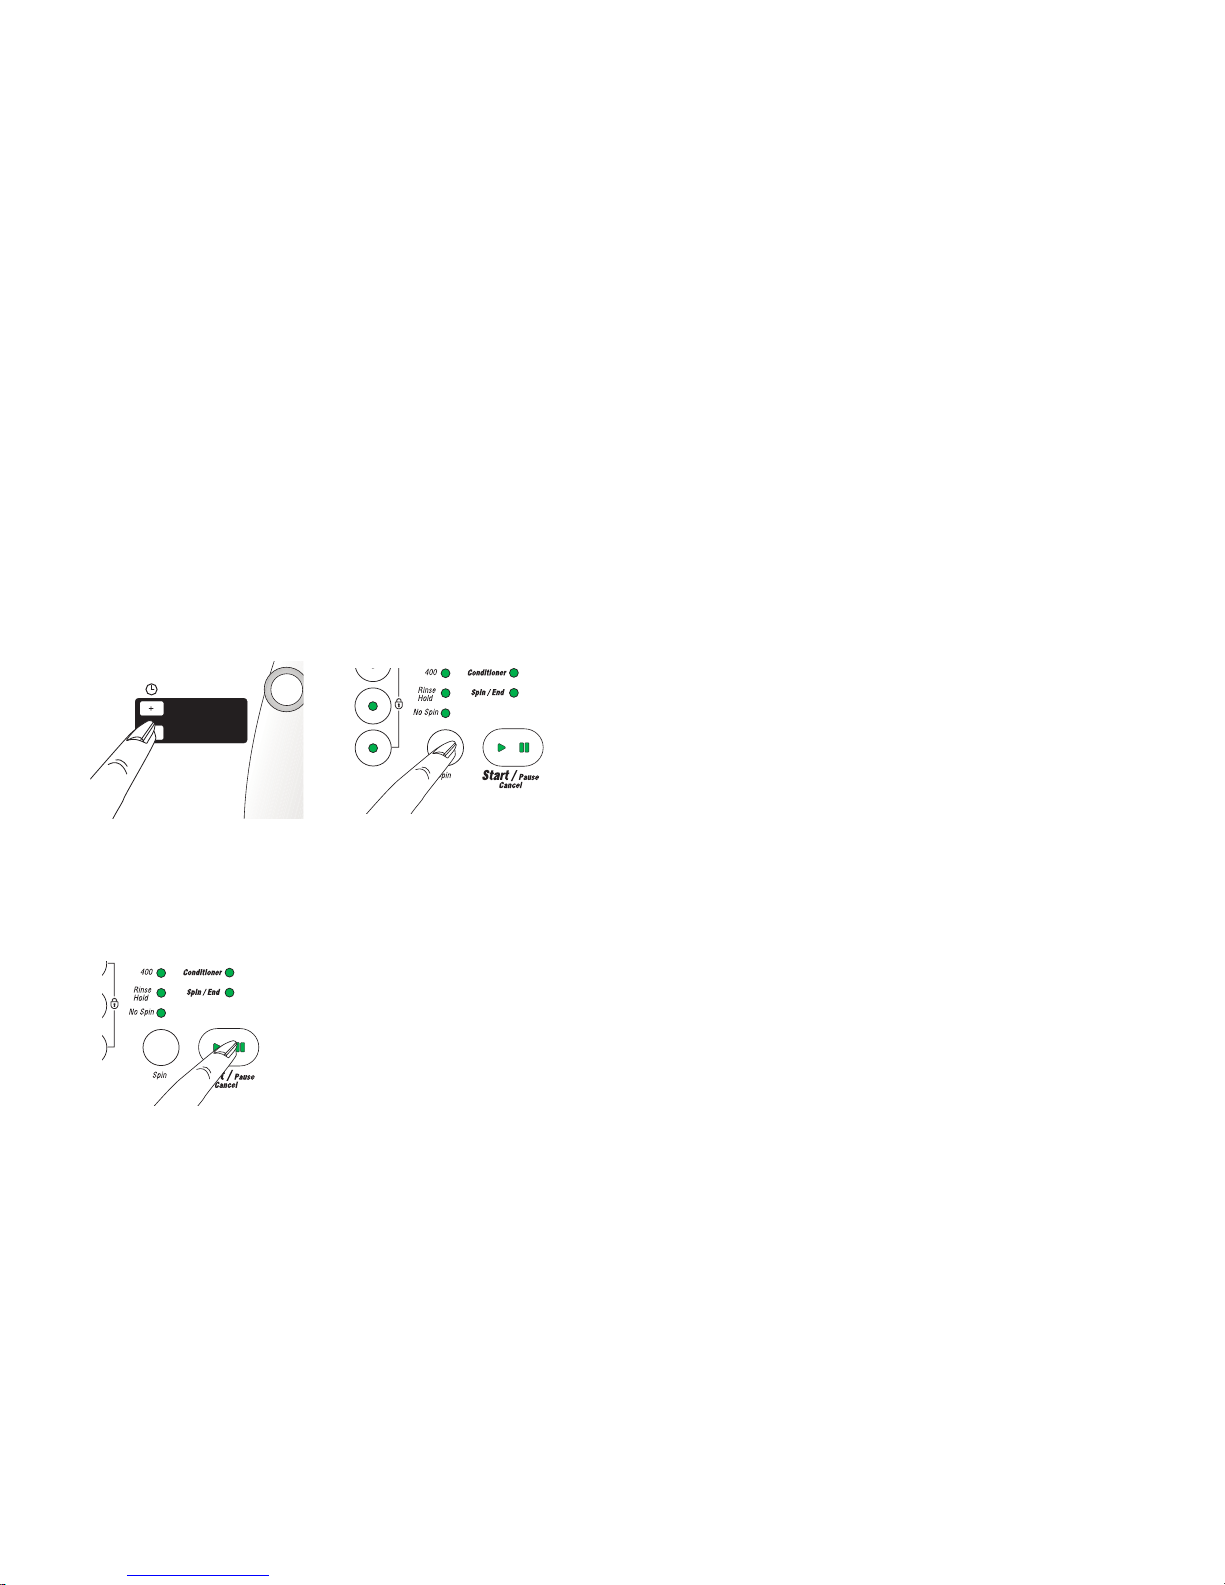
Unloading the machine
The machine stops automatically at the end of the selected programme. Turn off the taps. After 1-2 minutes the door lock will
de-activate. Open the door. Press the On/Off button to switch off the machine.
Unload the machine and leave the front door open. Check to see if there is any water left in the door hood. If so, remove with
a soft cloth.
Time Delay
By using the time delay buttons, the start time of any program can be delayed. Time delay can be set at intervals of 30 min.
On the display, the delayed starting time is added to the duration of the program.
For example, if the program duration is 2 hours and 16 min and you delayed the program for 2 hours, the display will show
“4:16”. After the time delay is set, press Start/Pause button. The washing cycle will be started after 2 hours.
Program Cancelling
If the program has started and you want to cancel it, press and hold down the Start/Pause button for 3 seconds. The program
will move to the “spin” step and related led on the program follower will be on. Machine will start to pump for draining and the
door can be opened after 1-2 minutes.
18
Page 20
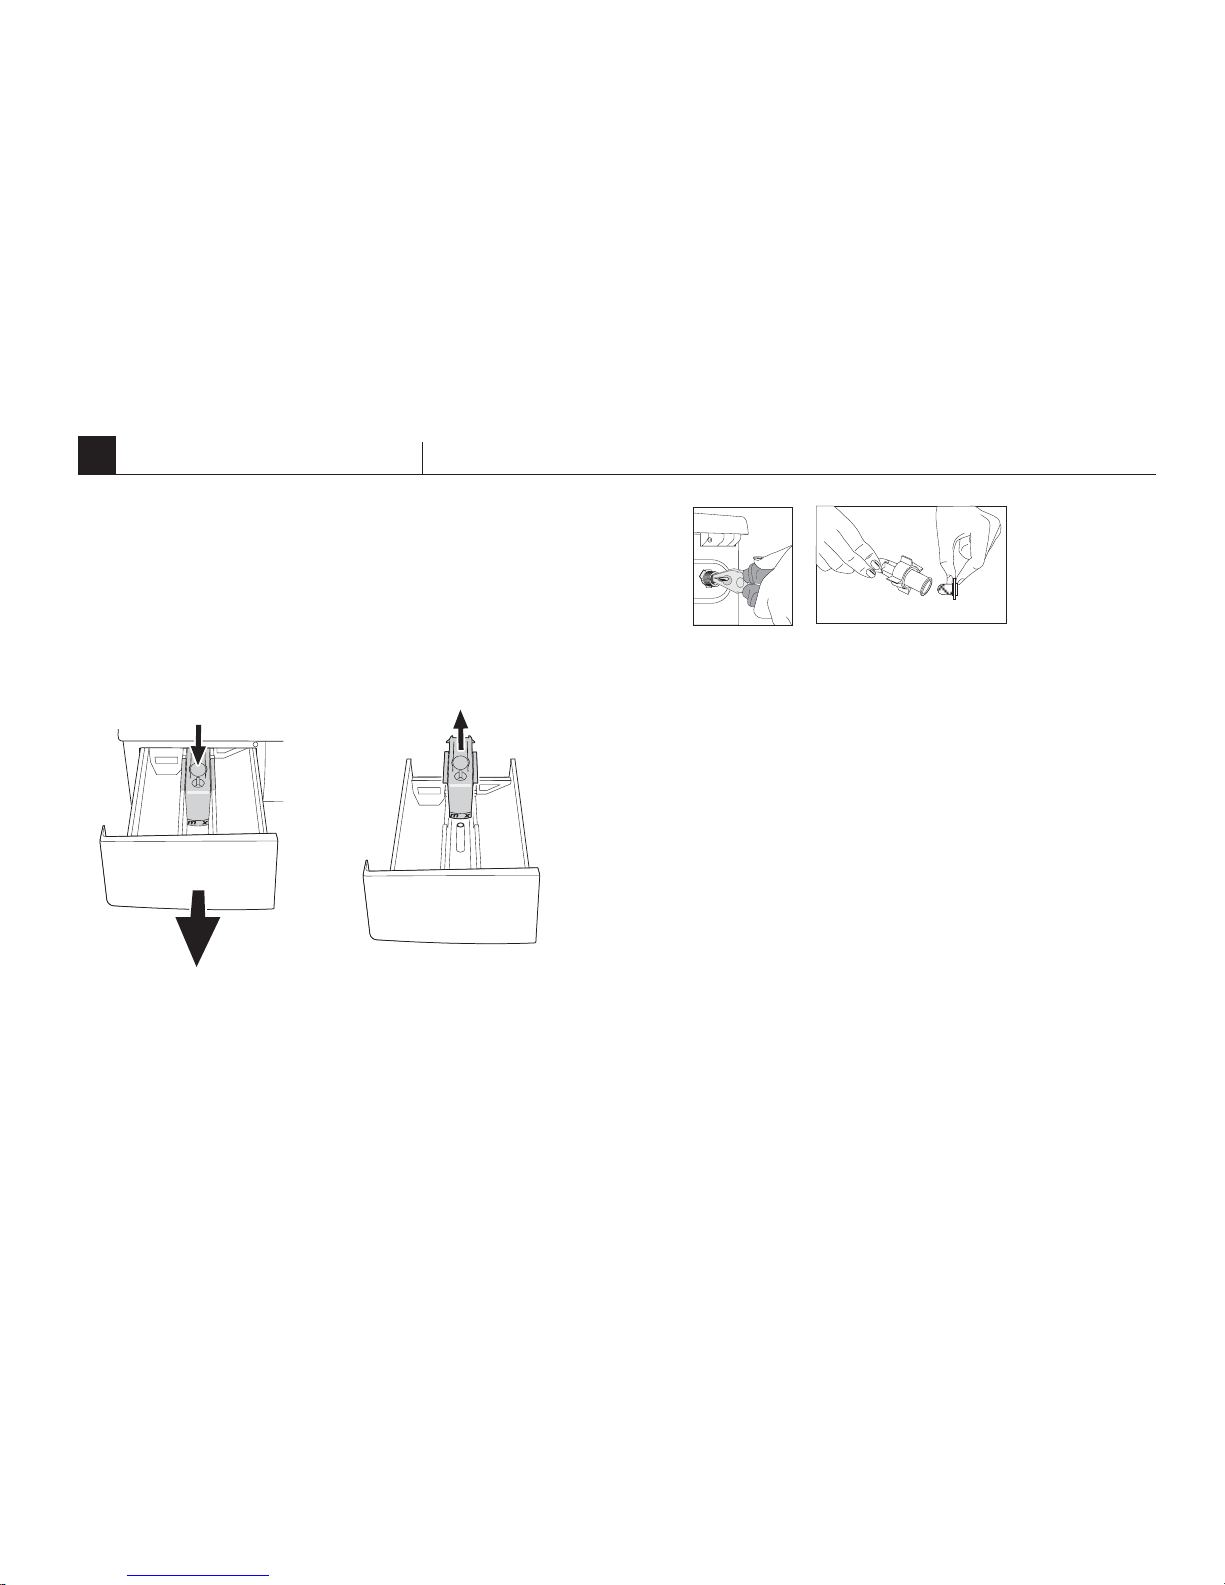
Detergent dispensing drawer
Clean when necessary:
1. Open the drawer as far as possible.
2. Push down the depression on the suction cup and pull the drawer
out completely.
3. Clean the drawer under warm running water. Pull off the suction
cup; Clean
suction cup and opening in the drawer with warm running water,
pierce the opening with a needle if necessary. Replace the suction
cap.
4. Wipe off detergent residue from the drawer guides. If present,
remove calc deposits from the water-jet nozzles (inside the drawer).
8
Care and maintanence
Water intake filter
At the end of the water intake connection module and water inlet
hose-tap side, there exists filters. These filters prevent any dirt and
objects passing into the machine. It is advisable that these filters
should be cleaned every 30-40 washes. To clean the filter , first turn
the tap off. Then, disconnect the hose and clean the filter with a
thin brush. If the filter is very dirty, you may clean it by pulling out
with pliers. To clean the filter at the tap side of the hose, pull it out
by hand and clean the filter under the tap water.
Hose
To prevent any leakage, have a technician check the hoses every
two years. If the machine is placed at cold ambient temperatures,
the water remaining inside the pump and hoses should be removed
from the filters. Also to prevent freezing, empty the water intake
hoses by disconnecting from taps.
Drum
Do not leave any metal objects (pins, needles, etc.) inside the
drum. These objects may cause rust on the drum surface.
19
Page 21
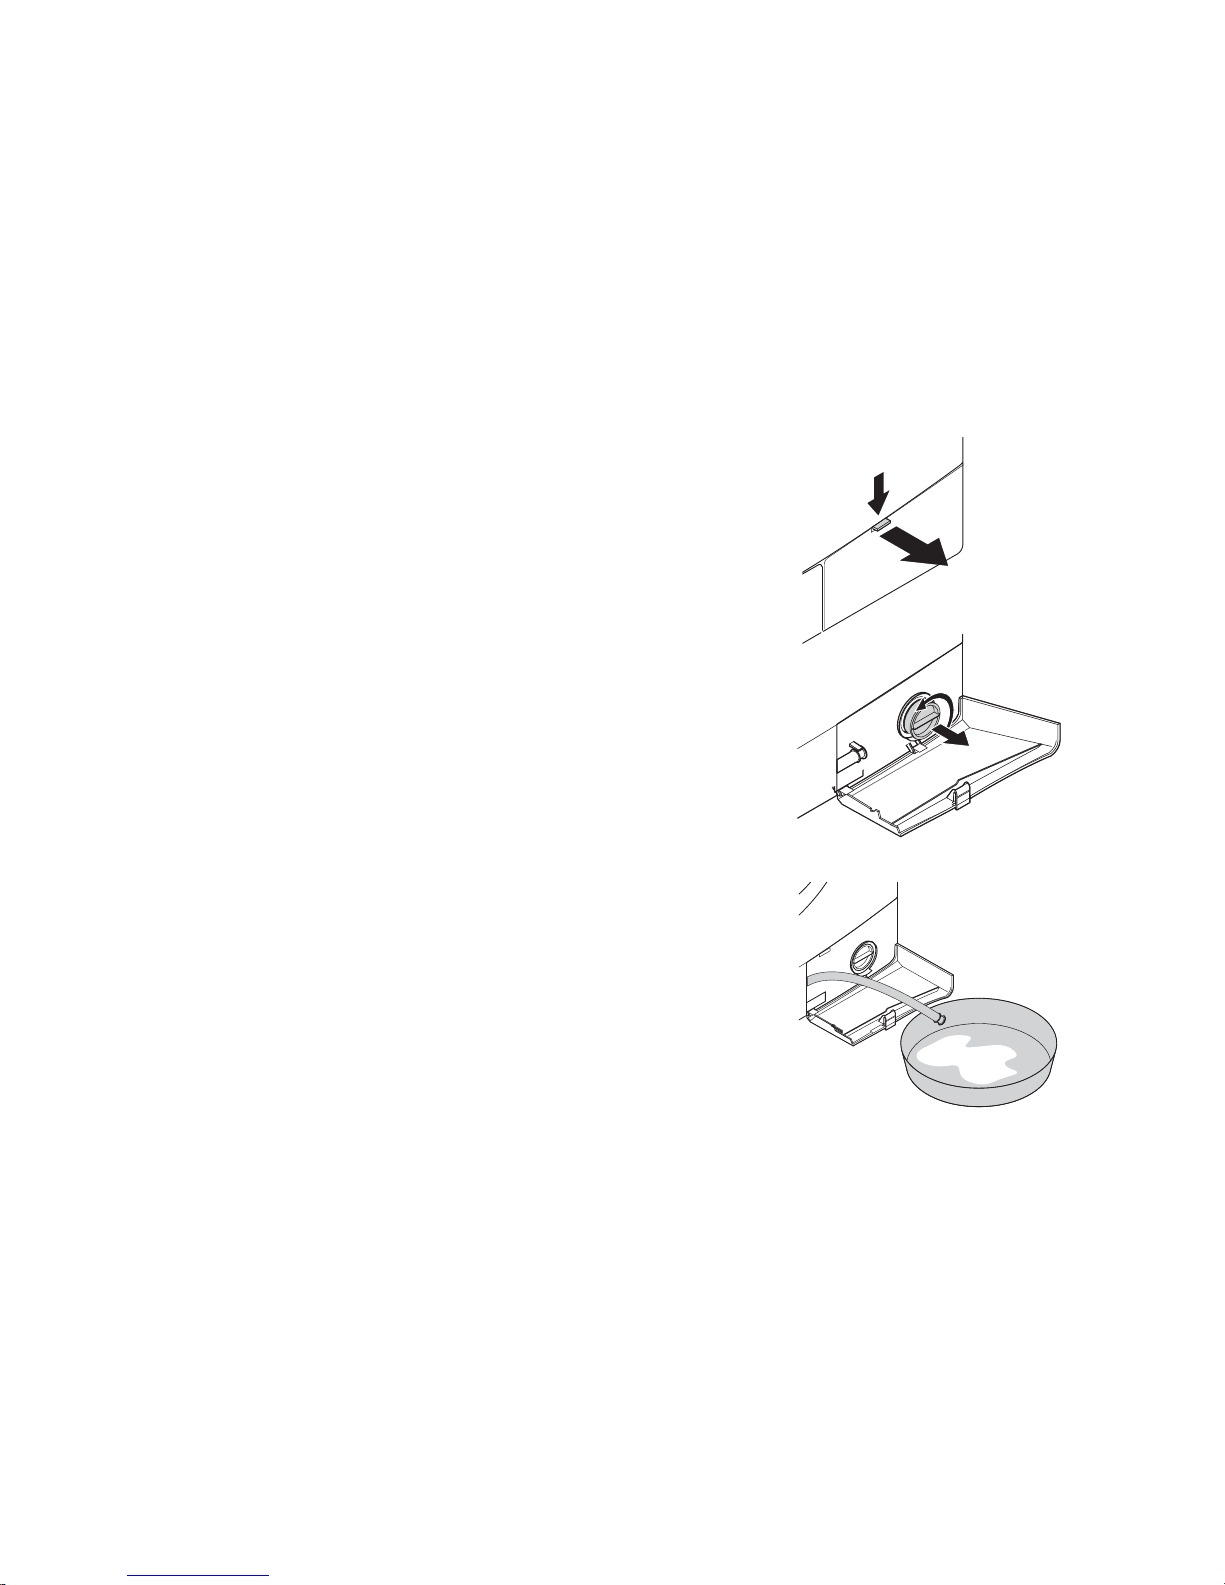
Cleaning the Foreign matter trap
It is recommended that this is cleaned once every 30 cycles.
Follow instructions below:
1) Drain off the water completely…
2) Switch appliance off, unplug the power cable, close the water
tap. Allow hot suds to cool off sufficiently. This poses a risk of
scalding.
3) Open the service door by pushing on the button. Take out
the drain pipe and hold it over a bowl. Pull the seal off the drain
hose and allow the water to drain out one bowl at a time.
There may be more than 20 litres of water left in the machine
when the drum is full (e.g. after a power failure)!
4) Turn the foreign object trap 1/2 turn to loosen it (anti-clockwise)
and soak up the remaining water with a cloth. Once no more
water is coming out, turn the foreign object trap until it is
completely free and remove it.
5) Clean foreign object trap and the pump opening. Check if
the pump impellor (in the pump opening) can be turned freely.
6) Replace the cap on the drain hose and put it away.
7) Replace the foreign object trap and screw in it tight (in
clockwise direction).
8) Close the service door.
20
Page 22
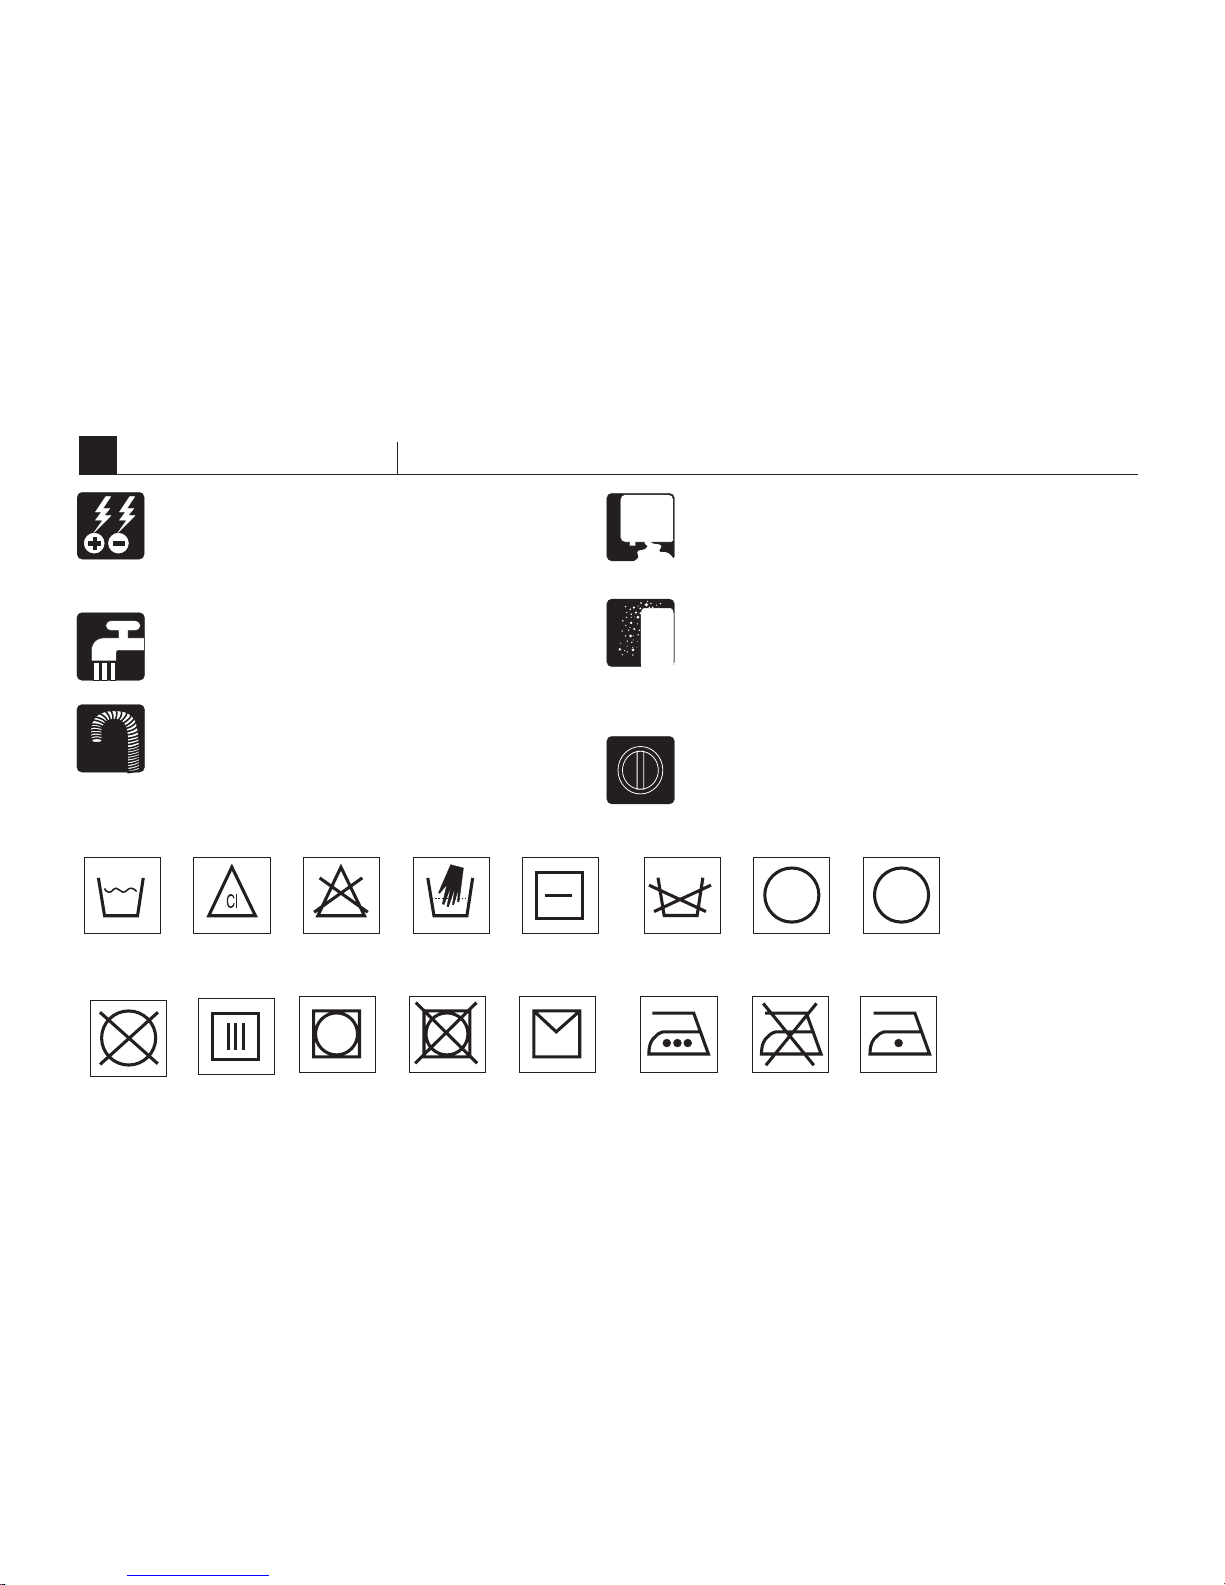
Do not use
bleach
Washing
temperature
Can be washed
at centrifugal
machine
Do not wash
centrifugal
machine
Dry on horizantal
surface
Warm iron
Bleach can
be used
Do not machine
wash
Line dry
Descriptions of the international textile care label (ITCL) symbols
60°
No spin
No dry cleaning
Machine does not start, no lights show.
Check whether:
• The mains plug is inserted in to the socket.
• The wall socket is functioning correctly. (use a table lamp
or similar to test)
Machine does not take water.
• Check the front door for proper closure.
• Check inlet hoses connected and turned on.
Inlet water is directly discharged.
• Check if the discharge hose placed as described in the
users manual or not.
Water coming from beneath the machine.
• Check the water inlet and drain hoses. Tighten the
connections. The washers of the hoses may be worn out.
•Check the pump filter is closed properly.
Foam coming out of the detergent dispenser.
• Check whether your detergent is suitable for front loading
washing machines.
• Check amount of detergent used against detergent
supplier‘s instructions. (you may have used too much
detergent)
Pump does not drain water.
• Clean the pump filter.
• Check whether the drain hose is bent or not.
Chemicals can
be used
Do not wash Dry clean
P A
Iron permitted Do not iron
9
Before calling service
21
Page 23

Manufacturer’s Warranty
When you purchase any new Fisher & Paykel whiteware Product you automatically receive a two year Manufacturer’s Warranty
covering parts and labour for servicing.
Fisher & Paykel undertakes to
Repair or, at its option, replace without cost to the owner either for material or labour any part of the Product, the serial number
of which appears on the Product, which is found to be defective within TWO YEARS of the date of purchase.
This warranty DOES NOT cover
A Service calls which are not related to any defect in the Product. The cost of a service call will be charged if the problem is
not found to be a Product fault. For example:
1. Correct the installation of the product.
2. Instruct you how to use the product.
3. Replace house fuses or correct house wiring or plumbing.
4. Correcting fault(s) caused by the user.
5. Blocked pumps.
B Defects caused by factors other than:
1. Normal domestic use or
2. Use in accordance with the Product’s User Guide.
C Defects to the Product caused by accident, neglect, misuse or Act of God.
D The cost of repairs carried out by non-authorised repairers or the cost of correcting such unauthorised repairs.
E Normal recommended maintenance as set out in the Product’s User Guide.
F Repairs when the appliance has been dismantled, repaired or serviced by other than Fisher & Paykel
AUTHORISED SERVICE CENTRE or the selling dealer’s service department.
Service under this manufacturer’s warranty must be provided by an Authorised Service Centre (refer to the Customer Care
section for contact details). Such service shall be provided during normal business hours. This warranty certificate should be
shown when making any claim.
Note:
This Warranty is an extra benefit and does not affect your legal rights and applies only to product purchased in New Zealand
and Australia.
Please keep this User Guide in a safe place.
Do not return to Fisher & Paykel.
Page 24
 Loading...