

Fisher & Paykel AeroSmart dryer, AeroSmart clothes dryer Installation Instructions & User Manual
the
in must be
followed to minhnize the .risk of fire or
--\VHAT TO DO IF YOU SMELL GAS
° Do not try to light any appliance°
÷ Do not touch any electrical switch_ do
not use. any phone _oinyour°....building.
÷ Clear the room> baddmg or area o_ all
occapaatso
÷ Immediately call your gas supplier from
a neighbors phone° Follow the gas
supplier's instructiOnSo
÷ If you cammt .reach your gas supplier,
call the fire departmemo
must be
per_brmed by a qualified installer, service
agency or the gas supplier°
The Governor of California is required to publish a list of substances known to the
state of California to cause cancer or reproductive harm and requires business to
warn customers of potential exposures to such substances°
WARNING!: Gas appliances contain or produce substances, which can cause death,
or serious illness and which are known to the State of California to cause cancer,
birth defects, or other reproductive harm, To reduce the risk from substances in
fuel or from fuel combustion, make sure this appliance is installed, operated, and
maintained according to the manufacturers [nstruct[onso
ntroduction
_mportantsafetyinstructions
_nstaHationinstructions
Thefirsttimeyouturnyourdryeron
Gettingstartedquickly
Operatinginstructions
AeroSmartcontrob
Easytouchcontrols,Thedisplayscreen
Sorting andloading
Lint bucket
Choosing your drying cycle
Changing the drying cycle options
Drying cycle options
Drying cycle progress
Drying cyclesexpkdned
Handwash /,bans / Freshen Up /Warm Up / Dryclean
Comfoder/Pillows / Allerf_y / Shirts /ToweB / Soft:Toys
Sportswear Light / Sportswear Heavy / Outdoor Wear /
Protection Equipment
Care labeB
Lid Lock
Power failure
Settings Menu
Alarm Level/ ScreenBrightness/ KeyLock Mode
Reminders/ Hints / Language
Setvice Contacts/Trouble Shooting / Rese_Defaults/ Repkq In,to
Caring for your AeroSmart dryer
Before you call for service
If your AeroSmarl:dryer beepsfor help
Solving operating problems
Solving d:ying probbms
Limited warranty
2
S
7
32
S4
34
S6
S6
37
37
38
39
40
41
42
4S
46
47
48
50
51
52
52
53
53
54
55
56
57
57
58
59
60
SAVE THESE INSTRUCTIONS
sl3>)_?ctroc/_sn£8st shy time Forc'/rrent d_t#Ji/s_;bo'/tmodd cmdsp#cif/cc/t/on
ov<;i/sbi/ityin yourcountry, p/#d/s8visitout/oct,/wetsile/isled on the 8sckcoy<tr
or <:o£_tt;c/'y,our/oct;/fishet/',; P<;yke/deo/eiq
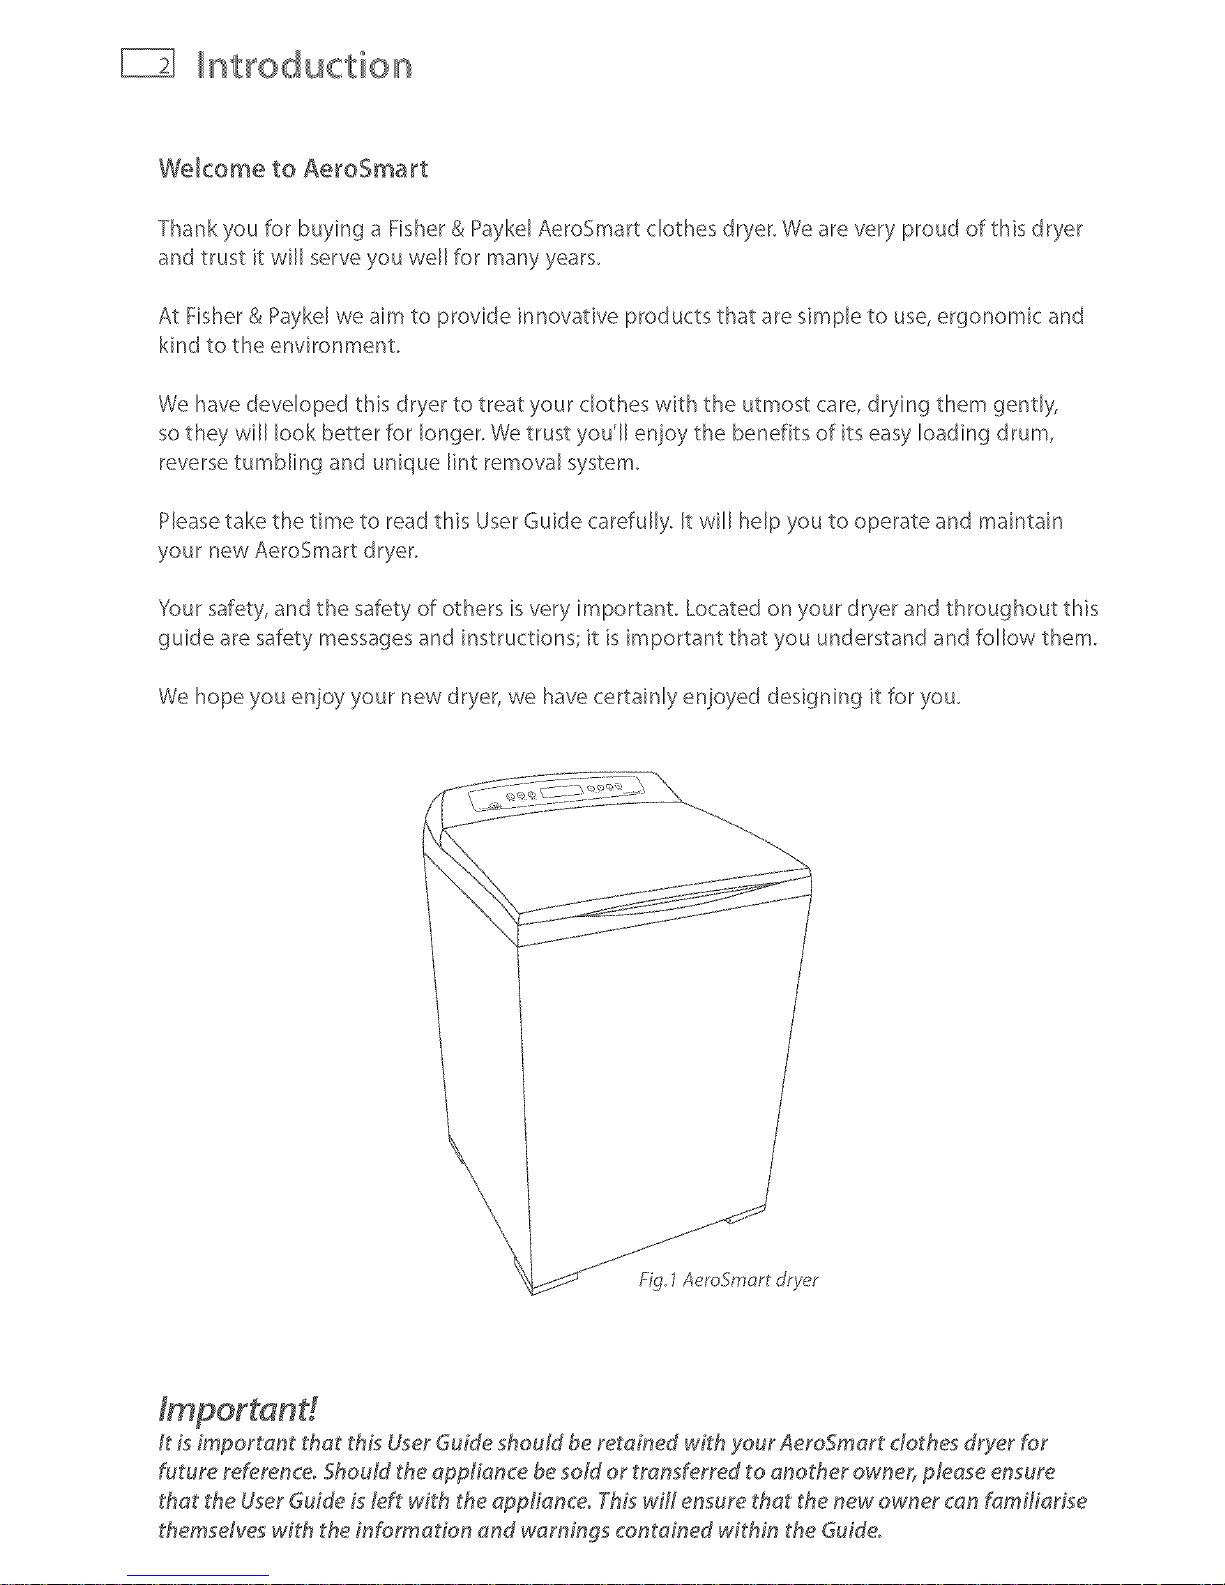
WekometoAeroSmart
Thank you for buying a Fisher & Paykd AeroSmart clothes dryer. We are very proud of this dryer
and trust it will serve you well for many years.
At Fisher & Paykel we aim to provide innovative products that are simple to use, ergonomic and
kind to the environment.
We have developed this dryer to treat your clothes with the utmost care, drying them gently,
so they will look better for longer. We trust you'll enjoy the benefits of its easy loading drum,
reverse tumbling and unique lint removal system.
Please take the time to read this User Guide carefully. It will help you to operate and maintain
your new AeroSmart dryer.
}'our safety, and the safety of others is very important. Located on your dryer and throughout this
guide are safety messages and instructions; it is important that you understand and follow them.
We hope you enjoy your new dryer, we have certainly enjoyed designing it for you.
_t is important that this User Guide shouJd be retained with your AeroSmart clothes dryer for
future reference. Should the appliance be sold or transferred to another owner, please ensure
that the User Guide is left with the appliance. TrOiswill ensure that the new owner can familiarise
themsdves with the information and warnings contained within the Guide.
mportant safety instructions
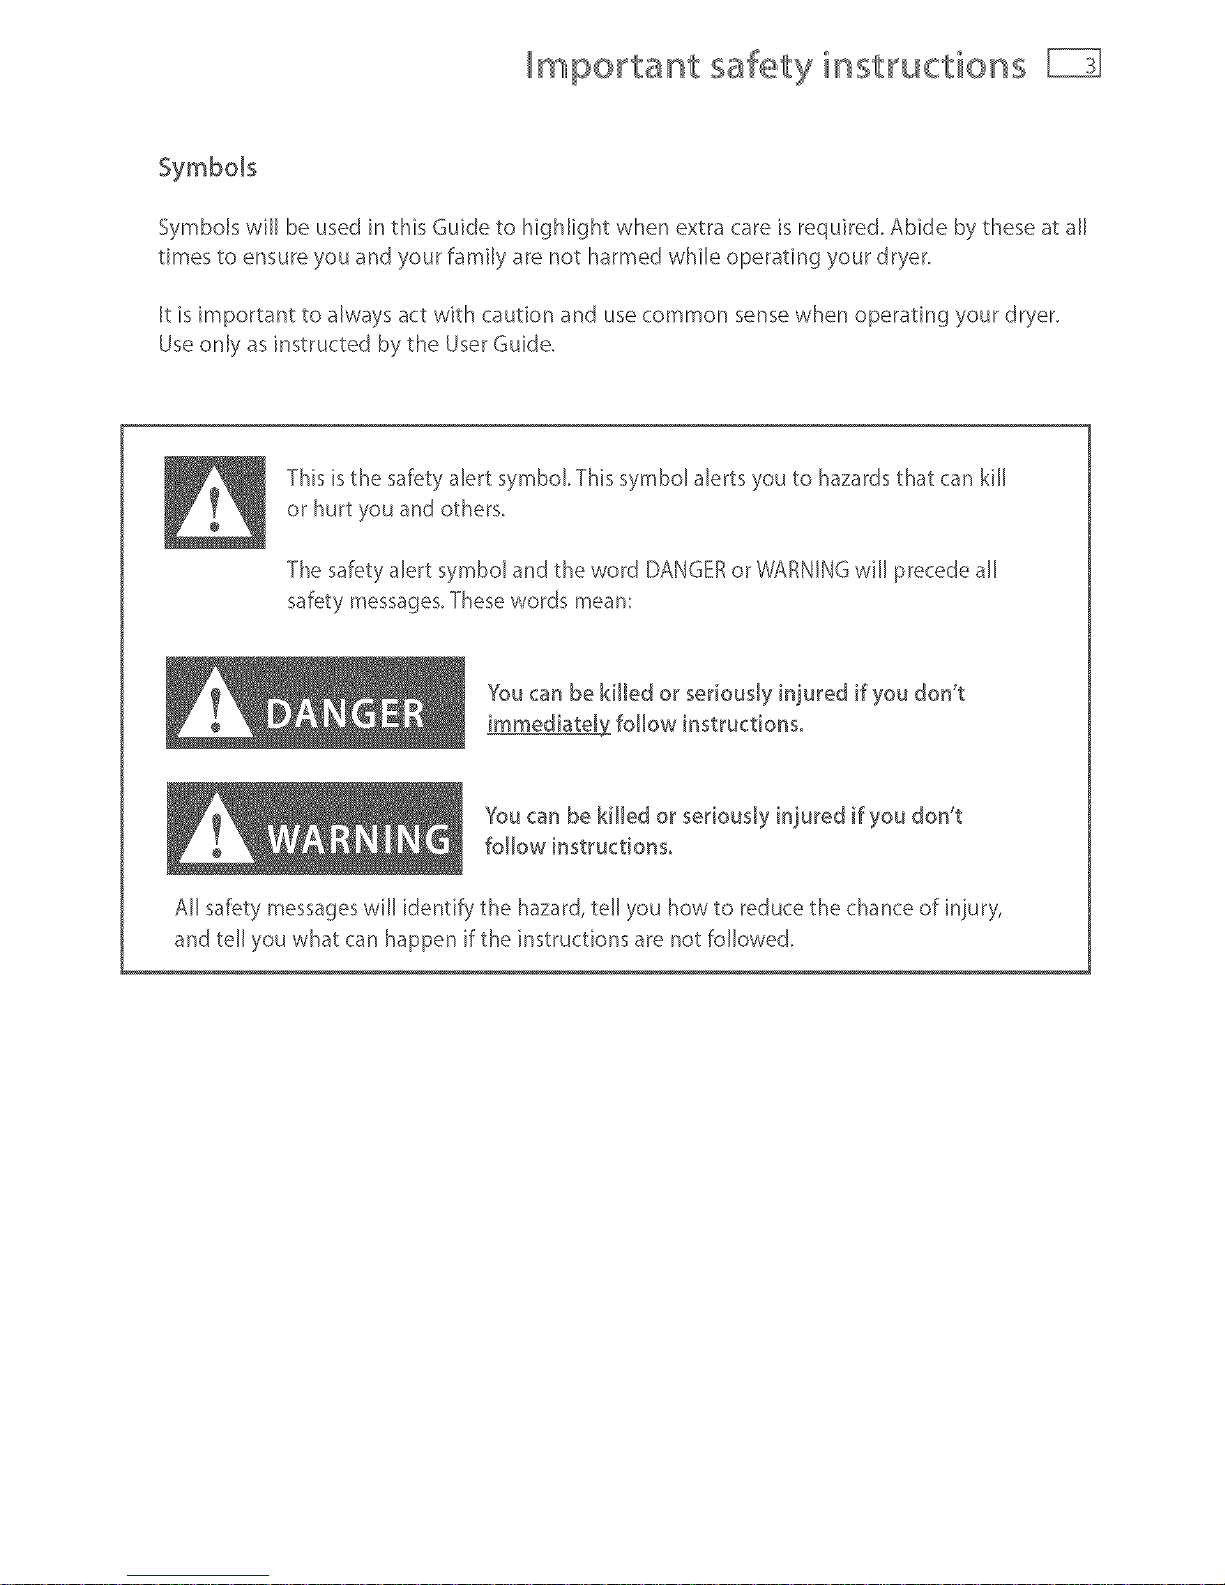
Symbols
SymboB will be used in this Guide to highlight when extra care is required. Abide by these at all
times to ensure you and your family are not harmed while operating your dryer.
It is important to always act with caution and use common sense when operating your dryer.
Use only as instructed by the User Guide.
This isthe saf_ty alert symbol, This symbol alerts you to hazardsthat can kill
or hurt you and others,
The saf_tyalert symbol and the word DANGERor WARNINGwill precedeall
safetymessages,Thesewords mean:
YOu can be killed or seriously injured if you don't
immediate[_ follow instructions,
%u can be killed or seriously in}ured if you don't
follow instructions,
All saf_tymessageswill identify the hazard,tell you how to reduce the chanceof in}ury',
and tell you what can happen if the instructions are not followed,
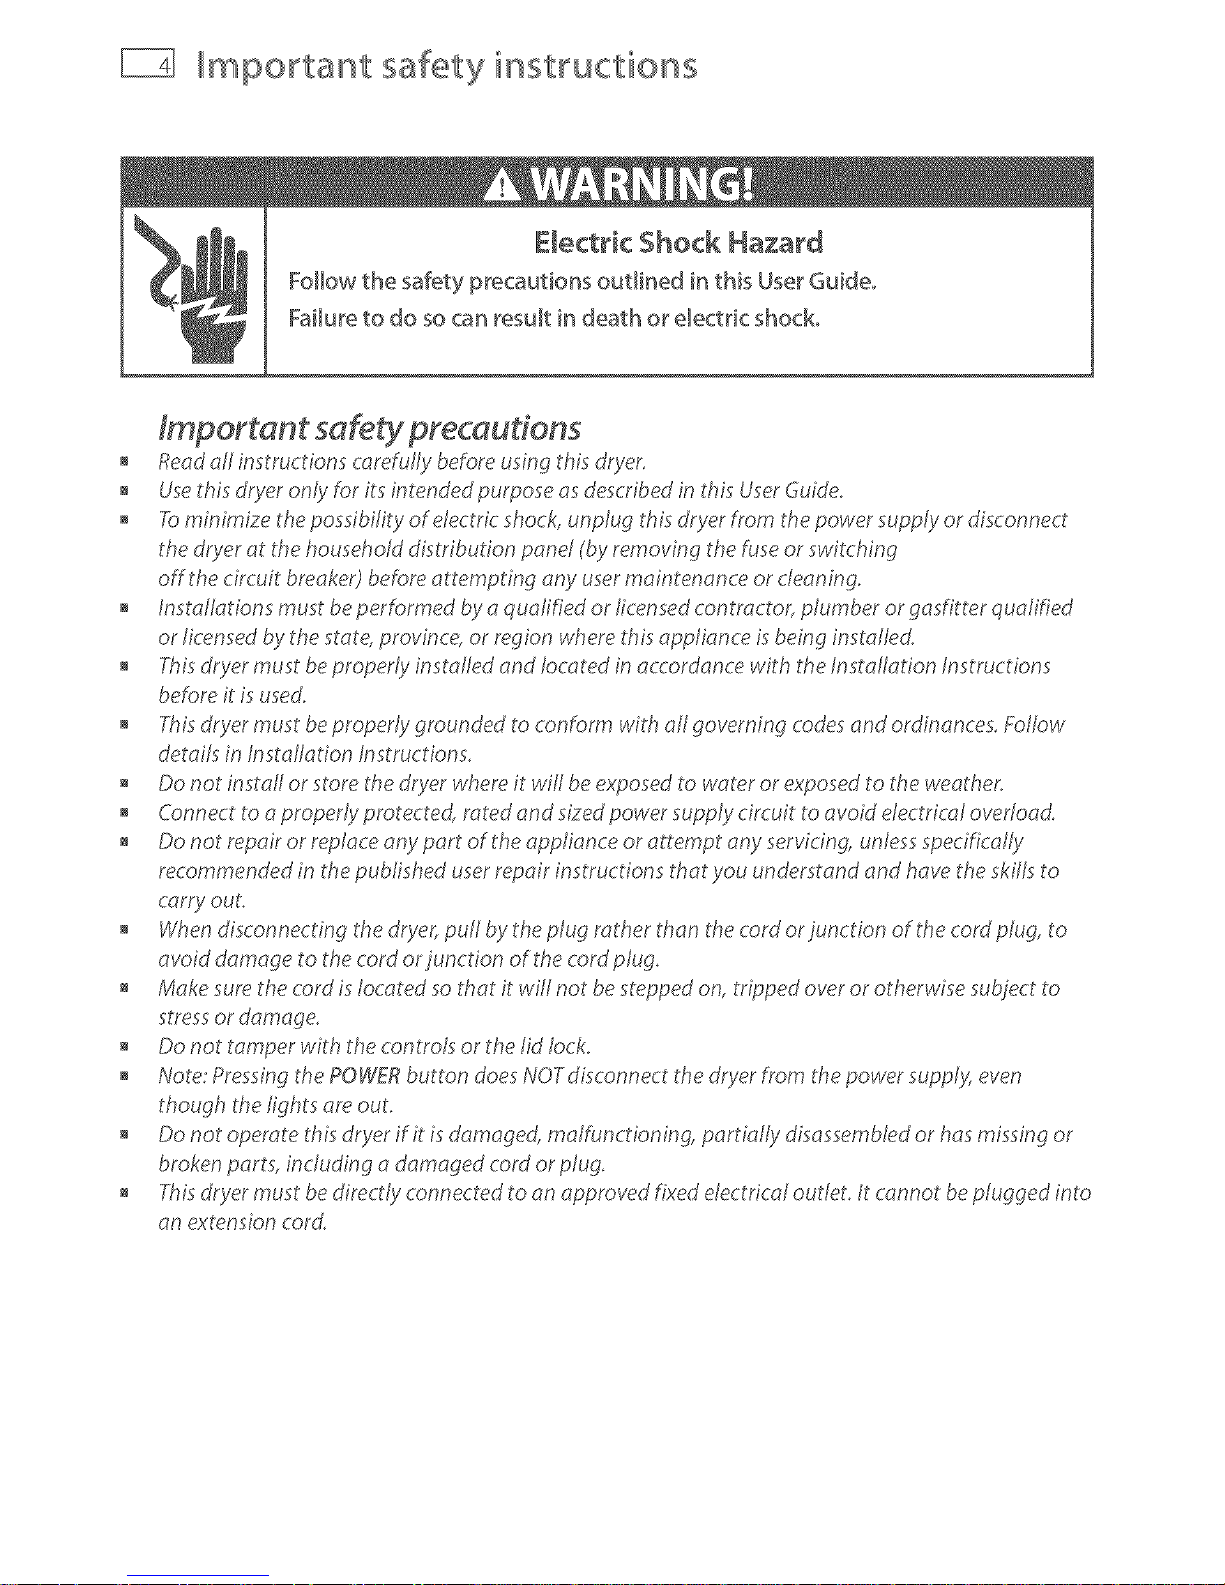
mportant safety instructions
Electric Shock Hazard
Follow the safety precautions outlined in this User Guide°
Failure to do socan result in death or electric shock.
Readall instructions c_refully beforeusing thisdryer.
Usethisdryer only for its intendedpurpose asdescribedinthis Userduide_
Taminimize thep_ssibi_ity_f dectric sh_ck,unplug thisdryer from the p_wer supply_r d_sc_nnect
the dryer at the householddistribution panel (byremoving the fuseorswitching
off the circuit breaker)beforeattempting any user maintenance or cleaning,
Installations must beperf,ormedby aqualified or licensedcontractor, plumber or gasfitter qualified
or licensedby the state,province,or region wherethisappliance isbring installed
Thisdryermust beproperly installed and located in accordance with theInstallation Instructions
her,oreitisused,
Thisdryermust beproperly grounded to conform wiP_all governing codesand ordinances,Follow
details in Installation Instructions,
Do not install or store the dryer whereit will be exposedto wateror exposedto the weathe,_
Connectto aproperly protected, rated andsized powersupply circuit toavoid electrical overload
Do not repairor replace anypart of the appliance or attempt any servicing, unlessspecifically
recommended in the published userrepair instructions that you understand andhavethe skiffsto
carc¢out,
Whendisc_nnecting the dryer_pu_ bythe p_ugmther than the c_rd_r_unct_n _f the c_rd_ug` t_
avoid damage to the cordorjunction of the cordplug.
Makesure the cordislocated sothat it will not besteppedon, tn)_pedoveror otherwise subject to
stressordamage.
Do not tamper with the controls or the lid lock,
Note: Pressingthe POWERbutton doesNOTdisconnect the dryer fnomthepower supp/y:,even
though the lights are out,
Do not operatethisdryer if it is damaged, malfunctioning, partially disassembledor hasmissing or
brokenparts, including a damaged cordor plug_
Thisdryermust bedirectly connected to an approved fixedelectrical outlet, It cannotbeplugged into
an extension cord
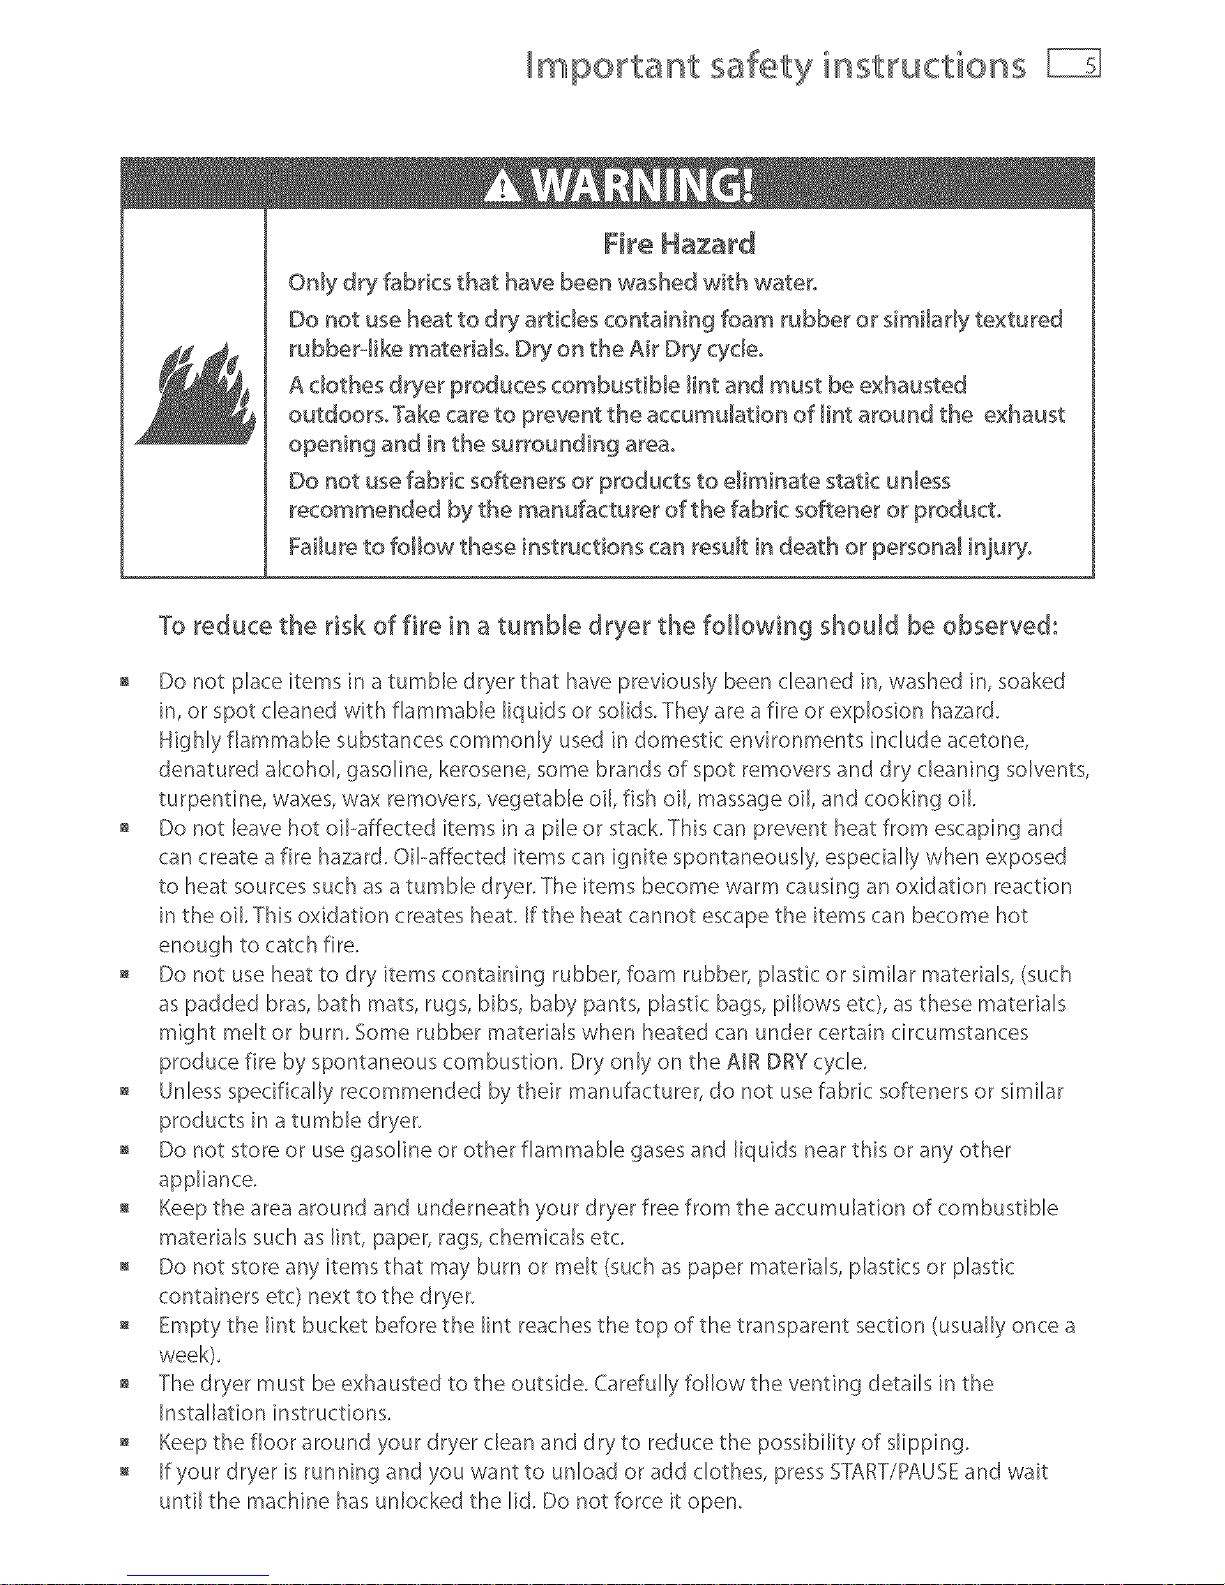
mportant safety instructions
Fire Hazard
Only dry fabrics that have been washed with water°
Do not use heat to dry articles containing foam rubber or simHady textured
rubber.olike materiaBo Dry on the Air Dry cydeo
A clothes dryer produces combustiMe lint and must be exhausted
outdoorsoTake care to prevent the accumulation of _int around the exhaust
opening and in the surrounding area°
Do not use fabric softeners or products to e_iminate static unless
recommended by the manufacturer of the fabric softener or product°
Failure to follow these instructions can result in death or personal injury°
To reduce the risk of fire in a tumble dryer the fo
Important safety insWuctions
Do not reach into the appliance if the drum is moving,
= Close supervision is necessary if this dryer is used by or near children, Do not allow children to
play inside, around or with this dryer or any other appliance,
Never cNmb on, climb into, or stand on the dryer top, lid or drum,
Undergarments that contain metal reinforcements should not be placed directly in the dryer,
Damage to the dryer can result if the metal reinforcements come loose during drying,
= The intedor of the appliance and exhaust duct should be cleaned periodically by qualified
servke personnel
Before the appliance is removed from servke or discarded remove the lid and the drum door to
the drying compartment,
SAVE THESEINSXSUCTIONS
iiilI!i!,!,!!!!!' I'liiiliii,ill¸IIII IIIiiiiliill_li_i_lii_i_i, i_il_lli,i_,i_iiI_liii:iiiiiiiiiiii¸i¸IIIiiiIliillllilli¸Iliiiiiiiiiiiltil_
Installatiion instrultions
Clothes d I_
[ P •
/ Ilsttll the dothes dryer tccordilg to the mtlufacturer's hstructiols tld [octl codes.
[ DO lot insttll t clothes dryer with flexible pltstic ver, tilg mtteritls. If flexible mettl i]
/ (foil type} duct is installed, it must be of a specific type identified by the appliance
[ manufacturer as suitable for use with clothes dryers. Flexible venting materials are known ii
/ to collapse, be easily crushed, and trap linto These conditions will obstruct clothes dryer
/ airflow and increase the riskoffireo
Read the important safety instructions on pages 3 - 6 before you start installing the dryer.
Checktomakesureyoohaveallthetoolsandpartsnecessarytocorrectly_nstaUth_sappUance.
= )_,"nut driver or socket wrench
= PhUl_psscre,,,,'_r_ver
= Ha - adescrewdriver
Adjustable wrench 8" or 10" (200 mm or 250 ram) for gas connections
, Pipe joint compound (pipe dope or tape) for gas pipe connections that is resistant to
LPPropane,ButaneandNaturalGas(CSasmodelsonly)
= Leve_ _[
, Caulking gun and compound (for installing new exhaust vent)
" Gloves
Safeb/glasses .p--_
1
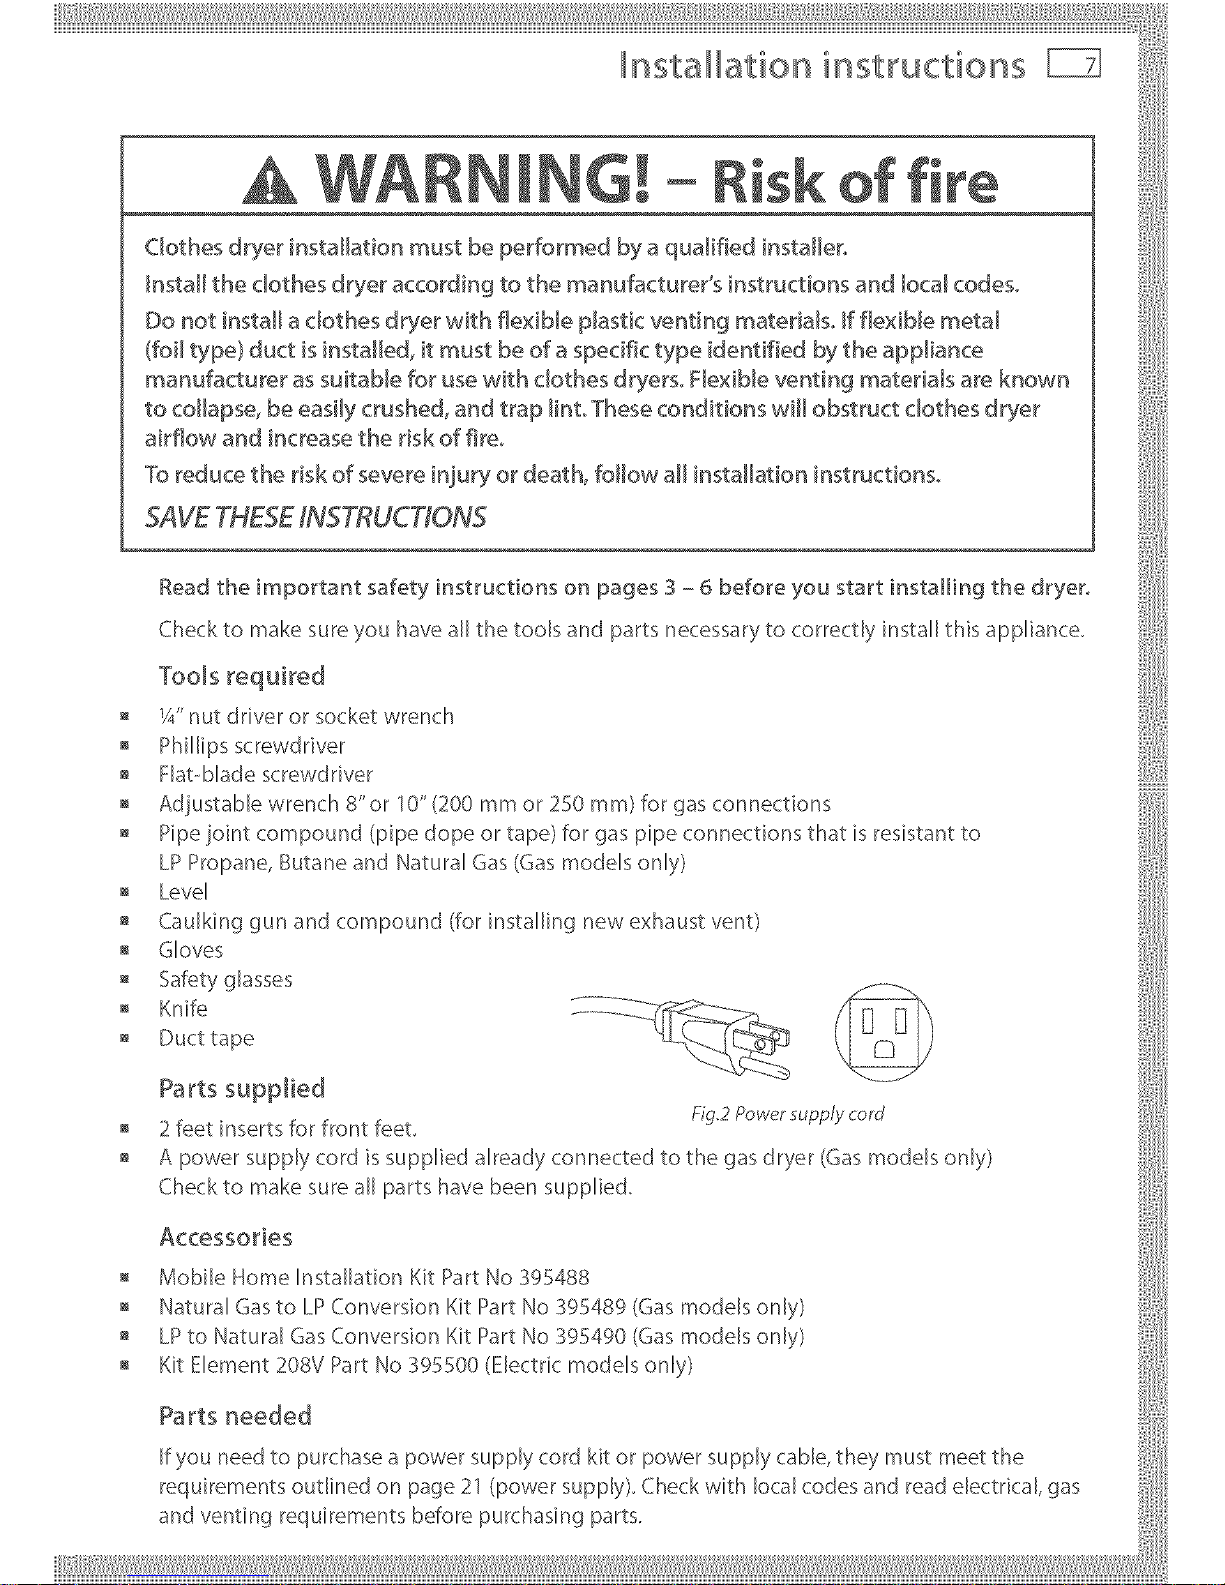
ralr_5 5upp led Fig.2Povv_¢rsupplydord
2 feet inserts for front feet.
= Apowersupplyco_d_ssuppl_edalreadyconnectedtothegasdryer(Gasmodelsonly/
Check to make sure a[[ parts have been supplied.
A_ce_sories i
" Mobile Home Installation Kit Part No 395488
= NaturalGastoLPConversionKitPartNo39S489/Gasmodelsonly>
" LP to Natural Gas Conversion Kit Part No 395490 (Gas models only)
, Kit Element 208V Part No 395500 (Electric models only) !,
Parts needed
If you need to purchase a power supply cord kit or power supply cable, they must meet the
requirements outlined on page 21 (power supply). Check with local codes and read electrical, gas
and venting requirements before purchasing parts.
___________
nsta ation instructions
To the installer
The correct installation of the dryer is your responsibility.
Be sure you read the following instructions carefully before you start to install the dryer. These
instructions should be left with the home owner for future reference.
It is your responsibility to:
Observe all governing codes and ordinances.
Check code requirements. Some codes limit or do not penT]it installation of clothes dryers in
garages, closets, mobile homes or sleeping quarters. Contact your local building inspector.
Adhere to these installation instructions.
Allow for spacing requirements with side by side installations (refer page 9).
Make sure you have all items necessary for correct installation.
Properly install the dryer.
Contact a qualified installer to ensure that the electrical and gas installation meets all national
and local codes and ordinances, (See page 4).
Location requirements
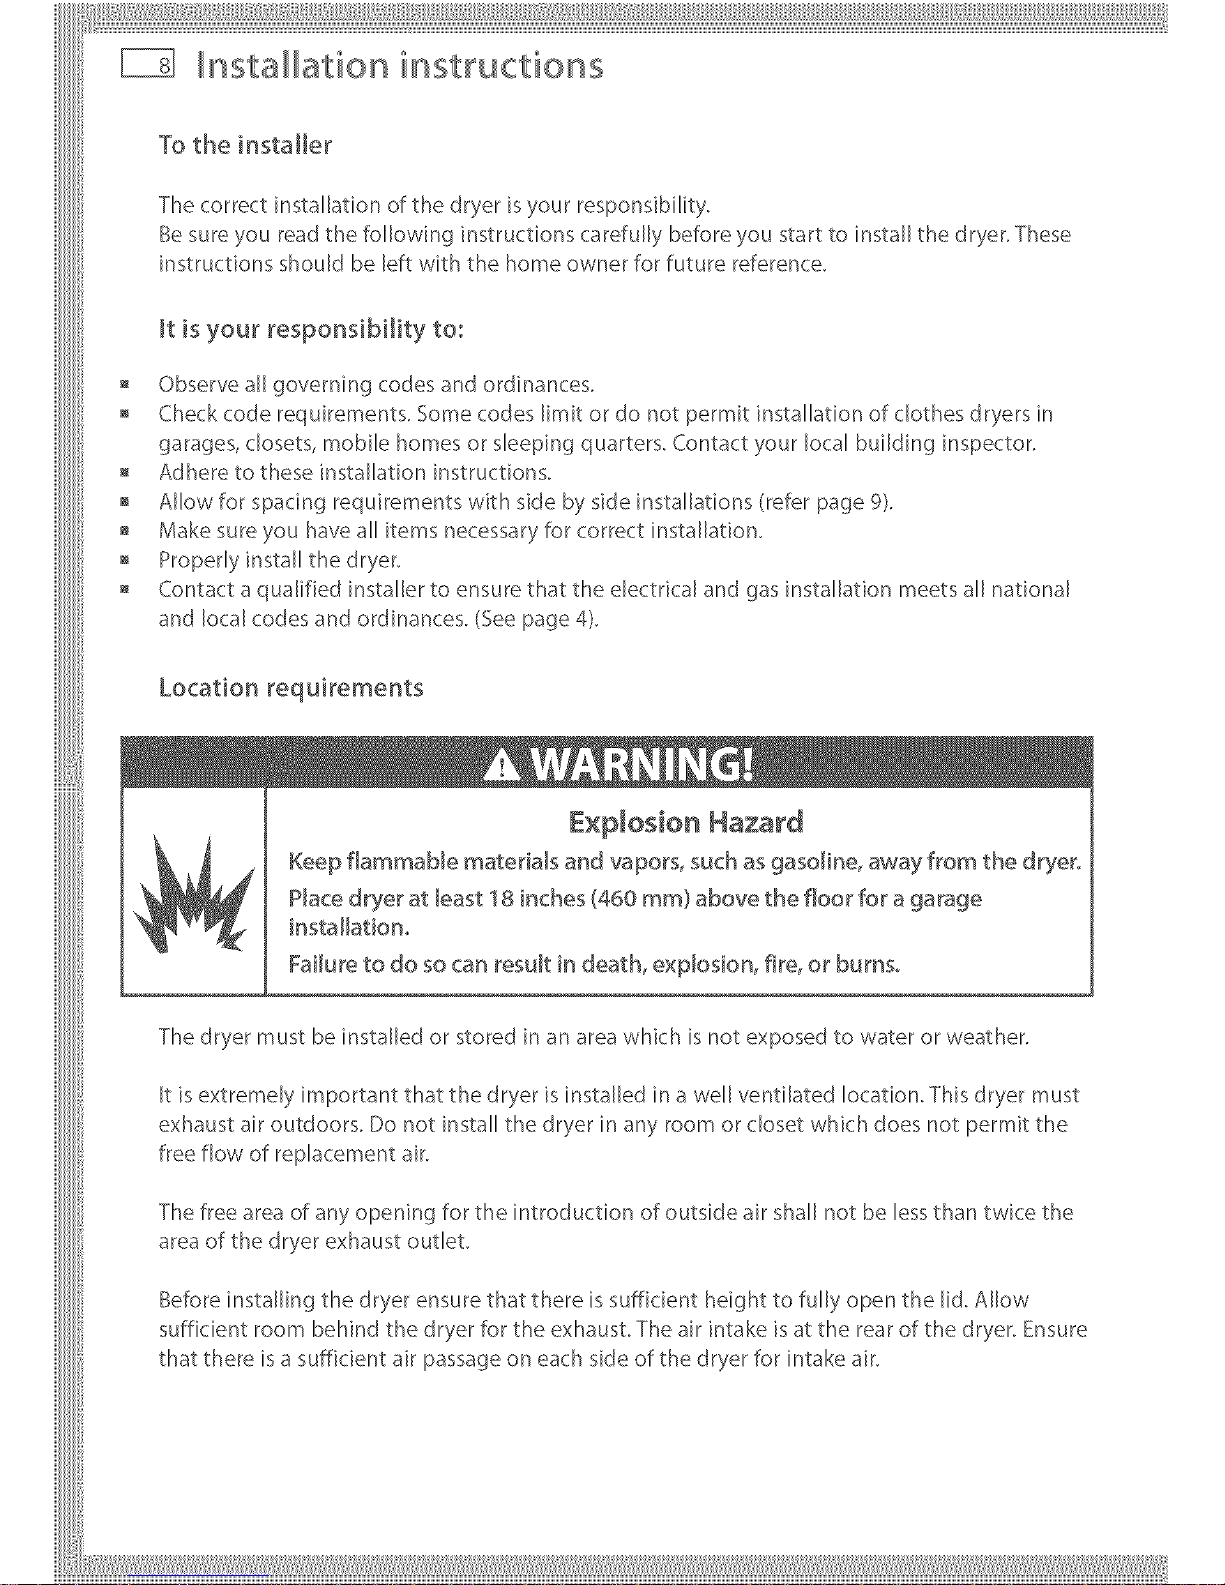
E×D[os[on Hazard
Keep flammaMe materiaB and *vapors, such as gasoline, away from the dryeg_
Pbce dryer at least 18 inches (460 ram) above the floor for a garage
instaHationo
Failure to do so can result in death, explosion, fire, or burns,
The dryer must be installed or stored in an area which is not exposed to water or weather.
[t is extremely important that the dryer is installed in a we[[ ventilated location. This dryer must
exhaust air outdoors, Do not install the dryer in any room or closet which does not permit the
free flow of replacement air.
The free area of any opening for the introduction of outside air shall not be less than twice the
area of the dryer exhaust outlet.
Before installing the dryer ensure that there is sufficient height to fully open the lid. Allow
sufficient room behind the dryer for the exhaust The air intake is at the rear of the dryer. Ensure
that there is a sufficient air passage on each side of the dryer for intake air.

iiiI!i!!i@@@@@@@@@@@@@@@@@@@@@@@@iIii,!ii! iI iillli¸Ili i iili!liiiii:iiliiiiiiiiiii:i,lliii....
Installation instructions
Location _equirements
The area in which the dryer is located must be
kept clear and free from combustible materials,
gasoline and other flammable vapors and
liquids. A dryer produces combustible lint so
the area around the dryer must be cleaned
regularly to keep it free of lint.
This dryer can only be vented from the rear and must be exhausted to the outdoors.
Alcove or closet installation
When installing adryer in a closet/alcove it must be exhausted to the outdoors° No other
fuel burning appliance can be installed in the same closet or alcove°
The top opening area in the door must be a minimum of 48 square inches (3100 mm) and the
bottom opening area must have a minimum of 24 square inches (1550 ram). These openings
must never be obstructed (a Iouvred door with the minimum air opening is acceptable).
Minimum installation clearances are required but more clearance is recommended.
!/
___________
nsta ation instructions
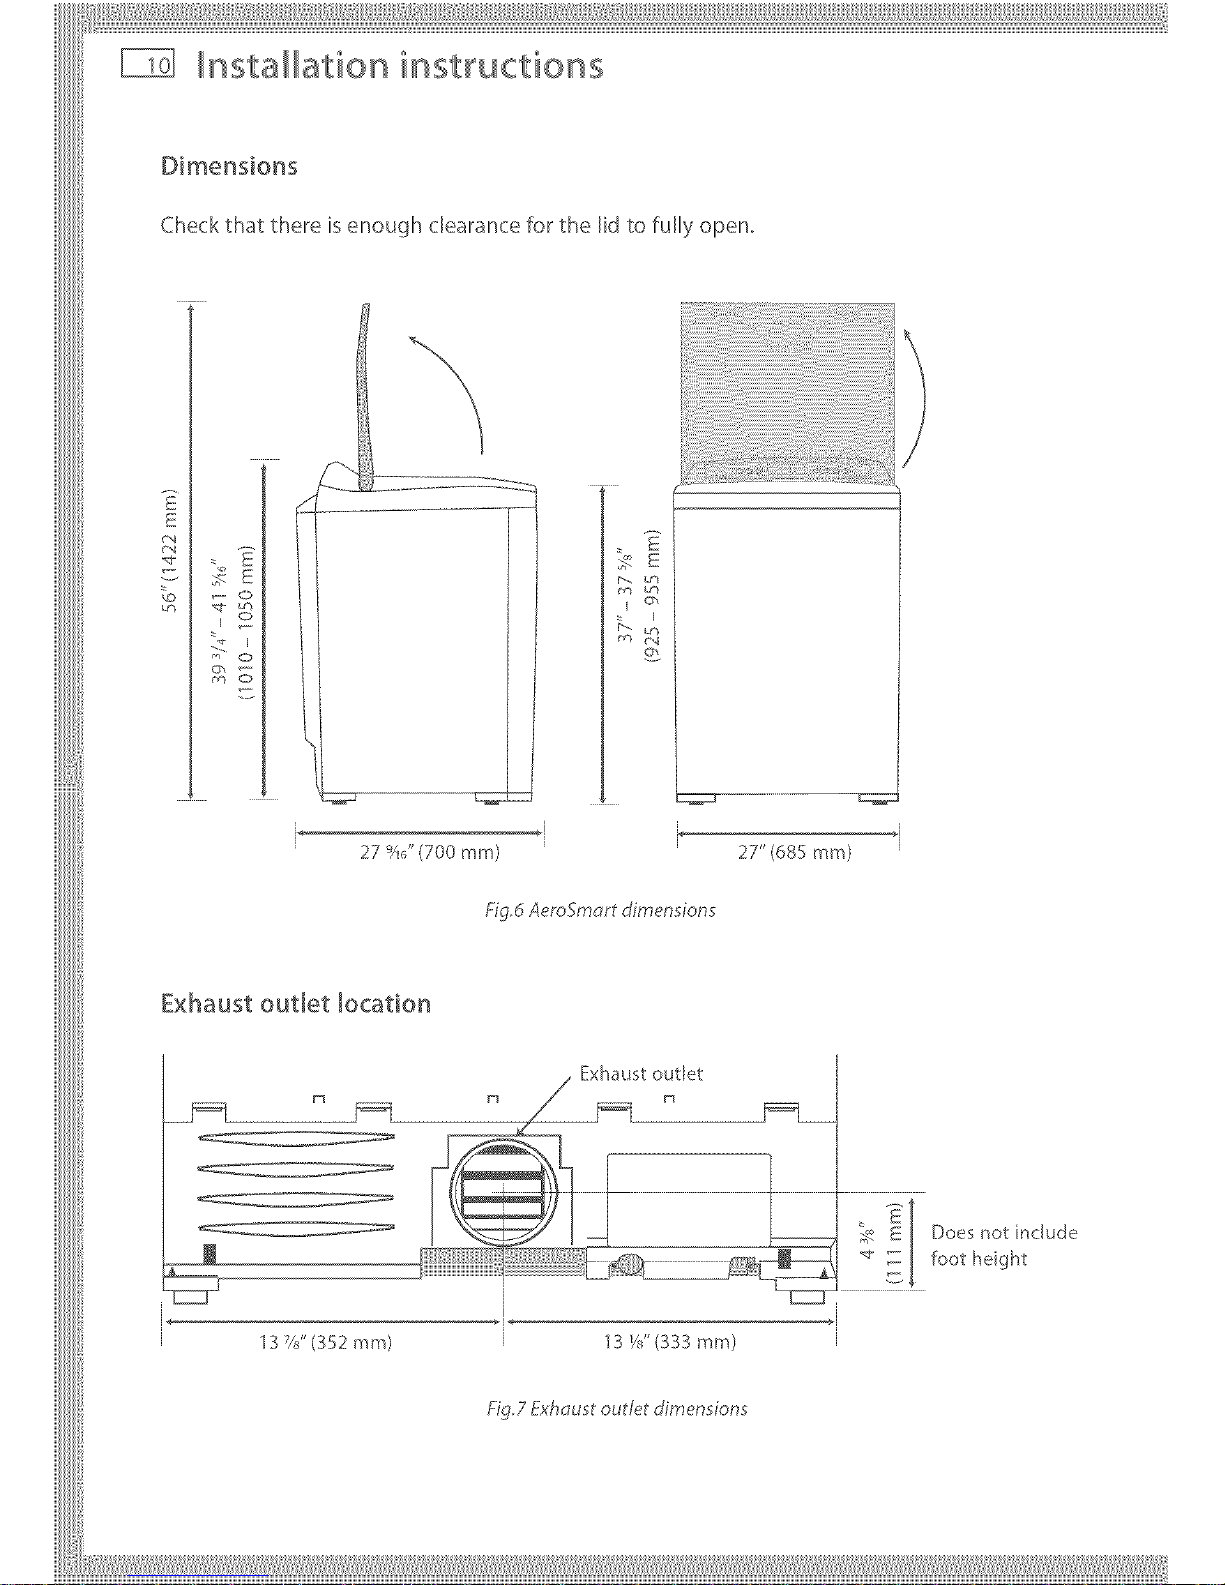
Dimensions
Checkthat there isenough clearancefor the lid to fully open,
A
I
o
£g
E
_ _ _:
27 *A_,"(700 ram) 27" (685 ram)
Fig,d AeroSmort dimensions
Exhaust outlet location
N
J
13 _/J'(352 mm) "137_" (333 mm)
Fig,7 Exhoust outlet dimensions
iiilI!i!,!,!!!!!' I'liiiliii,ill¸IIII IIIiiiiliill_i, iliiii_illiiillIIIlilil_ill,i!,lilii_ii!iI,lii!IIIi:liii!_iiiiii_ilill,i!_Ii!i
Installation instructions
Mobile home installation
The installation of the dryer in a mobile home must conform to the Manufactured Home
Construction and Safety Standard Title 24 CFR, Part 3280 {formerly the Federal Standard for
Mobile Home Construction and Safety, Title 24 HUD (Part 280), 1975} for the United States or
Standard CAN/CSA - Z240MH for Canada.
When installing a dryer in a mobile home, provisions for anchoring the dryer to the floor must
be made.
A Mobile Home anchoring installation kit is available with instructions (see Accessories page 7).
Locate in an area that has adequate outside make up air (a minimum of 72 square inches of
unobstructed opening is required).
Mobile home installations must be exhausted to the outdoors with the exhaust duct
termination securely fastened to the mobile home structure, using materials that will not
support combustion.
The exhaust duct must not terminate beneath the mobile home. See the section on exhausting
for more information (refer to page 12).
illllllllllllllllllllll
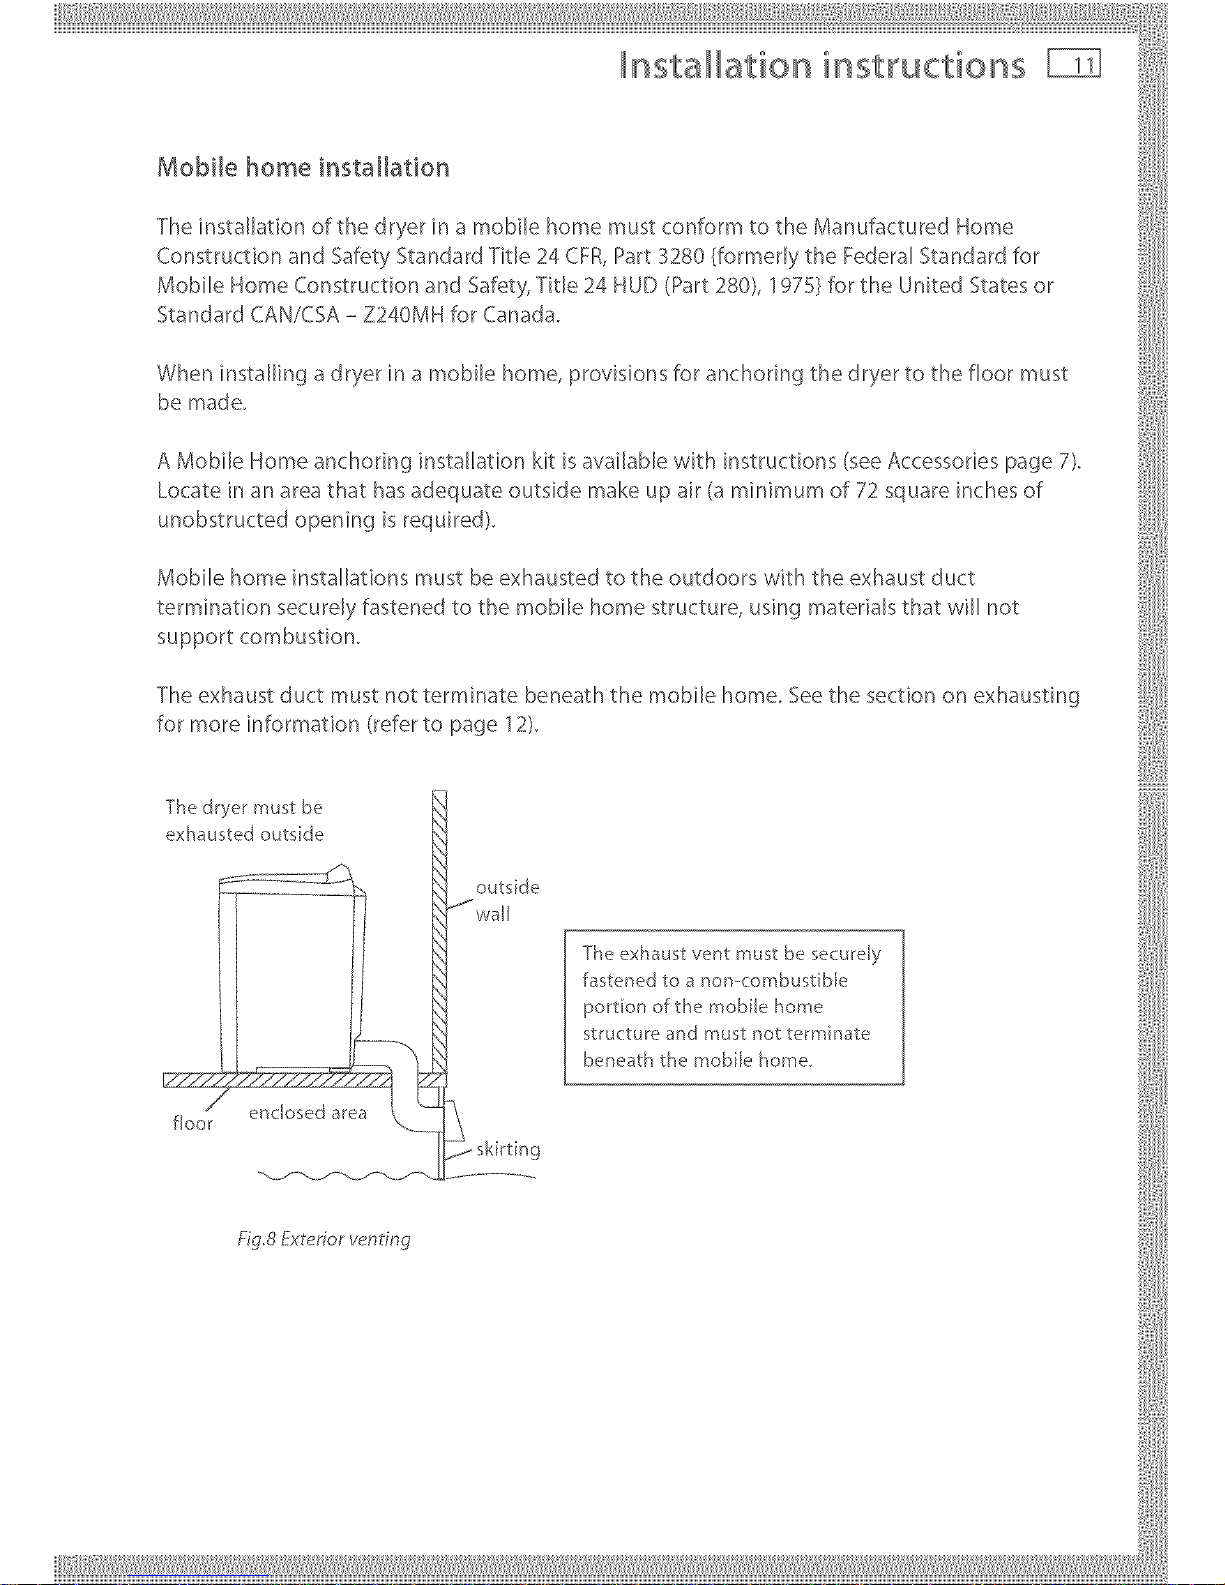
Thedryermustbe iiii!iiiii!iiii
exhausted outside iJiii!iiiiii!!
outsde
li wo,, i!ii/
Jr exhoustve tmus secu e,y i"iii
I J fastenedtoanor,-combustiL,k_ ili!iiiiii:iiliiiii
i i po,t_o_orthe_obUehom_ ii!i!!
J I structure and must not termilqate iiiiX_iiiiiii
I I _i-'_ ber,e_ththemobUehome, ill
I- g !iiii!!i
-._--_f----_--f ............... !iiii!i/ii!l
___________

nsta ation instructions
Fire Hazard
The dryer must be vented to the outdoors,
Use rigid or thick wall flexiMe meta_ exhaust duct on_yo
Do not use a p_astic exhaust duct°
Do not use a meta_ foil exhaust duct,
Failure to follow these instructions can result in death or fire,
The dryer exhaust must be vented to the outdoors. This will prevent the build up of lint and
moisture in the room in which it is located and reduce the risk of fire.
Exhaust ducting products can be purchased from your local Appliance store or Hardware store.
Never use plastic or metal foil flexible duct. This ducting can kink, sag, be punctured, reduce
airflow, extend drying times and affect dryer operation.
A minimum of 4 inch (100 ram) thick wall flexible metal or rigid galvanised metal duct must be
used. Using ducts larger than 4 inches (100 ram) diameter may result in more lint accumulating.
[n Canada, the exhaust duct must be 4.02 inches (102 ram) in diameter.
Using straight rigid metal ducting will minimize lint accumulation, Thick wall flexible metal
ducting may be used but care must be exercised to avoid sharp bends which may squash the
duct and cause blockages.
Use duct tape to secure joints. Do not use screws or any other fastening device which will
extend into the duct, as they will collect lint.
Keep ducting as short and straight as possible. Do not exceed the maximum exhaust duct
lengths stated later in these installation instructions. The total length of flexible metal duct used
should be no longer than 94.5 inches (2A m).
Do not vent the dryer into any other duct, chimney or gas vent because accumulated lint and
other material is a potential fire hazard. Do not vent the dryer into any ceiling, attic, crawl space,
under--floor space, wall cavity, window well or any other concealed cavity that will accumulate lint.
Fit an exhaust hood with a swing-out damper to the outside end
of the exhaust duct to prevent back d rafts and entry of wild life.
Never use exhaust hoods with a magnetic damper. The hood
should have at least 12 inches (305 ram) clearance between the
bottom of the hood and the ground or other obstruction, The
hood opening should point down. Never install a screen over the
exhaust outlet.
12"(305 ram)
FiG9 Exhau t hood minimum
ground clearance*.

iiilI!i!,!,!!!!!,l,liiiliii,ill ¸IIIIlllliiiliill,i,iliiii_illiiillIIIlilil_ill,i_,lilii_ii!il.lii!lllilll,iiiiii,liiliiiiii!
Installation instructions
Venti!lg
-toreducecondensation,_nsulatean;,duct_ngwhichpassesthroughur/heatedareas.Slopethe
ductgentl;,downwardstothehood,todraincondensationandreducelintbuUdup.Avoidsag
orloopsintheductastheymaycollectandstorewaterandaccumulatelint.
Before using an existing exhaust duct system for a dryer ensure that: ii
, No plastic or other potentially combustible duct or flexiMe metal foil ducting has been used.
= Theduct_sriotp_erced,k_nkedorcrushed.
" The duct does riot exceed the maximum recommended length for the new dryer.
= Theexhausthooddamperopensaridclosesfreelyandw_thsumdentmovement.
" Static pressure in the exhaust ducting does riot exceed I inch of water column (250Pa), or is riot
lessthan0_nchesofwatercolumn/_e,negativepressure/,whenmeasuredw_thamanometer
in the 6 inches of the ctuct nearest the ctryer, with the empty ctryer running on Air Dry (rio heat)
setting.
, The exhaust duct system meets all relevant local, state and national codes.
All ducting should be inspected and cleaned at least once a ),ear to remove accumulated Int.
Frequently check that the damper on the exhaust hood moves sufficiently and opens and
shutsfreely. :_
=o =o=oo,o
A Mobile Home Installation Kit is available (see Accessories page 7). :'/
Doto inovo°td° tIo°gth
erearandmustbeexhaustedtotheoutdoors.
This dryer can only be vented from th
% !_iiiiii
Fig.10 £ea_venting oAy
D_fferent_;,pesofventarrangementsareshownbelow.
_:r; /
II I / II I / _!/ Ix /.
Jl } + } .... } i !
s ...... :s-,, f* , / ...........
!
nsta ation instructions
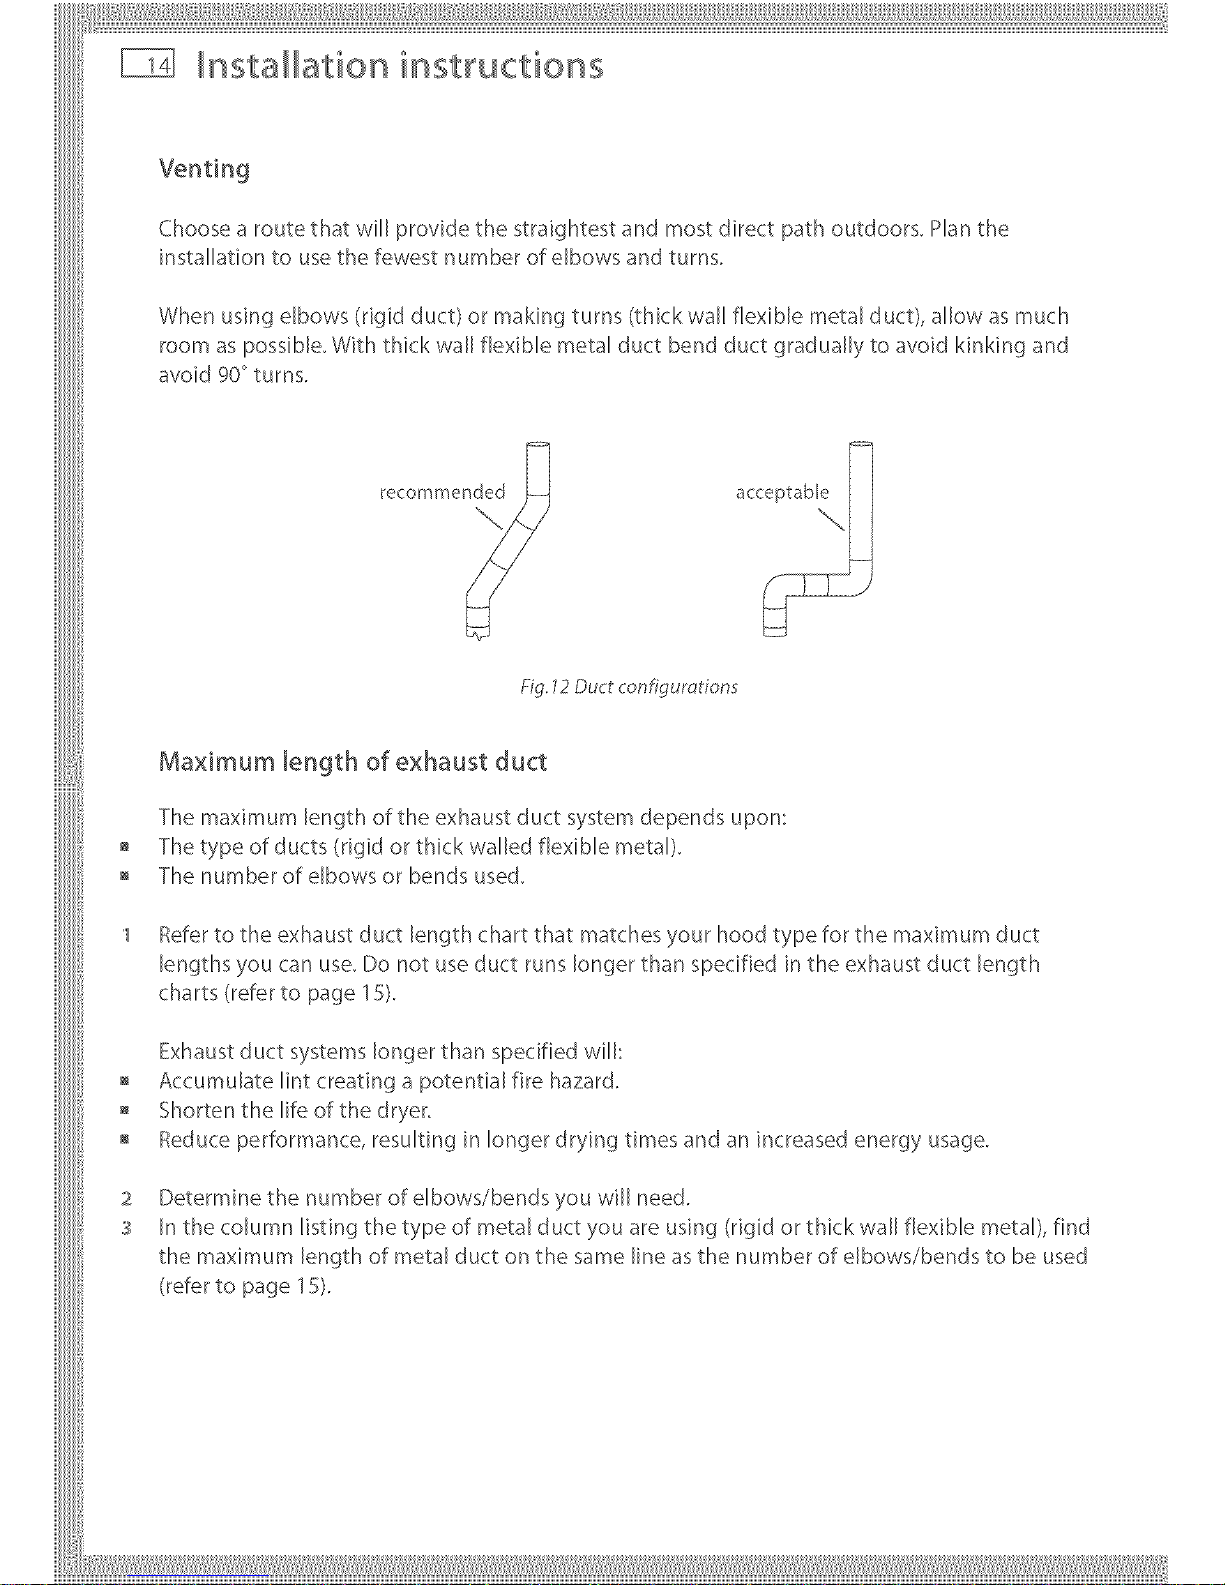
Choose a route that will provide the straightest and most direct path outdoors. Plan the
installation to use the fewest number of elbows and turns.
When using elbows (rigid duct) or making turns (thick wall flexible metal duct), allow as much
room as possible. With thick wall flexible metal duct bend duct gradually to avoid kinking and
avoid 90_turns.
Fig. 12 Duct configurations
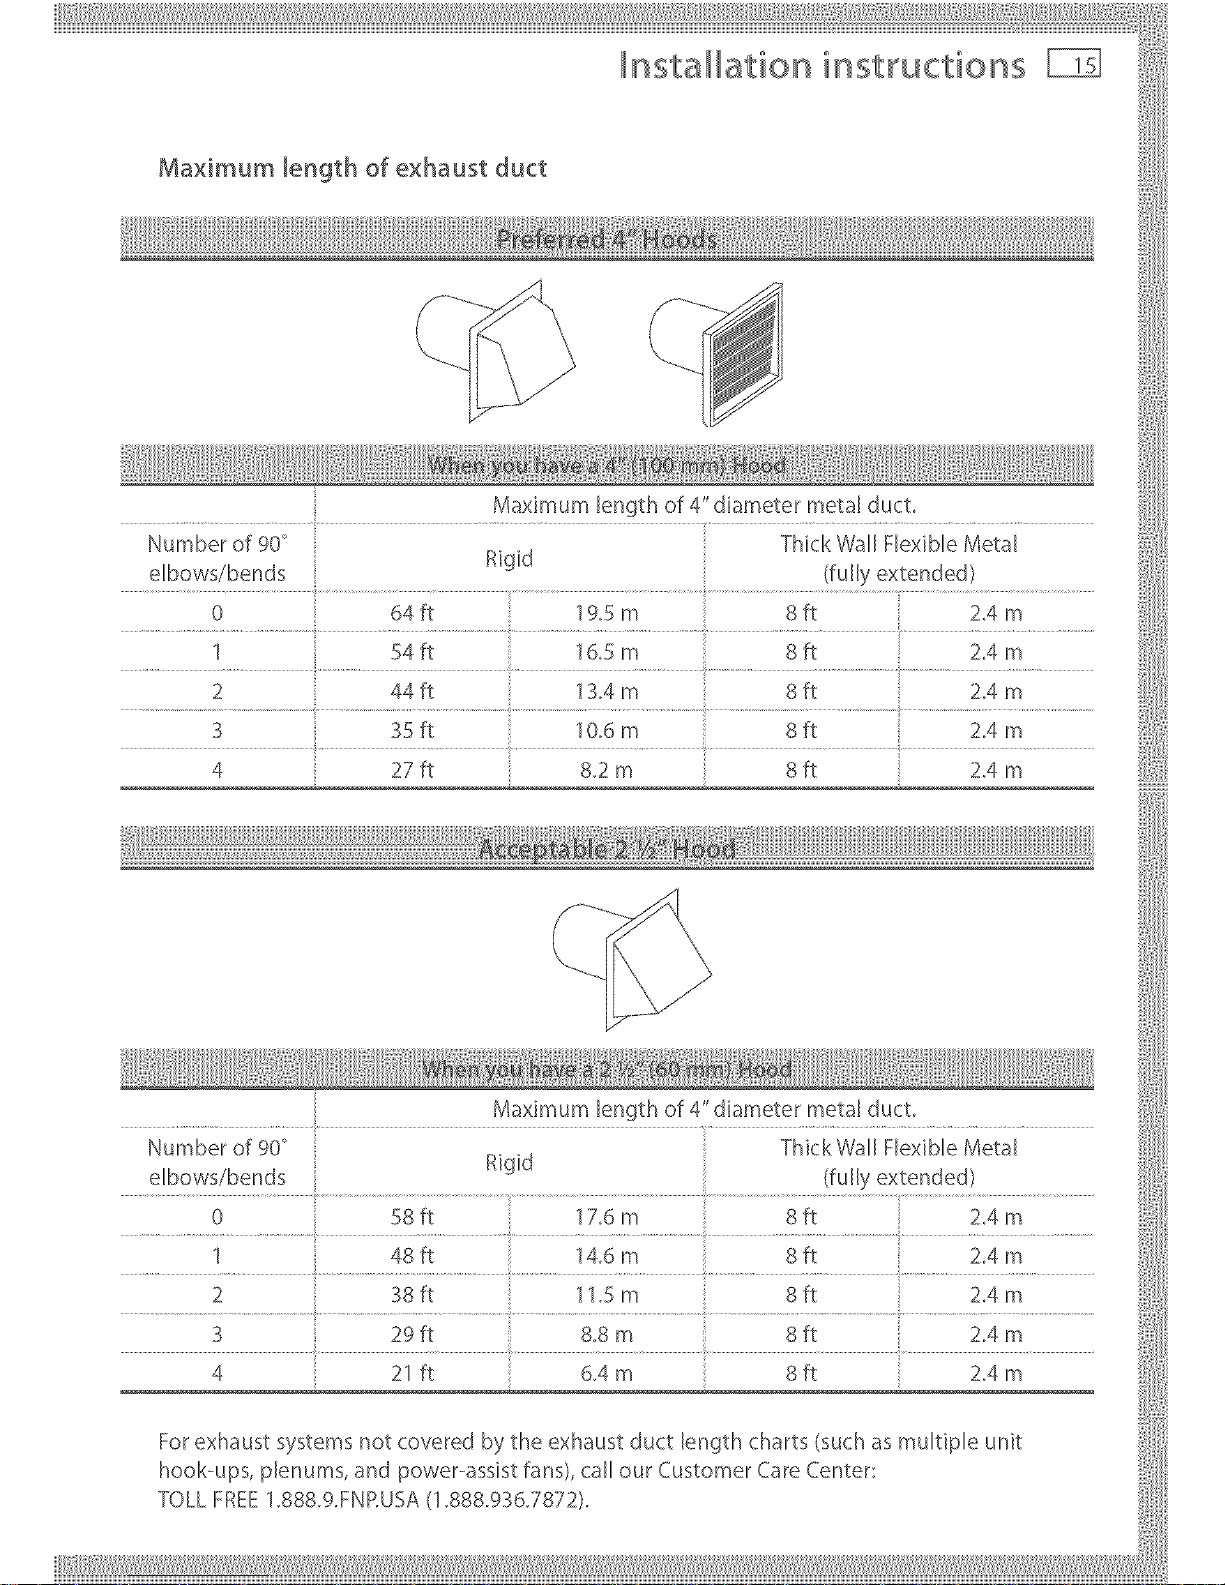
Maximum length of exhaust duct
The maximum length of the exhaust duct system depends upon:
The type of ducts (rigid or thick walled flexible metal).
The number of elbows or bends used.
Refer to the exhaust duct length chart that matches your hood type for the maximum duct
lengths you can use. Do not use duct runs longer than specified in the exhaust duct length
charts (refer to page 15).
Exhaust duct systems longer than specified will:
Accumulate lint creating a potential fire hazard.
Shorten the life of the dryer,
Reduce performance, resulting in longer drying times and an increased energy usage.
2
S
Determine the number of elbows/bends you will need.
In the column listing the type of metal duct you are using (rigid or thick wall flexible metal), find
the maximum length of metal duct on the same line as the number of elbows/bends to be used
(refer to page 15),
iiilI!i!,!,!!!!!' I'liiiliii,ill¸IIII IIIiiiiliill_i, iliiii_illiiillIIIlilil_ill,i!,lilii_ii!iI.lii!IIIi;liii!_iiiiii_
Installation instructions
Maximum length of exhaust duct
Maximum length of 4" diameter metal duct.
Number of 90 ° Thick Wall Flexible Metal
elbows/bends Rigid (fully extended)
0 64fl 19.5 m 8ft 2.4 m
1 54fl 16.5m 8fl 2.4m
2 44fl 13.4m 8R 2.4 m
3 35 fl 10.6m 8ff 2.4m
4 27ft 8.2 m 8ft 2.4 m
iiiiiiiiiill
_::: } }
M_×_mumlengthof4"d_mete_met=lduct
Number of 90° Thick Wall Flexible Metal
Rigid
elbows/bends : {fully extended)
..... 0...... ..................._it ...............................t:7_m.... ....................8it...........................214m....... 1
1 4Sft "_4.6m Sft Z4m
2i):t..... .... ;4m...... .... 8it.... .... 214m.....
Fo_exhaust_;,_tem_notcove_edb;,_heexh=u_tductlengthch=_t_{_uch_ multipleunit
hook-ups, plenums, and power-assist fans), call our Customer Care Center: i
Tou_FRE_:1.sss.gmP.usA/1.88s.9:_6.;:'s;:'2/.
___________
nsta ation instructions
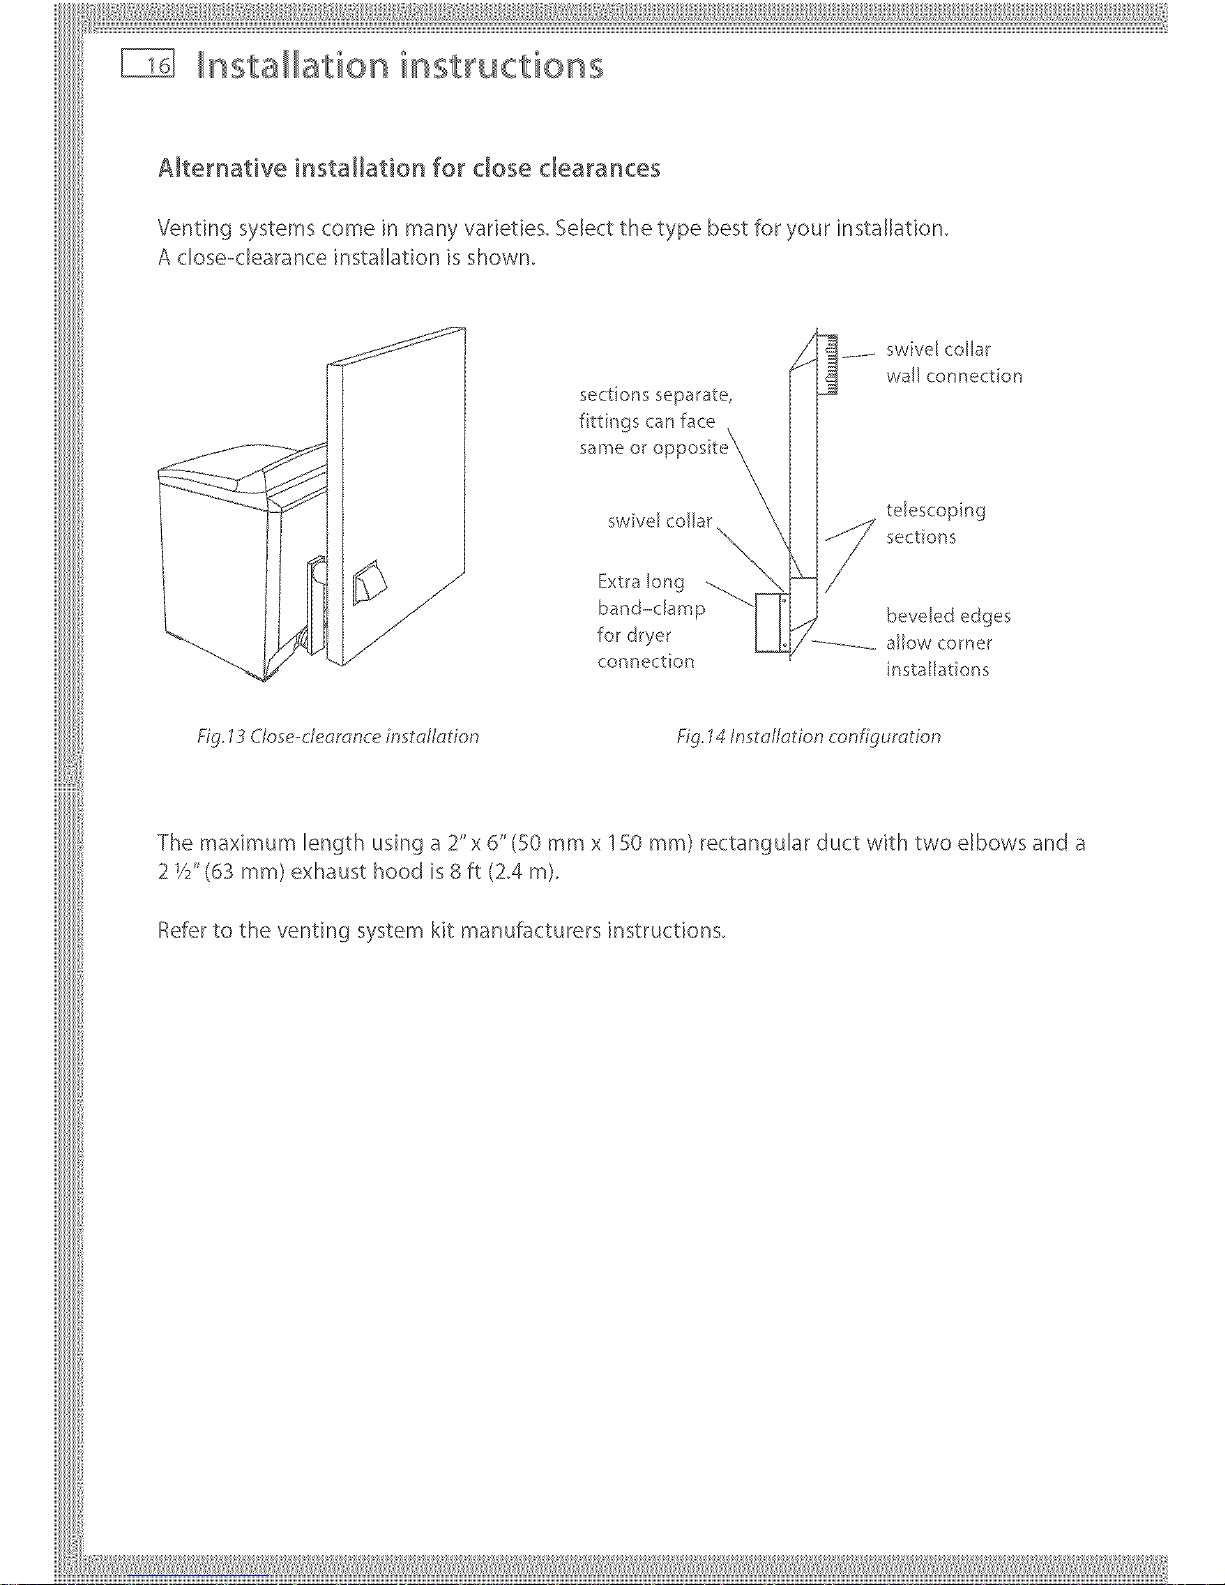
Alternative installation for dose clearances
Venting systems come in many varieties. Select the type best for your installation.
A close-clearance installation is shown.
sections separate,
f ttings can face
same or c
swivel collar
Extra long
band-clamp
for dryer
connection
swivel collar
wall connection
telescoping
sections
beveled edges
allow corner
nsta[lat[ons
Fig 13 C/ose-deomnce installation Fig. 14 Insto/Iotion configuration
The maximum length using a 2"x 6" (50 mmx 150 ram) rectangular duct with two elbows and a
2 V2"(63 ram) exhaust hood is 8 ft (2.4 m).
Refer to the venting system kit manufacturers instructions.
iiilI!iI!i !!!_IliiiIill,illiliIIiIiiiiiIIIIIIiiiliilil!!li!liii,iliilliIliiiiiiiiiiIIilillliii,illilii_iil!l,liiIiili:liii_iiililiiiiliilili!iiiii!illiii!
Installation instructions
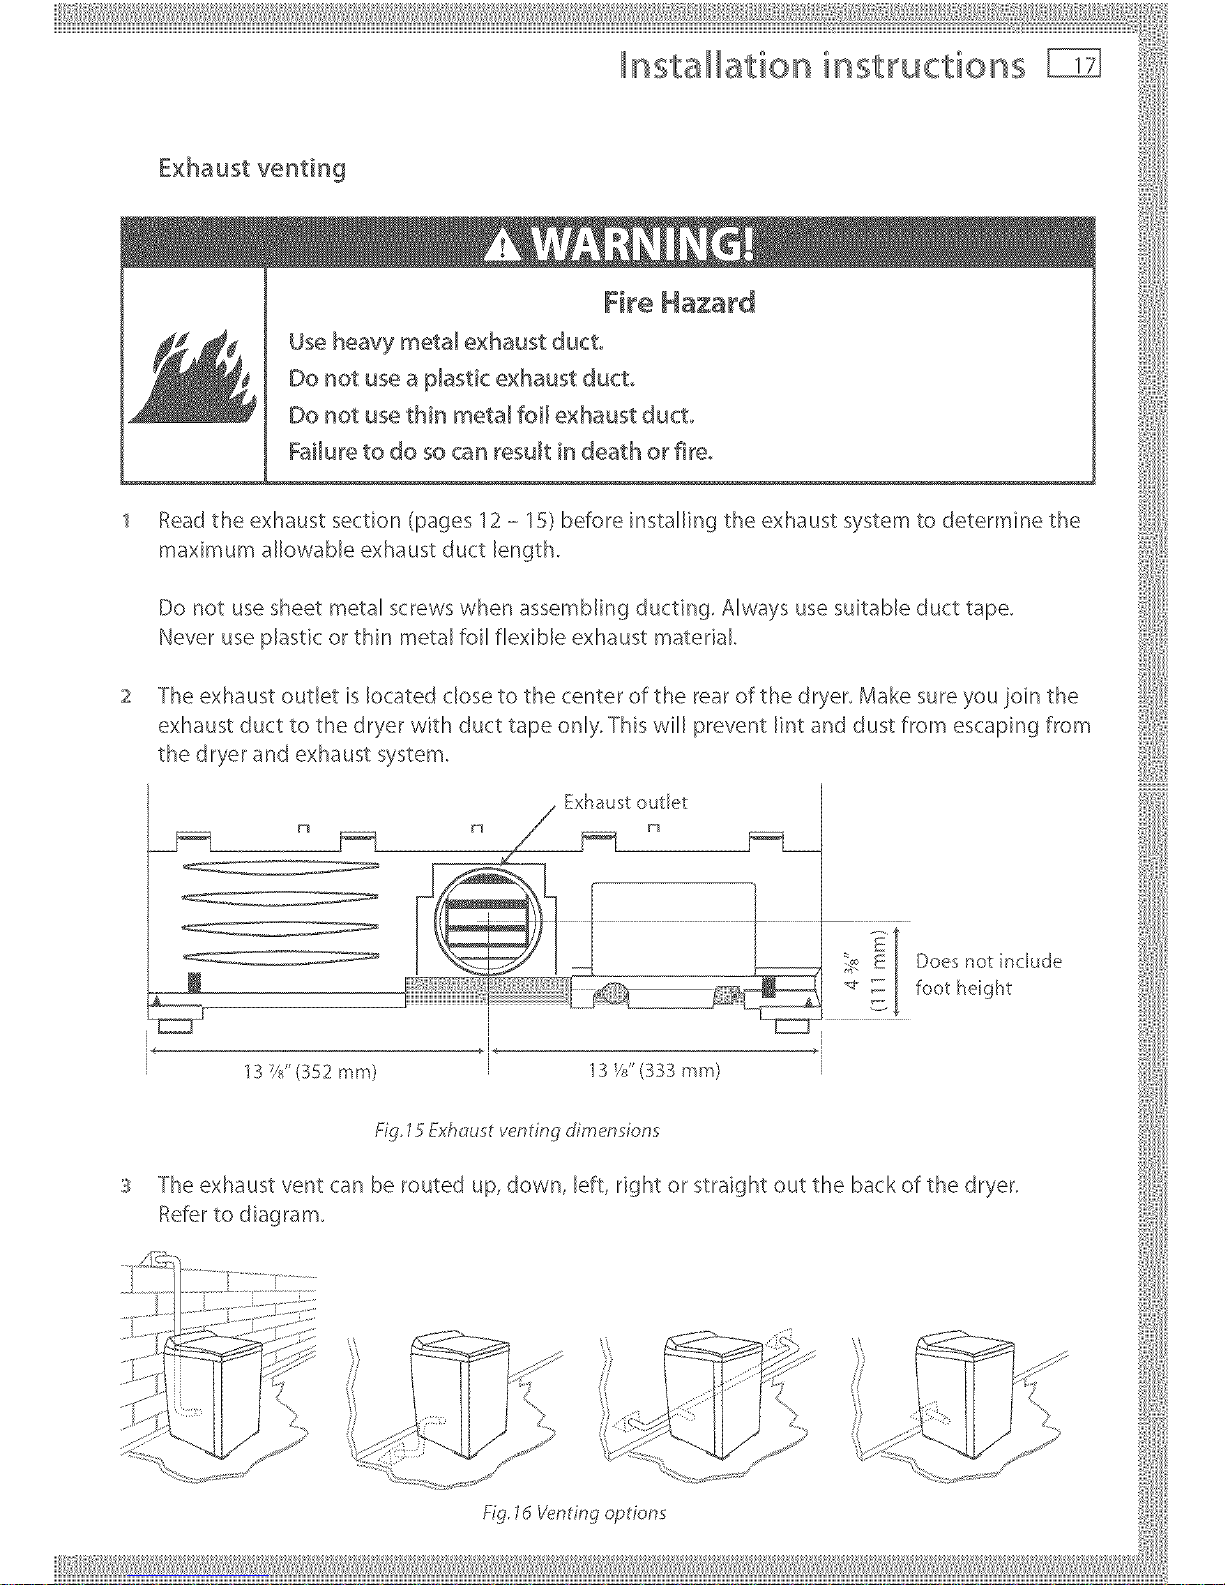
fxhtust veltilg
I 11
Use heavy metal exhaust duct
' tead the exhaust section (pages 12 - 15) before installing the exhaust system to detemqne the
maximumaUowableexhaustductlength.
Donotusesheetmetalscrewswhenassembl_n_duct_ng.Alwaysusesuitableducttape.
I,leve_useplastico_thinmetalfoUflexibleexhaustmaterial.
2 The exhaust outlet is located close to the center of the rear of the dryer. Make sure you join the
exhaust duct to the dryer with duct tape only. This will prevent lint and dust from escaping from
the dryer and exhaust system.
. Exhaust outlet :}[ .....
- t
..... _e _ [ Does not include ?7ii
_ E _: : [ footh_ght
.................... I
3 The exhaust vent can be routed up, down, left, dght orstraight out the backof the dryer.
Refe_tod_ag_am. i
......._f-.....
_{:33: ....
..... " - , ' ,iM {
' \} ,,,, _ i
..... '% ; , .... ; ....
..... _:_!(': = k" ...... _'
___________
nsta ation instructions
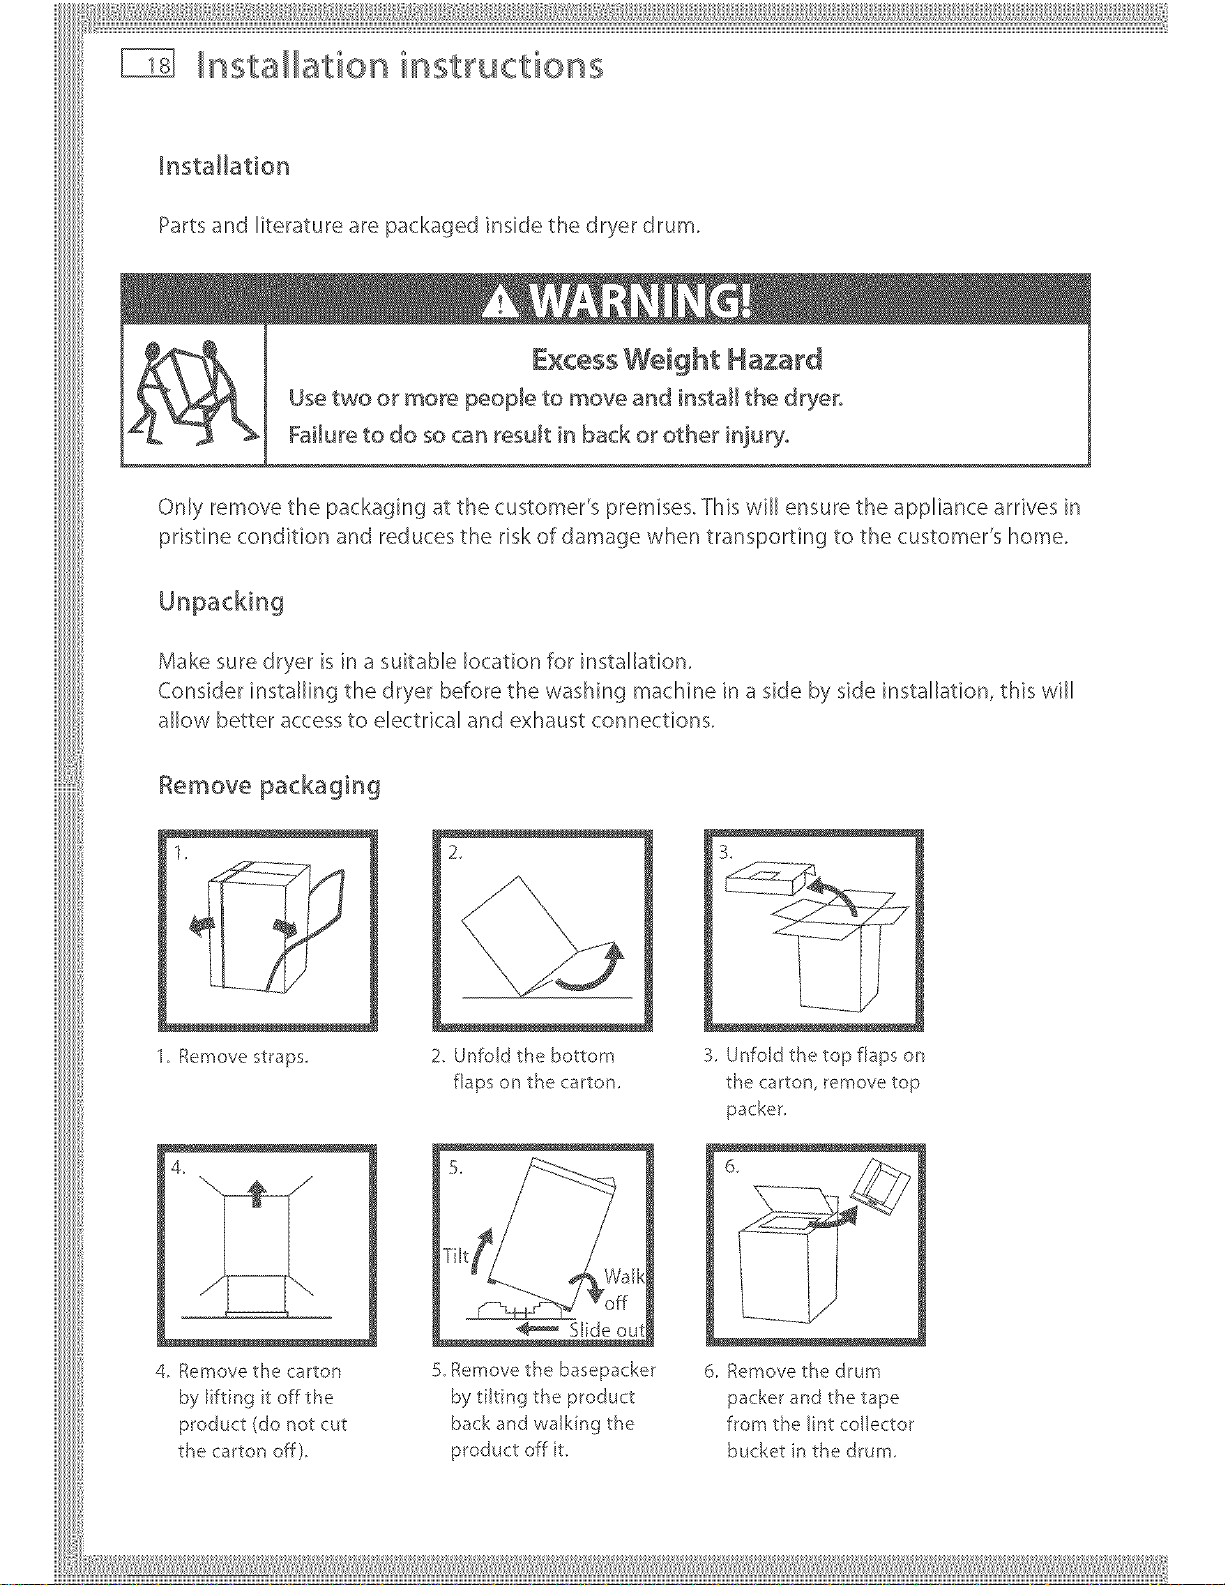
Installation
Partsand literature are packaged inside the dryer drum.
Excess Weight Hazard
Usetwo or more people to move and install the dryer,
Failure to do socan result in back or other injury,
Only remove the packaging at the customer's premises. This will ensure the appliance arrives in
pristine condition and reduces the risk of damage when transporting to the customer's home.
Make sure dryer is in a suitable location for installation.
Consider installing the dryer before the washing machine in a side by side installation, this will
allow better access to electrical and exhaust connections.
Remove packaging
1. Remove staps
4.
4. Remove the carton
by lifting it off the
product (do not cut
the carton off).
2_
2. Unfold the bottom
flaps on the carton
5 Remove the basepacker
by tilting the product
back and walking the
product off t.
3.
3. Unfold the top flaps on
the carton, remove top
packer.
6. Remove the drum
packer and the tape
from the lint collector
bucket n the drum.
 Loading...