


AD55
Front loading dryers
NZ AU GB IE
ED56, AD55, AD39 models
Installation instructions
and user guide


1
Introduction 2
Safety and warnings 3
Installation instructions
Installation options 5
Installation – Electronic and Manual 4.5 kg dryers 6
Installation – Manual 3.5 kg dryers 8
Specifications 8
Dryer wall mounting instructions 9
Before you dry
Sorting and loading 11
Cleaning the lint filter 12
Electronic dryer
Using your dryer 13
Dryness levels 13
1 hour settings 14
Key Lock 14
Temperature settings 15
Delay start 15
Wrinkle guard 15
Manual dryers
Using your dryer 16
Drying times 17
Drying rack 18
Operating problems 19
Manufacturers warranty 20
Customer care 21
Contents
Important!
SAVE THESE INSTRUCTIONS
The models shown in this user guide may not be available in all markets and are subject to
change at any time. For current details about model and specification availability in your country,
please go to our website www.fisherpaykel.com or contact your local Fisher & Paykel dealer.

2
Congratulations on purchasing a Fisher & Paykel dryer. Your new dryer will give you the
convenience of tumble drying and your clothes the advantage of not being subjected to the
harsh overdrying effects of the sun. Your clothes will feel softer, retain their shape better and will
require less ironing.
At Fisher & Paykel we aim to provide products that are simple to use, ergonomic and energy
efficient. Thousands of tonnes of washing and 70 years of laundry experience have been
programmed into you dryer to help give you the best possible performance.
We hope you enjoy your new dryer. We have certainly enjoyed designing it.
Cost to dry
Many people are reluctant to use a dryer because
they believe they are expensive to run. True enough,
sunshine is free, but we don’t always have sunshine
and the benefits to you and your clothes can make
machine drying worthwhile.
The following example of a 2.5 kg load is used to
demonstrate the cost of drying.
4 T-shirts
1 Sweat Shirt
5 Pair Underpants
5 Pairs Socks
1 Pair Trousers
2 Pair Shorts
3 Handkerchiefs
This load was spun at a high spin speed (1000 rpm) and dried in an Electronic dryer on dryness
level 4 (Medium dry and Extra dry lights on). The load took 60 minutes to dry.
For example if power costs 10 cents / unit, the load will cost approximately 15 cents to dry (1.48
units x 10c). Check with your local Electricity Supply Authority for your domestic tariff.
Before using your dryer
Ensure the correct installation has been used for the dryer type. The Electronic and Manual 4.5 kg
dryers are rear venting dryers while the Manual 3.5 kg dryer is a front venting dryer.
Read the Safety and Installation Instructions.
Introduction
3
Safety and warnings
WARNING!
Fire Hazard
Only dry fabrics that have been washed with water.
Do not use heat to dry articles containing foam rubber or similarly textured
rubber-like materials. Dry on Airing.
A clothes dryer produces combustible lint and must be exhausted outdoors.
Take care to prevent the accumulation of lint around the exhaust opening
and surrounding area.
Failure to follow these instructions can result in death or personal injury.
Dryer use
The tumble dryer is intended only for drying textile material washed in water.
Undergarments that contain metal reinforcements should not be placed in the dryer. Damage
to the dryer can result if the metal reinforcements come loose during drying. If you wish to dry
these items use a drying rack.
Never dry rubber articles, fibreglass, or any plastic items or film eg plastic lined tablecloths and
baby bibs.
Clothes should go through the cool down/airing phase of the cycle. If for any reason the dryer is
stopped before the cycle has finished, dry clothes should be removed immediately and not left
in the dryer.
Clothes should be spread out to cool and not left bunched up eg in a clothes basket.
This dryer has been designed for domestic use only, not for commercial applications, such as
massage/beauty clinics where there may be increased lint accumulation or flammable materials
in the atmosphere or load.
This dryer is not intended for use by young children or infirm persons without supervision.
Young children should be supervised to ensure they do not play with the dryer.
Important!
If you are using an extension cord or a portable electrical outlet device (eg multi-socket outlet
box), ensure that it is positioned so that it does not come into contact with water or moisture.
Lint
Accumulated lint in the dryer can become a fire hazard, it also reduces the efficiency of the dryer
by causing longer drying times and increased power consumption.
Clean the lint filter before every load.
Ensure the area around the dryer is clear of lint.
At regular intervals have the interior of the dryer cleaned of any accumulated lint. This must be
done by a qualified person for electrical safety.
If you change the mounting of the dryer from upright to inverted or vice versa, the dryer must
be cleaned internally by a serviceman.

4
Safety and warnings
Spontaneous combustion
Important!
To reduce the risk of fire in a tumble dryer the following should be observed:
Items that have been spotted or soaked with vegetable oil or cooking oil are a fire hazard and
should not be placed in a tumble dryer.
Oil-affected items can ignite spontaneously, especially when exposed to heat sources such as a
tumble dryer.
The items become warm causing an oxidation reaction in the oil. This oxidation creates heat.
If the heat cannot escape the items can become hot enough to catch fire. Piling, stacking or
storing oil-affected items can prevent heat from escaping creating a fire hazard.
If it is unavoidable that fabrics that contain vegetable oil, cooking oil or have been contaminated
by hair care products be placed in a tumble dryer, they should first be washed in hot water with
extra detergent – this will reduce, but not eliminate the fire hazard. The cool down cycle of the
dryer should be used to reduce the temperature of these items. They should not be removed
from the tumble dryer or piled or stacked while hot.
Items that have previously been cleaned in, washed in, soaked in or spotted with flammable
liquids or solids eg petrol/gasoline, kerosene, dry cleaning solvents, vegetable or cooking oil,
waxes or other flammable or explosive substances should not be placed in a tumble dryer.
Highly flammable substances commonly used in domestic environments include acetone,
denatured alcohol, petrol/gasoline, kerosene, some brands of spot removers, turpentine, waxes
and wax removers.
Fabric Softeners or similar products should not be used in a tumble dryer to eliminate the effects
of static electricity, unless this practice is specifically recommended by the manufacturer of the
fabric softener product.
Rubber backed articles, clothes fitted with foam rubber pads, pillows, fibreglass, shoes
containing rubber, plastic items such as shower caps, and babies waterproof napkin covers
should not be placed in the dryer.
Items containing rubber (also known as latex foam) or similarly textured rubber like materials
should not be dried on any heat setting. Dry these garments on Airing. Foam rubber material can
when heated produce fire by spontaneous combustion.
5
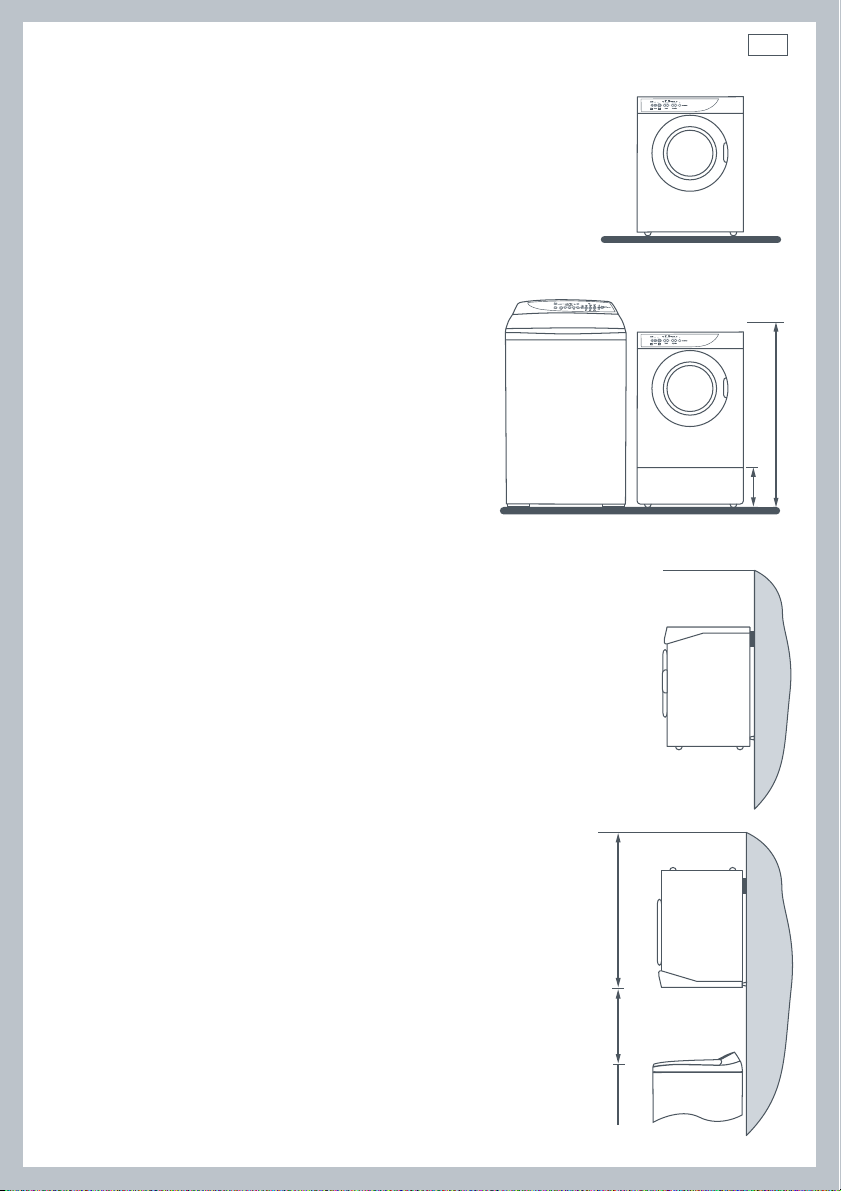
There are several different ways you can install your dryer.
1. Free standing
The dryer stands on the floor and can easily be moved into position.
2. Plinth*
Electronic and Manual 4.5 kg only
A plinth, with adjustable feet, allows the dryer to be:
– matched in height to your washer.
– installed under a bench.
Plinths can be purchased from your dealer.
115 mm Plinth Part No. 94832
60 mm Plinth Part No. 94852
3. Upright wall mounting*
All models
The wall mounting kit allows the dryer to be installed at any desired
height minimising the amount of bending and stretching.
Wall Mounting Kit Part No. 502067
4. Inverted wall mounting*
All models
A wall mounting kit and inverted panel allows you to
install the dryer above the washer or tub.
AD39 Inverted Panel Part No. 427560P
AD55 Inverted Panel Part No. 427560
ED56 Inverted Panel Part No. 427562
Wall Mounting Kit Part No. 502067
*Contact your dealer for assistance with plinths,
inversion kits and wall mounting kits
115 mm
925 mm
Washer
5 series = 415 mm
6 series = 455 mm
7 series = 505 mm
Minimum
lid clearance
Min. clearance
for dryer = 840 mm
Installation options
Fig. 1 Free standing
Fig. 2 Plinth height
Fig. 3 Upright wall
mounting
Fig. 4 Inverted wall mounting
6
Correct installation is very important for all dryers to ensure maximum efficiency and safety.
Important!
Never run the dryer unless the airflow system is free from obstruction.
There must be adequate ventilation to avoid the backflow of gases into the room from
appliances burning fuels, including open fires, when operating the dryer.
Exhaust air must not be discharged into a flue which is used for exhausting fumes from
appliances burning gas or other fuels.
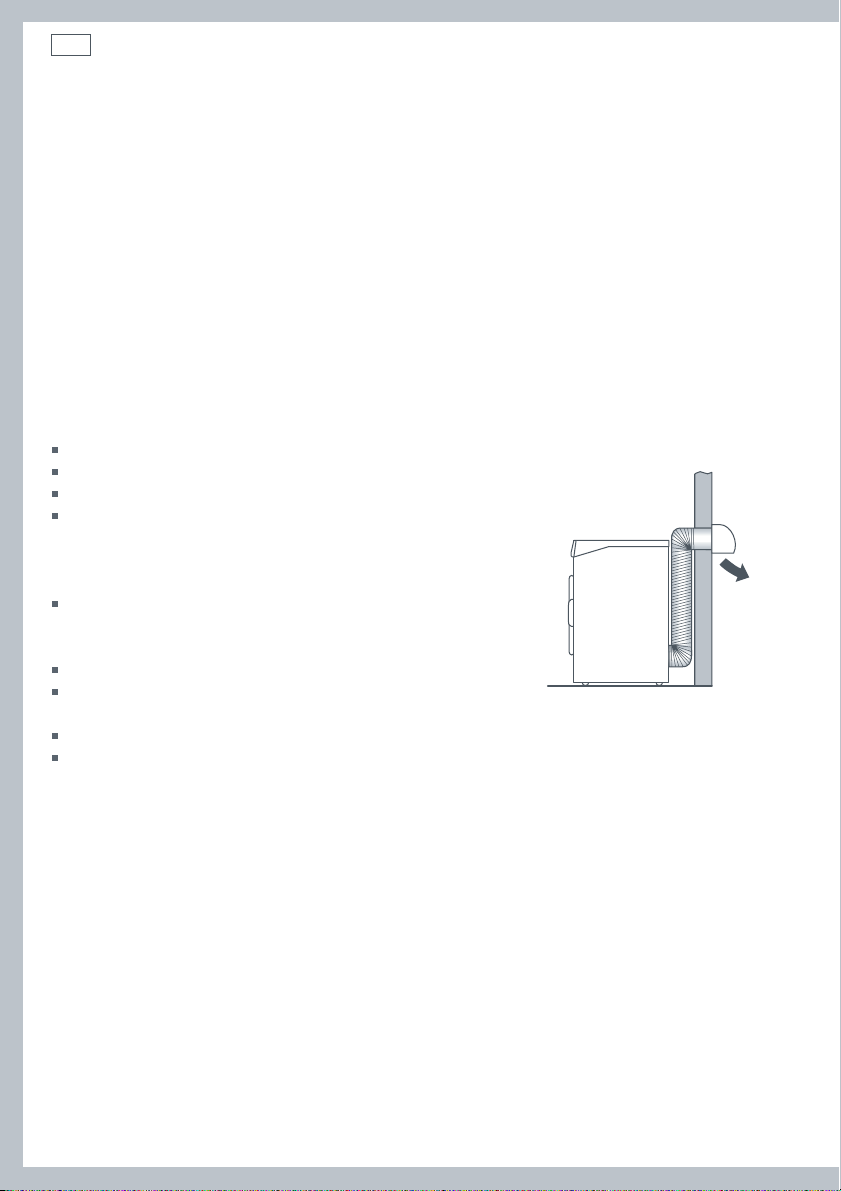
External venting
The dryer has been designed to be externally vented to provide the following advantages:
Ensures optimum efficiency by preventing recirculation of moist air.
Eliminates condensation on walls and ceilings.
Reduces the chance of lint being sucked into the dryer.
Prevents lint and other fine particles being blown into the
room.
All external venting systems should be:
Made from galvanised metal pipe or be sleeved with
a galvanised metal pipe where the vent system goes
through a wall or ceiling.
Exhausted outside and not into another confined space.
Fitted with a vent cap outside to stop rain water entering
the dryer exhaust system.
Angled to avoid condensation running back into the dryer.
Less than 2 m long. Special installation is required for ducting over 2 m. Contact your Authorised
Service Centre.
DO NOT use the internal vent deflector as an external weather cap as this will cause restriction of
the airflow and a loss in performance.
Installation – Electronic and Manual 4.5 kg dryers
Fig. 5 External venting
 Loading...