

Page 1

OWNER’S MANUAL
If you do not have prior experience with a metal
detector, we strongly recommend that
you:
1) Adjust the Gain to a
low setting in the
event of false
signals. Always
begin use at a reduced
Gain level; increase Gain
only after you have
become familiar with the detector.
2) Do not use indoors. This detector is for
outdoor use only. Many household
appliances emit electromagnetic energy,
which can interfere with the detector. If
conducting an indoor demonstration, turn
the Gain down and keep the searchcoil
away from appliances such as computers,
televisions and microwave ovens. If your
detector beeps erratically, turn off
appliances and lights.
Also keep the searchcoil away from
objects containing metal, such as
floors and walls.
3) Use a 9-volt ALKALINE battery only.
Do not use Heavy Duty Batteries.
Page 2

2
TABLE OF CONTENTS
Introduction . . . . . . . . . . . . . . . . . . . . . . . . . . . . . . . . . . . . . . . . . . . . . . . . . .3
Terminology . . . . . . . . . . . . . . . . . . . . . . . . . . . . . . . . . . . . . . . . . . . . . . . . . .4
Assembly . . . . . . . . . . . . . . . . . . . . . . . . . . . . . . . . . . . . . . . . . . . . . . . . . .5-6
Batteries . . . . . . . . . . . . . . . . . . . . . . . . . . . . . . . . . . . . . . . . . . . . . . . . . . . .7
Quick-Start Demo . . . . . . . . . . . . . . . . . . . . . . . . . . . . . . . . . . . . . . . . . . .8-9
Headphones . . . . . . . . . . . . . . . . . . . . . . . . . . . . . . . . . . . . . . . . . . .9
Basics Of Metal Detecting . . . . . . . . . . . . . . . . . . . . . . . . . . . . .10-11
Ground Minerals . . . . . . . . . . . . . . . . . . . . . . . . . . . . . . . . . . . . . . . .10
Trash . . . . . . . . . . . . . . . . . . . . . . . . . . . . . . . . . . . . . . . . . . . . . . . . .11
Identifying Buried Objects . . . . . . . . . . . . . . . . . . . . . . . . . . .11
Size and Depth of Buried Objects . . . . . . . . . . . . . . . . . . . . .11
EMI . . . . . . . . . . . . . . . . . . . . . . . . . . . . . . . . . . . . . . . . . . . .11
Operation and Controls . . . . . . . . . . . . . . . . . . . . . . . . . . . . . . . . . . . . . . . .12
Control Panel . . . . . . . . . . . . . . . . . . . . . . . . . . . . . . . . . . . . . . . . . . . . . . .12
Control Knobs
Off / On / Gain . . . . . . . . . . . . . . . . . . . . . . . . . . . . . . . . . . . .13
Disc / All-Metal / Threshold . . . . . . . . . . . . . . . . . . . . . . . . . .14
Touchpad Controls
GG / Pinpoint . . . . . . . . . . . . . . . . . . . . . . . . . . . . . . . . . . . . .14
+
and - . . . . . . . . . . . . . . . . . . . . . . . . . . . . . . . . . . . . . . . . .14
Operating in All-Metal mode
Ground Grab (GG) . . . . . . . . . . . . . . . . . . . . . . . . . . . . . . . .15
Setting the Controls . . . . . . . . . . . . . . . . . . . . . . . . . . . . . . . .15
Unwanted Noise . . . . . . . . . . . . . . . . . . . . . . . . . . . . . . . . . .15
Sweeping the Searchcoil . . . . . . . . . . . . . . . . . . . . . . . . . . . .15
Reading the Display . . . . . . . . . . . . . . . . . . . . . . . . . . . . . . .16
Target Scale . . . . . . . . . . . . . . . . . . . . . . . . . . . . . . . . . . . . .16
Operating in Discrimination mode
Ground Grab (GG) . . . . . . . . . . . . . . . . . . . . . . . . . . . . . . . .17
Setting the Controls . . . . . . . . . . . . . . . . . . . . . . . . . . . . . . . .17
Gain . . . . . . . . . . . . . . . . . . . . . . . . . . . . . . . . . . . . . . . . . . . .17
Mode . . . . . . . . . . . . . . . . . . . . . . . . . . . . . . . . . . . . . . . . . . .17
Disc Level . . . . . . . . . . . . . . . . . . . . . . . . . . . . . . . . . . . . . . .17
Unwanted Noise . . . . . . . . . . . . . . . . . . . . . . . . . . . . . . . . . .17
Sweeping the Searchcoil . . . . . . . . . . . . . . . . . . . . . . . . . . . .17
Using Pinpoint . . . . . . . . . . . . . . . . . . . . . . . . . . . . . . . . . . . .18
Reading the Display . . . . . . . . . . . . . . . . . . . . . . . . . . . . . . .18
Discrimination Control . . . . . . . . . . . . . . . . . . . . . . . . . . . . . . . .19-20
Ground Balancing . . . . . . . . . . . . . . . . . . . . . . . . . . . . . . . . . . .21-23
Ground Balancing Technical Info . . . . . . . . . . . . . . . . . . . . . . . . . .24
Target Display & Audio . . . . . . . . . . . . . . . . . . . . . . . . . . . . . . .25-26
Gold Prospecting . . . . . . . . . . . . . . . . . . . . . . . . . . . . . . . . . . . .27-28
Hot Rocks . . . . . . . . . . . . . . . . . . . . . . . . . . . . . . . . . . . . . . . . . . . .29
Electrical Interference (EMI) . . . . . . . . . . . . . . . . . . . . . . . . . . .30-31
Search Techniques . . . . . . . . . . . . . . . . . . . . . . . . . . . . . . . . . . . . .32
Target Pinpointing . . . . . . . . . . . . . . . . . . . . . . . . . . . . . . . . . . . . . .33
Optional 11”DD Searchcoil . . . . . . . . . . . . . . . . . . . . . . . . . . . . . . . . . . . . .34
Treasure Hunter’s Code of Ethics . . . . . . . . . . . . . . . . . . . . . . . . . . . . . . . .35
Device Specifications . . . . . . . . . . . . . . . . . . . . . . . . . . . . . . . . . . . . . . . . .35
Warranty . . . . . . . . . . . . . . . . . . . . . . . . . . . . . . . . . . . . . . . . . . . .Back Cover
DEVICE SPECIFICATIONS
Mechanical: S-rod with electronics housing on rod, 3-piece breakdown
construction, nonmetallic telescoping lower rod, adjustable position
arm rest
Weight: 2 lbs, 8 oz with battery installed
Standard searchcoil: 4.7 inch (12.3 cm) closed-frame round biaxial,
waterproof
Batteries: Single 9 volt rectangular alkaline
Operating principle: VLF induction balance
Operating frequency: 19 kHz, crystal controlled
Reactive overload: 10,000 micro-cgs (with standard searchcoil)
Resistive overload: 1,200 micro-cgs (with standard searchcoil)
Ground balance range: From ferrite to salt water inclusive
Discrimination ground suppression: Combination of 2
order methods
Target ID ground suppression: 3
Battery life: 15+ hours on good quality alkaline
Operating temp range: 14 to 122 degrees F (-10 to +50 C)
Operating humidity range: 0 - 90% noncondensing
TREASURE HUNTER’S CODE OF ETHICS
• Always check Federal, State, County and local laws before searching.
• Respect private property and do not enter private property without the
owner’s permission.
• Take care to refill all holes and do not leave any damage.
• Remove and dispose of any and all trash and litter found.
• Appreciate and protect our inheritance of natural resources, wildlife and
private property.
• Act as an ambassador for the hobby; use thoughtfulness, consideration and
courtesy at all times.
• Never destroy historical or archaeological treasures.
• All treasure hunters may be judged by the example you set; always conduct
yourself with courtesy and consideration of others.
Page 3

Introduction to the Gold Bug Pro
The New Gold Bug Pro is unique among gold prospecting metal detectors for
its combination of high sensitivity to small gold nuggets and its versatile
function as an all-purpose treasure detector.
The controls and features are tailored to gold prospecting, including a
sophisticated ground balancing system, separate control over signal gain and
threshold, and a unique discrimination control system. These features also
make for a great relic-hunting detector, especially when the Gold Bug Pro is
outfitted with the optional 11” DD searchcoil. While the Gold Bug Pro makes
for a highly competent coin-shooting detector, its user interface and features
are not specifically designed for this purpose. As a coin-shooter, you will
notice that the Gold Bug Pro exhibits slightly lower sensitivity to highconductivity coins, like a U.S. quarter; this is a result of its specialized design
to emphasize sensitivity to small low conductivity metals like
gold nuggets.
The Gold Bug Pro is outfitted with a small 5” searchcoil as standard equipment
since this searchcoil construction is best-suited to finding gold nuggets. You
may be familiar with other metal detectors which have larger searchcoils,
generally in the range of 8 to 10 inches in diameter. Large coils are designed
to cover the maximum amount of ground efficiently and for the deepest ground
penetration. Small searchcoils, intended for gold prospecting, are designed for
precision. The Gold Bug Pro’s small DD searchcoil makes pinpointing easier,
fits into small spaces where gold is often hidden, is better suited to penetrate
highly mineralized soils where gold is frequently found, and has the highest
possible sensitivity to tiny gold nuggets.
Congratulations!
Congratulations on your purchase of the new Gold Bug Pro metal detector. The newly
designed Gold Bug Pro has been custom designed to find the smallest gold nuggets,
but unlike other specialized gold prospecting detectors, it can also be used for relic
hunting and coin shooting too.
Whether you use your Detector in the backyard, at the shoreline, in the mountains or
fields afar, your investment will let you experience the excitement of searching for yet
uncovered treasures and give you hours and years of outdoor enjoyment. Out on your
own or with a group, places to use your Gold Bug Pro are unlimited as buried treasures
can be as near as your doorstep or as far as you wish to travel.
This manual has been written to help you get optimal use of your detector, so we hope
you will read it thoroughly before your first outing and will also refer back to this manual
from time to time to reinforce features and methods as you become more proficient in
the field.
Happy Hunting from Fisher Research Labs!
3
Page 4

4
TERMINOLOGY
After you have identified a target using Discrimination mode,
press-and-hold the PINPOINT button to identify the target’s exact
location. This technique can yield more information about the target’s
shape and size and also find its exact location to facilitate extraction.
Pinpoint as follows:
1.
Position the searchcoil just barely off the ground, and to the side of
the target.
2. Now move the searchcoil slowly across the target; you can locate
it by the sound. The target is located directly under where the
sound is loudest.
Narrow It Down:
1.
To narrow the response further, position the center of the searchcoil
near the center of the response pattern, but not directly over the
center.
2. Release the PINPOINT button.
3. Press-and-hold PINPOINT button again.
4. Repeat this narrowing procedure to narrow the field of detection
further.
Note: Depth indication is less accurate
SEARCHCOIL DRIFT
If you plan to use the PINPOINT mode for
continuous searching, realize that drift will
occur
over
time,
causing
the detector
to gain or lose
sensitivity. Periodic
retuning of the detector
is required to minimize
drift; release and press
PINPOINT again to retune.
The following terms are used throughout the manual, and are standard
terminology among treasure hunters.
ELIMINATION
Reference to a metal being "eliminated" means that the detector will not
emit a tone, nor light up an indicator, when a specified object passes
through the searchcoil’s detection field.
DISCRIMINATION
When the detector emits different tones for different types of metals, and
when the detector "eliminates" certain metals, we refer to this as the
detector "discriminating" among different types of metals.
Discrimination is an essential feature of professional metal detectors.
Discrimination allows the user to ignore trash and other undesirable
objects.
RELIC
A relic is an object of interest by reason of its age or its association with
the past. Many relics are made of iron, but can also be made of bronze
or precious metals.
IRON
Iron is a common, low-grade metal that is an undesirable target in certain
metal detecting applications. Examples of undesirable iron objects are
old cans, pipes, bolts and nails.
Sometimes, the desired target is made of iron. Property markers, for
instance, contain iron. Valuable relics can also be composed of iron;
cannon balls, old armaments, and parts of old structures and vehicles
can also be composed of iron.
FERROUS
Metals which are made of, or contain, iron.
PINPOINTING
Pinpointing is the process of finding the exact location of a buried object.
Long-buried metals can appear to the eye exactly like the surrounding
soil, and can therefore be very hard to isolate from the soil.
PULL-TABS
Discarded pull-tabs from beverage containers are an especially
bothersome trash item for treasure hunters. They come in many
different shapes and sizes. Pull-tabs can be eliminated from
detection, but some other valuable objects can have a magnetic
signature similar to pull-tabs, and will also be eliminated when
discriminating out pull-tabs.
GROUND BALANCE
Ground Balancing is the ability of the detector to ignore, or "see through" the
earth’s naturally occurring minerals, and only sound a tone when a metal
object is detected. The Gold Bug Pro incorporates proprietary circuitry and
programming to eliminate false signals from severe ground conditions.
TARGET PINPOINTING
Page 5
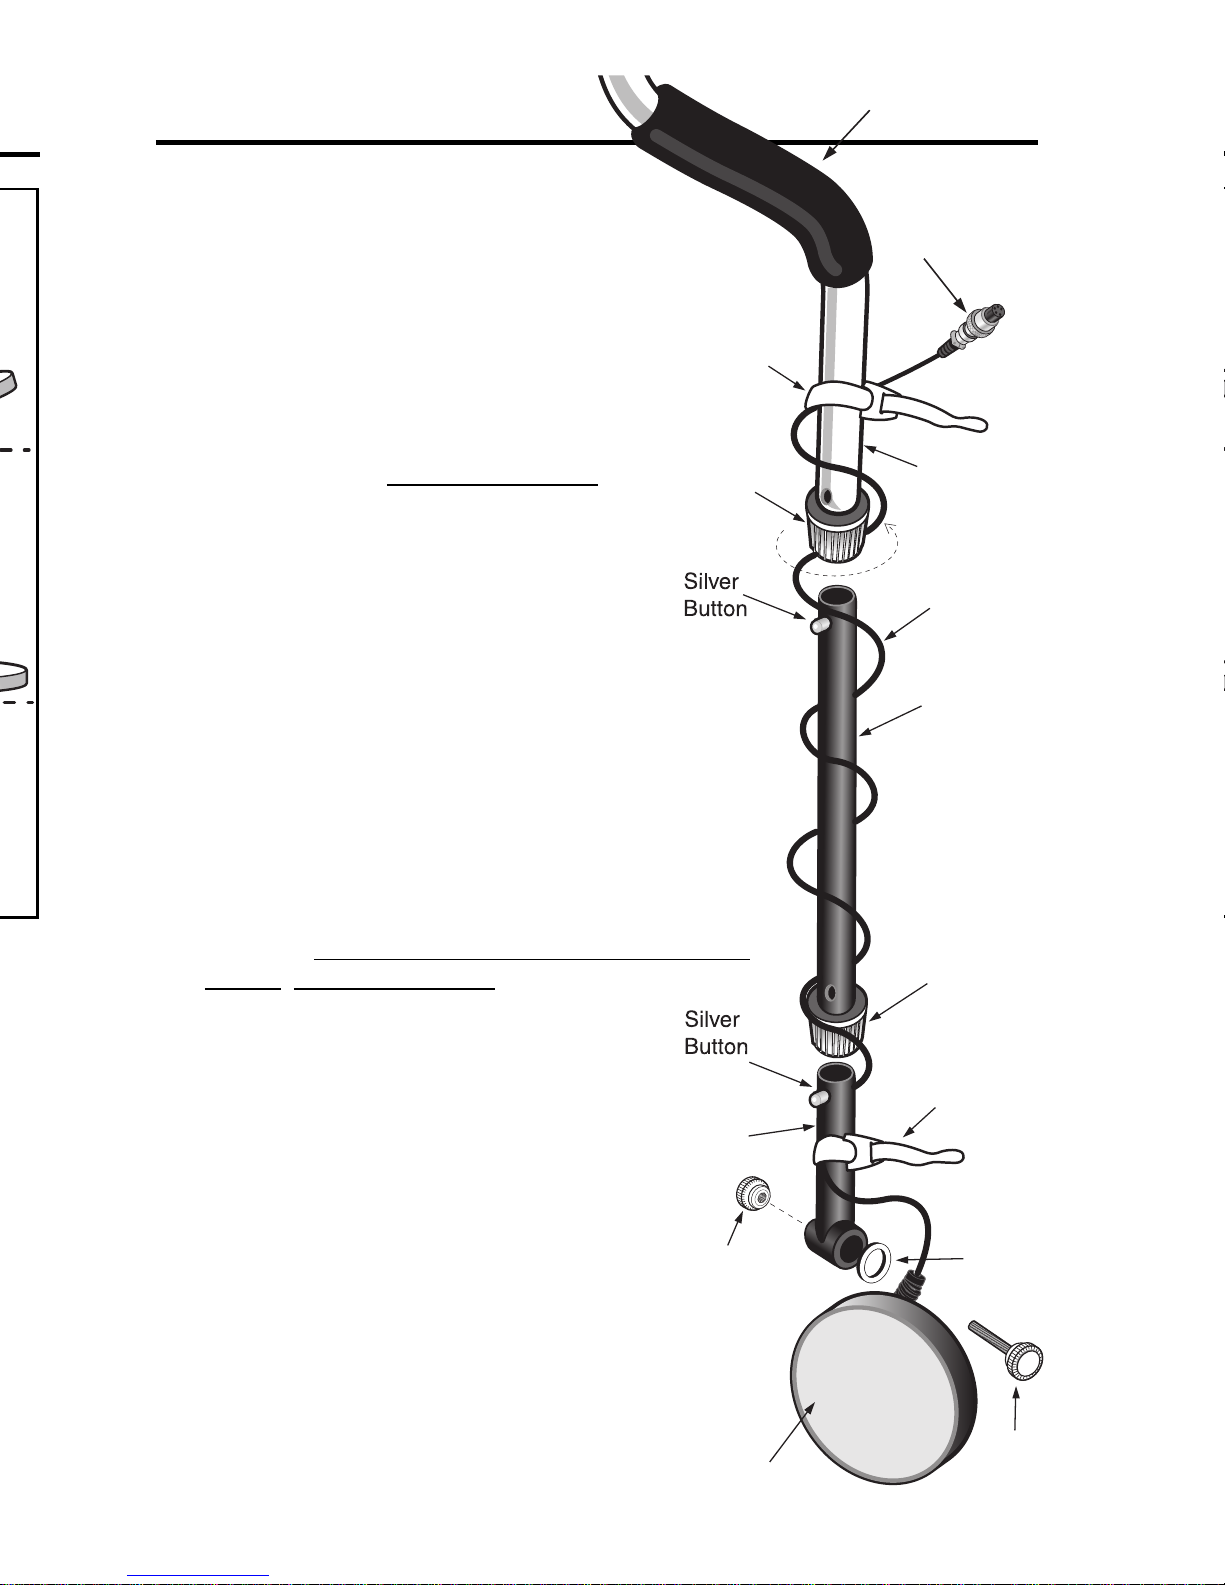
ASSEMBLY
Assembly is easy and requires
no tools.
●
1 Loosen both Locking Collars by rotating 100%
counterclockwise.
●
2 Insert the Middle Stem into the S-Rod and
click Silver Button into hole.
●
3 Position the lower stem with the silver button
toward the back.
Using the bolt, one rubber washer, and
knurled knob, attach the searchcoil to the
lower stem.
●
4 Press the button on the upper end of the
lower stem, and slide the lower stem into the
middle stem.
Adjust the stem to a length that lets you maintain a
comfortable upright posture, with your arm relaxed at
your side, and the searchcoil parallel to the ground in
front of you.
●
5 Wind the cable securely around the stems.
A loose or moving cable can cause false signals.
●
6 Connect cable plug to housing.
Do not twist the cable or plug. Turn knurled locking
ring only. Use minimal finger pressure to start the
threads. Do not cross-thread. When the locking ring is
fully engaged over the threaded connector,
give it a firm turn to make sure that it is very
tight. When the locking ring is fully engaged
over the threaded connector, the locking ring
may not cover all of the threads.
●
7 Tighten both locking collars.
●
8 Secure the cable with the 2 velcro straps
provided, one on the lower stem close to the
searchcoil, and one on the upper stem, close
to the housing. Leave just enough slack in the
cable, at the searchcoil end, to be able to
rotate the searchcoil a small amount about the
bolt. After full assembly and upon first use in
the field, check this adjustment. It is very
important to keep the cable secure against the
stem, especially at high Gain, as movement in
the cable may cause false signals.
Loc
kin
g
Col
lar
Loc
kin
g
Col
lar
S-R
od
Vel
cro
Str
ap
Vel
cro
Str
ap
Knurled
Kno
b
Bolt
Single
Rubber
Was
her
Sea
rch
coi
l
Hand-grip
Sea
rch
Coi
l Cable
Low
er
Stem
Middle
Stem
Cable
Plug
Page 6
6
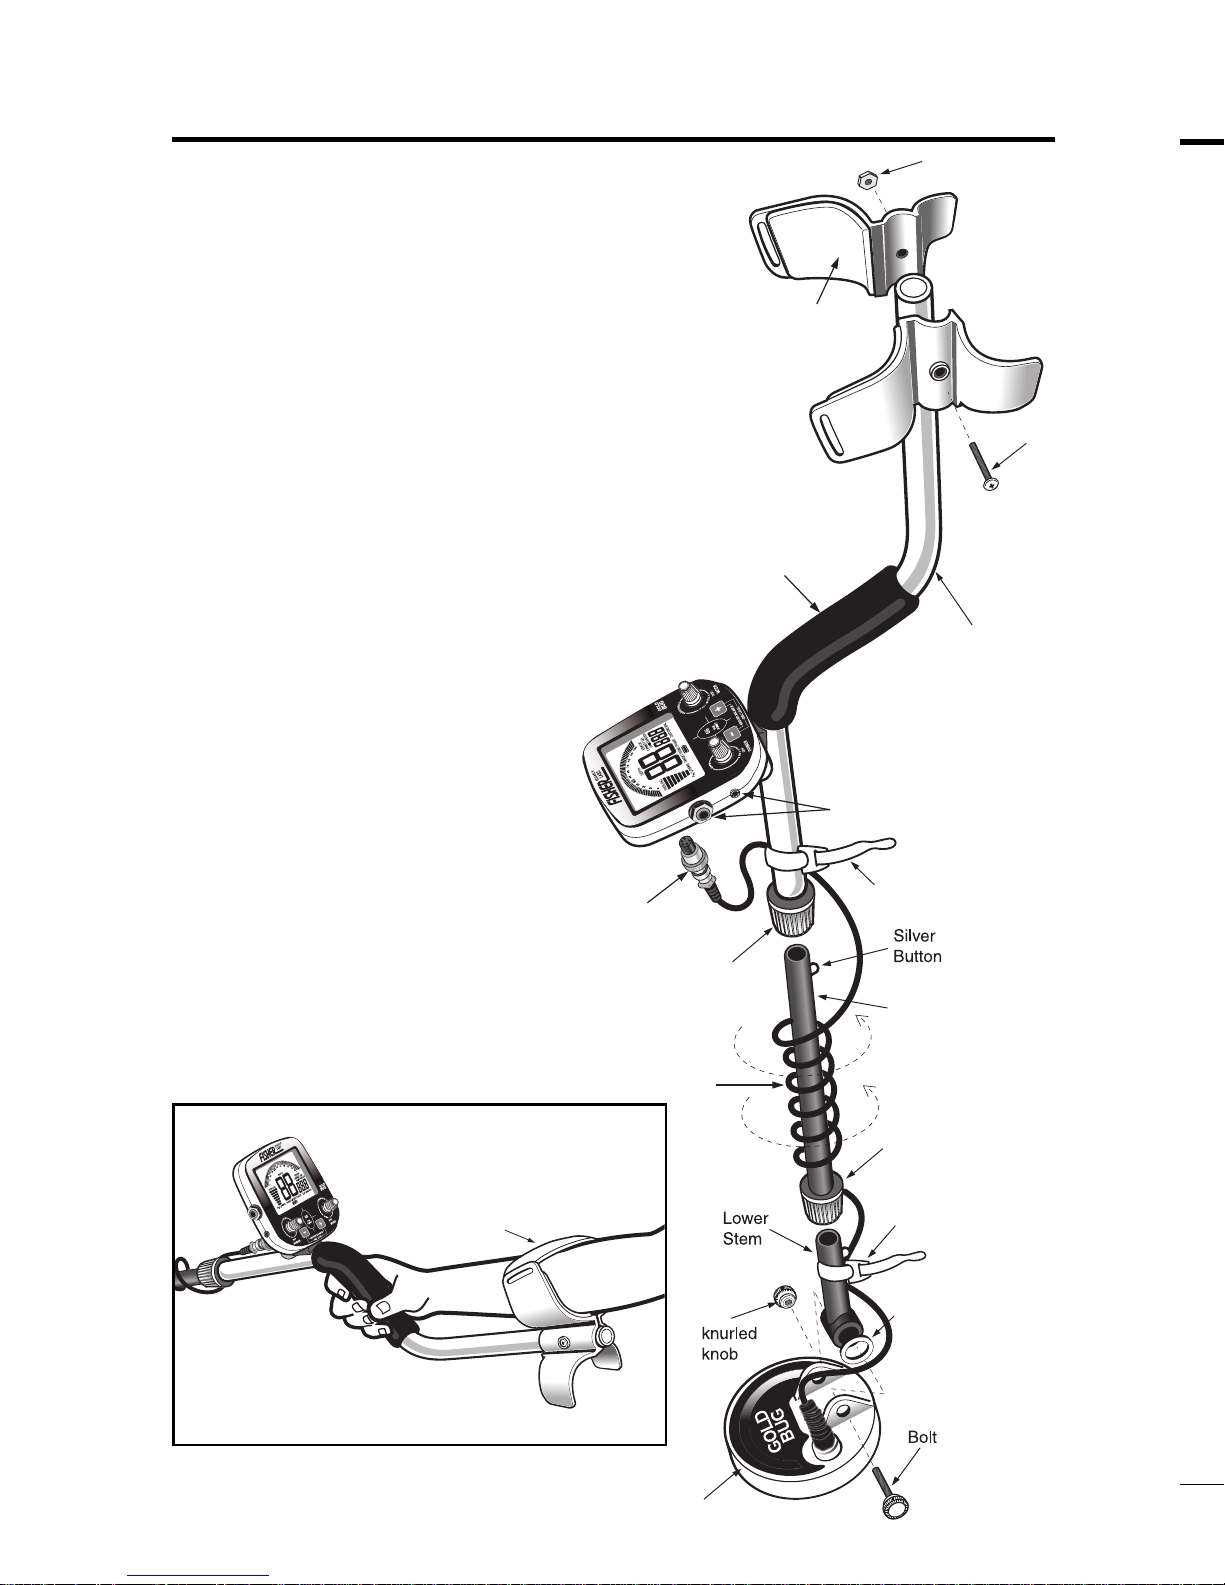
ASSEMBLY
Adjusting the Arm Rest
The Arm Rest may be moved
forward or backward by removing
the single screw and nut, and then
repositioning the 2-piece Arm Rest.
Users with shorter arms may find
the Arm Rest more comfortable in
the forward position. In order to
move the Arm Rest backward, the
plastic plug must be removed from
the aluminum tube.
Arm Rest Strap
(optional accessory)
The Arm Rest Strap accessory can
be purchased separately. Some
users prefer to use the strap when
swinging the detector vigorously, in
order to hold the detector securely
against the arm.
The detector can always be used
without the strap, with no
compromise to detector balance
and stability under most conditions.
Hand-grip
Nut
Screw
Search
Coil
Cable
Cable
Plug
Sea
rch
oil
S-Rod
armrest
Velcro
Strap
Middle
Stem
Velcro
Strap
Locking
Collar
Locking
Collar
Headphone Jacks
Single
Rubber
Was
her
Optional Arm Strap
line of defense against electrical interference. The Threshold control only applies to
the All-Metal mode.
Electrical interference is usually more controllable in the All-Metals mode than in the
Discrimination mode.
On the Gold Bug, setting the discrimination level between 60 and 70 will usually reduce
electrical interference. In the Discrimination mode, the detector may chatter if the
searchcoil is not in motion, but once you start sweeping it over the ground, the signal
from the ground will usually suppress the electrical interference chatter, except for an
occasional pop or click which will not sound like a real target.
If you are conducting an indoor demonstration, you may find that changing the
orientation of the searchcoil will reduce the pickup of electrical interference.
If you carry a cell phone or other high-tech electronic equipment while metal detecting
and you encounter electrical interference, try turning the device off and see if that solves
the problem. Turn such devices completely off, not just into standby mode.
When working near overhead power lines, you may get the best results right under the
power line and the worst results when standing at a 30° to 45° angle to the power line.
Many sources of electrical interference are intermittent. You may find that an area which
is difficult to search at one time of day may be easier after 5 PM, or on weekends.
Power lines are usually quietest late at night, and early on weekend mornings.
Small searchcoils usually pick up less electrical interference than larger searchcoils. On
a site with severe electrical interference, a small searchcoil is often a better choice than
a large one.
Distinguishing electrical interference from other problems
Electrical interference will often vary as you walk around from place to place, and it will
also vary with changes in the orientation of the searchcoil. This is almost never the
case if there is a functional problem with the metal detector itself.
The most common cause of a noisy metal detector, where the problem is not electrical
interference, is a defective searchcoil. If striking the searchcoil with your hand causes
the noise to start or stop, the problem could be a defective searchcoil. Also, a defective
searchcoil often causes noise of a more intermittent nature than electrical interference.
The second most common cause is a loose searchcoil connector. The noise from a
loose connector will usually be very erratic or intermittent in nature. Try unplugging the
searchcoil and then reconnecting it to ensure the connector is firmly installed.
If you use a searchcoil cover, dirt or water can accumulate inside it, and movement of
those materials can cause false signals while sweeping the searchcoil. Searchcoil
covers must be periodically removed and cleaned.
ELECTRICAL INTERFERENCE
Page 7

7
A 3-segment battery indicator at the bottom of the display indicates the
battery condition.
The detector requires a single 9-volt ALKALINE battery.
Do not use ordinary zinc carbon batteries.
Do not use “Heavy Duty” batteries.
Rechargeable batteries can also be used.
If you wish to use rechargeable batteries, we recommend using a
Nickel Metal Hydride rechargeable battery.
The battery compartment is located on the back side of the housing.
Slide the battery door to the side and remove it to expose the battery
compartment.
BATTERY LIFE
Expect about 15 to 20 hours of life from a 9-volt alkaline battery.
Rechargeable batteries can provide up to 8 hours of usage per charge.
SPEAKER VOLUME AND BATTERY CHARGE
You may notice the speaker volume drop when only one battery segment is
illuminated.
With one segment flashing, low speaker volume will be very apparent.
BATTERY INDICATOR
The 3-segment battery indicator has 3 stages of indication.
These indications are accurate for a 9-volt alkaline battery.
Segments Illuminated Battery Voltage
3 -segments more than 8.5 volts
2 -segments more than 7.5 volts
1 -segment flashing more than 6.8 volts
After the 1st segment begins flashing, expect the detector to shut off within 10
minutes.
A rechargeable battery will usually illuminate two to three segments
throughout most of its useful charge. But as soon as it drains to the 1-segment
level, it will then lose its charge very rapidly.
BATTERIES
Page 8
8
QUICK-START DEMONSTRATION
HOT ROCKS
I. Supplies Needed
• a Nail • a Zinc Penny (dated after 1982)
• a Nickel • a Quarter
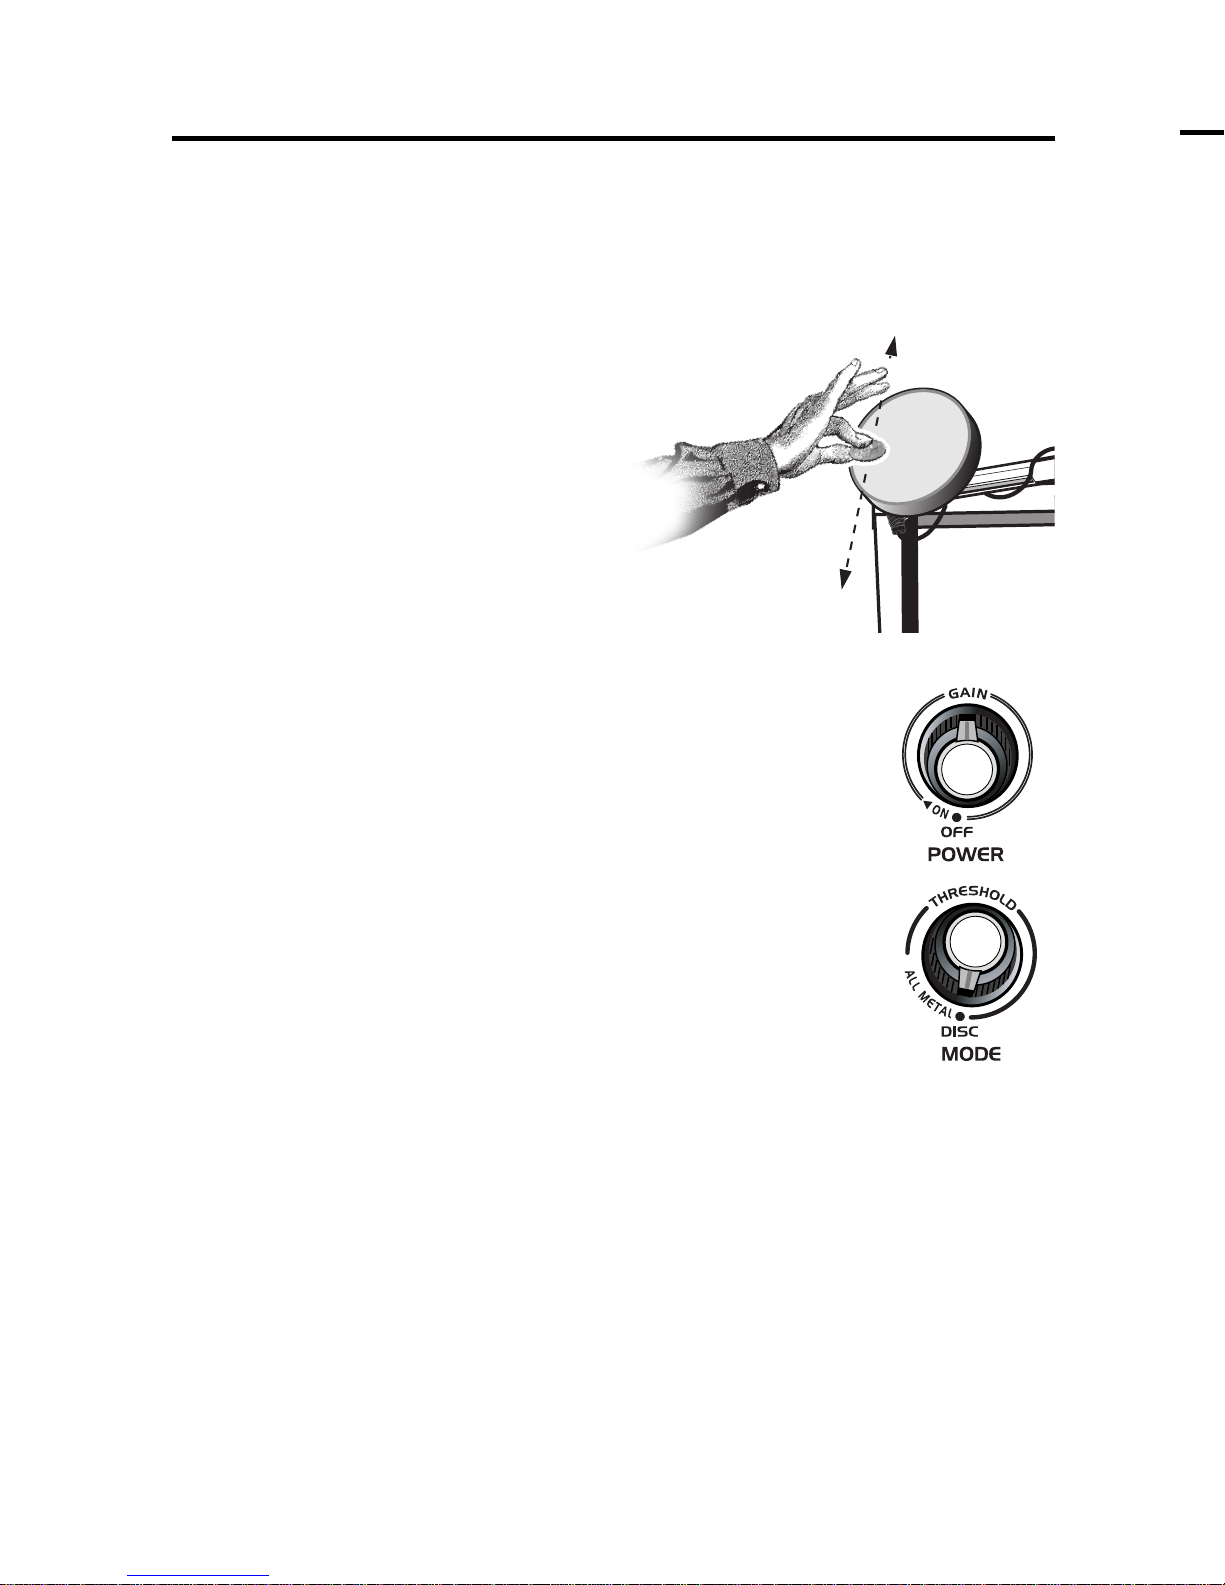
II. Position the Detector
a. Place the detector on a table,
with the searchcoil hanging over
the edge.
Or better, have a friend hold the
detector, with the searchcoil off
the ground.
b. Keep the searchcoil away from
walls, floors and metal objects.
c. Remove watches, rings and
jewelry.
d. Turn off lights or appliances,
whose electromagnetic emissions may cause interference.
e. Pivot the searchcoil back.
III. Click on detector with the left knob. Set the Gain at the
12:00 position for this demonstration.
IV. Click the right knob to the left to the DISC setting.
V. a. Wave the nail over the searchcoil.
b. Press
+
repeatedly, while continuing to wave the nail.
• Notice the change in sound.
• Sound changes from a HIGH tone to a LOW tone.
VI. Wave each object over the searchcoil.
Sweep coin flat and parallel to the searchcoil. This is how
you will usually find them buried.
a. Notice the tones and 2-digit target IDs for each object.
b. Motion is required.
Objects must be in motion over the searchcoil to be
detected in this mode.
VII. Press the +button several more times until the Disc value on the
display
=
60.
VIII. Wave the nail over the searchcoil.
a. The nail will not be detected
b. The nail has been “discriminated out.”
Quick-Start Demo continued on next page
A hot rock is a rock which causes the metal detector to sound off because the
rock contains iron minerals. They come in two basic types.
Negative hot rocks (also called cold rocks) are usually magnetite or
contain magnetite, and give a negative response because their ground
balance value is a higher number than the soil they are found in. They
tend to be dark in color, usually black, and usually heavy. In some cases
they will have rust stains. They are usually attracted to a magnet, and for
this reason gold prospectors always carry a magnet -- the ultimate
ferrous/nonferrous discriminator. In All Metal mode, negative hot rocks
produce a
recognize the difference and you will learn to ignore them. As the
searchcoil passes over a hot rock, this
is quite distinctive. To hear this response, you must be properly Ground
Balanced and in All-Metal mode with an audible threshold hum. First, as
the center of the searchcoil passes over the negative hot rock, the
detector will go quite; the threshold hum momentarily silences. Then,
passing beyond the negative hot rock, you hear the
pass the searchcoil back and forth over a negative hot rock, it will be
impossible to pinpioint and will seem as if it
Positive hot rocks are iron-bearing rocks which have been oxidized by
natural weathering processes so that their GRND BAL value is a number
lower than the soil they are found in. They are often small, right on the
surface, sound just like a gold nugget, and are common in many gold
prospecting areas. They are usually, but not always, drawn to a magnet.
They are most often reddish in color but are often black, brown, or yellow.
On relic hunting sites, red clay bricks and rocks which have lined a fireplace
or a campfire will often be
them without difficulty if widely scattered, but if there is a large concentration
of them, the discriminator may not quiet them all. In that case, you can
revert to the rule of thumb -- “don’t dig non-repeatable signals.”
Remember to always carry a magnet to help discriminate gold from hot rocks
and iron.
• Gold will not
• Pieces of iron will always
• Negative hot rocks will almost always
• Positive hot rocks will usually
Page 9

9
X. Click the MODE knob to the right.
The detector is now in the ALL-METAL Mode
QUICK-START
continued
a. Keep GAIN set at the 12:00 position
b. Rotate the THRESHOLD knob slowly from the far counterclockwise
position to the full clockwise position.
Notice these attributes of the THRESHOLD control, with no metal
over the searchcoil.
i. at low settings you will hear no sound
ii. at mid-scale, there will be a transition point from no sound to
a barely audible, choppy sound.
iii. at full scale you will hear a loud, constant tone. It may also have
an irregular or choppy sound, as a result of electromagnetic
interference emitted from other electrical devices.
Use with headphones
(not included)
The Gold Bug Pro is equipped with both a 1/8” and 1/4” headphone jack. Any
headphones with a stereo plug will work; headphones with a mono plug will not
work. Using headphones extends battery life, and also prevents the sounds from
annoying bystanders. It also allows you to hear subtle changes in the sound more
clearly, particularly if searching in a noisy location. Gold nuggets are often very
small, so closely monitoring changes in sound using headphones will improve your
gold prospecting results. For safety reasons, do not use headphones near traffic
or where other dangers, like rattle snakes, are present. This device is to be used
with interconnecting cables/headphone cables shorter than three meters.
IX. Press-and-hold and hold the nickel over the searchcoil
a. Notice that motion is not required.
A motionless object induces a hum.
b. Notice the single monotone hum. The PINPOINT mode produces
only this single sound, regardless of the type of metal detected.
c. Move the nickel closer to and farther away from the searchcoil.
Notice the changing “depth” values.
Page 10
10
THE BASICS OF METAL DETECTING
GOLD PROSPECTING
A hobby metal detector is intended for locating buried metal objects. When
searching for metals, underground or on the surface, you have the following
challenges and objectives:
1. Ignoring signals caused by ground minerals.
2.
Ignoring signals caused by metal objects that you do not want to find,
like pull-tabs.
3. Identifying a buried metal object before you dig it up.
4. Estimating the size and depth of objects to facilitate digging them up.
5. Eliminating the effects of electromagnetic interference from other
electronic devices.
Your Gold Bug Pro metal detector is designed with these things in mind.
1. Ground Minerals
All soils contain minerals. Signals from ground minerals can interfere with
the signals from metal objects you want to find. All soils differ, and can
differ greatly, in the type and amount of ground minerals present. You
therefore want to calibrate the detector to the specific ground conditions
where you are hunting. The detector incorporates both automated and
manual ground balancing features which will eliminate false signals from
most types of soils. To maximize the detector’s target identification
accuracy and depth of detection, use the GROUND GRAB (GG) function
to calibrate the detector to the ground where you are searching. See the
section on GROUND BALANCING for details.
The Basics continued on next page
practice, bits of rusted barbed wire, chips off shovels and other mining tools,
rusted tin cans, etc. Hot rocks -- rocks containing concentrations of iron
oxides that sound like metal when you pass over them -- are also a nuisance
in many gold areas. Discrimination is usually ineffective because the loss of
sensitivity resulting from discrimination is enough to cause those little nuggets
to vanish. If you have gone many hours without finding gold and are
wondering if there is something wrong with your metal detector or how you are
using it, the most important clue is this: if you are digging
metal, then if gold were present you would have found small gold pieces too!
Page 11

1126
2. Trash
If searching for coins, you want to ignore items like aluminum foil, nails and
pull-tabs. These undesirable items are generally identified toward the lower
end of the 0-100 scale. You can listen to the sounds of all objects detected,
and decide on what you want to dig up. Or you can eliminate unwanted
metals from detection by using the DISCRIMINATION feature.
3. Identifying Buried Objects
Different types of metals are classified along the arc at the top of the screen
on a 0-100 scale from left to right. A 2-digit numerical reading is also
provided in the middle of the display for more precise target identification in
Discrimination mode.
4. Size and Depth of Buried Objects
When using the detector in the motion DISC mode, the relative depth of an
object is displayed to the left of the display over the SIGNAL strength
indicator. A more accurate depth reading is available using PINPOINT.
Pinpoint displays target depth in inches. The Pinpoint mode does not
require the searchcoil to be in motion to detect metals. The ability to hold
the searchcoil motionless over the target also aids in tracing an outline of
the buried object, or in pinpointing the exact location of the object using
techniques described in the pinpointing section of this manual.
5. Electromagnetic Interference (EMI)
Electrical interference, (EMI), can cause a metal detector to chatter
spontaneously, to lose sensitivity for no apparent reason, or to cause a
periodic wobbly audio sound. Common sources of electrical interference
include power lines, electronic communication equipment such as
cellphones, fluorescent lamps, military electronics such as radar, other
metal detectors and computer equipment.
Your first line of defense against EMI is to reduce the
Gain and/or
Threshold. In areas with heavy EMI, operating at reduced sensitivity levels
will result in the loss of some depth, but at least the metal detector will be
usable
See the 2-page section on ELECTRICAL INTERFERENCE for a more
thorough explanation of EMI and how to manage it
.
THE BASICS
continued
Page 12

12
OPERATION & CONTROLS
• In DISC mode press
and-hold to enter
no-motion
PINPOINT mode
• In ALL-METAL mode
press-and-hold
while bobbing coil,
to set ground
balance
In DISC mode:
Change discrimination level from 0 to 80
In ALL-METAL mode:
Change Ground Balance
setting from 1 to 999
HOW TO WORK
THE CONTROLS
ON/OFF/GAIN:
• Click ON/OFF
• In DISC mode rotate
to change GAIN
(sensitivity) from
1 to 100
• In ALL-METAL mode
rotate to change
GAIN from 5 to 100
in steps of 5
MODE SELECTION
and THRESHOLD CONTROL
• Click left to operate
in DISCrimination
mode
• Click to right to
operate in ALL-METAL
mode.
• Rotate knob in
ALL-METAL mode to
change THRESHOLD from
-40 to 40
POWERING UP
Click the left knob to turn the detector ON.
After clicking the knob on, continued clockwise rotation will increase the
“sensitivity” in DISC mode or the “GAIN” in ALL-METAL mode.
We suggest keeping the GAIN below 70 until you become familiar with
the detector’s operation.
TARGET DISPLAY and AUDIO
SIGNAL Indicator
The lower-left bargraph designates
SIGNALstrength only when operating
in Discrimination mode.
The signal strength indicator at the
bottom-left of the screen indicates
how large or close the buried metal
target is.
If all bars are illuminated, the target is
large or close to the searchcoil.
If one or two bars are illuminated, the
target is far away or small, or both.
DEPTH Indicator
When operating in Discrimination
mode, a target’s location and size can
be verified using the PINPOINT
control.
Press PinPoint to temporarily detect
metal without searchcoil motion, and
a monotone hum.
While holding the PinPoint button, the
DEPTH indicator will appear. The
number beneath DEPTH represents
the distance of the object, in inches,
from the searchcoil. The Depth scale
is calibrated to coin-sized objects. For
objects other than a coin, the numeric
value is a relative measure of the
target’s depth.
Page 13

13
CONTROL KNOBS:
1. OFF/ON/GAIN
a. Click right to turn on. Click left to turn off.
b. Turning the knob clockwise increases the detector’s sensitivity; the
higher the sensitivity, the deeper targets will be detected, and the more
likely the detector will be to detect very small targets.
c. As you turn the knob, notice that the GAIN value at the bottom-right of
the screen displays your current sensitivity setting.
d. GAIN and THRESHOLD
“Gain” increases, or multiplies, the strength of signals from buried metal
objects. For maximum detection of the smallest or most deeply buried objects,
increase the Gain. To minimize the weakest signals, reduce the Gain.
“Threshold” controls the detector’s audio level. Positive threshold values
amplify the audio response of weak target signals. Negative threshold
values suppress sensitivity.
Sensitivity in DISC mode
The left knob is labeled “GAIN” and in DISCRIMINATION mode it alone
controls the sensitivity of the detector.
GAIN in ALL-METAL mode.
In All-Metal mode, GAIN increases as you rotate the knob clockwise.
THRESHOLD is controlled independently using the right knob.
Control knobs continued on next page
CONTROL PANEL
Page 14

14 23
CONTROL PANEL
continued
2. DISC / ALL-METAL / THRESHOLD
a. Click knob to the far-left “DISC” position and the detector enters
DISCRIMINATION mode.
b. Click on clockwise to operate in ALL-METAL mode.
c. In ALL-METAL mode, rotate knob to increase the threshold.
Threshold values range from -40 to +40.
In ALL-METAL mode, the Threshold control can be used in two ways.
For searching at maximum sensitivity
, first set the gain at a low level. Then
set threshold into the positive region, with a comfortable background-hum
volume level. Then increase Gain to a comfortable level, free of chatter.
For silent searching
, set threshold to a negative number, and also reduce
Gain if necessary . Silent searching will result in the loss of some sensitivity.
TOUCHPAD CONTROLS
1. GG / PINPOINT
This button has a dual function, depending on the detection mode.
a. In DISC mode, press-and-hold the button to activate PINPOINT.
Pinpoint temporarily engages a no-motion detection mode. Searchcoil
motion is not necessary to detect metal. Any metal within the searchcoil’s
detection field will induce a sound. Pinpoint is generally used to verify a
target previously detected in Discrimination mode.
b.
In ALL-METAL mode, press-and-hold the button to activate GROUND GRAB.
Ground Grab allows you to set the detector’s internal ground setting equal
to the phase of the ground you are searching over. See the section on
Ground Balancing for a more thorough explanation of this feature and the
reason for using it.
2. + and -
a. In Discrimination mode, + and - change the level of discrimination (target
rejection)
b. In All-Metal mode,
+ and - provide a manual override to the Ground Balance
Setting.
The goal of Ground Balancing is to eliminate the sound as the searchcoil is being
pumped over the ground. In some soils, the sound is not completely eliminated.
After balancing to ground with GG some user may want to further adjust the
ground balance point manually.
To manually adjust ground balance:
1. Operate in ALL-METAL mode.
2. Pump searchcoil up and down over the ground as in the GG procedure.
3. Press
+ or
If the ground balance adjustment is incorrect, there will be a difference in the
sound as the searchcoil is either moving toward or away from the ground. It
sounds like you are either
sound into the ground.
•If the sound is louder as you raise the searchcoil, increase the ground
balance setting.
•If the sound is louder as you lower the searchcoil, reduce the ground balance
setting.
NOTE: Experienced users often prefer to adjust the ground balance to get a weak
but audible response when lowering the searchcoil. This is called
positive response.
Positive and Negative Response
The purpose of ground balancing is to adjust the metal detector to ignore ground
minerals. If the setting is incorrect, ground minerals will give either a
negative response, depending on which direction the adjustment is off.
POSITIVE RESPONSE
If the G.B. setting is too high a number, the response of minerals will be positive.
This means that when the searchcoil is lowered to the ground in PinPoint or All
Metals mode, the sound will get louder as the searchcoil approaches the ground.
The sound will grow quieter as the searchcoil is raised. What, if anything, you will
hear in Discrimination mode depends on the discrimination setting.
When searching in an All Metals mode, if ground balance is properly set to cancel
the ground, and you sweep over a
sound similar to that of a metal object.
NEGATIVE RESPONSE
If the G.B. setting is too low a number, the response of minerals will be negative.
When the searchcoil is lowered to the ground in PinPoint or All Metal mode, the
machine will be silent. The machine will sound off as the searchcoil is lifted away
from the ground. What, if anything, you hear in Discrimination mode depends on
the Discrimination setting.
When searching in All Metal mode a
sound after passing over it, making it difficult to know where it is located. It will
not have the sound and “feel” of a metal object.
GROUND BALANCING
Page 15

Operating in All-Metal Mode continued on next page
15
OPERATING IN ALL-METAL MODE
The All-Metal mode is more sensitive than the Discrimination mode, and is used to
find all types of metal objects in the ground. The searchcoil must be in motion for
objects to be detected.
Ground Grab (GG)
Naturally occurring minerals in soil look like metal to a metal detector, so you want to
cancel out this mineral signal coming from the ground, and only detect the signal from
metal objects in the ground.
So before using your detector, set it in All-Metal mode and perform the automatic
ground balancing procedure. Press-and-hold the GG button while pumping the
searchcoil up and down over the ground. Release the button when the sound evens
out. The GND BAL number on the bottom right of the screen is the detector’s internal
setting which cancels out the minerals in the ground. Different soils in different areas
will require different GND BAL settings, so balance to ground before you search. See
the section on Ground Balancing for a detailed description of this procedure.
Setting the Controls
As you adjust any of the controls, notice that the values on the bottom-right of the
display indicate the settings of the value you are changing.
If you are new to metal detecting, start with the GAIN and THRESHOLD controls at a
low enough setting that you do not hear too many unwanted sounds, like warble or a
loud hum. Set the GAIN at the 12:00 position, or less. Then set the THRESHOLD to a
position where you hear a very slight background hum, or if you prefer, dial the control
just left of that position to a setting where the detector is silent.
Unwanted Noise
Read the section on Electrical Interference.
The Gold Bug Pro is a highly sensitive device.
It is intended for use outdoors. Indoor operation will subject it to electrical interference
from a wide variety of devices in the home or office.
Sweeping the Searchcoil
As you sweep the searchcoil over the ground, try to keep the searchcoil parallel to the
ground.
Avoid lifting the searchcoil at the end of your sweeps.
Page 16

16
Reading the Display
Most gold prospecting and relic hunting is done by ear. Listen for the louder sounds,
riding on top of the constant background hum.
As you sweep the searchcoil, notice the Fe3O4(iron oxide) scale to the left of the
display.
This indicates the amount of ground mineralization.
Most black sand is made of magnetite.
Gold nuggets are often found in concentrated black sand deposits.
For the best depth detection in highly mineralized soils, use the All-Metal mode.
For the most accurate Fe
3O4
reading, pump the searchcoil over the ground.
While sweeping the searchcoil, also notice the GND PHASE value in the middle of the
screen.
GND PHASE is the ground phase; this indicates the type of minerals in the soil.
Within an area, the ground phase may change.
After ground balancing, periodically compare GND PHASE to GND BAL. If these two
numbers differ by a great deal, you may want to ground balance the detector again.
When not adjusting the knobs, the GND BAL setting will always appear on the
bottom-right of the display.
GND BAL is the detector’s internal ground balance setting. The detector’s default
ground balance setting is 849, which is the best starting point for achieving the
correct setting.
After you perform the Ground Grab procedure, the GND BAL number will change
to match your soil.
You can change the current GND BAL setting by pressing the
+ or – buttons.
See section on Ground Balancing for a more detailed explanation.
Experienced users often prefer to adjust the ground balance to get a weak
audible response when lowering the searchcoil to the ground. This is called
adjusting for positive response and is achieved by increasing the GND BAL
number with the + key.
Target Scale
The arc across the top classifies metal objects.
Each time a target is detected three segments will illuminate above the arc.
The segments will remain illuminated until the next target is detected.
This indication shows the approximate classification of the buried metal object.
See the section on Target Display for a more detailed explanation.
Iron is on the left. U.S. dimes and quarters are to the far right.
In an air test, gold indicates right of center -- the larger the gold piece, the
farther to the right.
In the ground, the I.D. of gold may jump around with each pass of the searchcoil.
If searching in All-Metal mode, you may want to switch back into Discrimination mode, after
finding a target, to see a more accurate target identification, viewing the 2-digit Target I.D.
OPERATING IN ALL-METAL MODE
cont.
GROUND BALANCING
What is Ground Balancing?
Why do I need to Ground Balance?
All soils contain minerals. Signals from ground minerals are
often tens or hundreds of times stronger than a buried metal
object. The magnetism of iron minerals, found in nearly all soils,
causes one type of interfering signal. Dissolved mineral salts,
found in some soils, are electrically conductive, causing another
type of interfering signal.
Ground Balancing is the process by which the
metal detector cancels the unwanted signals
coming from the ground minerals while still detecting
the signals from buried metal objects. This is
accomplished by matching the detector’s ground
balance setting to the phase of the ground signal.
When the detector is calibrated to the soil, the
result will be deeper target detection, quieter
operation, and more accurate target identification.
How to Ground Balance your detector:
Ground Balancing procedure with the “GG” touchpad.
1. Turn the detector on and set GAIN at the 12:00 position.
2. Click on the right knob to the ALL-METAL mode.
3. Rotate the THRESHOLD control knob to the point where you hear a slight
background hum.
4. Sweep searchcoil across the ground to find a clear patch of ground with
no metal present.
5. Press and hold the GG touch pad, and pump coil over the clean ground.
See illustration.
Pump coil from within 1” of ground to 6”- 8” above ground.
6. When the GND PHASE
release the GND GRAB button while still pumping the coil. Note that the
audio response to the ground changed and “Evened Out” when you
released the button. Also note that the GND BAL value changed. After
balancing, you can hunt in ALL-METAL... or return to Disc Mode.
The most accurate GND PHASE value is the value displayed when “pumping”
the searchcoil over the ground in an area free of metal.
Page 17

OPERATING IN DISCRIMINATION MODE
Discrimination is used to eliminate trash metal objects (e.g. nails, foil, pull-tabs) from
detection. The searchcoil must be in motion to detect metal. The Discrimination mode
is less sensitive to small and deep objects than the All-Metal mode.
Ground Grab (GG)
This feature is not available in Discrimination mode.
Your best results will be achieved by first performing the GG procedure in All-Metal mode.
The ground balance setting achieved using GG will carry over into this mode.
Setting the Controls
As you adjust any of the controls, notice that the values on the bottom-right of the
display indicate the settings of the value you are changing.
GAIN
If you are new to metal detecting, start with the GAIN at a low enough setting that you do not
hear any sounds when the searchcoil is sweeping across the ground, with no metal present.
Start with GAIN at the 12:00 position, or less.
In this mode, Gain refers to the detector’s sensitivity. The higher the setting, the deeper
objects can be found, and the more sensitive the detector is to very small metal objects.
MODE
The right knob is not used in the Discrimination mode.
Click the right knob 100% counterclockwise.
If you turn the knob to the right, you will leave Discrimination mode, entering All-Metal mode.
DISC LEVEL
Press + to eliminate unwanted metals from detection.
Each time you press + the Disc Value at the bottom-right of the display will increment by one.
Press-and-hold + to increase the Discrimination level rapidly.
See the Target Identification section of the manual for a detailed description of this function.
Sections of the arc with no indication represent metals completely eliminated from detection.
Sections of the arc with a lightly shaded indication represent metals detected with
a low tone.
Press – to detect metals which were previously eliminated from detection
Unwanted Noise
Read the section on Electrical Interference.
This is a highly sensitive device.
It is intended for use outdoors. Indoor operation will subject it to electrical interference
from a wide variety of devices in the home or office.
In Discrimination mode, when you sweep the coil over the ground it will usually be quieter than
when holding the detector still.
Sweeping the Searchcoil
As you sweep the searchcoil over the ground, try to keep the coil parallel to the ground.
Avoid lifting the coil at the end of your sweeps.
Operating in Discrimination Mode continued on next page
Page 18

Using PINPOINT
Press-and-Hold the Pinpoint button to narrow down the location of a buried metal object.
Pinpoint is a mode of detection which does not require the searchcoil to be in motion.
A motionless searchcoil held over a metal object will induce a monotone hum.
The approximate target depth, in inches, will be indicated in the center of the screen.
The depth scale is calibrated to coin-sized objects.
Relative depth is indicated for larger or smaller objects.
Upon releasing the button, you will return to the motion Discrimination detection mode.
If you keep the Pinpoint button depressed for a long time, the audio tone may begin to drift.
If you plan to search like this, release and re-press the button periodically to avoid
drift. Drift may result in a loudening sound or a reduced sensitivity with no sound.
See the manual section on Target Pinpointing for how to
narrow down a target’s location.
This technique is indispensable as long-buried metals can look exactly like the
surrounding soil to the naked eye. If you are not adept at pinpointing, digging up a
small metal object can drive you crazy. So learn how to narrow-it-down.
Reading the Display
TARGET ID
Each time you pass the searchcoil over a metal object, a 2-digit value will appear in
the center of the display. See the manual section on Target Identification for a better
understand of these values.
Three segments will simultaneously appear above the arc at the top of the screen.
This represents the same target identification.
Target Scale
This display works as in the All-Metal mode.
The arc across the top classifies metal objects.
Each time a target is detected three segments will illuminate above the arc.
The segments will remain illuminated until the next target is detected.
This indication shows the approximate classification of the buried metal object.
See the section on Target Display for a more detailed explanation.
Iron is on the left. U.S. dimes and quarters are to the far right.
In an air test, gold indicates right of center -- the larger the gold piece, the
farther to the right.
In the ground, the I.D. of gold may jump around with each pass of the coil.
SIGNAL
Each time a target is detected, bars will illuminate showing the strength of the target’s signal.
If all 7 bars illuminate, the target signal is strong.
This may be a large metal object.
Or it may be a coin-sized metal object close to the surface.
If only a few bars illuminate, the target signal is weak.
This may be a deeply buried object, even a big one.
Or it may be a very, very small metal object, close to the surface.
The depth of a coin-sized object can be confirmed using Pinpoint.
OPERATING IN DISCRIMINATION
cont.
18
DISCRIMINATION CONTROL
In Discrimination mode, pressing + or – will change two detection parameters:
1.Tone Identification
2.Target Elimination
As the level of discrimination changes, the target segments along the arc on the
screen will be displayed in one of three states:
1. Blank (no segments displayed)
2. Grey (segments displayed in a shaded color)
3. Black (segments are solid black)
The segments along the arc will remain illuminated in this state as you are
pressing
+ or –.
This displays your chosen target discrimination parameters.
The arc will remain illuminated in this state until a target is detected.
At any time during operation, you can view the discrimination settings in one of
two ways:
1. On the bottom-right of the screen the DISC value is always illuminated.
a. This value is the division between the LOW tones and HIGH tones.
b. This value is the lowest target value which will be detected with a
HIGH tone
2. Whenever you press
current detection parameters.
The first press of
When a target is detected, the target icons representing the target category are
illuminated.
Page 19

19
DISCRIMINATION CONTROL
In Discrimination mode, pressing + or – will change two detection parameters:
1.Tone Identification
2.Target Elimination
As the level of discrimination changes, the target segments along the arc on the
screen will be displayed in one of three states:
1. Blank (no segments displayed)
2. Grey (segments displayed in a shaded color)
3. Black (segments are solid black)
The segments along the arc will remain illuminated in this state as you are
pressing
+ or –.
This displays your chosen target discrimination parameters.
The arc will remain illuminated in this state until a target is detected.
At any time during operation, you can view the discrimination settings in one of
two ways:
1. On the bottom-right of the screen the DISC value is always illuminated.
a. This value is the division between the LOW tones and HIGH tones.
b. This value is the lowest target value which will be detected with a
HIGH tone
2. Whenever you press
+ or –, the arc will illuminate and show your
current detection parameters.
The first press of
+ or – will change the discriminate level by one value.
When a target is detected, the target icons representing the target category are
illuminated.
Discrimination Control continued on next page
Page 20

20 17
OPERATING IN DISCRIMINATION MODE
Discrimination is used to eliminate trash metal objects (e.g. nails, foil, pull-tabs) from
detection. The searchcoil must be in motion to detect metal. The Discrimination mode
is less sensitive to small and deep objects than the All-Metal mode.
Ground Grab (GG)
This feature is not available in Discrimination mode.
Your best results will be achieved by first performing the GG procedure in All-Metal mode.
The ground balance setting achieved using GG will carry over into this mode.
Setting the Controls
As you adjust any of the controls, notice that the values on the bottom-right of the
display indicate the settings of the value you are changing.
GAIN
If you are new to metal detecting, start with the GAIN at a low enough setting that you do not
hear any sounds when the searchcoil is sweeping across the ground, with no metal present.
Start with GAIN at the 12:00 position, or less.
In this mode, Gain refers to the detector’s sensitivity. The higher the setting, the deeper
objects can be found, and the more sensitive the detector is to very small metal objects.
MODE
The right knob is not used in the Discrimination mode.
Click the right knob 100% counterclockwise.
If you turn the knob to the right, you will leave Discrimination mode, entering All-Metal mode.
DISC LEVEL
Press + to eliminate unwanted metals from detection.
Each time you press + the Disc Value at the bottom-right of the display will increment by one.
Press-and-hold + to increase the Discrimination level rapidly.
See the Target Identification section of the manual for a detailed description of this function.
Sections of the arc with no indication represent metals completely eliminated from detection.
Sections of the arc with a lightly shaded indication represent metals detected with
a low tone.
Press – to detect metals which were previously eliminated from detection
Unwanted Noise
Read the section on Electrical Interference.
This is a highly sensitive device.
It is intended for use outdoors. Indoor operation will subject it to electrical interference
from a wide variety of devices in the home or office.
In Discrimination mode, when you sweep the coil over the ground it will usually be quieter than
when holding the detector still.
Sweeping the Searchcoil
As you sweep the searchcoil over the ground, try to keep the coil parallel to the ground.
Avoid lifting the coil at the end of your sweeps.
This value
and higher
will induce
a HIGH tone
Values less
than 20 will
NOT BE
DETECTED
Values from 20 to 49
will induce a LOW tone
Values from 50 to 100
will induce a HIGH tone
Suggestion: Try changing the
settings, watch the screen, and pass
objects over the searchcoil at each
setting. It will quickly become obvious
how these controls work.
Notice that the segments along the arc, and the discrimination parameters they
represent, vary as you change the discrimination level with
+ or
-
.
For DISC values up to 40:
- Operation is tone discrimination only
• No targets are eliminated from detection
- Target IDs less than the DISC value induce a LOW tone
• Represented by shaded segments
At DISC value = 41:
- Target elimination begins
•Targets in the blank segment region are not detected.
- Target IDs less than the DISC value induce a LOW tone
• Represented by shaded segments
At DISC values over 41:
- The LOW tone range of targets progressively shrinks
• Represented by shaded segments
- Target IDs less than the DISC value induce a LOW tone
• Represented by shaded segments
At DISC value = 80:
- All detected targets induce HIGH tones.
• Represented by solid segments
- There are no LOW tones
- No targets under 80 are detected.
Here is an example of one possible setting:
This discrimination interface for the Gold Bug Pro was designed especially for relic-hunting.
Relic hunters want control over what sizes of iron are detected, and also control over
which targets are detected with a low-tone. Target values of 40 or less are ferrous.
DISCRIMINATION CONTROL
continued
Page 21

GROUND BALANCING
What is Ground Balancing?
Why do I need to Ground Balance?
All soils contain minerals. Signals from ground minerals are
often tens or hundreds of times stronger than a buried metal
object. The magnetism of iron minerals, found in nearly all soils,
causes one type of interfering signal. Dissolved mineral salts,
found in some soils, are electrically conductive, causing another
type of interfering signal.
Ground Balancing is the process by which the
metal detector cancels the unwanted signals
coming from the ground minerals while still detecting
the signals from buried metal objects. This is
accomplished by matching the detector’s ground
balance setting to the phase of the ground signal.
When the detector is calibrated to the soil, the
result will be deeper target detection, quieter
operation, and more accurate target identification.
How to Ground Balance your detector:
Ground Balancing procedure with the “GG” touchpad.
1. Turn the detector on and set GAIN at the 12:00 position.
2. Click on the right knob to the ALL-METAL mode.
3. Rotate the THRESHOLD control knob to the point where you hear a slight
background hum.
4. Sweep searchcoil across the ground to find a clear patch of ground with
no metal present.
5. Press and hold the GG touch pad, and pump coil over the clean ground.
See illustration.
Pump coil from within 1” of ground to 6”- 8” above ground.
6. When the GND PHASE
settles down to only 1 or 2 numbers in variation,
release the GND GRAB button while still pumping the coil. Note that the
audio response to the ground changed and “Evened Out” when you
released the button. Also note that the GND BAL value changed. After
balancing, you can hunt in ALL-METAL... or return to Disc Mode.
The most accurate GND PHASE value is the value displayed when “pumping”
the searchcoil over the ground in an area free of metal.
Ground Balancing continued on next page
Pumping coil
to ground
balance with
GG button.
21
Page 22

22 15
OPERATING IN ALL-METAL MODE
The All-Metal mode is more sensitive than the Discrimination mode, and is used to
find all types of metal objects in the ground. The searchcoil must be in motion for
objects to be detected.
Ground Grab (GG)
Naturally occurring minerals in soil look like metal to a metal detector, so you want to
cancel out this mineral signal coming from the ground, and only detect the signal from
metal objects in the ground.
So before using your detector, set it in All-Metal mode and perform the automatic
ground balancing procedure. Press-and-hold the GG button while pumping the
searchcoil up and down over the ground. Release the button when the sound evens
out. The GND BAL number on the bottom right of the screen is the detector’s internal
setting which cancels out the minerals in the ground. Different soils in different areas
will require different GND BAL settings, so balance to ground before you search. See
the section on Ground Balancing for a detailed description of this procedure.
Setting the Controls
As you adjust any of the controls, notice that the values on the bottom-right of the
display indicate the settings of the value you are changing.
If you are new to metal detecting, start with the GAIN and THRESHOLD controls at a
low enough setting that you do not hear too many unwanted sounds, like warble or a
loud hum. Set the GAIN at the 12:00 position, or less. Then set the THRESHOLD to a
position where you hear a very slight background hum, or if you prefer, dial the control
just left of that position to a setting where the detector is silent.
Unwanted Noise
Read the section on Electrical Interference.
The Gold Bug is a highly sensitive device.
It is intended for use outdoors. Indoor operation will subject it to electrical interference
from a wide variety of devices in the home or office.
Sweeping the Searchcoil
As you sweep the searchcoil over the ground, try to keep the searchcoil parallel to the
ground.
Avoid lifting the searchcoil at the end of your sweeps.
GROUND BALANCING
continued
Understanding ground conditions assists the user in setting up the machine,
knowing when to readjust ground balance, and in understanding the responses
of the machine while searching.
This detector displays two kinds of ground data:
1. The type of mineralization (which affects where the ground phase should
be set). This is
GND PHASE
2.
The amount of mineralization (the greater the amount of mineralization,
the greater the loss of detection depth & ID accuracy; this loss is more
pronounced in Discrimination Mode). This is
Fe3O4.
The goal of ground balancing is to equate the GND BAL number to the
PHASE number.
PHASE is the measurement of the ground.
GND BAL is the detector’s internal setting which calibrates the detector
to the ground’s phase.
Notice that the GND BAL number is three digits, with a decimal point.
PHASE has only two digits.
GND BAL is a higher resolution number, so may differ a bit from PHASE
in a perfectly balanced scenario.
After pumping and releasing GG, the exact measurement of the ground
will be transferred to the GND BAL setting.
The two-digit PHASE number displayed on the screen indicates the type of
ground mineralization.
Some typical ground mineralization types are:
0 – 10 Wet salt and alkali
5 – 25
Metallic iron. Very few soils in this range. You are probably over metal.
26–39 Very few soils in this range -- occasionally some saltwater beaches
40–75 Red, yellow and brown iron-bearing clay minerals
75–95 Magnetite and other black iron minerals
Ground Balancing continued on next page
Page 23

The goal of Ground Balancing is to eliminate the sound as the searchcoil is being
pumped over the ground. In some soils, the sound is not completely eliminated.
After balancing to ground with GG some user may want to further adjust the
ground balance point manually.
To manually adjust ground balance:
1. Operate in ALL-METAL mode.
2. Pump searchcoil up and down over the ground as in the GG procedure.
3. Press
+ or
-
while pumping
If the ground balance adjustment is incorrect, there will be a difference in the
sound as the searchcoil is either moving toward or away from the ground. It
sounds like you are either
pulling the sound out of the ground, or pushing the
sound into the ground.
•If the sound is louder as you raise the searchcoil, increase the ground
balance setting.
•If the sound is louder as you lower the searchcoil, reduce the ground balance
setting.
NOTE: Experienced users often prefer to adjust the ground balance to get a weak
but audible response when lowering the searchcoil. This is called
adjusting for
positive response.
Positive and Negative Response
The purpose of ground balancing is to adjust the metal detector to ignore ground
minerals. If the setting is incorrect, ground minerals will give either a
positive or a
negative response, depending on which direction the adjustment is off.
POSITIVE RESPONSE
If the G.B. setting is too high a number, the response of minerals will be positive.
This means that when the searchcoil is lowered to the ground in PinPoint or All
Metals mode, the sound will get louder as the searchcoil approaches the ground.
The sound will grow quieter as the searchcoil is raised. What, if anything, you will
hear in Discrimination mode depends on the discrimination setting.
When searching in an All Metals mode, if ground balance is properly set to cancel
the ground, and you sweep over a
positive hot rock, the rock will give a “zip”
sound similar to that of a metal object.
NEGATIVE RESPONSE
If the G.B. setting is too low a number, the response of minerals will be negative.
When the searchcoil is lowered to the ground in PinPoint or All Metal mode, the
machine will be silent. The machine will sound off as the searchcoil is lifted away
from the ground. What, if anything, you hear in Discrimination mode depends on
the Discrimination setting.
When searching in All Metal mode a
negative hot rock will produce a “boing”
sound after passing over it, making it difficult to know where it is located. It will
not have the sound and “feel” of a metal object.
GROUND BALANCING
continued
Page 24

24
CONTROL KNOBS:
1. OFF/ON/GAIN
a. Click right to turn on. Click left to turn off.
b. Turning the knob clockwise increases the detector’s sensitivity; the
higher the sensitivity, the deeper targets will be detected, and the more
likely the detector will be to detect very small targets.
c. As you turn the knob, notice that the GAIN value at the bottom-right of
the screen displays your current sensitivity setting.
d. GAIN and THRESHOLD
“Gain” increases, or multiplies, the strength of signals from buried metal
objects. For maximum detection of the smallest or most deeply buried objects,
increase the Gain. To minimize the weakest signals, reduce the Gain.
“Threshold” controls the detector’s audio level. Positive threshold values
amplify the audio response of weak target signals. Negative threshold
values suppress sensitivity.
Sensitivity in DISC mode
The left knob is labeled “GAIN” and in DISCRIMINATION mode it alone
controls the sensitivity of the detector.
GAIN in ALL-METAL mode.
In All-Metal mode, GAIN increases as you rotate the knob clockwise.
THRESHOLD is controlled independently using the right knob.
CONTROL PANEL
GROUND BALANCING -Technical Info
Fe3O4BARGRAPH
The Fe3O47-segment bargraph indicates the amount of ground mineralization,
independent of type, expressed as an equivalent volume concentration of
magnetite (Fe
3O4
). It updates every second. It is sensitive to motion and will give
the most accurate readings if you
pump the searchcoil up and down several times
over the ground. The presence of metal or “hot rocks” will cause the readings to be
inaccurate. If you stop moving the searchcoil, the bargraph will go blank.
INDICATION RELATIVE % Fe3O
4
SUSCEPTIBILITY
MINERALIZATION
7 Bars High over 1 over 2500
2 to 6 Bars Medium .026 - 1.0 61 - 2,500
1 Bar Very Low 0.006 - .025 15 - 60
none -- less than .006 less than 15
Magnetic susceptibility is expressed in micro-cgs units. In a salt water environment
in the absence of iron minerals, the bargraph indicates relative electrical conductivity .
In soils with greater than 10,000 micro-cgs units magnetic susceptibility, the
signal from the soil may saturate, or overload, the circuitry. This will not harm
the detector but the machine will not be usable in that condition. The solution
is to hold the searchcoil several inches above the soil surface so it is not “seeing
as much dirt.” By listening and watching you will know how high you need to
hold the searchcoil in order to avoid overload.
The highest magnetic susceptibilities are usually found in soils developed over
igneous rocks, in alluvial black sand streaks on beaches, and in red clay soils
of humid climates.
The lowest magnetic susceptibilities are usually found in white beach sands of
tropical and subtropical regions, and soils developed over limestone.
Page 25

25
Depth and Target Display continued on next page
TARGET DISPLAY and AUDIO
SIGNAL Indicator
The lower-left bargraph designates
SIGNALstrength only when operating
in Discrimination mode.
The signal strength indicator at the
bottom-left of the screen indicates
how large or close the buried metal
target is.
If all bars are illuminated, the target is
large or close to the searchcoil.
If one or two bars are illuminated, the
target is far away or small, or both.
DEPTH Indicator
When operating in Discrimination
mode, a target’s location and size can
be verified using the PINPOINT
control.
Press PinPoint to temporarily detect
metal without searchcoil motion, and
a monotone hum.
While holding the PinPoint button, the
DEPTH indicator will appear. The
number beneath DEPTH represents
the distance of the object, in inches,
from the searchcoil. The Depth scale
is calibrated to coin-sized objects. For
objects other than a coin, the numeric
value is a relative measure of the
target’s depth.
AUDIO FEEDBACK
When a target is detected, the Gold
Bug Pro will respond with two types of
sound:
1. VCO, or Voltage Controlled
Oscillator, is an audio response
with variable pitch and volume.
2. A LOW or HIGH tone.
In Discrimination mode, targets which
fall into the zone along the arc
whose segments are shaded will be
identified with a LOW tone beep, and
solid segments with a HIGH tone.
As the user sets the discrimination
level with the
+ and - buttons, he is
determining which targets will induce
the low tone, and which will be
eliminated.
All targets’audio responses in All-Metal
mode will be VCO.
VCO, or V oltage Controlled Oscillator ,
is an audio response which provides
a good feel for the target.
The stronger the target signal, the
higher the volume and the higher
the audio pitch.
Very weak signals will have the
fainted volume and lowest pitch.
For this reason, the use of
headphones is always
recommended for detecting the
smaller and deeper targets.
Page 26

2. Trash
If searching for coins, you want to ignore items like aluminum foil, nails and
pull-tabs. These undesirable items are generally identified toward the lower
end of the 0-100 scale. You can listen to the sounds of all objects detected,
and decide on what you want to dig up. Or you can eliminate unwanted
metals from detection by using the DISCRIMINATION feature.
3. Identifying Buried Objects
Different types of metals are classified along the arc at the top of the screen
on a 0-100 scale from left to right. A 2-digit numerical reading is also
provided in the middle of the display for more precise target identification in
Discrimination mode.
4. Size and Depth of Buried Objects
When using the detector in the motion DISC mode, the relative depth of an
object is displayed to the left of the display over the SIGNAL strength
indicator. A more accurate depth reading is available using PINPOINT.
Pinpoint displays target depth in inches. The Pinpoint mode does not
require the searchcoil to be in motion to detect metals. The ability to hold
the searchcoil motionless over the target also aids in tracing an outline of
the buried object, or in pinpointing the exact location of the object using
techniques described in the pinpointing section of this manual.
5. Electromagnetic Interference (EMI)
Electrical interference, (EMI), can cause a metal detector to chatter
spontaneously, to lose sensitivity for no apparent reason, or to cause a
periodic wobbly audio sound. Common sources of electrical interference
include power lines, electronic communication equipment such as
cellphones, fluorescent lamps, military electronics such as radar, other
metal detectors and computer equipment.
Your first line of defense against EMI is to reduce the
Threshold. In areas with heavy EMI, operating at reduced sensitivity levels
will result in the loss of some depth, but at least the metal detector will be
usable
See the 2-page section on ELECTRICAL INTERFERENCE for a more
thorough explanation of EMI and how to manage it
THE BASICS
TARGET DISPLAY and AUDIO
continued
TTAARRGGEETT RReeaaddoouut
t
The table below lists some common approximate target values. With
experience in the field, you will recognize many types of metal objects by
their numeric value.
OOBBJJEECCT
T
TTAARRGGEETT II..DD.
.
foil from gum wrapper 40 - 55
U.S. nickel (5¢ coin) typically 58
aluminum pull-tab 60 - 75
aluminum screwcap 70 - 80
zinc penny (dated after 1982) typically 78
aluminum soda pop can 75 - 85
copper penny, clad dime typically 83
U.S. quarter (25¢ coin), clad typically 89
50¢ coin, modern clad typically 92
old silver dollar coin typically 94
US silver Eagle $1 coin typically 95
Caution:The target indications are visual references. Many other types of metal
can also be represented by a given target I.D.
2-DIGIT TARGET INDICATOR
In Discrimination mode the 2-digit
target indicator, in the middle of the
screen, provides a specific target
value to help identify buried targets
more accurately. With practice in the
field, you will learn to associate target
values with the probable identification
of buried objects. The target value can
vary each time the searchcoil passes
over the target, depending upon the
angle of the object and the distance
from the searchcoil.
As a starting point, refer to the table
below.
Page 27

27
GOLD PROSPECTING
Gold Prospecting continued on next page
In the United States, gold is found in many places in the
western states, Alaska, and in a few localities in the
Appalachians. The old saying "Gold is where
you find it," means that to find gold, you
should look in areas where the yellow
metal is known to be present.
Hillsides are the best areas for
gold prospecting using a
metal detector, because
hillsides cannot be
cleaned out by panning
and dredging the way
streams can. Also,
gold on hillsides, not far
from its source vein,
tends to be larger, and hence more
readily detected, than alluvial (placer)
gold which tends to get pounded to
pieces and worn away as it rolls along
the streambed with gravel during floods.
Gold is valuable because it is a scarce
commodity. Even in a good gold producing
area, you will often spend an entire day
without finding any gold. Meanwhile you
will dig bits and pieces of other metal--
birdshot, shells and bullets from hunting and target
practice, bits of rusted barbed wire, chips off shovels and other mining tools,
rusted tin cans, etc. Hot rocks -- rocks containing concentrations of iron
oxides that sound like metal when you pass over them -- are also a nuisance
in many gold areas. Discrimination is usually ineffective because the loss of
sensitivity resulting from discrimination is enough to cause those little nuggets
to vanish. If you have gone many hours without finding gold and are
wondering if there is something wrong with your metal detector or how you are
using it, the most important clue is this: if you are digging
tiny pieces of trash
metal, then if gold were present you would have found small gold pieces too!
Page 28

X. Click the MODE knob to the right.
The detector is now in the ALL-METAL Mode
QUICK-START
GOLD PROSPECTING
continued
a. Keep GAIN set at the 12:00 position
b. Rotate the THRESHOLD knob
position to the full clockwise position.
Notice these attributes of the THRESHOLD control, with no metal
over the searchcoil.
Use with headphones
The Gold Bug is equipped with both a 1/8” and 1/4” headphone jack. Any
headphones with a stereo plug will work; headphones with a mono plug will not
work. Using headphones extends battery life, and also prevents the sounds from
annoying bystanders. It also allows you to hear subtle changes in the sound more
clearly, particularly if searching in a noisy location. Gold nuggets are often very
small, so closely monitoring changes in sound using headphones will improve your
gold prospecting results. For safety reasons, do not use headphones near traffic
or where other dangers, like rattle snakes, are present. This device is to be used
with interconnecting cables/headphone cables shorter than three meters.
IX. Press-and-hold and hold the nickel over the searchcoil
a. Notice that motion is not required.
A motionless object induces a hum.
b. Notice the single monotone hum. The PINPOINT mode produces
only this single sound, regardless of the type of metal detected.
c. Move the nickel closer to and farther away from the searchcoil.
Notice the changing “depth” values.
28
Because most gold nuggets are tiny, and are usually found in soil which is
high in iron oxide minerals, serious gold prospecting requires a detector with
high sensitivity and true ground balanced All Metal operation. Run the
machine with the sensitivity high enough to hear some noise from ground
minerals, and
learn the language of the sounds you hear. Headphones are
recommended unless consideration for safety (for instance rattlesnakes) rules
them out. Move the searchcoil slowly and deliberately, carefully controlling its
height above the ground to minimize noise from iron minerals in the soil. If you
hear ground noise, your GND BAL setting could be a bit off, so perform the
ground balancing procedure again. As you walk even a very short distance,
ground conditions can change. The ground geology typically associated with
gold will tend to change over very short distances.
The Fe
3O4
bar graph indicates the amount of iron mineralization in the soil. In
most gold fields, especially alluvial (placer) deposits, gold tends to be
associated with iron minerals, especially magnetite
black sand. If you know
this to be the case in the area you're working, you can maximize your gold
recovery by concentrating your effort on areas where the bar graph indicates
higher amounts of iron mineralization.
Gold prospectors are mostly a friendly bunch, and willing to spend some time
showing a beginner how to increase his odds of finding the yellow stuff. Many
will invite you to search on their claims (if they have any) once they get to
know you. In some gold areas, a lot of the terrain is under claim, so you
need to learn how to recognize posted claims and stay off of them unless you
have the claim owner's permission. Prospecting clubs such as the Gold
Prospector Association of America (GPAA) often own claims which are open
to its members and sponsor group outings to good gold areas.
It’s a thrilling experience to dig into the ground and pull out a precious piece of
yellow metal that you are the first person on earth to see. If you love being
outdoors, have patience, and can stay motivated by the prospect of finding
that next nugget, then
beeping for gold may be the hobby for you. While only
a few get rich prospecting, if you are not among them, think of it as outdoor
recreation where your finds defray the expense of having fun!
Page 29

29
HOT ROCKS
A hot rock is a rock which causes the metal detector to sound off because the
rock contains iron minerals. They come in two basic types.
Negative hot rocks (also called cold rocks) are usually magnetite or
contain magnetite, and give a negative response because their ground
balance value is a higher number than the soil they are found in. They
tend to be dark in color, usually black, and usually heavy. In some cases
they will have rust stains. They are usually attracted to a magnet, and for
this reason gold prospectors always carry a magnet -- the ultimate
ferrous/nonferrous discriminator. In All Metal mode, negative hot rocks
produce a
boing sound rather than the zip sound of a metallic target;
recognize the difference and you will learn to ignore them. As the
searchcoil passes over a hot rock, this
boing sound, or negative response,
is quite distinctive. To hear this response, you must be properly Ground
Balanced and in All-Metal mode with an audible threshold hum. First, as
the center of the searchcoil passes over the negative hot rock, the
detector will go quite; the threshold hum momentarily silences. Then,
passing beyond the negative hot rock, you hear the
boing sound. As you
pass the searchcoil back and forth over a negative hot rock, it will be
impossible to pinpioint and will seem as if it
moves around.
Positive hot rocks are iron-bearing rocks which have been oxidized by
natural weathering processes so that their GRND BAL value is a number
lower than the soil they are found in. They are often small, right on the
surface, sound just like a gold nugget, and are common in many gold
prospecting areas. They are usually, but not always, drawn to a magnet.
They are most often reddish in color but are often black, brown, or yellow.
On relic hunting sites, red clay bricks and rocks which have lined a fireplace
or a campfire will often be
hot rocks. The discriminator will usually eliminate
them without difficulty if widely scattered, but if there is a large concentration
of them, the discriminator may not quiet them all. In that case, you can
revert to the rule of thumb -- “don’t dig non-repeatable signals.”
Remember to always carry a magnet to help discriminate gold from hot rocks
and iron.
• Gold will not
be attracted to a magnet.
• Pieces of iron will always
be attracted to a magnet.
• Negative hot rocks will almost always
be attracted to a magnet.
• Positive hot rocks will usually
be attracted to a magnet.
Page 30

30
A 3-segment battery indicator at the bottom of the display indicates the
battery condition.
The detector requires a single 9-volt ALKALINE battery.
Do not use ordinary zinc carbon batteries.
Do not use “Heavy Duty” batteries.
Rechargeable batteries can also be used.
If you wish to use rechargeable batteries, we recommend using a
Nickel Metal Hydride rechargeable battery.
The battery compartment is located on the back side of the housing.
Slide the battery door to the side and remove it to expose the battery
compartment.
BATTERY LIFE
Expect about 15 to 20 hours of life from a 9-volt alkaline battery.
Rechargeable batteries can provide up to 8 hours of usage per charge.
SPEAKER VOLUME AND BATTERY CHARGE
You may notice the speaker volume drop when only one battery segment is
illuminated.
With one segment flashing, low speaker volume will be very apparent.
BATTERY INDICATOR
The 3-segment battery indicator has 3 stages of indication.
These indications are accurate for a 9-volt alkaline battery.
Segments Illuminated Battery Voltage
3 -segments more than 8.5 volts
2 -segments more than 7.5 volts
1 -segment flashing more than 6.8 volts
After the 1st segment begins flashing, expect the detector to shut off within 10
minutes.
A rechargeable battery will usually illuminate two to three segments
throughout most of its useful charge. But as soon as it drains to the 1-segment
level, it will then lose its charge very rapidly.
BATTERIES
ELECTRICAL INTERFERENCE (EMI)
You are likely to encounter electrical interference when using your Gold Bug Pro metal
detector. It is important that you recognize electrical interference and take appropriate
measures to deal with it. This will prevent you from giving up on a worthwhile search
site, or from returning a properly functioning detector for repair.
Symptoms of electrical interference
Electrical interference can cause a metal detector to chatterspontaneously , to lose sensitivity
for no apparent reason, or to cause a periodic wobbly audio sound. What you hear will
depend on what operating mode you are using, the detector’s settings, and the source of the
electrical interference. The most common manifestation is spontaneous chatter.
All metal detectors are susceptible to electrical interference, but they vary in what kinds
of electrical interference affect them. In a given environment some metal detectors may
be affected by electrical interference whereas others may not.
Common sources of electrical interference
Common sources of electrical interference include: overhead electric power lines,
underground power lines, other metal detectors, telephone lines carrying electronic
data, computer systems, electric fences, old CRT-based televisions, cell phones, CB
and emergency communication radios, thunderstorms, fluorescent lights, metal vapor
lamps, military aircraft with electronic warfare countermeasures turned on, electric
motors, VLF military communications systems and automobile ignition systems. At
home, in a store, or in an urban environment, there may be several different sources of
electrical interference present simultaneously.
All metal detectors generate a certain amount of internal electronic noise. The Gold Bug
Pro is specifically designed to enable you to work into the noise. Experienced users,
striving for maximum depth, often adjust the machine to search with a constant audible
background sound, and then listen through that noise for the sound of real targets.
Stricter regulations in recent years have cut down on interference from electric light
dimmers and auto ignition systems. However there has also been a proliferation of
VLF-UHF wireless communication systems (cell phones, Bluetooth, wi-fi, etc.), which
often affect metal detectors. Overall, the potential for electrical interference is greater
than it was just a few years ago.
Modern high-end metal detectors are a lot more sensitive than older units; this also
increases your detector’s vulnerability to electrical interference beyond what you may
be accustomed to with an older detector. Metal detectors are by their nature designed
to detect magnetic fields, and electric current always produces magnetic fields.
Coping with electrical interference
The primary reason metal detectors provide a sensitivity (gain and/or threshold) control,
is so that users can reduce sensitivity in order to eliminate response to electrical
interference. Some users are reluctant to reduce sensitivity out of fear of losing depth.
At reduced sensitivity settings, you may lose some depth, but at least you can still
search. The Gain and Threshold knobs control the sensitivity and are your first
Page 31

31
line of defense against electrical interference. The Threshold control only applies to
the All-Metal mode.
Electrical interference is usually more controllable in the All-Metals mode than in the
Discrimination mode.
On the Gold Bug Pro, setting the discrimination level between 60 and 70 will usually
reduce electrical interference. In the Discrimination mode, the detector may chatter if
the searchcoil is not in motion, but once you start sweeping it over the ground, the signal
from the ground will usually suppress the electrical interference chatter, except for an
occasional pop or click which will not sound like a real target.
If you are conducting an indoor demonstration, you may find that changing the
orientation of the searchcoil will reduce the pickup of electrical interference.
If you carry a cell phone or other high-tech electronic equipment while metal detecting
and you encounter electrical interference, try turning the device off and see if that solves
the problem. Turn such devices completely off, not just into standby mode.
When working near overhead power lines, you may get the best results right under the
power line and the worst results when standing at a 30° to 45° angle to the power line.
Many sources of electrical interference are intermittent. You may find that an area which
is difficult to search at one time of day may be easier after 5 PM, or on weekends.
Power lines are usually quietest late at night, and early on weekend mornings.
Small searchcoils usually pick up less electrical interference than larger searchcoils. On
a site with severe electrical interference, a small searchcoil is often a better choice than
a large one.
Distinguishing electrical interference from other problems
Electrical interference will often vary as you walk around from place to place, and it will
also vary with changes in the orientation of the searchcoil. This is almost never the
case if there is a functional problem with the metal detector itself.
The most common cause of a noisy metal detector, where the problem is not electrical
interference, is a defective searchcoil. If striking the searchcoil with your hand causes
the noise to start or stop, the problem could be a defective searchcoil. Also, a defective
searchcoil often causes noise of a more intermittent nature than electrical interference.
The second most common cause is a loose searchcoil connector. The noise from a
loose connector will usually be very erratic or intermittent in nature. Try unplugging the
searchcoil and then reconnecting it to ensure the connector is firmly installed.
If you use a searchcoil cover, dirt or water can accumulate inside it, and movement of
those materials can cause false signals while sweeping the searchcoil. Searchcoil
covers must be periodically removed and cleaned.
ELECTRICAL INTERFERENCE
cont.
Page 32

32 5
ASSEMBLY
Assembly is easy and requires
no tools.
●
1 Loosen both Locking Collars by rotating 100%
counterclockwise.
●
2 Insert the Middle Stem into the S-Rod and
click Silver Button into hole.
●
3 Position the lower stem with the silver button
toward the back.
Using the bolt, one rubber washer, and
knurled knob, attach the searchcoil to the
lower stem.
●
4 Press the button on the upper end of the
lower stem, and slide the lower stem into the
middle stem.
Adjust the stem to a length that lets you maintain a
comfortable upright posture, with your arm relaxed at
your side, and the searchcoil parallel to the ground in
front of you.
●
5 Wind the cable securely around the stems.
A loose or moving cable can cause false signals.
●
6 Connect cable plug to housing.
Do not twist the cable or plug. Turn knurled locking
ring only. Use minimal finger pressure to start the
threads. Do not cross-thread. When the locking ring is
fully engaged over the threaded connector,
give it a firm turn to make sure that it is very
tight. When the locking ring is fully engaged
over the threaded connector, the locking ring
may not cover all of the threads.
●
7 Tighten both locking collars.
●
8 Secure the cable with the 2 velcro straps
provided, one on the lower stem close to the
searchcoil, and one on the upper stem, close
to the housing. Leave just enough slack in the
cable, at the searchcoil end, to be able to
rotate the searchcoil a small amount about the
bolt. After full assembly and upon first use in
the field, check this adjustment. It is very
important to keep the cable secure against the
stem, especially at high Gain, as movement in
the cable may cause false signals.
Loc
kin
g
Col
lar
Loc
kin
g
Col
lar
S-R
od
Vel
cro
Str
ap
Vel
cro
Str
ap
Knurled
Kno
b
Bolt
Single
Rubber
Was
her
Sea
rch
coi
l
Hand-grip
Sea
rch
Coi
l Cable
Low
er
Stem
Middle
Stem
Cable
Plug
SEARCH TECHNIQUES
Target Verification
After detecting a target, do the
following:
1. Walk around the target in a
circle.
2. While circling the target,
continue sweeping the
searchcoil across the target.
3. Sweep once every 30° or 40° of
the circle.
If the tone does not change
and the target ID value is
consistent as you circle the
target, you can be highly
confident of the target’s
identification.
If the tone or target ID
changes as you circle the
target, you may have multiple
targets or an irregularly shaped
object.
If the tone completely
disappears at different angles, the target may be trash or a lowvalue metal.
If you are new to the hobby, dig all targets. With practice in the
field, you will soon be able to correlate audible and visual target
feedback with certain types of metal objects.
Pinpointing in Discrimination mode:
1. Sweep over target in narrowing side-to-side pattern.
2. Take visual note of spot on ground where “beep” occurs.
3. Step 90° to the side of the target.
4. Sweep searchcoil over same area, at 90° to 1st sweep pattern.
5. This pinpoints the target location with an “X.”
SEARCHCOIL MOVEMENT
When swinging the searchcoil,
be careful to keep it level with
the ground about 1/2 inch from
the surface. Never swing the
searchcoil like a pendulum.
WRONG
CORRECT
Page 33

33
TARGET PINPOINTING
After you have identified a target using Discrimination mode,
press-and-hold the PINPOINT button to identify the target’s exact
location. This technique can yield more information about the target’s
shape and size and also find its exact location to facilitate extraction.
Pinpoint as follows:
1.
Position the searchcoil just barely off the ground, and to the side of
the target.
2. Now move the searchcoil slowly across the target; you can locate
it by the sound. The target is located directly under where the
sound is loudest.
Narrow It Down:
1.
To narrow the response further, position the center of the searchcoil
near the center of the response pattern, but not directly over the
center.
2. Release the PINPOINT button.
3. Press-and-hold PINPOINT button again.
4. Repeat this narrowing procedure to narrow the field of detection
further.
Note: Depth indication is less accurate
after narrowing.
SEARCHCOIL DRIFT
If you plan to use the PINPOINT mode for
continuous searching, realize that drift will
occur
over
time,
causing
the detector
to gain or lose
sensitivity. Periodic
retuning of the detector
is required to minimize
drift; release and press
PINPOINT again to retune.
Page 34

install
a rubber washer at the
searchcoil connection point.
For information about the 11”DD searchcoil
(part# 11COIL-TEK, MRSP=$199.00),
please call 800-685-5050.
34
Introduction to the Gold Bug Pro
The New Gold Bug Pro is unique among gold prospecting metal detectors for
its combination of high sensitivity to small gold nuggets and its versatile
function as an all-purpose treasure detector.
The controls and features are tailored to gold prospecting, including a
sophisticated ground balancing system, separate control over signal gain and
threshold, and a unique discrimination control system. These features also
make for a great relic-hunting detector, especially when the Gold Bug Pro is
outfitted with the optional 11” DD searchcoil. While the Gold Bug Pro makes
for a highly competent coin-shooting detector, its user interface and features
are not specifically designed for this purpose. As a coin-shooter, you will
notice that the Gold Bug Pro exhibits slightly lower sensitivity to high-
conductivity coins, like a U.S. quarter; this is a result of its specialized design
to emphasize sensitivity to small low conductivity metals like
gold nuggets.
The Gold Bug Pro is outfitted with a small 5” searchcoil as standard equipment
since this searchcoil construction is best-suited to finding gold nuggets. You
may be familiar with other metal detectors which have larger searchcoils,
generally in the range of 8 to 10 inches in diameter. Large coils are designed
to cover the maximum amount of ground efficiently and for the deepest ground
penetration. Small searchcoils, intended for gold prospecting, are designed for
precision. The Gold Bug Pro’s small DD searchcoil makes pinpointing easier,
fits into small spaces where gold is often hidden, is better suited to penetrate
highly mineralized soils where gold is frequently found, and has the highest
possible sensitivity to tiny gold nuggets.
Relic-Hunting and Coin-Shooting
with the Optional 11” DD Searchcoil
While the Gold Bug Pro is a high performance, specialized gold prospecting
metal detector , it is also a good multi-purpose detector. With the purchase of an
11” DD searchcoil, you can bring more power to your coin-shooting and relichunting searches.
The standard 5” Gold Bug Pro searchcoil is engineered for precision and is best
at finding the smallest gold nuggets that most other gold prospecting detectors
would miss.
If you want a larger sweep area and deeper detection, the 11” DD should be
considered.
Advantages of the 11” DD searchcoil are:
1 Deeper detection
2. Broader sweep (cover more area in less time)
Disadvantages of the 1 1” DD searchcoil over the standard 5” searchcoil are:
1. Less separation between adjacent buried targets.
Not as good at extremely trashy sites.
2. Loss of sensitivity to the tiniest gold pieces.
3. Does not fit into tight spaces as well.
Notice:
If you use the 11” DD
searchcoil, DO NOT
Page 35

35
DEVICE SPECIFICATIONS
Mechanical: S-rod with electronics housing on rod, 3-piece breakdown
construction, nonmetallic telescoping lower rod, adjustable position
arm rest
Weight: 2 lbs, 8 oz with battery installed
Standard searchcoil: 4.7 inch (12.3 cm) closed-frame round biaxial,
waterproof
Batteries: Single 9 volt rectangular alkaline
Operating principle: VLF induction balance
Operating frequency: 19 kHz, crystal controlled
Reactive overload: 10,000 micro-cgs (with standard searchcoil)
Resistive overload: 1,200 micro-cgs (with standard searchcoil)
Ground balance range: From ferrite to salt water inclusive
Discrimination ground suppression: Combination of 2ndand 3
rd
order methods
Target ID ground suppression: 3rdorder
Battery life: 15+ hours on good quality alkaline
Operating temp range: 14 to 122 degrees F (-10 to +50 C)
Operating humidity range: 0 - 90% noncondensing
TREASURE HUNTER’S CODE OF ETHICS
• Always check Federal, State, County and local laws before searching.
• Respect private property and do not enter private property without the
owner’s permission.
• Take care to refill all holes and do not leave any damage.
• Remove and dispose of any and all trash and litter found.
• Appreciate and protect our inheritance of natural resources, wildlife and
private property.
• Act as an ambassador for the hobby; use thoughtfulness, consideration and
courtesy at all times.
• Never destroy historical or archaeological treasures.
• All treasure hunters may be judged by the example you set; always conduct
yourself with courtesy and consideration of others.
Page 36

5-YEAR LIMITED WARRANTY
The Gold Bug Pro metal detector is warranted against defects in materials and
workmanship under normal use for 5 years from the date of purchase to the
original owner.
Damage due to neglect, accidental damage, or misuse of this product is not
covered under this Warranty. Decisions regarding abuse or misuse of the
detector are made solely at the discretion of the manufacturer.
Proof of Purchase is required to make a claim under this warranty.
Liability under this Warranty is limited to replacing or repairing, at our option,
the metal detector returned, shipping cost prepaid to Fisher Labs. Shipping
cost to Fisher Labs is the responsibility of the consumer.
To return your detector for service, please first contact Fisher Labs for a
Return Authorization (RA) Number. Reference the RA number on your
package and return the detector within 15 days of calling to:
Fisher Research Labs, Inc.
1465-H Henry Brennan Dr.
El Paso, TX 79936
Phone: 915-225-0333 ext.118
NOTICE TO CUSTOMERS OUTSIDE THE U.S.A.
This Warranty may vary in other countries; check with your distributor for details.
Factory Warranty follows the channel of distribution.
Warranty does not cover shipping costs.
Warranty coverage does not include the cost of transporting the
detector back to an owner who is located outside of the United
States of America.
According to FCC part 15.21 Changes or Modifications made to this device not expressly approved by
the party responsible for compliance could void the users authority to operate this equipment.
Copyright© 2010 by Fisher Research Labs, Inc.
All rights reserved, including the right to reproduce this book, or parts thereof, in any form.
Published by Fisher Research Labs, Inc.
Fisher®is a registered trademark of Fisher Research Labs, Inc.
www.fisherlab.com
1465-H Henry Brennan Dr., El Paso, TX 79936 • (915) 225-0333
MGBug 030410
 Loading...