

Page 1

OPERATING
MANUAL
Use ALKALINE
Batteries ONLY
Page 2

2
2
NOTES
TABLE OF CONTENTS
TTeerrmmiinnoollooggy
y
. . . . . . . . . . . . . . . . . . . . . . . . . . . . . . . . . . . . . .
3
3
AAsssseemmbblly
y
. . . . . . . . . . . . . . . . . . . . . . . . . . . . . . . . . . . . . . . .
4
4
BBaatttteerriiees
s
. . . . . . . . . . . . . . . . . . . . . . . . . . . . . . . . . . . . . . . . .
5
5
HHeeaaddpphhoonneess .. .. .. .. .. .. .. .. .. .. .. .. .. .. .. .. .. .. .. .. .. .. .. .. .. .. .. .. .. .. .. .. .. .. .. .. ..5
5
QQuuiicckk--SSttaarrtt DDeemmo
o
. . . . . . . . . . . . . . . . . . . . . . . . . . . . . . .
66--7
7
CCoonnttrrooll PPaanneell .. .. .. .. .. .. .. .. .. .. .. .. .. .. .. .. .. .. .. .. .. .. .. .. .. .. .. .. .. .. .. .. .. ..88--111
1
SSeennssiittiivviittyy .. .. .. .. .. .. .. .. .. .. .. .. .. .. .. .. .. .. .. .. .. .. .. .. .. .. .. .. .. .. .. .. .. .. .. ..8
8
AAuuttoo TTuunnee .. .. .. .. .. .. .. .. .. .. .. .. .. .. .. .. .. .. .. .. .. .. .. .. .. .. .. .. .. .. .. .. .. .. ..8
8
DDiissccrriimmiinnaattiioonn CCoonnttrrooll .. .. .. .. .. .. .. .. .. .. .. .. .. .. .. .. .. .. .. .. .. .. .. .. ..9
9
PPiinnppooiinntt .. .. .. .. .. .. .. .. .. .. .. .. .. .. .. .. .. .. .. .. .. .. .. .. .. .. .. .. .. .. .. .. .. .. .. ..110
0
DDiisscc .. .. .. .. .. .. .. .. .. .. .. .. .. .. .. .. .. .. .. .. .. .. .. .. .. .. .. .. .. .. .. .. .. .. .. .. .. .. ..110
0
NNoottcchh .. .. .. .. .. .. .. .. .. .. .. .. .. .. .. .. .. .. .. .. .. .. .. .. .. .. .. .. .. .. .. .. .. .. .. .. .. ..111
1
GGrroouunndd BBaallaanncciinng
g
. . . . . . . . . . . . . . . . . . . . . . . . . . . . .
1122--113
3
QQuuiicckk GGrroouunndd BBaallaanncciinng
g
. . . . . . . . . . . . . . . . . . . . .
113
3
44--TToonnee AAuuddiioo SSyysstteemm .. .. .. .. .. .. .. .. .. .. .. .. .. .. .. .. .. .. .. .. .. .. .. .. .. .. .. .. ..114
4
DDeepptthh aanndd TTaarrggeett DDiissppllaayy .. .. .. .. .. .. .. .. .. .. .. .. .. .. .. .. .. .. .. .. .. ..1155--116
6
TTaarrggeett RReeaaddoouutt TTaabbllee .. .. .. .. .. .. .. .. .. .. .. .. .. .. .. .. .. .. .. .. .. .. .. ..116
6
DDDD CCooiill CChhaarraacctteerriissttiiccss .. .. .. .. .. .. .. .. .. .. .. .. .. .. .. .. .. .. .. .. .. .. .. .. .. .. ..117
7
BBoottttllee CCaapp DDiissccrriimmiinnaattiioonn .. .. .. .. .. .. .. .. .. .. .. .. .. .. .. .. .. .. .. .. ..117
7
SSwweeeett SSppoott .. .. .. .. .. .. .. .. .. .. .. .. .. .. .. .. .. .. .. .. .. .. .. .. .. .. .. .. .. .. .. .. ..117
7
SSeennssiittiivviittyy AAddjjuussttmmeennt
t
. . . . . . . . . . . . . . . . . . . . . . . . . . . . .
118
8
EElleeccttrroommaaggnneettiicc IInntteerrffeerreennccee .. .. .. .. .. .. .. .. .. .. .. .. .. .. .. .. ..118
8
SSeevveerree GGrroouunndd CCoonnddiittiioonnss .. .. .. .. .. .. .. .. .. .. .. .. .. .. .. .. .. .. .. ..118
8
SSeeaarrcchh TTeecchhnniiqquuees
s
. . . . . . . . . . . . . . . . . . . . . . . . . . . . . . .
119
9
TTaarrggeett VVeerriiffiiccaattiioonn .. .. .. .. .. .. .. .. .. .. .. .. .. .. .. .. .. .. .. .. .. .. .. .. .. .. ..119
9
PPiinnppooiinnttiinngg wwiitthh mmoottiioonn mmooddeess .. .. .. .. .. .. .. .. .. .. .. .. .. .. .. ..119
9
TTaarrggeett PPiinnppooiinnttiinngg ((NNoo mmoottiioonn)
)
. . . . . . . . . . . . . . . . . . . . .
220
0
CCooiill DDrriifftt .. .. .. .. .. .. .. .. .. .. .. .. .. .. .. .. .. .. .. .. .. .. .. .. .. .. .. .. .. .. .. .. .. .. .. ..110
0
TTrreeaassuurree HHuunntteerr’’ss CCooddee ooff EEtthhiiccs
s
. . . . . . . . . . . . . . . . . . .
221
1
CCooiill DDrriifftt .. .. .. .. .. .. .. .. .. .. .. .. .. .. .. .. .. .. .. .. .. .. .. .. .. .. .. .. .. .. .. .. .. .. .. ..110
0
WWaarrrraanntty
y
. . . . . . . . . . . . . . . . . . . . . . . . . . . . . . . . . . . . . . .
221
1
CCooiill DDrriifftt .. .. .. .. .. .. .. .. .. .. .. .. .. .. .. .. .. .. .. .. .. .. .. .. .. .. .. .. .. .. .. .. .. .. .. ..110
0
AAcccceessssoorriiees
s
. . . . . . . . . . . . . . . . . . . . . . . . . . . . . .
BBaacckk PPaagge
e
CCooiill DDrriifftt .. .. .. .. .. .. .. .. .. .. .. .. .. .. .. .. .. .. .. .. .. .. .. .. .. .. .. .. .. .. .. .. .. .. .. ..110
0
Page 3

3
3
TERMINOLOGY
The following terms are used throughout the manual, and are standard
terminology among treasure hunters.
EELLIIMMIINNAATTIIOON
N
Reference to a metal being "eliminated" means that the detector will not
emit a tone, nor light up an indicator, when a specified object passes
through the searchcoil’s detection field.
DDIISSCCRRIIMMIINNAATTIIOON
N
When the detector emits different tones for different types of metals, and
when the detector "eliminates" certain metals, we refer to this as the
detector "discriminating" among different types of metals.
Discrimination is an essential feature of professional metal detectors.
Discrimination allows the user to ignore trash and other undesirable
objects.
RREELLIIC
C
A relic is an object of interest by reason of its age or its association with
the past. Many relics are made of iron, but can also be made of bronze
or precious metals.
IIRROON
N
Iron is a common, low-grade metal that is an undesirable target in certain
metal detecting applications. Examples of undesirable iron objects are
old cans, pipes, bolts and nails.
Sometimes, the desired target is made of iron. Property markers, for
instance, contain iron. Valuable relics can also be composed of iron;
cannon balls, old armaments, and parts of old structures and vehicles
can also be composed of iron.
FFEERRRROOUUS
S
Metals which are made of, or contain, iron.
PPIINNPPOOIINNTTIINNG
G
Pinpointing is the process of finding the exact location of a buried object.
Long-buried metals can appear to the eye exactly like the surrounding
soil, and can therefore be very hard to isolate from the soil.
PPUULLLL--TTAABBS
S
Discarded pull-tabs from beverage containers are an especially
bothersome trash item for treasure hunters. They come in many
different shapes and sizes. Pull-tabs can be eliminated from
detection, but some other valuable objects can have a magnetic
signature similar to pull-tabs, and will also be eliminated when
discriminating out pull-tabs.
GGRROOUUNNDD BBAALLAANNCCE
E
Ground Balancing is the ability of the detector to ignore, or "see through"
the earth’s naturally occurring minerals, and only sound a tone when a
metal object is detected. The Gold Bug incorporates proprietary circuitry
and programming to eliminate false signals from severe ground conditions.
Page 4
4
4
•Always check Federal, State, County and local laws before searching.
•
Respect private property and do not enter private property without the owner’s permission.
•Take care to refill all holes and leave no damage.
•Remove and dispose of any and all trash and litter found.
•
Appreciate and protect our inheritance of natural resources, wildlife and private property.
•Act as an ambassador for the hobby, use thoughtfulness, consideration and courtesy
at all times.
•Never destroy historical or archaeological treasures.
•All treasure hunters may be judged by the example you set; always conduct yourself
with courtesy and consideration of others
The F4 metal detector is warranted against defects in materials and
workmanship under normal use for five years from the date of purchase to
the original owner.
Damage due to neglect, accidental damage or misuse of this product is not
covered under this warranty. Decisions regarding abuse or misuse of the
detector are made solely at the discretion of the manufacturer.
P
P
Liability under this Warranty is limited to replacing or repairing, at our option,
the metal detector returned, shipping cost prepaid to Fisher Labs. Shipping
cost to Fisher Labs is the responsibility of the consumer.
To return your detector for service, please first contact Fisher Labs for a Return
Authorization (RA) Number. Reference the RA number on your package and
return the detector within 15 days of calling to:
Warranty coverage does not include the cost of transporting the detector
back to an owner who is located outside of the United States of America.
NOTE TO CUSTOMERS OUTSIDE THE U.S.A.
This warranty may vary in other countries, check with your distributor for details.
Warranty does not cover shipping costs.
According to FCC part 15.21 Changes or Modifications made to this device not expressly approved by the
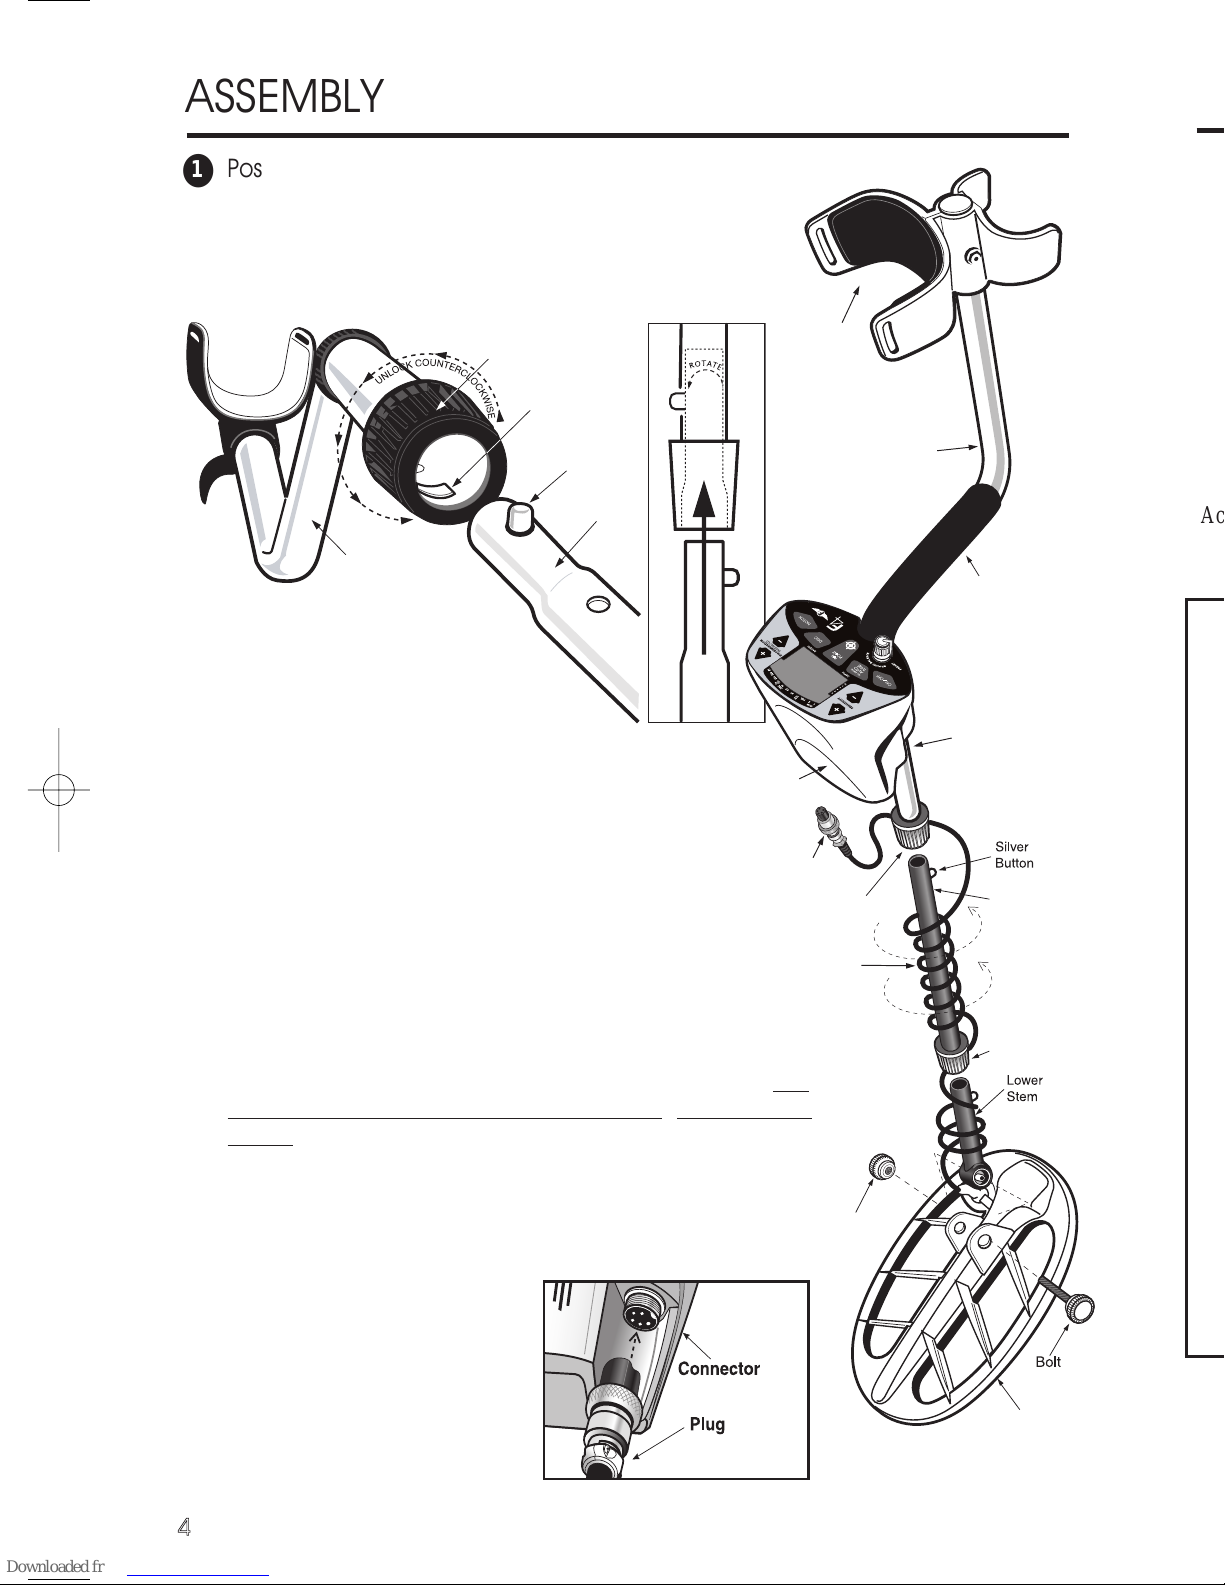
ASSEMBLY
●
1 Position detector upright.
●
2 Rotate the LOCKING COLLAR fully in the
counterclockwise direction.
●
3 Insert your finger inside the tube and make sure the
INTERNAL CAM LOCK is flush with the inside of the tube.
●
4
Insert the MIDDLE STEM into the
S-ROD, with the SILVER BUTTON
pointed upward
●
5 Rotate the MIDDLE STEM until the
SILVER BUTTON locates in the hole.
●
6 Twist the LOCKING COLLAR fully in the clockwise
direction until it locks.
●
7 Repeat this process on the LOWER STEM.
●
8 Using the BOLT and KNURLED KNOB, attach
the SEARCHCOIL to the LOWER STEM.
●
9
Adjust the LOWER STEM to a length that lets you
maintain a comfortable upright posture, with your arm
relaxed at your side, and the SEARCHCOIL parallel to the
ground in front of you.
●
10
Wind the CABLE securely around the STEMS.
●
11
Connect CABLE PLUG to housing.
Do not twist the Cable or Plug. Turn Locking Ring only. Use
minimal finger pressure to start the threads. Do not crossthread. When the Locking Ring is fully engaged over the
threaded connector, give it a firm turn to make sure that it
is very tight. When the Locking Ring is fully engaged over the
threaded connector, it may not cover all of the threads.
●
12
Tighten both LOCKING COLLARS.
S-ROD
LOCKING
COLLAR
INTERNAL
CAM LOCK
SILVER BUTTON
MIDDLE
STEM
S-ROD
MIDDLE STEM
●
2
●
3
●
4
●
4
●
5
Hand-grip
Search
Coil
Cable
Cable
Plu
g
S-R
od
Middle
Stem
Locking
Collar
Locking
Collar
Knu
rled
Kno
b
Battery
Compartment
(back side)
Headphone
Jack
Armrest
Biaxial
Searchcoil
*
*
Note: Very tall users can purchase the optional Extended Lower Stem (TUBE5X), for extended reach.
Caution:
Forcing in MIDDLE STEM with CAM LOCK raised may form a burr on
camlock. If this happens, remove burr with knife to allow insertion.
Armrest Adjustment
If you wish to change the
position of the armrest, remove
the screw and move the armrest
to one of the alternate hole
locations.
Page 5
5
5
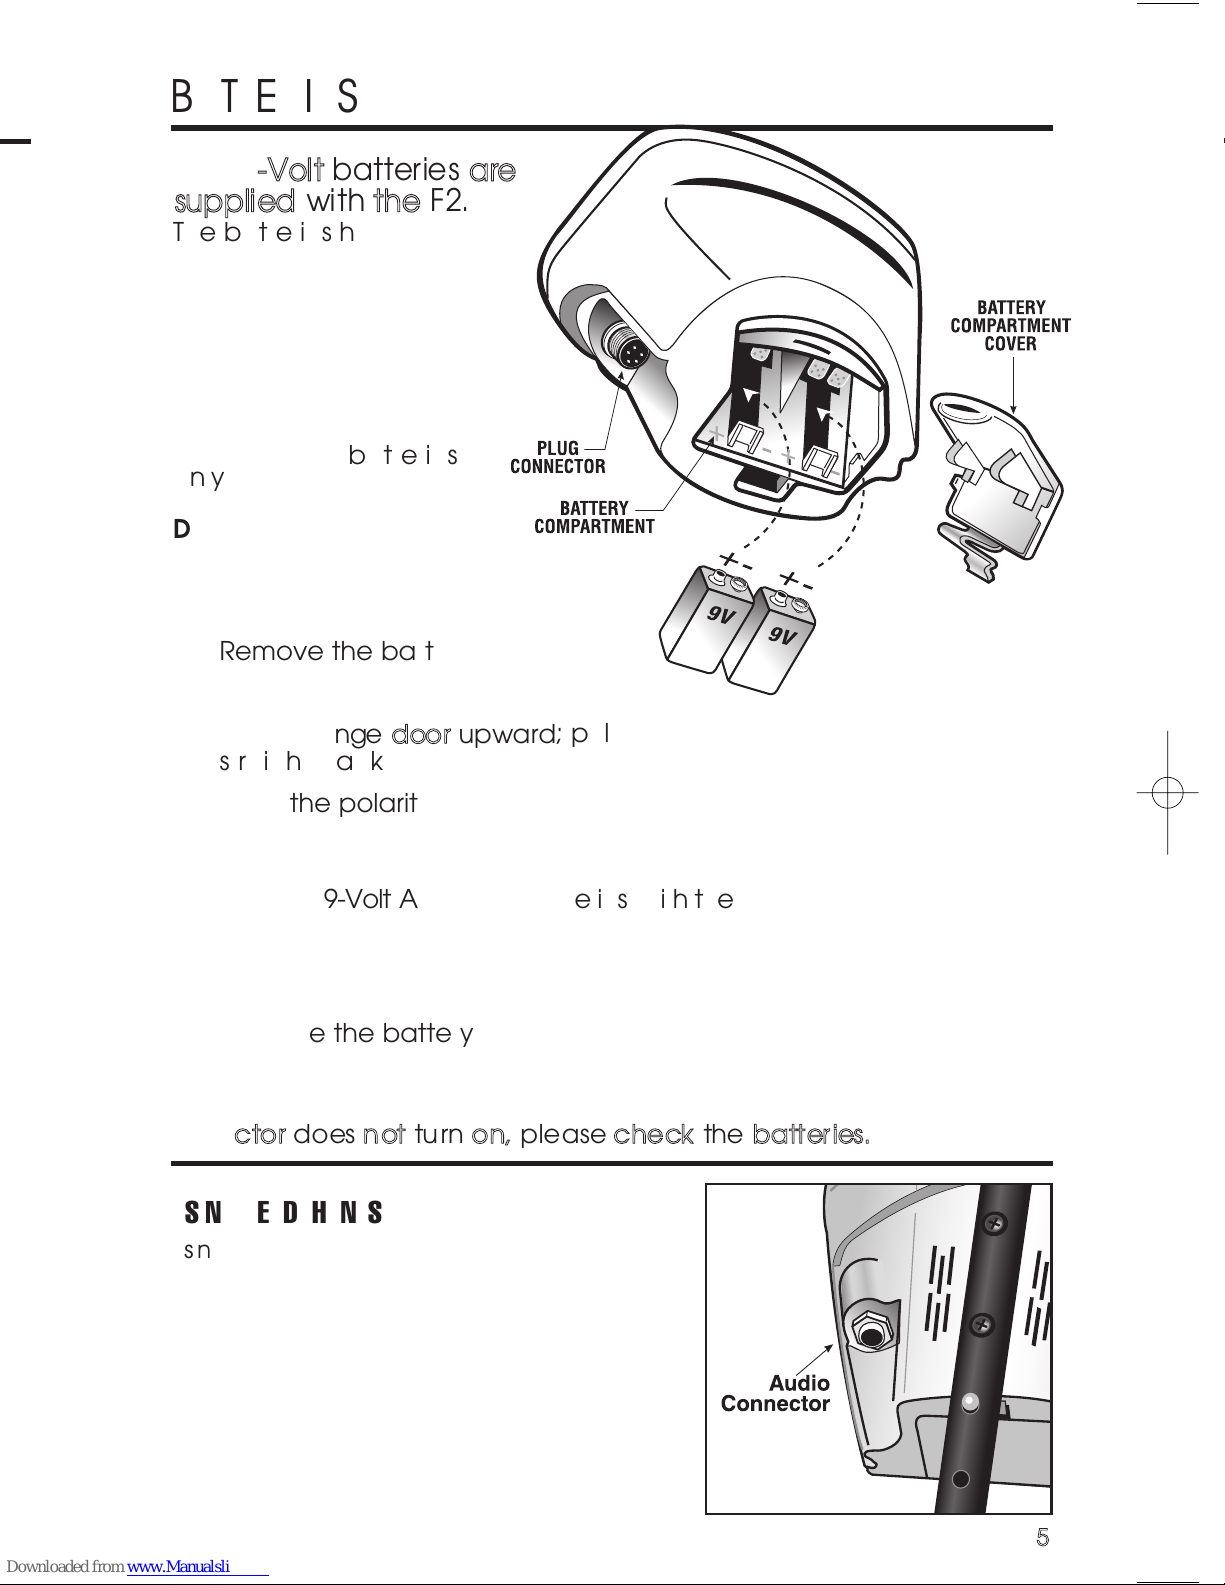
TTwwoo 99--VVoolltt bbaatttteerriieess aarre
e
ssuupppplliieedd wwiitthh tthhee FF22.
.
The batteries have been
inserted backwards in the
compartment for storage
during transportation.
Please remove batteries,
turn them around, and install
correctly.
Use
AALLKKAALLIINNE
E
batteries
only.
DO NOT MIX OLD AND
NEW BATTERIES.
To install the batteries:
l
1
1
Remove the battery cover
by disengaging the clip at the
back.
DDoo nnoott hhiinnggee ddoooorr uuppwwaarrd
d
; pull
straight back
l
2
2
Align the polarity of the batteries correctly, with the positive "+"
toward the coil plug connection, as indicated by the + indicator
on the housing.
l
3
3
Insert (2) 9-Volt
AALLKKAALLIINNE
E
batteries, with the contacts pointed inward,
and press down on the back of the batteries to snap them into place.
Some brands of batteries will require moderate force to clear the
retaining tabs.
l
4
4
Replace the battery door.
Most metal detector problems are due to improperly installed
batteries, or the use of non-alkaline or discharged batteries.
IIff tthhe
e
ddeetteeccttoorr ddooeess nnoott ttuurrnn oonn,, pplleeaassee cchheecckk tthhee bbaatttteerriieess..
BATTERIES
USING HEADPHONES
Using headphones (not included) improves
battery life, and prevents the sounds from
annoying bystanders.
It also allows you to hear subtle changes in the
sound more clearly, particularly if searching in a
noisy location. For safety reasons, do not use
headphones near traffic or where other
dangers are present. This device is to be used
with interconnecting cables/headphone
cables shorter than three meters.
Page 6
6
6
SEARCH TECHNIQUES
TTaarrg
g
After detecting a target, do the
following:
11.
.
22.
.
33.
.
PPiinnp
p
11.
.
22.
.
33.
.
44.
.
55.
.
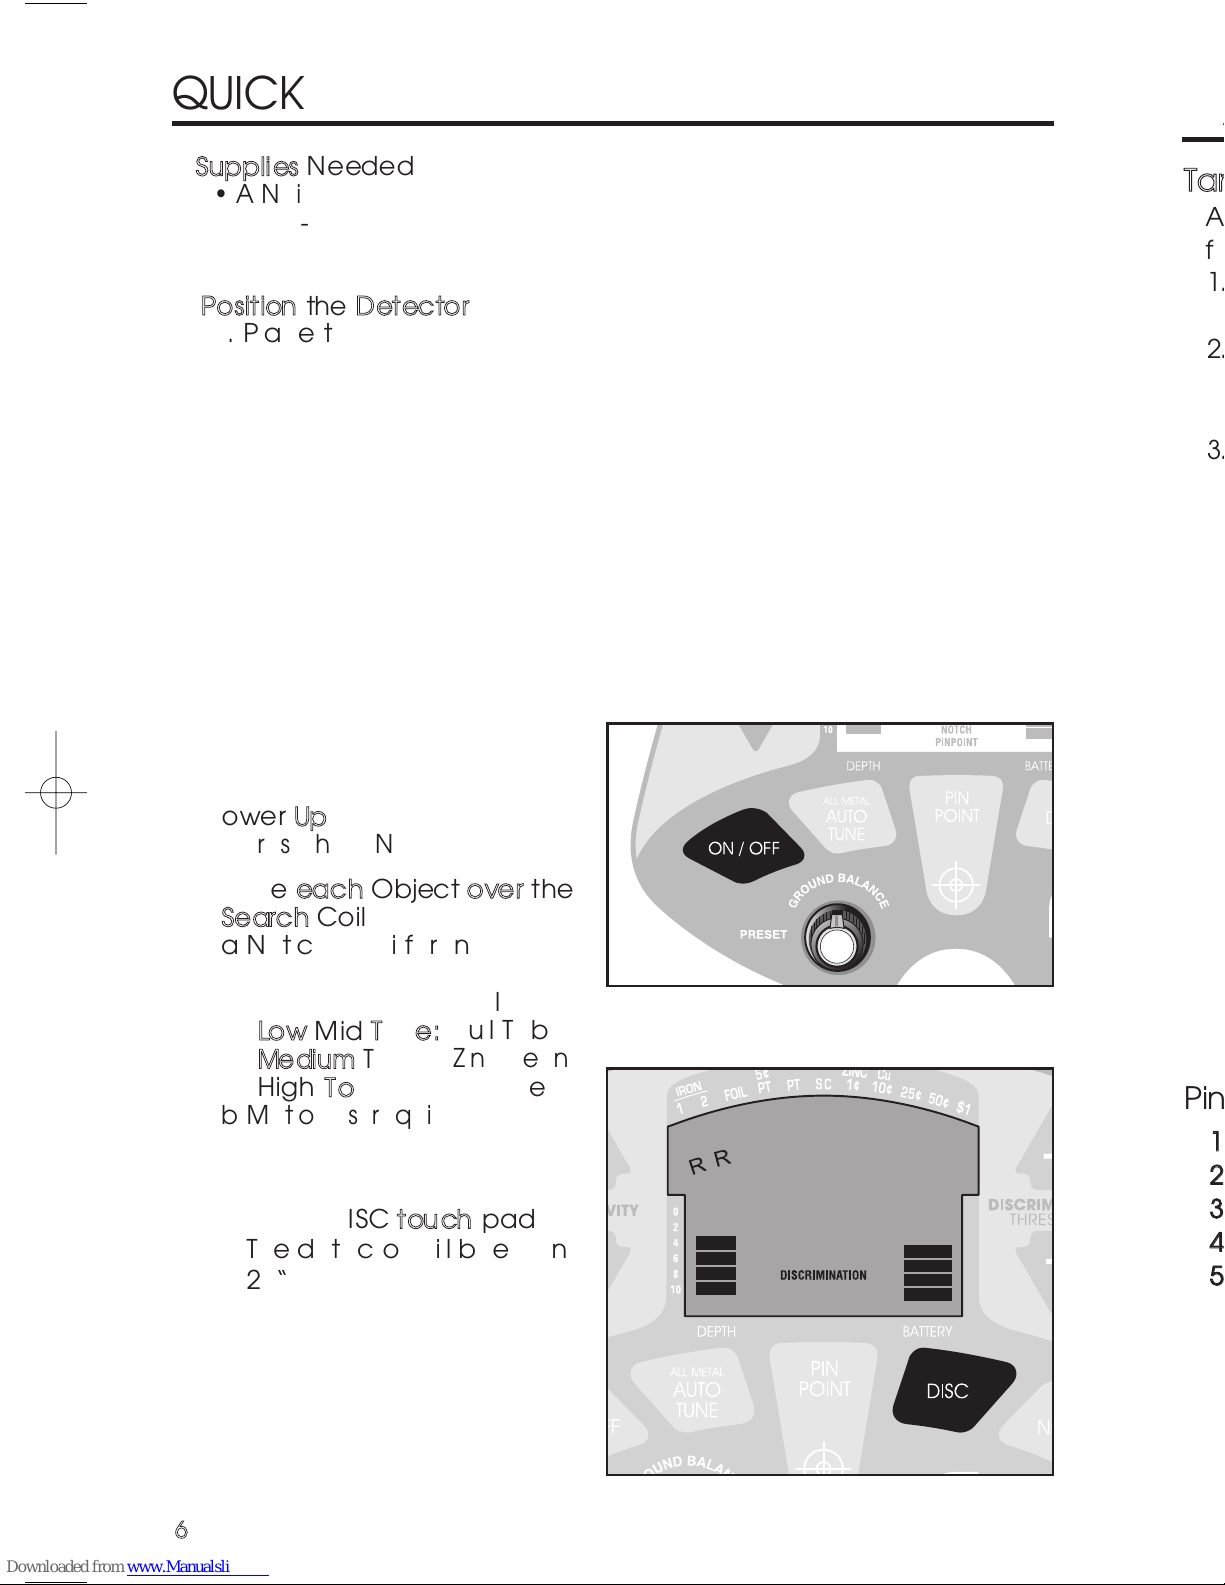
QUICK-START DEMONSTRATION
II.. SSuupppplliieess NNeeeeddeed
d
• A Nail • A Quarter
•
•
A Pull-Tab from a beverage can • A Zinc Penny (dated after 1982)
• A Nickel
IIII.. PPoossiittiioonn tthhee DDeetteeccttoor
r
a. Place the detector on a
table, with the search
coil hanging over the
edge. (or better, have a
friend hold the detector,
with the coil off the
ground).
b. Keep the searchcoil
away from walls, floors,
and metal objects.
c. Remove watches, rings and other jewelry or metal objects from
hands and wrists.
d. Turn off appliances or lights that cause electromagnetic
interference.
e. Pivot the search coil back
toward the detector body.
IIIIII.. PPoowweerr UUp
p
Press the ON/OFF touch pad.
IIVV.. WWaavvee eeaacchh OObbjjeecctt oovveerr tthhee
SSeeaarrcchh CCooiil
l
a.Notice a different tone for
each object.
LLooww TToonnee:
:
Nail
LLooww MMiidd TToonnee:
:
Pull-Tab
MMeeddiiuumm TToonnee:
:
Zinc Penny
HHiigghh TToonnee:
:
Quarter
b.Motion is required. Objects
must be in motion over the
search coil to be detected.
VV.. PPrreessss tthhee DDIISSCC ttoouucchh ppaad
d
The detector will beep and
2 “R”’s will appear under
the iron indicators.
Page 7
7
7
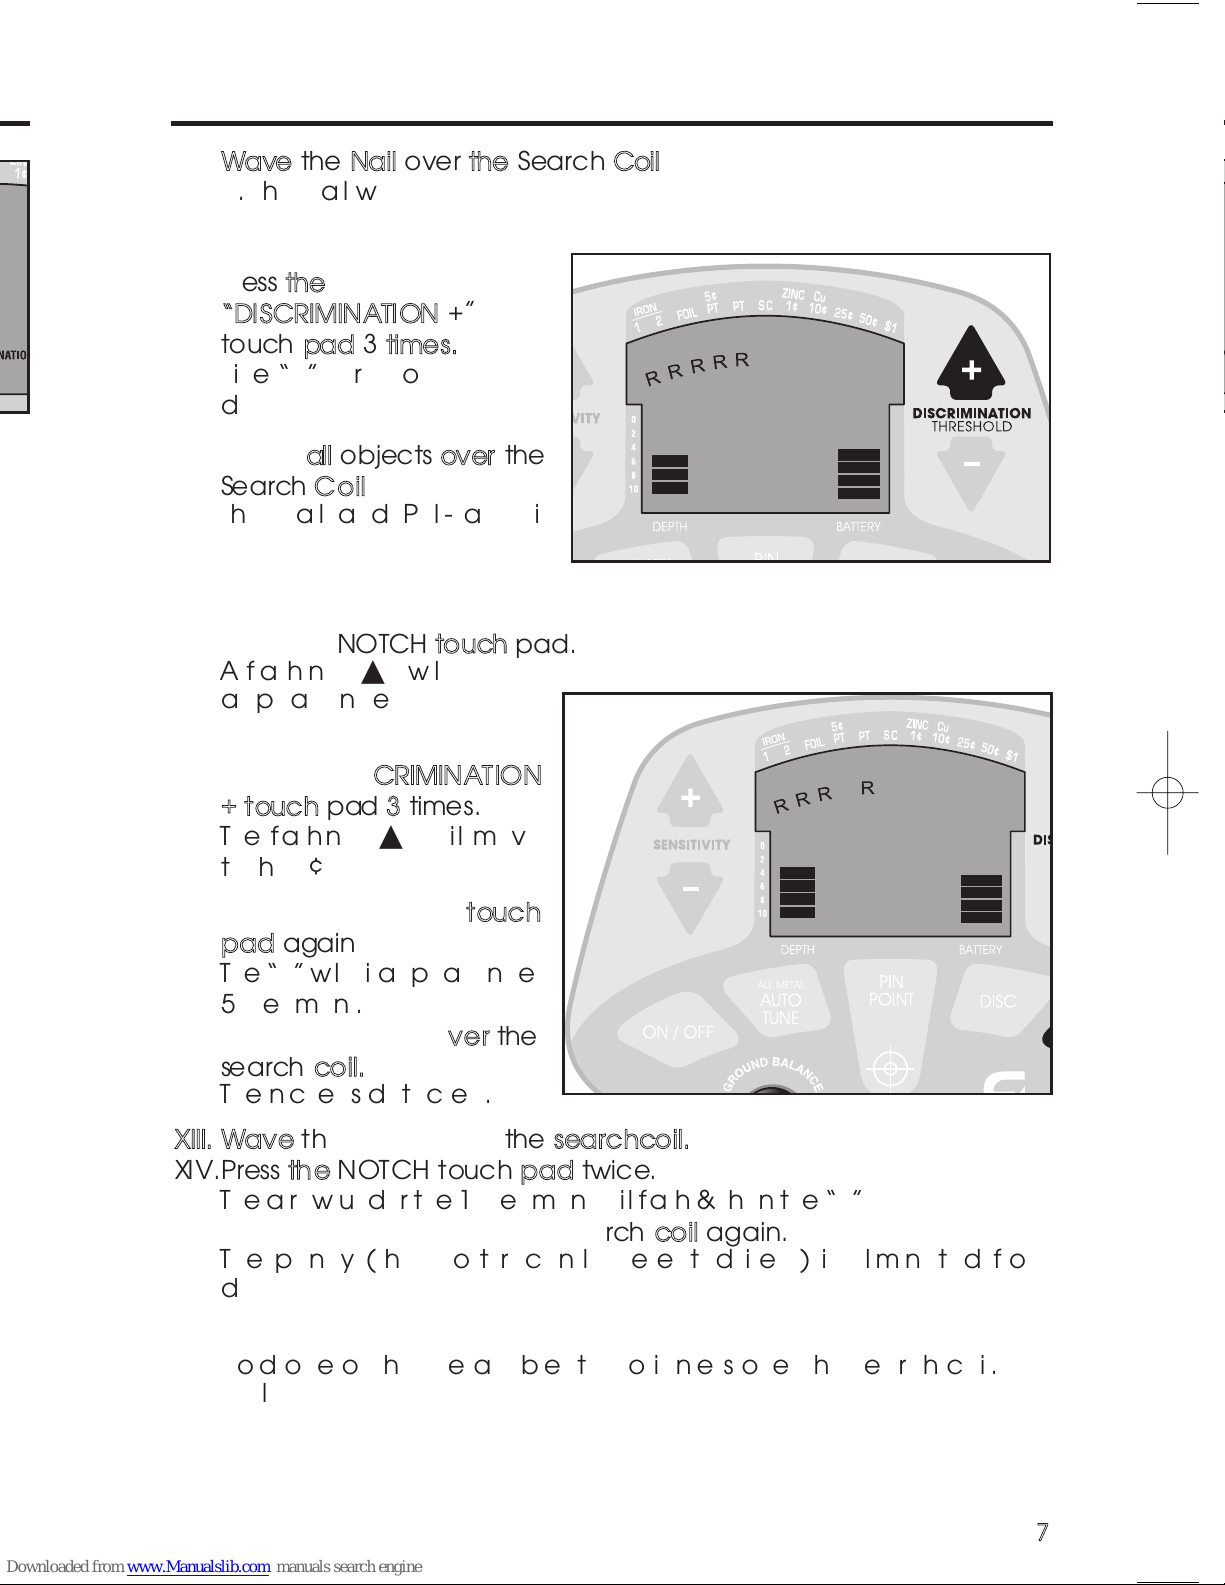
VVII..WWaavvee tthhee NNaaiill oovveerr tthhee SSeeaarrcchh CCooiil
l
a. The Nail will not be detected.
b. The Nail has been "Discriminated Out."
VVIIII.. PPrreessss tthhe
e
““DDIISSCCRRIIMMIINNAATTIIOONN
++”
”
ttoouucchh ppaadd 33 ttiimmeess.
.
Five “R”s are now
displayed.
VVIIIIII.. WWaavvee aallll oobbjjeeccttss oovveerr tthhe
e
SSeeaarrcchh CCooiil
l
The Nail and Pull-Tab will
not be detected.
The other objects will be
detected with their own distinctive tones.
IIXX.. PPrreessss tthhee NNOOTTCCHH ttoouucchh ppaadd.
.
A flashing “▲” will
appear under the IRON-1
segment.
XX.. PPrreessss tthhee DDIISSCCRRIIMMIINNAATTIIOON
N
+
+
ttoouucchh ppaadd 33 ttiimmeess.
.
The flashing “▲” will move
to the 5¢ segment.
XXII..PPrreessss tthhee NNOOTTCCHH ttoouucch
h
ppaadd aaggaaiin
n
The “R” will disappear under
5¢ segment.
XXIIII..WWaavvee tthhee nniicckkeell oovveerr tthhe
e
sseeaarrcchh ccooiill..
The nickel is detected.
XXIIIIII..WWaavvee tthhee ppeennnnyy oovveerr tthhee sseeaarrcchhccooiill..
XXIIVV..PPrreessss tthhee NNOOTTCCHHttoouucchh ppaadd ttwwiiccee.
.
The arrow under the 1¢ segment will flash & then the “R” will illuminate.
XXVV.. WWaavvee tthhee ppeennnnyy oovveerr tthhee sseeaarrcchh ccooiill aaggaaiinn.
.
The penny (the most recently detected item) is eliminated from
detection.
XXVVII.. PPrreessss tthhee PPIINNPPOOIINNTT ttoouucchh ppaadd.
.
Hold one of the metal objects motionless over the search coil.
• All Metal objects are now detected.
•
One monotone sound indicates the presence of any type of metal.
•
A 2-digit numerical display indicates approximate target depth, in inches.
QUICK-START DEMONSTRATION
(continued)
Page 8
8
8
DD COIL CHARACTERISTICS
A DD coil is superior to a concentric coil, but sometimes requires a
different sweep technique.
Advantages are
If you experience multiple responses on a shallow target, you can
raise the coil, or narrow the sweep over known targets to only
intersect the center section of the coil.
BOTTLE CAPS
The disadvantage of the DD coil is its propensity to
classify steel bottle caps as coins.
If you hear a high tone in DISC mode and believe
that it is a coin, make sure it is not a bottle cap using
the following method.
SWEET SPOT
The “center” of the DD-Coil is elongated (elliptical) from top to
bottom of the coil. With some practice you will find where the center
of this ellipse lies on your coil. Use this center point as a reference in
pinpointing.
Sweep back end
of searchcoil over
suspected bottle cap.
(Low Tone = Bottle Cap)
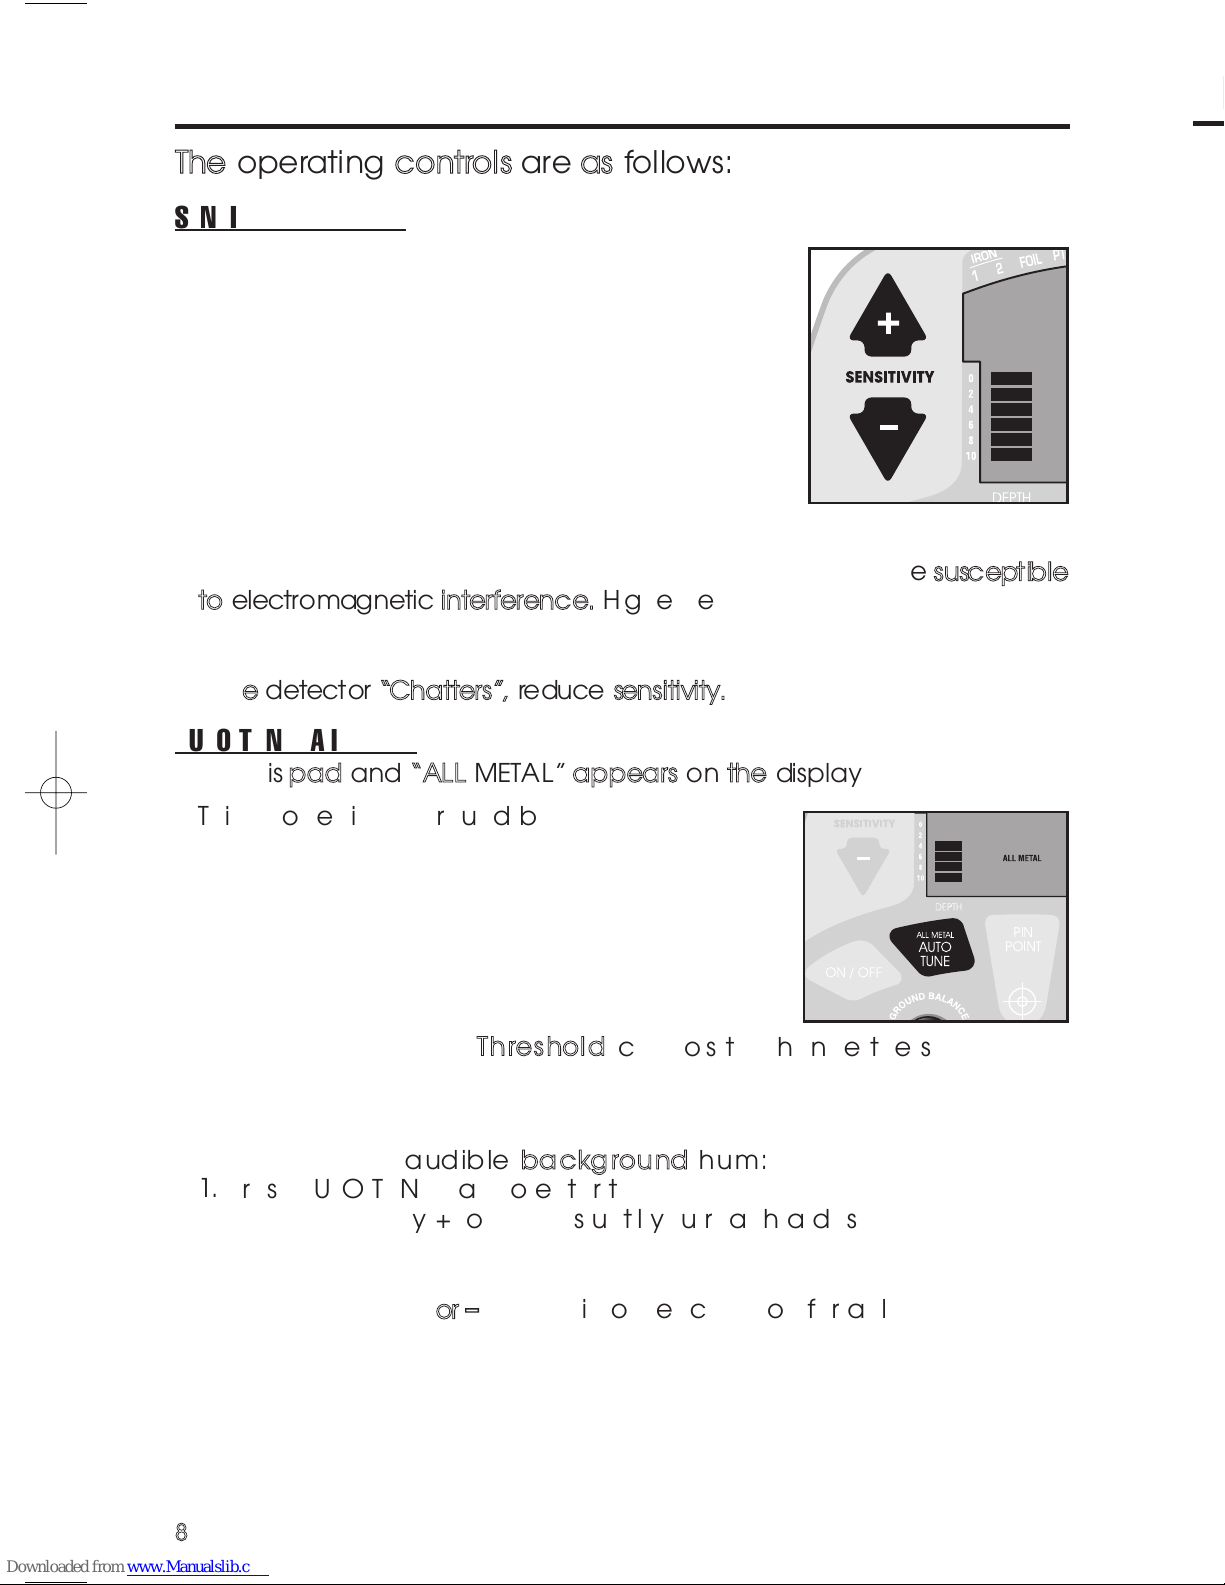
TThhee ooppeerraattiinngg ccoonnttrroollss aarree aass ffoolllloowwss:
:
SENSITIVITY + AND –
These controls change the detector’s sensitivity;
higher settings enable detection of deeper
targets. At power-up, the detector is pre-set to
75% of maximum sensitivity. At minimum, the
sensitivity is 35% of maximum. With each press of
the + or – touch pads, the sensitivity level is
displayed on the bar graph on the left of the
display. Upon reaching the minimum or maximum
sensitivity setting, the detector will beep twice.
While higher levels of sensitivity enable detection of deeper targets,
operation at high levels of sensitivity make the detector
mmoorree ssuusscceeppttiibblle
e
ttoo eelleeccttrroommaaggnneettiicc iinntteerrffeerreennccee..
Higher sensitivity settings can also lead
to false signals in difficult ground conditions. Use lower sensitivity settings
to suppress interference or false signals from soil minerals when necessary.
IIff tthhee ddeetteeccttoorr ““CChhaatttteerrss””,, rreedduuccee sseennssiittiivviittyy.
.
AUTO TUNE (All Metal)
PPrreessss tthhiiss ppaadd aanndd ““AALLLL MMEETTAALL”” aappppeeaarrss oonn tthhee ddiissppllaay
y
This mode is a ground-balanced All Metal
motion search mode. This mode offers the
maximum amount of sensitivity under most
ground conditions. The search coil must be in
motion to detect metal. One monotone sound
is emitted. No discrimination or target
identification is possible in this mode.
Use the
SSeennssiittiivviitty
y
or
TThhrreesshhoolldd
controls to change the sensitivity or
background hum. Maximum sensitivity to buried metal objects is
achieved with a slightly audible background hum.
TToo aacchhiieevvee aann aauuddiibbllee bbaacckkggrroouunndd hhuumm:
:
11..
Press AUTO TUNE pad to enter this mode.
22..
Press
SSeennssiittiivviittyy+
+
or
-
-
pads until you reach a desired setting.
This sensitivity setting may be the highest “quiet” setting, or you may
hear a faint background hum.
33..
Press
TThhrreesshhoolldd++oor
r
-
-
pad until you reach a comfortable volume level.
The Sensitivity control works like a course adjustment in this mode.
The Threshold control works like a fine adjustment in this mode.
The AUTO TUNE mode must be ground-balanced to eliminate interfering
signals from soil minerals. See the section on ground balancing for a
description of this procedure.
CONTROL PANEL
Page 9

9
9
hhe
e
DISCRIMINATION (THRESHOLD) + AND
–
The
ffuunnccttiioonn ooff tthhiiss ccoonnttrrooll ddeeppeennddss uuppoonn tthhe
e
ooppeerraattiinngg mmoodde
e
you are in before you press
these touch pads.
AUTO TUNE
++aanndd–
–
will change the threshold sensitivity
of the detector in this mode. This
TThhrreesshhoolld
d
control operates like a fine adjustment for
setting the sensitivity level and the volume
of the background audible hum. If you
continue to press +, you will cause the
detector to make a sound, or hum, when
no metal is present. Depending upon skill
level and environment, some users prefer to operate in AUTO TUNE
with an audible hum active at all times. At such a high “threshold,”
faint signals from deeply buried or very small objects will be more
apparent to the user.
PINPOINT
Not applicable.
The
++ aanndd–
–
touch pads have no function in this mode.
DISC
++ aanndd–
–
will increase or decrease the level of
discrimination. Each press of the pads will
cause an “R” to appear or disappear on the
display. When the “R” appears, the
corresponding target category will be
eliminated from detection. No audible tone
nor target-arrow will appear when the
searchcoil passes by an object in a
category with an “R” illuminated. A
maximum of seven “R”s can be displayed, eliminating objects up to
the Zinc-1¢ category. The four right-most target categories cannot
be eliminated from detection.
NOTCH
When Notching-Out a target, the
++ aanndd–
–
pads will move a flashing
arrow to the target category selected for
notching. This feature allows you to
discriminate items selectively across the
target spectrum. While the “discrimination”
control eliminates all targets from left to right,
this control allows you to either add back
categories previously eliminated (changing
from “R” to “blank”) or to selectively eliminate
categories (changing from “blank” to “R”).
CONTROL PANEL
(continued)
Page 10

110
0
DEPTH AND TARGET DISPLAY
READING THE DISPLAY
The Liquid Crystal Display (LCD) shows the
PROBABLE identification of the targeted
metal, as well as the PROBABLE depth of
the target, in inches.
An arrow will illuminate under the
target category where an object is
best classified, and stay illuminated
until another target is identified.
The detector will normally register a
repeating, unchanging target
identification when a buried target has
been located and identified. If, upon
repeated passes over the same spot,
the target identification reads
inconsistently, the target is probably a
trash item, oxidized metal, or too deep
to be classified accurately. With
practice, you will learn to unearth only
the more repeatable signals.
The segment identifications are highly
accurate, when detecting the objects
described on the label. However, if you
register in a given category for an
unknown buried object, you could be
detecting a metallic object other than
the object described on the label, but
with the same metallic signature. Also,
the greater the distance between the
target and the coil, the less accurate
the target identification.
GGOOL
L
on the left side of the LCD scale. Gold
will register depending upon its size. The
smaller the gold object, the further to the
left it will register.
G
G
SSm
m
CONTROL PANEL
(continued)
PINPOINT
This is a static search and static pinpointing
mode; no coil motion over the target is required
to detect metal. This mode is most effective in
pinpointing the exact location of small buried
objects. The detection sensitivity of this mode is
controlled by the
SSEENNSSIITTIIVVIITTYY++oorr–
–
touch pads.
DDiissccrriimmiinnaattiioon
n(tthhrreesshhoolldd))++ // -
-
has no function.
Reduced sensitivity, and thus a smaller search
field, can also be achieved by pressing the
PPIINNPPOOIINNTT
pad while an object is in the coil’s
detection field. The greatest sensitivity to large,
deeply-buried objects is achieved with this mode.
IIff yyoouu ppllaann ttoo uussee PPIINNPPOOIINNTT aass aa ccoonnttiinnuuoouus
s
sseeaarrcchh mmooddee,, tthhee ddeetteeccttoorr mmuusstt bbee ggrroouunndd-
-
bbaallaanncceedd bbeeffoorree sseeaarrcchhiinngg.
.
DISC
This control invokes motion target identification
search modes.
Successive presses of the DISC pad will toggle
back and forth between the:
1. All Metal Discrimination mode: a motion
mode where all metal targets are detected
and the:
2. Discrimination mode: a motion mode where
the user can selectively eliminate target
categories from detection.
When the detector powers up, it automatically enters ALL METAL
DISCRIMINATION mode with no targets eliminated from detection.
Press DISC to enter discrimination mode.
In order
ttoo eelliimmiinnaattee mmoorree ttaarrggeettss
from detection, press the
DDIISSCCRRIIMMIINNAATTIIOONN +
+
pad.
To reverse this target elimination, press the
DDIISSCCRRIIMMIINNAATTIIOONN –
–
pad; illuminated “R”s will disappear.
Page 11

111
1
CONTROL PANEL
(continued)
As you sweep the searchcoil over a metal object, a numeric target
identification will appear in the center of the display. At the same time,
the bar graph on the left of the display will indicate the target depth, in
inches. See the scale printed on label to left of the bar graph. This
scale is calibrated to coin-sized objects. If the target is larger than a
coin, it can be used to approximate relative target depth.
NOTCH
This control allows you to selectively include or exclude target
categories from detection. The NOTCH control can be invoked from
any search mode. After selecting the categories to notch-in or notchout, the detector will always return to the motion discrimination mode.
Notching functions in two ways, manual or automatic.
MANUAL NOTCH
If no target arrows are visible, pressing the NOTCH pad will display
an “R” under all target categories currently eliminated and the “▲”
under Iron1 will flash.
Use the
DDiissccrriimmiinnaattiioon
n
+
oor
r
– pads to move the position of the
flashing “▲”. Pressing NOTCH a 2nd time will change the state of
the “R” under the flashing “▲”; if the “R” was previously illuminated,
it will disappear. Conversely, if the “R” was not illuminated, a 2nd
press of the NOTCH pad will illuminate the “R”, causing this category
to be eliminated from detection.
Practice by pressing the NOTCH pad in conjunction with the
DDiissccrriimmiinnaattiioon
n
+
aannd
d
–
pads; their function will
quickly become obvious.
AUTOMATIC NOTCH
If a target has just been
detected and a target
arrow is visible, pressing
NOTCH will immediately
illuminate a flashing “▲”
under this category.
Press NOTCH a 2nd time to
eliminate that target
category from detection.
This Automatic Notch
feature is a convenient way to quickly eliminate the most recently
detected target from future detection.
Page 12

112
2
7
7
8
8
9
9
AAlltte
e
You may also use the following, simpler method, to ground balance.
While not as accurate as the coil-pumping method in AutoTune, it
yields an approximate ground balance setting.
1
1
2
2
3
3
4
4
5
5
6
6
GROUND BALANCING
GROUND BALANCING
What is Ground Balancing?
Why do I need to Ground Balance?
All soils contain minerals. Signals from ground minerals are often tens or
hundreds of times as strong as the signal from a buried metal object.
The magnetism of iron minerals, found in nearly all soils, causes one
type of interfering signal. Dissolved mineral salts, found in some soils, are
electrically conductive, causing another type of interfering signal.
Ground Balancing is the process by which the metal detector cancels
the unwanted signals coming from the ground minerals while still
detecting the signals from buried metal objects. This is accomplished
by calibrating the detector’s phase response, eliminating the signals
from ground minerals.
When the detector is calibrated to the soil, the result will be deeper
target detection and quieter operation.
HHooww ttoo GGrroouunndd BBaallaannccee yyoouurr ddeetteeccttoorr::
(
Preferred method
)
Find a patch of ground free of metal
11.
.
Rotate the
GGrroouunndd--BBaallaanncceeKKNNOOB
B
100% clockwise to the Preset
position.
22.
.
Press the
AAUUTTOO TTUUNNE
E
pad. ALL METAL appears on the display.
33.
.
Press
SSeennssiittiivviittyy+
+
pad several times to reach the highest “quiet”
setting or a setting with a faint background hum.
44.
.
Press
TThhrreesshhoolld
d
+
oor
r
– to
adjust the audible hum to a
comfortable level.
55.
.
Physically pump the
searchcoil and detector up
and down over the ground.
Lift the searchcoil about 6
inches above the ground
and lower it to within 1 inch
of the ground, about once
or twice a second.
66.
.
While pumping the
searchcoil over the ground
in this fashion, slowly rotate
the KNOB counterclockwise.
Page 13

77.
.
Notice that the position of the KNOB affects
the sound relative to the coil’s direction:
aa.
.
If you hear a louder sound as the
searchcoil is lowered toward the ground,
we call this positive response.
bb.
.
If you hear a louder sound as the
searchcoil is lifted away from the ground, we
call this negative response.
88.
.
Rotate the knob both clockwise and
counterclockwise while pumping
the coil and notice the KNOB
position where the sound
changes from negative
response to positive response.
99.
.
Set the KNOB at the position
where you achieve a slight
positive response.
i.e. the sound is slightly
louder as the coil is
lowered toward the
ground.
CCAAUUTTIIOONN::
cannot ground balance over a metal object.
AAlltteerrnnaattee QQuuiicckk GGrroouunndd BBaallaanncciinngg MMeetthhood
d
You may also use the following, simpler method, to ground balance.
While not as accurate as the coil-pumping method in AutoTune, it
yields an approximate ground balance setting.
Find a patch of ground free of metal
11)
)
Set the ground-balance knob at the pre-set position, 100%
clockwise.
22)
)
Position the searchcoil about 6” over the ground.
33)
)
Press PINPOINT button
44)
)
Lower searchcoil to within 1” of the ground. Sound will get louder.
55)
)
Rotate knob slowly counterclockwise until detector is just silent.
66)
)
Rotate knob back slightly clockwise until you hear a low volume
sound. At this low-volume setting, the detector is approximately
ground balanced.
GROUND BALANCING
(continued)
113
3
)
Page 14

114
4
4-TONE AUDIO SYSTEM
While the LCD (Liquid Crystal Display) is very accurate in identifying
buried objects, the user in the field does not always maintain the
display screen in his field of vision. Therefore, we have incorporated an
audio feedback mechanism to alert the user to the nature of buried
objects. This audio feedback system first alerts the user to the presence
and classification of objects, whose nature and location can be
confirmed using the LCD display.
The 4-tone audio target identification system functions only in the motion
modes of operation. The detector must be in the DISCRIMINATION
mode, as indicated on the display. In PINPOINT or AUTOTUNE modes, the
detector will emit only a monotone sound.
The detector can sound four different tones, depending on the object
detected.
LLOOWW TTOONNE
E
Ferrous objects, such as iron and steel, will induce a low tone.
The smallest gold objects can also induce a low tone.
LLOOWW--MMIID
D
Pull-Tabs, nickels & smaller gold
MMEEDDIIUUMM TTOONNE
E
Newer pennies (post-1982), larger gold objects, zinc, and small
brass objects, will induce medium tones. Many recent vintage
non-U.S. currencies will induce medium tones.
HHIIGGHH TTOONNE
E
Silver and copper coins, larger brass objects and older pennies
(pre-1982), will induce high tones. Quarters, dimes and other
precious coins fall into this category.
Audio Target Identification (ATI) classifies metals into four categories.
LLOOWW TTOONNE
E
Nails, Iron Objects,
& Smallest Gold Objects
LLOOWW--MMIIDD TTOONNE
E
Pull Tabs, Nickels,
& Smaller Gold
MMEEDDIIUUMM TTOONNE
E
Zinc Pennies (Post 1982),
Larger Gold Objects
HHIIGGHH TTOONNE
E
Copper, Silver & Brass
Copper Pennies (Pre 1982)
CONTROL PANEL
As you sweep the searchcoil over a metal object, a numeric target
identification will appear in the center of the display. At the same time,
the bar graph on the left of the display will indicate the target depth, in
inches. See the scale printed on label to left of the bar graph. This
scale is calibrated to coin-sized objects. If the target is larger than a
coin, it can be used to approximate relative target depth.
NOTCH
This control allows you to selectively include or exclude target
categories from detection. The NOTCH control can be invoked from
any search mode. After selecting the categories to notch-in or notch-
out, the detector will always return to the motion discrimination mode.
Notching functions in two ways, manual or automatic.
MANUAL NOTCH
If no target arrows are visible, pressing the NOTCH pad will display
an “R” under all target categories currently eliminated and the “▲”
under Iron1 will flash.
Use the
flashing “▲”. Pressing NOTCH a 2nd time will change the state of
the “R” under the flashing “▲”; if the “R” was previously illuminated,
it will disappear. Conversely, if the “R” was not illuminated, a 2nd
press of the NOTCH pad will illuminate the “R”, causing this category
to be eliminated from detection.
Practice by pressing the NOTCH pad in conjunction with the
feature is a convenient way to quickly eliminate the most recently
detected target from future detection.
Page 15

115
5
DEPTH AND TARGET DISPLAY
READING THE DISPLAY
The Liquid Crystal Display (LCD) shows the
PROBABLE identification of the targeted
metal, as well as the PROBABLE depth of
the target, in inches.
An arrow will illuminate under the
target category where an object is
best classified, and stay illuminated
until another target is identified.
The detector will normally register a
repeating, unchanging target
identification when a buried target has
been located and identified. If, upon
repeated passes over the same spot,
the target identification reads
inconsistently, the target is probably a
trash item, oxidized metal, or too deep
to be classified accurately. With
practice, you will learn to unearth only
the more repeatable signals.
The segment identifications are highly
accurate, when detecting the objects
described on the label. However, if you
register in a given category for an
unknown buried object, you could be
detecting a metallic object other than
the object described on the label, but
with the same metallic signature. Also,
the greater the distance between the
target and the coil, the less accurate
the target identification.
GGOOLLDD TTAARRGGEETTS
S
Gold objects will register
on the left side of the LCD scale. Gold
will register depending upon its size. The
smaller the gold object, the further to the
left it will register.
GGoolldd ffllaakkees
s
will register under Iron-1
SSmmaallll ggoolldd iitteemmss
will register under
Iron or 5¢/PT.
MMeeddiiuumm--ssiizzeedd ggoolldd iitteemmss
will register
under PT or S-cap.
LLaarrggee ggoolldd iitteemms
s
will register under
S-cap or Zinc.
SSIILLVVEERR TTAARRGGEETTSS:
:
Silver objects will
normally register to the right of the scale,
under 10¢, 25¢, 50¢, or $1, depending
on the size of the object. The larger the
object, the farther to the right it will
register.
IIRROONN:
:
Ferrous objects will register on
the far-left side of the target
identification scale. 1, or 2 indicates
the relative size of iron objects. Small
nails, for instance, will usually illuminate
the Iron-1 arrow whereas large
structural ferrous objects will usually
illuminate the Iron-2 arrow.
Objects in this category could be
worthless scrap, or a more valuable iron
relic.
55¢¢//PPTT::
Nickels and most newer pulltabs(those that stay attached to the
can) will register here.
PPTT((ppuullll--ttaabbss)):
:
Pull-tabs from older
beverage cans will register here. Few
newer pull-tabs will also register here.
Many gold rings will also register here.
SSCC ((SSccrreeww CCaappss)):
:
Screw caps from
glass bottles will register here. Large
gold rings, like a class ring, could also
register here. Some non-U.S. coins will
also register here.
ZZIINNCC//11¢¢:
:
Newer pennies (post-1982)
will register here. Many non-U.S. coins
of recent vintage will also register here.
Page 16

116
6
DEPTH AND TARGET DISPLAY
CCuu//1100¢¢:
:
Dimes and pre-1982 pennies will
register here. Older, pre-1982, pennies
are composed of copper, which has a
metallic signature similar to a dime. Most
copper coins will register here.
CCaauuttiioonn:
:
The target indications are
visual references. Many other types of
metal can fall under any one of these
categories. While the F4 will eliminate
or indicate the presence of most
common trash items, it is impossible to
accurately classify ALL buried
objects.
DEPTH INDICATOR:
The Depth Indicator is accurate for
coin-sized objects. It indicates the
depth of the target, in inches. Large
and irregularly-shaped objects will
yield less reliable depth readings
While holding the PinPoint touch pad,
and passing over a metal object
“depth” will appear next to the one-digit
or two-digit number in the middle of the
screen.
TWO DIGIT TARGET INDICATOR
The Two-digit target indicator, in the
middle of the LCD display, provides a
specific target value to help identify
buried targets more accurately. With
practice in the field, you will learn to
associate target values with the
probable identification of buried objects.
The target value can vary each time the
coil passes over the target, depending
upon the angle of the object and the
distance from the coil.
AAss aa ssttaarrttiinngg ppooiinntt,, rreeffeerr ttoo tthhe
e
ttaabbllee bbeellooww.
.
TTAARRGGEETT RReeaaddoouut
t
The table below lists some common
approximate target value
equivalents. With experience in the
field, you will recognize many types
of metals by their numeric value.
TTYYPPIICCAAL
L
PPOOSSSSIIBBLLEE
VVAALLUUE
E
OOBBJJEECCTTS
S
0-15 Iron
25-28 Pull-Tab Tail
(broken off)
28-32 Nickel
36-42 Pull-Tab (old type)
58-62 Zinc, Penny
68-72 Dime & Wheat Cent
78-83 Quarter
86-90 Half Dollar
91-95 Silver Dollar
DISCRIMINATION (THRESHOLD) + AND
The
oop
p
these touch pads.
AUTO TUNE
PINPOINT
DISC
NOTCH
CONTROL PANEL
Page 17

117
7
DD COIL CHARACTERISTICS
A DD coil is superior to a concentric coil, but sometimes requires a
different sweep technique.
Advantages are
11.
.
Better target separation
22.
.
Superior performance in highly mineralized ground
33.
.
Broader Sweep- cover more ground with each sweep
If you experience multiple responses on a shallow target, you can
raise the coil, or narrow the sweep over known targets to only
intersect the center section of the coil.
BOTTLE CAPS
The disadvantage of the DD coil is its propensity to
classify steel bottle caps as coins.
If you hear a high tone in DISC mode and believe
that it is a coin, make sure it is not a bottle cap using
the following method.
11.
.
If a repeatable ID# around 68 to 72, then it
should be a dime or copper penny.
22.
.
If not in the range of 68 to 72, then:
aa.
.
Sweep the back end of search coil over
the target. If tone changes from high to a
low tone, it is probably a bottle cap.
bb.
.
Sweep search coil fast
across target.
11.
.
If tone and ID-value
drop, it is probably a
bottle cap.
22.
.
If a bottle cap, the
faster you sweep, the
lower the tone.
SWEET SPOT
The “center” of the DD-Coil is elongated (elliptical) from top to
bottom of the coil. With some practice you will find where the center
of this ellipse lies on your coil. Use this center point as a reference in
pinpointing.
Sweep back end
of searchcoil over
suspected bottle cap.
(Low Tone = Bottle Cap)
iibblle
e
Page 18

118
8
ELECTROMAGNETIC INTERFERENCE
Use the Sensitivity Control is to eliminate
Electromagnetic Interference (EMI).
The F4 metal detector is an extremely sensitive
device; the search coil creates its own
magnetic field and acts like an antenna. If
your detector beeps erratically when the
search coil is motionless, the unit is probably
detecting another electromagnetic field.
Common sources of EMI are electric power lines, both suspended and buried,
motors, and household appliances like computers and microwave ovens.
Some indoor electronic devices, such as dimmer switches used on household
lighting, produce severe EMI and can cause the detector to beep erratically.
Other metal detectors also produce their own electromagnetic fields; so if
detecting with a friend, keep two metal detectors at least 20 feet apart.
If the detector beeps erratically,
RREEDDUUCCEE TTHHEE SSEENNSSIITTIIVVIITTY
Y
by pressing the
SSeennssiittiivviitty
y
-
-
Pad on the left of the control panel.
In most urban environments, you should be able to search without chatter from
interference at the default sensitivity setting (default setting is the sensitivity level
at power-up, 4 bars), or at one level reduced from default. At maximum
sensitivity, the F4 will “chatter” in proximity to underground or overhead power
lines, or to indoor or outdoor electrical devices. In fact, if you notice rapid
chatter with the searchcoil near the ground, you may be able to trace the
approximate location of the underground power lines by following the chatter.
To manage chatter, which is most likely from electrical interference:
11..RREEDDUUCCEE tthhee SSEENNSSIITTIIVVIITTY
Y
until the chatter stops.
22..
Try sweeping it over the ground.
If the F4 chatters while held still, or held up in the air, it may be much
quieter when sweeping over the ground.
33..
Operate in AUTOTUNE mode
Interference is much more tolerable in this mode, even at high sensitivity.
SEVERE GROUND CONDITIONS
A secondary use for the Sensitivity Control is to reduce false detection signals
caused by severe ground conditions. While the detector contains circuitry to
eliminate the signals caused by most naturally occurring ground minerals, 100%
of all ground conditions cannot be anticipated. Highly magnetic soils found in
mountainous and gold-prospecting locations can cause the detector to emit
tones when metal objects are not present. High saline content soils and sands
can sometimes cause the detector to beep when no metal target is present.
If the detector emits false, non-repeatable, signals, REDUCE THE SENSITIVITY.
SENSITIVITY ADJUSTMENT
VVII.
.
VVIIII.
.
VVIIIIII.
.
IIXX..
XX..
XXII.
.
XXIIII.
.
XXIIIIII.
.
XXIIV
V
XXVV.
.
XXVVI
I
QUICK-START DEMONSTRATION
Page 19

119
9
SEARCH TECHNIQUES
(in DISC mode)
TTaarrggeett VVeerriiffiiccaattiioon
n
After detecting a target, do the
following:
11.
.
Walk around the target in a
circle.
22.
.
While circling the target,
continue sweeping the
searchcoil across the target.
33.
.
Sweep once every 30° or 40° of
the circle.
If the tone does not change
and the target ID value is
consistent as you circle the
target, you can be highly
confident of the target’s
identification.
If the tone or target ID
changes as you circle the
target, you may have multiple
targets or an irregularly shaped
object.
If the tone completely
disappears at different angles,
the target may be trash or a
low-value metal.
If you are new to the hobby, dig all targets. With practice in the
field, you will soon identify audible and visual target feedback with
certain types of metal objects.
PPiinnppooiinnttiinngg pprroocceessss iinn mmoottiioonn mmooddeess:
:
11.
.
Sweep over target in narrowing side-to-side pattern
22.
.
Take visual note of spot on ground where “beep” occurs.
33.
.
Step 90° to the side of the target
44.
.
Sweep coil over same area, at 90° to 1st sweep pattern.
55.
.
This pinpoints the target location with an “X”
COIL MOVEMENT
When swinging the coil, be
careful to keep it level with
the ground about 1/2 inch
from the surface. Never swing
the coil like a pendulum.
WRONG
CORRECT
Page 20

220
0
TARGET PINPOINTING
(no-motion PINPOINT mode)
After you have identified a target using a motion mode of detection,
press the PINPOINT pad to identify the target’s exact location. This
technique can yield more information about the target’s shape and
size and also find its exact location to facilitate excavation.
PPiinnppooiinntt ((iinn nnoo--mmoottiioonn mmooddee)) aass ffoolllloowwss:
:
11.
.
Position the searchcoil just barely off the ground, and to the side of
the target.
22.
.
Press PINPOINT pad and raise the searchcoil about 2 inches. Lifting
the searchcoil away from the ground makes the ground signal go
negative, so the machine is silent.
33.
.
Now move the searchcoil slowly across the target, and you can
locate it by the sound. The target is located directly under where
the sound is loudest.
NNaarrrrooww IItt DDoowwnn:
:
11..
To narrow the response further, position the
center of the searchcoil near the center of the
response pattern, but not directly over the center.
22.
.
Press PINPOINT pad again.
33.
.
Repeat this narrowing procedure to narrow the
field of detection further.
NNoottee::
Depth indication is less accurate after
narrowing.
COIL DRIFT
If you plan to use the PINPOINT mode for continuous
searching, realize that drift will occur over time,
causing the detector to gain or lose sensitivity.
Periodic retuning of the detector is required
to minimize drift; press PINPOINT to retune.
Temperature change will cause the
coil to drift in point mode.
If the detector moves from a
cooler to a warmer
environment, the detector
may emit a constant tone
until the temperature
stabilizes; if so, retune.
If the detector moves
from a warmer to a
cooler environment,
the detector may lose
sensitivity (remaining
quiet); if so, retune.
TTw
w
ssuup
p
The batteries have been
inserted backwards in the
compartment for storage
during transportation.
Please remove batteries,
turn them around, and install
correctly.
Use
only.
DO NOT MIX OLD AND
NEW BATTERIES.
To install the batteries:
l
1
1
l
2
2
l
3
3
l
4
4
Most metal detector problems are due to improperly installed
batteries, or the use of non-alkaline or discharged batteries.
ddeet
t
BATTERIES
USING HEADPHONES
Using headphones (not included) improves
battery life, and prevents the sounds from
annoying bystanders.
It also allows you to hear subtle changes in the
sound more clearly, particularly if searching in a
noisy location. For safety reasons, do not use
headphones near traffic or where other
dangers are present. This device is to be used
with interconnecting cables/headphone
cables shorter than three meters.
Page 21

221
1
TREASURE HUNTER’S CODE OF ETHICS:
•Always check Federal, State, County and local laws before searching.
•
Respect private property and do not enter private property without the owner’s permission.
•Take care to refill all holes and leave no damage.
•Remove and dispose of any and all trash and litter found.
•
Appreciate and protect our inheritance of natural resources, wildlife and private property.
•Act as an ambassador for the hobby, use thoughtfulness, consideration and courtesy
at all times.
•Never destroy historical or archaeological treasures.
•All treasure hunters may be judged by the example you set; always conduct yourself
with courtesy and consideration of others
55--YYEEAARR LLIIMMIITTEEDD WWAARRRRAANNTTY
Y
The F4 metal detector is warranted against defects in materials and
workmanship under normal use for five years from the date of purchase to
the original owner.
Damage due to neglect, accidental damage or misuse of this product is not
covered under this warranty. Decisions regarding abuse or misuse of the
detector are made solely at the discretion of the manufacturer.
PPrrooooff ooff PPuurrcchhaassee iiss rreeqquuiirreedd ttoo mmaakkee aa ccllaaiimm uunnddeerr tthhiiss wwaarrrraannttyy.
.
Liability under this Warranty is limited to replacing or repairing, at our option,
the metal detector returned, shipping cost prepaid to Fisher Labs. Shipping
cost to Fisher Labs is the responsibility of the consumer.
To return your detector for service, please first contact Fisher Labs for a Return
Authorization (RA) Number. Reference the RA number on your package and
return the detector within 15 days of calling to:
1465-H Henry Brennan Dr.
El Paso, TX 79936
Phone: 915-225-0333 ext.118
Warranty coverage does not include the cost of transporting the detector
back to an owner who is located outside of the United States of America.
NOTE TO CUSTOMERS OUTSIDE THE U.S.A.
This warranty may vary in other countries, check with your distributor for details.
W
arranty does not cover shipping costs.
According to FCC part 15.21 Changes or Modifications made to this device not expressly approved by the
party responsible for compliance could void the users authority to operate this equipment.
This device complies with FCC Part 15 Subpart B Section 15.109 Class B.
Copyright© 2013
All rights reserved, including the right to reproduce this book, or parts thereof, in any form.
Fisher
®
is a registered trademark of Fisher Research Labs
www.fisherlab.com
MADE IN USA
Page 22

222
2
NOTES
TERMINOLOGY
The following terms are used throughout the manual, and are standard
terminology among treasure hunters.
EELLIIM
M
DDIIS
S
RREEL
L
IIRRO
O
FFEER
R
PPIIN
N
PPU
U
GGR
R
Page 23

223
3
NOTES
Page 24

OPERATING
MANUAL
ACCESSORIES
FOR COMPLETE DETAILS VISIT WWW.FISHERLAB.COM • 1-800-685-5050
Fisher® Padded Carry Bag
Rugged double stitched construction. Includes handy
exterior pocket for extra batteries or small accessories.
– 103693000C
Fisher® Camo Pouch
Camo pouch with two inside pockets, belt included
. –PCH-F
Stereo Headphones
Use with Fisher® metal detectors. Lightweight and adjustable with
true stereo sound, adjustable volume, 1/4 jack with 1/8 adaptor,
4’ cable. – 9720950000
Metal Sand Scoop
Large galvanized metal scoop with filtering holes. Strong Rubberized grip.
– SAND SCOOP
Lesche Knife
Made from high quality heat-treated tempered steel. The ultimate digging tool.
Comes with a durable sheath. 12" in length with a 7" serrated blade.
– LESCHE KNIFE
Fisher® Baseball Cap
One size fits all. – FCAP
Fisher® T-Shirt
100% cotton with Fisher® Logo. Sizes: S, M, LG, XL & XXL – FTSHIRT
Replacement/Accessory Search Coils
11” Biaxial Standard Coil (replacement) – 11COIL-F4F
4” Concentric Accessory Coil – 4COILF
8” Concentric Accessory Coil – 8COIL-7BLKF
10” Concentric Accessory Coil – 10COILF
Coil Covers
Specially made to protect your coil from abrasion and damage.
11” Biaxial Standard Coil Cover – COVER-11DD
4” Concentric Accessory Coil Cover – 4COVER
8” Concentric Accessory Coil Cover – 8COVER-7
10” Concentric Accessory Coil Cover – 10COVER
Rain Cover
Neoprene rain cover specially made to protect your F2 from weather
– RAINCOV-F2
Gold
Prospecting Kits
MF4B Rev.4 050313
 Loading...