

Page 1

INSTRUCTION MANUAL
MANUAL DE INSTRUCCIONES
VACUUM CLEANER
SC-TA3000
TABLE OF CONTENTS
IMPORTANT SAFETY INSTRUCTIONS 2-3
PART NAMES & ASSEMBLY 4
USING THE VACUUM CLEANER 5-6
USING THE ATTACHMENTS 7
EMPTYING THE DUST CONTAINER 8
MAINTENANCE 9
TROUBLESHOOTING & SPECIFICATIONS 10
WARRANTY 11
SPANISH 12-21
Read these instructions carefully before using your vacuum cleaner.
SAVE THESE INSTRUCTIONS
Page 2

2
IMPORTANT SAFETY INSTRUCTIONS
WARNING - To reduce the risk of fire, electric shock or injury:
This vacuum cleaner is intended for household use only.
To reduce the risk of electric shock, this appliance has a polarized plug (one blade is wider than
the other). This plug will fit into a polarized outlet only one way. If the plug does not fit fully in
the outlet, reverse the plug. If it still does not fit, contact a qualified electrician to install the
proper outlet. Do not change the plug in any way.
WARNING: Handling the cord on this product or cords associated with
accessories sold with this product, will expose you to lead, a chemical known
to the State of California to cause cancer, and birth defects or other
reproductive harm. Wash hands after handling.
When using an electrical appliance, basic precautions should
always be followed, including the following:
READ ALL INSTRUCTIONS BEFORE USING THIS VACUUM CLEANER
SAVE THESE INSTRUCTIONS
NOTE TO USER CONCERNING ATTACHMENT PLUG
1. Do not leave the vacuum cleaner when
plugged in. Unplug it from the outlet
when not in use and before servicing.
2. Do not use outdoors or on wet surfaces.
3. Do not allow vacuum cleaner to be
used as a toy. Close attention is
necessary when used by or near
children or infirm persons.
4. Use only as described in this manual.
Use only the manufacturer’s
recommended attachments.
5. Do not use with a damaged cord or
plug. If the vacuum cleaner is not
working as it should, or if it has been
dropped, damaged, left outdoors, or
dropped into water, return it to a
service center.
6. Do not pull or carry by the cord, use
the cord as a handle, close a door on
the cord, or pull the cord around sharp
edges or corners. Do not run the
vacuum cleaner over the cord. Keep
the cord away from heated surfaces.
7. Do not unplug by pulling on the cord.
To unplug, grasp the plug, not the cord.
8. Do not handle the plug or the vacuum
cleaner with wet hands.
9. Do not put any objects into the openings.
Do not use with any opening blocked:
keep free of dust, lint, hair and anything
that may reduce air flow.
10.Keep hair, loose clothing, fingers and
all the parts of your body away from
openings and moving parts.
11. Do not pick up anything that is burning
or smoking, such as cigarettes,
matches or hot ashes.
12. Do not use without filters in place.
13. Turn off all controls before unplugging.
14. Use extra care when cleaning on stairs.
15. Do not use to pick up flammable or
combustible liquids such as gasoline,
or use in areas where they may be
present.
16. Do not touch the agitators while they
are spinning.
17. Do not place any heavy items on top of
the vacuum cleaner.
18. Do not step on the hose or pull it too
strongly.
19. Do not pick up items such as pieces of
waste paper or cloth which look as
though they may cause the hose to
become blocked.
20. Do not clean or store the vacuum
cleaner in places where there are high
temperatures.
21. Store the vacuum cleaner away from
excessive humidity.
22. When carrying the vacuum cleaner,
hold it by the carrying handle.
23. Before servicing the vacuum cleaner,
allow all internal metal parts to cool first.
24. Always place foot on handle release
pedal when adjusting the handle
position of the vacuum cleaner.
Page 3
3
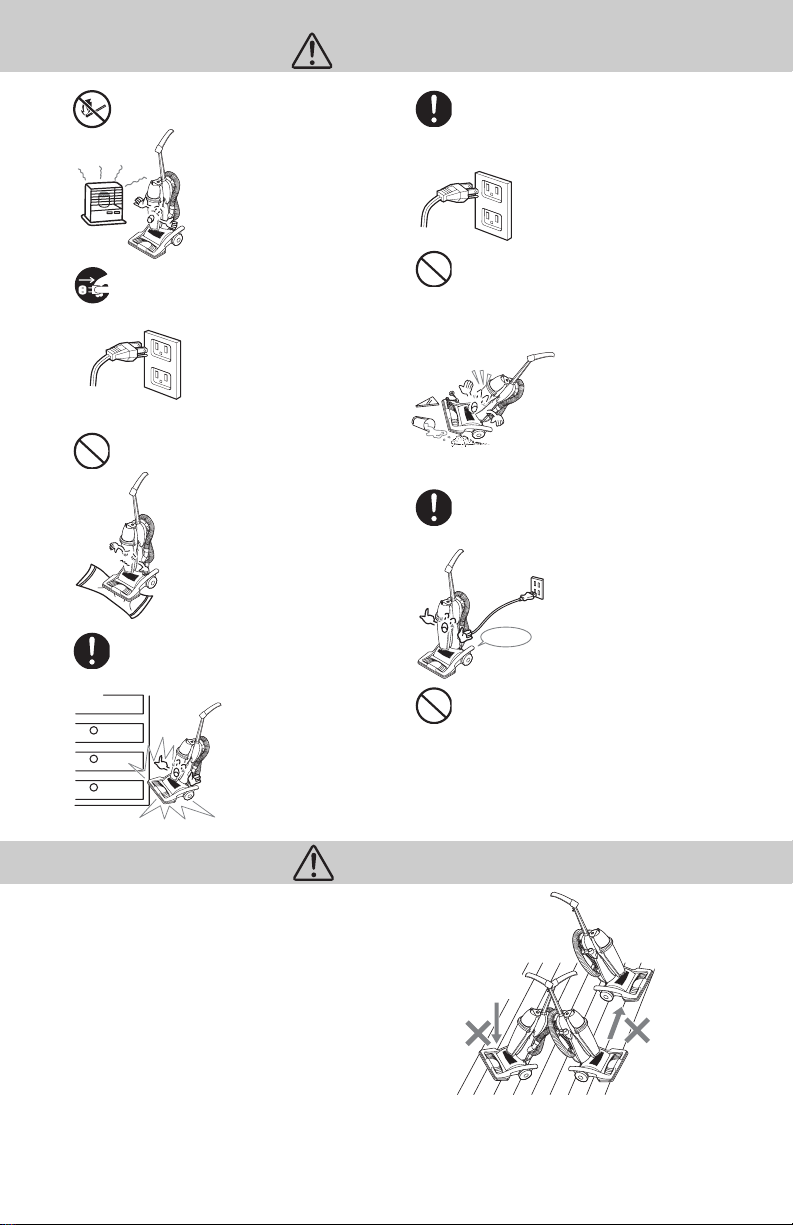
CAUTION
CAUTION
Do not expose vacuum cleaner to
open flames while operating or
during storage.
Flames may be made larger
from the vacuum cleaners
exhaust, resulting in a fire.
Short circuit or fire may
occur due to possible
warping of the main unit.
Unplug from outlet when not
in use.
May result in a short circuit
fire due to a weakening in
insulation.
Do not run the vacuum cleaner
for long periods of time with the
nozzle obstructed.
May result in fire due to
warping of the main unit
from overheating.
Do not bang floor nozzle against
walls or dressers.
May result in damage to
the wall or dresser.
FIRE
CAUTION
Remove from Outlet
PROHIBITED
PROHIBITED
Never disconnect the plug by
pulling on the cord. To disconnect
from an outlet, grasp the plug,
not the cord.
May result in fire due to
electrical shock or
short circuit.
Do not use vacuum cleaner to
pick up powders or sharp
objects that may clog the floor
nozzle such as: broken glass,
razor blades, pins, needles or
similar materials.
May result in fire due to
warping of the main unit
from overheating.
Make sure the power switch is
turned [OFF] before plugging
into the outlet.
The vibrating motion of
the motor may cause the
vacuum cleaner to fall
over or damage the floor.
Do not store the vacuum cleaner
in high-temperature areas.
Do not push floor nozzle strongly against
the floor or slide along the floor sideways
during cleaning.
May result in warping of the main unit,
fire, or injury.
Grasp plug to
disconnect.
PROHIBITED
REQUIREMENT
OFF
PROHIBITED
Do not press hard
against the floor
Do not slide along the
floor sideways
Page 4
4
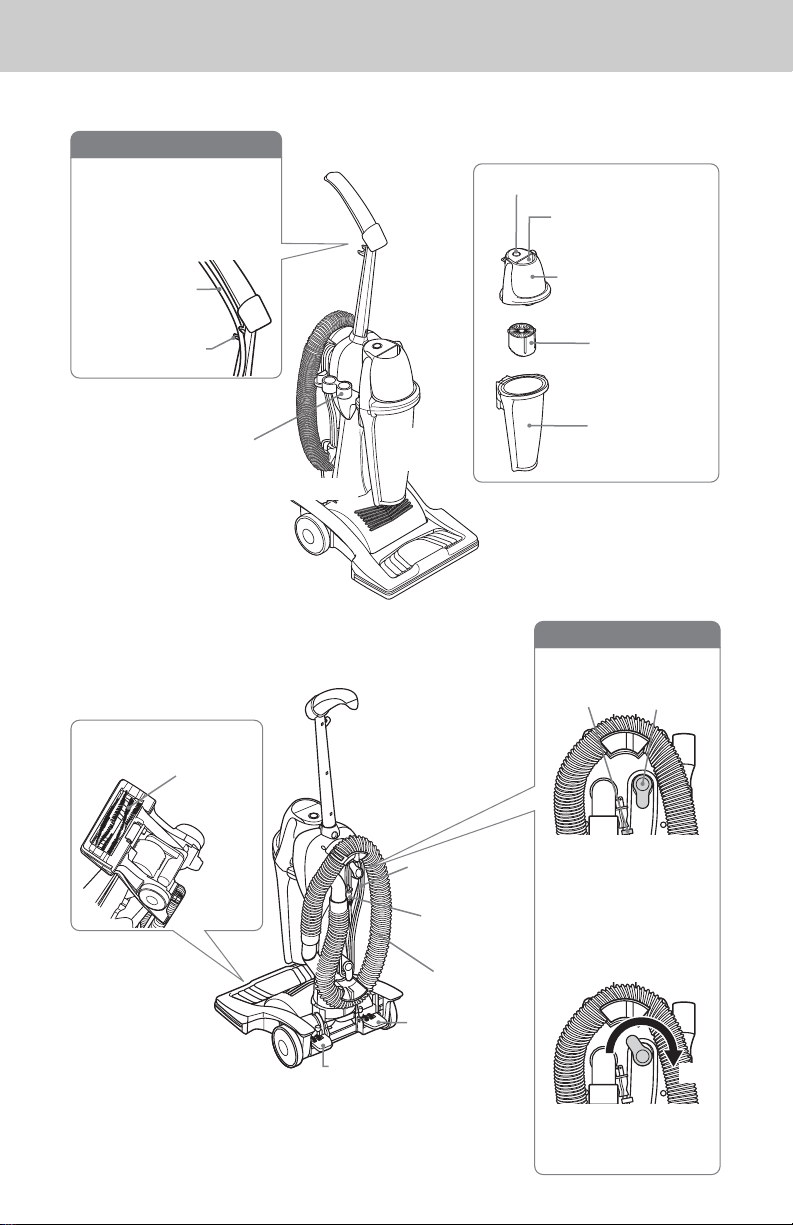
PART NAMES & ASSEMBLY
THIS VACUUM CLEANER IS INTENDED FOR HOUSEHOLD USE ONLY.
FRONT SIDE OF
MAIN UNIT
BACK SIDE OF MAIN UNIT
(Bottom View of Floor Nozzle)
Rotating
Brushes
PLUG
HOOK
ROTATING
CORD
HOOK
Wrap the power cord
around the rotating
upper cord hook and the
lower cord hook. When
complete, insert the
power cord tightly into
the plug hook.
When removing the
power cord, turn the
rotating cord hook.
POWER CORD
POWER CORD
PLUG
HOSE
ON/OFF SWITCH
PEDAL
HANDLE RELEASE PEDAL
While cleaning, use the
cord retainer to prevent the
power cord from becoming
entangled around your feet.
POWER SUPPLY
CORD
INSERT
CORD RETAINER
HANDLE
Dust Container Button
Dust Container Handle
Dust Container Cover
Filter
Dust Container
FLOOR NOZZLE
MAIN UNIT
DUST
CONTAINER
CORD RETAINER
ROTATING CORD HOOK
ATTACHMENT HOLDER
Page 5
5
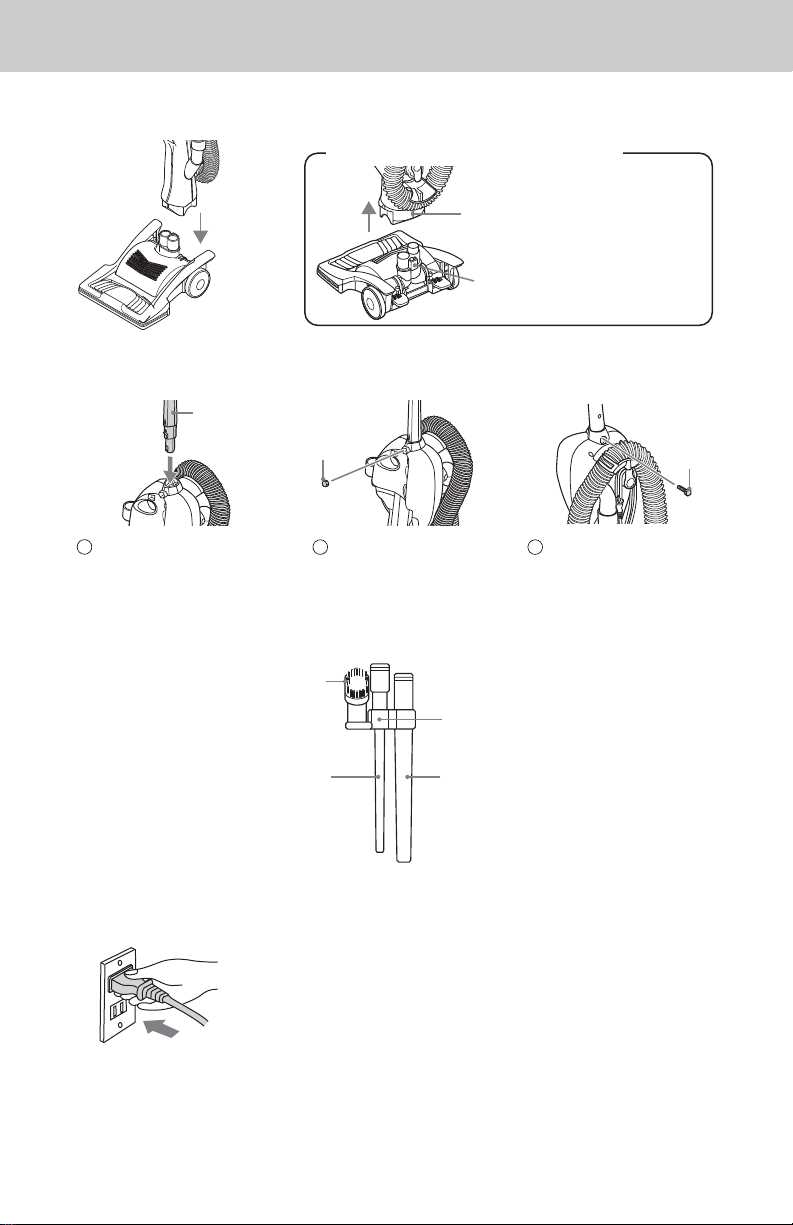
USING THE VACUUM CLEANER
1. Attach the floor nozzle and main unit together.
2. Remove the dust container and connect the handle and main unit together.
3. Attach the crevice tool, wand and brush into the tool holder.
4. Connect the power cord plug to the outlet.
[HOW TO DETACH THE FLOOR NOZZLE]
To detach the
floor nozzle, insert
a screwdriver into
the hole and pull
up while pushing
the lock button.
Insert the handle into the
hole in the main unit and
press tightly, as shown.
Insert the bolt and nut
into the bolt hole.
ATTACHMENT HOLDER
Make sure the power cord plug is tightly
inserted and secured in place.
BRUSH
CREVICE TOOL
WAND
From the back side,
using a screwdriver,
twist and attach the nut
and bolt.
Floor Nozzle
Detach Hole
Lock Button
HANDLE
NUT
BOLT
1
2 3
Page 6
6
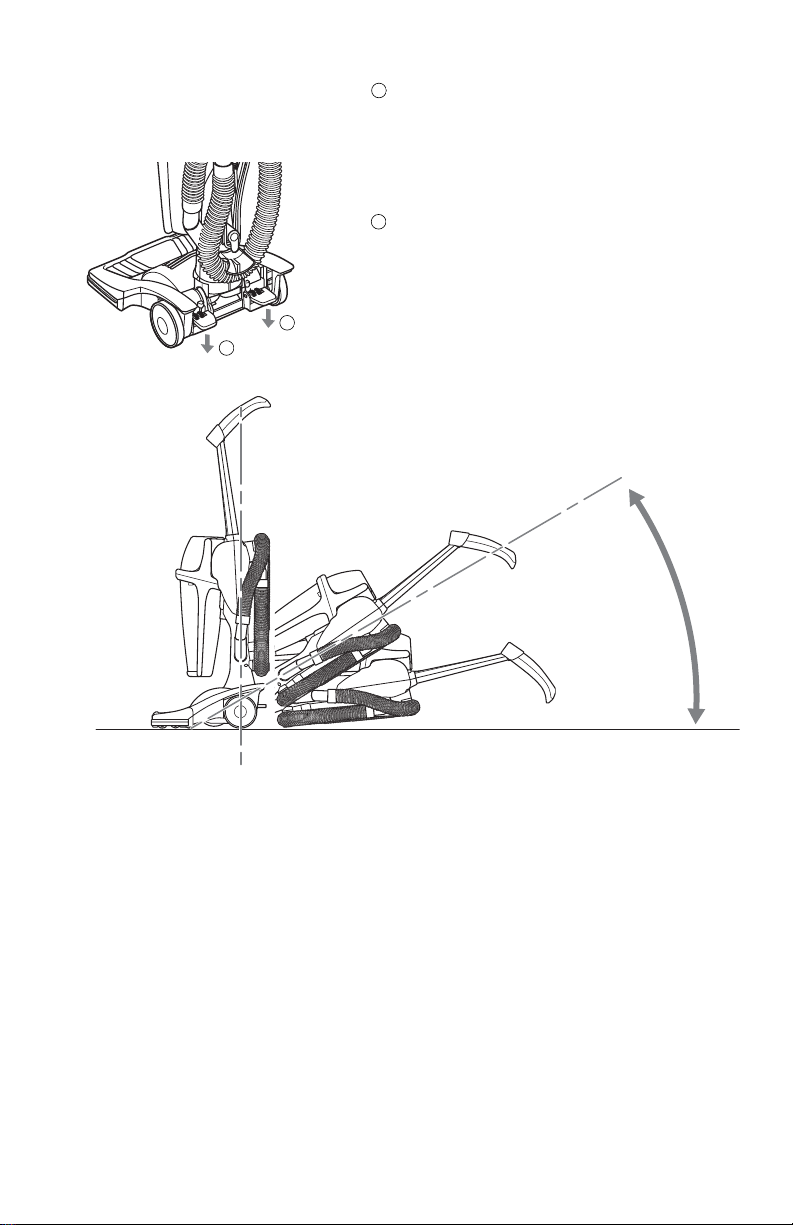
5. Turn on the switch.
6. After using.
Note: The rotating brushes are designed to stop rotating when the vacuum cleaner is in the
upright position.
Press down with your foot on the handle
release pedal and pull back on the handle
until it releases from its upright position.
(At about 30˚, it will relock. Press down on
the handle release pedal again to move to the
parallel position.)
Press down with your foot on the on/off
switch pedal to turn the unit on. Press once
again to shut it off.
Press the handle release pedal.
Upright Position
Normal Position
Parallel Position
Return the vacuum cleaner to the upright position, and press down on the on/off switch
pedal. Disconnect the power cord plug from the outlet.
30˚
Press the on/off switch pedal.
1
2
1
2
Page 7
7
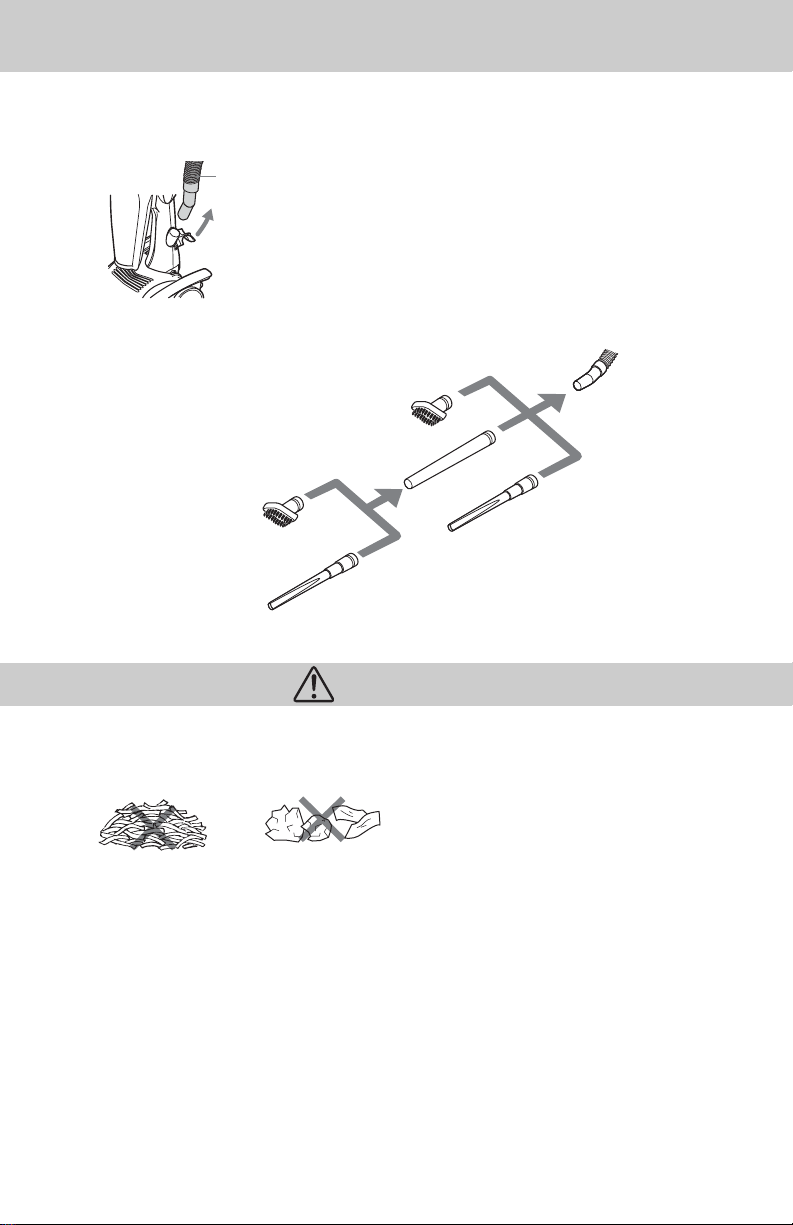
USING THE ATTACHMENTS
1. Remove the hose from the main unit.
CLEANING WITH THE CREVICE TOOL, WAND, AND BRUSH
HOSE
2. When inserting the crevice nozzle, wand or brush, insert tightly onto the
end of the hose.
After use, connect the end of the hose firmly back into the main unit.
Firmly insert the desired attachment onto
the end of the hose.
Do not pick up a large amount of dust at once, or objects that are noticeably larger than
3/4 inch in size. Do not pick up objects such as plastic sheets or other wrappings, which
may clog the floor nozzle and filters.
Large amounts of
finely condensed
particles
Noticeable large trash,
plastic sheets or other
paper wrappings
Such objects may clog the floor
nozzle and rapidly reduce the
performance of the vacuum
cleaner. If the floor nozzle
appears to be clogged, shut the
power off, empty the accumulated
dirt and debris, then continue
cleaning.
CAUTION
Page 8

8
EMPTYING THE DUST CONTAINER
Carefully empty out dirt and debris. Very fine dirt and dust particles may seal the
filter and cause loss of suction, as well as damage to the motor.
• Always turn off the vacuum cleaner when emptying the dust container.
• Exceeding the “Max” fill line may cause dirt and debris to seal the filter and cause
loss of suction.
• Empty the dust container before reaching the “Max” fill line and clean the filter often
to prevent various types of dirt particles from sealing the filter.
• Since fine dust, powders and other types of small dirt particles can collect into the
filter after carpet cleaning, suction may weaken. When this happens, please refer to
the Maintenance section on page 9.
1. Remove the dust container.
Press the dust container button to detach
the dust container.
4. Remove the filter from the dust
container cover.
Detaching
Turn
Turn filter counterclockwise to remove.
When filter is clogged with dirt and
debris, remove the filter and wipe off
debris with a tissue.
Turn
Filter's Convex Tab
To reattach the filter, turn and align the
convex tab on the filter to the
(triangle mark) as shown in
the illustration.
Filter
Dust Container
Cover
2. Remove the dust container cover.
3. Empty the accumulated dirt and
debris from the dust container.
5. Shake off dust and dirt from filter.
Attaching
Attaching
Detaching
Detach
DUST
CONTAINER
LEVER
Push
Push the dust container lever and remove.
To attach, join the tab into the slot.
TAB
SLOT
Close
Detach
Dust Container
Button
CAUTION
Push
1
2
1
2
Detach
1
1
2
2
Turn
1
Side view
Page 9

9
MAINTENANCE
Always turn off the on/off switch pedal and unplug the power cord before servicing.
• Using a soft, dry cloth, wipe off dirt from the vacuum cleaner.
• When the vacuum cleaner becomes extremely dirty, soak a soft cloth in water with a
small amount of mild detergent, and wring out well. With the moist cloth, wipe until clean.
• Do not use thinner, benzene, or any type of spray cleaner to clean the unit.
• After emptying all dust and debris from the dust container, rinse with cold water. Then,
wipe with a dry cloth and allow to air dry thoroughly before reattaching to the main unit.
Regular Maintenance
When dirt and debris clog the
rotating brushes, slowly work
your finger around the brushes
to remove any particles.
FILTER
Tap gently to allow dust particles to fall.
• When loss of suction occurs due to extreme dirtiness, tap out dirt and debris, then rinse
with cold water.
1. Rinse with cold water.
• Never attempt to machine wash the filter.
• Never use hair dryers, clothes dryers or other heated air devices to dry the filter.
2. Air dry thoroughly until completely dry.
MAIN UNIT • FLOOR NOZZLE • HANDLE
DUST CONTAINER - When dirty from accumulation of dust and dirt particles
ROTATING BRUSHES - When hair and other particles get entangled
(check and maintain the unit once or twice a week)
NOTE
Page 10

10
TROUBLESHOOTING
Before inquiring about service and maintenance, please check the following points listed
below.
Power won’t turn on even
when the on/off pedal
switch is turned on.
Is the power cord plug
firmly plugged into the
outlet?
Insert power cord plug
firmly into the outlet.
(See page 5)
Suction power
has weakened.
Is the hose firmly attached
to the main unit?
Has dirt clogged up the
hose?
Did you check the "Max" fill
line to see if the dust
container is full?
Is dust and debris
clogging the filter?
Make sure the hose is
attached. (See page 7)
Remove the clogged dirt.
Empty the dust container.
(See page 8)
Clean the filter.
(See pages 8-9)
The rotating brushes
won’t turn.
Did you press the handle
release pedal?
Has dirt clogged up the
rotating brushes?
If the rotating brushes still won't turn after checking the
above points and possible solutions, an internal drive
belt in the floor nozzle may be broken. Contact an
authorized service center for further evaluation.
(See page11)
Press the handle release
pedal and pull back on the
handle. (See page 6)
Remove the clogged dirt.
(See page 9)
Dirt and debris are flying
out from the exhaust vent.
Have the filter and dust
container been correctly
attached?
POWER SUPPLY AC120V 60Hz
POWER CONSUMPTION 10 Amps
CAPACITY OF DUST CONTAINER 0.8 Gallon
DIMENSIONS (W x D x H) 13-3/8” x 15-3/4” x 43-11/16”
WEIGHT 14.3 lbs
POWER CORD LENGTH 25 ft
ACCESSORIES
Floor nozzle (1), Crevice Tool (1), Handle (1),
Brush (1), Wand (1)
Make sure they are
attached correctly.
(See page 8-9)
TROUBLE CHECK POINT POSSIBLE SOLUTION
SPECIFICATIONS
Page 11

11
WARRANTY
OBLIGATIONS
SC-TA3000
EXCLUSIONS
In order to obtain warranty service, the product must be delivered to and picked up from an
Authorized Sanyo Factory Service Center at the user’s expense, unless specifically stated otherwise in
this warranty. The names and addresses of Authorized Sanyo Service Centers may be obtained by
calling the toll-free number listed below.
This warranty does not cover (A) the adjustment of customer-operated controls as explained in the
appropriate model’s instruction manual, or (B) the repair of any product whose serial number has
been altered, defaced or removed.
This warranty shall not apply to the following items: non-electrical/mechanical attachments;
accessories; appearance items; disposable parts such as filters, paper bags, wiper cloths, belts, head
lights, lamps and agitator brushes.
This warranty shall not apply to setup, installation, removal or the product for repair or reinstallation
of the product after repair.
This warranty does not apply to repairs or replacements necessitated by any cause beyond the
control of SFC including, but not limited to, any malfunction, defect or failure caused by or resulting
from unauthorized service or parts, improper maintenance, operation contrary to furnished
instructions, shipping or transit accidents, modification or repair by the user, abuse, misuse, neglect,
accident, incorrect power line voltage, fire, flood or other Acts of God, or normal wear and tear.
The foregoing is in lieu of all other expressed warranties and SFC does not assume or authorize any
party to assume for it any other obligation or liability.
THE DURATION OF ANY WARRANTIES WHICH MAY BE IMPLIED BY LAW (INCLUDING THE
WARRANTIES OF MERCHANTABILITY AND FITNESS) IS LIMITED TO THE TERM OF THIS WARRANTY.
IN NO EVENT SHALL SFC BE LIABLE FOR SPECIAL, INCIDENTAL OR CONSEQUENTIAL DAMAGES
ARISING FROM OWNERSHIP OR USE OF THIS PRODUCT, OR FOR ANY DELAY IN THE
PERFORMANCE OF ITS OBLIGATIONS UNDER THIS WARRANTY DUE TO CAUSES BEYOND ITS
CONTROL. SOME STATES DO NOT ALLOW LIMITATIONS ON HOW LONG AN IMPLIED WARRANTY
LASTS AND/OR DO NOT ALLOW THE EXCLUSION OR LIMITATION OF CONSEQUENTIAL DAMAGES,
SO THE ABOVE LIMITATIONS AND EXCLUSIONS MAY NOT APPLY TO YOU.
THIS WARRANTY GIVES YOU SPECIFIC LEGAL RIGHTS. YOU MAY HAVE OTHER RIGHTS, WHICH
VARY FROM STATE TO STATE.
THIS WARRANTY IS VALID ONLY ON SANYO PRODUCTS PURCHASED AND USED IN THE UNITED
STATES OF AMERICA.
THIS WARRANTY APPLIES ONLY TO THE ORIGINAL RETAIL USER AND DOES NOT APPLY TO
PRODUCTS USED FOR ANY INDUSTRIAL, PROFESSIONAL OR COMMERCIAL PURPOSE. THE
ORIGINAL DATED BILL OF SALE OR SALES SLIP MUST BE SUBMITTED TO THE AUTHORIZED
SANYO SERVICE CENTER AT THE TIME WARRANTY SERVICE IS REQUESTED.
Subject to the OBLIGATIONS above and EXCLUSIONS below, SANYO FISHER COMPANY (SFC)
warrants this SANYO product against defects in materials and workmanship for the periods of
LABOR and PARTS specified below. SFC will repair or replace (at its option) the product and any of
its parts which fail to conform to this warranty. The warranty period commences on the date the
product was first purchased at retail.
SANYO UPRIGHT VACUUM CLEANER LIMITED WARRANTY
For product operation, authorized service center referral, service assistance, problem resolution, or
parts and accessories availability, you may contact us by:
A. Visiting www.sanyoservice.com on a 24 Hr/7days a week basis or
B.Calling the customer support center at 1-800-421-5013
Weekdays 7:30 am – 5:00 pm Pacific Time.
LABOR PARTS MOTOR (Parts only)
1 YEAR 1 YEAR 2 YEARS
Page 12

12
INSTRUCCIONES DE SEGURIDAD IMPORTANTES
ADVERTENCIA - Para reducir el riesgo de fuego, golpes eléctricos o heridas:
Esta aspiradora es para uso doméstico.
Para reducir el peligro de recibir una descarga elétrica, este aparato tiene un enchufe polarizado (una
pata es más ancha que la otra). Este enchufe sólo puede conectarse a un tomacorriente polarizado y
en un solo sentido. Si el enchufe no ha entrada completamente en el tomacorriente, invierta el enchufe.
Si no entra tampoco de esta forma, llame a un electricista circunstancia debe cambiar el enchufe.
ADVERTENCIA: El manejo del cable de este producto o cables asociados con accesorios
vendidos con este producto, le podría exponer a plomo, un químico conocido por el
estado de California que causa cáncer, y anormalidades relacionadas de nacimiento
humano u otro daño reproductivo. Lávese las manos después del manejo.
Al usar un aparato eléctrico se deben tener ciertas precauciones,
incluyendo las siguientes.
LEA LAS INSTRUCCIONES ANTES DE USAR LAASPIRADORA
GUARDE ESTAS INSTRUCCIONES
NOTA PARA EL USUARIO CONCERNIENTE AL ENCHUFE
1. No deje la aspiradora enchufada si no la va
a usar. Desenchúfela de la red elétrica
cuando no la use o antes de realizar el
servicio de mantenimiento.
2. No la use en el exterior o sobre superficies
mojadas.
3. No permita que la usen como un juguete.
Tenga mucho cuidado cuando se use cerca
de niños o personas enfermas.
4. Usela sólo como se describe en este
manual. Use sólo los accesorios
recomendados por el fabricante.
5. No la use si el cable o enchufe está dañado.
Si la aspiradora no funciona como debiera,
o si se ha golpeado, dañado, dejado a la
intemperie o se ha mojado, llévela a un
centro de servicio.
6. No la arrastre del cable, no use el cable para
levantarla, no apriete el cable al cerrar una
puerta, ni tire del cable alrededor de bordes
o esquinas filosas. No haga funcionar la
aspiradora sobre el cable. Mantenga el cable
alejado de superficies calientes.
7. No la desenchufe tirando del cable. Para
desenchufarla, tome el enchufe, no el cable.
8. No toque el enchufe o la aspiradora con las
manos húmedas.
9. No introduzca objetos por las aberturas. No la
use con las aberturas tapadas: manténgalas
libres de polvo, pelusas, pelo y cualquier otra
cosa que reduzca el flujo de aire.
10.Mantenga sus cabellos, vestimenta, dedos y
otras partes de su cuerpo alejadas de las
aberturas y partes móviles.
11. No aspire nada que se esté quemando o
humeando, como cigarrillos, fósforos u
cenizas.
12. No la use sin el compartimiento de polvo
y/o filtros en su lugar.
13. Desconecte todos los controles antes de
desenchufar.
14. Tenga mucho cuidado al limpiar escaleras.
15. No la use para aspirar líquidos combustibles
o inflamables como gasolina, o no la use
donde puedan estar presentes esos productos.
16. No toque el agitador mientras que está
girando.
17. No coloque ningún elemento pesado sobre
la aspiradora.
18. No pise la manguera o tire de ella muy
fuerte.
19. No aspire elementos como pedazos de
papel o tela que puedan obstruir la manguera.
20. No limpie ni guarde la aspiradora en lugares
donde pueda quedar expuesta a altas
temperaturas.
21. Guarde la aspiradora lejos de lugares muy
húmedos.
22. Al transportar la aspiradora de un lugar a
otro, hágalo sosteniéndola del mango de
transporte.
23. Antes de realizar el servicio de
mantenimiento de la aspiradora, deje que
las partes metálicas se enfríen.
24. Siempre pise el pedal de liberación del
mango al ajustar la posición del mango de
la aspiradora.
Page 13

13
PRECAUCIÓN
PRECAUCIÓN
No exponga la aspiradora a
fuego aberto mientras lo opera o
durante el almacenaje.
se hacen llamas más grande
de la abertura de la descarga
de la aspiradora, resultando
en un incendio. Incendio o
cortocircuito puede ocurrir
debido al alabeo de la
unidad principal que se
sobrecalienta.
Desenchufe del tomacorriente
cuando no la utilice.
Puede resultar en un fuego
del cortocircuito debido a una
debilidad del aislamiento.
No use la aspiradora por largos
períodos com la boquilla de piso
obstruída.
Puede resultar en fuego
debido al alabeo de la
unidad principal que se
sobrecaliente.
No choque la boquilla de piso
contra las paredes ni los armarios.
Puede resultar en daño
a la pared o al armario.
PRECAUCION
de INCENDIO
Desenchufe del
tomacorriente
PROHIBIDO
PROHIBIDO
Nunca cargue ni jale la unidad
por el cable ni tire del cable para
desconectarlo del tomacorriente.
Para desconectarlo de un toma-
corriente, sujete el cable
por el enchufe.
Puede resultar en incendio
debido a choque eléctrico o
cortocircuito.
No use la aspiradora para
aspirar polvos o objetos duros y
filosos que puedan bloquear la
boquilla de piso como: vidrio,
cuchillas de afeitar, agujas u
otros materiales
similares.
Puede resultar en fuego
debido al alabeo de la
unidad principal que se
sobrecaliente.
Asegúrese de que la aspiradora
este apagada [OFF] antes de
conectarla al tomacorriente.
La vibración de la moción
del motor podría causar
que la aspiradora se
caiga y dañe el piso.
No guarde la aspiradora en
areas de alta temperatura.
No empuje la boquilla de piso fuertemente
contra el piso ni deslice a lo largo del piso
de lado durante la limpieza.
Puede resultar en el alabeo de la
unidad principal, incendio, o lesiones.
Agarre el
enchufe para
desconectar
PROHIBIDO
REQUISITO
OFF
PROHIBIDO
No empuje fuertemente
contra el piso.
No deslice a lo largo
del piso de lado.
Page 14

14
NOMBRE DE LAS PARTES & INSTRUCCIONES DE OPERACIÓN
ESTA ASPIRADORA HA SIDO DISEÑADA SOLAMENTE PARA USO DOMÉSTICO.
LADO DELANTERO
DE LA UNIDAD
PRINCIPAL
LADO TRASERO DE LA UNIDAD PRINCIPAL
(Vista Inferior de la
Boquilla de Piso)
CEPILLOS
GIRATORIOS
GANCHO
DEL
ENCHUFE
GANCHO
GIRATORIO
PARA EL CABLE
Enrolle el cable de potencia
alrededor del gancho
giratorio superior y del
gancho giratorio inferior.
Cuando completo, inserte el
cable de potencia firmemente
en el gancho del enchufe.
Gire el gancho para el
cable media vuelta y
deslice el cable de potencia.
CABLE DE
POTENCIA
ENCHUFE DE
POTENCIA
MANGUERA
PEDAL DE PIE DE
ENCENDIDO Y
APAGADO
(ON/OFF)
PEDAL DE LIBERACIÓN
DE MANGO
Al usar, utilice el detenedor
del cable para evitar el
enredo del cable alrededor
sus pies
CABLE DE
POTENCIA
INSERTE
DETENEDOR
DEL CABLE
MANGO
Botón de Recipiente de Polvo
Mango de Recipiente
de Polvo
Tapa de Recipiente de
Polvo
Filtro
Recipiente de
Polvo
BOQUILLA DE PISO
UNIDAD PRINCIPAL
RECIPIENTE
DE POLVO
DETENEDOR DEL CABLE
GANCHO GIRATORIO PARA EL CABLE
ATTACHMENT HOLDER
Page 15

15
COMO USAR LA ASPIRADORA
1. Conecte la boquilla de piso con la unidad principal.
2. Quite el recipiente de polvo y conecte el mango con la unidad principal.
3. Coloque el accesorio para hendiduras, el tubo de extensión, y el cepillo en
la ranura para el accesorio para hendiduras.
4. Conecte el cable del enchufe al tomacorriente.
[COMO QUITAR LA BOQUILLA DE PISO]
Para quitar la
boquilla de Piso,
inserte un desarmador
en el orificio y jale
mientras que
presione el seguro
de cierre.
Coloque el mango en el
orificio de la unidad
principal para fijarlo, como
se muestra.
Inserte el perno y
tuerca en el orificio.
RANURA PARA ACCESORIO
Asegúrese de que el enchufe de potencia esté
insertado y asegurado firmemente en lugar.
CEPILLO
ACCESORIO PARA HENDIDURAS
TUBO DE EXTENSIÓN
Usando un desarmador,
tuerza y coloque la
tuerca y el perno del
lado trasero.
Orificio de
Quitar de la
Boquilla de
Piso
Seguro de
Cierre
MANGO
TUERCA
PERNO
1
2 3
Page 16

16
5. Encienda el interruptor.
6. Después de usar.
Nota: Los cepillos giratórios están diseñadas para quitar de rodar cuando el aspirador
está en la posición derecha.
Presione hacia abajo con su pie el pedal de
liberación de mango y levante el mango hasta
que libere de su posición derecha. (alrededor
30°, se cerrará. Presione hacia abajo de
nuevo el pedal para mover para la posición
paralela.)
Presione hacia abajo con su pie el pedal de
pie de encendido y apagado (ON/OFF) para
encender la unidad. Presione otra vez para
apagarla.
Presione el pedal de liberación de mango.
Posición Derecha
Posición Normal
Posición Paralela
Retorne el aspirador a la posición derecha y presione hacia abajo el pedal de encendido y
apagado (ON/OFF). Apágala, y desconecte el enchufe del tomacorriente.
30˚
Presione el pedal de encendido y apagado (ON/OFF.)
1
2
1
2
Page 17

17
COMO USAR LOS ACCESSORIOS
1. Quite la manguera de la unidad principal.
LIMPIEZA USANDO EL ACCESORIO PARA HENDIDURAS, EL TUBO DE
EXTENSIÓN, Y EL CEPILLO PARA DESEMPOLVAR
MANGUERA
2. Al insertar el accesorio para hendiduras, el tubo de extensión o el cepillo,
inserte firmemente en el extremo de la manguera.
Después de usar, conecte el final de la manguera firmemente en la unidad principal.
Inserte firmemente el accesorio que desea
en el extremo de la manguera.
No aspire polvo en grandes cantidades, ni objetos que sean más grandes de 3/4 pulgadas
en tamaño. No aspire objetos tales como hojas plásticas u otros embalajes que pueden
obstruir la boquilla de piso y los filtros.
Cantidades grandes
de partículas finas
Objetos grandes tales,
como hojas plásticas u
otros embalajes
Tales objetos pueden obstruir la
boquilla de piso y disminuirán
marcada del rendimiento de la
aspiradora. Si la boquilla de piso
parece ser obstruida, apague la
aspiradora y vacíe la suciedad
acumulada, y siga limpiando.
PRECAUCIÓN
Page 18

18
VACIANDO EL RECIPIENTE DE POLVO
Cuidadosamente vacíe la suciedad. Las partículas de polvo muy finas pueden sellar el
filtro de rejilla y ocasionar una perdida de succión. También puede dañar el motor.
• Siempre apague la aspiradora (OFF) cuando vacíe el recipiente de polvo.
• Rebasando de la línea del amplio “Máximo” podría causar que polvo y residuo sellen
el filtro y ocasionar que disminuya la succión.
• Vacíe el recipiente de polvo antes de alcanzar la línea del amplio “Máximo,” y limpie
los filtros a menudo para evitar varios tipos de partículas de suciedad que puedan
sellar el filtro.
• Porque el polvo u otros tipos de partículas pequeñas de suciedad podrían sellar el
filtro después de la limpieza, la succión puede disminuir. Cuando sucede esto,
refiere a la sección de mantenimiento en la página 19.
1. Quite el recipiente de polvo.
Empuje el botón del recipiente de polvo
para quitar el recipiente de polvo.
4. Quite el filtro de la tapa del
recipiente de polvo.
Desconectar
Gire
Para quitar, gire en sentido contrario al de
las agujas del reloj. Cuando el polvo y
residuos se acumulan, quite el filtro y
limpie la suciedad con un paño seco.
Gire
Parte Convexa Del Filtro
Para atar de nuevo el filtro, gire y alinee la
parte convexa del filtro al triangulo
como muestra en el dibujo.
Filtro
Tapa de
Recipiente de
Polvo
2. Quite la tapa del Recipiente de Polvo.
3. Vacíe los residuos y polvo
acumulados del recipiente de polvo.
5. Agite el filtro hasta que quede
libre de polvo y demás partículas.
Conectar
Conectar
Desconectar
Quite
PALANCA DE
RECIPIENTE
DE POLVO
Empuje
Presione la palanca de recipiente de polvo
para quitarla. Para conectarlo, empuje el
clip en la ranura.
ETIQUETA
RANURA
Cierre
Quite
Botón de
Recipiente de
Polvo
PRECAUCIÓN
Empuje
1
2
1
2
Quite
1
1
2
2
Gire
1
Vista del Lado
Page 19

19
MANTENIMIENTO
Siempre apague la aspiradora y desenchufe el cable antes de darle servicio.
• Limpie la suciedad de la aspiradora con un paño seco y suave.
• Cuando la aspiradora se ensucie extremadamente, empape un paño suave en agua con
una cantidad pequeña de detergente suave, y tuérzalo bien. Con el paño seco, enjuáguela
hasta que esté limpia.
• No use diluyente, bencina, o ningún otro tipo de limpiador de regador para limpiar la unidad.
• Después de vaciar toda la suciedad del recipiente de polvo, lávelo con agua fría.
Entonces séquelo con un paño seco y deje que se seque completamente antes de volver
a colocarlo en la aspiradora.
Mantenimiento Regular
Cuando la suciedad y el polvo se
acumulan en los cepillos
giratorios, mueva lentamente
con el dedo alrededor del cepillo
para quitar cualquier partícula.
FILTRO
Golpee suavemente para dejar caer las
partículas de polvo.
• Cuando la disminución en el poder de succión ocurre debido a la extrema suciedad,
golpee para caer las partículas de polvo, y lave con agua.
1. Lave con agua fría.
• Nunca lave el filtro en el lavavajillas.
• Nunca utilice los secadores de pelo, las maquinas de secar, ni cualquier otro aparato
calentado para secar el filtro.
2. Deje que se seque completamente.
UNIDAD PRINCIPAL • BOQUILLA DE PISO • MANGO
RECIPIENTE DE POLVO - Cuando se ensucie de la acumulación de polvo y residuo
CEPILLOS GIRATORIOS - (Cuando el pelo u otras partículas se enredan
(cheque y mantenga la unidad una vez o dos veces semanal)
NOTA
Page 20

20
GUÍA PARA LA DETECCION Y SOLUCION DE PROBLEMAS
Si tiene dificultades con su aspiradora, utilice primero esta guía para la detección y
solución de problemas antes de solicitar el servicio.
La aspiradora no enciende
cuando el pedal de
encendido y apagado esta
en la posición de ON.
¿Está conectado el enchufe
de potencia completamente
en el tomacorriente?
Enchúfelo bien.
(Página 15)
El poder de succión ha
disminuido.
¿Está colocada la manguera
firmemente a la unidad principal?
¿Está obstruida la manguera?
¿Revisó la línea de amplio
máximo para ver si el
recipiente de polvo está lleno?
¿Está obstruido el filtro?
Asegúrese de que estée
colocada. (Página 17)
Quite la suciedad acumulada.
Vacíe el recipiente para polvo.
(Página 18)
Limpie el filtro.
(Páginas 18-19)
Los Cepillos Giratorios
no giran.
Presionó el pedal de liberación
de mango?
Están obstruidos los cepillos
giratorios?
Si los cepillos giratórios todavía no dan vueltas después de
verificar el puntos arriba y soluciones posibles, un cinturón
de paseo interno en el inyector de suelo puede estar roto.
Póngase en contacto con un centro de servicio autorizado
para la evaluación adicional.(Página 21)
Presione el botón de
liberación de mango y levante
el mango. (Página 16)
Quite la suciedad
estorbada. (Página 19)
El polvo está saliendo de la
abertura de la descarga.
¿Han estado colocados
correctamente el filtro y
recipiente del polvo?
FUENTE DE PODER AC120V 60Hz
POTENCIA DE SALIDA 10 Amps
CAPACIDAD MÁXIMA DEL
0.8 Gallon
RECIPIENTE DE POLVO
DIMENSIONES (W x D x H) 13-3/8” x 15-3/4” x 43-11/16”
PESO 14.3 lbs (1.8 kg)
LONGITUD DEL CABLE DE POTENCIA
25 ft
ACCESORIOS
Boquilla de piso (1), Accesorio para hendiduras (1),
Mango (1), Cepillo (1), Tubo de extension (1)
Asegúrese de que estén
correctamente colocados.
(Páginas 18-19)
PROBLEMA COMPROBACIÓN SOLUCIÓN POSIBLE
ESPECIFICACIONES
Page 21

21
GARANTÍA
OBLIGACIONES
SC-TA3000
EXCLUSIONES
Con el fin de obtener el servicio de garantía, deberá enviarse e ir a buscar el producto a un Centro
de Servicio de Fábrica Autorizado por Sanyo a cargo del usuario, a menos que se mencione lo
contrario en esta garantía. Los nombres y direcciones de los Centros de Servicio Autorizados por
Sanyo podrán obtenerse llamando a los números sin cargo que se enumeran a continuación.
Esta garantía no cubre (A) el ajuste de los controles operados por el usuario como se explica en el manual de
instrucciones del modelo apropiado, ni (B) la reparación de ningún producto cuyo número de serie haya sido
alterado, deformado o extraído
.
Esta garantía no se aplica a los siguientes puntos: accesorios no elétricos/mecánicos; accesorios; puntos de
aspecto exterior; piezas desechables tales como filtros, correas, lámparas de luces y escobillas agitadoras. Esta
garantía no es aplicable a las operaciones de desempacado, instalación o remoción del producto para
reparación o la reinstalación de equipo una vez reparado.
Esta garantía no se aplicará a las reparaciones o reemplazos necesarios por cualquier causa que esté fuera del
alcance del control de SFC incluyendo, pero sin limitarse a ello, cualquier mal funcionamiento, defecto o falla
causados o resultantes de un servicio no autorizado de piezas, mantenimiento inadecuado, operación contraria a
las instrucciones suministradas, accidentes de embarques o de tránsito, modificaciones o reparaciones hechas por
el usuario, abuso, uso indebido, negligencia, accidente, tensión incorrecta de la alimentación eléctrica, incendios,
inundaciones, ni otros actos de la providencia, ni al desgaste y deterior o normal.
Todo lo dicho será vigente en lugar de cualquier otra garantía expresada y SFC no asume ni autoriza a nadie a
asumirla para cualquier obligación ni nada semejante.
LA DURACIÓN DE LAS GARANTÍAS QUE PUEDAN ESTAR IMPLICITAS POR LA LEY (INCLUYENDO LAS
GARANTÍAS DE COMERCIO Y ADAPTABILIDAD) ESTÁ LIMITADA A LOS TÉRMINOS DE ESTA GARANTÍA. SFC NO
SE HARÁ RESPONSABLE EN NINGÚN CASO DE LOS DAÑOS ESPECIALES, INCIDENTALES, NI DE CONSECUENCIA
DEBIDO A LA PROPIEDAD O EMPLEO DE ESTE PRODUCTO, NI A NINGÚN RETARDO EN EL RENDIMIENTO DE SUS
OBLIGACIONES DE ESTA GARANTÍA DEBIDO A LAS CAUSAS QUE ESTÁN MÁS ALLÁ DE SU CONTROL.
ALGUNOS ESTADOS NO PERMITEN LIMITACIONES DE DURACIÓN DE UNA GARANTÍA IMPLÍCITA O/NI
PERMITEN LAS EXCLUSIONES NI LIMITACIONES DE DAÑOS DE CONSECUENCIAS, POR LO QUE LAS
LIMITACIONES Y EXCLUSIONES ANTERIORES PUEDEN NO APLICARSE A SU CASO EN PARTICULAR. ESTA
GARANTÍA LE OTORGA DERECHOS LEGALES. ES POSIBLE QUE USTED TENGA OTROS DERECHOS, QUE VARÉAN
SEGÚN EL ESTADO.
ESTA GARANTÍA ES VÁLIDA SÓLO PARA LOS PRODUCTOS SANYO ADQUIRIDOS Y EMPLEADOS EN LOS
ESTADOS UNIDOS DE AMÉRICA.
ESTA GARANTÍA SÓLO SE APLICA AL USUARIO ORIGINAL DE COMPRA AL POR MENOR, Y NO SE APLICA A
LOS PRODUCTOS EMPLEADOS PARA PROPÓSITOS INDUSTRIALES, PROFESIONALES NI COMERCIALES. LA
FACTURA DE VENTA, RECIBO DE VENTA O ACUERDO DE ALQUILER CON LA FECHA ORIGINAL DEBERÁ
ENTREGARSE AL CENTRO DE SERVICIO AUTORIZADO POR SANYO EN EL MOMENTO DE SOLICITAR EL
SERVICIO DE LA GARANTÍA.
Sujeto a las OBLIGACIONES de arriba y a las EXCLUSIONES de la página siguiente, SANYO FISHER COMPANY
(SFC) garantiza este producto Sanyo contra defectos de materiales y de mano de obra durante los períodos
especificaciones para MANO DE OBRA y para PIEZAS siguientes. SFC reparará o reemplazará (según crea
conveniente) el producto y cualquiera de sus piezas que no satisfagan esta garantía. El período de garantía
comienza en la fecha de la primera adquisición del producto o de alquiler del producto al por menor.
GARANTÍA LIMITADA DEL ASPIRADORA DE POLVO SANYO
Para la operación del producto, remisión autorizada del centro de servicio, ayuda del servicio,
resolución de problema, o la disponibilidad de partes y accesorios, usted puede contactarnos por:
A. Visite www.sanyoservice.com en días laborales 24 Hr/7 días
B.Llame el centro de servicios al cliente a 1-800-421-5013
de lunes a viernes de 7:30 am a 5:00 pm.
MANO DE OBRA PIEZAS MOTOR (Piezas solamente)
1 AÑO 1 AÑO 2 AÑOS
Page 22

 Loading...