

Page 1

Warranty Information
All Fisher Educational Microscopes are warranted to be free of all defects in material and
workmanship for a period of 60 months (5 years) from the date of delivery.
Statement of Limited Product Warranty
The warranty does not apply to any instrument, which has become worn, defective,
damaged or broken due to abuse, misuse, and tampering, or unauthorized repairs. Under
this warranty , Westover Scientific will repair or replace, without charge to the purchaser ,
any part, which upon our examination, appears to be defective in materials or
workmanship.
Returned Goods Policy for Repair or Replacement Parts.
Warranty repair is free when the instruments are returned to us prepaid. Domestic return
shipment will be made at our expense in a manner similar to your shipment to us. All
international shipping charges are to be prepaid.
To return goods for repair or replacement, please contact Westover Scientific Customer
Service at 1-800-304-3202 or 1-425-398-1298. Please be prepared to supply the following
information:
. Your name, return shipping address and telephone number
. Catalog/Model number of the item/s you are returning
. Serial Numbers if applicable
. Description of the product’s problem or reason for return
. Date the item was purchased.
S90014 Series
Student Microscopes
Users Guide
The Customer Service Representative will issue you a Return Materials Authorization
(RMA) number . Please label the outside of your shipping container with this number .
Doc. No. ZP-MC-0055
Copyright 2003
Westover Scientific, Inc. 18421 Bothell-Everett Hwy., Suite 110 Mill Creek, WA 98012 Phone: 800-304-3202 Fax: 425-398-0717
4500 Turnberry Dr., Hanover Park, IL 60133
Toll Free: 1-800-955-1177 Fax: 1-800-955-0740
Page 2
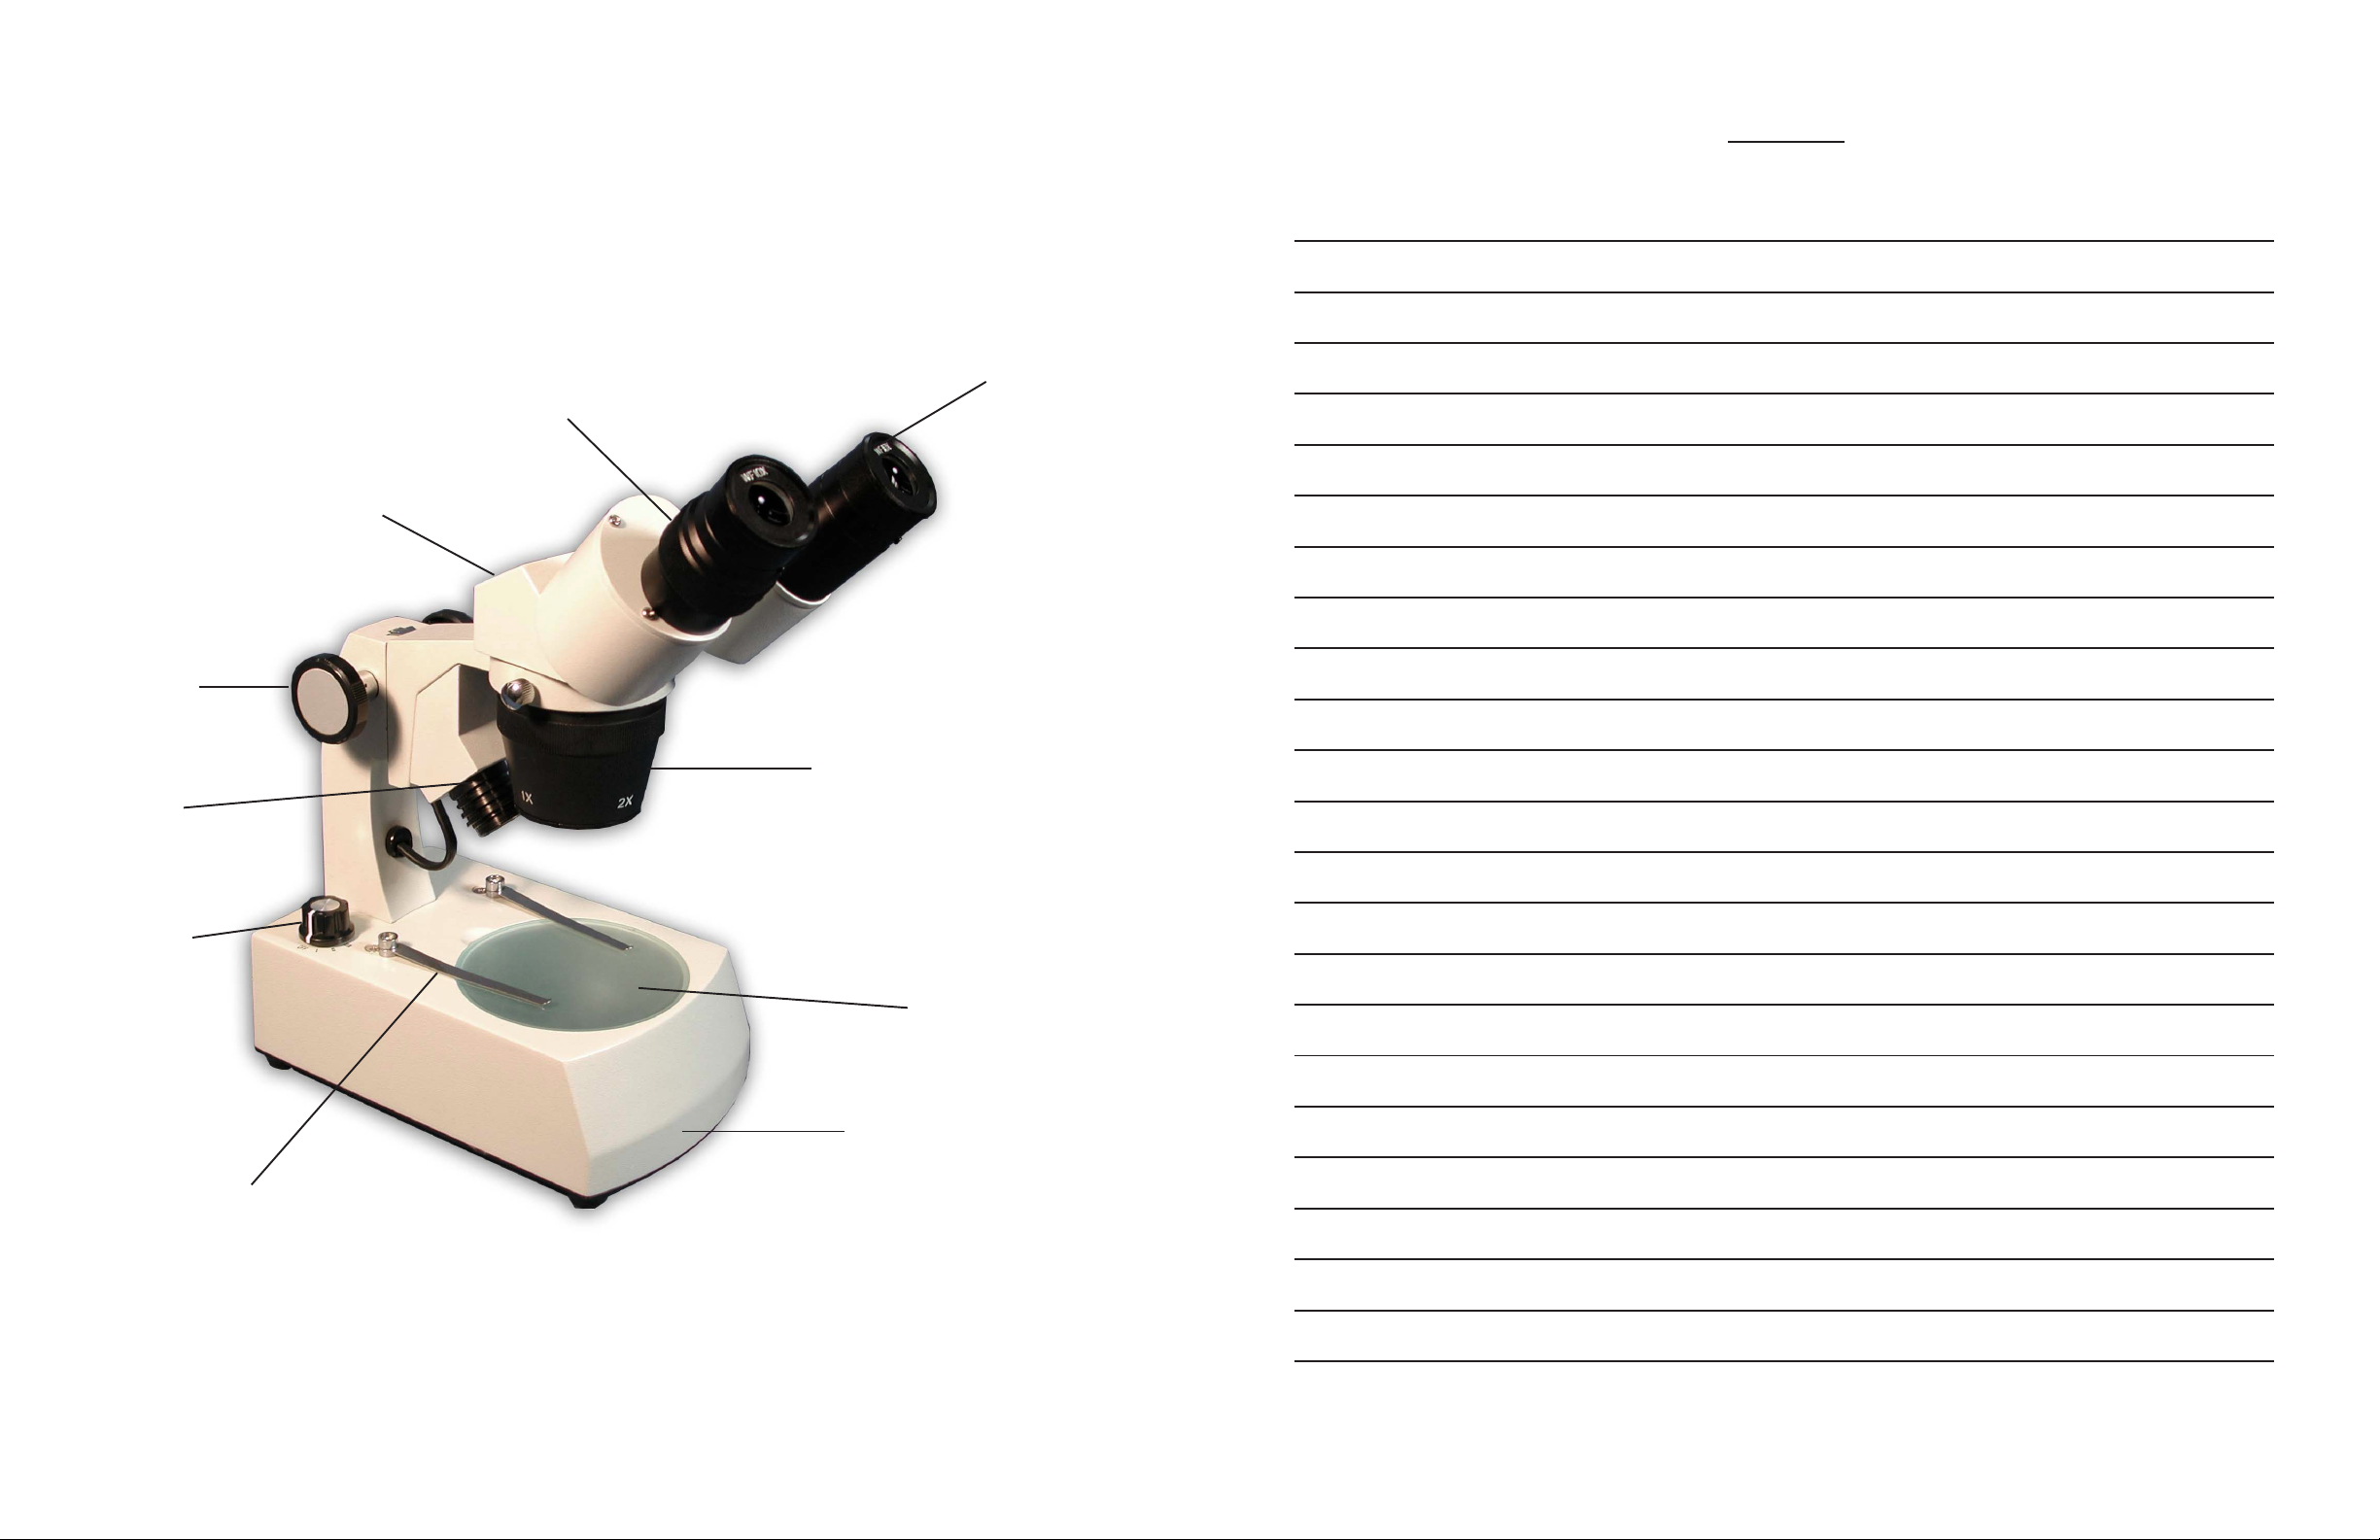
S90014, B, D, E, H Microscope Nomenclature
Diopter
Head with Interpupillary
Adjustment
Focusing
Knob
NOTES
Eyepiece
Lamp
Housing
On/Off
Switch
Stage Clip
Objective Turret
Stage Plate
Base with built-in
illumination
2
7
Page 3
General Maintenance:
When not in use, protect the instrument with the dust cover provided.
Use filtered air to remove dust particles, and lens cleaner on a Q-tip for lens cleaning.
Replacement Parts:
S68044 12V/10W Halogen Bulb: S90014, B, E
S68035 3.6V LED Bulb: S90014D, H
S68047 110V/5W Ring Lamp: S90014A, C, F, G
S68040 10x Widefield Eyepiece: S90014 series
S68050 Black/White stage plate: S90014 series
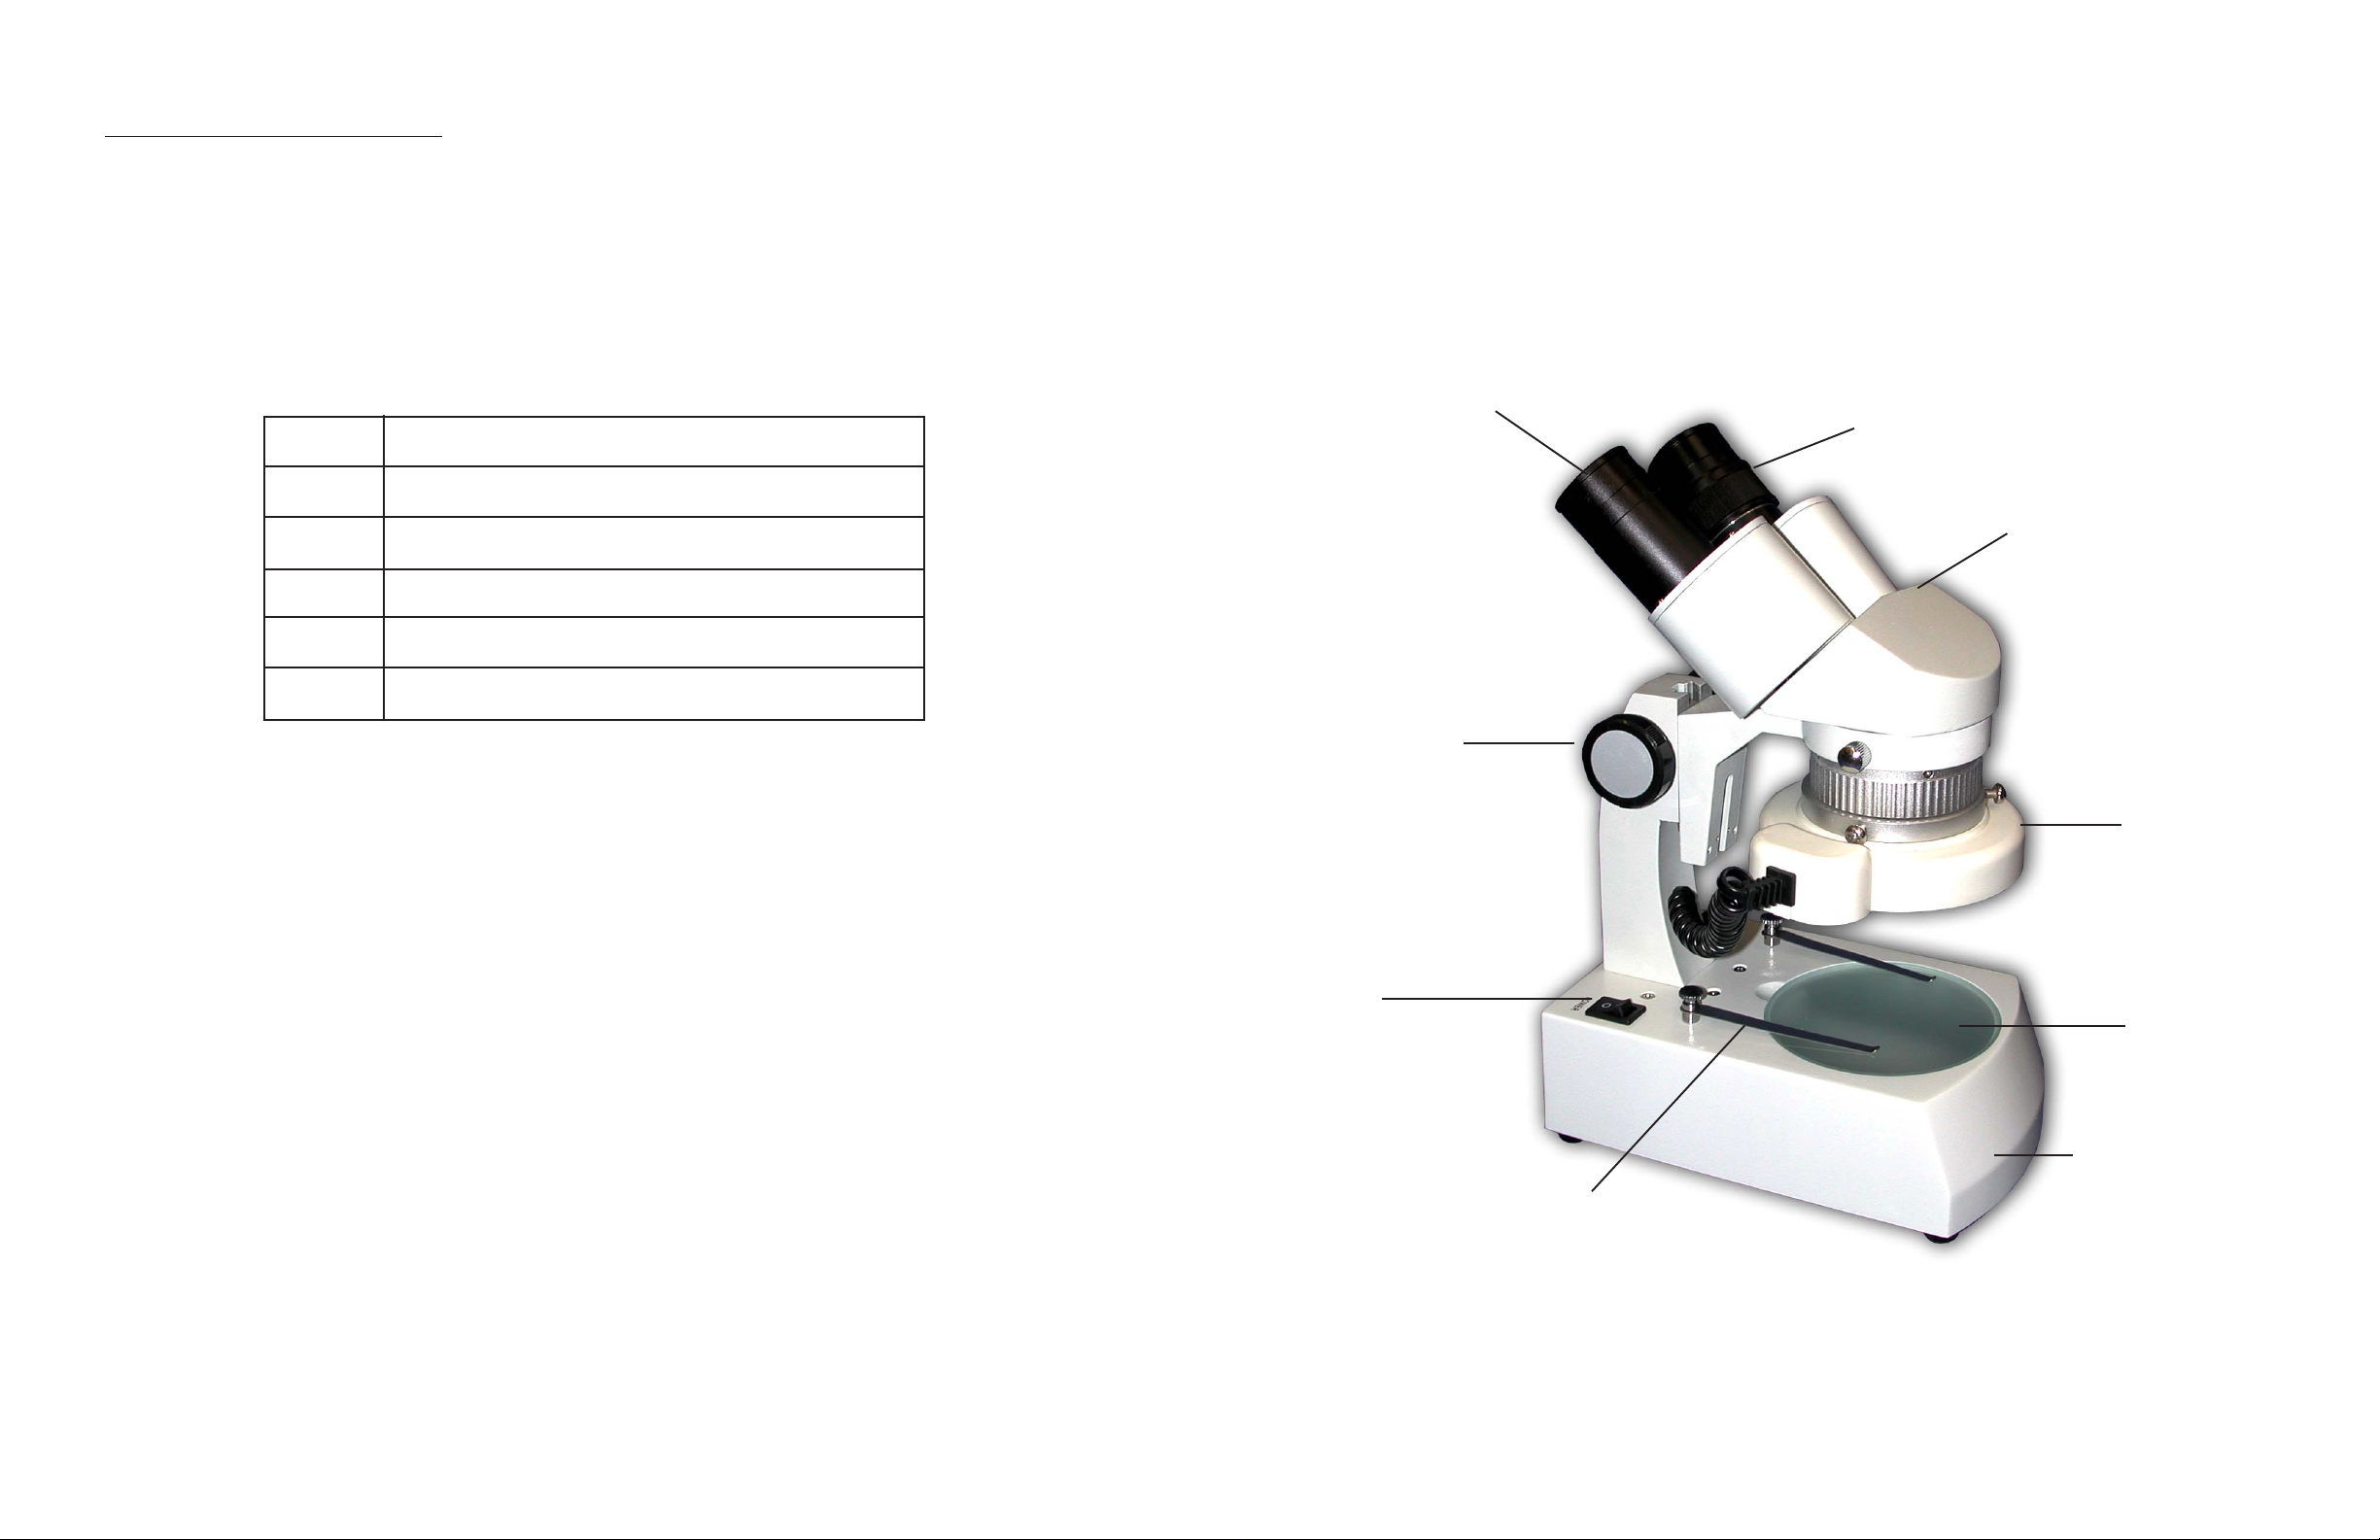
S90014A, C, F, G Microscope Nomenclatur e
Eyepiece
Diopter
Head with Interpupillary
Adjustment
S68048 Frosted stage plate: S90014 series
To order replacement parts, contact Fisher Education Customer Service at 800-955-1177.
On/Off
Switch
Focusing
Knob
Fluorescent
Ring Lamp
Stage Plate
Base with built-in
illumination
Stage Clip
6
3
Page 4

Introduction:
Using your microscope:
This stereo microscope is well designed and sturdily built. It has high quality optics and
precision mechanics. The inclined head rotates 360 degrees for comfortable viewing.
The S90014 series microscopes include 10x widefield eyepieces, and come in a variety of
magnification and illumination configurations (see chart below). There are three types of
illumination in the S90014 series: Cordless LED, Fluorescent, and Halogen. USB/Analog
model S90014G is also available, and includes a seperate users guide for the software.
LED and Halogen models come pre-assembled in the box and ready to use. Fluorescent
models require minimal assembly .
Model# Objectives Magnification Illumination
S90014 1x, 2x 10x, 20x Halogen
S90014A 1x, 2x 10x, 20x Fluorescent
S90014B 1x, 3x 10x, 30x Halogen
S90014C 1x, 3x 10x, 30x Fluorescent
S90014D 1x, 3x 10x, 30x LED
Turn the microscope on using the on/off switch. Place your sample on the stage plate and
look through the eyepieces. Adjust the focusing knob until your specimen is in focus.
Adjust the interpupillary distance of your eyepieces utilizing the “folding” motion of the
head. Both eyes should be focusing on your sample. If one eye appears out of focus,
focus on the specimen with your right eye only. Once in focus with the right eye, close
that eye and look at the sample with your left eye. If sample is out of focus, use the diopter adjustment on the left eyetube to bring it into focus. Once this is done, your microscope is ready for use and dioptic differences have been adjusted. There are two magnification settings on your microscope, to change the magnification, rotate the objective turret
90 degrees. The microscope comes with a frosted stage plate, and a black and white
stage plate. The frosted plate is used on transparent specimens that light can pass
through. Use the black and white stage plate for macro objects that require light from the
top. T ry viewing your specimen with both sides of the black and white plate to get the
best image.
Lamp replacement:
S90014E 2x, 4x 20x, 40x Halogen
S90014F 2x, 4x 20x, 40x Fluorescent
S90014G 2x, 4x 20x, 40x Fluorescent
S90014H 2x, 4x 20x, 40x LED
Assembly (fluorescent models only):
Fluorescent models in the S90014 series include a fluorescent ring lamp. Attach the ring
lamp to the objective turret by sliding the lamp over the turret, and securing in place with
the 3 phillips (+) screws. Your microscope is now assembled and ready for use.
Three Way Illumination:
All S90014 series microscopes have a 3 way illumination switch. Your choices are:
A. Upper and lower lamps on simultaneously
B. Upper lamp only
C. Lower lamp only
WARNING: Unplug the microscope from the wall outlet, or remove the batteries
from your microscope before replacing your bulbs! Do not touch the new bulb with
your bare fingers. Use a tissue or surgical glove. Oils from the skin will lessen the life of
your bulb.
HALOGEN & LED MODELS: To replace the upper bulb, unscrew the black lamp
housing behind the objective turret. Pull the bulb straight out, and push the new bulb into
the lamp socket. Remove the stage plate to expose the lower bulb. Remove the bulb by
pulling to the left, and push the new bulb into the lamp socket.
FLUORESCENT MODELS: To replace the ring lamp, remove the single phillips (+)
screw which attaches the lamp to the lamp housing. Pull the lamp straight down, and push
the new lamp straight up. Secure in place with the phillips screw . Remove the stage plate
to expose the lower bulb. Remove the bulb by pulling straight forward, and push the new
bulb into the lamp socket.
4
5
 Loading...